As you just learned, you can link multiple contacts to a single account by using the Parent Customer field. This relationship typically indicates an employer-employee relationship between the records. In addition, you can link two accounts by using the parent account and sub-account functionality. These relationships typically indicate some sort of legal ownership between the accounts. But what if you want to capture additional types of relationships between accounts and contacts outside of the ones we just described? For example, what if you wanted to record that Company A is the networking consultant for Company B? Clearly, that relationship wouldn’t fit into the parent account/ sub-account structure, but it is still valuable information.
Fortunately, Microsoft Dynamics CRM allows you to link accounts and contacts by using customer relationships. Because each type of business will want to track different types of relationships, Microsoft Dynamics CRM allows your administrator to configure the types of account and contact relationships that your business will track.
In this example, you will create a customer relationship between two accounts to indicate that one account is the customer and the other is the networking consultant.
Note
USE the Sonoma Partners account record you created earlier in this chapter.
BE SURE TO have your system administrator import the sample relationship roles included in the practice files, or create your own relationship roles in your Microsoft Dynamics CRM environment. Use the Internet Explorer Web browser to navigate to your Microsoft Dynamics CRM Web site, if necessary, before beginning this exercise.
Open the Sonoma Partners account record.
In the left navigation pane, click Relationships.
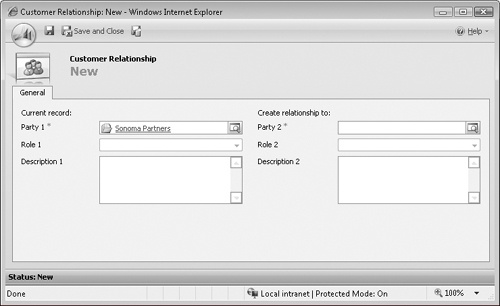
In the grid toolbar, click the New Customer Relationship button to launch the New Customer Relationship dialog box.
In the Party 2 field, click the Look Up button, and select any account record.
After you select a value for Party 2, notice that Microsoft Dynamics CRM enables the Role 1 and Role 2 lists. In the Role 1 list, select Customer.
In the Role 2 list, select Networking Consultant. If you want, you can add more information about the relationship in the Description 1 and Description 2 boxes.
Click Save and Close to create the relationship.
Microsoft Dynamics CRM now displays the relationship that you created between the Sonoma Partners account and the account you selected in step 4.
Important
The values that appear in the Role 1 and Role 2 lists depend on the values configured by your system administrator. He or she can also set up certain types of relationships that apply only to account-to-account, account-to-contact, or contact-to-contact relationships. For example, you might want to track a family relationship between two contacts, but this type of relationship would never apply to an account-to-account or an account-to-contact relationship.


