Chapter at a Glance
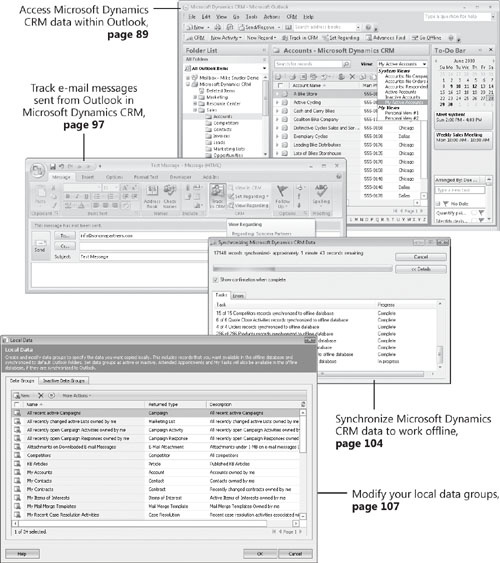
✓ | Access Microsoft Dynamics CRM records within Microsoft Dynamics CRM for Outlook. |
✓ | Synchronize contacts, tasks, and appointments between Microsoft Dynamics CRM and Outlook. |
✓ | Create and track Microsoft Dynamics CRM contacts, tasks, and appointments in Outlook. |
✓ | Send and track e-mail messages in Microsoft Dynamics CRM for Outlook. |
✓ | Delete records in Microsoft Dynamics CRM for Outlook. |
✓ | Go offline with Microsoft Dynamics CRM for Outlook. |
✓ | Configure a local data group. |
Microsoft Dynamics CRM offers a Microsoft Dynamics CRM for Outlook interface in addition to the Web client interface. Without a doubt, the integration with Microsoft Office Outlook generates the most excitement and interest among Microsoft Dynamics CRM users. Information workers love being able to work directly with their Microsoft Dynamics CRM data in Outlook without needing to open a second software application. More importantly, users do not need to learn a new software application to perform their day-to-day functions. The Microsoft Dynamics CRM for Outlook user experience closely matches the rest of the functions that users already know how to perform in Outlook. This chapter will highlight many of the key steps and processes you’ll use when working with Microsoft Dynamics CRM for Outlook.
Important
Before you can use Microsoft Dynamics CRM for Outlook, you or your system administrator must install the software on your computer. In this chapter, we assume that the Microsoft Dynamics CRM for Outlook software is already installed and connecting properly to your Microsoft Dynamics CRM server.
Your company can deploy one of two versions of the Microsoft Dynamics CRM for Outlook software:
Microsoft Dynamics CRM for Outlook
Microsoft Dynamics CRM for Outlook with Offline Access
Both versions offer almost identical functionality, but the Offline Access version allows you to work offline, disconnected from the Microsoft Dynamics CRM server. In this chapter, we will assume that you are using the Offline Access client.
Important
The exercises in this chapter require only records created in earlier chapters; none are supplied on the companion CD. For more information about practice files, see "Using the Companion CD" at the beginning of this book.
Troubleshooting
Graphics and operating system–related instructions in this book reflect the Windows Vista user interface. If your computer is running Windows XP and you experience trouble following the instructions as written, refer to the "Information for Readers Running Windows XP" section at the beginning of this book.
Important
The images in this chapter show Microsoft Dynamics CRM for Outlook with Outlook 2007, but Microsoft Dynamics CRM also supports Outlook 2003. If you are using Outlook 2003, the exercise steps will be the same, but the user interface will look a little different than the one shown in the images.
Important
The images used in this book reflect the default form and field names in Microsoft Dynamics CRM. Because the software offers extensive customization capabilities, it’s possible that some of the record types or fields have been relabeled in your Microsoft Dynamics CRM environment. If you cannot find the forms, fields, or security roles referenced in this book, contact your system administrator for assistance.
Important
You must know the location of your Microsoft Dynamics CRM Web site to work the exercises in this book. Check with your system administrator to verify the Web address if you don’t know it.
In this chapter, you will learn how to use the integration between Microsoft Dynamics CRM and Outlook to create contacts, tasks, appointments, and e-mail messages in Outlook and track them in Microsoft Dynamics CRM. You’ll also learn how to work with Microsoft Dynamics CRM records while disconnected from the server and how to configure a local data group.
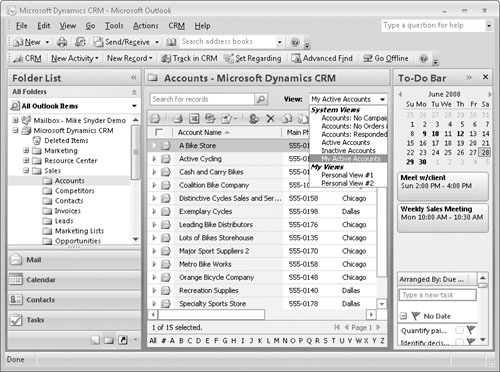
With Microsoft Dynamics CRM for Outlook, you can access Microsoft Dynamics CRM records directly within Outlook. Many users prefer to access their Microsoft Dynamics CRM data through Outlook instead of using the Web client because they are already working in Outlook to manage e-mail and other tasks. Microsoft Dynamics CRM for Outlook installs additional folders to your Outlook file, creating a folder for each area of the Microsoft Dynamics CRM user interface. Therefore, to access a list of accounts within Microsoft Dynamics CRM for Outlook, you would navigate the folder list to drill into the Sales folder and find the Account folder.
You will notice that Microsoft Dynamics CRM creates a folder for each of the application areas and then creates sub-folders for each entity contained within that application area. When you’re viewing a list of records within Microsoft Dynamics CRM for Outlook, you can perform the same actions that you can in the Web client, such as searching for and opening records, exporting to Microsoft Office Excel, changing views, and running reports.
In this exercise, you will display a list of opportunities within Microsoft Dynamics CRM for Outlook.
Note
BE SURE TO start Outlook with Microsoft Dynamics CRM for Outlook installed before beginning this exercise.
On the Outlook menu bar, click Go, and then click Folder List. Scroll down past your mailbox to see the Microsoft Dynamics CRM folder. Click the + symbol to expand the folder.
Locate the Sales folder and click the + symbol next to it to expand the folder.
Click Opportunities.
Microsoft Dynamics CRM for Outlook displays a list of opportunities within Outlook.


