The combination of business units and teams allows extreme flexibility in organizing your CRM implementation. At first it can be confusing: "Is marketing a business unit or a team?" However, this chapter provides you with a better understanding of how to use each organizational structure.
The essential difference between the two is that business units are hierarchal, potentially consisting of parent and children business units, while teams can cut across this hierarchy. As an example, let's assume that you have some standard business units: Sales, Marketing, Product Development, and Service. Let's also assume that you are starting development of a new product: X. You might create a team, Product X, that includes members from each of the business units. In this manner, teams offer you greater flexibility than you could get by simply having business units.
In this chapter, you see how to create and configure both business units and teams.
A business unit is analogous to a division or a profit center in a company. But the concept of business units in Microsoft CRM allows more flexibility than the simple concept of divisions in a company. Rather, business units are more like organizational charts. They also play a large role in the security model of Microsoft CRM.
For example, suppose a software dealership has three main business units: software, hardware/networking, and professional services. One or more of these units might have subunits. Maybe the software business unit is further divided into three brands of software. Each of those three is also a business unit. The security division might be divided into the firewall, the spyware, and the antispam units.
To set up business units, follow these steps in either the Outlook or Web client:
At the bottom left of the navigation pane, click the Settings button.
Click Administration in the upper right of the navigation pane.
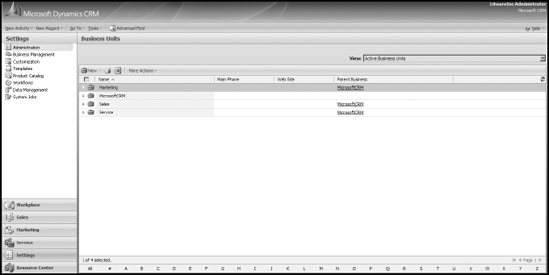
Click Business Units on the right.
The screen shown in Figure 6-1 appears.
On the Business Units window's toolbar, click the New button.
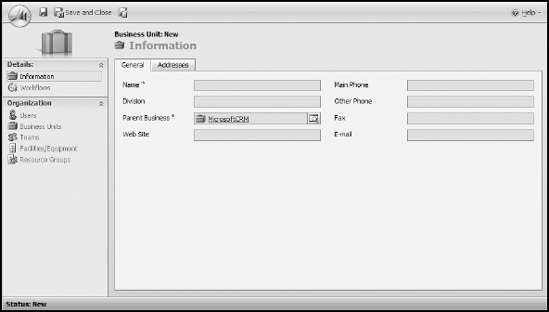
The Business Unit: New window appears, as shown in Figure 6-2.
Give your new business unit a name and change the Parent Business field if necessary.
Notice that the default Organization business unit is automatically selected as the Parent Business. This top business unit is created when you install CRM and every new business unit must be a child of that Business Unit or of some other Business Unit. You can select a different Parent Business Unit by clicking the lookup (magnifying glass icon).
After filling in the relevant fields (by default Name is the only required field), click Save and Close.
Notice that The system returns to the Business Units window, where you see your new business unit.
After you create a business unit and link it to its parent unit (and maybe even give it some children), you can reorganize your business units at any time by changing the parent business unit of your business units.
After you create your business units, you can assign teams of users to them. That's the topic of the next section.
You might have a team of people who work together to service customers in a particular territory. Perhaps you have a separate team for each territory. Or you may have teams that are made up of users with similar skill sets. For example, you might have a sales team, a marketing team, and a technical support team. In this case, you'd want to assign your teams to business units.
Unlike territory assignments, in which each user can be in only one territory, each user can be a member of many teams. In all likelihood, this will be the case, with a typical user being a member of, say, the sales team, the process brainstorming team, and the summer-picnic planning team.
The concept of sharing is also important to teams. Although you can't assign an account to a team, you can share an account with a team. In this section, we describe creating teams and assigning members to teams. See Chapter 8 for more on Assigning and Sharing records.
After you create a business unit, you can create and assign teams to that unit. To create a team and assign it to a business unit, follow these steps using either the Web or Outlook client:
At the bottom of the navigation pane, click the Settings button.
Click Administration in the navigation pane.
Select Business Units.
Double-click the business unit to which you want to assign one or more teams.
The Business Units window appears.
In the upper part of the navigation pane, select Teams.
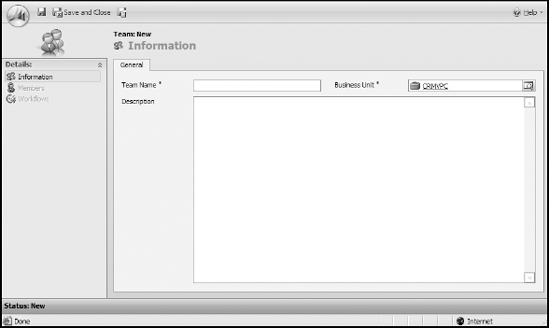
On the window's toolbar, click the New Team button.
The screen shown in Figure 6-3 appears.
Fill in the Team Name field.
The business unit you selected in Step 4 is automatically filled in for you, although you can change this association by clicking the magnifying glass to the right of the Business Unit field.
Click Save and Close.
The system returns to the listing for that particular business unit.
Tip
If you create a team without assigning it to a specific business unit, by default it's assigned to the overall parent unit. After a team is assigned to any business unit, you can't reassign it to another business unit. However, you can disable the team and start fresh with a new team.
When you initially create a team, it has no members. But after the team is created, it's easy to add or later remove members.
To add one or more members to a team, follow these steps:
Double-click the team you created.
At the top of the navigation pane, select Members.
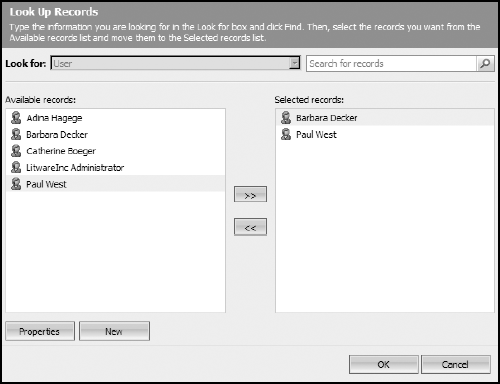
On the window's toolbar, click the Add Members button and then click the Find button.
The Look Up Records dialog box appears, as shown in Figure 6-4.
In the left panel, double-click each member that you want to add to your team.
When you've finished assembling the team, click OK at the bottom of the window.
The system returns to that team's listing.
In this chapter, you've seen how to define and create territories, business units, and teams. You can assign each user to only one territory, but each user may be a member of several teams and business units. By assigning users to teams, you can easily share and shift responsibilities between teams.