In This Chapter
While the cloning debate rages in political circles, database users have already decided, no clones, no duplicates!
In version 4, Microsoft CRM lets the system administrator determine the rules an organization will use to determine what constitutes a duplicate record. Microsoft CRM calls this Duplicate Detection.. The administrator can add duplicate detection rules to any entity in the system, even custom entities. Duplicate detection rules are run behind the scenes when creating or updating a record, going online with the Outlook client, or during data import.
This chapter discusses CRM's ability to implement duplicate detection rules and how to use those rules to manage your data.
Microsoft CRM uses the concept of match codes to determine duplicate records. For example, if the duplicate detection rule for your contact consists of the first four letters of the last name and the first three digits of the zip code, the match code for John Smith, 123 Main Street Boston, MA 02111 would be SMIT021. Meaning, Sally Smith of 999 Tremont Street, Boston, MA 02111 would also be SMIT021. The records would match. Therefore, we suggest the following rules when setting up your match codes:
Use a unique identifier whenever possible. This can be the e-mail address of a contact or the account number of an account.
Keep your detection rules as simple as possible, or you'll end up detecting too many duplicates, slowing down data entry.
You can have more than one rule per entity, but do so sparingly.
After your rules are established, try not to change them. Changing duplicate detection rules means match codes will be regenerated. This could be slow when done against large entities.
Creating duplicate detection rules isn't easy. You need to consider many variables when creating the match code. Remember, you're creating a string of data to match on. Should your rules be too strict, every record will match, causing continuous duplicate detection prompts. (See Figure B-1.) If your rules are too loose, many duplicates won't be detectect and your database will be full of duplicates.
Create rules that match your business best practices. For example, determine how your users should import the account name. Should the account name be: Department of Usually Micro Managed Important Executive Secretaries, or DUMMIES, or D.U.M.M.I.E.S? Now imagine what your match code would be.
For the record: A best practice for account names is to use the organization's full name in the account name field — such as, Department of Usually Micro Managed Important Executive Secretaries.
The administrator can add a second field to the account form for the shorter, abbreviated name. A second duplicate detection rule could monitor the short name field. What's next? Decide upon and create a best practice around abbreviations. Should the short name be DUMMIES or D.U.M.M.I.E.S? Decide at design time and have your users follow this best practice.
What do you do with Inc, Incorporated, Company, Co, LTD, and so on? Don't ask us — it's up to you. It is your job to establish a corporate best practice.
Tip
You can have more than one rule per entity.
Note
An on-change event that with the help of regular expressions helps to enforce your corporate standards, however, is beyond the scope of this book. To learn more about both on-change events and regular expressions, contact your Microsoft CRM professional.
So you and your users are ready to establish duplicate detection rules. Let's stop cloning around!
Before your duplicate detection rules can run, you need to enable duplicate detection and define when the rules will fire. To do so, just follow these steps:
On the navigation pane, click the Settings button second up from the bottom.
The Settings navigation options appear at the top of the navigation pane.
In the navigation pane, click the Data Management button.
Data Management options are now available on the right.
In the Data Management pane, click the Duplicate Detection Settings link on the top left.
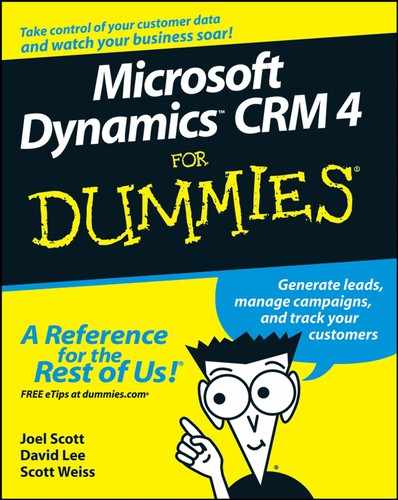
The Enable Duplicate Detection Settings dialog box opens. (Refer to Figure B-1.)
This dialog box includes a primary check box to enable duplicate detection.
Select the Enable Duplicate Detection check box.
These three additional options activate:
When a Record Is Created or Updated: This option turns duplicate detection on when records are created or updated. However, only entities with detection rules active will actually be evaluated. See the section, "Creating a Duplicate Detection Rule," later in this chapter to learn more.
When Microsoft Dynamics CRM for Outlook Goes from Offline to Online: If you don't have any users using CRM in offline mode, don't select this option.
During Data Import: Select this check box if you regularly import external data such as trade show attendees or purchased marketing lists. If your initial import doesn't contain duplicates, don't select this option.
Select any of the check boxes that apply.
Click OK.
Note
You still need to create the actual duplicate detection rules. This step simply enables duplicate detection.
Because matching on a unique identifier is a great way to establish your rule, we will create a contact rule based on the contact's e-mail address. The wrinkle here is that your database will probably contain more than one e-mail address. Microsoft CRM ships with three e-mail address fields for the contact. Our rule will need to address all contact e-mail addresses.
Duplicate detection rules are created in a similar fashion to Advanced Find. (See Chapter 26 for more on Advanced Find.)
To create a duplicate detection rule for the Contact entity, follow these steps:
In the Data Management area, click Duplicate Detection Rules.
The Duplicate Detection Area replaces data management.
Click New to create a new duplicate detection rule.
The Duplicate Detection Rule: New form opens. (See Figure B-2.) This form has three tabs: General, Administration, and Notes.
All the action happens on the General tab, but you can explore the Administration and Notes tabs on your own.
Fill out the required Name field.
We're calling our rule "Contacts with the same e-mail addresses."
Status Reason is a system field; you can skip it.
From the Base Record Type drop-down list, select Contact.
From the Matching Record Type drop-down box, select Contact.
Mouse over Select in the Attribute area.
A list of contact attributes is displayed.
Select the E-mail Address option.
For Criteria, select Exact Match.
We want the e-mail addresses to match exactly. The other two choices are Same First Characters and Same Last Characters. If either of these is selected, the third box, No. of Characters, becomes available.
Repeat Steps 6-8 two more times with E-mail Address2 and E-mail Address3.
You only have to add E-mail Address2 and E-mail address3 if those fields are on the contact form, ergo you're using those fields.
Click Save.

Warning
The matchcode that your rule generates can not exceed 450 characters. Plan your rules accordingly. The bottom left of the Duplicate Detection Rule form keeps a count for you. (Refer to Figure B-2.)
To publish a rule, follow these steps:
Click on the rule you want to publish
The rule is highlighted.
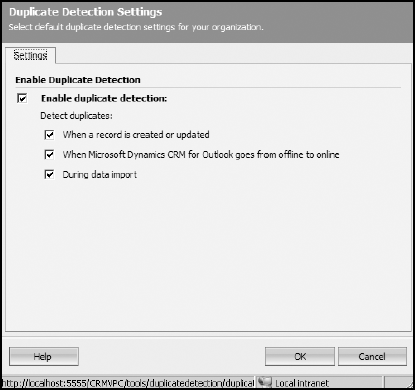
Click the Publish button on the menu bar.
Click OK to begin the match code generation.
A prompt indicating that the rule is going to generate the match codes while running in the background appears. (See Figure B-3.)
Should you decide that a published duplicate detection rule is not working as you'd like, you can un-publish the rule. In doing so, the rule will not be run. To unpublish a rule, follow these steps:
Click on a rule to be un-published.
On the toolbar, click More Actions.
Click Unpublish.
The Status Reason will remain Publishing until the match codes are generated. The Status Reason field changes to Published when the match codes are generated.
To edit a duplicate detection rule for a contact (or any other entity), follow these steps:
On the Navigation Bar, click Settings.
The settings menu is displayed in the top of the Navigation Bar.
In the top portion of the Navigation Bar, click Data Management.
The data management options are displayed.
In the Data Management area, click Duplicate Detection Rules.
The Duplicate Detection Area replaces Data Management.
Double Click on a duplicate detection rule to edit.
The Duplicate Detection Rule form opens.
Edit your rule as necessary.
Click the Save icon (The Blue Disk) or the Save and Close Icon.
You'll be prompted with a message indicating that modifying the rule necessitates a regeneration of match codes. The match codes will be removed and the rule will be unpublished. (See Figure B-4.)
Click OK.
On the Menu Bar click Publish.
New match codes will be generated for the rule.

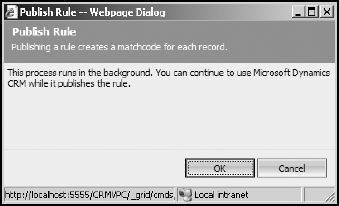
If you've followed our instructions in the "Creating a Duplicate Detection Rule" section, you can test out the new rule. To do that, create a contact with a test e-mail address, such as [email protected]. Save and close the record. Then create another contact with the same e-mail address. You'll be prompted with the Duplicate Detection dialog box. (See Figure B-5.)
The Duplicate Detection dialog box is split into two areas. The top is the record you're trying to create. The bottom half of the dialog box lists the potential duplicate records.
The drop-down box at the top of the second portion shows the duplicate detection rule or rules that triggered the dialog box. Below that are the potential duplicate records.
Here are some tips about manipulating records:
To open a possible duplicate record: Double-click the record or select Edit from the Action button on the menu bar.
To activate or deactivate records: Click the More Actions button and select Activate or Deactivate.
To activate or deactivate multiple records: Ctrl+click all the appropriate records' rows in the grid and select Activate or Deactivate.
To affect all the records in the grid: Click the check box on the top left of the grid first.
To delete a record: Highlight the record and click the X icon on the menu bar.
With the duplicate detection rules in place, you're now ready to import records into Microsoft CRM. Microsoft CRM 4 Import/Export Wizard allows importation to any and all entities in the system. This is an enhancement over prior versions. To import data, keep in mind the following:
The file to import must be a CSV file.
When mapping to a drop-down list, the source values need to be mapped to drop-down list items.
When the import has finished, you have the option of receiving an automated e-mail indicating that the import has finished.
For our example, we import sample data collected at a trade show. The trade show data was collected by the marketing team working the trade show booth. When they returned to the office they provided us with a file called tradeshow.csv.
Because the data is coming from a trade show, we will import the records into the Lead entity. You can import into other entities, but the process is the same.
Note
The trade show list import is subject to the duplicate detection rules you create earlier in this chapter.
Microsoft CRM uses data maps to translate the incoming data to the proper fields in Microsoft CRM. A data map is simply the mapping of the source fields (the data you wish to import) with the target fields (the fields in Microsoft CRM where the data will be going). The Import Wizard is based on a data map. So the first step is to create a data map. To create a data map for an account, follow these steps:
In the Navigation Bar Click Settings.
The Settings options show at the top of the Navigation Bar.
Click Data Management on the top of Navigation Bar.
The Data Map area replaces Data Management.
In the Data Management area, click Data Maps.
The Data Map area replaces Data Management.
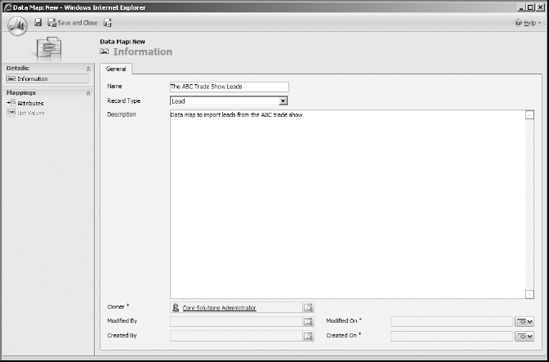
Click New in the upper left corner.
The Data Map: New form opens. (See Figure B-6.)
Give the map a name in the Name field.
In this example, we use ABC Trade Show Leads.
Make sure that the value in the Record Type drop-down list is Lead.
You use the drop-down list to select the target entity — the entity where the data will reside., such as Contact.
Provide a description in the Description field.
Click Save at the top left of the form.
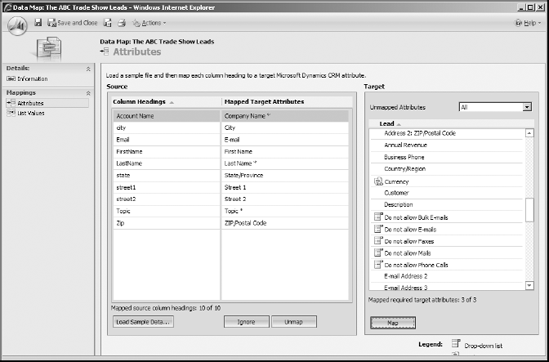
On the left navigation pane, click Attributes.
The Attributes form is displayed on the right.
On the bottom left, click the Load Sample Data button.
Browse to the CSV file that you're importing. (In our case, it's called
ABC Trade Show Leads.csv.)The Attributes section is now split into two sections: Source on the left and Target on the right. (See Figure B-7.)
Source is further split into two columns: Column Headings and Mapped Target Attributes.
On the Source side, map the items under Column Headings with the appropriate fields in the Target column. Highlight the source row to map, find the appropriate target row item, and click the Map button on the bottom right.
The required fields in the Microsoft CRM have a red asterisk to the right of the field name.
Tip
Double-clicking the target item also maps it to the highlighted source row.
If you're importing to the Lead entity, Topic is a required field. Add a Topic column to your import CSV file and add copy a topic to each record.
Tip
If your source data has fields being mapped to drop-down list fields, the source values need to be mapped to the values in Microsoft CRM.
Click List Values on the left navigation pane.
The List Attributes form appears.
The left panel lists the drop-down fields that were mapped in Step 11. On the right, there are two boxes. The top box lists the distinct values in the source file. The box on the bottom lists the options in Microsoft CRM.
Highlight a source value in the top box and a corresponding value in the bottom box and click Map below. Repeat for all fields on the left.
When all attributes and list values are mapped, click Save and Close on the menu bar at the top of the form.
The data map is completed.
If your data map needs to be updated or edited, follow these steps:
In the Navigation Bar Click Settings.
The Settings options show at the top of the Navigation Bar.
Click Data Management on the top of Navigation Bar.
The Data Map area replaces Data Management.
In the Data Management area, click Data Maps.
The Data Map area replaces Data Management.
Find the Data Map in the grid and double-click.
The data map form opens.
Double Click a Data Map.
The data map form opens.
Edit the items in in much the same way you created the map. Refer to steps 9–14 in the section, "Creating Data Maps," above.
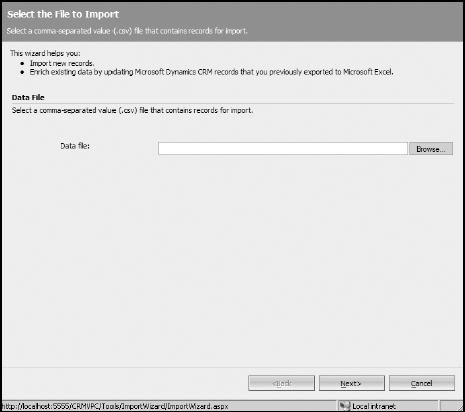
To import records you first need a data map. The data map created earlier maps where the source data will go in Microsoft CRM, but until you actually import the data, it remains in the CSV file where it currently resides. To import records, follow these steps:
From the menu bar at the top of the screen, choose Tools
Import Data.
The Import Records Wizard launches. (See Figure B-8.)
Click the Browse button and browse to the file containing the data to be imported.
Click Next.
In the Record Type drop-down list, select the target source.
In our example, you'll select Account.
In the data map box, select your map from the lookup box.
Tip
Clicking New from the data map lookup form is another way to add a new data map. For details see the section, "Creating a New Data Map," earlier in this chapter.
Click Next.
Determine who the record owner will be.
The assign to lookup will set the owner of the imported records. By default it is set to the importing user, but can be changed here.
Choose Do Not Duplicate if you've created a duplicate detection rule (if not, and you want a rule, review the beginning of this chapter) or if you're interested in duplicate records, choose Import Duplicates.
Name the import rule and select the Notification check box if you'd like an e-mail notification when the job is completed.
Click Import.
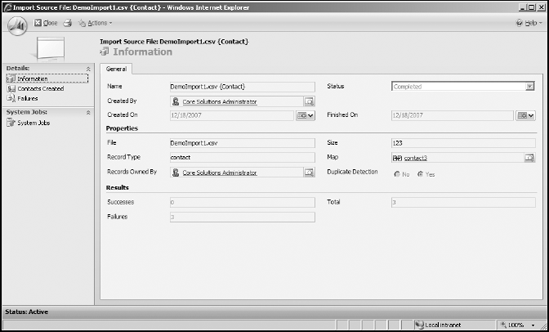
To review the import job status, just follow these steps:
On the navigation bar, click Settings.
In the Settings area, click Data Management.
The data management options are displayed on the right.
Click Imports.
Double Click an Import.
The Import Source form opens. (See Figure B-9.)
On the left navigation pane, Click <Entity> Created.
A list of records created is displayed (Leads in our example).
On the navigation bar Click Failures.
A list of failed records is displayed.
If desired, Click Export Error Rows on the toolbar.
The failed records will be exported to Excel.
Close the form when done.
There are several reasons to export data from Microsoft CRM. A common request is to export certain data from Microsoft CRM to further manipulate in Excel, which is covered in Chapter 10.
However, a new feature in Microsoft CRM is the ability to export data, update the data, and re-import the changed data. This feature has been added to the Export to Excel function. The fields that are available to update are those that are in the grid view. To export, update, and re-import, follow these steps:
When viewing a grid of data, click the Excel icon on the toolbar.
The Export to Excel dialog box opens.
At the top of the box, select Static Worksheet with Records from this Page.
At the bottom of the form, select the Make this Data Available for Re-Import by Including Required Columns check box.
Click Open when prompted.
Edit the Excel spreadsheet and Save it as a CSV file.
From the menu bar at the top of the screen, choose Tools
Import Data.The Import Records Wizard launches. (See Figure B-6.)
Click the Browse button and browse to the file containing the data to be imported.
Click Next.
Ensure that the Enrich Data by Updating Existing Records Rather Than Creating New Records check box is selected.
Click Next twice.
Name the import rule and select the Notification check box if you'd like an e-mail notification when the job is completed.
Click Import.
Tip
Fields not contained in the grid can't be updated. To update these fields, ask your system administrator to add those fields.