Workflow. I know what you're thinking. Workflow? What is that? Well, as one of the most powerful functions of Microsoft CRM, workflow is the nearest thing you'll find to a money machine.
The Workflow Management System takes your manual business rules (or procedures) and turns them into an automated system. Without workflow, you'd have a database with names, addresses, and a schedule, but the database by itself wouldn't do anything. With workflow, Microsoft CRM becomes a system that farms your existing accounts for additional business, helps you hunt for new accounts, and ensures that important tasks don't slip through the cracks. Whooaa. That's a pretty hefty statement, isn't it? However, by providing you with electronic business alerts — such as automatic calls for accounts or automatic follow-up e-mails — Microsoft CRM can step beyond being your contact/account database and become an important part of your business and corporate culture.
You probably have many business rules already in place, even if they aren't set in writing and mentioned all the time. For example, do you return a phone call to a client who asks you to call him back? That's a business rule, and work-flow might automate that business rule by sending you an electronic reminder message — again and again — until you actually make the call. Your business rule has now become a workflow rule. I like to call this one "auto-nag."
Now, before you start plugging in workflow rules, we recommend that you review all your current business processes. This may take some time. You should consult with the CEO, his or her assistant, the sales department, the marketing department, you get the idea. This is also the best time to do spring cleaning. Get rid of business rules that worked before the advent of the Internet, and update others or make new ones. Automating an ineffective procedure is like building a faster Edsel. The speed is there, but it's still an Edsel.
In this chapter, we touch on the general principles of implementing workflow rules and then provide you with an example of a typical rule. You also find the background and basis to design and implement at least some simple workflow rules of your own. However, keep in mind that the creation of complex workflow rules is probably best left to professional Microsoft CRM consultants or dealers.
Let's start from the beginning. Workflow may sound complicated, but when you get the knack of it, it's fairly simple. Workflow has two main modules: Manager and Monitor.
Manager: Enables you to develop and use the workflow rules feature, which is nothing more than a system to automate the business processes you already have and use.
Monitor: Provides a display of the current status of each rule. You can see exactly which processes are running and which ones may be waiting for a triggering event.
Although Workflow is a powerful utility, it isn't Super Program and does have some limitations. For example:
Workflow can monitor data and events within the Microsoft CRM database but not outside it, unless you write a custom .NET assembly. (More on .NET assembly in a moment.)
A workflow rule can check for data in more than one object (accounts or contact records) at one time, but it's limited to a few entities. For example, a workflow rule can look through all of your accounts to notify you of any that are missing telephone numbers, but a single workflow rule can't check for accounts that are missing phone numbers and have open cases more than two weeks old.
Workflow rules have difficulty checking for the absence of an event, meaning they can alert you to an open or uncompleted appointment but don't tell you about stuff that wasn't scheduled but should have been. (It's a software program, not a mind-meld machine.)
An important step in creating your workflows is to think through the flow itself carefully. What are the exceptions? What conditions should terminate the process? For example, if someone buys something, workflow should start treating the person as a new customer and not as a prospect.
For creating your workflow rules, we recommend that you use members of your staff who work with the product on a daily basis, both on the administrative side and the operations side. This way, you cover your business processes from all angles.
Tip
Now, we do suggest letting your company's system administrator be the only person to implement workflow rules. The process of creating rules can scary, humorous, or just outright sad. (Just spend an hour or two watching C-SPAN!) We think the best way to approach the process is with a small team of individuals from both the business side and the tech side. The business guys will say "We need to make sure that the managers get notified of every account that's not touched in 90 days." Then the data or tech person will say "What's a touch?" "What's an account?" and "Who's the manager?" This exchange can be frustrating, but it is necessary. If you don't go through it, then on Monday morning the CEO might receive a flood of e-mails indicating that hundreds of records in the database, including vendors and competitors, have not had a completed sale in the last 90 days.
One of the most common tasks your company may want to automate is the assignment of an account manager to a newly created account. We use that as our example for creating a workflow rule:
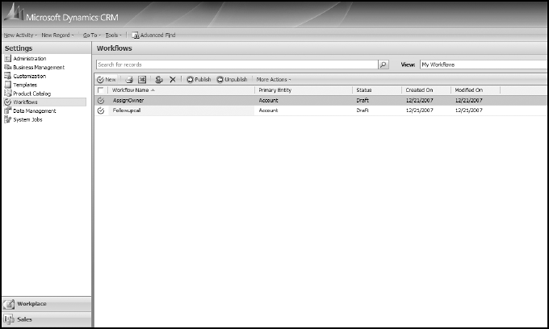
Choose Settings and then Workflows in the navigation pane of CRM Web client.
The Microsoft CRM Workflow Manager window appears, as shown in Figure 9-1.
Click New.
Enter a name for the workflow and select an entity type.
The Entity Type option is the type of record (account, contact, lead, and so on. See chapters 12 & 13) that your workflow rule focuses on. Click the down arrow to the right of the field to open the drop-down box and choose the entity you want to work with. For this exercise, we chose Account for Entity Type.
Select the New Blank workflow radio button and then click OK.
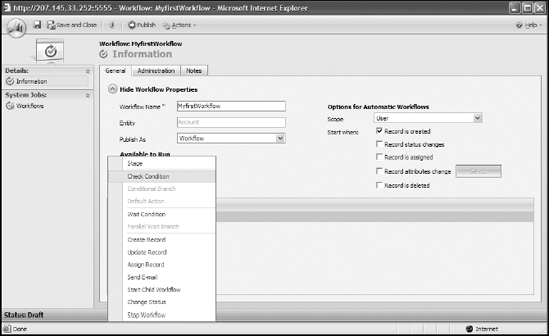
Select the Record Is Created check box.
The Workflow form should appear as shown in Figure 9-2. Note that the Entity field is already filled in with your choice from the preceding step. For our example, we chose Start when: Record is created because we want the creation of a new record to trigger this workflow rule.
The other options to automatically trigger a workflow are:
Record status changes (run Workflow when the status field changes)
Record is assigned (run Workflow when the Owner field changes)
Record attributes change (run Workflow when the button to select attributes has been clicked)
Record is deleted (this one's pretty obvious and a good one to use to audit deletions)
Click the Add Step drop-down list and then a list appears with the following choices, as shown in Figure 9-3:
Check Condition: This is basically an IF...THEN construct.
Conditional Branch: This is an ELSE...THEN to be attached to the above Check Condition.
Default Action: This is an ELSE to be attached to a Check Condition.
Wait Condition: This pauses workflow until the condition is met.
Parallel Wait Branch: This indicates a separate pause to wait for a condition. This one is useful for creating timeouts or escalations in your workflow logic. For instance you might have a wait condition waiting for a call to be made and Parallel Wait condition set to alert someone after certain amount of time that the call has not been made.
Create Record: Creates a new CRM record of any entity type.
Update Record: Updates a CRM Record.
Assign Record: Reassigns a record to a different user.
Send E-Mail: This one does your laundry — no, wait! It sends an e-mail!
Start Child Workflow: Branches to a child workflow. A child workflow is a workflow that cannot be run on its own but only when called from a parent workflow. If you have a given group of steps that many workflows will use then you may want to create a child work-flow of the steps and then just reference the child workflow from the other workflows.
Change Status: Changes the status field of the record.
Stop Workflow: Immediately stops the process of the workflow.
Select Check Condition.
Three lines of information are added to the Workflow details area at the bottom of the screen. The first line is a text box containing the words Type a Step Description Here.
In that text box, enter the description of this step.
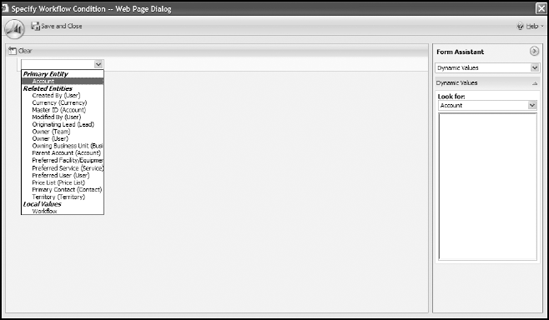
Highlight <condition> (click to configure) in the workspace.
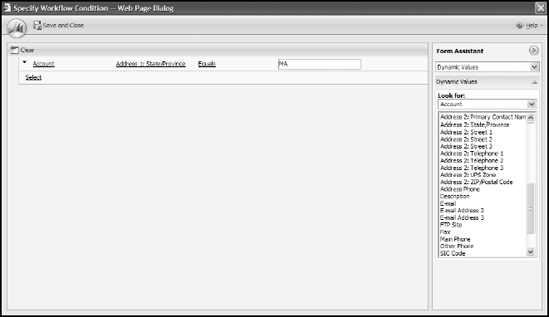
The Specify Condition form appears as shown in Figure 9-4.
Hover your cursor over the word Select and a drop-down box appears. Click the down arrow and select a table.
In this example, we're working with the Account table, so select Account.
Hover your cursor over the word Select, which appeared to the right of where you selected Account, and another drop-down appears. Click the down arrow and select a field.
Just about every field in the table selected in step 10 is available here. Select the field to which you'd like to apply the workflow rule. For example, if you want to assign only records in Massachusetts to your account manager, Ted, you'd choose the Address1: State/Province field.
Hover your cursor over the word Select next to the State field you selected, click the down arrow, and then select Equals.
The Contains, Begins With, and Ends With operators can produce surprising results if you don't carefully consider what data these expressions might find. For example, if you search for records containing East, you also get records containing beast.
In our example, we're testing for Accounts in Massachusetts, so we select Equals.
Hover over the words Enter Value next to the Equals condition and enter MA in the text box that appears.
For example, if you selected State in Step 11, you could put the state here in the Static Value field. If you wanted to compare two fields, you could select another field by selecting a Dynamic Value from the forms assistant on the right.
Now your new Workflow condition should look similar to Figure 9-5.
Click Save and Close.
You return to the main Workflow screen.
Back on the main Workflow creation screen Highlight Select this row and click Add Step under the condition you just created.
The action you select tells the program what you want done when the condition you set in Steps 8 through 11 is met. A list of actions and their descriptions is available in the "Workflow Glossary" at the end of this chapter.
Select Assign Record from the Add Step drop-down menu.
Enter the account manager name or click the find button next to the field to search for a list of system users.
Click Save and Close.
To make the rule available, click Publish.
If you forget to do this, your perfectly good new rule will sit there forever, forlorn and lost.
Click Save and Close to return to the main workflow manager window.

Throughout this book, you can find reference to our office manager's arch nemeses, the Minions of Chaos (MoC). They love to sneak inside your database and wreak havoc. Remember this because they can make an appearance at any moment, now that you've created your workflow rules.
Back to the workflow rules. They're complete and ready to go, so you load them up and away you go, right? Negative, databoy.
Warning
Loading an untested workflow rule on your active database is an invitation to the MoC, who want nothing more than to get in and show you any errors or glitches that are on your live system by bringing your system to a grinding halt as that workflow rule runs amok on your data. Okay, this is dramatic, but we must stress the importance of testing your workflow rules before you make them live features of your Microsoft CRM.
The good news is that testing your workflow rule is easy. Here's how:
Now that you've created your workflow rule, go ahead and start Microsoft CRM.
Create a condition in your database that triggers the workflow rule.
For example, if you set your workflow rule to trigger on every new account created in the system, go ahead and create an account and remember to save, Save, SAVE and Close the record.
Reopen the record you just created so you can check for the intended result.
If the rule said to assign every new account to Bob, you'd check to see whether Bob is listed as the owner.
If you don't see the desired result, you either failed to activate your rule, or you need to review the rule criteria and specifics to determine the cause of the problem. Always go back and check out how you built the workflow rule first before assuming there's a bug in the program — because most computer errors are the result of operator error.
In large, mission critical environments there would most likely be a development or test system that mimics the live system in every way possible. These systems allow you to test possible solutions without the danger of damaging your production data.
An On-Demand rule is a rule that can only be invoked manually — not automatically (at least not directly). Essentially it is a Workflow that doesn't have any of the Start When: boxes checked and instead has the Available to Run: On Deman box checked. For those of you designing complex workflow rules, you can call manual rules by another rule. By calling, we mean that each rule should do one or two simple things and should then trigger, or call, another rule if more functionality is needed.
Speaking of calling, try to avoid creating a giant workflow-rule Godzilla. Instead of one massive process, it may be easier to put together a series of simple manual rules that call each other. You can also do what computer programmers do (no, not change people's passwords for fun): Create small modules of code, or in this case, workflow rules that you can reuse for many different applications.
Remember that you have to activate a workflow rule after you create it, as the last step. On-Demand rules, just like all the other rules, must be active before you can invoke or call them.
Tip
On-Demand Workflow rules are great if everyone remembers to invoke or trigger them. The key word here is remembers. In today's offices, most people are so busy answering the phone, dealing with customer service issues, and making sales calls that things are bound to slip through the cracks. We suggest that you create a system with a master workflow rule that automatically attaches to every new record and begins a sequence of calling additional rules as conditions in that record warrant.
Almost every business does some sort of follow-up with its customers, and yours is probably no exception. You may want to send a thank-you e-mail for a recent purchase, or you may want to schedule calls to accounts that have had no activity for 60 days. This is called a follow-up rule, and it's usually a manual one. The steps are similar to creating a rule in the first place, so we'll just touch on them here and make sure we point out the variations.
One of the most common tasks your company may want to automate is the scheduling of a call to a newly created account. We use that as our example for creating a follow-up rule. As mentioned earlier, the steps mostly mirror the ones you use to create a workflow rule.
To create a manual rule that schedules a follow-up activity for the owner of an account, follow these steps:
Choose Settings and then Workflows in the navigation pane of CRM Web client.
The Microsoft CRM Workflow Manager window appears, as shown in Figure 9-1.
Click New.
Enter a name for the workflow and select an entity type. For this example we will use the Account entity once again.
Select the New Blank workflow radio button and then click OK.
Click On Demand and uncheck Start when: Record is created.
This is a slight variation. In the list used to create a workflow rule, you selected the Record Is Created option instead.
Click the Add Step drop-down list and then select Check Condition.
Click in the box where it says Type a step description here and type a description to describe this step of the workflow. Something such as "Where State = MA" should suffice.
Click <condition> (click to configure), which opens the Specify Workflow Condition screen.
Hover your cursor over the word "Select" and a drop-down box appears. Select Account from the box.
Hover your cursor over the word "Select" to the right of where you just selected Account. Another drop-down box appears. Select Address1: State/Province.
Hover over the word Select that appeared to the right of the the last selection you made and select Equals from the drop down box that appears.
Hover over the word Select that appears to the right of the last selection and enter MA in the text box that appears.
Click Save and Close.
Back at the main Workflow screen click on "Select this row and click Add Step" under the condition you just created.
Select Create Record from the Add Step drop-down menu.
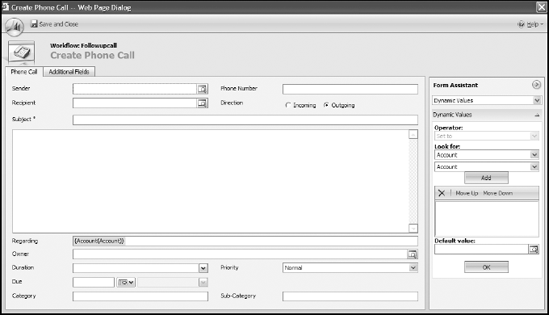
Select Phone Call from the drop-down menu of the Record you're creating and then click the Set Properties button to the right of the drop down.
The Create Phone Call window appears, as shown in Figure 9-6. Here, you can specify what tasks the follow-up rule should perform when it is called, or triggered.
Enter a subject and a description for this new activity.
For example, in the Subject field, you might enter New Account or Assigning an Account Manager to a new Account.
Enter a due date and a priority.
The due date isn't so much an actual date but a length of time you want the system to wait before it sends the letter or fax or prompts you to perform the task or make the phone call. The priorities are low, normal, and high.
Click Save and Close.
You're taken to the main window of the workflow you just created. Remember, rules do nothing unless you publish them.
To make the rule available, click Publish.
After it's published, click Save and Close to return to the main work-flow manager window.
Remember the Minions of Chaos mentioned earlier? They don't discriminate between automatic rules and manual ones, so you'll want to test these as well.
The steps for testing follow-up rules are different than those for testing automatic ones. Here's how you do it:
Create a condition in Microsoft CRM that triggers the original rule.
A good example is the New Account workflow rule we just created.
In Microsoft CRM, use the navigation pane to find and highlight the account.
In the window's toolbar, click Run Workflow.
The Workflow dialog box appears.
Select your workflow process from the list and then click OK.
The process begins to run invisibly.
Go to the workplace and click Activities in the upper part of the navigation pane.
You should see the follow-up activity listed there (if the activity was assigned to you, anyway).
Now that you have all of those workflow rules processing merrily away, you want to see them all on one screen, without having to go to every account or contact to see whether a rule has been applied. You can do this through the Workflow Monitor. Like Workflow Manager, Workflow Monitor is visible from within the CRM Web client. It also keeps a log of processes that are currently active and records which ones have already run.
There are two ways to view the Monitor:
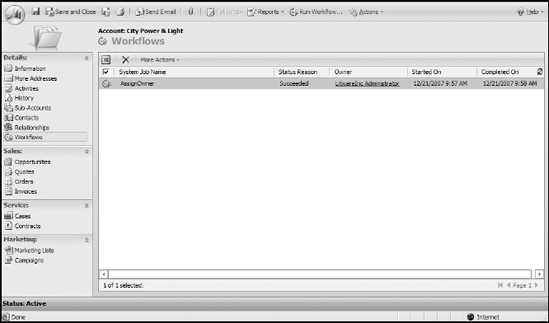
Click a record that the workflow applies to, then click Workflows in the navigation pane to see the status of workflows on that record.
The Workflow Monitor window appears, as shown in Figure 9-7. In this display, you can see Workflow process attached to the selected record and along with some brief information regarding each Workflow.
In the navigation pane, click Settings and then click System jobs. The Settings area is generally only accessible by end users so they will need to use the first method.
You can sort the items by clicking the header for each column. You can also export the log to an Excel spreadsheet by clicking the Excel icon.
Note
The Workflow Monitor only shows workflow rules that have been triggered. Even though you may have additional rules activated, they remain invisible to the Monitor when an event triggers them.
Throughout this chapter, we tell you to select an event, or choose an action, or set a condition. Maybe you're wondering what, exactly, constitutes an event, action, or condition. Well, we list them all here, in a one-stop, look-see that's easy to find.
In Microsoft CRM, an event is the trigger condition that initiates a workflow rule. For example, you can set a workflow rule for Assign, and anything that is assigned has that workflow rule applied to it. Microsoft CRM has four events:
Record is created: This trigger fires whenever a new record is created for the selected entity.
Record status changes: CRM monitors whether records have changed state from active to inactive or vice versa and this event is fired when this happens.
Record is assigned: This event fires when a record is assigned (or reassigned).
Record attributes change: This event fires when one of the selected attributes (or fields) changes for the selected entity.
Record is deleted: This trigger fires when an entity is deleted.
On Demand: Only workflow rules marked On Demand can be invoked manually. To perform this invocation, select Apply Rule from the Actions tab of the Workflow Manager window.
Every business process is triggered by some change in a condition. That condition might be a change in a data field, a due date being passed, or a record being created. The various conditions of the Workflow Manager (visible in Figure 9-3) enables you to initiate an action based on a field or an activity that has changed or an amount of time that has transpired.
The options for possible conditions are as follows:
Check Object Conditions: This enables you to drill down to a specific field in a record. For example, if the State field is New York, you can take an action to assign the New York sales rep to the account. Based on the type of field (whether it's a numeric, text, or a date field, for example), various operators are available.
Check Activities: By checking activities, you can initiate actions based on scheduled or completed activities.
Else If: This enables you to nest additional condition statements saying that if the first condition is false, evaluate the second condition.
Wait for Conditions: Workflow can wait for a specified amount of time until the specified criteria becomes true before the rest of the rule is completed. This can be the cornerstone of an activity escalation plan. For example, if a lead is assigned to a sales rep, the system can be instructed to wait for three days before checking to see whether a user has created an appointment. If the system finds no evidence of an appointment, a message can be automatically sent to the sales rep or the sales rep's manager.
Wait for Timer: This is similar to Wait for Conditions, but this condition can make sure that an assignment is handled within a specified time limit. For example, you can monitor a high-priority tech support call that must be returned within an hour by using Wait for Timer.
Actions are a series of operations performed after conditions have been evaluated as true. You can enact nine activities:
Create Activity: This schedules a task, phone call, fax, or appointment.
Send E-Mail: This powerful utility enables CRM to send a confirming e-mail, on your behalf, to a customer who has just placed an order or notify a sales rep when a lead is assigned to him or her.
Create Note: CRM can automatically attach a note to a record. For example, CRM could create a note that places an account on hold when payment becomes overdue.
Update Record: You can use the Update Record action to modify individual fields in records. Many fields in each record are not, by default, displayed on the screen. You can use Update Record to modify visible as well as invisible fields.
Change Status: Different types of records are assigned different types of status. The Change Status action enables the workflow system to change a record's status automatically based on conditions being met.
Assign Entity: Workflow can automatically assign cases to customer service reps based on a topic, or it can assign an account to a sales rep based on a territory. For example, if a customer calls about a malfunctioning transporter, the case can be assigned to Molly, your most experienced customer service rep.
Post URL: This action sends a Web site address of another business to a data field. For example, when a new account is created, you can post the Web site address in the Web Site field.
Run child workflow: Basically, this is one process or rule calling another one. By using this technique, you can program a large number of simple workflow rules, with each rule potentially calling another rule.
Stop: This brings your process to a halt.
Call Assembly: This option contains any custom .NET assemblies that your administrator or implementation partner has registered with Microsoft CRM. Refer to the SDK documentation to add your own assemblies here. You can download the SDK from
www.microsoft.com/downloads. Search for "CRM SDK".
Microsoft CRM also allows you call a small piece of code called a .NET assembly that does some custom functions. For example, if you want Microsoft CRM to check the credit on one of your customers and update the customer record with the customer's FICO score, you can write a small .NET assembly that calls another application to get that information and then updates Microsoft CRM. Based on the returned score, Microsoft CRM can then finish processing the rest of the rule you set up.
A third-party business alert system, KnowledgeSync, enables you to look at multiple databases and multiple types of records. We describe KnowledgeSync in Chapter 27. If you anticipate the need to build sophisticated rules and alerts, and you don't want to write custom code, you may want this add-on program.