Territories, teams, and business units are three organizational concepts that are so closely linked that you need to understand all three before deciding how to handle any one of them.
Territories are customer records managed and maintained by one or more people in an organization. A team is a group of users who work together on specific records. As one can imagine, some records might contain sensitive information and some may contain information that may be viewed by others but not edited. For example, Person A reports to a Manager A who reports to Region Manager A. Region Manager A has full access to all his own records as well as those accounts managed by his subordinates. The subordinates in turn cannot edit accounts that are outside their territories or managed directly by a supervisor. A business unit, then, is where an administrator creates and manages security settings that dictate who can access what information.
Typically, you establish territories to manage sales in bite-sized chunks. You probably want to develop a sales quota for your company in each territory and then check forecasted sales and closed sales against the quotas you've set. (We talk more about assigning quotas and forecasting sales in Chapter 11.) You may also want to use territories as a way to ensure that customers are equitably distributed among salespeople. By using Microsoft CRM, you can measure equitable distribution by geography, the number of customers, account revenue, or some combination of all three factors.
Territories come into play when assigning accounts and when reporting on them. In this chapter, we explain how to set up territories, business units, and teams.
Every account record has one field called Territory. After you define your territories, you assign the proper territory to each account record. You can do this by manually selecting a territory for each account record from a drop-down list that your database administrator sets up, or you can use workflow rules to automatically assign an account to a territory based on state, province, zip or postal code, or some combination of these.
Tip
Don't use telephone area codes for territory definitions. Area codes change too often and, in the U.S., aren't geographically consistent. On top of that, with many people using cell phones or Internet phones, it's hard to relate phone numbers to geography.
Implementing workflow rules is a powerful way to have Microsoft CRM do a tremendous amount of work for you. For example, an administrator can create a workflow rule that automatically attaches to every new record; the rule checks the physical location of that account or contact and assigns it to a territory. Setting up such rules is appropriate for this or any kind of procedure that's well defined and frequently repeated. See Chapter 9 for a discussion of workflow rules.
An administrator can assign each user to a single territory and designate the user as either a territory user (a member of a team) or as the territory manager.
The task of setting up and managing territories is usually reserved for people with administrative rights. If you don't already have territories defined, this is a good time to do so. Follow these steps:
At the bottom of the navigation pane, click the Settings button. (If you are using Outlook Client, click on Settings under the Microsoft Dynamics CRM folder in Outlooks navigation pane.)
Click Business Management in the navigation pane.
The Settings window with its 11 options appears. The options are as follows:
Fiscal Year Settings: This is where you configure your company's settings for its fiscal year and options on how they are displayed.
Facilities/Equipment: This is where you manage people and the services you provide for your clients. In example, you can schedule a technician to go onsite and fix a printer. The technician may need certain equipment for this job.
Resource Groups: A resource group is simply a team of people who provide services for clients. This is where you would create and manage them.
Services: Services are jobs scheduled for a customer. These appear as calendar activities for the users who are scheduled to perform the tasks.
Subjects: This is where you create and manage various areas on knowledge in a hierarchy. An example would be a company knowledge base.
Relationship Roles: This is where you create and manage a correlation between the records in your system. For example, you may wish to create relationships between distributor and seller accounts.
Business Closures: This is where you define the days in the year that the company will remain closed.
Queues: These are scheduled activities that need attention or need to be closed.
Sales Territories: This is where you create and manage territories. (Sales territories are discussed later in this chapter.)
Sites: A site is a physical location of a business. This is where you would manage, per site, services you provide.
Currencies: Currencies help determine the price of products you track in your system. (Products are discussed in Chapter 7.) They are also used to determine the price for various transactions, such as purchase orders.
Select Sales Territories.
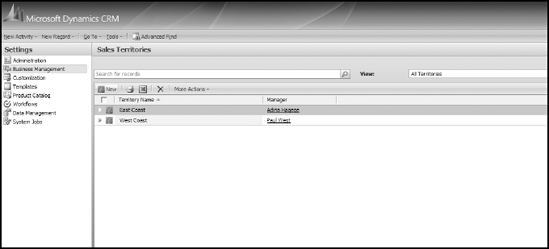
The Sales Territories window shown in Figure 5-1 appears. This is a typical view displaying the territories already in your system, presumably put there by your system administrator or by a sales manager.
On the Sales Territories window's toolbar, click the New button to add a new territory.
The Territory: New window opens.
Fill in the General tab as follows:
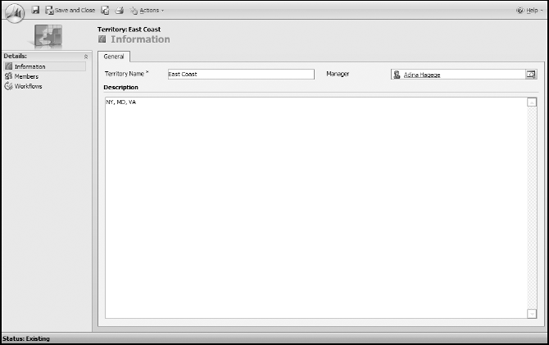
In the Territory Name field, enter a unique territory name.
To the right of the Manager field, select a territory manager for that territory from the drop-down list.
If your territory name isn't self-explanatory, be sure to enter a description.
For example, if the Territory Name is New England, you should list the individual states in the Description field. See Figure 5-2.
At the top of the screen, click Save (the disk icon).
Note that the Members option in the navigation pane is available. The users assigned to a territory are called members of that territory. After you set up a territory, you can add users to that territory.
Add a user (member) to the territory as follows:
In the navigation pane of the territory, click the Members button.
On the window's toolbar, click the Add Members button.
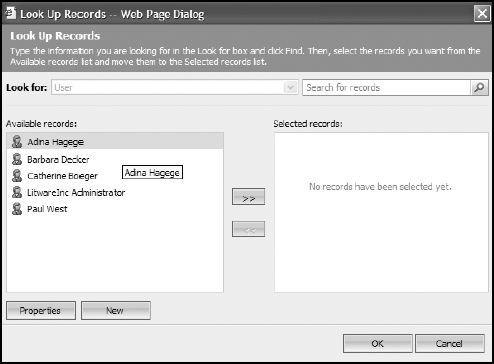
You see a list of available users in the Look Up Records window. Because an administrator can assign an individual user to only one territory, the available users display in Figure 5-3 shows only unassigned users.
From the available users, select one or more users (that is, members) for a territory.
After you finish adding users to a territory, click the Save and Close button.
You return to the Sales Territories window.
Tip
Sometimes you may think that you need to assign someone to more than one territory. For example, if the Mid-Atlantic manager leaves, you may need to have the New England manager temporarily take over both territories. You do this by defining a new territory that encompasses both the New England and the Mid-Atlantic regions.
If you plan to assign accounts to territories, you need to ensure that the Territory field for every account is filled in. You can do this by establishing workflow rules that automatically assign territories based on the City or State fields.
You can ensure that every account is assigned to a territory in these ways:
Make the Territory field a Business-Recommended field. (Creating Business Recommended fields is a system administrator function.) This designation turns the field label blue, indicating to the user that entering data in this field is important. The business recommended designation does not force the entry of data.
Make the Territory field a Business-Required field. (This is also a system administrator function.) With this designation, which turns the field label red, no one can save the record unless the field is filled in.
Send missing data alerts by using a third-party alert system, such as KnowledgeSync (which we discuss in Chapter 27). An alert system sends a pop-up alarm or report to a user or manager when a new record is saved without critical data. Since KnowledgeSync is not part of MS CRM but an add-on tool, we will not cover how to set it up.
After you do everything possible to make sure every account is assigned to a territory, you'd think you'd be done with it. But, things change. Salespeople leave or are reassigned. New salespeople appear. Territories are merged. It isn't enough to just assign a salesperson to a territory. You must be vigilant to ensure that the assignments still make sense.
When customers are assigned to a territory or reassigned, someone should notify the account manager. In a perfect world, you would also notify the customers that they have a new account manager.
Warning
Although notifying account managers when you assign accounts to them seems obvious, the software has no built-in function to make this happen automatically. If a salesperson already has several hundred accounts, he or she may not notice for a long time when a half dozen new accounts are added to the list.
Workflow rules (discussed in Chapter 9) are an effective way to provide this notification. Failing that, you can resort to the old-fashioned method of either telling the salesperson or printing a report of existing customers and highlighting the new ones with a yellow marker.
The second notification needs to go to the client. Whenever an account manager changes, it's critical to inform all affected customers. With the appropriate workflow rules, you can accomplish this by an e-mail, a fax, a template letter, a scheduled phone call, or a visit.