Product catalogs, whether they're paper or virtual, are a great invention. And product catalogs aren't just for consumers! They also make excellent reference tools for your sales and customer service staff.
With Microsoft CRM, your company can create a brawny, capable, all-inclusive computer-based product catalog. That way, you can quickly and easily find all the items and services you sell (nix thumbing through pages). This chapter shows you how to set up this valuable resource.
Within a product catalog, you can create pricing schedules and assign them to your customers as default schedules. This way, Bob's Big Discount Warehouse gets the wholesale pricing schedule, and the National Organization for Toasters gets nonprofit pricing. Using these assigned pricing schedules and the quote generation feature of Microsoft CRM (refer to Chapter 16), your salespeople can generate accurate quotes quickly. Quotes beget orders and orders beget invoices and invoices beget bucks (most of the time).
You can create a number of pricing schedules, for any reason. These schedules can be as simple as retail, wholesale, and nonprofit pricing or as complex as seasonal pricing or tiered membership pricing. Chapter 16 details how to create and use the pricing schedule to your company's advantage.
The product catalog can link to opportunities, competitors, and product literature. In fact, the product catalog has its tentacles into virtually every aspect of the system.
If you're integrating with one of Microsoft Dynamics' back-office accounting systems, you can set up the product catalog in the accounting system and link to it rather than set up the catalog in Microsoft CRM. If you're integrating with an accounting system other than Dynamics, you can upload that system's product list directly into the CRM product catalog. When integrating with these systems, any data from the accounting side normally overrides what you entered previously in the CRM product catalog.
If you use an accounting application other than one from the Microsoft Dynamics family, there are solutions for you, too. See Chapter 27 for some add-ons that simplify this work.
Tip
It's a good idea to read this entire chapter before you build your product catalog. This will give you an overview and allow you to do some planning.
When you're ready to start building your product catalog, we recommend that you use the order suggested by Microsoft, which we follow too:
Discount lists
Unit groups
Price lists
Products
To start your planning, categorize your products and services and organize and simplify your pricing schedules. This is also a good time to check and update your inventory lists. Take out products you haven't sold since President Nixon was in office. And while you're at it, update your pricing. Remember, the cost of living has increased considerably since you founded the company (36 cents for a gallon for gas, anyone?).
You create a product catalog in the Product Catalog window of Microsoft CRM. You don't have to venture out of this section while creating your catalog — although we recommend venturing out of your cubicle for a leg stretch once in a while.
Now that you've stretched your legs and shared the latest rumor, it's time to get to work. Start by going to the Product Catalog window, as follows:
At the bottom of the navigation pane, click Settings.
The Settings section expands in the top left with the Administration section highlighted.
Click the Product Catalog section in the upper left.
The four components of the product catalog appear in the Product Catalog window.
As mentioned, we recommend that you create your product catalog in the order that Microsoft indicates. So that's what you do next.
Discount lists control how prices change based on the quantity of the product or service being purchased. You can set your discounts in two ways:
By percentage
By reduction according to a set dollar amount
For example, a seasonal sale in which you offer a 10 percent discount on all purchases calls for a percent discount list. Offering $5 off for every touch-down the high school team makes during the weekend game is a set dollar amount discount.
To set up a discount list, you first need to get to the Product Catalog window, as explained in the preceding section. Then follow these steps:
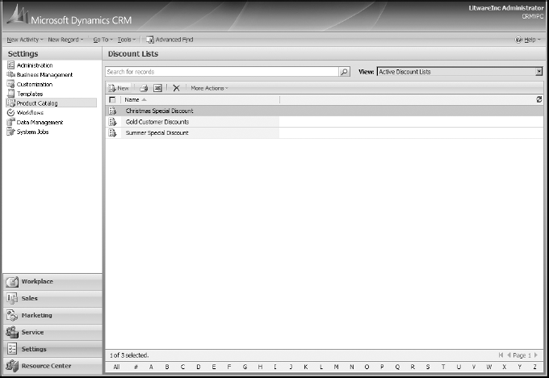
In the Product Catalog window, click Discount Lists.
All existing discount lists are displayed, as shown in Figure 7-1.
On the Discount Lists window's toolbar, click the New button.
The Create Discount List window appears.
In the Name field, enter a title for your new discount list.
We recommend a unique and self-explanatory title so that others will be able to identify the list. In our example, we entered Summer Special Discount.
Choose the type of discount that you want to offer your customers.
The Percentage option is based on a percentage of the regular price. The Amount option is based on a set dollar amount deducted from the regular price. To follow along with our example, select Percentage.
Click OK.
The Information window for your new discount list appears. (The navigation pane has three options: Information, Discounts, and Workflows. The Information display is the default display.) Note the top of the window; whatever you named your discount list appears here.
Tip
At this point, you can continue with creating the discount list, or you can exit the discount list by clicking Save and Close.
Enter some descriptive information for the discount list in the description box.
For example, you can add a note about the limitations of the discount (such as limit 4).
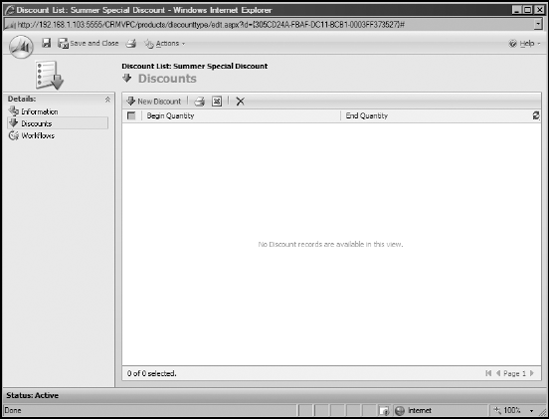
In the navigation pane, select Discounts.
The Discount section of your discount list appears, as shown in Figure 7-2. This is where you begin entering the details for this discount.
Now to make your discounts, click the New Discount button on the toolbar.
In the Discount: New window that appears, enter the following information for your discount:
The beginning and ending quantity: The program calls these Begin Quantity and End Quantity.
Your discount amount: If you chose Percentage in Step 4, this line says Percentage. If you chose Amount in Step 5, this line says Amount ($). When entering the amount, don't enter the symbol (% or $).
Click the Save and Close button to return to your discount list.
To enter another line item, go back to Step 8.
You can enter as many line items as you want to establish the necessary price breaks for this discount list. For example, if you want to offer price breaks for quantity purchases, you might create a line item for a discount for 1–10 items purchased and another one to assign a price for 11–20 items.
To save this list, click Save and Close in the Discount List window.
Tip
Make sure that you don't overlap quantity ranges. For example, suppose your first discount covers the first nine items sold, and you have a larger discount for ten items and above. You enter 1–9 for the first discount and 10–99 for the second discount. But what if you sell time and break it down in 15-minute increments? The undefined quantity between 9 and 10 could be an issue. We suggest that you break down time increments into decimals when entering quantities for time.
A base unit is the smallest or most common means of tracking an item sold. Typical base units are pounds, gallons, hours, days, and tons.
A unit group defines how individual items are grouped into larger quantities. For example, suppose that you sell books individually, by the case, and by the pallet. A unit group of books shows how a book relates to a case and a case to a pallet. Using this example, if you sell 2 cases of books, with 20 books to a case, the system knows that you sold 40 books.
To create a unit group, follow these steps:
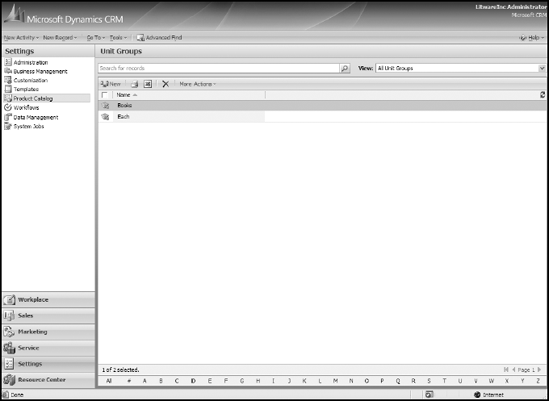
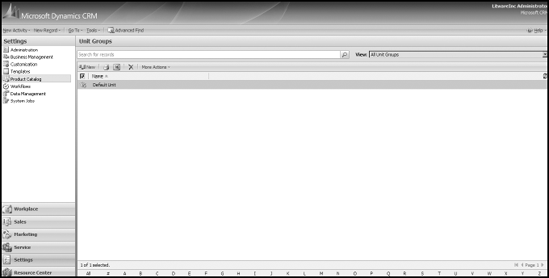
In the Product Catalog window, click Unit Groups.
If you need help finding the window, see the earlier section titled "Getting to the Product Catalog Window." The screen shown in Figure 7-3 appears.
On the window's toolbar, click the New button.
The Create Unit Group dialog box appears.
Enter the following information for your unit group:
Name: This is the name of your unit group. For our example, we're calling this unit group Books.
Primary Unit: This is the smallest unit by which the product can be sold. The primary unit is also known as the base unit. Enter Each as the Primary Unit.
Click OK.
The Information window, which is the default display, appears.
At the top of the navigation pane on the left, click Units.
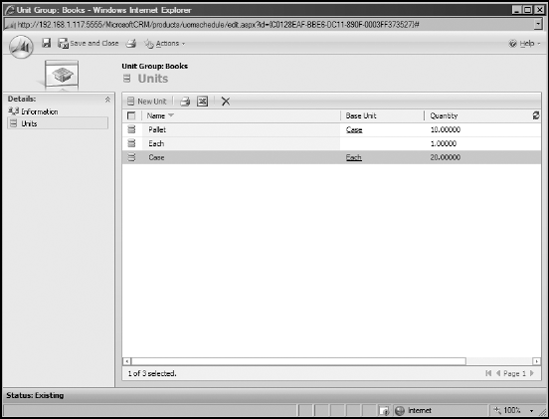
The Unit Group: Books window appears. (If you named your unit something else, that name would appear instead of Books.) This is where you'll add your units to your unit group.
Click Units on the left and then on the toolbar of your new Unit Group, click New Unit.
The Unit: New window appears.
For each of the three units (book, case, and pallet in our example), do the following:
Enter the name.
This is where you enter the name of each unit. To follow along with the example, enter Book (the first time through), then Case, and then Pallet.
Enter the quantity.
Again, to follow along with the example, enter a quantity of 1 for Each because this is our base unit. The Case quantity is 20, meaning that each case contains 20 base units. The Pallet quantity is 10, meaning that each pallet contains 10 cases.
Enter the base unit.
The base unit is the smallest increment of this new unit you're creating. Continuing with the example, you can see that Each has no base unit (because it is the base unit and was determined in Step 3 to be the Primary Unit). Case has a base unit of Each, and Pallet has a base unit of Case. Use the magnifying glass to browse for the unit you want to set as the base unit. All units, with the exception of the primary unit, must have a base unit.
Click the Save and Close button.
A quick note for those keeping score: The columns in the Unit Group work-space are listed in a different order than those in the Unit: New window.
Click the Save and Close button.
You're returned to the unit group that you're working on, as shown in Figure 7-4.
To save the unit group, click the Save and Close button again.
Price lists are the backbone of all your opportunities and quotes. Your company may have more than one price list, such as a retail price list and a wholesale one. You could also have separate price lists for government and nonprofit customers. You can add a default price list to each contact or account, but you can override this when you create quotes and invoices. (See Chapter 16.)
Tip
If your company uses an accounting system and wants to integrate it with Microsoft CRM, keep in mind that the interface normally provides all of this information and overwrites your price lists with the information from the accounting system. With the integration provided to Microsoft CRM, much of this functionality is disabled because it is controlled by the accounting application.
Here's how you create that price list:
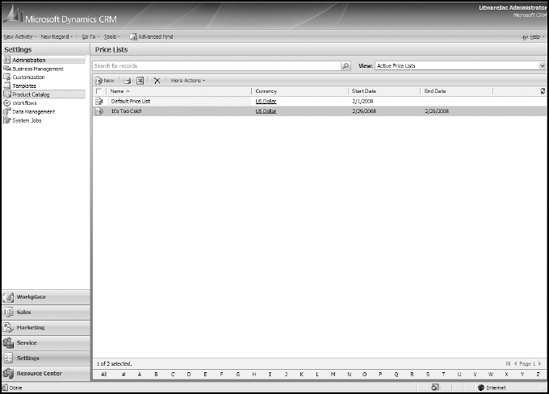
In the Product Catalog window, click Price Lists.
The Price Lists window, similar to the one shown in Figure 7-5, appears.
On the window's toolbar, click the New button.
The Price List: New window appears. The navigation pane displays three choices: Information, Price List Items, and Workflows. Price List Items and Workflows aren't available until you've saved the price list.
Enter a name for your price list.
Required fields are in red. The Name field is required, but the start and end date fields aren't. In our example, we created the "It's Too Cold!!" price list to offer special prices to match the dropping temperatures. However, winter lasts only so long, so we've set the price specials to end in February.
Click Save (the disk icon next to the Save and Close button).
Clicking Save allows you to continue with the next part of the process, adding price list items. However, if you aren't ready to enter your price list items or need to get out of this window for some reason, just click the Save and Close button.
In the navigation pane on the left, click Price List Items.
On the Price List Items toolbar, click the Add Price List Item button.
The Price List Item: New window appears, as shown in Figure 7-6.
Enter your price list information in the available fields.
Some fields must be filled in by using the magnifying glass to the right of the field. The magnifying glass opens a Look Up window. You can fill in other fields freehand or by using the drop-down boxes. As with other screens in Microsoft CRM, the fields in red are required.
Price List: This is filled in automatically by the program. However, you can change the price list by using the magnifying glass.
Product: Use the magnifying glass to find the product you want in this price list. Microsoft thwarts the Minions of Chaos by allowing your staff to enter only predefined choices from the product list.
Unit: Use the magnifying glass to make your selection. This field isn't enabled until you select a product.
Discount List (optional): Use the magnifying glass to find the discount list you created earlier in the chapter and link it to your price list. By adding a discount list to work in tandem with the price list item, your staff can create thorough pricing to quote your customers. (See Chapter 16 for details on generating quotes.)
Quantity Selling Option: This is where you define the quantities in which you'll sell your product. Choose No Control, Whole, or Whole and Fractional. This feature really comes in handy if you sell fractional services such as help desk or prorated time products.
Pricing Method: Six options are available: Currency Amount; Percent of List; Percent Markup — Current Cost; Percent Margin — Current Cost; Percent Markup — Standard Cost; Percent Margin — Standard Cost.
Amount ($): Enter the dollar amount for the price list. The Amount option is available only if you chose Currency Amount under Pricing Method. Don't include a dollar sign.
Percentage: Enter the percentage for the price list. Don't include the symbol (%).
Rounding Policy: Your rounding policy tells the system how to round percentage calculations to arrive at a specific price. Your options are None, Up, Down, and To Nearest. Rounding applies only when the pricing method is based on percentage. If you selected Currency Amount for the Pricing Method, this field isn't available.
Rounding Option: This option works with the Rounding Amount field. For example, select Ends In here and .00 in the Rounding Amount field if you want to round to the nearest dollar. Select Multiple Of here and enter .05 in the Rounding Amount field to round to the nearest nickel. If you selected None for the Rounding Policy or Currency Amount for the Pricing Method, this field isn't available.
Rounding Amount: Fill in the amount on which you want to base your rounding, as described in the preceding entry. If you selected None for the Rounding Policy or Currency Amount for the Pricing Method, this field isn't available.
Click Save and Close to save your price list items to your price list.
As mentioned, the fields in red are required. If you've missed one (due to excessive caffeine intake or hunting down who burned the popcorn), the program will remind you.

By creating price lists, you build an easy-to-use system to generate price quotes for your customers. Microsoft CRM uses the price lists, discount lists, and price list items to automatically calculate client costs, so your salespeople can focus on selling and not math.
Your products — without them, you wouldn't have a business, right? From the first entrepreneurial caveman, businesses are made because someone has a product to sell. We use the term product as a general term to encompass products, services, the help desk — basically whatever you build your business around.
Now, because the Minions of Chaos love mischief, Microsoft has taken a smart step in preventing them from running amok in your system: Only system administrators are allowed to add new products. That means that if Sam the Salesman can't find the entry for the Hop-n-Pop toaster, he won't be able to add entries that could create confusion when you want a report or when other salespeople are looking for the Hop-n-Pop. Can you imagine if he added the product as hopnpop, Mary in the next cube added it as HnP, and then Carey added it by the model number X900? How could you run a report on how many of those have sold?
Another function of Microsoft CRM allows you to group products sold as a kit. Take your Hop-n-Pop toaster, sell it with bagels and organic preserves, and you have the Bagel Buff Gift Basket. You can also create special kits to simplify your sales and ordering processes or to get rid of some stuff that you don't want anymore — clearance, anyone?
You can also relate individual products to substitute products. This is a handy function for your salespeople when Mrs. Reynolds wants a Hop-n-Pop toaster but you sold the last one two days ago. By relating this product to a substitute, your salesperson can easily recommend the equivalent HotHopPop toaster.
If you're a system administrator, follow these steps to add a new product to your product list:
In the Product Catalog window, click Products.
A list of your active products appears, as shown in Figure 7-7.
On the Products window's toolbar, click the New button.
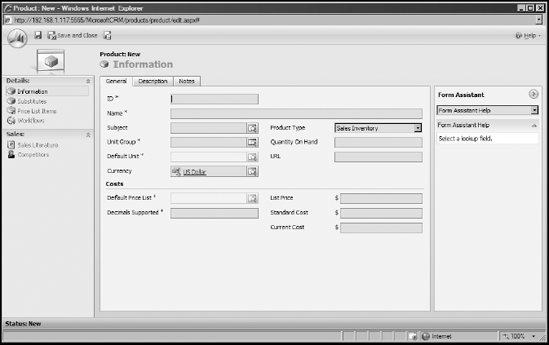
The Product: New window appears with three tabs, as shown in Figure 7-8.
Fill in the General tab.
The General tab, which is the default tab, is where you enter most of the information for your product. You can fill in some fields freeform, others using the magnifying glass (thwarting those Minions of Chaos), and still others with the Form Assistant. For details on using the magnifying glass and the Form Assistant, see Chapter 2.
The following fields are mandatory:
ID: If your system is integrated with your accounting system, the ID is the item number used by the accounting system. Through this field, the accounting system updates (and overwrites) information in each product record.
Name: This is descriptive text entered freehand. But it can also be populated by your accounting system if it's integrated.
Unit Group: If your system isn't integrated with accounting, select the unit group that includes the units by which this product will be sold.
Default Unit: This is the unit you would typically sell the product as. For example, if you sold the book, Toasting the Night Away, as a single product, the default unit would be Each. If you were selling nails, the default unit might be Box.
Default Price List: Earlier in the chapter, we discuss price lists. This field relates an individual product to a default price list (wholesale, retail, dealer, government, and the like) you've set up. When sales-people go to make that quote, they'll actually get the price list attached to the customer record. However, if no price list is attached to the customer record, the system defaults to the price list indicated for the product itself. You can't assign a default price list to the product until you save the product (use the Save button rather than the Save and Close button) and associate the product with a price list item. Until you do this, you see a warning message that the default price list isn't set.
Decimals Supported: If you can't divide your product (books, for example) into fractional quantities, enter 0. If fractional quantities are possible, you can use up to five decimal places.
Currency: This field is used to compute prices for you products. It is also used compute the costs of business transactions such as sales orders.
The following fields are optional, but we find them helpful in building a product catalog and entering products:
Subject: This field allows you to group your products for reporting.
Product Type: The four default product types are Sales Inventory (usually physical goods); Miscellaneous Charges (fees, such as for restocking); Services (such as consulting or annual maintenance fees); and Flat Fee (for example, handling or shipping charges).
Quantity on Hand: The number of items in stock. This field is controlled by the back-office system if you have integrated it.
URL: The Web address related to this product. This is a handy place to get up-to-date product information.
List Price, Standard Cost, and Current Cost: The price on a generated quote is based on these fields.
On the Description tab, you can enter vendor and part number information.
Having the vendor and part information can be helpful, especially if you sell similar products with similar names. Entering information on this tab isn't mandatory, but it does offer you another opportunity to identify your product.
The Notes tab is for freeform notes and information about your product.
Suppose that your product comes in other colors. Instead of making the salesperson back up a few screens to see what colors you offer, you can list the colors here, too.
After you enter all of your product information, click Save and Close to return to your product catalog. (Refer to Figure 7-7.)
Remember the motto of computer users everywhere: save, Save, SAVE!
Ta-dah! Now you've entered your product into your product catalog! Give yourself a pat on the back.