Marketing professionals are often looking for ways to build lists of customers and prospects to help target their marketing message. Your Microsoft CRM system is most likely full of useful marketing data. Fortunately, the developers of Microsoft CRM understand that and provide a multitude of ways to target customers and prospects directly from the CRM system. This chapter addresses the marketing module contained in Microsoft CRM 4.
Target marketing with databases consists of storing critical business data, mining that data, and building lists of people that correspond to a marketing need. This book isn't a primer on database marketing, but that doesn't mean we can't review some basic concepts.
Databases are wonderful tools for storing data and retrieving it. With Microsoft CRM Marketing Lists, we can retrieve individual records, aggregate data, build lists, and perform marketing-related actions against the aggregated lists of data. We can then associate marketing lists with marketing campaigns (as we discuss in Chapter 20). Marketing campaigns store data on the types of channels used to reach your target market: who responded, how much new business was created, and lots more. Analyzing this data helps to improve future campaigns by allowing you to focus on the channels and people that not only respond to your marketing activities but more importantly purchase your goods and services.
Believe it or not, marketing list development starts with database design. A well-designed database allows for maximum output with minimal input. Simply put, a well-designed database puts few data entry requirements on users while allowing the marketing department to query the database at will. We suggest you check with your Microsoft CRM dealer to aid in database design.
Let's take a look at an example to illustrate marketing list development. Mr. Spacely (of The Jetsons) wants to make a special offer to customers of his competitive product, Cogswell Cogs. Fortunately, Mr. Spacely had a reader of Microsoft CRM 4 For Dummies design his database. His CRM designer added a field to the Account form called Product Owned, which records the product that an account owns, either a Spacely Sprocket or a Cogswell Cog. Mr. Spacely asks his marketing department to create a list of all customers who purchased Cogswell Cogs. His marketing team uses Advanced Find to create the desired list. (For more on Advanced Find, see Chapter 3.) With the list created, the Spacely marketing will create a campaign targeted at Cogswell customers. To learn more about Marketing Campaigns, see Chapter 20.
We recommend that you work with a Microsoft CRM professional organization to help in determining the best approach for designing your database.
Here are some basic rules for designing your Microsoft CRM 4 system, to help you optimally market to customers, prospects, or leads, or any combination of the three:
Track company information on the account form only. If you need to segment by industry, enter it on the account form and not on the contact form. If you know what industry a company is in, you can safely assume the company's employees also work in that industry. Similarly, when designating companies as prospects or customers, we recommend tracking that information on the account screen.
Enter contact-specific data on the contact screen. This may seem obvious, but should you want to send out birthday notices, put a birthday field on the contact screen.
Query related entities. Microsoft CRM is a relational database. The Advanced Find lets you query related entities to help develop a list. If you're unaware of how to relate entities, call your reseller.
Let's not lose sight of an obvious fact: You market to people — not buildings, accounts, opportunities, or anything else. And some people don't want you to market to them. Don't worry if someone opts out of your marketing but somehow ends up on one of your marketing lists anyway; Microsoft CRM has a built-in safety net. (Okay, you may not be trapeze artists, so safety net is more of a metaphor.) In any case, the aforementioned safety net is found on the Administration tab of the Contact form, as well as the Account and Lead forms under Contact Methods.
Figure 19-1 shows the Contact form's Administration tab. At the top of the tab is the Contact Methods section, where you can adjust the following settings:
Preferred: This drop-down list allows you to choose the contact's preferred method of contact.
E-Mail: If the contact opts out of e-mail, select the Do Not Allow radio button. Subsequent attempts to e-mail the contact from Microsoft CRM will be blocked.
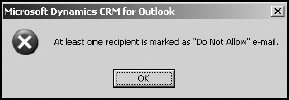
Warning
You can't send an Outlook e-mail to a CRM record that has Do Not Allow set in the E-Mail field. When you click Track in CRM prior to sending the e-mail, you'll receive the message shown in Figure 19-2.
Tip
Chapter 20 covers marketing campaigns; however, it will be helpful now if you understand the distinction between a campaign and a quick campaign in Microsoft CRM. A quick campaign is a single marketing activity sent to one or more records. A marketing campaign is a full marketing campaign that can have one or more events in a variety of channels, such as e-mail, letter, fax, and more. Marketing campaigns can have associated planning steps, targeted responses, and more.
Bulk E-Mail: Used for quick campaigns. Records marked "Do Not Allow" with this option will not receive quick campaigns.
Phone: Indicates a person's desire, or lack thereof, to accept marketing calls from your organization.
Fax: As with phone, you can indicate whether or not the person will accept fax marketing messages.
Mail: Indicates whether a person will accept marketing materials that are mailed to them.
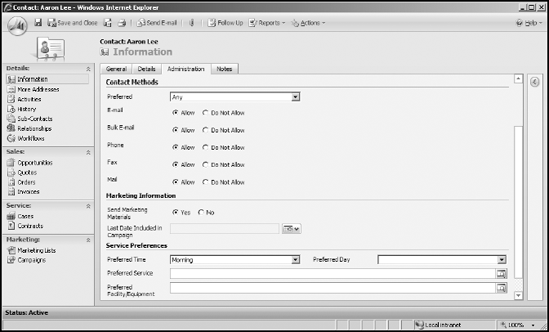
The next section, called Marketing Information, contains a radio button for sending marketing materials. Selecting the No radio button for the Send Marketing Materials option prevents all marketing campaigns from going to that contact.
Note that setting Bulk E-Mail to Do Not Allow (in the Contact Methods section, above) prevents all quick campaigns. A Do Not Allow for E-Mail blocks all e-mail to the contact regardless of the selected choices for Bulk E-Mail and for Send Marketing Materials (when the campaign is an e-mail campaign).
Figure 19-3 illustrates the proper settings for a contact with whom you often exchange e-mails, but who has declined to receive your e-mail marketing. In Figure 19-3 we've set: E-mail to Allow; Bulk E-mail to Do Not Allow; and Send Marketing Materials to No.
This contact is now someone with whom we can communicate on a regular basis via e-mail but who won't receive any of our e-mail marketing.
We recommend creating corporate best practices on how to utilize the Contact Methods settings. More and more laws are being passed regulating spam, opt-in/opt-out marketing, and the divulging of contact details to third parties. If you violate any of these rules, your marketing will probably not benefit and may create all sorts of trouble.
We're ready to build that marketing list we mentioned earlier in the chapter. If you've properly designed your database, now you simply need to go ahead and build the list.

Marketing lists differ from Advanced Find in that, after a marketing list is built, it requires human interaction to alter the contents. In contrast, whenever you run an Advanced Find query, the result set that is returned encompasses all the data in the database satisfying the query. If you create a marketing list with 100 records, 100 records will remain in that list forever, unless someone alters the marketing list. In contrast, an Advanced Find query can differ in the number of records returned every time it's executed. For example, an Advanced Find query run for all customers in Massachusetts returns a specific number of records, such as 1,000. If we rerun the Advance Find later in the day we may now return 1,010 records as 10 new customers have been added to the database.
A marketing list isn't dynamic, meaning that marketing list entries don't change automatically with changes to the database as an Advanced Find does. If we create a marketing list based on the Massachusetts Advanced Find, we have 1,000 records in the marketing list. Later, when the Advanced Find returns 1,010 records, the marketing list will continue to return 1,000 records. This allows you to track the original group marketed to regardless of additions made to the database.
Before creating a marketing list, have an idea as to the target audience of your marketing message (such as accounts, contacts, or leads). Then follow these steps:
On the navigation pane, click the Marketing button.
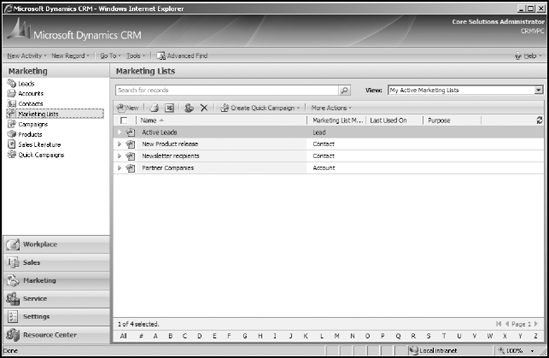
In the upper part of the navigation pane, select Marketing Lists.
The Marketing Lists window appears, as shown in Figure 19-4.
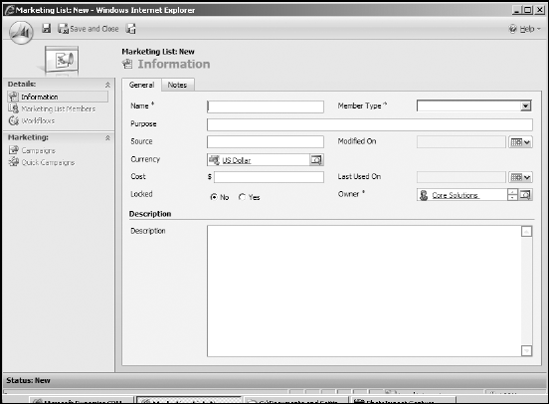
On the window's toolbar, click the New button.
The Marketing List: New screen appears, as shown in Figure 19-5. Three fields are required: Name, Member Type, and Owner.
In the Name field, enter a unique name for your new list.
Select a Member Type from the drop-down list.
The Member Type simply indicates whether you're building the list from your accounts, contacts, or leads. You can choose only one of these per list.
By default you will be the Owner; to change ownership of the marketing list to another user, click the magnifying glass icon and select another user.
Enter information in the other fields, as desired.
If you're building this marketing list based on a purchased list that was imported into the CRM system, indicate so in the Source field. Enter how much you paid for the list in the Cost field. You can enter notes either in the Description field or in the Notes tab. If you use the Notes tab, each note is date and time stamped.
Click the Save button.
The navigation menu on the left of the marketing list is now available.
Now you have a list, but it has no records in it. The next section describes how to populate your list.
You can populate marketing lists by adding records one at a time or with Advanced Find. The Advanced Find method populates the list with multiple records at a time. Similarly, you can remove marketing list members from the list one at a time or en masse via Advanced Find.
In general, if a database relationship exists between the records you'd like to target, Advanced Find is the best tool for the job. On the other hand, should you want to add records without a common thread (no database relationship can be established), the Look Up feature is the way to go. Of course, you could do both. The examples that follow illustrate these points.
To add all contacts where the account type is Customer, use the Advanced Find method. The database relationship between the account records is the account type of Customer. Your list will consist of contacts where the relationship field on the Account form is Customer. This is in contrast to a list created that is not based on a database relationship. For example, a marketing list called Newsletter will contain anyone requesting your corporate newsletter. Other than adding these records to a marketing list called Newsletter, there may not exist any other database relationship between these records.
To add specific members to the marketing list, follow these steps:
On the marketing list navigation pane, click Marketing List Members.
At the top of the Marketing List Members pane, click Manage Members.
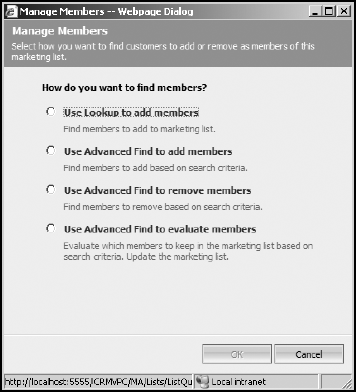
Figure 19-6 shows the Manage Members screen.
Click the first option, Use Lookup to Add Members, and then click OK.
The Look Up Records dialog box opens.
In the Look For field, enter the name of the account(s) you want to add to your list.
You can enter all or part of the name. We entered *mo*. The asterisk (*) is a wildcard that matches any sequence of characters. The mo finds any contact record with mo in the first or last name. The characters aren't case sensitive and will display mo in the first or last names, such as Moe Howard, Amos Smith or Mickey Monaghan.
Click the Search Icon (magnifying glass).
All the contacts with mo in their first or last names appear in the Available Records pane, as shown in Figure 19-7. This list may include records you don't want. For example, the figure shows many other people that we don't want to add to our marketing list.
Highlight the records you want to include in your marketing list and then click the ≫ button.
To select a range of records, use the Shift key or the Ctrl key to select multiple records.
Click OK when you're finished.
The system flashes a message, telling you that it's adding records to your list, and then returns to the Marketing Lists window.

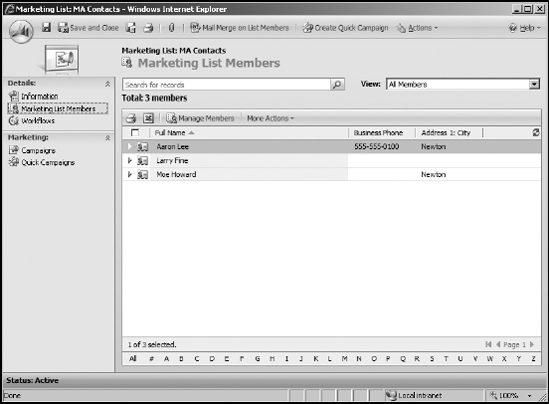
To see the number of records added to a marketing list, follow these steps:
Click Marketing on the Navigation Bar.
Click Marketing Lists.
Double-click a marketing list to open it.
On the Local Marketing List navigation bar, click Marketing List Members.
The total number of list members is written near the top left of the form. (See Figure 19-8.)
Here's an alternative way to add a record to the marketing list. After you've created your marketing list, you can add members when you're on the Lead, Contact, or Account forms. To do so, just follow these steps:
Open the contact record and Click Marketing Lists on the bottom of the contact navigation pane.
At the top of the Marketing List Members pane, click Add to Marketing List.
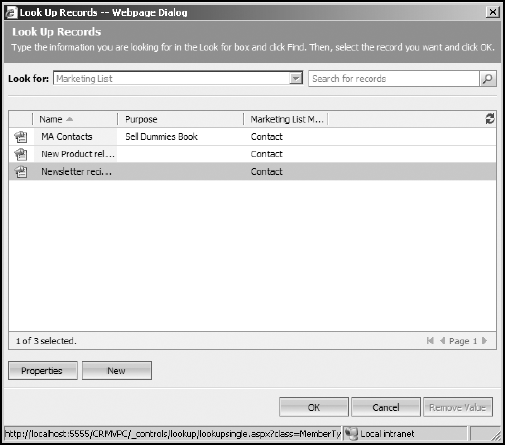
The Look Up Records - Marketing List dialog box opens. (See Figure 19-9.)
Select a record.
Click Save and Close.
With Advanced Find, you can add many records to the marketing list at one time; you create a query that returns a subset of data. For example, the query you create could be: All contact records in the state of California where the E-Mail field contains data and the contact's title is VP of Operations. This complex query returns all the contact records in the database that satisfy the query. Some benefits of using Advanced Find are:
Advanced Find can look at any field within a record, not just the Name field.
Advanced Find can look at more than one field in a search. For example, Advanced Find can locate all the accounts in New York that also have fax numbers.
Advanced Find can search more than one entity. Your contact list can be filtered by values on the account form or any entity related to contacts.
You can save Advanced Find queries for use later.
To create a targeted list using Advanced Find, follow these steps:
On the navigation pane, click the Marketing button.
At the top of the navigation pane, select Marketing Lists.
Double-click to select the marketing list you want to populate (if you have not yet created a marketing list, refer to creating marketing lists above).
The marketing list form opens.
On the navigation pane, select Marketing List Members.
On the window's toolbar, click the Manage Members button.
The Manage Members dialog box appears.
Click the second option, Use Advanced Find to Add Members, and then click OK.
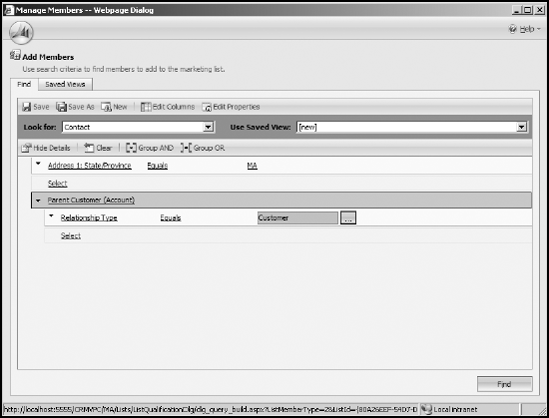
The type of record on which you're basing your search is limited to list type; however, you can query related entities, such as the Account entity from Contacts, as shown in Figure 19-10.
You're looking for contacts in Massachusetts with an account Relationship Type of Customer. (See Figure 19-10.)
Tip
You can also use a saved Advanced Find query by clicking the Saved Views tab and selecting an existing query.
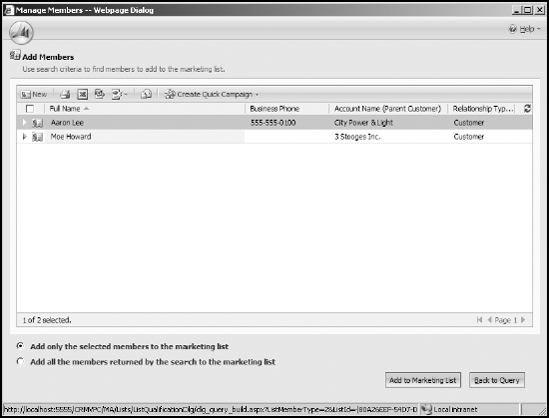
In Figure 19-11, you can add selected members to the marketing list by using Ctrl+click or by clicking the Add All the Members Returned by the Search to the Marketing List radio button. When done, click the Add to Marketing List button.
If so desired, click the Back to Query button and save your Advanced Find.
This adds the Advanced Find to your saved queries.
Click Save and Close to save this new entry as one of your marketing lists.
Note
After a marketing list is created, it's static. In other words, marketing list members don't change without manual intervention.
We mention several times that, unlike an Advanced Find, marketing lists are static and can be changed only manually. Why would you want to change a list? One reason is to add people to the list to comply with a request, such as a newsletter opt in. To update a list with many records at one time, you can use Advanced Find in much the same way you use it when creating a marketing list.
To add records, follow the steps in the preceding "Populating a marketing list" section.
Tip
You can enter a record into a specific marketing list only once, so don't worry about duplicating the entry.
There are two ways to remove records from a marketing list. We cover both options in the steps that follow.
To remove records from a marketing list, follow these steps:
Open a contact record.
On the form's navigation pane, click the marketing list icon second from the bottom.
The marketing list view is displayed on the right.
Click the list item (or Ctrl+click several marketing lists) from which you'd like to remove the record.
On the toolbar, choose More Actions
Remove.
The contact will be removed from chosen list or lists.
Click OK.
The second approach is to navigate to a particular marketing list where you have several options to remove records. From the marketing list, you can remove one or multiple records at a time. Let's explore those options:
On the navigation pane, click the Marketing button.
At the top of the navigation pane, select Marketing Lists.
Double-click to select the marketing list you want to edit.
The marketing list form opens.
On the navigation pane, select Marketing List Members.
Click the list member or Ctrl+click the members you want to remove.
On the toolbar, choose More Actions
Remove From Marketing List.Click OK.
Alternatively, you can remove records via an Advanced Find query. To do so, follow these steps:
From an open marketing list, Click Marketing List Members on the navigation bar.
Click Manage Members on the top right.
The manage members dialog box opens. (Refer to Figure 19-6).
Select Use Advanced Find to remove members.
The Advanced Find query window opens.
Create an Advanced Find or use a saved one.
Click Find in the lower right corner.
The list of members satisfying the search is shown.
Ctrl+click to remove individual members or click the Remove All the Members Returned by the Search from the Marketing List radio button.
Click the Remove from Marketing List button on the bottom of the form.
Or, finally, you can remove records with the Use Advanced Find to Evaluate Members option. To do so, follow these steps:
From an open marketing list, click Marketing List Members on the navigation bar.
Click Manage Members on the top right.
The manage members dialog box opens. (Refer to Figure 19-6.)
Select Use Advanced Find to evaluate members.
Click OK.
The Advanced Find window opens.
In this case, you're going to evaluate the account state and remove any contacts whose parent account isn't located in Massachusetts. Figure 19-12 shows your query.
Of your three records, Moe and Larry work for a company in Massachusetts, and Mickey Monaghan works for a company located in Washington state.
Click the Find button.
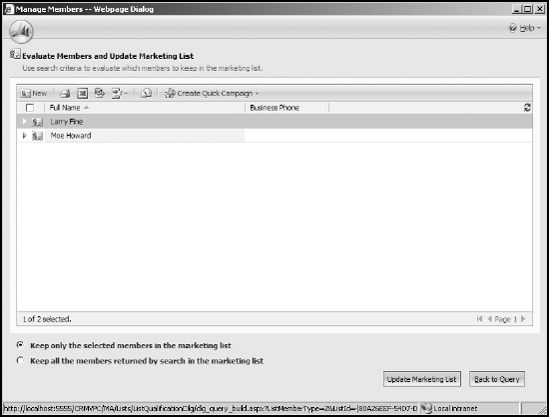
Figure 19-13 shows the results. Only two records appear based on the query, which means Mickey will be removed from the list.
Click the Keep All the Members Returned by Search in the Marketing List radio button.
Click the Update Marketing List button.

A new feature added to Microsoft CRM 4 is the ability to launch mail merge documents from the Internet Explorer client, a feature only found in the Outlook client in version 3. The mail merge feature enables the user to output data from the marketing list members to Microsoft Word, e-mail, fax, labels, or envelopes.
After you create a marketing list, the Mail Merge on List Members button is available at the top of the screen. Use it to create the mail merge as follows:
At the top of the marketing list form, click the Mail Merge on List Members button.
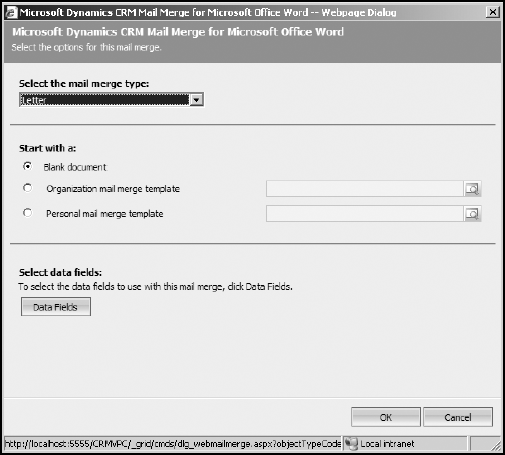
The Mail Merge for Microsoft Office Word dialog box opens, as shown in Figure 19-14.
In the Select the Mail Merge Type drop-down box, choose Letter, Email, Fax, Envelope, or Label, according to your needs.
Choose the type of document to start with: a blank document, or an organization or personal mail merge template.
If you choose one of the templates, you'll then have to click the lookup box to the right of your selection. If you have a few templates they will show in the dialog box. Select one and click OK. If you have many templates, you can search for the desired template in the Look For box. When found, click on the template and click OK.
Select a template, if necessary, and click OK.
Click the Data Fields button.
You can select up to 62 fields.
Click OK twice.
Click Open when prompted with the file download dialog box.
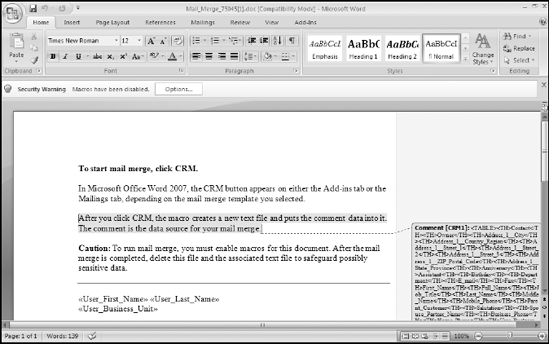
If macros have been disabled, click Options in Word and enable macros. (See Figure 19-15.)
If you're using Word 2007, as we are in Figure 19-15, you'll also have to click the CRM button on the Add-Ins or Mailing tab.
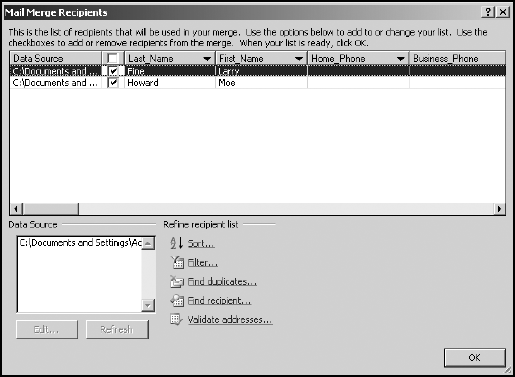
Select the data to be merged and click OK.
Figure 19-16 shows the data to be merged.
In Word, on the bottom right, click Next: Preview your letters.
You're merge document shows with actual CRM data merged.
In Word, on the bottom right, click Next: Complete the merge.
Your merge documents are now complete. You can print or save or both.