In this day and age, security is important. As technology advances, so do the hackers, virus writers, and other malevolently minded folks. With Microsoft CRM, you should be concerned with two types of security: physical security and internal security.
Physical security is a defense against everyone you don't know and don't want to meet. These are the people who have nothing better to do than develop and propagate viruses or, worse yet, spend their time hacking into your system to either paralyze it or steal your stuff. This type of security is generally handled by firewalls, routers, and other types of hardware and software. Because the vast majority of CRM installations run only on your intranet, this type of security is beyond the scope of this book. For more information, see the Microsoft Implementation Guide.You can download the Implementation Guide by going to www.microsoft.com/downloads and searching for "Microsoft Dynamics CRM 4.0 Implementation Guide." In fact, searching for just "Microsoft Dynamics CRM 4.0" will result in dozens of downloads regarding CRM including the latest security patches.
http://community.dynamics.com/
Be sure to check this Web site regularly to ensure that you are fully up-to-date on any security issues specifically affecting Microsoft CRM.
The second type of security, internal security, is aimed at your own usually well-meaning team members. Some organizations, such as brokerage houses, deal with internal security by requiring the restriction of certain records, even from members of their own staff. In other organizations, salespeople's opportunities need to be hidden from the other salespeople. In our company, we find it occasionally important to keep e-mails away from prying eyes.
CRM has quite a bit of built-in security. And your system administrator, perhaps with several people from your management team, will probably be charged with setting up security and access rights within Microsoft CRM. In this chapter, you find out about the types of security you should consider and how to regulate your internal security.
No form of security is ever foolproof. Although Microsoft CRM provides a sophisticated security system, this issue should remain a high priority. Security threats can come from anywhere: from your staff (innocent mistakes or not-so-innocent sabotage) and from outside hackers.
Remember, no system is foolproof (remember the Titanic?), but you can develop an efficient compromise and make your system user-friendly and hacker-unfriendly.
And, don't forget about the Minions of Chaos — always back up your data.
Microsoft CRM's security focuses on meeting the needs of most organizations in two ways:
Role-based security
Object-based security
Role-based security in Microsoft CRM allows you to assign a role to a user, such as Sales Manager, that controls what the user can do and has access to. Your installation can also define its own roles to meet your requirements. See the upcoming section, "Looking at Predefined Roles" to have a look at the security roles that exist out of the box Many of these will work as-is or require only slight tweaking.
Object-based security in Microsoft CRM focuses on what access the roles have to primary and extended entities (such as leads, opportunities, contacts, accounts, and cases). So, in this way, you could possess the role of Sales Manager and have access to change opportunities (an object) but only read cases (another object).
Essentially a user's rights depend on what Role they are a member of and what Object they are working with. Although a Sales Manger (Role) might have full access to Leads (Object) they may only have limited access to Cases (Object). On the other hand, the opposite might be true for a CSR (Role). CSRs might have full access to the Cases (Objects) but limited access, if any, to Leads (Object).
Privileges are the most basic security options in Microsoft CRM and are generally set up by your administrator. User privileges determine what a user can and can't do, such as creating records or deleting records. (We recommend that only a system administrator be allowed to delete records.) Altogether, a user can have eight basic privileges, as follows:
Create: The ability to create new records.
Read: The ability to read or view the record.
Write: the ability to change the record.
Delete: The ability to delete the record.
Append: The ability to link the record to another record.
Append To: The ability to link other records to this record.
Assign: The ability to change the record owner or "Assign" to another owner.
Share: Similar to assign but without changing the owner. If you share a records with another user then they will have nearly the same rights as you on that record depending on their roles.
The next step above privileges, access levels help determine which records the user privileges should apply to. In other words, your privileges may include the ability to delete account records, but your access level determines exactly which records you are able to delete. Microsoft CRM defines four access levels from user (least authority) to organization (most authority), as follows:
User: You only have access to your records.
Business Unit: You have access to all the records in your business unit.
Parent: You have access to all the records in your business unit and all subordinate business units.
Organization: You have access to all records in the entire organization.
Many organizations deal only with the User and Organization Access Levels. This depends mostly on corporate policy and culture. Some organizations allow everyone access to everything and others have a more "your contacts and my contacts" mentality. The Business Unit and Parent access levels allow for very complex access rights more suitable for very large organizations with complex organizational structures.
You can learn more about setting up CRM to mimic your organizational structure in Chapter 6.
The concept of roles marries privileges and access rights. Microsoft CRM comes with 13 predefined roles that are typical of a midsized organization, as shown in Figure 8-1. Making use of these predefined roles saves a lot of time that would otherwise be spent setting up specific access rights for each user.
If you're going to make any changes to the default roles, we recommend that you use the functionality Microsoft provides, called Role Copy. Refer to the online help on how to use this.
Note
Online help is available in the upper-right corner of virtually every screen in CRM.
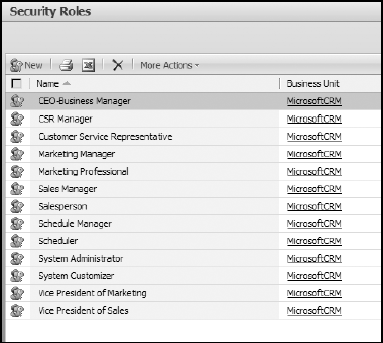
In this section, we show you how to look at the roles that Microsoft CRM ships with. Each of these roles has a complete set of predefined privileges and access rights. The prototypical sales manager, for example, is given a default set of privileges and access rights. To see the settings for any of the default roles, follow these steps:
In the lower left part of the navigation pane, click the Settings button and then click Administration sub-section in the upper left.
The Administration window appears on the right. (Remember that non-administrative users will not have access to the Settings area.)
Select Security Roles on the right.
The Security Roles window appears, listing all existing roles. (Refer to Figure 8-1.)
View a role by double clicking it in the list.
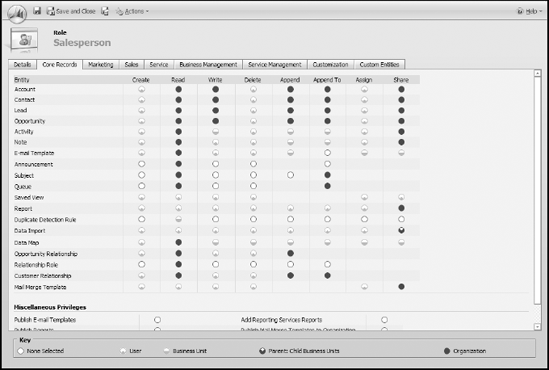
For instance, if you double click the Salesperson Role, the Role: Salesperson window appears.
Click the Core Records tab.
A screen similar to the one shown in Figure 8-2 appears. The Core Records tab contains all the toggle switches to turn access rights on or off and is the central storehouse for role information.
Click each tab in turn to see all the objects that the role can access at various levels.
Click the Save and Close button to return to the Security Roles window.
If your business has specific business rules you need to enforce, you should seek help from your system administrator or implementation partner.
After you have defined a role by either copying or editing and existing role, you need to assign it to the user. Every user in the system must have at least one role to access the system.
Tip
A user can have more than one assigned role. For example, someone could have a role as a systems administrator and as a mailroom clerk. Not a very likely combination but still possible. When a single user has multiple roles with different privileges and access rights, the role with the less restrictive privileges takes precedence. So, even when your systems administrator is functioning as a mailroom clerk, he or she will have the maximum levels of access rights.
If your organization is complex or you don't understand Microsoft CRM's concepts of roles, we suggest that you consult with an expert to help you in setting up your roles and assigning them to users. See Chapter 28 for more information on when and where to go for help.
To add a role to a user of the system, just follow these simple steps:
At the bottom left of the navigation pane, click the Settings button and then click Administration in the upper left.
The Settings window appears.
Select Users.
The Users window appears, listing all current users.
Double-click a username.
The User window appears.
In the navigation pane, click Roles.
At the top of the Roles window, click Manage Roles.
Select the roles you want this user to have and then click OK.
Click Save and Close.
Microsoft CRM has powerful security and record-sharing tools. If keeping certain records or data confidential is necessary for your company, that's no problem. Usually more critical than keeping data confidential, however, is your ability to share information with other members of your team.
Before you set up your CRM system, we suggest that you do a bit of homework and planning. So get your management staff together and order pizza, because you have some brainstorming to do. You'll want to figure out your business units (think divisions or remote offices) and then assign users to those units.
Typically, the users assigned to a particular business unit are also members of a team. Each user in CRM can be a member of one or more teams. The concept of a team allows for a convenient sharing of records. (For more on teams, see Chapter 6.)
You can easily share records and activities with members of your team, and you should. Sharing a record is like asking your buddies to help you when you need it. Rest assured: If you ask them, they'll return the favor. By sharing and distributing the workload, you, your team members, and your customers all benefit. While you're on vacation, team members who have access to your data while you're away can still help your clients.
You can also assign records and tasks. Assigning is a little more like telling another user on the system to handle the assignment. (It's more like delegating than sharing.)
Whatever you share you can unshare. If you turned over access to your clients while you were on vacation, you can retake control upon your return. In most work environments, this is a far better solution than sending your clients e-mails telling them you'll be away for two weeks and they should just relax until you get back. And it's certainly a better approach than not letting your clients know that you'll be away at all.
The concept of sharing is also pertinent to security. Assuming you have sharing privileges, you can regulate who else in your organization has access to your records. By sharing your records with another user or a team, you're granting access to people who wouldn't otherwise be able to view or modify those records.
Granting sharing privileges to someone who already has organizational rights (the highest level of access rights) really doesn't accomplish anything. Similarly, if you try to deny sharing rights to someone with organizational rights, nothing's going to change. That's like telling the boss he or she can't look over your shoulder.
Sharing is a good tool if, for example, you're working on a deal in New York and need to bring in a co-worker from Detroit. Under normal security, your co-worker wouldn't be able to view your records. By sharing, you can give him or her access to the record to help work the deal.
You can share almost any kind of record, but here we use an account record as an example. Follow these steps to share an account with one user or a whole team:
Navigate to the object you want to share using the navigation pane on the left of the main CRM screen.
For this example click on Sales and then Accounts.
The Accounts list appears on the right.
Open a record by double-clicking it.
The General tab for the account appears.
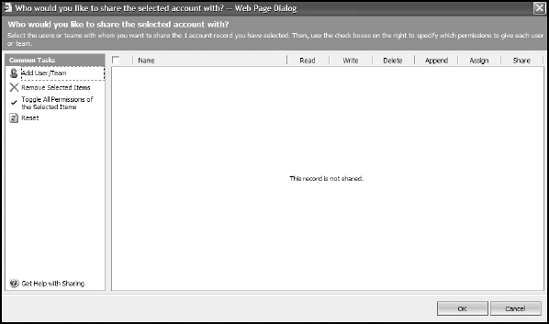
On the menu bar (at the top of the screen), choose Actions
Sharing.
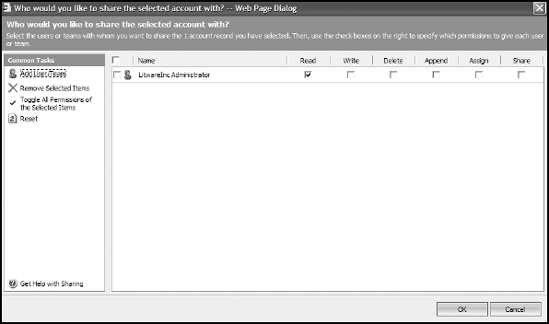
The window shown in Figure 8-3 appears.
In the Common Tasks pane on the left, select Add User/Team.
The Look Up Records dialog box appears, as shown in Figure 8-4.
In the Look For field, select User or Team and then click the Find button which looks like a magnifying glass.
All available users or teams are displayed. Alternately, you could enter some text in the text box to the left of the Find button to narrow the results.
Double-click any user (or team) from the list in the left panel.
Another method is to highlight the user (or team) and click the right-facing arrow button. The user (or team) is transferred to the right pane in anticipation of sharing the record with that user or team.
Click OK.
The window shown in Figure 8-5 appears.
Specify which permissions you're allowing for this record.
To do so, select or deselect each of the check boxes that relate to the rights you're granting.
Click OK when you're satisfied that you've shared enough rights.
The window for the record reappears, but now these other users have as much access to the record as you've granted them.

You can share multiple records by Shift-clicking them or Ctrl-clicking them from the list and then clicking More Actions from the tool bar and selecting Sharing. This brings you to the same screen as in Figure 8-3, and from there the process is the same as sharing a single record.
If you can share it, you can unshare it. For example, before going on vacation, you may want to share all your records with one of your peers. When you return, you probably want to unshare them and resume your usual tasks. To unshare a record, follow these steps:
Navigate to the record you want to unshare.
On the menu bar (at the top of the screen), choose Actions
Sharing.Click the Share check box to remove the check mark.
If you granted sharing rights to more than one user, you can eliminate multiple users' rights by clicking each of their Share check boxes on this one screen.
Click OK.
The system returns to the General tab of the account record.
If you can share it, you can unshare it. For example, before going on vacation, you may want to share all your records with one of your peers. When you return, you probably want to unshare them and resume your usual tasks. To unshare a record, follow these steps:
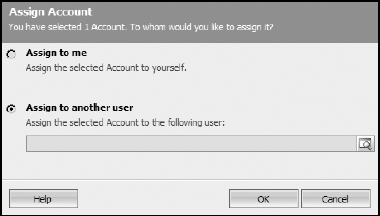
Navigate to the record you want to assign.
On the menu bar (at the top of the screen), choose Actions
Assign.You will see the Assign Account box pictured in Figure 8-6. (Assuming it's an account that you are assigning.)
Select either Assign to me or Assign to other user.
If you are assigning to another user then use the provided lookup to select the user.
Click OK.
The system returns to the General tab of the record and it is now assigned to the new user.
If you share with multiple people or multiple teams, you can end up having to deal with quite a few check boxes to manage in the Common Tasks panel, which you see at the left side of the screen after you choose Actions
Toggle All Permissions of the Selected Items: After you've selected one or more users using the check boxes to the left of their name, this option acts like a toggle switch (it turns all permissions on and off) for for the selected users. This is an easy way to grant permissions across the board for multiple users.
Reset: This is like a do-over button. Selecting Reset brings you back to the settings you had before the last time you clicked the OK button.