
Chapter 7
Creating Resources
IN THIS CHAPTER
![]() Understanding work and material resources
Understanding work and material resources
![]() Creating resources to complete your project
Creating resources to complete your project
![]() Setting resource availability
Setting resource availability
![]() Benefitting from resource groups and shared resources
Benefitting from resource groups and shared resources
Projects utilize people, equipment, and materials, and these people, equipment, and materials are called project resources.
Using resources wisely is the delicate art of combining the right resources with the right skills and assigning those resources to invest the right amount of time (or units) for tasks. And you have to do this without overbooking anyone or anything at any point in the schedule.
A resource, because it affects timing and costs, is a big deal in Project. For this reason, many tools are available to help you create resources, specify how and when they’ll work, assign them to tasks, manage their costs, and manipulate their workload. The first step in working with resources is to create them and enter certain information about them. That’s what this chapter is all about.
Resources: People, Places, and Things
Many people hear the word resources and think that it means people. Well, people are indeed frequently used as project resources, but they’re only part of the story. Resources can also consist of equipment you rent or buy or materials such as wood or iron. You can even create resources that represent facilities you have to rent by the hour, such as laboratories or meeting spaces.
Here are some typical project resources (and one not-so-typical resource):
- Engineer
- Office supplies
- Hotel ballroom
- Administrative assistants
- Furniture
- Computer software
- Graphical designer
- Rocket fuel
You get the picture. Resources can be practically anything or anyone that you use to complete your project.
 You can also create a resource as a cost placeholder if you’re tracking costs using Project. For example, you might assign a resource named Plant Visit a cost of $1,750 to cover airfare, hotel, and rental car charges for the visit.
Becoming Resource-Full
After you create and organize the tasks in your project, the next step, typically, is to create its resources. Before you create resources in Project 2019 willy-nilly, though, you must understand how they affect your project.
Understanding resources
First and foremost, a resource is an asset that helps accomplish a project, whether the asset is a person, a piece of equipment, a material, or a supply. One aspect of working with resources effectively is to manage the workflow of any resource that has limited time availability for your project. When you create resources, you indicate their availability by hours in the day or days of the week. For example, one person may be available 50 percent of the time, or 20 hours in the standard 40-hour workweek, whereas another may be available full time (40 hours). When you assign these kinds of resources to your project, you can use various views, reports, and tools to see whether any resource is overbooked at any point during the project. You can also see when people are sitting around, twiddling their thumbs, or when they may be available to help on another task. You can even account for resources that work on multiple projects across your organization and ensure that they’re being used efficiently.
Another aspect of working with resources effectively is understanding how the number of resources you assign to work on a task affects the duration of that task. In other words, if you have a certain amount of work to perform but few people to do that work, a typical task takes longer to finish than if scads of folks are available.
The task type determines whether a task’s duration changes based on the number of resources assigned to it. Remember: The task type can be fixed units, fixed duration, or fixed work. (Chapter 5 describes task types in more detail.)
Finally, resources add costs to a project. To account for costs in your project — such as a person working many hours on a task, computers that you have to buy, or services that require fees — you must create resources and assign them to one or more tasks. I discuss project costs in Chapter 10.
Resource types: Work, material, and cost
For the purposes of resource planning, Project recognizes only these three types of resources:
- Work: This person, such as a programmer or plumber, can be reassigned but not depleted. Work resources are assigned to tasks to accomplish work.
- Material: Material has a unit cost and doesn’t consume working hours, but it can be depleted. Examples of material costs are steel, wood, and books.
- Cost: Using a cost resource gives you the flexibility to specify the applicable cost, such as travel or shipping, every time you use the resource.
Deciding which resource type to use when adding an external vendor or equipment resource to the project can be tricky. If you want to avoid adding hours of work to the project when that resource is being used, don’t set up the resource as a work resource. Use a cost resource or fixed-cost approach instead.
How resources affect task timing
Under Project 2019’s default settings, effort-driven scheduling is turned off for both manually and automatically scheduled tasks. So no matter how many work resources you assign, the task duration stays the same and Project piles on more hours of work for the task, to reflect more effort.
However, in some cases of a fixed-unit or fixed-work task type, the addition or removal of resources assigned to the task should have an impact on the time it takes to complete the task. In essence, the old maxim “Two heads are better than one” may be modified to “Two heads are faster than one.”
Suppose that one person is assigned to the Dig Ditch task, which requires four hours of effort. Two people assigned to the Dig Ditch task will finish the job in two hours because two hours are being worked by each resource simultaneously, which achieves four hours of effort in half the time. To make scheduling a task work this way, you first have to change the task to an auto-scheduled task by clicking the Auto Schedule button in the Tasks group on the Task tab. Then you have to turn on effort-driven scheduling by double-clicking the task, clicking the Advanced tab in the Task Information dialog box, selecting the Effort Driven check box, as shown in Figure 7-1, and then clicking the OK button. (I discuss effort-driven tasks in Chapter 5.)
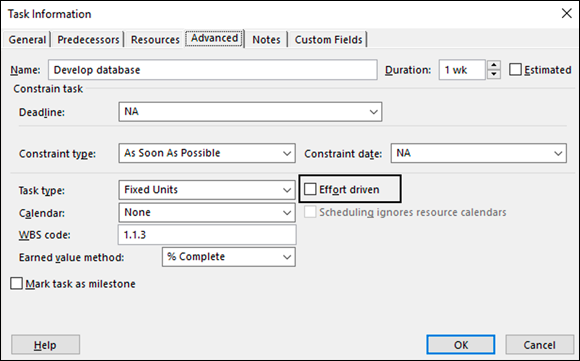
FIGURE 7-1: The Effort Driven check box.
 Assigning additional people to tasks doesn’t always shorten work time proportionately, even though that’s how Project calculates it. When you have more people, you also have more meetings, memos, duplicated effort, and conflicts, for example. If you add more resources to a task, consider also increasing the amount of effort required to complete that task to account for inevitable workgroup inefficiencies.
Estimating resource requirements
You usually know how many material resources it takes to complete a task: In most cases, you can use a standard formula to calculate the number of pounds, tons, yards, or another quantity. But how do you know how much effort your work resources must invest to complete the tasks in the project?
Include a certain amount of extra material resources if you think you will need it for rework or scrap.
As with many aspects of information you put into a Project schedule, determining the level of effort rests to a great degree on your own experience with similar tasks and resources. Still, remember these caveats:
- Skill counts. A less skilled or less experienced resource is likely to take more time to finish a task. Experiment — increase the duration by 20 percent for a less skilled resource, for example, or reduce it by 20 percent for a more skilled resource.
- History repeats itself. Look at previously completed projects and tasks. If you’ve tracked people’s time, you can likely see how much effort was required in order to complete various types of tasks on other projects and draw parallels to your project. This technique for estimating effort duration is similar to analogous estimating, covered in Chapter 5.
- Ask and you shall receive. Ask the resources themselves to estimate how long they think a task will take. After all, the people doing the work should know best how long it takes.
Allow for reserve time in a project to account for unforeseen circumstances, such as resources being less skilled than you had planned. To ensure that milestone dates are met, many people add a task called Contingency Reserve or Buffer to their schedules immediately before a milestone delivery or the end of a phase. See Chapter 12 for more information on contingency reserve.
The Birth of a Resource
Just as someone fills out the birth certificate whenever a baby is born, a form is filled out whenever a resource in Project is born (that is, created). On the Resource Information form, you enter information such as the resource name, the availability, and the rate per hour or cost per use. You can also enter optional information, such as the group (company workgroup) to which the resource belongs or the resource’s email address.
You can create a resource as a single person or entity, a generic resource (such as a skill set with no person assigned, such as Assistant or Engineer), or even a group of several resources that work together. Many times in the early stages of project planning, you know only the resource skill you need, to be replaced later by a named individual who has both the time and the qualifications to complete the task.
Creating one resource at a time
On the simplest level, a resource is created as a single entity — a particular person or a meeting room or a piece of equipment. You create the resource by entering information in the Resource Information dialog box.
When you create a resource, you must type, at minimum, the resource name, though you can also add as much information as you want. Some people prefer to create all the resources first and add contact and cost information later. In Chapter 10, I describe in detail how to add the cost information for resources.
To create a resource using the Resource Information dialog box, follow these steps:
Click the bottom of the Gantt Chart button on the Task tab in the View group of the Ribbon, and click Resource Sheet.
At that point the view changes to Resource Sheet View.
Double-click a blank cell in the Resource Name column.
The Resource Information dialog box appears, as shown in Figure 7-2.
- Type a name in the Resource Name text box.
Click the down arrow in the Type box (on the right) to choose Work, Material, or Cost.
The settings that are available to you differ slightly, depending on which option you choose. For example, a material resource has neither the Email nor Logon Account option, and a work resource or cost resource has no Material Label option.
For a material resource, enter a description of the units in the Material Label field.
For example, you might enter pounds for a Flour resource or tons for a Steel resource.
In the Initials field, type an abbreviation or initials for the resource.
If you don’t enter anything, the first letter of the resource name is inserted when you save the resource.
Continue to enter any information you want to include about the resource.
This information may include an email address, the group type (a department, division, or workgroup, for example), booking type (proposed or committed), or code (such as a cost-center code).
If you enter information in the Group field, you can then use the Filter, Sort, and Group By features to look at sets of resources. (See Chapter 11 for more about filtering and working with groups.)
- Click the OK button to save the new resource.
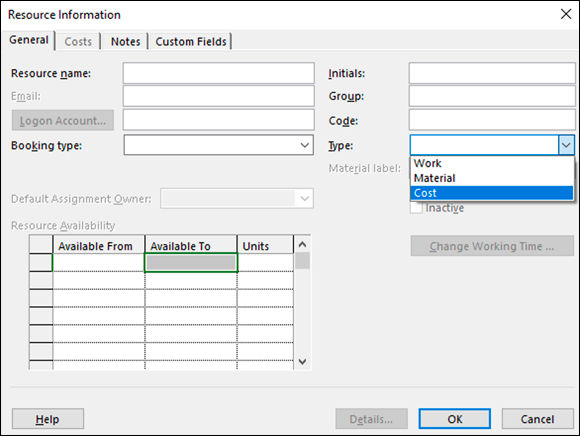
FIGURE 7-2: These four tabs can hold a wealth of information about any resource.
To enter information about several resources at a time, display Resource Sheet view and enter information in the columns. You can even paste resources copied from another source (such as an Excel spreadsheet) into this view.
Identifying resources before you know their names
In the planning stages of a project, you often find that not all resources are assembled. Even well into the project, sometimes you don’t know what resource you’ll be using; you know only that you need a resource with a certain skill set to complete upcoming tasks. In this case, consider creating certain resources as generic resources.
To create a generic resource, give it a name that describes its skill, such as Engineer, Security Personnel, or even Meeting Space (rather than a specific resource named Conference Room B). Then, in the Resource Information dialog box, be sure to select the Generic check box, as shown in Figure 7-3. No formula exists for using the Generic setting to recalculate your schedule based on resource availability. However, many people find this setting useful when they use rolling wave planning or when they aren’t responsible for specific resource assignments (for example, assigning a temporary worker to a task when a temporary-hiring agency will choose the specific worker). For a refresher on rolling wave planning, see Chapter 3.
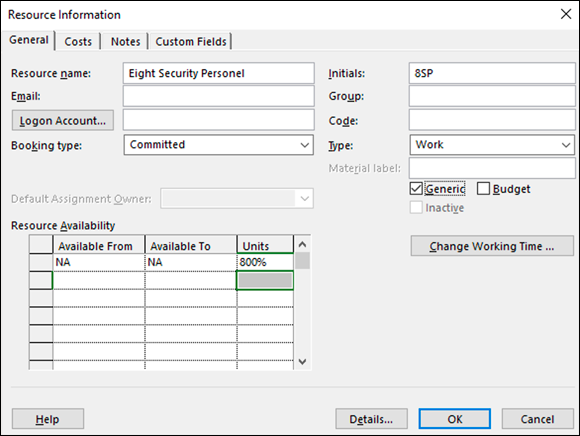
FIGURE 7-3: Consolidated resource.
You can replace a generic resource name with the name of the resource that’s added to your project. For example, if you enter Security Personnel as a resource, you can replace it with Jim Taylor, the name of the security professional who will do the work. To make the switch, go to Resource Sheet view and, in the Resource Name column, click the cell for the resource, type the new name, and press Enter. Don’t worry if you’ve already assigned the generic resource to tasks in the project. Project updates all assignments with the new name.
Many hands make light work
Rather than assign people individually to a task, you can assign a group of people who typically work together. Being able to make a single assignment of a consolidated resource rather than several separate resources and assignments can be a time-saver in larger projects.
Suppose that you need eight security personnel for the Youth Center event, and you create a Security Personnel resource. This functions as a consolidated resource that represents eight individual resources. In the Resource Information dialog box you enter 800% in the Units column in the Resource Availability box to indicate eight full-time resources.
No special setting is used to designate a multiple resource. However, you may want to indicate the number of resources by adding it to the resource name. For example, name your security personnel resource Eight Security Personnel. The defining factor in this type of resource is the maximum number of assignment units: 800% signifies eight resources in the group. Figure 7-3 shows Security Personnel with the Generic check box selected and the units at 800%.
Assigning a resource at less than 100 percent units creates a part-time assignment. Of course, another option is to keep the resource in the pool at 100 percent and assign them only part time to a task. It’s your choice.
Managing Resource Availability
Lots of Project 2019 features handle resources — in particular by helping you spot resource overallocation. Overallocation is a calculation, based on the resource’s calendar and availability, indicating that too much work has been assigned based on availability.
Consider Monica Mendez, an engineer who works a standard eight-hour day based on her calendar. Monica is assigned to the Write Final Report task at 50 percent of her availability and to the Create Design Specs task — which occurs at the same time as the report task — at 100 percent of her availability. Monica is now working at 150 percent of her availability, or 12 hours per day. Poor Monica is overbooked. Be careful — she might even quit the project.
A resource is assigned to a task at 100 percent availability (or units) by default, but you can modify that setting if you know that a resource will be assigned to several tasks and can only spend a limited amount of time working each one.
Estimating and setting availability
Availability is easier to estimate for some resources than for others. A manager is unlikely to devote an entire day to any single task, because he has to deal with all the employees who report to him and also sign authorizations, attend meetings concerning various projects, and develop budgets, for example. A production worker’s availability may be simpler to pin down to a single task: If one manufacturing job spends three days on the line and one person is working on the line the entire time, it’s more accurate to say that she is working on that task full time.
One mistake made by Project beginners is to overthink availability. Of course, no one spends eight hours every day on a single task in a project. Employees spend part of their workdays reading email, chatting with coworkers, and answering phone calls about issues unrelated to their projects. A resource may spend seven hours on a task one day and only three hours the next. Don’t get hung up on a day-by-day resource schedule when estimating availability. If, over the life of a task, the employee focuses on it, 100 percent availability is an appropriate setting. If that person works only five days on a ten-day task, however, that’s 50 percent availability, whether she works four hours per day for ten days or five full days at any point.
 The Units (availability) setting helps you spot the overbooking of a resource who may work on multiple tasks at the same time in a project schedule.
To set default resource units to specify availability, follow these steps:
- Display the Resource Sheet view.
- Click the Max column for the resource.
Type a number representing the percentage of time that the resource is available to work on the project.
For example, type 33 for a resource who’s available one-third of the time or 400 for a resource who can provide four full-time workers. (Entries greater than 100 percent represent resources that provide a group or team to handle assignments.) The most common entry (the default) is 100 for a single resource working full time on assignments in the project.
Press Enter or Tab.
The entry is completed.
Note that this only works for resources whose type is set to Work.
When a resource comes and goes
In addition to being available to a project only a certain percentage of the time (say, 50 percent of the project’s entire duration), a resource may be available for only a certain period of time (perhaps April–June) during the life of the project — commonly, when you use a resource borrowed from another department or when you’re working with a freelancer who’s squeezing in your project with others. Another possible resource is one who’s available half time for the first few days of the project and then full time for the remainder. In this case, you enter a date range in the Available From and Available To columns of the Resource Availability area in the Resource Information dialog box, as shown in Figure 7-4, to specify varying availability.
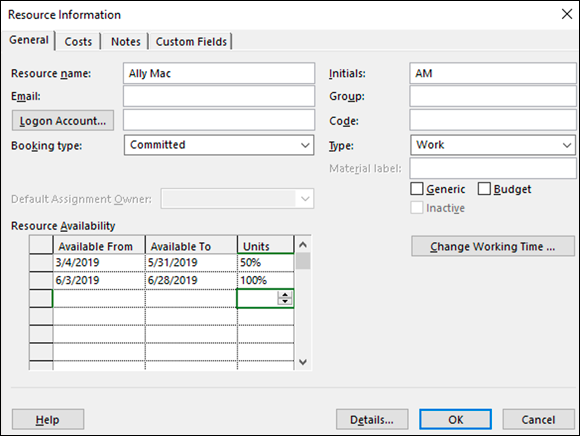
FIGURE 7-4: Time periods and units of availability.
To specify a limited period during which a resource is available to work on your project, follow these steps:
- Display the Resource Sheet view.
Double-click a resource.
The General tab of the Resource Information dialog box appears (refer to Figure 7-4).
- Use the Available From and Available To columns (in the Resource Availability area) to specify the period of availability.
In the Units column in the same row, either click the arrows to raise or lower the availability in 50 percent increments, or type a number.
Press Enter to finish the entry.
- Repeat Steps 3 and 4 to specify additional periods of availability on subsequent rows in the Resource Availability area.
- Click the OK button to save the changes.
Sharing Resources
Many organizations manage lots of projects at the same time. Sometimes, a project is the only project of its type in a company, such as organizing an office move. Other projects, such as a building design project in an architectural firm, happen simultaneously with several other, similar projects and draw on many of the same resources, such as architects and draftspeople.
When an organization engages in projects of a similar nature at the same time, drawing from a centralized resource pool can save it time because it doesn’t have to create resources that already exist. Tracking resources across projects can also be helpful.
You can use another time-saving Project feature to pull existing resources from a company address book or from your own Address Book in Outlook.
Skimming from resource pools
If you use Project throughout your company, you may have a resource pool, a centralized repository of common resources that allows project managers to assign those resources to their various projects. By using a resource pool, you can form a more realistic idea of how busy resources are across all projects at any time.
Don’t confuse resource pools with enterprise resources, which require that you set up Project Professional, Project Server, and Microsoft Office Project Web App. A resource pool is simply a Project file that contains only a list of resources in Resource Sheet view and is saved on a shared network drive for your workgroup or on your company server. Anyone with access to the resource pool file can assign the resources it contains to projects. A resource pool saves everybody the trouble of having to repeatedly create these resources in his or her individual projects.
To access a resource that’s available to your entire organization, follow this procedure:
Open the resource pool file and then open the file that will be the sharer file.
See the earlier sidebar “Creating sharer files” for information about the resource pool and sharer file.
Working in the sharer file, choose Resource ⇒ Resource Pool ⇒ Share Resources.
The Share Resources dialog box appears.
Specify the resources for the project.
If you want to specify that a project will use only its own resources (the default setting), select the Use Own Resources option. If you want to share resources, select the Use Resources option and then choose a project from the From list.
Specify what Project should do when a conflicting resource setting, such as the resource base calendar, exists.
If your project’s setting will take precedence, select the Sharer Takes Precedence option. If you want the pool setting to rule, select Pool Takes Precedence.
Click the OK button to complete the process.
All resources in the specified resource pool are added to your own project’s resource list, ready to be assigned to tasks.
After you add a shared resource to your project, you can update shared resource information, in case the person who maintains those shared resources has made a change, such as increasing the resource’s rate per hour. To do this, choose Resource ⇒ Resource Sharing ⇒ Refresh Resource Pool.
If you combine separate projects into one master project at any point, Project allows you to have duplicated resources. If you link the combined projects and then delete a duplicate resource in the master project, it’s deleted in the subproject as well. A better practice is to have all the separate projects share resources from a resource pool so that no duplicate resources exist when you create the master project file.
Importing resources from Outlook
Project allows you to save yourself the time spent entering resource information by allowing you to pull resources from Outlook.
To pull resources from Outlook, you must have it specified as your default email program: Open Outlook, and when you’re asked whether you want it to be your default program, say yes.
When you insert one or more Outlook resources into your project, they’re added to your project list, using the resource name and email address as they exist in the Outlook Address Book. The default first-letter initial and work type are also preassigned. You can then add to the resource any details you like.
To insert resources from your Outlook Address Book, display Resource Sheet view and follow these steps:
Go to the Resource Tab on the Ribbon. In the Insert group, click Add Resources, and then click Address Book.
The Select Resources dialog box appears.
- Click the name of a resource in the Name list.
- Click Add to place the selected name in the Resources list.
- Repeat Steps 2 and 3 to add to your project all the resource names you want to import.
- When you’re finished, click the OK button.
The names now appear in the project resource list, ready for you to assign them to tasks.