
Chapter 3
Becoming a Task Master
IN THIS CHAPTER
![]() Creating summary tasks and subtasks
Creating summary tasks and subtasks
![]() Moving tasks
Moving tasks
![]() Collapsing and expanding tasks
Collapsing and expanding tasks
![]() Creating milestones
Creating milestones
![]() Deleting tasks and inactive tasks
Deleting tasks and inactive tasks
![]() Entering a task note
Entering a task note
The foundational unit in a project schedule is the project task; everything starts with it. After you identify and document your tasks, you can work with resources, dependencies, costs, durations, and other elements.
To be an effective task master, you need to be nimble in managing your tasks: Determine how to summarize work with a summary task, move work around, start and stop work in the middle of a task, and do all kinds of other tricks that help your schedule reflect what you want to happen on your project.
Creating Summary Tasks and Subtasks
When you look at a project work breakdown structure, also known as WBS (refer to Chapter 2), or a project task list, such as the one shown in Figure 3-1, you see that it organizes tasks into levels. The upper levels are from the WBS. The lower level consists of tasks that have been decomposed from the WBS. A task that has other tasks indented below it in this outline structure is a summary task, or parent task. The tasks indented below the summary task are sometimes known as subtasks or child tasks. Summary tasks are indicated in bold in the Project outline. You can tell when a summary task has a family of subtasks clinging to its skirts: When a subtask is hidden, a little clear triangle is displayed to the left of the summary task. When you click the triangle with the tip of the pointer, the task expands to show its whole clan of subtasks, and the summary task adds a black triangle to its left.
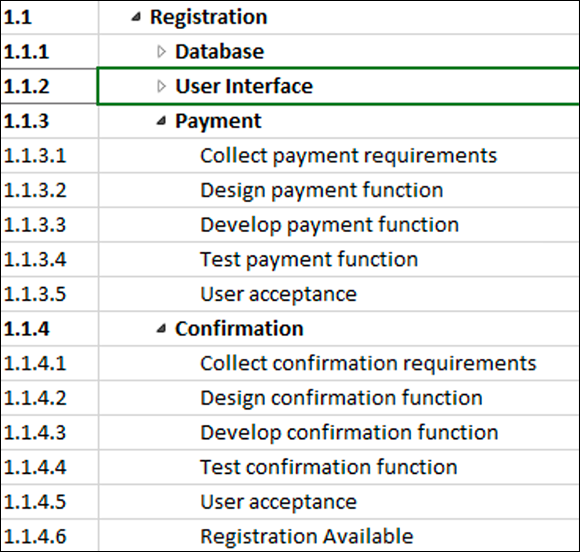
FIGURE 3-1: Project outline, showing summary tasks and subtasks.
In Figure 3-1 you can see that the summary tasks of Database and User Interface have hidden subtasks. The Payment and Confirmation summary tasks show all their subtasks.
All information about a family of tasks is rolled up into its highest-level summary task. Therefore, any task with subtasks has no timing or cost information of its own: It gathers its total duration and cost from the sum of its parts.
This roll-up functionality is cumulative: The lowest-level task rolls up to its parent, which might roll up into another summary task, which rolls up (for example) into a project summary task. Any task with tasks below it gets its duration and cost information from a roll-up of its subtasks, no matter how deeply nested it may be in the hierarchy.
 The structure of families in an outline is also useful when you need to reorganize an outline: When you move a summary task, all its subtasks come right along for the ride, regardless of whether it’s expanded!
If a summary task is manually scheduled, the roll-up functionality doesn’t work, and Project displays warnings telling you so. The Gantt bar for the summary task has a red warning bar that shows you the calculated duration of the subtasks when they don’t match up with the summary task’s duration. The summary task’s Finish field entry also has a red, squiggly underline to indicate a potential scheduling problem. To deal with this situation, you can change the summary task to use auto-scheduling, in which case it calculates roll-up data correctly. If you want the summary task to continue to be manually scheduled, you can edit its finish date or use the Task Inspector as described in Chapter 11 to fix the summary task schedule.
How many levels can you go?
You have no practical limit on how many levels of tasks you can create in an outline. Project enables you to indent to more levels of detail than you’ll need for all but the most complex schedules. Remember, though: At some point, you have to deal with assigning timing and resources to each of these tasks and then track their progress. Too much detail can make your schedule difficult to manage. For example, if your project is a few months long, you don’t want to track to a level where tasks last only a few hours. Best practices suggest that you always set up your schedule to the level to which you want to manage your team — typically, business (working) days or weeks.
For longer projects, you can schedule by using rolling wave planning, a method of progressively elaborating the amount of detail for near-term work and keep at a higher level any work that’s further out. For example, if you have a two-year project, you may have the first three months planned out in detail, the next three months at a higher level, and the remainder of the project schedule showing only milestones and key deliverables. As you progress through the project, you start to add more detail for six months and beyond. A good rule of thumb is to keep a good amount of detail for 90 days out.
 Rolling wave planning isn’t an excuse to add scope; it’s only the elaboration of existing scope.
The project summary task
Just as a ship has only one captain, only one task summarizes all other tasks in a project. I strongly suggest that you display the project summary task, which represents the highest (least detailed) level of information and is often simply the title of the project, such as New Product Rollout. When you tell Project to display the project summary task, every task in the project falls under it in the outline, as shown in Figure 3-2.
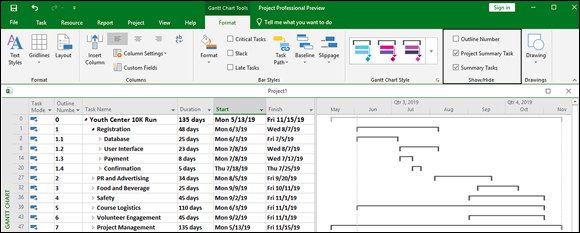
FIGURE 3-2: The project summary task.
As you build your project, you can easily create a project summary task yourself (indent other tasks beneath it) or use a Project feature to generate one automatically at any time — even after you build all the phases of your project. To have Project automatically display a project summary task, follow these steps:
- In the Gantt Chart view, select the Gantt Chart Tools Format context tab.
- In the Show/Hide group, select the Project Summary Task check box.
As you can see in Figure 3-2, Task 0, Youth Center 10K Run, is the project summary task. Notice that the bar for the project summary task on the chart is gray and that the bars for other summary tasks are black.
When you think about it, an upper-level headline in an outline is the sum of its parts: The headline reflects the overall topic for all items below it. The project summary task advances this concept a step further: This task rolls up all actual data from other tasks into one line item. Thus, the project summary task’s duration reflects the duration of the entire project. From a monetary angle, the project summary task’s total cost reflects the total costs for the entire project. Figures such as these can be handy to have at your fingertips — and that’s one value of a summary task.
 If you’re confused about the length of your summary task, remember that the summary task duration is the difference between the earliest task start date and latest task end date. However, nonworking days aren’t counted in the summary task duration. The length of the summary task, therefore, equals the number of days of work over the course of the subtasks, not the number of calendar days between the start of the first task and end of the last.
Not everyone uses project summary tasks. You can simply create, at the highest level of your outline, tasks that represent major project deliverables or phases — with subphases and subtasks below them — and not create one task that’s higher in the order than all others. However, having a project summary task has certain benefits:
- You can quickly view totals for the project at a glance in the columns of data in Gantt Chart view and other views.
- You can place a link to your project summary task in another project so that all data for one project is reflected in another. For example, if you create five schedules for new product launches in your company, you can easily create a master schedule for all company product launches by linking to the project summary tasks in each of the projects.
Moving Tasks Up, Down, and All Around
In Chapter 2, I show you how to outdent and indent tasks to create the WBS and the project outline. In this section, I show you additional ways to move tasks, collapse and expand tasks, and set up recurring tasks.
A maxim of project management says that things change: Tasks that you thought you could complete early can’t happen yet because money, people, or materials are in short supply. Or a task that you thought you couldn’t start until next July gets bumped up in priority when your customer changes his mind (again) about deliverables. Because of this changeability, when you enter tasks in a project outline, odds are that you’ll need to move those tasks around at some point. You should understand that moving a task can change its outline level, so you’ll need to check your outline level for tasks that you move and adjust as necessary using the indent and outdent features.
Moving tasks with the drag-and-drop method
If you ask me, drag-and-drop is to computing what the remote control is to television. It’s a quick, no-brainer method of moving stuff around in software that just makes life simpler. Here’s an example:
To move a task up and down with the drag-and-drop method, follow these steps:
- Display a column view, such as Gantt Chart view.
Select a task by clicking its task ID number.
Simply click and release; don’t hold down the mouse button.
Click and drag the task to wherever you want it to appear in the outline.
A gray “T-bar” line appears, indicating the new task position.
When the gray line is located where you want to insert the task, release the mouse button.
The task appears in its new location. If you want the task to be at a different level of the outline, you can now indent or outdent it as needed.
If you move the parent task, all the child tasks, and all the relevant information — such as start, finish, duration, cost, and so on — come with it.
Moving tasks with the cut-and-paste method
Dragging and dropping works fine in most cases, but in very large projects — with a few hundred tasks or more, for example — it’s easier to cut and paste instead of scrolling through hundreds of tasks to find the exact location you want to move your tasks to.
In a larger outline, use the cut-and-paste method to move tasks:
- Select a task by clicking its task ID number.
Click the Cut button in the Clipboard group on the Task tab.
The task is removed from its current location and placed on the Windows Clipboard.
- Scroll to display the location where you want the task to appear.
- Click the task after which you want to insert the task.
- Click the top part of the Paste button, also on the Task tab.
If you want to insert a copy of a task in a project outline, you can follow the preceding steps and click Copy rather than Cut.
If you’re cutting and copying only a single cell and not a whole task, click in the cell rather than click the task ID number.
You can use the standard Microsoft shortcuts Ctrl+C to copy, Ctrl+X to cut, and Ctrl+V to paste.
Now You See It, Now You Don’t: Collapsing and Expanding the Task Outline
Remember in grade school when your teacher made you create an outline to organize your work? The outline helped you arrange content and allowed you to focus on different levels of information to keep everything organized.
With the invention of computer outlining, the capability to focus on only certain portions of an outline comes into its own, because you can easily expand and collapse an outline to show or hide different levels of information — or entire sections of your outline. The black triangle symbol next to the Payment summary task in Figure 3-1 indicates that all subtasks below it are displayed. The clear triangle next to the User Interface label indicates that the subtasks aren’t displayed. Remember that all summary tasks are in bold in the project outline.
This capability means that you can hide all but the upper level of tasks in a project to give your manager an overview of progress. Or you can collapse every phase of your project except the one in progress so that your team can focus on only those tasks in a status meeting. Or you can collapse most of your outline to make it easy to move to a late phase of a very large schedule.
If you want to hide all the summary tasks and just see the child tasks, you can go to the Gantt Chart Tools Format context tab and uncheck the Summary Tasks box (see Figure 3-2). Another nifty feature in Project is the ability to choose which level of detail you want to see in your outline. To wrangle the tasks to the level you want them, it’s best to work with the View tab. In the View tab under the Data group, there is a drop-down option called Outline. Figure 3-3 shows you the commands you can use to control how your outline appears.
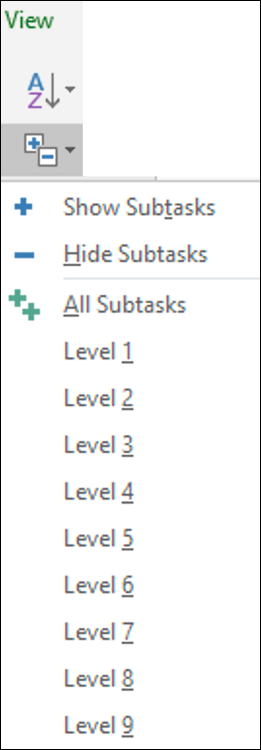
FIGURE 3-3: Outline options.
You can use the Show Subtasks command and the Hide Subtasks command at any level of summary tasks. Just select the summary task you want — regardless of whether it’s at Level 1 or Level 5 — and click Show Subtasks to see everything underneath, or click Hide Subtasks to just see the summary task.
When you want an overview of your project, it’s helpful to look at it from Level 1 or Level 2. You can see our 10K Run at Level 1 in Figure 3-4. Notice the duration for each of the summary level tasks. You can see how they nest within the Project Summary Task.
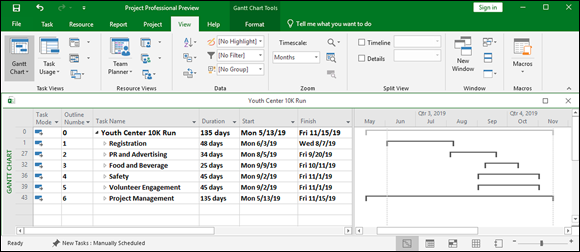
FIGURE 3-4: Level 1 Outline for 10K Run.
Figure 3-5 shows Registration and PR & Advertising at Level 2. This level gives you a good overview of the project with a bit more detail than Level 1. Using the concept of progressive elaboration I cover earlier in this chapter, I show more detail for the work that is happening in the immediate future and leave the work that is further out with less detail. Level 2 is the view I like to show management or other high-level stakeholders to give them an overall understanding of the project.
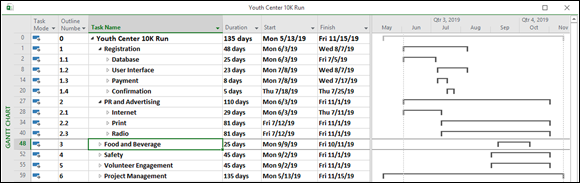
FIGURE 3-5: Level 2 Outline for 10K Run.
To quickly reveal all subtasks in a project, click the Outline button and then click All Subtasks.
To show subtasks from the keyboard, you can press Alt+Shift+* (asterisk). To hide subtasks, you can press Alt+Shift+- (hyphen) or Alt+Shift+– (minus sign) if you’re using the numeric keypad.
Showing Up Again and Again: Recurring Tasks
Some tasks occur repeatedly in projects. For example, attending a monthly project debriefing or generating a quarterly project report is considered a recurring task.
No one wants to create all the tasks for the monthly debriefing in a project that will take a year to complete. Instead, you can designate the recurrence, and Project automatically creates the 12 tasks for you.
Here’s how to create a recurring task:
Click the Task tab on the Ribbon, click the bottom part of the Task button (with the down arrow) in the Insert group, and then click Recurring Task.
Figure 3-6 shows the Recurring Task Information dialog box that will insert a recurring task for a monthly meeting on the 14th of every month. The meeting is scheduled to occur every month from May through November.
- In the Task Name box, type a name for the task.
In the Duration box, click the spinner arrows to set a duration, or type a duration, such as 1d for 1 day.
Edit the abbreviation to specify a different time unit, if needed.
You can read about the abbreviations that you can use for units of duration — such as h for hours — in Chapter 5.Select a recurrence pattern by selecting the Daily, Weekly, Monthly, or Yearly radio button.
The option you select provides different choices for the rest of the recurrence pattern.
Depending on the selections offered to you, make choices for the rest of the pattern.
For example, if you select the Weekly radio button, you must choose a Recur Every x Week(s) On setting and then choose a day such as Friday. Or, if you select Monthly, you must specify which day of every month the task is to recur.
In the Range of Recurrence area, type a date in the Start box; then select and fill in either the End After or End By option.
For example, you might start on January 1 and end after 12 occurrences to create a task that occurs every month for a year.
- Click the OK button to save the recurring task.
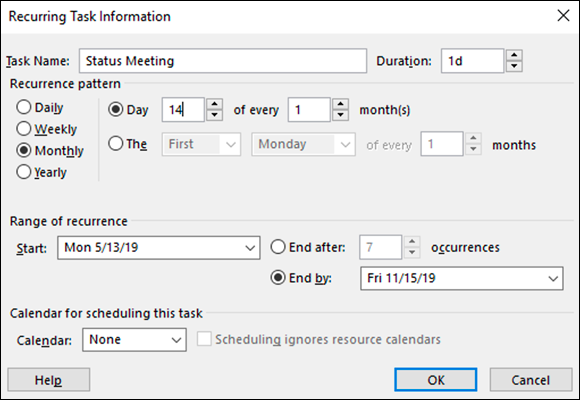
FIGURE 3-6: The Recurring Task Information dialog box.
If your settings cause a task to fall on a nonworking day (for example, if you choose to meet on the eighth day of every month and the eighth day is a Sunday in one of those months), a dialog box appears, asking you how to handle this situation. You can choose not to create the task, or you can let Project adjust the day to the next working day in that period.
To assign resources to a recurring task, you have to assign the resources to the individual recurrences, not to the “summary” recurring task. If you assign resources to the summary recurring task, Project doesn’t calculate the hours of work correctly. I talk about assigning resources to tasks in Chapter 9.
Setting Milestones
Milestones are signposts that mark significant events. Examples of milestones are the approval of a prototype (although the deliberations to make that decision might have taken months), the completion of a key deliverable, or the start or end of a project phase.
Some people include tasks such as Design Completed or Testing Completed at the end of each phase of their projects. They can then create timing relationships to the moment of completion — for example, allowing the production of a drug to proceed after the testing and approval is complete. Such milestones also alert you and your team members to a moment of progress in your project that can help keep the team motivated.
Project creates new tasks with an estimated duration of one day unless you enter a duration. To create a milestone, you indicate that the task has zero duration. An easy way to do this is to simply type 0 in the Duration column in Gantt Chart view. When you do, the milestone is designated in Gantt Chart view with a diamond shape rather than a taskbar. You can also click Milestone in the Insert Group on the Task tab of the Ribbon. As shown in Figure 3-7, a new task will show up that says <New Milestone>. Finally, you can click the Advanced tab in the Task Information dialog box and select the Mark Task As Milestone check box. Use this latter method for any milestone that has a duration other than zero but that you want to mark as a milestone anyway; its milestone marker is charted at the end of the duration period on the Gantt chart.
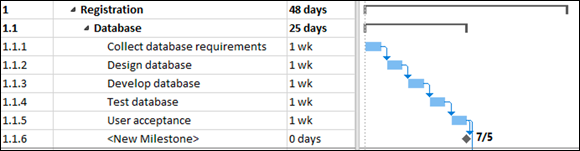
FIGURE 3-7: Creating a new milestone.
Deleting Tasks and Using Inactive Tasks
If your style is to delve into a lot of planning detail for everything you do, you may tend to overanalyze and add more tasks than you need to track in a project plan. In such cases, when you’re refining the project plan, you may decide that you need to delete a task or two to tighten up the plan. After all, the process of planning includes not only decomposing the work, but also consolidating tasks when they become too detailed. To delete a task, click its row (Task ID) number at the left side of the sheet and press the Delete key.
Project doesn’t display a warning or ask you to confirm deleting a task, so make sure that you really mean it when you press Delete. If you screw up, click the undo arrow in your Quick Access toolbar or press Ctrl+Z immediately to restore the deleted task. Also, be sure to check that any task dependencies (links) adjust as needed after you delete the task.
Another approach is to mark a task as inactive. Doing this leaves the task visible in the plan but strikes it out in the task sheet and on the Gantt chart, as shown in Figure 3-8. If any automatically scheduled tasks were dependent on the inactive task, Project ignores the now-inactive task when calculating the schedules for those other tasks. Leaving an inactive task in the schedule provides another opportunity to track and document what happened. For example, you can add a note explaining why the task was removed, such as not having a budget that’s sufficient for television advertising.
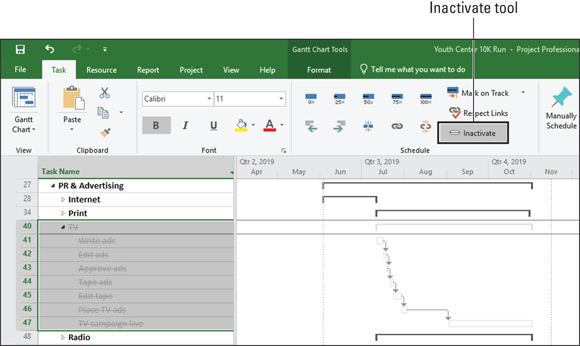
FIGURE 3-8: Marking a task as Inactive.
Follow these steps to mark a task as inactive:
- In Gantt Chart view, select the task to make inactive.
Click the Inactivate button in the Schedule group on the Task tab of the Ribbon.
Project immediately reformats the task as inactive.
Making a Task Note
Despite the wealth of information that you can enter about a task and its timing, not everything can be said with settings. That’s why every task includes an area to enter notes. You may use this feature, for example, to enter background information about constraints, detail a step-by-step process that’s summarized by the task duration, enter information about stakeholders, or list vendor contact information that’s relevant to the task.
To enter task notes, follow these steps:
Double-click a task.
The Task Information dialog box appears.
- Select the Notes tab, as shown in Figure 3-9.
In the Notes area, type any information you like.
You can enter contact information, notes about resources, or other useful information about the task.
Format the note.
Click the buttons at the top of the Notes area to change the font. You can also
- Left-align, center, or right-align text.
- Format text as a bulleted list.
- Insert an object.
Click the OK button to save the note.
You will notice that a note icon appears in the information column indicating there is now a note there.
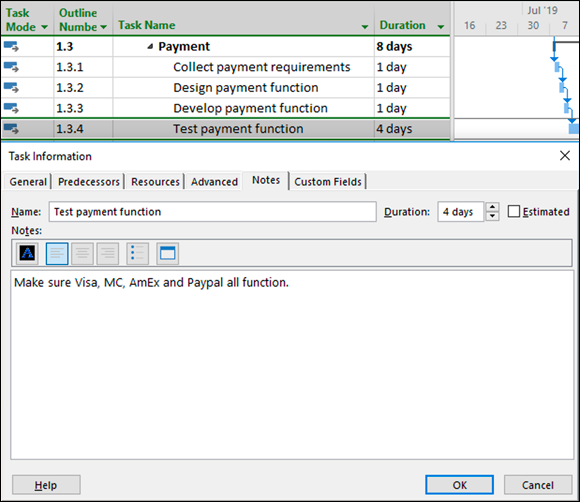
FIGURE 3-9: Task note.