
Chapter 8
Working with Calendars
IN THIS CHAPTER
![]() Exploring the base, project, resource, and task calendars
Exploring the base, project, resource, and task calendars
![]() Understanding how calendars work together
Understanding how calendars work together
![]() Setting calendar options and working times
Setting calendar options and working times
![]() Choosing the project calendar
Choosing the project calendar
![]() Working with task calendars
Working with task calendars
![]() Using resource calendars
Using resource calendars
![]() Creating your own calendar templates
Creating your own calendar templates
![]() Copying calendars to another project
Copying calendars to another project
Most people live their lives based on responding to their clocks and calendars. Think about it: You wake up, and your first thoughts are about what day it is, what time it is, and whether it’s a workday.
You have a typical workday, whether you’re a 9-to-5 person or your particular job calls for you to work from midnight to 8 a.m. You probably also vary from that routine now and then, when you complete a 12-hour marathon session in a crunch or slip away after half a day to go fishing on a nice summer day.
In a way, Project 2019 calendars resemble your work life: They set standards for a typical working time and then allow for variation. Unlike you, however, Project 2019 has several types of calendars to account for.
Mastering Base, Project, Resource, and Task Calendars
One piece of information to consider when assigning resources is when people can work. You adjust resource working time in calendars.
Setting the base calendar for a project
As I describe in Chapter 2, when you first open a new project, you enter information about the project either in the Project Information dialog box or by clicking the File Tab and working in the Project Information section of the Info screen in Backstage View. One option under project information is the Project Calendar.
You can choose among three options for the base calendar:
- The Standard (default) calendar shows a typical 8-to-5 workday and a 5-day workweek, with no exceptions such as holidays. You can think of it as the company calendar, which reflects its operating hours (when the “doors are open”).
- Night Shift shows an 8-hour workday, scheduled between 11 p.m. and 8 a.m., with an hour off for a meal, from Monday through Friday — no exceptions. You can select this calendar for resources who work the same company days but different hours.
- The 24 Hours base calendar shows continuous time, 24 hours per day and 7 days per week.
Understanding the four calendar types
Project 2019 has four calendar types: base, project, resource, and task. Mastering the calendar types can be tricky, but understanding how calendars work is essential to mastering the software. Tasks are scheduled and resources are assigned based on the calendar settings you make.
Here’s the lowdown on the role of each of the four calendar types in Project 2019 (the next section details how they interact):
- Base: The template on which all other calendars are built. Three base calendars are available: Standard, Night Shift, and 24 Hours. (You can read more about them later in this chapter, in the section “Working with Task Calendars and Resource Calendars.”)
- Project: The default calendar for scheduling. You choose which base calendar template your particular project should use.
- Resource: Combines the base calendar settings with any exceptions (nonworking times, such as vacation time) that you set for a particular resource.
- Task: Provides a spot where you can set exceptions for a particular task.
You can manage calendars in a project in one of three ways: Use a project calendar that sets the working dates and times for all resources and tasks, modify calendars for specific resources, or assign and modify calendars for specific tasks.
 Don’t become confused by my use of the term project as it refers to the software, the project calendar type, and your project. I use Project 2019 to indicate the software itself, project calendar to specify the calendar type, and plain project to refer to your project.
How calendars work
Not everyone in a company works the same schedule, and not every task can be performed in the same eight-hour workday. Nevertheless, when you create tasks and assign resources to work on them, Project 2019 has to base that work on a timing standard. For example, if you say that a task should be completed in one workday, Project 2019 knows that a workday means 8 hours (or 12 hours or whatever) because that’s how you set up a standard workday in the project calendar. Likewise, suppose that you assign a resource to work two weeks on a task in a company that uses a standard five-day workweek. If that resource’s own calendar is set for a standard four-day workweek, the two weeks of work by that resource defer to the timing of the resource calendar for a total of only eight workdays. In other words, the resource calendar overrides the standard calendar.
 The nature of a task can affect resource time. A two-week, effort-driven task isn’t complete until its resources have invested two weeks (according to the project calendar or task calendar) of effort. You can find out more about effort-driven tasks in Chapter 5.
How one calendar relates to another
All calendars in a project are controlled, by default, by the project calendar setting. Here’s the tricky part, though: When you change a task calendar or resource calendar Project creates an exception to the project calendar. Thus, to have an accurate schedule you have to understand which setting takes precedence.
Here’s how the precedence concept works:
- With no other settings made, the base calendar template you select for the project calendar when you first create the project controls the working times and days of all tasks and resources.
- If you make changes in the working hours for a resource, those settings take precedence over the project calendar for that resource when you assign it to a task. Likewise, if you assign a different base calendar for a task, that calendar takes precedence over the project calendar for that task.
- If you apply one calendar to a resource and a different calendar to a task that the resource is assigned to, Project 2019 uses only common hours to schedule the resource. For example, if the task calendar allows work from 8 a.m. to 5 p.m. and the resource calendar allows work from 6 a.m. to 2 p.m., the resource works from 8 a.m. to 2 p.m., which is the only period the calendars have in common.
- You can set a task to ignore resource calendar settings by opening the Task Information dialog box (double-click the task name in Gantt Chart view) and selecting the Scheduling Ignores Resource Calendars check box on the Advanced tab. (This setting isn’t available if the task calendar is set to None.) You might make this setting if you know that all resources are required to be involved in a task (such as a quarterly company meeting), regardless of their usual work hours.
Scheduling with Calendar Options and Working Times
In this section, I throw two more timing elements at you: calendar options and working times.
Calendar options are used to change the standard settings for a working day, week, and year. You can set a project calendar to Standard, for example. By default, that’s 8 a.m. to 5 p.m., five days a week.
Working time is used to adjust the time available for work on a particular date or days. Suppose that you make a change to the calendar options so that you have 8-hour days and 32-hour workweeks. Also check your working time to ensure that you specify 3 nonworking days of the 7-day week, to jibe with the 32-hour week. If you want to set a certain date as nonworking for your project, such as the company offsite meeting day, you can do that using the working-time settings.
 To ensure that the project is scheduled accurately from the get-go, make all changes to calendar options and working times before you add tasks to the project.
You have to change the calendar options and calendar settings for every new project file you create. However, you can set up a calendar that can be used for all your projects and shared in a single global location, as explained later in this chapter, in the section “Sharing Copies of Calendars.”
Setting calendar options
When you make changes to a resource calendar or task calendar, you simply adjust the times that a resource is available to work or the time during which a task occurs; you don’t change the length of a typical workday for the project. A day is still 8 hours long if that’s the project calendar setting, even if you say that a task that takes place on that day uses the 24-hour base calendar template.
To change the length of a typical workday to ten hours rather than eight, for example, you must do so on the Calendar tab of the Options dialog box.
Follow these steps to modify the calendar options:
Select the File tab on the Ribbon and click the Options button.
The Project Options dialog box appears.
- Click the Schedule category on the left side of the Project Options dialog box, as shown in Figure 8-1.
- From the Week Starts On drop-down list, choose a day.
- To modify the start of the fiscal year, select a month from the Fiscal Year Starts In drop-down list.
To change the working hours in a typical day, type new times in the Default Start Time and Default End Time fields.
If you change the default start or end time setting, change the corresponding working time also, as described in the following section.- Modify the Hours Per Day, Hours Per Week, and Days Per Month fields as needed.
- Click the OK button to save these settings.
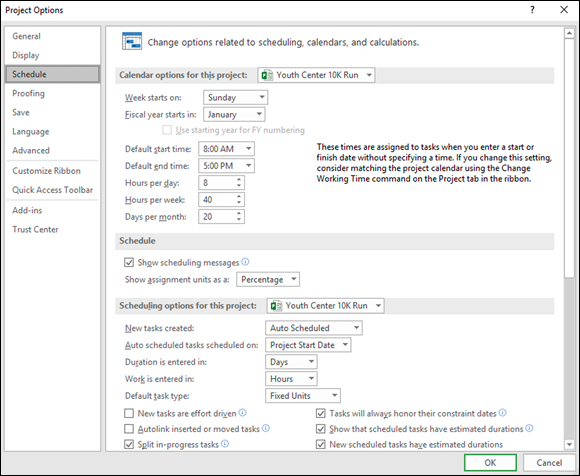
FIGURE 8-1: Define the typical working day, week, month, and year.
Worrying about every calculated hour can be tedious. Most professional schedulers avoid changing the default calendar settings. Unless you truly want to track the scheduling of tasks to the hour, simply manage tasks to the day or week and keep track of scheduled deliverables in this manner.
Setting exceptions to working times
To change the available working hours for a particular day (such as December 24), you use the working-time settings. For example, if the day before Thanksgiving is half a workday, you can modify the working-time settings for that day; then any resources assigned to a task on this date spend only half a day working. You also use these settings to specify global working and nonworking days to match the calendar options settings.
Here’s how to change working times:
On the Project tab, go to the Properties group and click the Change Working Time button.
The Change Working Time dialog box opens, as shown in Figure 8-2.
- On the calendar, click the day you want to change.
Click the Exceptions tab to display it; then click the Name cell in a blank row, type a name for the exception, and press the Tab key.
The Start and Finish dates will autopopulate with the date you selected in Step 2.
Click the exception name you entered in Step 3 and then click the Details button.
The Details dialog box for this exception opens, as shown in Figure 8-3. This example shows Thanksgiving Eve with the workday ending at 2 p.m.
- Select either the Nonworking radio button or Working Times radio button.
Enter a time range in the From and To fields.
To set nonconsecutive hours (for example, to build in a lunch break), you have to insert two or more sets of numbers (such as 8 to 12 and 1 to 5) in the From and To fields.Select a recurrence pattern and then set an interval in the Recur Every x Time Period field.
For example, if you select Weekly and click the arrows to set the interval field to 3, this pattern recurs every three weeks.
Set the range of recurrence.
Either enter Start and End By dates or select the End After radio button and set the number of occurrences there. This example ends after one occurrence.
- Click the OK button to close the Details dialog box and click OK again to close the Change Working Time dialog box. Save your changes.
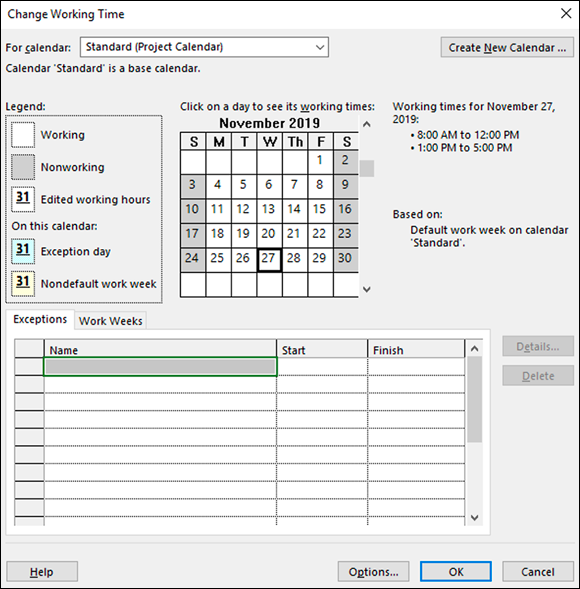
FIGURE 8-2: The standard calendar shows the default working times.
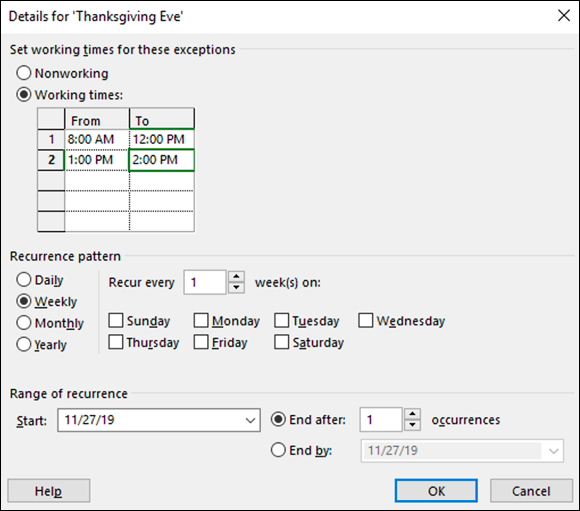
FIGURE 8-3: Modifying the default calendar.
Working with Task Calendars and Resource Calendars
You can set a task calendar to use a different base calendar template from the one you selected for the project calendar. Doing so takes precedence over the project calendar for that task. Suppose that you select the Standard calendar template for a project and a 24 Hours task calendar template. If you then specify that the task has a duration of one day, it’s one 24-hour day (assuming that the assigned resources also use a calendar allowing for a 24-hour schedule, such as machinery).
To modify the settings for a task calendar, follow these steps:
In the Gantt Chart view, double-click the task name.
The Task Information dialog box appears.
- Click the Advanced tab.
- From the Calendar drop-down list, choose a different calendar (see Figure 8-4).
- Click the OK button to save the new calendar setting.
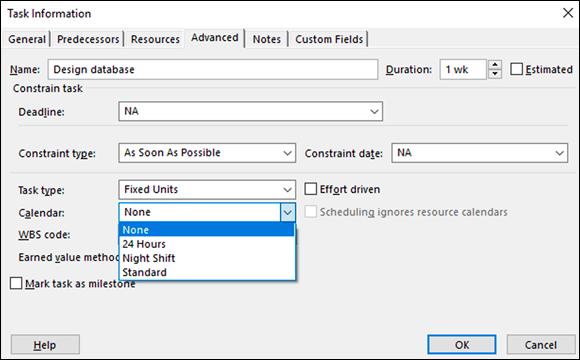
FIGURE 8-4: Changing the task calendar.
If a resource assigned to a task has a modified calendar, the resource works only during the specific hours that the task calendar and resource calendar have in common.
Setting resource calendars
Only work resources have their own calendars. That’s because material resources are charged not by time worked but by units used, and a cost resource is assigned a set cost that doesn’t relate to any time worked on a task.
Even the most resourceful resources have only so many hours in a day to work. When you have to deal with variations in resource schedules, consider modifying the resource calendars.
You can change the base calendar template for each work resource and set specific dates as working or nonworking. These exceptions take precedence over the project and task calendars, and control when a specific resource can work.
Unless a resource has a truly unique working schedule, don’t change its base calendar template. For example, if a resource usually works a day shift but works a night shift for only a few days during the life of the project, don’t change that resource’s base calendar template to Night Shift. If one person works from 10 a.m. to 7 p.m. because the company allows him to, you probably don’t have to vary his schedule from the typical 8-to-5 work schedule that’s set in the project calendar, because he works eight hours a day, like everyone else does. Unless your project deals with the most detailed level of time, where hours and not days are the typical units of measure for tasks, making these types of changes is more work than it’s worth.
Making the change to a resource’s calendar
To modify a resource’s calendar settings, follow these steps:
Display a view that includes a resource column, such as the Resource Sheet view.
Simply select the view from the drop-down list that appears when you click the bottom of the Gantt Chart button on the Task tab of the Ribbon. Chapter 6 covers how to display different views.
Double-click a resource name.
The Resource Information dialog box appears.
Click the Change Working Time button on the General tab to display the Change Working Time dialog box.
The Exceptions and Work Weeks tabs have settings that are identical to the ones in the Change Working Time dialog box for tasks, but changes made here affect this resource rather than the task.
- Click on a day on the calendar to see its working times.
Click the Work Weeks tab to display it; then click a blank row, enter a name for the exception, and press Enter.
The Start and Finish dates populate with the date you chose. If you want to edit the default workweek for all weeks of the year, leave [Default] selected instead. If you want to mark a single holiday, use the Exceptions tab instead.
Click the exception you just created, and click the Details button.
The Details dialog box for this exception appears.
Figure 8-5 shows the Detail dialog box.
Select the day or days to modify in the Select Day(s) list on the left side.
You can click the first day and then Shift+click to select a range of adjacent days, or Ctrl+click to select nonadjacent days.
- To set working times for these exceptions, select either the Nonworking radio button or Working radio button. If you chose nonworking time, click OK.
If you chose to set specific working times in Step 8, enter a time range in the From and To fields. Click OK.
To delete a row in the From and To area, click the row number and press Delete.
To set nonconsecutive hours (for example, to build in a lunch break), put two or more sets of numbers (such as 8 to 12 and 1 to 5) in the start and finish columns.Set the range of recurrence.
Change the Finish date to meet your needs, if needed.
Figure 8-6 shows how a resource’s vacation is shown in the Change Working Time dialog box.
- Click the OK button to close the Change Working Time dialog box and save these changes.
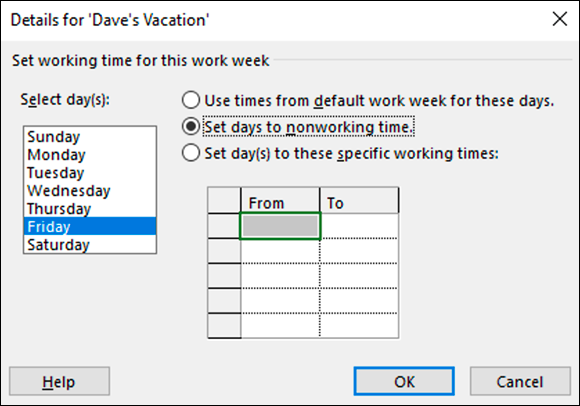
FIGURE 8-5: The Detail dialog box.
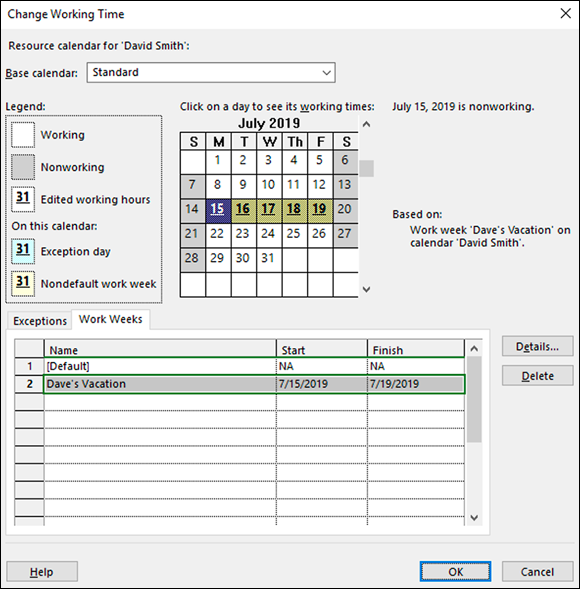
FIGURE 8-6: Changing working time on a resource calendar.
Micromanaging nonworking time for your resources can leave you no time to do anything else, so avoid this urge. For example, if someone takes off half a day for a doctor’s appointment, don’t block off a day. However, if a resource takes a two-week vacation or a three-month sabbatical, you should probably modify that resource’s calendar.
Resources can work overtime even if their calendars say that they’re 8-to-5ers, though you have to tell Project 2019 to schedule overtime work. You can also set a different rate to be charged for overtime work for that resource. To find out more about overtime rates, see Chapter 10.
Creating a Custom Calendar Template
Although the three Project 2019 base calendar templates cover most working situations, you might want to create your own calendar template. For example, if the project involves a telemarketing initiative and most project resources work six hours, from 4 p.m. to 10 p.m. (that’s when they all call me anyway!), consider creating a new calendar template named Telemarketing. Another reason to create a custom template is that the three Project 2019 calendars have no holidays specified. You may need to ensure, at minimum, that company holidays are indicated in the calendar you use to ensure that Project 2019 accurately schedules around those dates.
If you want to save some time when creating a template, start with an existing base calendar template that most closely fits your needs. Then modify it as you like by making changes to the working times and calendar options (see the section “Scheduling with Calendar Options and Working Times,” earlier in this chapter) to ensure that they’re in agreement. After you create a new calendar template, it’s available for you to apply in all three calendar types: project, task, and resource.
Because the project calendar is the basis of the entire project, it should represent the most common working schedule in the project. If only certain resources in the project work odd hours, change the resource calendars and not the project calendar.
Follow these steps to create a new calendar template:
Click the Project tab, go to the Properties group, then click Change Working Time.
The Change Working Time dialog box appears.
Click the Create New Calendar button.
The Create New Base Calendar dialog box appears, as shown in Figure 8-7.
- In the Name box, type a unique name for the new calendar.
Select either the Create New Base Calendar radio button or the Make a Copy of x Calendar radio button; then select an existing base calendar from the list on which to base the calendar template.
If you choose Create New Base Calendar, Project 2019 creates a copy of the Standard calendar with a new name. If you choose Make a Copy Of and select 24 Hours or Night Shift, the new calendar is based on that choice. Whichever you choose, it’s your starting point, and you can make changes to make the calendar unique after making this choice.Click the OK button to return to the Change Working Time dialog box.
Now make changes to the working time for the new calendar template.
- Click the OK button to save the new calendar settings.
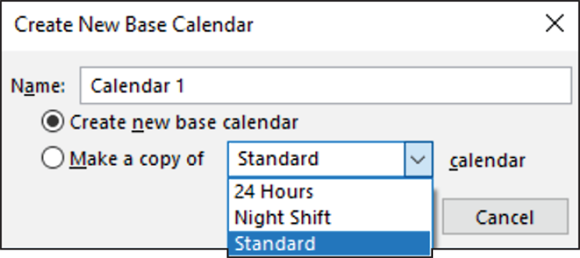
FIGURE 8-7: Creating a New Calendar
If you haven’t already done so, change the calendar options to match the working times of the custom calendar you created. You can do this from the Change Working Time dialog box, using its Options button.
Sharing Copies of Calendars
You can make a calendar available for multiple projects by using the Organizer; it serves as the control center for custom items such as calendars you create in your project files. Using the Organizer, you can copy a custom calendar from one project file into another. Or you can copy a custom calendar into a template that provides default settings to every new, blank project file you create.
To copy a calendar from one project to another, follow this procedure:
- Open the project to which you want to copy a calendar and the project file that holds the custom calendar to copy.
Choose File ⇒ Info.
Backstage view opens.
Click the Organizer button.
The Organizer dialog box appears.
- Click the Calendars tab.
- From the Calendars Available In drop-down list (in the lower-left corner), select the Project file that contains the calendar you want to copy.
- In the Calendars Available In drop-down list (in the lower-right corner), choose whether you want to make the calendar available in another open project (by selecting that project) or the Global template (by selecting
Global.MPT). In the list on the left, click the calendar you want to copy and then click the Copy button, as shown in Figure 8-8.
The calendar is copied to the current project.
- If you want to give the calendar you copied a different name, make sure that it’s selected in the list, click the Rename button, type a new name in the Rename dialog box that appears, and then click the OK button.
- Close the Organizer by clicking the X (Close) button in the upper-right corner.
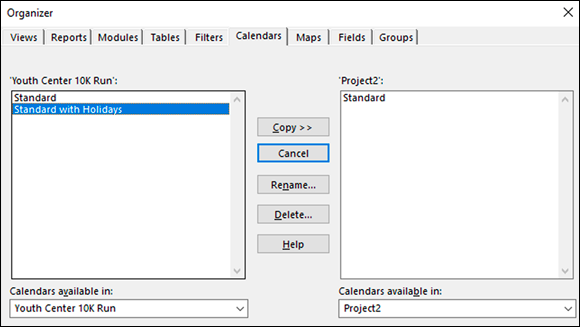
FIGURE 8-8: Copying a calendar to other projects.
Follow these pointers to copy calendars from project to project:
- Give the calendar a descriptive name. Providing an appropriate name helps you remember the calendar’s general parameters.
- If your company has standard calendars, have a single resource create and disseminate them. If ten versions of a management calendar float around and you grab the wrong one, it can cause problems.
- Add the project manager’s initials to every calendar template name you create. That way, you know which ones you created.