
Chapter 17
You’re Behind — Now What?
IN THIS CHAPTER
![]() Analyzing plan versions and notes to understand what went wrong
Analyzing plan versions and notes to understand what went wrong
![]() Experimenting with what-if scenarios
Experimenting with what-if scenarios
![]() Benefitting from more time or more people
Benefitting from more time or more people
![]() Adjusting the timing going forward
Adjusting the timing going forward
Let’s face it: A project rarely proceeds as planned. Every project has issues (situations that must be handled before the project can move forward) and risks (uncertain events that can prevent a project objective from being met). Issues and risks either crop up suddenly or barrel down on you like a freight train coming down the track. Regardless of whether you see risks approaching, at some point you may feel that the floor has dropped out from under you. One day the project is doing just fine, and the next day it’s $75,000 over budget. Or it appears that you’ll miss the drop-dead finish date by two weeks. All the aspirin in the world won’t solve this one.
The first step is to find the cause and then fix it so that you can move forward and try to save the project. To try to save the day when the project rolls off the track, you will need to analyze the options and make tough choices. Project can help you analyze possible solutions and anticipate the likely results. After you decide what to do, you will update Project to reflect the solutions.
Using Project with Risk and Issue Logs
You can proactively document problems on the project in a number of ways, especially if you create and maintain an issue log and a risk register on the project. In Chapter 12, I describe how to handle risk, assign contingency reserve, and update the project schedule to include the work, resources, time, and funding necessary to implement risk responses.
An issue is a situation that you have to deal with before you can move forward, such as a risk that develops, a decision that has to be made, or an uncooperative stakeholder. Whatever the case, you should record issues in an issue log so that you can assign accountability for managing and resolving them in a timely manner.
You can also use Project to run what-if scenarios and develop alternative approaches for responding to issues or risks. You may have developed multiple baselines (described in Chapter 14) to account for various outcomes. It is a good practice to record task notes for those tasks affected by a risk or an issue. (Information on task notes is in Chapter 3.) Storing interim plans, multiple baselines, and task notes in Project helps you more easily explain messy situations to the powers that be.
Printing interim plans and baselines
Interim plans and multiple baselines demonstrate how you’ve made adjustments for risks or issues. Using these two items indicates that you were attuned to potential problems. You should also update the boss and other stakeholders by generating printouts or reports reflecting potential major issues and risks. I talk more about reports in Chapter 18.
 A baseline saves pertinent project data, including start and finish dates, duration, work, and cost; an interim plan saves only the start and finish dates of tasks in the project. Chapter 14 describes interim plans and baselines in depth.
To view multiple baselines, follow these steps:
- Click the Task tab. In the View section, click the down arrow for a list of Views.
- At the bottom of the list, choose More Views.
- In the More Views dialog box, select Multiple Baselines Gantt.
- Click Apply.
Multiple Baselines Gantt view shows the original Baseline, Baseline 1, and Baseline 2. To customize what you see by including baselines and interim plans in whichever way you want to see them, follow these steps:
- Display Task Sheet view.
Scroll the sheet pane to the right and click the Add New Column column heading.
The menu listing available fields appears, as shown in Figure 17-1.
Scroll down and click the field to insert.
For example, you may choose Start 1–10 and Finish 1–10 for any interim plan (or choose Baseline through Baseline 10 for baseline data).
- If necessary, repeat Steps 2 and 3 to display additional columns.
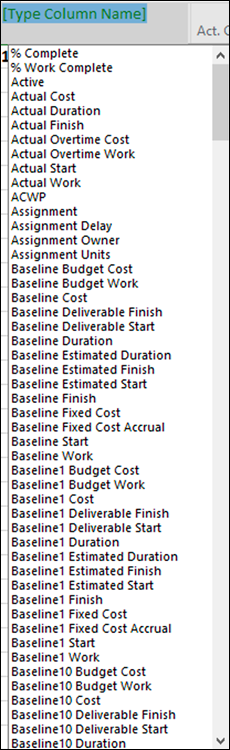
FIGURE 17-1: Adding new columns.
Printing task notes
In addition to printing interim plans and baselines, you can print task notes. They should include information about risk and issues such as vendor problems or late deliveries.
To add a note to a task, either display the Notes column in a task sheet pane or double-click a task and add the note on the Notes tab of the Task Information dialog box.
Project doesn’t let you print a single note or only the notes; you have to print the entire project and include the notes. To print task notes, follow these steps:
- Click the File tab.
- Click Print.
Click the Page Setup link.
The Print Setup dialog box appears.
- Select the View tab.
Check the Print Notes check box.
Figure 17-2 shows the Page Setup dialog box with the Print Notes check box selected on the View tab.
- Click OK to save your changes.
- Click Print.
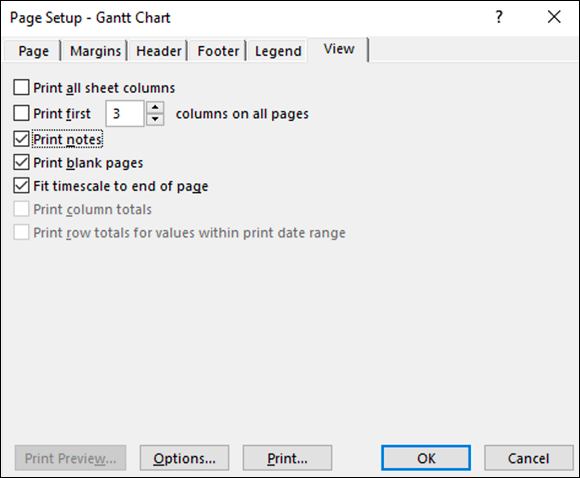
FIGURE 17-2: Printing notes.
When a note is associated with a task, a Note icon appears in the leftmost column of the schedule. You can hover the mouse on the icon to show the note content. If the information in the note is explained in greater detail in another project document — such as a risk register, an issue log, or a specification document — you can use the note to indicate where to find the detailed information. The note then serves as an indicator of additional relevant information about that task.
What-If Scenarios
Just as you can be too close to a problem to see its solution, you can be too close to the project to recognize what you need to do. Using the filtering and sorting features in Project, though, you can slice and dice various aspects of the project somewhat differently to see a fresh perspective.
You can also use tools, such as resource leveling, to solve resource conflicts. Resource leveling may not always solve problems to your satisfaction, but it’s a good way to let Project show you a what-if scenario that may solve resource problems instantly.
See Chapter 12 for more information about how to use resource leveling.
Sorting tasks
Sometimes when the project isn’t going as planned, it’s time to sort tasks. In Project, you can sort tasks by several criteria, including start date, finish date, priority, and cost.
To determine how sorting can help you, consider these examples:
- To cut costs: When you sort tasks by cost, you can focus on the most expensive tasks first, to see whether you have room to trim useful-but-pricey items.
- To review task timing: When you sort by duration in descending order, you can see the longest tasks first.
To apply a preset sorting order, simply choose View ⇒ Data ⇒ Sort and then choose an option from the submenu, such as By Start Date or By Cost. The sort button has an A over a Z with a down arrow next to it.
If you want to see additional sort criteria or to sort by more than one criterion, follow these steps:
Choose View ⇒ Data ⇒ Sort ⇒ Sort By.
The Sort dialog box appears, as shown in Figure 17-3. You can use it to sort by as many as three criteria in ascending or descending order. The first field shows the ID field by default. The remaining Then By fields have no values selected.
- In the Sort By list, select a criterion to sort by.
Select either Ascending (to sort from lowest to highest) or Descending (to sort from highest to lowest).
In a date field, the sorting order is from soonest to latest and from latest to soonest, respectively; in a text field, alphabetical is the order.
(Optional) If you want a second criterion, open the first Then By drop-down list and make a selection.
For example, if you choose to sort first by cost and then by type, tasks are sorted from least expensive to most expensive and then (within each cost level) by type (Fixed Duration, Fixed Units, and Fixed Work).
- (Optional) If you want to add a third criterion, open the second Then By drop-down list and make a selection.
- Click the Sort button.
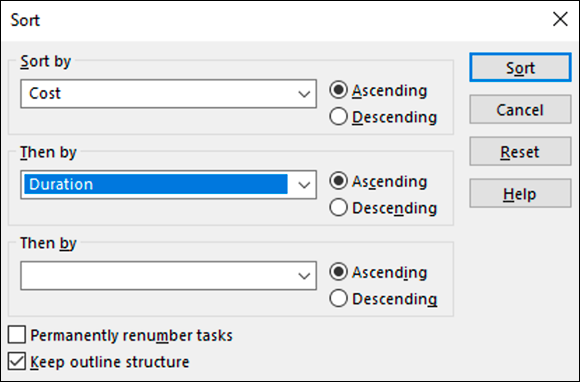
FIGURE 17-3: Choosing criteria for sorting.
To return to the original task order, choose View ⇒ Data ⇒ Sort ⇒ By ID. Tasks are now back in task ID number order, which is the standard sorting criterion in Project.
Filtering
Filtering, as described in Chapter 11, is a good way to focus on the areas of the project that are at risk. Especially in larger projects, where it can be difficult to scan hundreds of tasks and notice which ones are running late or over budget, filters can home in on exactly where the trouble lies. Filters are on the View tab, in the Data group.
You can choose to remove from the display any tasks that don’t meet filter criteria, or you can simply highlight tasks that meet the criteria onscreen.
Table 17-1 lists filters that are useful when you’re trying to identify and solve problems with the schedule.
TABLE 17-1 Filters That Isolate Problems
Filter Name |
What It Displays |
Task Filters |
|
Critical |
Tasks that must be completed according to schedule to meet the final deadline (the critical path) |
Cost Overbudget |
Tasks that exceed budgeted expenditures |
Incomplete Tasks |
Tasks that haven’t been marked as complete |
Late/Overbudget Tasks Assigned To |
Tasks assigned to a resource you specify that exceed their baseline estimates and are over budget |
Should Start By |
Tasks that should have started as of a specified date |
Slipped/Late Progress |
Tasks that are running late and have no progress recorded |
Resource Filters |
|
Overallocated Resources |
Tasks with resources assigned that are overbooked at some point during the life of the task |
Slipping Assignments |
Tasks involving resource work that should have already begun |
Work Incomplete |
Tasks whose work should have been recorded already |
Work Overbudget |
The number of work hours that have exceeded the original estimate |
You may not see all these choices in the More Filters dialog box; when you click View and, in the Data group, click Filter and then click More Filters to open it, you have to select the Task radio button to see task-related filters and the Resource radio button to see resource-related filters.
 You can export Project information to a program such as Excel so that you can use analysis tools, such as pivot tables. If this idea excites you, check out Excel 2019 For Dummies by Greg Harvey (Wiley) or Excel Data Analysis For Dummies by Paul McFedries (Wiley).
Examining the critical path
One useful filter in Project is named Critical; it displays or highlights all tasks that are on the critical path. If you’re running late, knowing which tasks can’t slip helps you identify areas that have no room for delay — and, conversely, areas where you can delay noncritical tasks and still meet the deadline. You may use the Critical filter to help determine how to free overallocated resources or get a task that’s running late back on track.
Ensure that the Gantt chart shows the Gantt bars for critical tasks in red. To do so, make sure you’re in the Gantt chart view; then select the Gantt Chart Tools Format tab on the Ribbon and ensure that the Critical Tasks check box is selected in the Bar Styles group.
You can look at the critical path in any Gantt Chart or Network Diagram view. Figure 17-4 shows Gantt Chart view of a project sorted for the critical path. Figure 17-5 shows Network Diagram view (with the boxes collapsed) with the same filter applied.
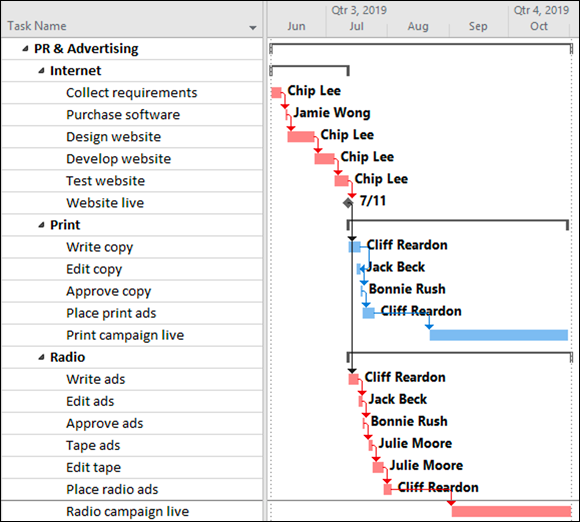
FIGURE 17-4: Gantt Chart sorted for the critical path.
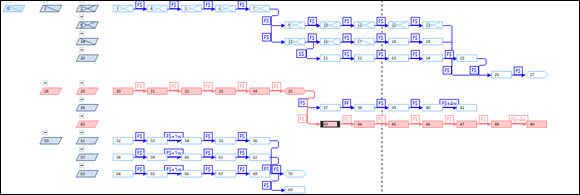
FIGURE 17-5: Network Diagram view of the critical path.
If you need a closer look at task timing, modify the timescale display to use smaller increments, such as days or hours. To do so, right-click the timescale itself and then choose Timescale, or click View and then, in the Zoom group, click the Zoom drop-down arrow, and select Zoom In. You can also use the slider at the bottom right-hand side of the screen. It’s less precise, but it’s a quick way to zoom to the level you need.
Using resource leveling (again)
If you use manual resource leveling early in the project to solve resource conflicts prior to baselining, try it again to help you when you need to update the schedule. With changes to tasks and tracked activity, resource leveling may uncover new options to solve conflicts.
If resource leveling is set to Automatic, Project automatically performs this calculation every time you modify the schedule. To see whether the option is set to Automatic or Manual, choose Resource ⇒ Level ⇒ Leveling Options to open the Resource Leveling dialog box, as shown in Figure 17-6. If the Manual radio button is selected, close the dialog box and click Level All in the Level group to run resource leveling.
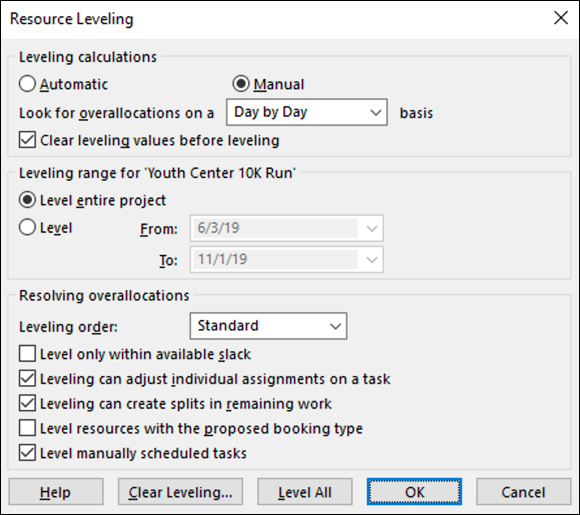
FIGURE 17-6: Resource-leveling controls.
Determining which factors are driving the timing of a task
You can use the Task Inspector feature to determine what’s causing tasks to occur in a certain time frame, such as dependencies, task calendars, or task constraints. You simply select a task and then, on the Task tab, click the Task Inspector button in the Tasks group. A pane then lists all factors that affect the timing of that task. Figure 17-7 shows an example of the Write Copy task for the Print work package. In this figure, the Task Inspector button is circled on the taskbar.
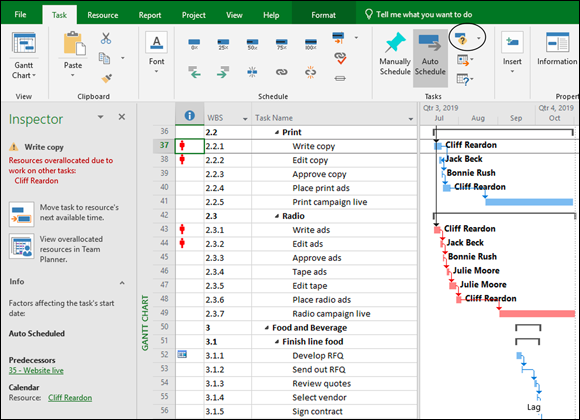
FIGURE 17-7: Task Inspector.
By using this feature (read more about it in Chapter 11), you can determine whether a task that you want to take place earlier can do so if you remove a dependency or constraint that’s affecting it. For example, early in the planning phase, you may have believed that you could write print and radio copy at the same time. However, as you progress, you realize that you should do the print copy first, and then write the radio copy. By understanding what’s driving the timing of the task, you can better search for a solution if that timing is causing problems.
How Adding People or Time Affects the Project
Human nature in a corporate environment often causes people to want to throw money and people at projects. In certain cases, that instinct is on target; however, you aren’t always able to draw on an endless supply of resources or time. For this reason, you may have to experiment with a combination of options that involve time and resources.
Hurrying up and making modifications
Saving time in Project requires that a task be completed earlier than scheduled or that the timing of the task be adjusted to use up slack. You’re likely to find that making this adjustment is similar to trying to solve an intricate puzzle: Correct one piece, and another one begins causing aggravation.
To accomplish work faster, you have these two options:
- Find more resources to help with tasks that are auto-scheduled. Adding people often requires money, so even if the schedule gets back on track, it will cost you.
- Modify the scope of tasks. This strategy may have an effect on the task quality. If you make two inspections rather than three or you shorten the QA cycle by a week, you may run the risk of causing problems down the road.
Changing the timing of tasks and shifting dependencies uses up slack to make up for delays, but it may leave you with no wiggle room. The next time a problem crops up, you’ll be up against the wall with no slack.
In reality, combining small modifications for both time and money can often help save the day.
Throwing resources at the problem
When auto-scheduled tasks are effort-driven, tasks are accomplished when the specified amount of effort is expended. A task with a duration of three days and based on the Standard calendar, for example, requires three days × eight hours per day to complete (a total of 24 hours of effort). One resource performing this task and working full time takes three days to complete it; three resources working full time take one day to complete the 24 hours of work. When you add resources to a task in this way, Project automatically recalculates its duration.
If you want Project to reduce the duration of a task when you assign more work resources to it, the task must be auto-scheduled, and effort-driven scheduling must be turned on.
Changing how resources are assigned
Beyond simply adding resources to a task, you can modify existing assignments. On any given project, you may have dozens (or even hundreds) of resources working on tasks. All these people are working according to their working calendars, the percentage of resource time assigned to particular tasks, and their ability to do the job. Take a look at how folks were assigned to begin with to see whether you can save time or money by modifying those assignments.
You can modify assignments in several ways:
- If someone is working at, say, only 50 percent capacity on a task, consider increasing the person’s assignment units, at least for the time they’re attending to tasks on the critical path.
- If a resource is available who can perform a given task more quickly, switch resources on the task and shorten its duration. Remember that the Team Planner view can be helpful when making this type of switch. A more skilled person may cost more, so take the time/cost trade-off into consideration.
- Have certain resources work overtime or let them be overbooked at various points during the project. You may have modified an overbooked resource’s assignments earlier to eliminate a conflict, but now you find that you have no choice other than to have the resource work an occasional 10- or 12-hour day.
Calculating the consequences of schedule modifications
Before you get carried away from making changes to resources, stop and think: Adding resources to effort-driven, auto-scheduled tasks can shrink the task and help the project get back on track. However, depending on the resources’ hourly rates, this approach may cost more.
Assigning three people to work on a task doesn’t necessarily shrink the duration of the task geometrically. That’s because those people have to coordinate their efforts, hold meetings, and spend more time communicating than they would if they were working on the task alone. If you add resources, Project shrinks the task geometrically: Consider adding a little time to the task to accommodate the inefficiencies of multiple resources.
Another concern about adding resources to tasks is that it may cause more resource conflicts, with people who are already busy being overbooked on too many tasks that happen in the same time frame. If you have the resources, and they have the skills and the time, though, beefing up the workforce is definitely one way to perform certain tasks more quickly.
To add resources to a task, you can use the Resources tab in the Task Information dialog box, or choose the task and click the Assign Resources button in the Assignments group on the Resource tab of the Ribbon.
Shifting dependencies and task timing
Time is a project manager’s greatest enemy. There’s never enough time, and the time you have is eaten up quickly.
Follow these suggestions to modify task timing and save time:
- Delete a task. You heard me. If a task represents a step that can be skipped and no actual work for it is tracked, simply delete the task. It doesn’t happen often, but sometimes — after you rethink the project — you realize that a few actions are unnecessary or have already been handled by someone else. If you prefer, you also can mark the task as inactive rather than deleting it.
- Adjust dependencies. Perhaps the revision of a training manual can start a few days before all the feedback is returned. Or perhaps the electrical and plumbing chores can take place at the same time rather than one after the other (assuming that the electrician and the plumber can stay out of each other’s way). Use the Predecessors tab in the Task Information dialog box, shown in Figure 17-8, to modify dependencies. In the Lag column, you can enter a negative number to allow tasks to overlap.
- Modify constraints. Perhaps you’ve set a task to start no earlier than the first of the year because you don’t want to spend money on it until the new fiscal year budget kicks in. To save time, consider whether you can allow it to start a week before the end of the year and bill the costs in January. Examine any constraint of this type — especially those created to verify the timing logic.
- Verify external dependencies. If you’ve created an external link to a task in another project and set dependencies with tasks in the project, see whether the other project manager can speed up certain tasks. Or if the timing relationship isn’t absolutely critical, delete the link to the other project. It may be slowing you down more than you realize.
- Change the scheduling method or move the task. Remember that Project usually cannot automatically reschedule a task based on dependency changes if the task is manually scheduled. You can either change the task to be auto-scheduled by using the Auto Schedule button in the Tasks group on the Task tab of the Ribbon, or you can select a manually scheduled task and then click the Respect Links button in the Schedule group on the Task tab to move it to its proper time frame. Or you can use the Move drop-down list on the Tasks group on the Task tab to reschedule a task to a particular earlier or future time slot, or to one when resources are available.
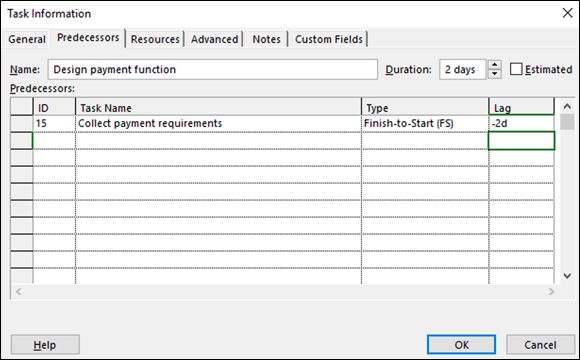
FIGURE 17-8: Modifying task dependencies and applying lag.
If you’ve set resource leveling to Automatic, Project may have delayed certain tasks until overbooked resources are freed up. On the Resource tab, click the Leveling Options button in the Level group and change the setting to Manual.
When All Else Fails
Okay. You’ve monkeyed with resource assignments and shifted around task dependencies to save time, and you’ve deleted tasks and assigned less expensive resources to save money. Still, it’s not enough. In this scenario, you have to say to the boss, “You can have it on time, you can have it on budget, or you can have quality work. Choose two.”
If the boss throws money at you, add resources to tasks, as discussed in the earlier section “Throwing resources at the problem.” But keep in mind that not all tasks are effort driven. Some tasks aren’t shortened by adding resources.
Taking the time you need
If the boss is willing to give you more time, grab it. However, when you do, you have to update the project a few ways:
- Modify task durations. Add time to tasks that are running late. In Project, you do this by increasing their durations or moving out their start or end date.
- Review task constraints. If you’ve specified that certain tasks can finish no later than a certain date, but now you’re extending the project finish date three months, you may be able to remove or adjust those original constraints accordingly.
- Adjust the contingency reserve. If you have a contingency reserve task, you can simply add to its duration, giving more waffle room to all other tasks. (See Chapter 12 for more about contingency reserve.) If you’re using reserve to stay on schedule, you can reduce the amount of contingency reserve by the amount you’re using.
After you adjust the time, you should make sure that the new timing of tasks doesn’t cause new resource conflicts by looking at Resource Graph view, and then reset the baseline to reflect the new schedule. To reset a baseline, select Project ⇒ Schedule ⇒ Set Baseline ⇒ Set Baseline. Choose Baseline 1–10 in the Set Baseline dialog box to save to a different baseline and preserve the original. Click OK after choosing a baseline.
Inform team members of the new timing and provide them an updated version of the plan.
Finding ways to cut corners
If your manager tells you to cut some corners that sacrifice quality, you have license to modify the quality of the deliverables. You can eliminate tasks that may ensure higher quality, such as a final proofreading of the employee manual. You can hire less-experienced and less-expensive workers, for example, and you can use cheaper paper or computer equipment.
To cut corners in Project, you have to:
- Take fewer steps: Delete tasks. Click the ID of the task in Gantt Chart view, and click Delete. Alternatively, you can mark the task as Inactive. (Review any dependencies that were broken because you deleted tasks!)
- Use less-expensive team resources: Delete one set of resource assignments, and assign other resources to tasks in the Assign Resources dialog box.
- Use less-expensive materials: Change the unit price of material resources you’ve created in Resource Sheet view. Or shop around for better pricing on items that are set up as cost resources, and enter the lower prices of tasks to which you’ve assigned those resources by using the Cost column in the Assign Resources dialog box, as shown in Figure 17-9. To get to the Assign Resources dialog box, right-click a task or a resource. From the right-click drop-down menu, choose Assign Resources.
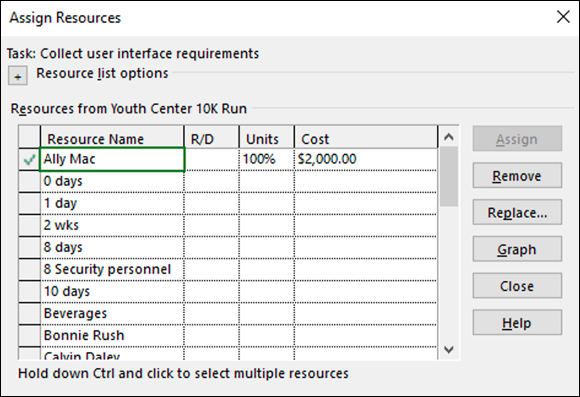
FIGURE 17-9: Modifying the resource cost.
You can also take a more sweeping approach: Simply redefine the goal of the project. If the goal were to launch a new product line, perhaps you can modify the goal to simply manage the design of the new product and then leave the launch to a later date or another project manager. If you were supposed to produce 10,000 widgets, see whether the company can make do with 7,500. To make this type of change, you may have to slice and dice entire phases of the project — or even start from scratch and build a new plan.
Save the revised project schedule with a new name to provide a head start on the revised project schedule. Clear the baseline (choose Project ⇒ Schedule ⇒ Set Baseline ⇒ Clear Baseline, and then click OK), make modifications, and then save a new baseline.