
Chapter 2
Starting the Project
IN THIS CHAPTER
![]() Moving from concept to plan
Moving from concept to plan
![]() Creating the project’s work breakdown structure (WBS)
Creating the project’s work breakdown structure (WBS)
![]() Entering project information into Project
Entering project information into Project
![]() Entering the WBS into Project
Entering the WBS into Project
![]() Entering tasks into Project
Entering tasks into Project
![]() Saving the project
Saving the project
Congratulations — you’re the proud project manager of a new project! Before you do anything, you need to understand the scope of the project. You must clearly specify, for example, any intended outcomes, expectations for milestones, main deliverables, budgeted amounts, key stakeholders, and what denotes success.
Planning a project isn’t as easy as opening a file in Project and entering all the activities you have to complete. Before you can begin to plan, you need to understand the purpose of the project and the high-level information about the project, such as milestone dates and overall budget.
To complete a successful project, you need to plan well. To plan well, you need to understand the project’s objectives as well as its success criteria. Therefore, before you enter the first task into Project, you create the project charter (described a little later in this chapter) to initiate the project and develop the work breakdown structure (WBS) to organize project deliverables. Then you can start organizing the project and entering tasks into Project.
This chapter describes how to move from imagining a concept to planning a project so that you know how to enter and work with tasks and how to save the new project.
Creating the Project Charter
Having a high-level understanding of a project is critical to project success. The project charter is a document that formally authorizes or recognizes a project; it contains high-level information about the project. The project charter is frequently developed by the project manager, with the project sponsor. The charter functions as an agreement about the purpose and objectives of the project.
Common elements of a project charter are:
- Purpose
- Description
- Objectives
- Criteria for success
- Summary milestone schedule
- Summary budget
- Assigned project manager
 Other names for the charter are project-initiating document and statement of work.
The high-level information in the charter provides background information to help you plan the project approach and organize the work logically. Using the information from the charter, you can start to define the project’s major deliverables and its life cycle — and your approach to accomplishing all the project work.
Throughout this book, I use a sample project to demonstrate key concepts in Project. The project charter for the 10K Run sample project is shown in Figure 2-1.

FIGURE 2-1: The 10K Run project charter.
Introducing the Work Breakdown Structure (WBS)
If you have a small project, you may be able to start entering tasks into Project and organize them on the fly. But for any project with more than 50 tasks, consider how to structure and organize the work before you open Project. One best practice is to create the work breakdown structure, or WBS — a hierarchically organized representation of all the project work.
 The concept of project work includes work that’s necessary to create the product and work that’s necessary to manage the project, such as attending meetings, managing risk, and creating documentation.
Generally, you approach the WBS from the top down. In other words, you evaluate the entire project and then break it into large chunks, and then break the larger chunks into smaller chunks, and so on, until you have a defined deliverable. That’s where the WBS stops and project tasks begin.
The breaking of WBS deliverables into smaller chunks is known as decomposition.
The WBS houses all deliverables for the project and product scope. It doesn’t include the tasks. Those are strictly for the schedule. Another way of thinking about the WBS is that it’s composed of nouns, whereas the schedule is composed of actionable verbs. For example, the Water Stations deliverable might be the lowest-level deliverable you would show on the WBS. Then define these tasks for the schedule using the “verb-noun” naming convention:
- Identify water companies.
- Develop request for quote.
- Receive quotes.
- Select vendor.
- Develop contract.
- Sign contract.
- Oversee water station setup.
Organizing the Work
Frequently, the most challenging aspect of creating a WBS is figuring out how to organize it. You have several options. For example, if you have multiple locations for a hardware deployment, you can arrange it by geography. Many times, software projects are managed by life-cycle phases, such as Concept, Requirements, Design, Build, Test, and Deploy.
Another common way to organize work is by major deliverable. The needs and deliverables of the project determine how best to organize work. The WBS for the Youth Center Run is arranged by the type of work. You can see it presented in two different ways. One way looks like an organizational chart, and the other way is via outline. Either way works well; however, when you start decomposing past two levels, the organizational chart method becomes difficult to manage. After you delve into the detail, consider moving to an outline format. Figure 2-2 shows an organizational chart format for the high-level WBS.

FIGURE 2-2: High-level WBS.
Using the high-level WBS, you can further decompose the work into outline format:
- Registration
1.1 Database
1.2 User interface
1.3 Payment
1.4 Confirmation
- PR and advertising
2.1 Print
2.2 Television
2.3 Radio
2.4 Internet
- Food and beverage
3.1 Finish-line food
3.2 Finish-line beverage
3.3 Water stations
- Safety
4.1 Medical
4.2 Security
- Course logistics
5.1 Route
5.2 Signage
5.3 Parking
- Volunteer Engagement
6.1 Onboard process
6.2 Management
- Project management
7.1 Communication
7.2 Planning
7.3 Management
7.4 Risk management
7.5 Stakeholder management
After outlining the organization of the work, you can start defining the tasks that comprise the project schedule.
Starting the Project
In Chapter 1, I discuss how to open a blank project. After you open a blank project, you can begin entering basic project information, such as the start or end date.
Entering project information
You can enter project information into Project in two ways:
Choose File ⇒ Info. In the Project Information section on the right side of the screen, as shown in Figure 2-3, you can enter the start, finish, current, and status dates for the project. All you have to do to make an entry or change an entry is click on it to display the controls — for example, to change the date, just click on the date picker.
After choosing File ⇒ Info, you can click the Project Information down arrow, then click Advanced Properties. The Properties dialog box opens. Enter the name of the project where it says “Title” and enter your name where it says “Author.” You can also enter company name, keywords, and other information. This information is used in many of the automated reports that Project creates.- On the Ribbon, go to the Project tab and click the Project Information icon. You see the Project Information dialog box, shown in Figure 2-4. It holds the same information as the Project Information section on the Info screen in the Backstage view.
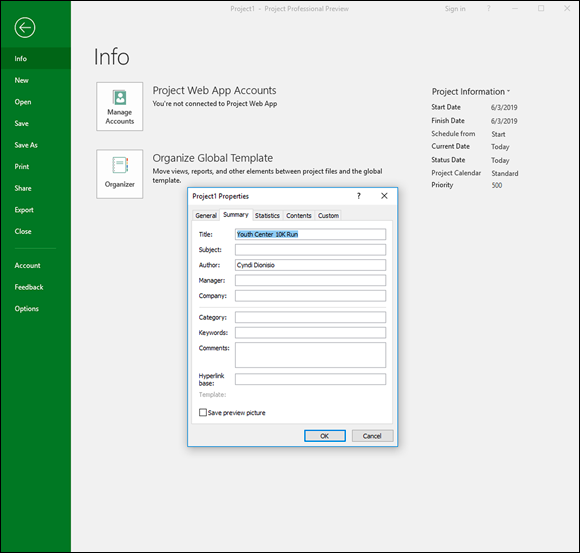
FIGURE 2-3: The result of choosing the File ⇒ Info command.
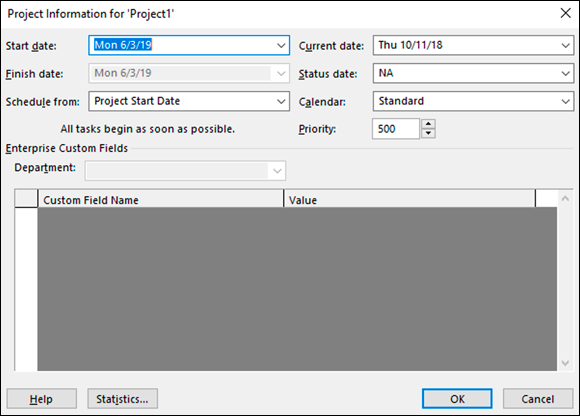
FIGURE 2-4: The Project Information dialog box.
This list describes the settings within the Project Information dialog box:
- Start Date and Finish Date: For a project scheduled forward from the start date (see the next bullet), enter only the start date. Or if you schedule backward from the finish date, enter a finish date.
Schedule From: You can choose to have tasks scheduled backward from the finish date or forward from the start date. Most folks move forward from the start date.
 Although you can schedule backward, use this feature only to schedule the work backward initially, by selecting the finish date and clicking the OK button. Immediately after doing so, return to this dialog box and revert to the (newly calculated) start date. If you don’t, you may encounter problems down the road if you eventually record progress. At that point, the end date will be fixed because you’ve backward-scheduled, and the start date will be fixed because you’ve recorded actuals, so the schedule will no longer be dynamic and won’t expand or contract.
- Current Date: By default, this setting matches the computer clock setting. However, you can change it so that it doesn’t match the computer clock setting. Changing this date is useful for looking at what-if scenarios or for tracking progress as of a certain date in the past or any date you choose.
- Status Date: You typically set the current date to track the progress on the project. When tracking, you usually want to see the status of the project as of the current moment, so you can ignore this setting. However, if you want to track as of the end of a fiscal period or another time frame, change it to track the status of tasks as of any other date.
- Calendar: Select from this drop-down list the Base calendar template to use for the Project calendar. I list this setting first because it’s the only one you have to deal with when you start a new project. For now, assume you will use the Standard calendar. I describe calendars in Chapter 8.
- Priority: This field is useful if your organization has many projects and you create links among them. If you use a tool such as resource leveling (see Chapter 12 for more about this topic) to resolve conflicts, it can consider this project priority setting when calculating what to delay and what to keep on track.
Weighing manual scheduling versus automatic scheduling
One of the most valuable aspects offered by Project has traditionally been its ability to recalculate task schedules, such as when you change the project start date or there is a change to one task’s schedule that affects one or more dependent (linked) tasks. This powerful behavior saves the project manager — you — from having to rethink and reenter dates to rescheduled tasks throughout the project.
But flip sides to the benefits of automation always exist, and in the case of project scheduling, automatic scheduling can lead to unwanted schedule changes based on software behavior and not on human expertise.
To retain the helpful aspects of automation that make scheduling less time-consuming while allowing project managers to retain schedule control when needed, Project 2019 allows user-controlled scheduling.
In user-controlled scheduling, you can select one of these scheduling modes for each task:
- Auto Schedule: Project calculates task schedules for you based on the project start date and finish date, task dependencies, calendar selections, and resource scheduling.
- Manually: Project enables you to skip entering the duration and dates, and specifying them later. When you enter the duration and dates, Project fixes the schedule for the task and doesn’t move it unless you do so manually. The manually scheduled tasks move if you reschedule the entire project, in most cases. The Gantt bars for manually scheduled tasks also differ in appearance from those for automatically scheduled tasks.
The indicator for auto-scheduled and manually scheduled tasks is at the bottom of the Project window. Figure 2-5 shows the Database tasks are auto-scheduled, as indicated by the time bar and the arrow in the Task Mode column. The User Interface tasks are manually scheduled, as indicated by the pushpin in the Task Mode column. On the time scale, the auto-scheduled tasks show up as blue bars on your screen and the manually scheduled tasks show up as aqua bars with vertical lines on each end.
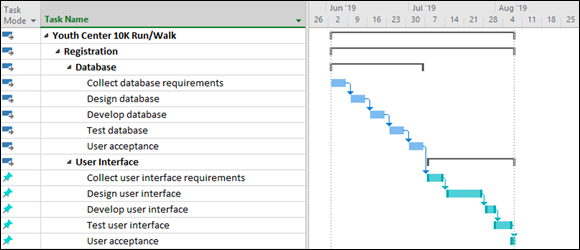
FIGURE 2-5: Manually and automatically scheduled tasks.
The summary task (the task with other tasks indented beneath it) should be auto-scheduled. That is because the start and finish dates of the tasks beneath it indicate when the summary task can can start and finish. You’ll read more about this in Chapter 3.
The project file can have all manually scheduled tasks or all auto-scheduled tasks — or any mix of the two. By default, all tasks that you create use the manually scheduled mode.
You can change the task mode for the overall project in two ways:
- To change the mode for all new tasks, select the Task tab, click the Schedule Mode icon in the Tasks group (the button with the calendar and a question mark), and then choose Auto Schedule or Manually Schedule from the menu, as shown in Figure 2-6.
- Another way to change the mode for all new tasks is to click the New Tasks link at the left end of the status bar at the bottom of the project, then select the mode you want.
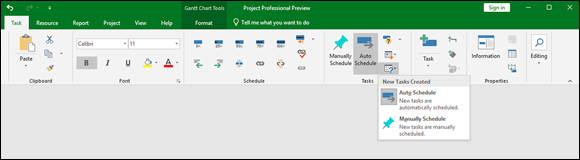
FIGURE 2-6: Changing the task mode from the Ribbon.
You can change the task mode for individual tasks in three ways:
- Select the task, click the Task tab on the Ribbon, and then click either Manually Schedule or Auto Schedule in the Schedule group.
- Select the task, click the Task Mode cell for the task, click the drop-down arrow that appears, and click either Manually Scheduled or Auto Scheduled in the drop-down list.
- Select the task, click the Task tab on the Ribbon, and click the Information button in the Properties group. On the General tab of the Task Information dialog box, go to the Schedule Mode area and click the Manually Scheduled radio button or the Auto Scheduled option button.
You need to balance the desires of your inner control freak versus the need to be an efficient project manager in determining how often to use manual scheduling. Though manual scheduling prevents Project from moving tasks that you want to stay put in the schedule, you may need to edit the schedules for dozens of dependent tasks in a long or complicated project. The best balance — particularly for beginning project managers — may be to use manual scheduling sparingly.
Entering the WBS
The schedule should be set up the same way as the WBS. If you want to continue the outline numbering scheme from the WBS, Project automatically extends to the schedule tasks the outline numbering used for the WBS. You can do this in two ways:
- Select the Format tab.
- In the Columns group, click Insert Column.
- Select the Outline Number option.
You can also enter the outline number directly into the task cell by following these steps:
- Click to open the Format tab.
- In the Show/Hide group, select the Outline Number check box.
The first information to enter into the new project is the WBS. Follow these simple steps to enter the WBS in Gantt Chart view:
- In the Task Name column, click a blank cell.
Type the name of the WBS element.
Using the example of the Youth Center 10K Run/Walk, the first element is Registration.
- Press Enter to move to the next cell in the column and then type the WBS element name.
Repeat Step 3 until you enter all WBS names.
You can edit the text that you type by pressing the Delete or Backspace key to clear characters.
After you enter the WBS, you can use the Indent feature to create the outline format. To indent, select the Task tab and click the Schedule group’s Indent icon.
Figure 2-7 shows part of the screen display after you enter the WBS outline. This version shows the outline numbering as a separate column. Notice that after you indent a task, its parent task switches from manually scheduled to auto-scheduled because the duration and dependencies of the child tasks determine when the parent task can start and finish. Therefore, you don’t fill in the duration or start and finish dates for WBS elements — that information will auto-populate when you enter tasks beneath the WBS elements.
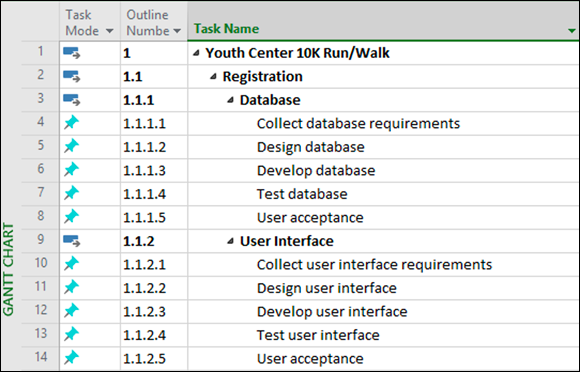
FIGURE 2-7: The WBS for the 10K run.
Entering tasks
After the WBS information is entered, you can start entering tasks. You can create tasks in a few different ways:
- Type information in the sheet area of the Gantt chart.
- Enter information in the Task Information dialog box.
- Import tasks from Outlook.
- Import tasks from Excel.
You can fill in the details of the task duration and start date when you enter the task, or later.
Entering tasks in Gantt Chart view
Many people who work on lengthy projects find that entering all task names in the sheet pane of Gantt Chart view is the quickest and easiest method. This method is the same one I used to enter the WBS information. You can simply enter a task name in the Task Name column, press the Enter or down-arrow key on the keyboard to move to the next blank row, enter another task, and so on.
Use the Task Mode column to change the task scheduling mode from Manually Schedule to Auto Schedule for any task not using the default method.
Entering tasks via the Task Information dialog box
If dialog boxes provide the kind of centralized information form that fits the way you like to work, consider using the Task Information dialog box to enter, well, task information. The series of tabs in this dialog box contain all the information about a task.
Follow these steps to create a task via the Task Information dialog box:
In the Task Name column, double-click a blank cell.
The Task Information dialog box appears, as shown in Figure 2-8.
In the Name field, type a task name.
You can enter any other information you would like to while you are there.
Click the OK button to save the new task.
The task name appears in Gantt Chart view in the cell you clicked in Step 1.
- Press the down-arrow key to move to the next cell.
- Repeat Steps 1–4 to add as many tasks as you like.
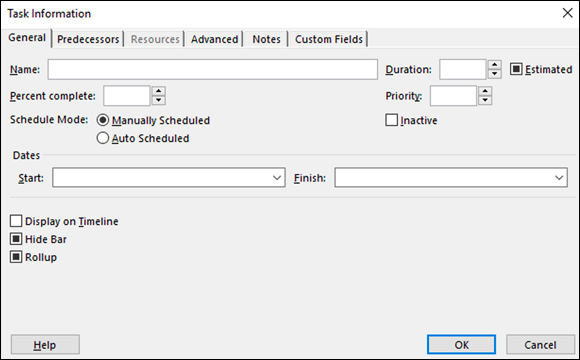
FIGURE 2-8: The Task Information dialog box.
As you name tasks, make task names in the project both descriptive and unique. However, if you can’t make all names unique (for example, you have three tasks named Hire Staff), you can use the automatically assigned task number or the outline number to identify tasks; these numbers are always unique for each task.
Naming tasks is a trade-off between giving a full description (which is much too long for a Task Name field) and being too brief (which can lead to misunderstandings and uncertainty). When in doubt, be brief in the Task Name and elaborate with a Task Note. I cover Task Notes in Chapter 3.
To insert a task anywhere within the list of tasks in Project, from the Task tab, Insert group, click a task name cell where you want the new task to appear, and click the Insert Task icon. The new task is inserted in the row above. You can also press the Insert key on the keyboard, or right-click and select Insert Task from the pop-up menu.
Importing tasks from Outlook
After you start thinking about what has to be accomplished in a project, tasks start resembling breeding rabbits; what might start as a series of simple to-do tasks in Outlook often becomes a full-fledged project. When that happens, you’ll be glad to know that Microsoft provides an easy-to-use import feature that transfers the tasks you create in Outlook to Project.
The Import Outlook Tasks feature is essentially an import map that’s preset to work with Outlook task fields. Follow these steps to import Outlook tasks into Project:
- Open the plan that you want to insert tasks into, or open a new project (choose File ⇒ New, click Blank Project, and click Create).
- Click the Task tab on the Ribbon, click the bottom part (with the down arrow) of the Task button in the Insert group, and click Import Outlook Tasks.
If a Microsoft Outlook warning message appears, click Allow.
The Import Outlook Tasks dialog box appears, as shown in Figure 2-9.
Select the check box beside each task you want to import, or click the Select All button to import all Outlook tasks.
By default, Outlook stores tasks in the Tasks folder. Selecting the Folder: Tasks check box is another way to select all tasks in Outlook.Click the OK button.
The tasks are imported and then appear at the end of the list of tasks with change highlighting applied.
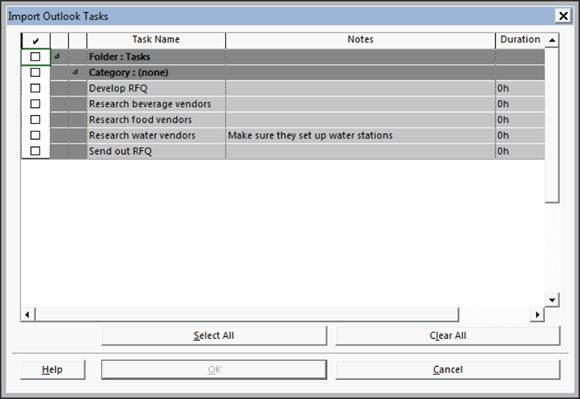
FIGURE 2-9: Importing task information into Project.
When you import a task from Outlook, its name, duration, and notes (if any) are also imported. If a task in Outlook has no duration, and you’ve set Auto Schedule as the project task mode, Project creates the task with an estimated one-day time frame.
Inserting hyperlinks
You can insert hyperlinks in a project outline, which provides a handy way to quickly open another project, another file of any type, or a web page.
To insert a hyperlink to a project document, follow these steps:
- Right-click the cell where you want the hyperlinked task to appear.
Choose Link.
The Insert Hyperlink dialog box appears, as shown in Figure 2-10.
In the Text to Display box, type the text that you want to appear for the hyperlink.
Ensure that this text clearly states what information is being summarized. In this case, I’m linking the Requirements Template to a task in the project.
In the Link To area, click the Existing File or Web Page icon.
You can link to a document of any type or to a web page.
In the Look In list, locate and select the file to which you want to insert a hyperlink.
In my example, I’m keeping the supporting documentation in a file called MS Project 2019.
Click the OK button.
The link text is inserted, and a hyperlink symbol appears in the Indicator field. You can simply click that link symbol to open the linked file.
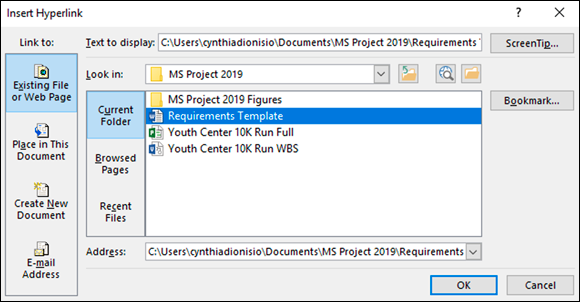
FIGURE 2-10: Linking a file.
Inserting one project into another
You can also insert tasks from one project into another. You do this by inserting an entire, existing project into another project. The project that’s inserted is called a subproject. This method is useful when various project team members manage different phases of a larger project. The capability to assemble subprojects in one place allows you to create a master schedule from which you can view, all in one place, all the pieces of a larger, more complex project.
Follow these steps to insert another Project file into the schedule:
- In Gantt Chart view, select the task in the task list above which you want the other project to be inserted.
From the Project tab, in the Insert group, select Subproject.
The Insert Project dialog box appears, as shown in Figure 2-11.
- Using the navigation pane and file list, locate the file that you want to insert, and click it to select it.
- If you want to link to the other file so that any updates to it are reflected in the copy of the project you’re inserting, make sure that the Link to Project check box is selected.
Click the Insert button to insert the file.
The inserted project appears above the task you selected when you began the insert process. You may want to click the Insert Read-Only command if you just want people to be able to view the file, but not make any changes to it.
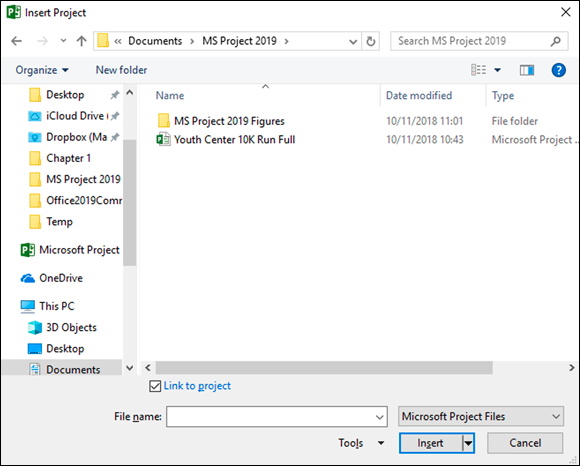
FIGURE 2-11: Inserting a link to another project.
The inserted project’s highest-level task appears at the level of the task you selected when you inserted the project, with all other tasks below it in outline order. If you need to, use the Outdent and Indent Task button (described in the following section) on the Formatting tab to place the inserted tasks at the appropriate level in the project.
Promoting and demoting: The outdent-and-indent shuffle
Outdenting and indenting are the functions you use to move tasks to higher or lower levels of detail in the WBS and the task list. In several software programs, these terms are promoting and demoting, respectively:
- Outdenting a task moves it up a level in the outline (literally shifting it to the left in the outline).
- Indenting a task moves it down a level in the outline (literally indenting the task to the right in the outline). Whenever you indent one or more tasks, the task above becomes the summary task. You can read more about summary tasks in Chapter 3.
You use tools from the Schedule group on the Task tab of the Ribbon, shown in Figure 2-12, to outdent and indent tasks in a project outline. The Outdent Task tool has a left-facing arrow; the Indent Task tool has a right-facing arrow.
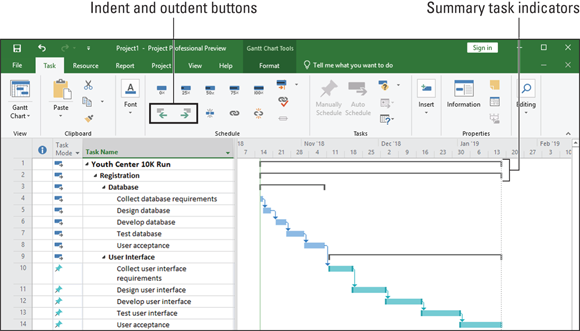
FIGURE 2-12: Outdenting and indenting.
To outdent or indent a task, follow these steps:
- Click a task to select it.
Click the Indent Task or Outdent Task button, according to the action you want to take.
When you indent a task, the task above it becomes a summary task. The summary task is in bold on the sheet. On the chart, a summary task has a bracket that stretches from the beginning of the earliest task to the end of the latest task.
You can build the outline even faster by indenting multiple tasks at a time. Drag to select multiple task IDs and then indent them. You can also use the standard Shift+click and Ctrl+click selection methods to select multiple tasks in a Project outline. Shift+click the task IDs to select contiguous tasks, and Ctrl+click to select discrete tasks.
You can indent using keystrokes by pressing Alt+Shift+right arrow. You can outdent using keystrokes by pressing Alt+Shift+left arrow.
Saving the Project
Saving Project files works just as saving does in other Microsoft software. Here’s a reminder.
To save a Project file that you haven’t yet saved, follow these steps:
- Choose File ⇒ Save As.
- Locate the folder where you want to save the file; then double-click to select it.
- The Save As dialog box will open. In the File Name text box, type a name for the project.
- Click the Save button.
Good organizational practice suggests that you create a folder for your project where you save — in one spot — your Project file and its supporting documents, such as email messages and other items. You can create a new folder from within the Save As dialog box by clicking the New Folder button.