
Chapter 10
Determining a Project’s Cost
IN THIS CHAPTER
![]() Understanding how costs accrue
Understanding how costs accrue
![]() Establishing work resource rates
Establishing work resource rates
![]() Specifying unit costs
Specifying unit costs
![]() Adding fixed costs
Adding fixed costs
![]() Allowing for overtime
Allowing for overtime
![]() Adding up all the costs
Adding up all the costs
There’s no such thing as a free lunch — and if you use Project to track costs, there’s no such thing as a free resource, because Project uses resources working on tasks as a way of calculating most of the costs of the project.
When you set up a resource, you specify a work resource rate (by default, this rate is calculated by the hour) or a material resource per use cost. You can also create cost resources — a variable cost that isn’t calculated using a per-use or hourly rate but that may be used several times in a project, such as travel expenses. For example, if you assign a resource to work ten hours on a task, give that resource an hourly rate of $50, and you’ve added a $500 cost to the project. Create a resource named cement, give it a unit cost of $200, and assign ten units (for example, ten tons of cement), and you’ve added a whopping $2,000 to the bottom line.
Some other factors come into play as well, such as how many hours a day a resource is available to work and any overtime rates. At the end of the day, all these settings come together to comprise the project cost.
This chapter helps you explore the relationship between resources and costs, and shows you how to set resource standard and overtime rates and create fixed costs.
How Do Costs Accrue?
Project helps to account for costs on various tasks with a combination of costs per hour, costs per use, costs per unit, fixed costs, and costs for specific assignments of cost resources. Before you begin to flesh out cost information about resources, you have to understand how these calculations work.
Project provides two main pictures of the budget in a project: one at the moment you freeze the original plan (a baseline plan) and the ongoing picture of actual costs that comes from the activity and material usage you record as the project moves along. You record a certain amount of work effort on tasks, and tasks with costs assigned to them then add up costs based on the effort expended or units of materials used.
Adding up the costs
The best way to understand how costs add up in the project is to look at an example. John Smith (not his real name) is managing a project that involves the building of a new gourmet ice-cream packaging plant. Here are the costs that John anticipates for the task he has created, Install Ice-Cream Mixers:
- About ten person-hours of effort to complete the installation
- A cost per use of $500 paid to the mixer manufacturer to oversee the installation and to train workers to use the machine
- Twenty pounds of ice-cream ingredients to test the mixers
- Shipping expenses of $150 for the mixers and supplies
- A fixed cost of $2,500 for the mixers themselves
The ten hours of effort will be expended by work resources. The total cost for the ten hours is a calculation: 10 × the resource rate. If the resource rate is $20, this cost totals $200. If two resources work on the task, one at a rate of $20 and one at a rate of $30, then (with effort-driven scheduling turned off by default) Project adds 20 hours of effort between them, and the resulting cost is $500.
The cost per use of $500 is a fee to the manufacturer, which is also created as a work resource. This cost doesn’t change based on the number of resources or the time involved.
The cost of 20 pounds of ice cream (any flavor you like) is calculated as 20 × the unit cost of the ice-cream ingredients. If the unit cost is $2, this cost is $40.
Shipping the new equipment and ice-cream supplies to you results in a charge of $150. Shipping was created as a cost resource because it has no associated work, and different shipping costs may apply to other tasks in the project.
Finally, the $2,500 cost for the mixers themselves was entered separately, as a fixed cost in the Cost table of Gantt Chart view.
And that’s how costs are assigned and how they add up on projects. When working in Project, you soon discover that although it has quite capable costing features, they’re probably some of the most underutilized.
 You can create and assign resources that have no associated costs. For example, if you want your boss to be available to review status reports but your company doesn’t require that your boss’s time be charged to the project, you can simply use those resource assignments to remind you about the need for your boss’s availability on that day or at that time.
When will this hit the bottom line?
In business, you rarely get to choose when you pay your own bills. In Project, however, you can choose when your costs affect your budget.
Resources can be set to accrue at the start or end of the task that they’re associated with or to be prorated throughout the life of the task. If a task of three months begins April 1, a $90 cost resource can be added to the actual costs to-date on Day 1, on Day 90, or at a dollar per day until the end of the task. Use the Accrue At field in Resource Sheet view or on the Cost Accrual drop-down list on the Costs tab of the Resource Information dialog box (shown in Figure 10-1) to set the accrual method.
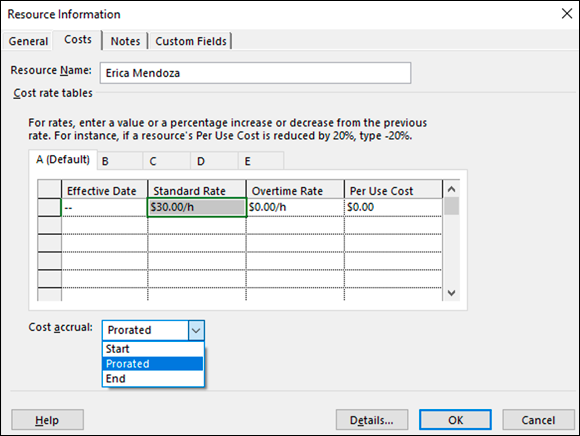
FIGURE 10-1: Cost accrual options in the Resource Information dialog box.
This scenario isn’t exactly a purely realistic reflection of how you have to pay for costs because, let’s face it: Most bills come due 30 days after they hit your desk. It’s more a factor of when you want that cost to show up for the purposes of tracking costs and reporting expenses against the project. My preference is to accrue cost at the same rate at which work is performed. This keeps costs and work aligned.
Specifying Cost Information in the Project
Most projects involve a combination of cost types: work, material, and cost (that is, fixed cost). Before you can enter the information at the task or resource level, you have to do your homework to find out the fixed costs as well as the hourly or unit rates for all your resources.
During the planning stages, you may not be able to anticipate exactly what a particular cost will be or know every resource’s rates. In this instance, you may need to develop an estimate and progressively elaborate the estimate as you know more. For example, if you know that you have a project to upgrade the lighting, painting, and landscaping for the community in a property owner’s association, you might start with a high-level estimate for the landscaping. As you find out more about the type of trees, shrubs, flowers, and labor you need, you can define costs at a more detailed and more accurate level. By starting with an estimate, at least some cost will be reflected in the plan, and you can enter more accurate information later, as soon as you know it.
Use a field in the Resource Sheet, such as the Code field, to designate resources as having estimated rates or costs so that you can easily go back to those tasks and update the estimates as the plan progresses.
You can’t avoid fixed costs
Maybe it’s that huge fee for the consulting company your boss insisted you use, even though you knew that the report wouldn’t tell you a thing you didn’t already know. Or perhaps it’s the $2,000 for a laptop computer you talked your boss into buying so that you could manage the project when you’re on the road. Whatever it is, it’s a cost that doesn’t change, no matter how many hours the task continues or how many people work on the task. It has no unit cost or rate per hour, and no actual hours of work are tracked. It’s a fixed cost.
You can specify this type of cost by entering Cost in the Type field in the Resource Sheet. Every time you assign the resource to a task, you specify the actual cost associated with it.
You can also simply enter a fixed cost associated with a task without having to create and assign a cost resource to it. To do so, you can use the Cost table in the sheet in Gantt Chart view.
 A table is a preset column combination that simplifies entering certain information in a sheet pane.
Follow these steps to enter a fixed cost for a task:
- Display the project in Gantt Chart view.
Click the View tab, and in the Data group, choose Tables ⇒ Cost.
The table of columns appears, as shown in Figure 10-2. You can insert the Fixed Cost column into any sheet, but the Cost table is ready for you to use.
- Click the Fixed Cost column for the task to which you want to assign the cost and then enter the amount.
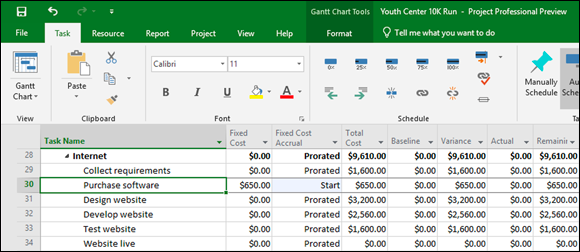
FIGURE 10-2: The Cost table.
That’s all there is to it, but because you can enter only one fixed-cost amount for a task, you should also enter a task note where you can itemize fixed costs if you have more than one. Note also that the default fixed-cost accrual method is prorated: If you prefer to have fixed costs hit the budget at the start or end of a task, use the Fixed Cost Accrual column in this table to select another option. Figure 10-2 shows the task to purchase software as having costs accrue at the start of the task.
Entering hourly, overtime, and cost-per-use rates
Whether it’s minimum wage or the astronomical fees your lawyer charges you every time you sneeze, most people are paid a certain amount per hour. To represent most people involved in the project, you create work resources and charge them to the project at an hourly rate. Some resources also charge an additional flat fee for each use. For example, a plumber may charge a trip charge or “show up” fee of $75 and then add the cost per hour. This flat fee is a cost per use, added every time you assign the resource to a task, no matter how many hours are involved in completing the task.
The first cost you enter is a resource’s hourly rate and an overtime rate (if the resource has one). After a resource has an hourly rate, you can enter the estimate of how many hours that person will work on each task he’s assigned to, and Project totals his estimated costs in your plan and adds any cost per use. When you track actual effort expended on tasks, a calculation of actual effort multiplied by the hourly rate plus any cost-per-use returns actual costs.
By comparing estimated costs and actual costs, you form an ongoing picture of whether the project is within budget.
To set resource rates per hour and cost per use for a work resource, follow these steps:
- Display Resource Sheet view.
- Click the Std Rate column for the resource to which you want to assign a cost.
Enter a dollar amount.
If you’re entering a rate for a unit other than hours, type a slash (/) and then the unit (for example, y for year or mo for month).
- Press Tab to go to the Ovt column.
- Enter a dollar amount or rate again.
- Press Tab to move to the Cost/Use column.
Type a dollar amount.
This amount is the flat-fee amount that will be added every time you assign the resource to a task.
Press Tab.
The entry is completed.
Figure 10-3 shows the work resources with their standard hourly rates and some with overtime rates.
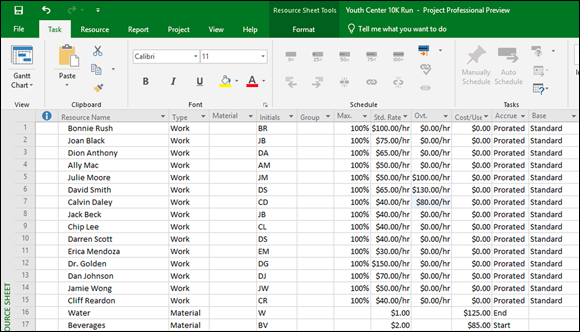
FIGURE 10-3: Resource costs.
In many projects, you don’t track the cost per resource for internal resources because people’s salaried rates are generally considered confidential. Sometimes, a standard midrange or loaded-resource rate is used to track employee rates by job grade.
Assigning material resources
Calculating the cost of a material resource might take you back to solving problems in your old high school algebra class. Fortunately, if you aren’t an algebra whiz, Project makes a straightforward calculation to arrive at the cost of using a material resource.
When you assign a work resource to a task, Project multiplies its standard hourly rate by the hours of work for the assignment. But material resources don’t have hours of work: You pay for them by the unit quantity, not by the hour. So when you set up a material resource, you specify a standard rate for a single unit (per yard, or ton, or gallon, for example) and assign a certain number of units to each task. The cost is the number of units multiplied by the cost per use.
To assign a standard unit rate for a material resource, follow these steps:
- Display Resource Sheet view.
- If you haven’t already done so, click the Material Label column for that resource and then type a unit name (such as gallon).
- Click the Std Rate column for the resource you want to set and then type a dollar amount (such as the cost per gallon).
- Press Enter or Tab to finish the entry.
Figure 10-3 shows that the water and beverages are set up at a cost per gallon, with a setup fee for the company to deliver and set up the water and beverage stations.
You can also make cost-rate entries in the Resource Information dialog box. The Costs tab of this dialog box, shown in Figure 10-4, offers columns labeled Standard Rate, Overtime Rate, and Per Use Cost.
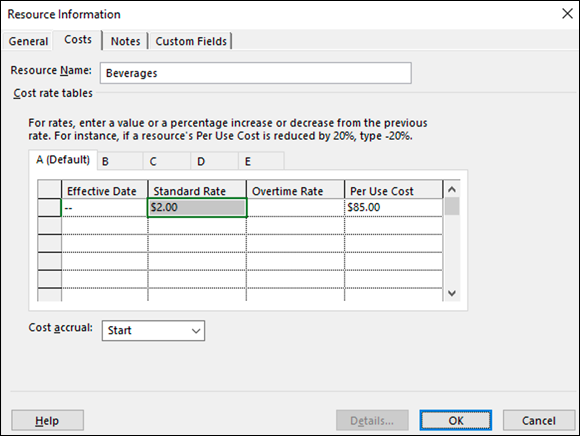
FIGURE 10-4: Setting rates in the Resource Information dialog box.
Note that you can also use the Resource Information dialog box to enter as many as five standard unit rates with effective dates to account for fluctuations in unit cost over the life of the project.
How Your Settings Affect Your Costs
In Chapter 9, I describe how to assign resources to tasks and how to assign those resources in certain units (percentages for work resources and quantity consumed for material resources). All these factors work together in calculating the cost of the resource when assigned to tasks.
Suppose that you want to assign a mechanic to a task with the following parameters:
- Base calendar: Night Shift (eight hours, six days per week, between 11 p.m. and 8 a.m.)
- Cost per hour: $40
- Overtime cost: $60
- Availability: 100 percent
- Assigned to a two-day task: 50 percent
Here’s how to calculate the cost of this resource: Two days at half-time availability based on an eight-hour calendar is a total of eight hours (four hours per day). The resource incurs no overtime, so the cost is 8 × $40 = $320.
Change two settings for the same resource to see what happens:
- Assigned to a two-day task: 150 percent
- Amount of overtime authorized: 8 hours
Now the resource is working 12 hours per day (150 percent of 8 hours) over two days. With 16 total hours at the standard rate ($40) and 8 hours of overtime ($60), this person will cost (16 × $40) + (8 × $60) = $1,120.
The great thing about Project is you don’t have to worry about completing the calculations; Project does them for you. After you specify settings for your resources, Project does the work of tallying and showing total costs to you.