
Chapter 14
It All Begins with a Baseline
IN THIS CHAPTER
![]() Saving plan information with a baseline
Saving plan information with a baseline
![]() Making use of multiple baselines
Making use of multiple baselines
![]() Setting and resetting baselines
Setting and resetting baselines
![]() Saving interim plans
Saving interim plans
Before you start tracking your progress, you need a benchmark to compare your status with so you know if you’re ahead or behind schedule. In project management, we call this benchmark a baseline. A schedule baseline is the agreed-upon version of the schedule, against which you’ll measure progress. It includes all information in the project, such as task timing, resource assignments, and costs.
An interim plan in Project is essentially a timing checklist. It includes the start and finish dates of tasks, and the estimated start and finish dates for tasks not yet started.
This chapter shows you when, why, and how to save a baseline and an interim plan for the project.
All about Baselines
After you complete all the planning necessary to develop a robust schedule (and other documents) for a project, and after you’ve made the schedule presentable, it’s time to baseline it. The baseline represents the project at the moment you consider the plan final and you’re ready to commit to it before you begin any activity. The baseline, which is saved in the original Project file, exists alongside the progress you record on tasks in the project.
Key data that a baseline captures includes the baseline start, finish, duration, work, and cost information for each task. After you save a baseline and track activity against it, you can get baseline data and actual data, as well as visual indications of your progress.
You can use a baseline to debrief yourself or the team at any point in a project. The baseline is especially useful at the end of a phase, when you can compare actual progress against estimates from many weeks or months ago. You can then improve your planning skills and learn to make more accurate estimates up front. You can also use a baseline and the actual activity that you track against it to explain delays or cost overruns and to illustrate the impact of significant scope changes to employers or clients by using a wide variety of reports and printed views.
 It’s a good practice to revisit the baseline and estimates at the end of each phase of the project. Plus, you’ll likely forget what you were thinking when you produced the original estimates.
Finally, you can also save and clear baselines for only selected tasks. If one task is thrown off track by a major change, for example, you can modify its estimates and leave the rest of the baseline alone.
Saving a baseline
You can save a baseline at any time by opening the Set Baseline dialog box. After you save a baseline the first time, the baseline data of a summary task is updated if you make changes to a subtask below it, such as changing the start date for a task or deleting a task. However, when you’re saving the baseline for only a selection of tasks, you can change that functionality by making a choice about how the baseline rolls up, or summarizes, data. You can choose to have modifications rolled up to all summary tasks or only from subtasks for any summary tasks you select. This second option works only if you’ve selected summary tasks and haven’t selected their subtasks.
To use rolling wave planning, save a baseline for only selected tasks. In other words, perhaps you’ve sufficiently detailed the early tasks in the first phase or first month or two of a large project, and you’re ready to commit to that part of the plan, but the latter detail still needs to be finalized. Saving a baseline for earlier tasks allows you and the team to get working on those tasks while allowing for the progressive detailing of later tasks down the line.
To save a baseline, follow these steps:
- To save a baseline for only certain tasks, select them by dragging over their task ID (row) numbers.
Click the Project tab, and in the Schedule group, click the Set Baseline drop-down arrow, and choose Set Baseline.
The Set Baseline dialog box appears, with the Set Baseline radio button selected, as shown in Figure 14-1.
- Select either the Entire Project radio button or the Selected Tasks radio button.
If you chose Selected Tasks in Step 3, make selections for how the baseline rolls up changes to task data.
You can summarize changed data in all summary tasks or for only selected summary tasks.
- Click the OK button to set the baseline.

FIGURE 14-1: Setting baselines and interim plans.
Saving more than one baseline
The concept of multiple baselines seems almost contrary to the definition of a baseline. After all, the purpose of a baseline is to set the proverbial stake in the sand and measure progress against it. You might keep multiple baselines for several purposes. Consider these reasons:
- You have a baseline plan for a customer and another one for the internal team. In other words, you might want to steer the team to a tighter deadline than the promised delivery date.
- You have multiple scenarios for the project. Maybe you’re unsure whether you’ll need an extra widget for the gadget you’re building. You can set one baseline that assumes the extra widget is unnecessary and set another baseline that assumes it’s vital.
- You’re anticipating a risk event taking place. You want to develop a recovery plan or response plan in one baseline version of the plan.
- You’re analyzing the effect of a change to the project schedule (or another element of the project plan) that affects the project or product scope. You can set a different baseline to see the before-and-after effect of the change, though in this case you may prefer to reset the baseline. I discuss resetting the baseline in the later section “Clearing and resetting a baseline.”
The Set Baseline dialog box includes a list of these baselines, with a date stamp of the last date each was saved, as shown in Figure 14-2. When you save a baseline, you can save without overwriting an existing baseline by simply selecting another one of the baselines in this list before saving.
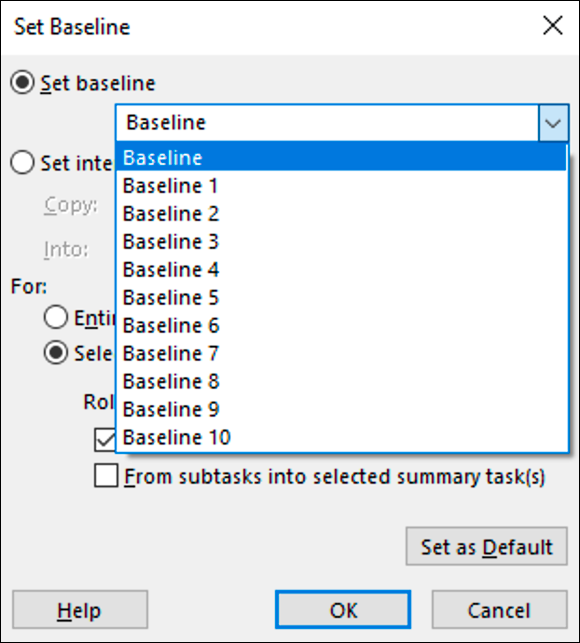
FIGURE 14-2: Multiple baseline options.
If you save multiple baselines or interim plans, you can view them by displaying columns in any sheet view for those plans. For example, if you want to display information for a baseline you saved with the name Baseline 7, you would insert the column named Baseline 7 into the Gantt Chart view sheet.
You can view multiple baselines at one time by going to View in the Task Ribbon, clicking to show the drop-down menu, selecting More Views, and then selecting Multiple Baselines Gantt. Then click Apply.
 When calculating variances (whether the schedule is early or late or costs are over or under budget), Project uses only the first baseline that’s saved (the one named Baseline, not Baseline1). If the project schedule and other parameters change dramatically, such as when a project is delayed and later revived, you produce more valid variance data by clearing and resetting the baseline, as described in the next section.
The more baselines you save, the larger the Project file becomes and the more it can slow performance.
Clearing and resetting a baseline
A baseline is intended to be a frozen picture of the project plan that remains sacrosanct and never changes. Well, that’s the theory. In practice, events can make an original baseline less than useful — and even obsolete.
For example, if a project that spans four years from beginning to end, you may want to save a new baseline every year because costs increase or resources change. Then you can see incremental versions of the estimates that reflect the changes you made based on changes in the real world.
In contrast, a project that starts with a well-thought-out baseline plan can change a week later when the entire industry shuts down from a massive strike that lasts for three months. All original timing estimates then become irrelevant, so you would adjust the plan, save a new baseline, and move ahead after the strike is resolved.
To clear an existing baseline, follow these steps:
- To clear the baseline for only certain tasks, select them.
Click the Project tab and, in the Schedule group, click the Set Baseline drop-down and choose Clear Baseline.
The Clear Baseline dialog box appears, with the Clear Baseline Plan option selected by default.
- From the Clear Baseline Plan drop-down list, choose a baseline to clear, as shown in Figure 14-3.
- Select either the Entire Project radio button to clear the baseline for the entire project or the Selected Tasks radio button to clear selected tasks.
Click the OK button.
The project baseline is cleared or selected tasks are cleared.

FIGURE 14-3: Clearing the baseline.
In the Interim
An interim plan is sort of a “baseline light,” in which you save only the actual start and finish dates of tasks that have had activity tracked on them, as well as the baseline start and finish dates for all tasks that haven’t started.
An interim plan saves only timing information; other information, such as all the data about resource assignments and costs, is not saved. If timing information is all you need, an interim plan is a great way to save space. (When you save a large number of baselines, the Project file is huge. Saving an interim schedule makes the schedule less bulky.)
Because a baseline holds a great deal of data, the baseline can eventually become obsolete. An interim plan can be saved to record date changes but not overwrite the original baseline cost data.
Finally, you’re allowed to save as many as 11 baseline plans (the original baseline plus baselines 1–10). If you need more than 11, consider using interim and some baseline data to expand the number of sets of data you can save.
Don’t go crazy for baselines and interim plans. Even in a long-term project, saving too many sets of plans can become confusing. To keep track of a plan when you save it, print a copy for your records, and note when and why the plan was saved.
Saving an interim plan
Interim plans and baselines are saved using the same dialog box. The difference is that you have to specify where the data in an interim plan originates. For example, if you want to save the start and finish dates from the Baseline2 plan to the third interim plan, you copy from Baseline2 to Start/Finish3. If you want the current scheduled start and finish dates for all tasks, choose to copy from Start/Finish.
If you want to change currently scheduled start and finish dates in a baseline, but you don’t want to change all the other data that’s typically saved in a baseline, you can copy from Start/Finish to the baseline plan that you want to change.
Follow these steps to save an interim plan:
- To save an interim plan for only certain tasks, select them.
Click the Project tab and, in the Schedule group, click the Set Baseline drop-down arrow, and choose Set Baseline.
The Set Baseline dialog box appears.
- Select the Set Interim Plan radio button.
- From the Copy drop-down list box, select the set of data that you want to copy to the interim plan.
- From the Into drop-down list box, select the fields in which you want to store the interim plan data, as shown in Figure 14-4.
- Select the appropriate radio buttons to save the plan for the entire project or selected tasks.
- Click the OK button to save the plan.

FIGURE 14-4: Copy settings from any saved baseline to an interim plan.
By using the Copy and Into fields in the Set Baseline dialog box, you can save as many as ten interim plans based on either baseline or actual data.
Clearing and resetting an interim plan
Ten interim plans may seem like a lot when you’re starting out in Project, but in the thick of a busy and ever-changing project, ten may fall short of the number you need. You may eventually need to clear one and resave it.
Project piggybacks baseline and interim plan settings, so you choose the Clear Baseline menu command to clear an interim plan.
To clear an interim plan, follow these steps:
- To clear only certain tasks in an interim plan, select them.
Click the Project tab and, in the Schedule group, click the Set Baseline drop-down arrow, and choose Clear Baseline.
The Clear Baseline dialog box appears, as shown in Figure 14-5. You can use it to clear and reset interim plans as often as you like.
- Select the Clear Interim Plan radio button, and then, from the accompanying drop-down list, choose the plan that you want to clear.
- Click to clear the specified interim plan for the entire project or for any tasks you’ve selected.
- Click the OK button to clear the plan.

FIGURE 14-5: The Clear Baseline dialog box.
You can now save a new set of information to that interim plan, if you like.
You may want to save a backup copy of various versions of the file with interim and baseline data. If you clear a baseline or an interim plan, its data disappears forever.