
Chapter 4
The Codependent Nature of Tasks
IN THIS CHAPTER
![]() Identifying the different kinds of dependency relationships
Identifying the different kinds of dependency relationships
![]() Creating dependency links
Creating dependency links
![]() Discovering how dependency links affect timing
Discovering how dependency links affect timing
![]() Allowing for lag and lead time
Allowing for lag and lead time
![]() Reflecting the timing of external tasks in your project
Reflecting the timing of external tasks in your project
Imagine this: If you create a hundred tasks and leave their default constraints so that they start as soon as possible and have no dependencies, all those tasks start on the project start date and occur simultaneously. The project consisting of a hundred tasks takes exactly as long to complete as the longest task.
Wander back over here to reality for a moment. When did you ever have a set of tasks in which not a single task had to be completed before another one could start? Imagine what would happen if you tried to train your employees to use a new piece of equipment before the equipment even arrived.
The reality is that not all tasks in a project start at the same time. To reflect this reality in a Project plan, you have to set dependency links between tasks. Dependencies are timing relationships between tasks — for example, when one task depends on the completion of another. Dependencies are caused by one of these factors:
- The nature of the tasks: You can’t frame a house, for example, until its concrete foundation is dry; otherwise, the building will sink. This concept is sometimes referred to as a mandatory dependency or hard logic.
- A best practice or preference: You should document all requirements before you start designing, however — you can start some of the high-level design work before documenting every requirement; it just isn’t a good practice to do so. This concept is sometimes referred to as a discretionary dependency or soft logic.
- Resource availability: When your operations manager can’t attend two plant inspections simultaneously, the situation is known as a resource dependency.
- Reliance on a resource or an action outside the project: When you need a deliverable from another project before you can start your work, or you’re waiting on someone from an external agency to sign off on it, you have an external dependency.
How Tasks Become Dependent
In Chapter 1, I talk about manually scheduled tasks versus auto-scheduled tasks. If you allow the auto-scheduling and your network logic (dependencies) to build your schedule instead of manually assigning specific dates to tasks, Project can reflect changes to your schedule and adjust the dates and timing automatically.
For example, if the task of receiving materials in-house is delayed by a week, the dependent task of starting the manufacturing process moves out a week automatically. You can note the change when you’re tracking activity in your plan, and Project makes adjustments accordingly. The alternative is to change the start date of just about every task in your schedule every time a task is running late; you don’t even want to think about doing that!
Dependent tasks: Which comes first?
When we talk about task relationships, we talk about a task having a predecessor and successor. The predecessor task comes first and impacts when the successor (following) task is scheduled, particularly under the auto-scheduling method.
Figure 4-1 shows you how the taskbars in Gantt Chart view graphically depict the predecessors and successors in dependency relationships between tasks. Notice how taskbars represent the relationship when a task starts after another task. Also notice the lines drawn between tasks: These lines indicate dependency links.

FIGURE 4-1: Dependency relationships.
 Here’s some important advice about dependencies: You can have more than one dependency link to a task, but don’t overdo it. Many people who are new to Project make the mistake of building every logical timing relationship that can exist. If the situation changes and the dependencies have to be deleted or changed (for example, to shorten a schedule), the web of dependencies starts to get convoluted — and can easily create a nightmare.
For example, you must complete the tasks of obtaining a permit and pouring a foundation for a building before you can start framing it. However, if you set up a dependency between obtaining the permit and pouring the foundation, setting a dependency from foundation to framing is sufficient to establish the correct timing. Because you can’t start pouring the foundation until you have a permit, and you can’t frame until you pour the foundation, framing can’t start before you have a permit. This common mistake is known as having a redundant predecessor.
You don’t have to use dependencies to prevent resources from working on two tasks simultaneously. When you set the availability of resources and assign them to two tasks happening at the same time, you can use tools such as Team Planner view (see Chapter 9) and resource leveling (discussed in Chapter 12) rather than establish a dependency that forces one task to happen after another. Resource leveling delays tasks when scheduling causes a resource overallocation. See Chapters 9 and 12 for more about how resource assignments affect task timing.
Dependency types
There are four types of dependency links: finish-to-start, start-to-start, finish-to-finish, and start-to-finish. Using these types efficiently can mean the difference between a project that finishes on time and one that’s still limping along long after you retire.
Here’s how the four dependency types work:
Finish-to-start: This most common type of dependency link should account for about 90 percent of the dependencies you create. In this relationship, the predecessor task must be completed before the successor task can start. When you create a dependency, the default setting is finish-to-start.
An example of a finish-to-start dependency is when you must complete the Develop Database task before you can begin the Test Database task. All the dependencies shown in Figure 4-1 are finish-to-start. The relationship is indicated by a successor taskbar that starts where the predecessor taskbar leaves off. You see the finish-to-start type abbreviated as FS.
The finish-to-start dependency is the default dependency. Therefore, you will not see FS (for finish-to-start) unless there is a lead or a lag.Start-to-start: The start of one task is dependent on the start of another. In this dependency type, two tasks can start simultaneously, or one task might have to start before another task can start. For example, assuming that you have the resources, you can start collecting requirements for payment and confirmation at the same time. A start-to-start relationship is abbreviated as SS.
Figure 4-2 shows, accordingly, the start-to-start relationship between the Collect Payment Requirements and Collect Confirmation Requirements tasks. Note in the Predecessors column that Collect confirmation requirements shows 15SS. That means the start is dependent on the start of Task 15, in this case Collect payment requirements.
Finish-to-finish: In a finish-to-finish relationship, one task (you guessed it) must finish before or at the same time as another task.
Suppose that you’re developing copy for print advertising. You know that the copy will require several rounds of writing and editing. Rather than show a Write ⇒ Edit ⇒ Write ⇒ Edit ⇒ Write ⇒ Edit set of tasks, you can show Write and Edit in a finish-to-finish relationship in which editing finishes at the same time as, or after, writing is done. Figure 4-3 shows a finish-to-finish relationship between Write Copy and Edit Copy. In the Predecessor column, you will see Finish-to-finish is abbreviated as FF.
Start-to-finish: In a start-to-finish dependency, the predecessor task can finish only after the successor task has started. If the successor is delayed, the predecessor task can’t finish. Of course, this type of relationship is abbreviated as SF.
Suppose that you’re bringing online a new accounting application. The predecessor task of Turn Off Old Application can’t be completed before the successor task of Start Up New Application has started. You need to make sure the new application works as expected, even though you have tested it — so you might run both for a month or so. Therefore, the demise of the old application is dependent on when the new application starts up.

FIGURE 4-2: The start-to-start relationship.
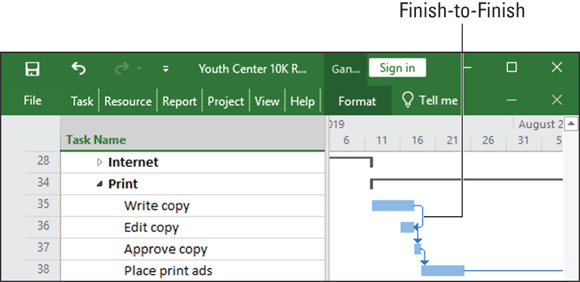
FIGURE 4-3: The finish-to-finish relationship.
 The start-to-finish dependency type is tricky. Leave this type of logic to the professional schedulers and try to find a different way to indicate the relationship between tasks. Often, simply breaking down the tasks and resequencing them accomplishes the same goal.
Allowing for Murphy’s Law: Lag and lead time
Dependencies can become a little more complex than simply applying the four types of dependency links that I describe in the preceding section. You can use lag time or lead time to fine-tune your timing relationships:
- Lag time occurs when you add time to the start or finish of a predecessor task; lag time causes a gap in timing, which delays the start of the successor task. For example, a period almost always exists between sending out a Request for Quote for a service and receiving the quotes. Figure 4-4 shows the lag time that’s scheduled between the Send Out RFQ and Review Quotes tasks. When you show a lag, you show the plus (+) sign and then the amount of lag. For example, a lag of one week is shown as +1wk (wk is the abbreviation for week). Therefore, the relationship between Send Out RFQ and Review Quotes is FS+1wk.
- Lead time is created when you accelerate time between the start or finish of the predecessor. In Figure 4-5, you see that the call for volunteers is set to start eight weeks before the race day — this gives us a start-to-start with an eight-week lead. We also don’t have to wait for all the volunteers to be onboard before we start assigning roles. In this case, we’re overlapping the call for volunteers and assigning the roles by a week. This is called fast tracking. Finally, we want the Train volunteers task to be done two days prior to the race, so we set a finish-to-finish with a two-day lead (FF-2d). A lead is sometimes considered negative lag.
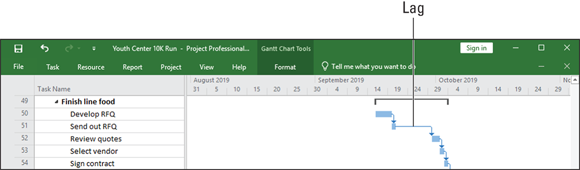
FIGURE 4-4: Lag time between tasks.

FIGURE 4-5: Lead time between tasks.
Setting the Dependency Connection
Setting dependency relationships is simple: You create a dependency, select the dependency type, and build in any lag time or lead time. The tricky part lies in understanding how each type of dependency affects your plan when your project goes live and you start to record actual work that resources perform on tasks.
Adding the dependency link
When you create a dependency, it’s a finish-to-start relationship by default: One task must finish before another can start. If that’s just the kind of dependency you want, that’s all there is to it. If it isn’t the kind you want, after you create this link, you can edit it to change the dependency type or to build in lag or lead time.
To establish a simple finish-to-start link, follow these steps:
Display Gantt Chart view and ensure that the two tasks you want to link are visible.
You may have to collapse some tasks in your project or use the Zoom button on the View tab to fit more tasks on the screen.
Click the predecessor task and Ctrl+click the successor task, and when both tasks are highlighted, click the Chain Link icon (see Figure 4-6) on the Task file tab in the Schedule Group.
You can continue holding down the Ctrl key and highlighting as many tasks as you want to link. Figure 4-6 outlines the Link button and Unlink buttons.

FIGURE 4-6: Linking and unlinking tasks.
You can link multiple tasks in a row in a finish-to-start relationship by clicking the first task and dragging to the last task. When you release the mouse button, click the Chain Link icon to link all the tasks in order.
Best practice is to link only subtasks, which represent the actual work performed, not the summary tasks. The Ctrl+click method is helpful for skipping over summary tasks when selecting tasks for linking. Regardless of the method you use to select the tasks to link, the task that’s selected first always becomes the predecessor. Therefore, if you’re not careful in how you select the tasks, the dependency arrow could move backward in the schedule.
To establish a link in the Task Information dialog box or to modify an existing relationship, make note of the task ID number of the predecessor task and then follow these steps:
Double-click the successor task.
The Task Information dialog box opens for the selected task.
Click the Predecessors tab, as shown in Figure 4-7.
On this tab, you can build as many dependency relationships as you like.
In the ID field, type the task ID number for the predecessor task.
Alternatively, you can select the task from the Task Name drop-down list. All the tasks you’ve already entered into the project appear. To display this list, click the next blank Task Name cell and then click the drop-down list arrow that appears.
Press Tab.
The task name and the default finish-to-start dependency type showing 0d (no days, which is the default unit of time) of lag time are entered automatically.
- Click the Type column and click the arrow that appears to display the dependency types, and then click the appropriate dependency for your situation.
If you want to add lag or lead time, click the Lag field and use the spinner arrows that appear to set the amount of time.
Click up to a positive number for lag time, or click down to a negative number for lead time.
- Repeat Steps 3 through 6 to establish additional dependency relationships.
- When you’re finished, click the OK button to save the dependencies.

FIGURE 4-7: Setting dependency relationships.
To “keystroke” a link between tasks, select both tasks and then press Ctrl+F2. To unlink, press Ctrl+Shift+F2.
Another way to enter dependencies is to expand the Task Sheet pane until you see the Predecessors column. You can enter the task number of the predecessor task directly into that column, as shown in Figures 4-4 and 4-5.
Words to the wise
I can’t stress enough how important it is to understand the nature of your dependencies. Assuming that you have identified the project work correctly, the way tasks are linked, coupled with your duration estimates (described in Chapter 5), is the key driver to developing an accurate schedule for your project. If you don’t enter the correct relationship between tasks, or if you leave out a linkage, your schedule will be incorrect.
When all your tasks are logically linked, the result is a network diagram, or precedence diagram — a visual display of how all the tasks relate to one another. This diagram shows the flow of work through the project. If you’re missing a relationship or dependency, the flow isn’t right, and you’re likely to be late or to have to scurry to try to make up for your oversight.
Every task except the first and last tasks has a predecessor and a successor. If one of these elements is missing, the hanger task is left dangling. If a task has no predecessor, connect the task to the start milestone of the project. If the task has no successor, connect the task to the end of the phase or the finish milestone of the project.
In addition to making sure you understand the predecessor and successors of each task, you should make sure that the type of relationship is correct. If you try to save time by overlapping tasks, you should understand whether a FS relationship with a lead is a better option than an FF or SS with a lag. To help you determine the better option, ask yourself these questions:
- If the start of the predecessor is delayed, will it cause the successor to be delayed?
- If the finish of the predecessor is delayed, will it cause the successor to be delayed?
The answer to these questions will help you understand how the predecessor task affects the scheduling of the successor task.
Understanding that things change: Deleting dependencies
Just like the latest trend in fashion, dependencies in a project can suddenly change. For example, sometimes they’re no longer needed because of a shift in priorities or overall project timing. When you need to get rid of a dependency, you can undo what you did in either the Gantt Chart or the Task Information dialog box.
Leading practices in project management suggest that dependencies should not be built based on resource availability when first creating the schedule. Rather, you should concern yourself with the logical order of the work regardless of who does it at this point in creating your schedule. Resource leveling, or the smoothing out of the peaks and valleys of resource usage, is always a factor in scheduling, of course, but it is a factor that will be addressed in later steps in project planning.
With Gantt Chart view displayed, follow these steps:
- Select the two tasks whose dependency you want to delete.
- For two adjacent tasks: Drag to select their ID numbers.
- For nonadjacent tasks: Click one task, press and hold Ctrl, and then click a nonadjacent task.
- Click the Unlink Tasks button in the Schedule group on the Task tab (refer to Figure 4-6).
Use the above method carefully. If you click only one task and then click the Unlink Tasks button, the result is somewhat drastic: All dependency relationships for that task are removed.
To remove dependency relationships in the Task Information dialog box, here’s the drill:
Double-click a successor task name.
The Task Information dialog box appears.
- Click the Predecessors tab to display it.
Click the Type box for the dependency you want to delete.
A list of dependency types appears, as shown in Figure 4-8.
- Choose None.
Click the OK button to save the change.
The dependency line on the Gantt chart is gone. The next time you open that Task Information dialog box, the dependency is gone, too.

FIGURE 4-8: You can use the Predecessors tab to create and delete dependency links.