
9. Using Graphics and Multimedia
Web Image Formats
It’s often said that content is king in a site. If that’s true (and I agree that it is), graphics definitely hold the title of queen. Quality graphics often make the difference between an amateur site and a professional one. Nothing can add an aura of professionalism like quality graphics.
Not all graphics are created equal, however. Part of projecting a professional impression is the proper choice of image formats. The most common image formats on the Web are GIF and JPEG. PNG is another image format that is growing in popularity for many reasons, some of which we discuss in this section.
The GIF Format
The GIF format is best suited to nonphotographic images that contain mostly straight lines. (Text, for example, is best suited to the GIF format.) GIF images can contain a maximum of 256 colors, but you can save them with fewer colors to achieve a smaller file size.
The GIF format has the advantage of being a lossless format. That means, in most cases, you can edit a GIF image as many times as you want without reducing the quality of the image. GIF images are also color-indexed, which means each image has a table of colors saved with it. By reducing the number of colors in the color table, you can reduce the file size of an image. If you remove a color that actually exists in the image, the GIF format can combine other colors in the color table to try to reproduce the color that was removed. This process is known as dithering.
GIF images also support transparency. Colors in the color table can be marked as transparent. A color marked as transparent is not visible in the final image; instead, the content underneath the image shows through. Transparent images are useful when you want background colors to show through, and they are useful as a formatting tool. Many designers place a transparent GIF inside a table cell to act as an invisible spacer.
The JPEG Format
JPEG images are best suited to photos and other graphics that consist of many colors. The JPEG format supports full-color images and can be compressed with excellent results. However, unlike GIF images, once you compress a JPEG image, it loses quality that can never be recovered. If a JPEG is edited multiple times, the quality can be dramatically degraded.
Note
![]()
The PNG format supports alpha transparency, which means a color can be set to varying degrees of transparency.
JPEG images do not support transparency, so if you want an irregularly shaped JPEG to appear on a particular background color, make the background of the actual image the same color as the background color on which it will appear.
The PNG Format
PNG images combine the best features of GIF and JPEG in a single format. PNG images support transparency and full-color reproduction.
Caution
![]()
Not all browsers fully support the PNG format. You can check your browser’s compatibility at www.w3.org/Graphics/PNG/.
Inserting Images
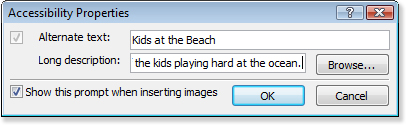
To insert an image, select Insert, Picture, From File. After you insert the desired image, Expression Web displays the Accessibility Properties dialog, as shown in Figure 9.1.
Figure 9.1. Using the Accessibility Properties dialog is the easiest way to ensure that most visitors can access your site.
You can also insert a picture directly from a scanner or camera by selecting Insert, Picture, From Scanner or Camera. The interface you see with this method is dependent on the camera or scanner.
Caution
![]()
It is strongly recommended that you include alternative text and long descriptions for all images to comply with current accessibility guidelines.

<img alt="Eating" src="file:///E:/Pictures/101_0118.JPG" />
<img alt="Eating" src="images/101_0118.JPG" />
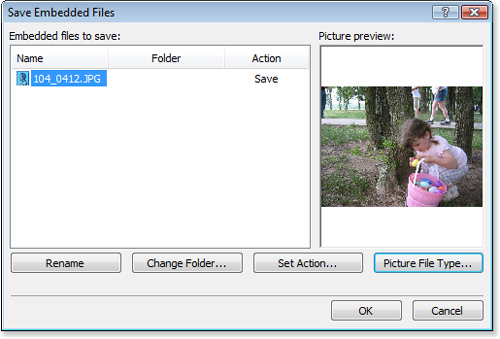
Inserted images can be located anywhere. If an image is not already located in the current site, Expression Web displays the Save Embedded Files dialog and prompts you to save the image into the site when the page is saved, as shown in Figure 9.2.
Figure 9.2. Expression Web prompts you to save embedded images when a picture is not already located in the current site.
Note
![]()
Expression Web also displays the Save Embedded Files dialog when you edit an existing image on a page.
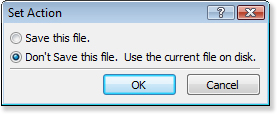
On some occasions you might want to link directly to an image on another site. When you do this, Expression Web displays the Save Embedded Files dialog and prompts you to save the image into the site. If you’d prefer not to save the image into your site, click the Set Action button and select the Don’t Save This File option, as shown in Figure 9.3.
Figure 9.3. You can choose to leave an image where it is instead of saving it to your site.
Caution
![]()
Before you link directly to an image on someone’s site, make sure it’s okay with the site owner. There are plenty of legitimate uses of this technique (affiliate images, for example), but it’s something you don’t want to do unless the owner of the site hosting the image approves.
Formatting Images
Many formatting options are available after you’ve inserted an image.
Tip
![]()
Expression Web also includes the ability to import Photoshop images directly into your site. For more information, see “Importing Adobe Photoshop Files” later in this chapter.
Resizing Images
To resize an image, select the image and drag one of the sizing handles that appear around the edges of the image. By default, Expression Web allows you to change an image’s proportions. In other words, when you change an image’s width, the height will not change proportionately by default.
In many cases, you just need to size an image without changing the proportions. To do that, press and hold the Shift key while dragging the sizing handle at the lower-right corner of the image. As you size the image either horizontally or vertically, Expression Web sizes each dimension proportionately.
After an image is resized, Expression Web displays the Picture Actions button. Clicking the button displays the options shown in Figure 9.4.
Figure 9.4. The Picture Actions options can make an image file smaller for faster downloads.

Using the Picture Actions options, you can choose between simply modifying the height and width attributes in the HTML code or resampling the file.
Resampling is often the best choice, especially if you have sized the image to a smaller dimension. When you resample an image that is smaller than its original dimensions, Expression Web applies a complex algorithm to the image. Doing so not only makes it look much better, it also substantially reduces the file size.
Changing Picture Properties
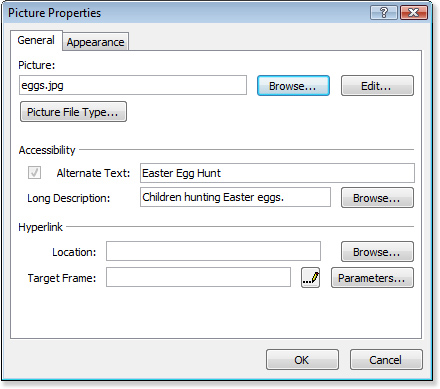
To edit the properties of an image, select the image, and then select Format, Properties to display the Picture Properties dialog shown in Figure 9.5.
Figure 9.5. Many properties of an image can be modified using the Picture Properties dialog.
Tip
![]()
You can also access the Picture Properties dialog by double-clicking an image or by right-clicking an image and selecting Picture Properties from the menu.
On the General tab of the Picture Properties dialog, you can change many general options for an image, including configuring a hyperlink for the image. You also can edit the image in an external editor by clicking the Edit button. When you click the Edit button, the image file opens in the image editing application associated with the image type.
![]() For information on configuring editors for images and other files, see “Configuring File Editors,” in Chapter 3, p. 65.
For information on configuring editors for images and other files, see “Configuring File Editors,” in Chapter 3, p. 65.
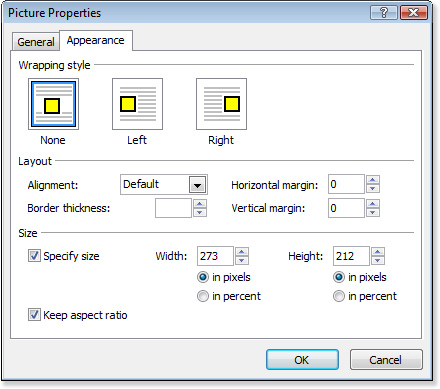
The Appearance tab of the Picture Properties dialog provides access to many useful image formatting tools. As shown in Figure 9.6, you can modify an image’s wrapping style, layout, and size.
Figure 9.6. Many useful properties can be modified on the Appearance tab of the Picture Properties dialog.
One of the most useful properties of an image is its wrapping style. Figure 9.7 shows an image with the default wrapping style of None. The same page is shown in Figure 9.8, but the wrapping style of the image has been changed to Left. Notice that the image appears on the left edge of the text in Figure 9.8.
Figure 9.7. The image pictured here has the wrapping style set to None, the default setting. Notice that the text appears below the image.
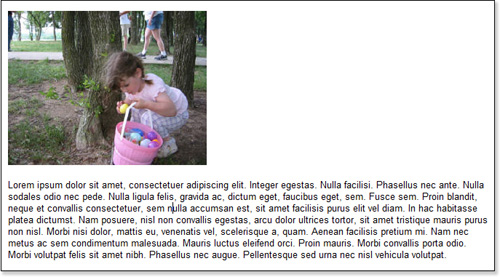
Figure 9.8. Here is the same page as in Figure 9.7, but the image now has a wrapping style of Left. Note that the image appears on the left edge of the text.
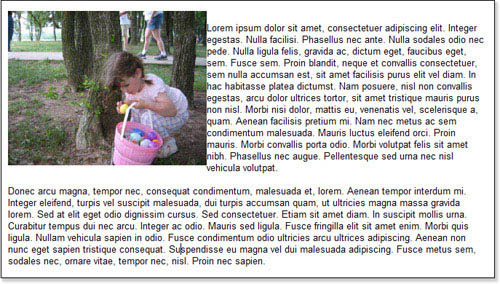
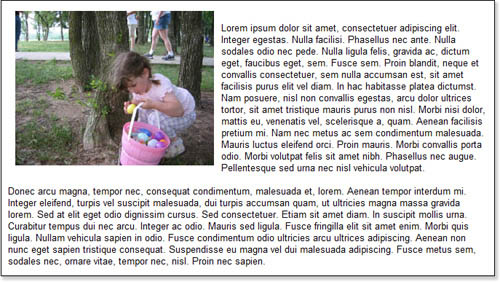
You might have noticed that the text in Figure 9.8 appears right up against the image. By adjusting the Horizontal Margin in the Picture Properties dialog, you can add a small buffer between the image and the text, as shown in Figure 9.9.
Figure 9.9. With the addition of a 10 px horizontal margin, the page now looks much cleaner.
Converting Images
You can easily convert an image from one format to another. To convert an image, right-click the image and select Change Picture File Type to display the Picture File Type dialog, as shown in Figure 9.10.
Figure 9.10. Changing a picture file type can reduce an image’s file size.
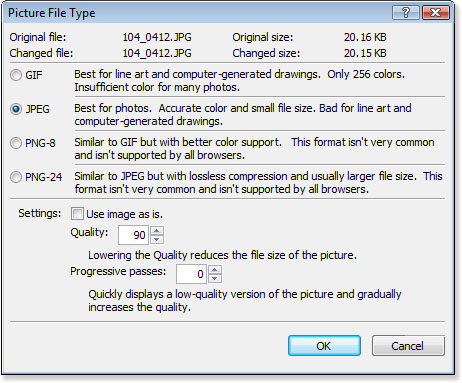
You might want to convert an image to another format to make the image file size smaller. For example, if you have been given a photograph in GIF format for use in a site, you’ll likely be able to substantially reduce the file size of the image by converting it to a JPEG image. On the other hand, if you are given a logo in JPEG format that contains only a few colors, you can likely make the file much smaller by converting the logo to a GIF image.
The options available in the Picture File Type dialog differ based on the image format you select. Figure 9.10, shown previously, shows the options for the JPEG format. If you select GIF as the image format, you are given the option to make the image transparent.
You can set the transparency of a GIF image only if a transparent color has already been selected for the image using the Pictures toolbar or a graphics editing program. Follow these steps to set the transparent color using the Pictures toolbar:
- Select View, Toolbars, Pictures to display the Pictures toolbar.
- Select the image.
- Click the Set Transparent Color button on the toolbar, as shown in Figure 9.11. If the image is not already a GIF image, Expression Web informs you that it will convert the image.
Figure 9.11. The Pictures toolbar lets you easily set a transparent color on a GIF image.
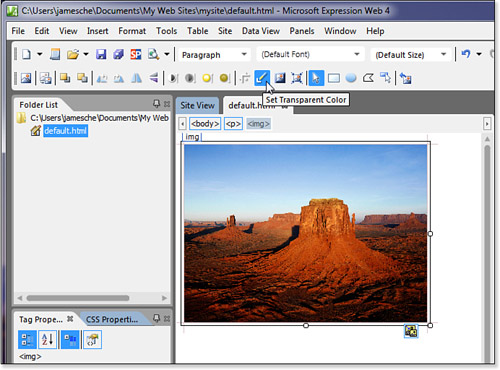
- Click the color you want to make transparent. The color should immediately disappear, revealing the color underneath it.
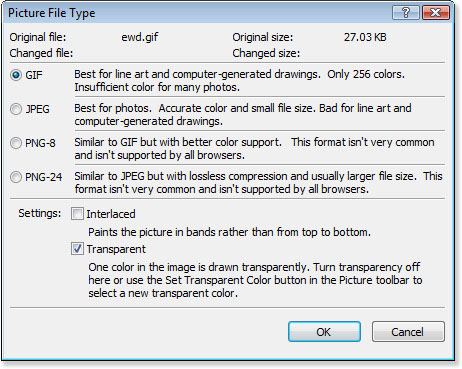
After you’ve added transparency to an image, you can use the Picture File Type dialog to disable transparency again by unchecking the Transparent check box shown in Figure 9.12.
Figure 9.12. The Transparent check box is checked when transparency has been applied to an image. Unchecking it removes the transparency and restores the image’s original color.
Creating Image Thumbnails
A common technique for displaying larger images is to show a small version of an image (called an image thumbnail) that can be clicked to show the larger version. This technique (often used in e-commerce sites) prevents site visitors from having to download large versions of images they aren’t interested in viewing.
Expression Web can automatically create image thumbnails for your images and also automatically creates links to the larger images. To create an image thumbnail, follow these steps:
- Insert an image.
- If the Pictures toolbar is not visible, select View, Toolbars, Pictures to display it.
- Select the image and click the Auto Thumbnail button on the toolbar, as shown in Figure 9.13.
Figure 9.13. Creating a thumbnail image is as easy as clicking a button.
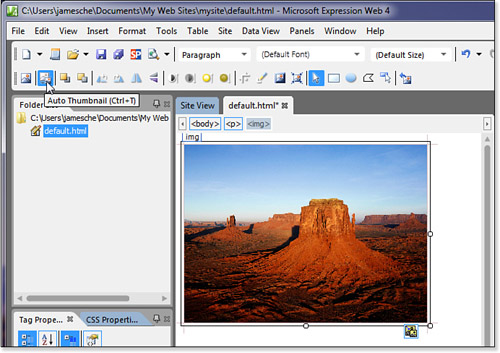
When you create an auto thumbnail, Expression Web resizes the image to be much smaller. It also adds a hyperlink that displays the larger version when you click it.
Tip
![]()
To remove the blue border around image thumbnails, set the border to 0 pixels in the Page Editor Options dialog. Note that changes here affect only new thumbnails and not existing ones.
<meta http-equiv="imagetoolbar" content="no" />
<img galleryimg="no" alt="Eating" src="images/101_0118.JPG" width="160"
height="120" />
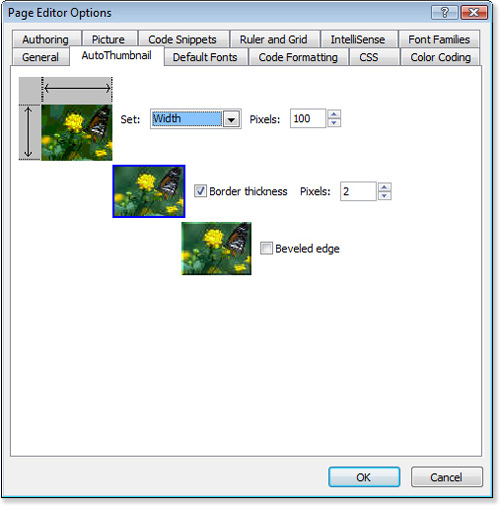
Configuring Auto Thumbnails
By default, Expression Web creates a thumbnail image that is 100 pixels wide. It also displays a blue border around the hyperlinked thumbnail. You can change these default settings using the AutoThumbnail tab on the Page Editor Options dialog, as shown in Figure 9.14.
Figure 9.14. You can configure how Expression Web creates auto thumbnails by using the Page Editor Options dialog.
Creating Image Maps
An image map is an image on which one or more regions are configured as hyperlinks. You can configure any number of hotspots on an image and configure a new hyperlink for each one.
To create an image map, follow these steps:
- Insert an image and enable the Pictures toolbar.
- Select the image, and then click one of the hotspot buttons on the Pictures toolbar. You can select a rectangular hotspot, a circular hotspot, or a polygonal hotspot, as shown in Figure 9.15.
Figure 9.15. To create a hotspot on an image, select the image and then use one of the three hotspot type buttons on the Pictures toolbar.
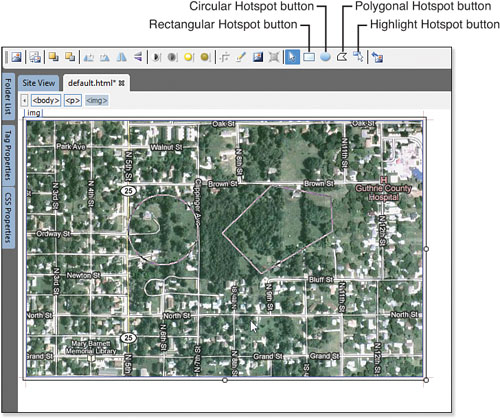
- Click and drag the image to create the hotspot. When creating a polygonal hotspot, click and drag to create each side until the polygon is closed on all sides.
When you release the mouse (or when a polygonal hotspot is closed on all sides), Expression Web displays the Insert Hyperlink dialog so you can configure the hyperlink for the hotspot. After the hyperlink has been created, you can edit it by right-clicking the hotspot and selecting Hyperlink from the menu or by double-clicking the hotspot.
![]() For information on using the Insert Hyperlink dialog, see Chapter 3, “Creating Pages and Basic Page Editing.”
For information on using the Insert Hyperlink dialog, see Chapter 3, “Creating Pages and Basic Page Editing.”
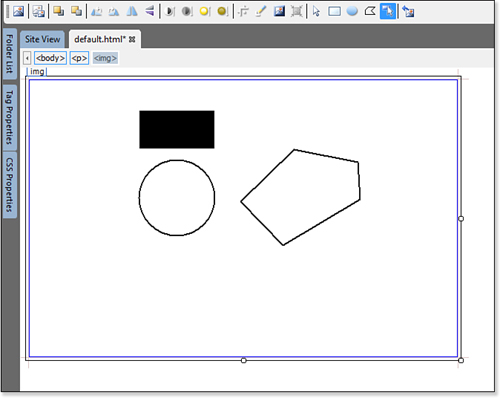
After you add a hotspot, you can resize it by selecting it and dragging the sizing handles. You also can move it to a different position by clicking and dragging it to the new location. You can highlight all hotspots on an image by clicking the Highlight Hotspots button shown previously in Figure 9.15. Highlighting hotspots makes it easy to locate all hotspots on an image. When hotspots are highlighted, selected hotspots appear as filled shapes and unselected hotspots appear as outlined shapes, as shown in Figure 9.16.
Figure 9.16. Hotspots can be highlighted for easy identification. Selected hotspots are filled shapes, while unselected ones appear as outlines.
Inserting Multimedia
Web designers have always sought out ways to add more interactivity to sites. One way is to add multimedia elements to a site. In the early days, web developers were limited to animated graphics, a trend that quickly became overused and annoying. However, as technology has improved over the years, multimedia options have increased to the point where adding effective multimedia to your site is now easy.
Expression Web offers the capability to insert Flash movies, Microsoft Silverlight applications and video, Microsoft Deep Zoom images, and Windows Media content.
Inserting Flash Movies
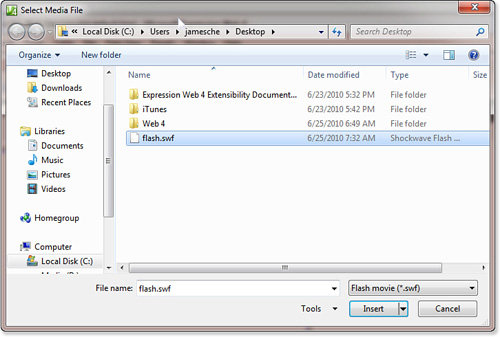
To insert a Flash movie, select Insert, Media, Flash Movie. You’ll be asked to browse for the *.swf file, as shown in Figure 9.17.
Figure 9.17. When inserting a Flash movie, you’ll need to browse to the *.swf file that you want to insert.
After the Flash movie has been inserted, you can configure it by either right-clicking it and selecting Flash SWF Properties or by double-clicking it in Design View to access the Flash SWF Properties dialog. The Flash SWF Properties dialog contains two tabs, the Appearance tab (shown in Figure 9.18) and the General tab (shown in Figure 9.19).
Figure 9.18. The Appearance tab in the Flash SWF Properties dialog allows for easy manipulation of properties that affect the playback of your Flash movie in the browser.
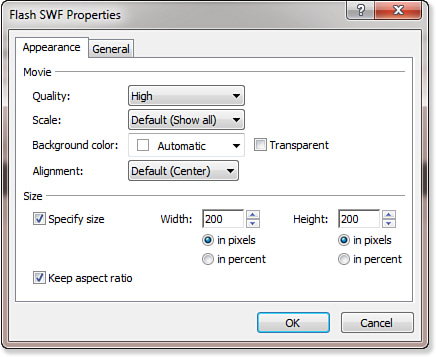
Figure 9.19. The General tab in the Flash SWF Properties dialog contains additional settings for the configuration of Flash movies.

You also might be familiar with the Flash Video (*.flv) format. Flash Video is high-quality compressed video that plays back in the Flash player inside your web browser.
Tip
![]()
When you insert a Flash movie in Expression Web, the animation will not play in Design View by default. To play the animation in Design View, right-click the Flash movie and select Play Movie in Flash Format.
Although Flash Video files can be played as standalone files, Expression Web does not allow for the insertion of Flash Video files. You’ll need to package your Flash Video inside a Flash SWF file to use it in Expression Web. Many Flash authoring tools are available that allow you to do this, including Adobe’s own Flash application, SWiSHzone.com’s SWiSH Max, and many other applications.
Note
![]()
Changes in the Flash SWF Properties dialog alter the HTML code used to display the Flash movie. The properties and settings available are documented by Adobe and can be accessed at kb.adobe.com/selfservice/viewContent.do?externalId=tn_12701.
Inserting Silverlight Applications
Microsoft Silverlight is a technology for building animated and interactive applications and for presenting high-quality video on the Web. Because Silverlight applications can be hosted on a page, they share some characteristics with Adobe Flash. However, Silverlight applications can be programmed using the Microsoft .NET Framework, so the capabilities of Silverlight are virtually limitless.
Note
![]()
A full discussion of Silverlight development is outside the scope of this book. If you’re interested in reading more about Silverlight development, read Essential Silverlight 3 from Addison-Wesley Professional.
Silverlight applications are developed using a language called XAML (pronounced zamel), an acronym that stands for Extensible Application Markup Language. XAML is similar in syntax to XML and—like XML—can be written using any text editor. However, the best tool for writing XAML and developing Silverlight applications is Microsoft’s Expression Blend. Expression Blend is a design tool that allows you to create interactive Silverlight interfaces by dragging and dropping user interface elements in a graphical environment.
Caution
![]()
Your Silverlight application relies on the folders and files in the folder that Expression Web imports into your site. Don’t move or rename those files or folders; doing so will break your Silverlight application.
Expression Blend provides tools to add basic interactivity to your Silverlight application, but you can also use Visual Studio to add complex interactivity using C#, VB, or any other language that targets the .NET Framework.
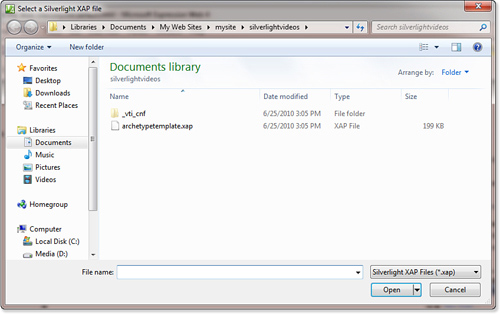
To insert a Silverlight application, select Insert, Media, Silverlight. You are prompted to select a folder in which your Silverlight .xap file exists, as shown in Figure 9.20.
Figure 9.20. You’ll need to point Expression Web to the folder where your Silverlight application resides.
Inserting Silverlight Video
Expression Web lets you easily add video to your site that plays using the Microsoft Silverlight 4 plug-in. When you use Expression Web to insert Silverlight video, the video you select is encoded automatically and adds the code necessary to play your video using Silverlight.
Note
![]()
Visitors to your site need to have the Silverlight plug-in installed to view your videos. If Silverlight is not installed, a graphic is displayed that notifies the visitor to install it along with a link to the download from Microsoft’s site.
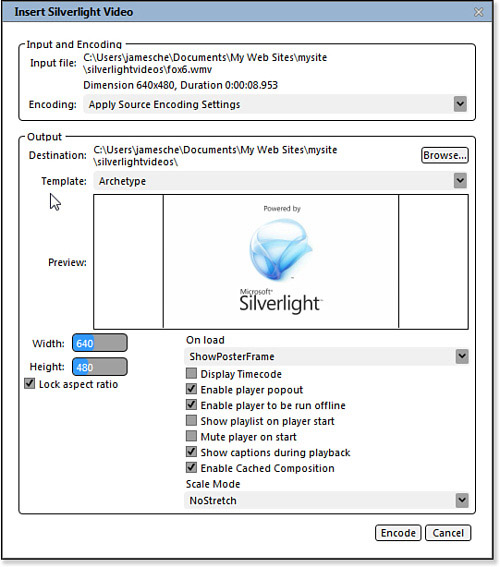
To insert Silverlight video, select Insert, Media, Silverlight Video and browse to the video file you want to include. After selecting the video file, Expression Web displays the Insert Silverlight Video dialog, as shown in Figure 9.21.
Figure 9.21. The Insert Silverlight Video dialog provides all the settings necessary to customize the appearance and quality of your Silverlight video.
Note
![]()
Inserting Silverlight video requires Expression Encoder. Expression Encoder ships with Expression Studio, but if you did not choose to install it when you installed Expression Studio, you need to add it to your installation before inserting Silverlight video using Expression Web.
The top part of the Insert Silverlight Video dialog shows the input and encoding options. You can select the encoding type for your video using the Encoding drop-down. Choose the appropriate encoding option for the bandwidth you expect your site visitors to have available.
Tip
![]()
For information on each of the options in the Insert Silverlight Video dialog, hover your mouse over each option and Expression Web displays a helpful tooltip.
The bottom portion of the dialog shows output options. You can select the output folder for the encoded video, the template for video controls, and various video options.
Tip
![]()
The Silverlight animation that plays in the Insert Silverlight Video dialog is actually a Silverlight video playing using the template selected in the Template drop-down. If you want to see how the controls in a particular template operate, select the template and then hover your mouse over the bottom portion of the preview window. You’ll see controls appear and you can interact with those controls just as you would on a web page.
After you’ve selected the desired options, click Encode. Expression Web encodes the video and inserts the necessary code into your page to display the video.
Inserting Deep Zoom Images
Microsoft Deep Zoom allows for the display of very large images by providing a means of panning and zooming in a smooth fashion. To see a great example of a Deep Zoom image, browse to memorabilia.hardrock.com.
Deep Zoom projects are created using Deep Zoom Composer. You can download a copy of Deep Zoom Composer from Microsoft by searching for it at www.microsoft.com/downloads.
To insert a Deep Zoom image, select Insert, Media, Deep Zoom and select the Deep Zoom output file from your Deep Zoom project. When you do, Expression Web displays the Insert Deep Zoom dialog shown in Figure 9.22.
Figure 9.22. The Insert Deep Zoom dialog provides settings for including Deep Zoom images on your page.
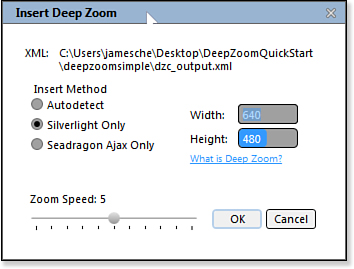
Expression Web can insert Deep Zoom images that use Silverlight 3, Silverlight 4, or Microsoft Seadragon Ajax. Seadragon allows web designers to use Deep Zoom in his or her site without using Silverlight. If you select the Autodetect option, Expression Web uses Silverlight if it’s available and Seadragon Ajax otherwise.
The Insert Deep Zoom dialog also provides controls for resizing your Deep Zoom image and for controlling the speed of the zooming feature of Deep Zoom.
Tip
![]()
If you have an iPhone or an iPod touch, you can download the Seadragon Mobile app free and view Deep Zoom images on your mobile device.
Inserting Windows Media
Expression Web can insert both Windows Media video and Windows Media audio. The formats that are supported depend on the capabilities of the user’s machine as they are viewing your site. For example, if you insert a video file encoded in DivX format, a user can view the video only if DivX is installed on his or her machine.
Tip
![]()
If Windows Media Player cannot find the correct software (called a codec) to play back the format you are using, the user is asked if she wants Windows Media Player to try to install the correct codec.
Users of Mac OS (Apple users) might have problems viewing Windows Media files even with the correct codecs installed. Because of that, you might cause problems for some of your visitors when you choose Windows Media format.
To insert Windows Media into your page, select Insert, Media, Windows Media Player, and then browse to the desired media file, just as you did with the Flash movie. After you’ve selected the file, click Open to add the Windows Media Player to your page.
After you’ve added Windows Media to your page, you can modify the properties of the player by either double-clicking it or by right-clicking and selecting ActiveX Control Properties from the menu to display the Windows Media Player Properties dialog.
The four tabs in the Windows Media Player Properties dialog are explained in the sections that follow.
The General Tab
The General tab (shown in Figure 9.23) enables you to configure general settings for Windows Media.
Figure 9.23. The General tab contains general settings for Windows Media.
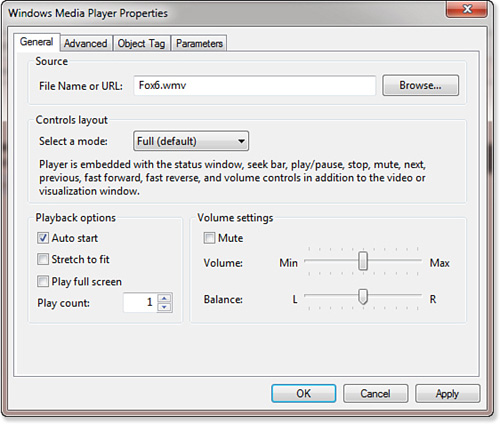
The General tab contains the following settings:
• File Name or URL—The filename or the URL to display in Windows Media Player.
Tip
![]()
Expression Web uses the filename parameter when adding Windows Media; therefore, the File Name or URL text box will be blank when Expression Web adds Windows Media.
• Select a Mode—This drop-down controls the appearance of the Windows Media controls. Expression Web displays a description of the selected setting under the drop-down.
• Auto Start—When checked (the default setting), the Windows Media file starts playing automatically when the page is loaded.
• Stretch to Fit—When checked, the video displayed in Windows Media Player is stretched to fit the video window. This check box is unchecked by default.
• Play Full Screen—When checked, the player opens in full-screen mode.
• Play Count—By default, Windows Media plays once and then stops. You can increase the play count to increase the number of times your media plays.
• Volume Settings—The Volume Settings section provides controls for adjusting the audio of your Windows Media.
The Advanced Tab
The Advanced tab is shown in Figure 9.24 and contains some of the advanced settings you can configure for Windows Media.
Figure 9.24. The Advanced tab contains some of the more advanced Windows Media settings.
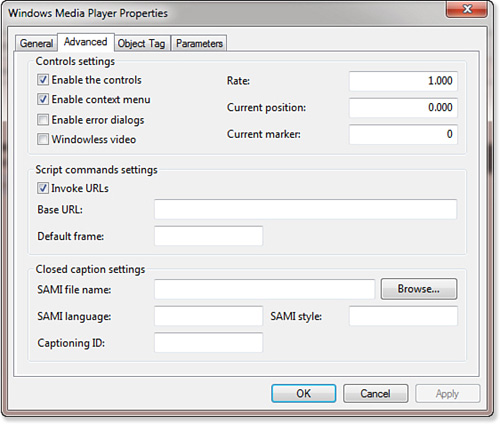
The following settings are available on the Advanced tab:
• Enable the Controls—When this box is checked (the default setting), the controls in the Windows Media Player are enabled and can be clicked. When it’s unchecked, the controls cannot be clicked.
• Enable Context Menu—When checked (the default setting), a contextual menu is displayed when you right-click the Windows Media Player in the web browser.
• Enable Error Dialogs—When checked, any errors that occur during playback are displayed in a pop-up dialog. This box is unchecked by default.
• Windowless Video—When checked, video is rendered by the Windows Media Player directly inside the client window so that other elements (such as effects or text) can be rendered on top of the video. Checking this option can cause reduced performance. It is unchecked by default.
• Rate—Controls the playback rate of the Windows Media. The default value is 1.
• Current Position—Controls the position (in seconds) at which the Windows Media begins playing. The default is 0.000, meaning the Windows Media begins playing at the beginning.
• Current Marker—Controls the marker at which the Windows Media begins playing. If the Windows Media was not encoded with markers, setting this value to anything other than zero (the default) results in an error.
• Script Command Settings—Windows Media files can contain URLs, and if the Invoke URLs check box is checked, those URLs open inside the default browser. The Base URL text box controls the base URL the Windows Media Player will use, and the Default Frame controls the frame that is used for the new window.
Note
![]()
A discussion of implementing closed captions in Windows Media is outside the scope of this book. For more information on SAMI, see msdn2.microsoft.com/en-us/library/ms971327.aspx.
• Closed Caption Settings—Windows Media Player can use Microsoft’s Synchronized Accessible Media Interchange (SAMI) technology to provide closed captions for Windows Media. The Closed Caption Settings section provides settings for implementing this feature.
The Object Tag Tab
When Windows Media is inserted, Expression Web uses the <object> tag to configure it on your page. The Object Tag tab (shown in Figure 9.25) provides settings for the <object> tag.
Figure 9.25. The Object Tag tab contains settings that affect the <object> tag used to add Windows Media to your page.
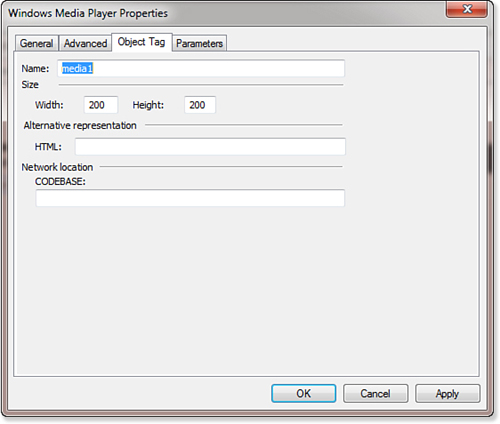
The following settings appear on the Object Tag tab:
• Name—Specifies the name for the Windows Media Player in your page. The name can be used in a script to refer to the Windows Media Player.
• Size—Specifies the size of the Windows Media Player in the page.
• HTML—HTML that is entered into this text box is displayed when someone without the Windows Media Player installed visits your page.
• CODEBASE—The CODEBASE setting can contain a URL that links to a location where the browser can download the Windows Media Player control, if it’s not already installed.
The Parameters Tab
The Parameters tab (shown in Figure 9.26) allows you to add, modify, or remove parameters of the <object> tag. As you make modifications in the other tabs, Expression Web adds parameters to the <object> tag on the page. Those settings appear in the Parameters tab.
Figure 9.26. The settings you configure on other tabs appear as parameters on the Parameters tab.

Importing Adobe Photoshop Files
Adobe Photoshop is one of the most commonly used graphic design packages for sites, and Expression Web offers Photoshop users some convenient integration features.
Tip
![]()
By right-clicking the image and selecting Adobe Photoshop (.psd), Edit Source, you can launch Photoshop from within Expression Web so that you can quickly edit the .psd file.
By selecting Insert, Picture, From Adobe Photoshop (.psd), you can use any of your Photoshop files in your page without importing the original .psd file into your site. After you select the .psd file from your hard drive or your network, Expression Web displays the Import Adobe Photoshop dialog as shown in Figure 9.27. By default, Expression Web includes all layers in your .psd file, but you can remove the check mark from any layer that you don’t want to include.
Figure 9.27. The Adobe Photoshop Import feature in Expression Web is an easy way to include your Photoshop creations in your page.

Expression Web also gives you the choice of importing the compatibility image that Photoshop saves with your .psd file. The compatibility image is an image that includes all layers marked as visible within Photoshop.
After you’ve chosen the layers you want to include, choose your encoding type (PNG, JPEG, or GIF) and click OK. Expression Web displays the Save dialog so you can save the imported image into your site.
Expression Web maintains the connection between the imported image on your page and the original Photoshop file. If you update the original .psd, and you want the image on your page to be updated with those changes, right-click the image on your page and select Adobe Photoshop (.psd), Update from Source from the menu. Expression Web displays the Import Adobe Photoshop dialog as shown in Figure 9.27 so that you can import the modified .psd file into your page and replace the existing image.
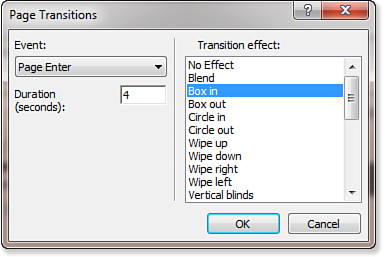
Page Transitions
Page transitions were introduced in Internet Explorer 5.5. They are effects that display when moving from page to page or site to site and are built into the browser. You can easily add page transition effects with Expression Web.
Caution
![]()
Page transitions work only in Internet Explorer. They will not adversely affect other browsers, but they won’t be visible.
To add a page transition effect, select Format, Page Transition to display the Page Transitions dialog shown in Figure 9.28.
Figure 9.28. Page transitions can be configured easily using the Page Transitions dialog.
Page transitions are met with mixed feelings by many site visitors. Depending on the speed of the computer on which the site is being browsed, a transition might take much longer to complete than the time for which it’s configured. For example, my wife uses an old, slow 500MHz machine to browse the Internet. Page transitions on that machine regularly take twice as long as they do on a faster machine. A nearly 10-second transition is far too long, and it can be annoying when visiting sites that use transitions for all pages.
Before you add an effect such as page transitions, give careful consideration to how it might affect people visiting your site.
Serving Video
Considering how easy inserting Windows Media is and how easy producing video has become, you might be tempted to load up your site with video files to share with friends, family, and visitors you don’t even know. Before you do, think carefully about how much data you’ll be serving.
Most hosting companies charge money when you exceed the amount of bandwidth that they allocate to you for your particular hosting plan. If you decide to start serving video files, it’s likely that you’ll surpass your bandwidth limit fairly quickly. If you do, you can end up spending a lot of money on additional bandwidth.
Another consideration is performance. Windows Media Player starts playing a video file before the entire file has finished downloading. If more than a couple of people are trying to watch one of your videos at the same time, they’ll start seeing stuttering and delays that cause a bad user experience. The reason for this is that bandwidth from your hosting company is limited, and each person watching video is using a good-sized chunk of that bandwidth. If you want good performance serving video to more than a few people, you’ll likely need to purchase an expensive hosting plan that provides a lot of bandwidth for your own use.
By keeping these things in mind when planning your site, you can avoid surprisingly high hosting bills or unhappy site visitors.