
34. Displaying and Editing Database Data with ASP.NET
A History of Data Access
Over the past several years, sites have evolved into complex web applications. As sites evolved, the consumers of those sites evolved as well. We expect more from our sites, and a large part of meeting that expectation is providing access to dynamic data.
Microsoft first introduced data access to mainstream web developers in FrontPage 97 with the inclusion of IDC/HTX. Although IDC/HTX allowed web developers to create data-driven pages, it was a far cry from the ease of use necessary to really push data-driven sites into the mainstream. However, when Active Server Pages (ASP) technology was released very soon thereafter, developers finally had a way to build dynamic content quickly.
Many years later, Microsoft unveiled the .NET Framework, which included a new server-side technology called ASP.NET. ASP.NET once again revolutionized site development because it finally gave web designers the toolset they needed to develop web applications that felt like Windows applications. In fact, many of today’s ASP.NET developers were developers of Windows-based applications just a few years ago.
![]() For more information on the .NET Framework and ASP.NET, see Chapter 25, “Using Standard ASP.NET Controls.”
For more information on the .NET Framework and ASP.NET, see Chapter 25, “Using Standard ASP.NET Controls.”
Note
![]()
ASP.NET used to be referred to by Microsoft as ASP+. In fact, the file extension for ASP.NET Web Forms is .aspx—the x is simply a + turned on its side.
Data Access Technologies in Expression Web
Because Expression Web uses ASP.NET for data access, many powerful data access tools such as the DataView, the GridView, and other tools are available to you. Using these tools, you can connect to data in a database, in an Extensible Markup Language (XML) file, or even in a sitemap file.
![]() For more information on sitemap files in ASP.NET, see Chapter 26, “Using ASP.NET Navigation Controls.”
For more information on sitemap files in ASP.NET, see Chapter 26, “Using ASP.NET Navigation Controls.”
Note
![]()
A sitemap file is a special XML file used by ASP.NET to map out the navigation structure of a site.
Note
![]()
If you find that you enjoy building ASP.NET pages with the features available in Expression Web, you can easily move to the next level by downloading Visual Web Developer 2010 Express free from Microsoft.
I realize that many web designers are not programmers. In fact, Expression Web is aimed squarely at the designer market and not the programmers among us. However, don’t let that dissuade you from digging into the data access features in Expression Web. You certainly don’t need to be a coder to appreciate and use the features that ASP.NET provides for Expression Web.
Additionally, some ASP.NET developers are more experienced in developing with ASP.NET, and yet they believe it is proprietary and that they are able to connect only to Microsoft database technologies. In fact, although you can certainly use the features in ASP.NET to connect to SQL Server and Microsoft Access, you can also use the same tools to connect to Oracle databases, IBM DB2 databases, MySQL databases, and so on. You can connect to all these data sources using what Microsoft calls the provider model.
ASP.NET comes with several providers that allow you to connect to the databases mentioned previously. However, anyone can write a provider and plug it into ASP.NET to enable extended functionality. For example, if you wanted to write a provider specific to MySQL, one that added some functionality geared toward MySQL databases, you certainly could. You could then use your provider along with all the existing data access functionality in ASP.NET.
Note
![]()
You don’t need to understand providers to use them. In fact, we’ll use some powerful data access features in the next chapter without going into providers at all.
An in-depth discussion of providers is outside the scope of this book, but if you’d like to dig into the topic and work with a sample provider, Microsoft offers one for download at http://msdn2.microsoft.com/en-us/library/26xsd945.aspx.
ASP.NET and Other Web Application Platforms
The one drawback to using ASP.NET for data access is that not all hosting companies offer hosting with ASP.NET support. In fact, many of the less expensive hosting companies host sites on Linux or UNIX, and those servers won’t work with ASP.NET.
Many of today’s web designers are drawn to technologies such as PHP because they think PHP is easier to use than ASP.NET. Still others believe that you have to buy the .NET Framework to use ASP.NET. It is my assertion that both of these positions are flat-out wrong. It is every bit as easy to use ASP.NET as it is to use PHP. In fact, it is actually easier to create robust web applications with ASP.NET in Expression Web because of the limited PHP support.
As for those who believe that being an ASP.NET developer is an expensive endeavor, let me say that the .NET Framework is a free download (as is the .NET Framework software development kit [SDK]), and Microsoft provides a feature-rich, professional development environment for creating ASP.NET applications called Visual Web Developer 2010 Express, which costs nothing. If you haven’t yet downloaded a copy of Visual Web Developer 2010 Express, you should stop reading right now and do it. You’ll be absolutely amazed that Microsoft is giving away this tool! You can download a copy at http://www.microsoft.com/express/Web/.
Let’s explore how you can take advantage of the data access and ASP.NET features in Expression Web to display and edit database data.
ASP.NET Data Source Controls
The previous chapters on ASP.NET have shown how you can design some pretty impressive ASP.NET pages without writing any code. It might surprise you to know that you also can create some powerful data access pages in ASP.NET without writing any code. The functionality for doing so is encapsulated within the ASP.NET data source controls.
ASP.NET data source controls provide robust connectivity to many types of data sources simply by setting properties on a control using the Tag Properties panel or by specifying properties for a control in Code View declaratively.
![]() For more information on setting ASP.NET control properties using the Tag Properties panel, see Chapter 25, “Using Standard ASP.NET Controls.”
For more information on setting ASP.NET control properties using the Tag Properties panel, see Chapter 25, “Using Standard ASP.NET Controls.”
Four data source controls are included in the Expression Web Toolbox. Each data source control is similar in functionality, but they are specialized for specific types of data.
Let’s go over the details of each data source control, and then we’ll create some pages that use the AccessDataSource and SqlDataSource controls to connect to a database.
Note
![]()
Data source controls do not display data on a page. As you’ll see later in this chapter, they are used in conjunction with other controls to display data.
Note
![]()
Throughout this chapter, we will be using the Nwind.mdb database to build examples. If you don’t already have this database on your system, you can download it from www.microsoft.com/downloads/details.aspx?familyid=C6661372-8DBE-422B-8676-C632D66C529C&displaylang=en. It’s a fairly old database, but it’s a great way to build sample database access pages.
AccessDataSource Control
The AccessDataSource control provides data connectivity to a Microsoft Access database file. It includes some advanced features such as support for paging, sorting, filtering, and more.
To insert an AccessDataSource control onto a page, drag it from the Toolbox and drop it on the page. By default, Expression Web is configured to not show nonvisual ASP.NET pages, so when you first insert any data source control, Expression Web asks whether you want to turn on the visual aid for ASP.NET controls. It’s recommended that you answer Yes to this prompt so you can work more easily with the data source control.
![]() For more information on visual aids, see Chapter 4, “Using Page Views.”
For more information on visual aids, see Chapter 4, “Using Page Views.”
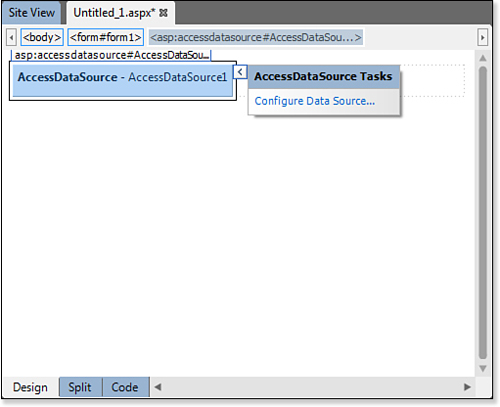
After you’ve inserted the AccessDataSource control, the easiest way to configure it is to click the Configure Data Source link in the AccessDataSource Tasks pop-up, as shown in Figure 34.1.
Figure 34.1. Configuring a data source is easily done using the Configure Data Source link in the AccessDataSource Tasks pop-up.
Note
![]()
The AccessDataSource control cannot connect to a password-protected Access database. To connect to a password-protected database, use the SqlDataSource control.

We’ll go over the details of configuring the AccessDataSource control and other data source controls later in this chapter. For now, let’s review some of the common properties used to configure the AccessDataSource control:
• DataFile—Specifies the location of the Microsoft Access database file used by the AccessDataSource control.
• DataSourceMode—This property can be set to either DataSet (the default) or DataReader. In most cases, you leave this property set to DataSet, but if you only need to display data in the database without sorting, filtering, and so on, you can set it to DataReader for better performance.
• SelectQuery—Specifies the SQL query used to select data from the database. When the SelectCommandType is set to StoredProcedure, the SelectQuery property can be used to specify a stored query.
• UpdateQuery—Specifies the SQL query to use when updating the database.
• DeleteQuery—Specifies the SQL query to use when deleting records from the database.
• FilterExpression—Filters data displayed by the SelectQuery property.
• FilterParameters—Specifies the parameters used with FilterExpression to filter the database results.
Note
![]()
A discussion of creating SQL queries is outside the scope of this book. If you’d like more information on how to use SQL queries to work with databases, read Sams Teach Yourself SQL in 24 Hours, 3rd Edition from Sams Publishing, available at www.quepublishing.com/bookstore/product.asp?isbn=0672324423&rl=1.
SqlDataSource Control
The SqlDataSource control can be used to connect to many types of databases, but it contains performance optimizations that specifically target Microsoft SQL Server.
Note
![]()
Unless you’re working with an enterprise-level application, you might not notice the optimizations in the SqlDataSource control.
The SqlDataSource control shares many of the same properties with the AccessDataSource control. All the properties discussed previously for the AccessDataSource control also apply to the SqlDataSource control.
To insert a SqlDataSource control on a page, drag it from the Toolbox onto the page. After inserting the SqlDataSource control, you can configure it using the Configure Data Source link on the SqlDataSource Tasks pop-up. We’ll cover the details of the SqlDataSource control later in this chapter.
SiteMapDataSource Control
The SiteMapDataSource control is a hierarchical data source control designed to work with the ASP.NET navigation controls. ASP.NET navigation controls are covered in detail in Chapter 26, “Using ASP.NET Navigation Controls,” so we won’t go into detail on this control here.
XmlDataSource Control
The XmlDataSource control provides data connectivity to XML files. To insert an XmlDataSource control, drag it from the Toolbox onto the page. You can then configure it using the Configure Data Source link on the XmlDataSource Tasks pop-up.
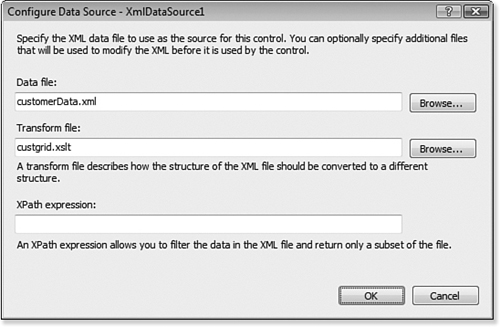
When configuring the XmlDataSource control, specify the XML data path, an optional XML transform file, and an optional XPath statement for filtering data, as shown in Figure 34.2.
Figure 34.2. For greater flexibility, an XML transform and XPath expression can be configured for an XmlDataSource control.
Displaying Data with ASP.NET
There are several approaches to displaying data with ASP.NET. Which one you choose depends largely on the type of data you need to display and your purpose for displaying it. For example, to display a list of products and prices, a tabular display might be the best choice. On the other hand, to display information such as the name and address of one particular user, a data-bound form would be a better choice.
Note
![]()
A discussion of using XML transforms and XPath is outside the scope of this book. For details on using these XML features, read Sams Teach Yourself XML in 10 Minutes from Sams Publishing, available from www.quepublishing.com/bookstore/product.asp?isbn=0672324717&rl=1.
ASP.NET makes it extremely easy to display data using both methods, and you can do it without writing any code because the work is all done by the data source control.
Displaying Data in Tabular Form
A few ASP.NET controls specialize in displaying data in tabular form. The two most common controls are the DataList control and the GridView control. Of the two, the GridView is the easiest to use and offers the largest feature set.
Let’s create a new ASP.NET page to display data from the Northwind Traders Access database. You can download the sample Nwind.mdb file using the link provided earlier in this chapter if you don’t already have the Northwind Traders database.
Adding and Configuring a GridView Control
We need to create a new ASP.NET page so we can add and configure a GridView control to display our data. Here’s how:
- Open an existing site or create a new one.
 For more information on creating a site, see Chapter 2, “Creating, Opening, and Importing Sites.” For more information on the Microsoft Expression Development Server, see Chapter 33, “Using the Microsoft Expression Development Server.”
 - Create a new ASP.NET page and save it as
gridview.aspx. For more information on creating ASP.NET pages, see Chapter 3, “Creating Pages and Basic Page Editing.” - Drag a
GridViewcontrol from the ASP.NET section of the Toolbox and drop it on the page. - Import the
Nwind.mdbfile into the root of the site. For more information on importing files, see Chapter 3, “Creating Pages and Basic Page Editing.” - If the GridView Tasks pop-up is not visible, click the arrow button to display it.
- Select <New Data Source...> from the Choose Data Source drop-down.
- Select Access Database in the Data Source Configuration wizard and click OK.
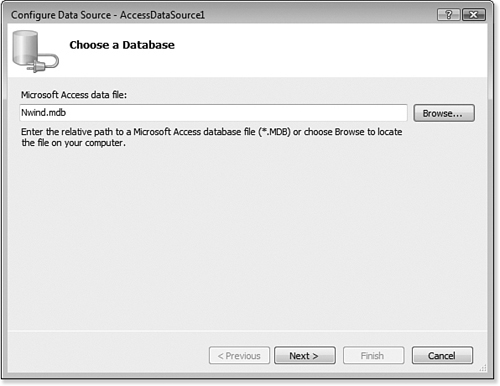
- Type Nwind.mdb in the Configure Data Source dialog, as shown in Figure 34.3; then click Next.
Figure 34.3. When displaying data from an Access database, you need to specify the location and filename of the database.
- Be sure Specify Columns from a Table or View is selected.
- From the Name drop-down, select Employees.
- Check the EmployeeID, LastName, FirstName, Title, and HireDate check boxes; then click Next.
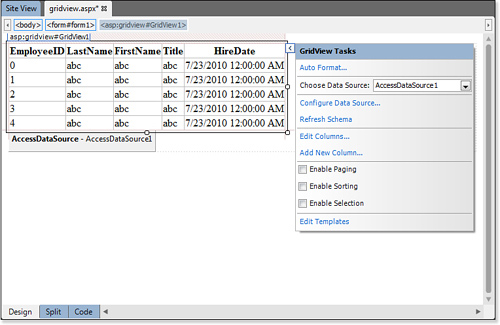
- Click the Test Query button to ensure that you are successfully connecting to the database; then click Finish. After you click Finish, you will see that the
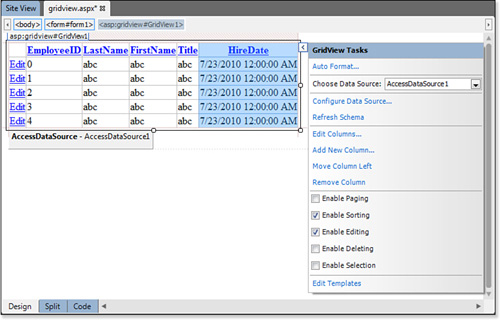
GridViewcontrol now displays the columns you selected. Several more options are available in the GridView Tasks pop-up, as shown in Figure 34.4.
Figure 34.4. After you’ve configured a data source, you have other options available for the GridView. In this case, you can now enable paging, sorting, and selection.
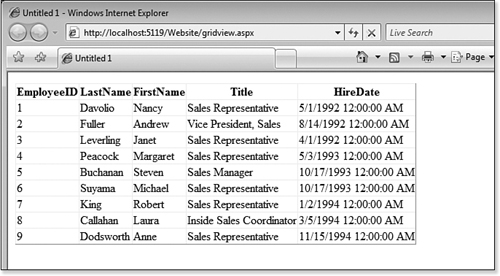
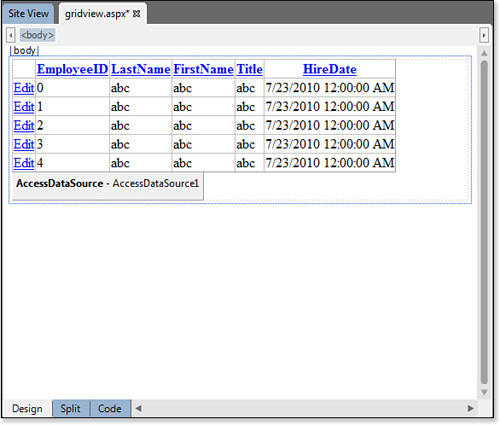
Save the page and test it in your browser. Even though you haven’t written any code, you will see that the GridView control is pulling the employee data from the database and displaying it on the page, as shown in Figure 34.5.
Figure 34.5. You have successfully pulled data from the Access database, and you did it without writing a single line of code.
Sorting the GridView
Right now the employees are in employee number order. Let’s reconfigure the display so they are listed in order of last name and then first name:
- Select the
GridViewand click the arrow button to display the GridView Tasks pop-up. - Click the Configure Data Source link.
- In the Configure Data Source dialog, click Next.
- Click the Order By button.
- In the Sort By drop-down, select LastName.
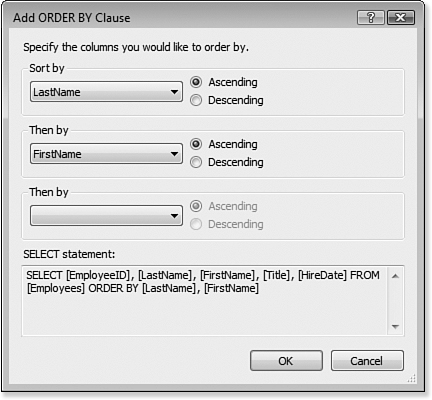
- In the Then By drop-down, select FirstName, as shown in Figure 34.6.
Figure 34.6. Configuring a data source so that the results are sorted is easy using the Add ORDER BY Clause dialog.
- Click OK.
- Click Next and then click Finish in the Configure Data Source dialog.
Save and browse the page. Notice that the grid is now sorted by last name. If any two employees with the same last name are added to the database, the grid displays them sorted by first name.
In a real-world application, it’s usually best to give the user a choice as to how to display the data. Let’s reconfigure the GridView control so the user can decide how to sort it:
- Select the
GridViewcontrol. - Click the arrow button to display the GridView Tasks pop-up.
- Check the Enable Sorting check box, as shown in Figure 34.7.
Figure 34.7. You can give the user a choice for how to sort a
GridViewby checking the Enable Sorting check box.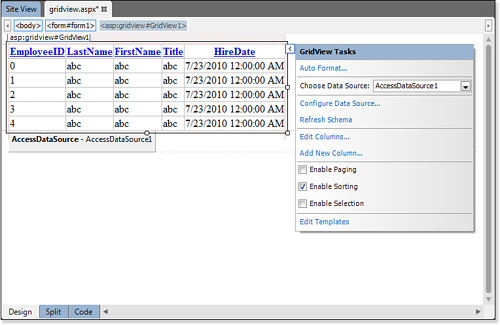
Save and view the page in your browser. Notice that the header on each column is now a hyperlink. Clicking a link sorts by that column in ascending order. Clicking the same link again sorts by that column in descending order.
In addition to binding data in a tabular fashion, you can bind data in forms and other controls in a page. We’ll explore data binding in the “Lagniappe” section of this chapter.
Editing Data with ASP.NET
Let’s create a page that allows us to edit employee information and save updated information back to the database. The GridView control makes this convenient by enabling you to switch a row into edit mode. When you switch a row into edit mode, the information in the row is presented in text boxes so you can make changes.
Open the gridview.aspx page and save it as edit.aspx.
Configuring the Data Source
Now you need to reconfigure the data source to allow for updates and add a column to the GridView so users can switch a row into edit mode.
- Select the
GridViewcontrol and click the arrow button to display the GridView Tasks pop-up. - Click the Configure Data Source link to display the Configure Data Source dialog.
- Click Next.
- Click the Advanced button.
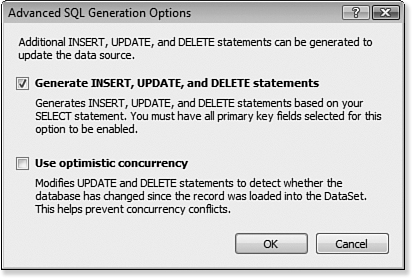
- Check the Generate INSERT, UPDATE, and DELETE Statements check box (see Figure 34.8). This causes Expression Web to generate the necessary SQL statements to enable us to edit records from the database.
Figure 34.8. The Advanced SQL Generation Options dialog makes adding the code necessary to edit the database a one-step process.
- Click OK, and then click Next and Finish to close the Configure Data Source dialog.
Configuring the GridView
Now that the data source is capable of updating information in the database, the final step is to configure the GridView and add a new column so a specific row can be switched into edit mode.
I’m going to walk you through a long way of doing this because it will give you some experience in using some of the features of the GridView that you wouldn’t see otherwise. After you’ve configured the GridView, I’ll tell you an easier way to accomplish the same task. Here’s how:
- Select the
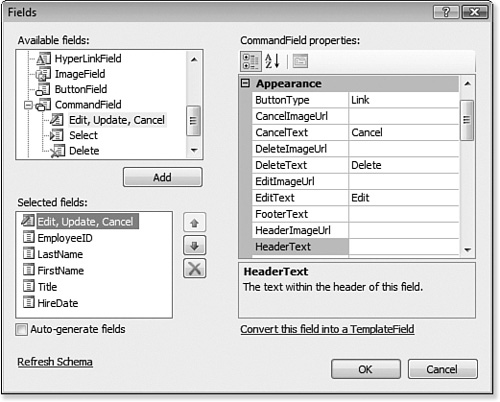
GridViewand click the arrow button to display the GridView Tasks pop-up. - Click the Edit Columns link to display the Fields dialog.
- Scroll down in the Available Fields list, and click the plus sign next to CommandField.
- Select the Edit, Update, Cancel field. Then click Add to add it to the
GridView. - Select the Edit, Update, Cancel field in the Selected Fields list, and click the up arrow button repeatedly to move it to the top of the list.
- Click OK in the Fields dialog.
Your page should now look like Figure 34.9.
Figure 34.9. The GridView now has a new column so employees can be edited.
When I started this section, I said I would describe the easy way to configure a GridView for editing the database. After you’ve configured the data source so it will generate the code necessary to update the database, new check boxes will be added to the GridView Tasks pop-up, as shown in Figure 34.10.
Figure 34.10. The GridView Tasks pop-up offers different options based on how the data source is configured. You now have the option to enable editing by simply checking a box.
The easy way to configure the GridView so records can be edited is to simply check the Enable Editing check box. When you do that, Expression Web automatically adds the Edit, Update, Cancel column to the GridView.
Testing the Page
View the edit.aspx page in your browser. Click the Edit link next to the employee of your choice. When you do, the Edit link changes to an Update and Cancel link and all the data will be displayed in text boxes, as shown in Figure 34.11.
Figure 34.11. The GridView is now a full-featured data editor.
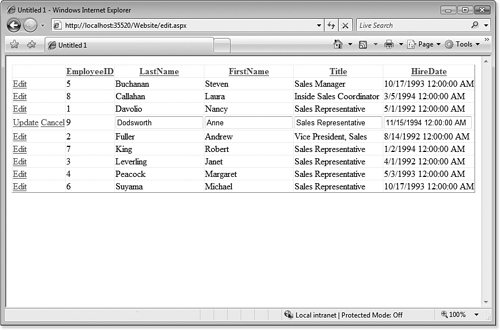
To update data in the database, enter the new information and click Update. Alternatively, click Cancel and revert to the original data from the database.
Using the methods you’ve learned here, you can easily create a robust web application that allows for not only the display of, but also the easy editing of, data from a database. The example used in this chapter used an Access database, but the same methods apply to other databases.
There’s much more you can do with data access and ASP.NET. The easiest way to learn how to take advantage of this powerful feature set is to explore it and experiment with creating data-enabled pages.
Creating a Master/Detail View
In many cases, it’s preferable to display a small subset of data and allow users to drill down into more information. This kind of approach is typically called a master/detail view, and creating such an interface is simple using the ASP.NET controls in Expression Web.
Creating the Master View
The master view contains a subset of the Products table in the Northwind Traders database. We’ll use a GridView to display this data.
- Create a new ASP.NET page and save it as
masterdetail.aspx. - Add a
GridViewcontrol to the page and select the option to add a new data source from the Choose Data Source drop-down in the GridView Tasks pop-up. - In the Data Source Configuration wizard, select Access Database and change the ID for the data source to MasterDataSource.
- Select the
Nwind.mdbdatabase and click Next. - Select the Products database from the Name drop-down.
- In the Columns list, select the ProductID, ProductName, and UnitPrice check boxes.
- Click Next, and then click Finish.
You’ll need to use the ProductID field to determine which record to display in the Detail View, but you don’t want the user to see the ProductID field. Therefore, you need to make the ProductID field invisible to the reader. Here’s how:
- Select the
GridViewand click the arrow button to display the GridView Tasks pop-up. - Select the Edit Columns link and select the ProductID field in the Selected Fields list.
- Change the Visible property to False.
- Click OK to dismiss the Fields dialog.
- Check the Enable Paging and Enable Selection check boxes in the GridView Tasks pop-up.
The next step is to create the detail view using a DetailsView control.
Creating the Detail View
Unlike the GridView you added previously, the DetailsView control displays all the fields for the selected record. Therefore, you need to insert a new data source control for the DetailsView control, and you need to configure the new data source to retrieve only the record you select in the GridView. Do the following:
- Add a new
AccessDataSourcecontrol to the page. - Click the Configure Data Source link in the AccessDataSource Tasks pop-up.
- Click Browse and select the
Nwind.mdbdatabase in the first step of the Configure Data Source wizard. Click Next. - Select the Products table from the Name drop-down.
- Place a check in the * check box, so that all fields are retrieved.
- Click the WHERE button.
- Select ProductID from the Column drop-down in the Add WHERE Clause dialog.
- Select = in the Operator drop-down.
- Select Control in the Source drop-down.
- Select GridView1 in the Control ID drop-down. The Add WHERE Clause dialog should now look like the one shown in Figure 34.12.
Figure 34.12. Adding the
WHEREclause for the data source control so that it retrieves only the record that is selected in theGridView.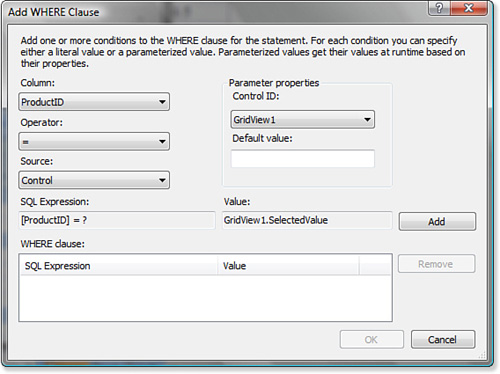
- Click the Add button to add the new
WHEREclause and then click OK. - Click Next and then Finish to complete the Configure Data Source wizard.
- Select the new
AccessDataSourcecontrol, if it’s not already selected; then change the ID property in the Tag Properties panel to DetailsDataSource.
The changes you made in the Add WHERE Clause dialog cause the ProductID for the record you select in the GridView control to be passed to the query that retrieves the selected record from the database.
To complete the page, add a new DetailsView control under the existing GridView control. In the Choose Data Source drop-down on the DetailsView Tasks drop-down, select DetailsDataSource. If you want to improve the appearance of your page, drag the right side of the DetailsView control so that it’s about 300 pixels wide; then save the page and preview it in your browser. When you click the Select link for one of the records in the GridView control, the details for that record are displayed in the DetailsView control as shown in Figure 34.13.
Figure 34.13. The master/detail page is now fully functional, and we did it without writing any code.
You can add more features to this page by using server-side code to control when the DetailsView control is displayed, but doing so is outside the scope of this book. However, hopefully you’ve learned enough about using the ASP.NET data controls available to you in Expression Web so you can implement powerful database functionality in your own sites.