
28. Developing a Login System Using ASP.NET
Website Login Systems
There are generally two types of sites. One type offers the same information to everyone, and the other type offers information that is somehow specific to the person using the site. It’s becoming more and more common to see sites that fall into the latter category, and because of that, it’s becoming more necessary for web developers to be able to design a method of allowing users to log in to a site so they can be uniquely identified.
There are many ways to implement a login system, but almost all of them require a significant amount of code. Not only that, but writing secure code for a login system is difficult because it requires a full understanding of security issues.
Fortunately, ASP.NET has a full suite of login controls that provide an amazing level of functionality without having to write a single line of code. You’re probably picturing a simple system with a basic username and password implementation. Think again! ASP.NET login controls provide you with all the features needed for most applications.
Note
![]()
Many hosting companies do offer tools for moving ASP.NET login information from a SQL Server Express Edition database to a full-blown SQL Server database. Check with your hosting company.
By default, ASP.NET uses SQL Server Express Edition for storing login information. Before you begin the process of developing a login system, keep in mind that most hosting companies don’t support SQL Server Express Edition. Therefore, you should use the exercises in this chapter to familiarize yourself with how everything works and then contact your hosting company to find out what it offers for storing ASP.NET membership data.
Overview of ASP.NET Login Controls
Expression Web provides access to all seven ASP.NET login controls via the Login section of the ASP.NET controls Toolbox.
![]() For more information on the Microsoft Expression Development Server, see Chapter 33, “Using the Microsoft Expression Development Server.”
For more information on the Microsoft Expression Development Server, see Chapter 33, “Using the Microsoft Expression Development Server.”
The Login Control
The Login control, like most of the other ASP.NET login controls, is simple in appearance but robust in functionality. In its simplest terms, the Login control provides users with text boxes for entering a username and a password, as shown in Figure 28.1. A Remember Me check box is also provided so users don’t have to log in on each subsequent visit to your site.
Figure 28.1. The Login control is simple in appearance, but there’s a lot of functionality under the hood.

Caution
![]()
Security should be among your highest priorities when designing a web application. You should be aware that, by adding features such as login functionality, you are exposing yourself to security risks.
If you are going to use ASP.NET’s login controls in your site, I highly recommend that you visit Microsoft’s page on securing the login controls. You can access this page by browsing to http://msdn2.microsoft.com/en-us/library/ms178346.aspx.
The Login control also implements form validation so users cannot submit a form without supplying both a username and a password.
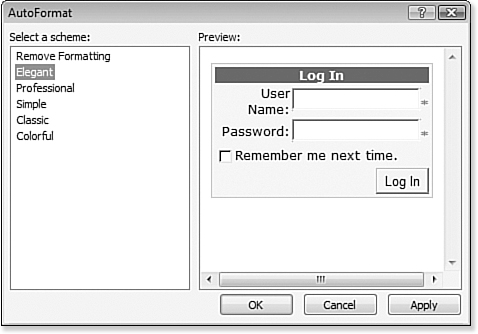
Figure 28.1 shows the default appearance of the Login control. You can reformat it using CSS styles or by using the AutoFormat option on the Login Tasks pop-up. By choosing one of the six available formatting options, as shown in Figure 28.2, you can quickly change the appearance of the entire control.
Figure 28.2. You can quickly give the Login control a new look using the AutoFormat dialog.
Because the Login control is a single control, you cannot move the elements in the control by default. If you want to rearrange the controls that make up the Login control, you’ll need to convert the control to a template, which is referred to as a templated control. By converting the control to a template, you have access to all the constituent controls that make up the Login control. All the functionality remains the same.
Note
![]()
The ASP.NET membership system uses Microsoft SQL Server Express Edition by default to store users for your site. Therefore, to walk through the examples in this chapter, you need to install Microsoft SQL Server Express Edition.
The easiest way to get everything you need is to install Microsoft Visual Web Developer Express Edition. You can find Visual Web Developer Express Edition at www.microsoft.com/express/vwd. However, you can also just install SQL Server Express Edition from http://www.microsoft.com/express/Database/.
To convert the Login control to a regular control instead of a template, click the button on the control to access the Login Tasks pop-up and click the Reset option. Any changes you made to the control while it was in a templated state are reset, and the control takes on its default appearance.
Converting a control to a template is more powerful than it might seem at first. As you will see shortly, many properties for the Login control enable several other user interface elements. For example, the control can display links for help text or user registration. By converting the control to a template, you have full control over the placement of all parts of the control.
The built-in functionality of the Login control isn’t limited to the appearance of the control. When the Log In button on the control is clicked, ASP.NET automatically does a lookup on the user and authenticates him. If the user presents incorrect credentials, the control notifies the user. If the credentials are correct, the control logs in the user and redirects him to the page specified in the DestinationPageUrl property of the control.
Tip
![]()
Those of you using an operating system without a web server are not excluded from testing the concepts described in this chapter. The Microsoft Expression Development Server provides a fully supported environment for ASP.NET.
Tip
![]()
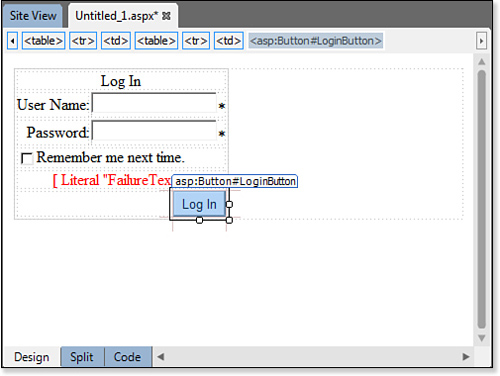
To convert the Login control to a template, click the button at the upper right of the control to access the Login Tasks pop-up and click the Convert to Template link. After you do this, the controls within the Login control immediately become accessible, as shown in Figure 28.3.
Figure 28.3. Converting the Login control to a template allows access to the controls that comprise it. Notice here that the Button control is selected. Accessing the button is impossible before converting the control to a template.
Many other useful properties of the Login control can be accessed via the Tag Properties panel:
• CreateUserIconUrl—Specifies a URL to a graphic file that acts as a link for new users who are not yet registered. When clicked, users are taken to a registration page for the site.
• CreateUserText—Text that is displayed that acts as a link for new users who are not yet registered. This is most often used in place of the CreateUserIconUrl.
• DestinationPageUrl—The URL to which users are redirected upon a successful login.
• DisplayRememberMe—If true, displays the Remember Me check box. This value is true by default.
• FailureAction—This property can be one of two values: Refresh or RedirectToLoginPage. It controls what happens if a user fails to log in successfully. The RedirectToLoginPage is used in situations where the Login control is placed on a page other than the login page.
• FailureText—Configures the text that is displayed if a user fails the login attempt. It is recommended that this text be chosen carefully so as not to cause a security risk. For example, notifying a user that a password is incorrect can imply that the username is valid, leading to a potential security risk.
• HelpPageIconUrl—Sets the URL of a graphic that can be displayed as a help icon. When the user clicks this graphic, she is redirected to a help page for your site.
• HelpPageText—Configures the text that is displayed as a link to the help page for the site.
• HelpPageUrl—Specifies the URL of the help page for the site.
• InstructionText—Sets the text that appears to offer instructions to users.
• LoginButtonImageUrl—Specifies the URL of an image to use for the login button. The LoginButtonType property should be set to Image when using this property.
• LoginButtonText—Allows you to change the text that appears on the button. By default, the button displays the text Log In.
• LoginButtonType—This property can be one of three values: Button, Image, or Link. Button is the default. When set to Link, the button is converted to a regular link. When set to Image, the image specified by the LoginButtonImageUrl property is displayed.
• Orientation—Sets the orientation of the control to either Horizontal or Vertical.
• PasswordLabelText—Sets the text that labels the Password text box.
• PasswordRecoveryIcon—Used to specify an image to display for a link to a password recovery page. A user can click this when she forgets her password.
• PasswordRecoveryText—Sets the text to display for the password recovery link.
• PasswordRecoveryUrl—Sets the URL of the password recovery page.
• PasswordRequiredText—The text entered here is displayed in the ValidationSummary control on the Login control when no password is entered.
• RememberMeSet—Sets this property to true to check the Remember Me check box by default.
• RememberMeText—Sets the text for the Remember Me check box.
• TextLayout—Can be set to TextOnLeft or TextOnTop. This controls the position of the text for the text boxes.
• TitleText—The text that appears in the title bar of the control.
• UserName—Sets the initial text of the Username text box.
• UserNameLabelText—Sets the text that labels the Username text box.
• UserNameRequiredError—Sets the text that is displayed in the ValidationSummary control on the Login control when no username is entered.
• VisibleWhenLoggedIn—When true, the Login control is visible even when the user is logged in. This property is normally used only when the Login control appears on a page other than the login page.
Note
![]()
The Tasks pop-ups for the login controls have an Administer Website link. If you click this link, you are informed that administering the site is not supported. If you want to administer the site, you need to use the tools that ASP.NET provides.
As you can see from that rather long list of properties, the Login control is more powerful than it seems at first.
LoginStatus Control
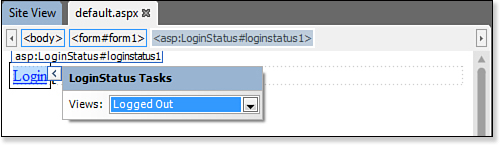
The LoginStatus control has two views: one view for when the user is logged in and one for when the user is logged out. As shown in Figure 28.4, the view of the control can be configured using the drop-down available in the LoginStatus Tasks pop-up.
Figure 28.4. ASP.NET automatically chooses the correct view for the LoginStatus control based on whether the user is authenticated, but you can select the view yourself if you want.
Some of the useful properties of the LoginStatus control are as follows:
• LoginImageUrl—Specifies the URL of an image to display for the login image. When a URL is specified in this property, the link in the control changes from text to the image specified.
• LoginText—Specifies the text that appears for the login link.
• LogoutAction—This property can be set to one of three values: Refresh, Redirect, or RedirectToLoginPage. When set to Redirect, users are redirected to the URL in the LogoutPageUrl property when logging out.
• LogoutImageUrl—Specifies the URL of an image to display for the logout image. When a URL is specified in this property, the link in the control changes from text to the image specified.
• LogoutPageUrl—The URL to which users are redirected upon logging out when the LogoutAction is set to Redirect.
• LogoutText—The text that is displayed for the logout link.
LoginName Control
The LoginName control is perhaps the simplest of the login controls. It displays the name of the logged-in user.
By default, the control displays only the username. By altering the FormatString property, you can alter the text that is displayed. For example, if a user named Jim is logged in to the site and the FormatString property is set to Logged in as {0}, the LoginName control would display the text “Logged in as Jim.”
ChangePassword Control
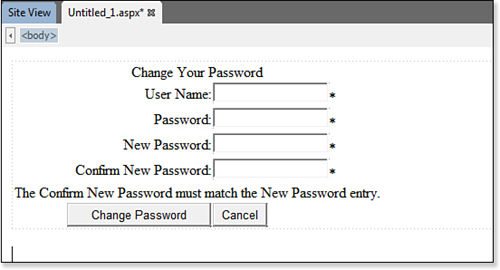
The ChangePassword control allows a user to change his password (see Figure 28.5). In the default configuration, users are required to be logged in to change their passwords. However, the ChangePassword control can be configured to also prompt for the username. In those situations, a user can change his password without logging in. In fact, when the username field is displayed on the control, a user can change the password of a different user as long as he knows the old password of the user whose password is being changed.
Figure 28.5. The ChangePassword control lets a user easily change his password. In some configurations, a user can even change someone else’s password.

Similar to the Login control, the ChangePassword Tasks pop-up shown in Figure 28.6 provides you with an AutoFormat link for easy formatting of the control and a link to convert the control to a template for more precision over the layout of the control.
Figure 28.6. The ChangePassword Tasks pop-up offers options similar to the Login control with the addition of a Views drop-down for switching between the two views provided by the control.
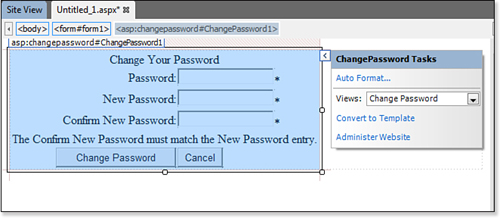
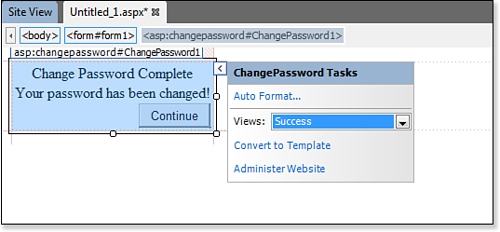
The ChangePassword control also includes a Views drop-down that allows you to switch between the Change Password view and the Success view. The Success view is displayed when a user has successfully changed his password. Figure 28.6 shows the Change Password view of the control, and Figure 28.7 shows the Success view.
Figure 28.7. When a user has successfully changed his password, the Success view is displayed.
The ChangePassword control has many properties that enable you to customize the control’s appearance and behavior. Because the list is long, we won’t go over the properties that are similar to corresponding properties of the Login control. Refer to that section of this chapter to refresh your memory if necessary.
DisplayUserName Property
The DisplayUserName property controls whether a text box for entry of a username exists on the control. If the DisplayUserName property is true and a user is already logged in, the user will be able to change the password of another user assuming she knows the other user’s password. The ChangePassword control shown in Figure 28.8 has a DisplayUserName property of true.
Figure 28.8. You can display a text box for a user’s username by setting the DisplayUserName property to true.
By placing the ChangePassword control on a page that can be browsed without logging in to the site (a page that can be browsed anonymously), a user can change her password without logging in to the site, provided the DisplayUserName property is set to true.
MailDefinition Property
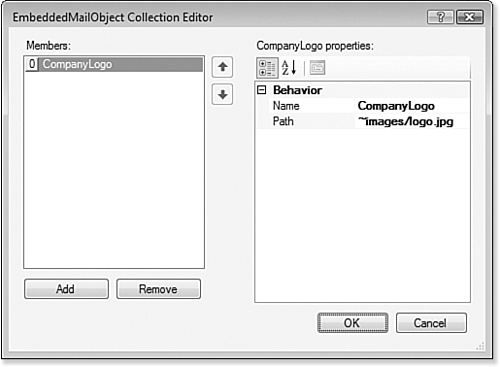
The MailDefinition property provides the capability to send users an email after a successful password change. The MailDefinition property is actually a reference to a special object in the .NET Framework called MailDefinition. As shown in Figure 28.0, the MailDefinition property expands into several different fields:
• BodyFileName—The BodyFileName field enables you to specify a file that will be used for the body of the email sent by the ChangePassword control. Any occurrence of <%UserName%> in this file will automatically be replaced by the username of the user, and any occurrence of <%Password%> will automatically be replaced by that user’s new password.
• CC—Email address(es) that should be copied on the email. If you’d like to enter more than one address, separate the email addresses with commas.
• EmbeddedObjects—The EmbeddedObjects property is a collection of images or graphics to be embedded into the email. When you click the button next to this property, the EmbeddedMailObject Collection Editor appears, as shown in Figure 28.10. The code to insert these objects into the email is included in the file specified by the BodyFileName property.
Figure 28.9. The MailDefinition property is actually a collection of many fields that make defining an email to send to users upon a password change easy.
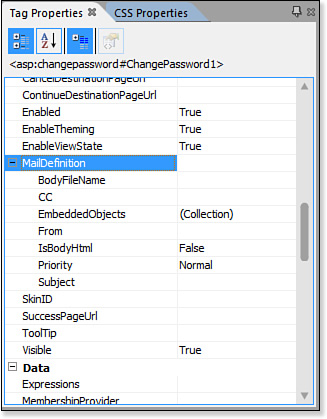
Figure 28.10. Embedding images in your email is accomplished via the EmbeddedMailObject Collection Editor. In this case, a company logo is being added.
Note
![]()
We’re delving into some basic programmatic concepts as we discuss the MailDefinition property. Because this isn’t a programming book, we won’t go into great detail on this property. I’ll explain how it’s used, but if you want the down-and-dirty details, your best resource is the MSDN site at http://msdn2.microsoft.com.
The details on the MailDefinition class can be found by browsing to http://msdn.microsoft.com/en-us/library/system.web.ui.webcontrols.maildefinition.aspx.
The following code inserts the embedded object shown in Figure 28.10:
<img src="cid:CompanyLogo" alt="Jimco Software" />
• From—The From property specifies the originating email address for the email.
• IsBodyHtml—This property specifies whether the file specified by the BodyFileName property contains HTML code or plain text. If you have set the EmbeddedObjects property, you should set the IsBodyHtml property to true.
• Priority—The priority at which the email will be sent. Valid values are Normal, Low, and High.
• Subject—The subject of the email.
Tip
![]()
To send email, the computer on which the site resides must have the SMTP service configured on it. You can get information on how to configure SMTP by browsing to http://msdn.microsoft.com/en-US/library/8b83ac7t.aspx.
PasswordHintText Property
The text specified for the PasswordHintText property appears above the Password text box. It is used to communicate your password requirements to users.
The default requirements of passwords specify that they be at least seven characters in length with at least one nonalphanumeric character.
Caution
![]()
When using the MailDefinition property, keep in mind that email can be intercepted fairly easily by someone other than the intended recipient. For that reason, you may want to consider using SSL for pages that use sensitive information.
PasswordRecoveryUrl Property
The PasswordRecoveryUrl property points to the page containing a PasswordRecovery control so that a user can recover or reset his existing password. (We’ll cover the PasswordRecovery control later in this chapter.)
Note
![]()
We won’t go into the specifics of configuring ASP.NET’s behavior when storing passwords. If you’d like more information, Microsoft has excellent documentation on the MSDN site at http://msdn.microsoft.com/en-us/library/system.web.ui.webcontrols.passwordrecovery.membershipprovider.aspx.
This property uses the PasswordRecoveryText or PasswordRecoveryIconUrl property to create the link.
SuccessPageUrl Property
The SuccessPageUrl property is used when you want a user to be redirected to a specific page when her password has been successfully changed.
If this value is not specified, the ChangePassword control switches to the Success view upon a successful password change. If the SuccessPageUrl property is specified, the Success view of the ChangePassword control is not displayed at all.
PasswordRecovery Control
The PasswordRecovery control is designed to allow a user to gain access to your site even in cases of a forgotten password. The name of the control is a bit misleading. By default, a user cannot recover his password. Instead, a new one is assigned and sent in an email because ASP.NET uses an irreversible hashing algorithm before storing a password by default. You can change this behavior and store passwords encrypted. When a password is encrypted, it can be decrypted and recovered for the user.
Tip
![]()
The view that is intially displayed for the PasswordRecovery control is the view selected in Expression Web when the page is saved. Therefore, you’ll want to be sure you select the UserName view before saving your page.
As with the other controls we’ve reviewed, the PasswordRecovery control can be auto-formatted for a more pleasing appearance using the AutoFormat dialog shown in Figure 28.11. This dialog is accessible via the PasswordRecovery Tasks pop-up. The PasswordRecovery control is also a templated control, so you can rearrange the layout if you want.
Figure 28.11. The PasswordRecovery control can be formatted for a more pleasing appearance using the AutoFormat dialog.

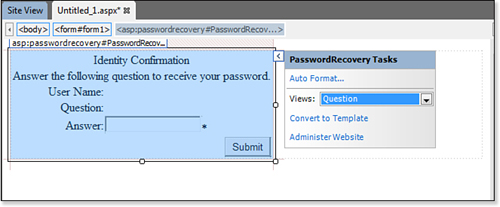
When a user changes his password, the process actually occurs in a series of three steps. In the first step, the user is asked for his username. After the Submit button is clicked, the user is asked for the answer to his secret question provided when he registered for the site. Assuming the answer is correct, the user is presented with a message indicating that the password is being emailed.
Each of these steps is accessible in Expression Web using the Views drop-down in the PasswordRecovery Tasks pop-up, as shown in Figure 28.12. Because the control is templated, you can convert one or more of these steps to a template and control the layout and other functionality of each step.
Figure 28.12. The PasswordRecovery control consists of three views to allow a user to retrieve or reset a password. The Question view is shown here.
The properties of the PasswordRecovery control are similar to the properties for the other login controls we’ve covered, so there’s no need to cover the details here.
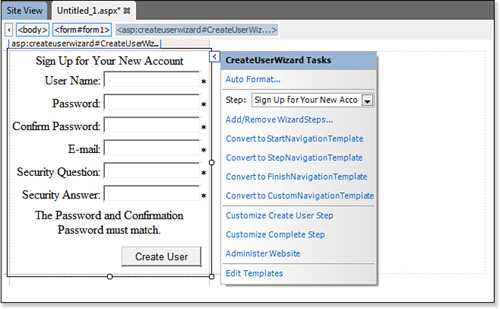
CreateUserWizard Control
The CreateUserWizard control is a wizard-based control that lets new users of your site easily create an account so they can log in (see Figure 28.13). The CreateUserWizard control is actually a customized ASP.NET Wizard control, so the configuration options available are the same options used for the Wizard control.
Figure 28.13. The CreateUserWizard control is a customized Wizard control designed to enable users to easily create new accounts for your site.
![]() For more information on the
For more information on the Wizard control, see Chapter 25, “Using Standard ASP.NET Controls.”
Several properties are unique to the CreateUserWizard control. The following are a few that affect the behavior of the control:
• DisableCreatedUser—By default, after a user creates a new account, she can immediately log in to the site. By setting the DisableCreatedUser property to false, the user will be prevented from logging in. This is commonly used when an administrator or moderator is required to approve an account before it is granted access.
• LoginCreatedUser—When a user creates a new account using the CreateUserWizard control, she is immediately logged in to the site upon completion of the wizard. If the LoginCreatedUser property is set to false, the user will have to explicitly log in instead of being logged in automatically.
If the DisableCreatedUser property is set to true, you should set the LoginCreatedUser to false so that the CreateUserWizard control doesn’t attempt to automatically log in a disabled user account.
• PasswordRegularExpression—Allows you to use a regular expression to apply specific restrictions to password requirements for your site. This regular expression is applied in addition to the password requirements specified by ASP.NET.
The CreateUserWizard control exposes a MailDefinition object so you can send the new user her login information via email if you choose. We discussed the requirements for sending email in the overview of the ChangePassword control earlier in this chapter.
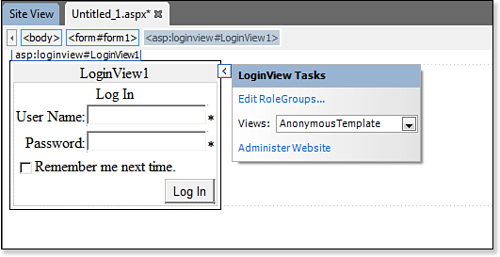
LoginView Control
So far, we’ve covered controls that have a single purpose. The LoginView control is a break from that pattern. The LoginView control is a container control for other controls and provides you with, by default, two views: the AnonymousTemplate view and the LoggedInTemplate view.
Controls that you place in the AnonymousTemplate view, as shown in Figure 28.14, are visible only to users who have not yet logged in to the site. In Figure 28.14, I have inserted a Login control into the AnonymousTemplate view so that users can log in if they haven’t done so.
Figure 28.14. The AnonymousTemplate view is visible only to users who are browsing anonymously. After a user logs in, she no longer sees the AnonymousTemplate view.
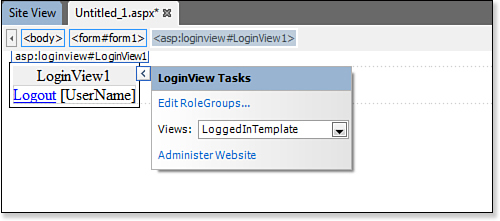
On the other hand, Figure 28.15 shows the LoggedInTemplate view, where I have inserted LoginStatus and LoginName controls. I changed the LoginStatus control’s view to the Logged In view so it will provide a link for the user to log out.
Figure 28.15. The LoggedInTemplate is usually visible to users who have logged in to the site. As you’ll soon see, the user might see a different view instead.
The LoginView control is commonly used on pages where anonymous content is present, but you also want to provide a login interface in one part of the page so that users can log in if desired. A forum page is an excellent example of a page suitable for this kind of control. Users can browse the forums anonymously. If they want to post on the forum, they can log in right on the page they are currently viewing without having to redirect to a login page and lose their place.
Tip
![]()
A discussion of ASP.NET roles is outside the scope of this book. If you’d like more information on ASP.NET roles, an excellent resource is available on the MSDN site at http://msdn2.microsoft.com/en-us/library/5k850zwb.aspx.
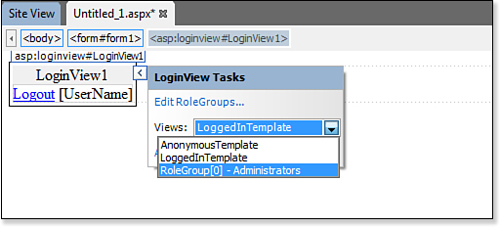
As shown in Figures 28.14 and 28.15, the LoginView Tasks pop-up contains a link for editing RoleGroups. This enables you to define a template for different ASP.NET roles to which a user might belong using the RoleGroup Collection Editor shown in Figure 28.16. In Figure 28.16, you can see that I’ve defined a role called Administrators. If the logged-in user is a member of the Administrators role, he sees the view associated with that role instead of the LoggedInTemplate view. Figure 28.17 shows the new role selected in the LoginView Tasks pop-up.
Figure 28.16. The RoleGroup Collection Editor allows for the creation of views for specific ASP.NET roles that have been previously created.
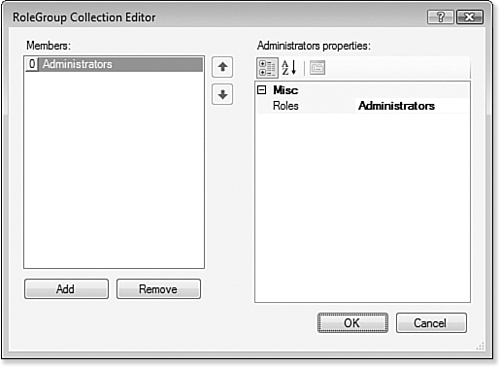
Figure 28.17. When a new RoleGroup has been added, you have a new view to select in the Views drop-down. Users who are in the Administrators role see the new Administrators view.
Tip
![]()
When the page containing a LoginView control is browsed, ASP.NET looks for a role that applies, starting at the top of the list of roles. As soon as it locates a role to which the current user belongs, it displays that view to the user. Therefore, if a user is a member of more than one role, he always sees the view for the first role in the list of RoleGroups.
Creating a Login Solution
Now that you’ve seen an overview of the various login controls that are available, let’s design a simple membership site. Create a site either as a disk-based site or on your local IIS instance.
Note
![]()
If you are using the Microsoft Expression Development Server, refer to the section “Configuring the Website (Microsoft Expression Development Server)” later in this chapter.
The first step in creating our membership site is to configure the site for ASP.NET Forms authentication. Forms authentication is a security mechanism enforced by ASP.NET. If a user tries to browse to a page that is not available anonymously, ASP.NET automatically sends her to a login page instead, where she can enter a username and password to log in to the site.
Use the appropriate steps that follow in order to configure the website based on whether you’re using IIS or the Microsoft Expression Development Server.
Configuring the Website (IIS 5 or IIS 6)
In ASP.NET 1.0 and 1.1, configuring Forms authentication required the manual editing of configuration files. ASP.NET 2.0 and later make the job significantly easier by providing a Windows interface into the configuration options.
- Create a new site at http://<server>/membership, where <server> is a web server running IIS 5 or greater with the .NET Framework 4 installed.
- Open the Windows Control Panel and double-click Administrative Tools.
- Double-click Internet Information Services.
- Expand the computer name node in Internet Information Services.
- Expand the Web Sites node.
- Expand the site on which the site in step 1 was created.
- Right-click the membership web application and select Properties.
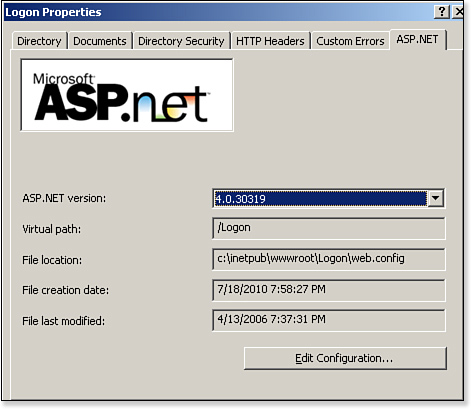
- Click the ASP.NET tab.
- Make sure that 4.0.30319 is selected in the ASP.NET version drop-down.
- Click the Edit Configuration button, as shown in Figure 28.18.
Figure 28.18. Editing the configuration of an ASP.NET site is easy thanks to the new user interface built in to IIS.
- Click the Authentication tab.
- Set the Authentication mode drop-down to Forms, as shown in Figure 28.19.
Figure 28.19. We need to configure the new application for Forms authentication so we can use the ASP.NET login controls.
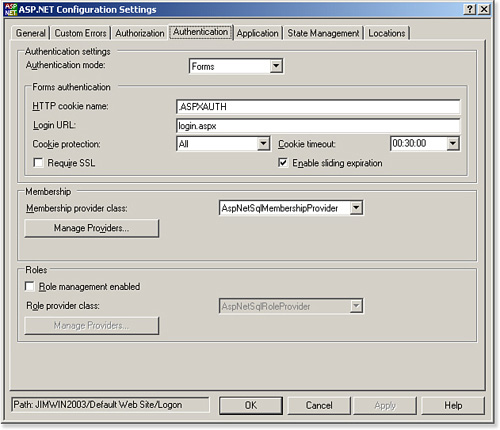
- Make sure the Login URL is set to
login.aspx. We will create this page soon.
Note
![]()
The following steps require IIS 5 or IIS 6. The Microsoft Expression Development Server does not allow for configuration of a site from within a Windows interface.
Note
![]()
Configuration of sites is dramatically different in IIS 7, so we’ll cover it in the next section.
If you’re running Windows XP Professional, you have access to IIS 5. If you’re running Windows Server 2003, you have access to IIS 6. If you’re running a later version of Windows, you have access to IIS 7 or IIS 7.5.
Tip
![]()
If you cannot select a version from the dropdown, make sure that the site you expanded in step 6 is configured for ASP.NET 4.0.30319.
![]() For more information on creating sites in Expression Web, see Chapter 2, “Creating, Opening, and Importing Sites.”
For more information on creating sites in Expression Web, see Chapter 2, “Creating, Opening, and Importing Sites.”

Regsvr32.exe %windir%microsoft.netframeworkv4.0.30319mmcaspext.dll
cd %windir%microsoft.netframeworkv4.0.30319
aspnet_regiis -i
Now we need to configure the application so that no one can browse it anonymously. We’ll use ASP.NET’s authorization features to implement this restriction. Here’s how:
- Click the Authorization tab in the ASP.NET Configuration Settings dialog.
- Click the Add button.
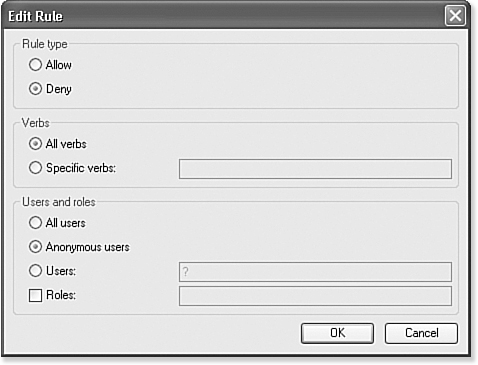
- Select the Deny radio button in the Rule Type section.
- Select the Anonymous Users radio button in the Users and Roles section, as shown in Figure 28.20.
Figure 28.20. The Edit Rule dialog is an easy way to configure authorization settings for your ASP.NET application. You can manually edit configuration files to do the same thing, but the Windows interface is much easier to use.
- Click OK in the Edit Rule dialog.
- Click OK in the ASP.NET Configuration Settings dialog.
- Click OK in the Properties dialog for your web application.
Tip
![]()
Notice that we didn’t tell ASP.NET to allow anonymous users to access the login page. ASP.NET always allows anonymous access to the login page, so even though we’ve configured the site so no anonymous users are allowed, everyone will be able to access the login page.
You have just configured an ASP.NET Forms authentication site and set the authorization of the site so anonymous users are not allowed.
Configuring the Website (IIS 7.x)
The default installation of IIS 7.x contains only the components required for the simplest site. To run an ASP.NET membership site on IIS 7.x, you must first install ASP.NET support. The steps necessary to install ASP.NET support differ based on the operating system you are running.
Configuring ASP.NET Support for IIS 7.x
Follow these steps to install ASP.NET support on IIS 7.x running on Windows Vista or on Windows 7:
- Select Programs and Features in Control Panel.
- Click the Turn Windows Features On and Off link.
- Expand the Internet Information Services node.
- Expand the World Wide Web Services node.
- Expand the Application Development Features node.
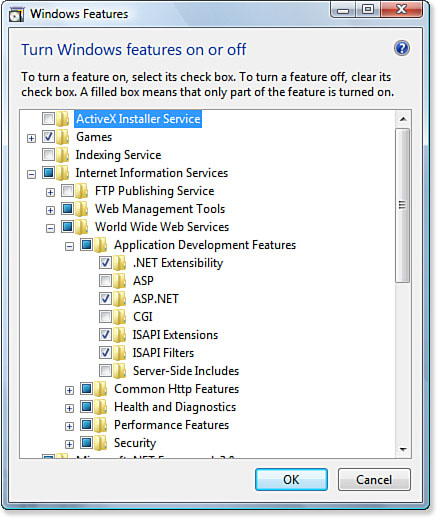
- Check the ASP.NET check box, as shown in Figure 28.21.
Figure 28.21. Check the ASP.NET check box under the Application Development Features node to install ASP.NET support on IIS 7.x.
- Click OK.
Tip
![]()
When you select ASP.NET, the .NET Extensibility, ISAPI Extensions, and ISAPI Filters nodes will be selected automatically.
Follow these steps to install ASP.NET support on IIS 7.x running on Windows Server 2008:
- Open Server Manager.
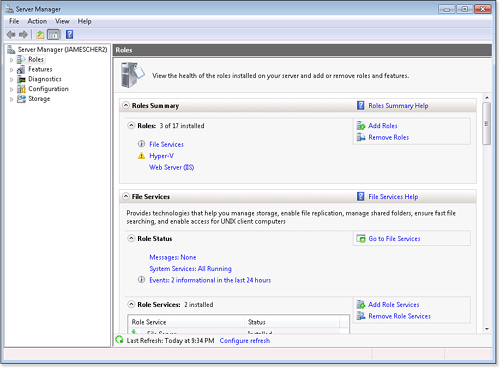
- In the Roles Summary section, click the Web Server (IIS) link, as shown in Figure 28.22.
Figure 28.22. The Roles Summary section of Server Manager contains a Web Server (IIS) link after IIS 7 is installed.
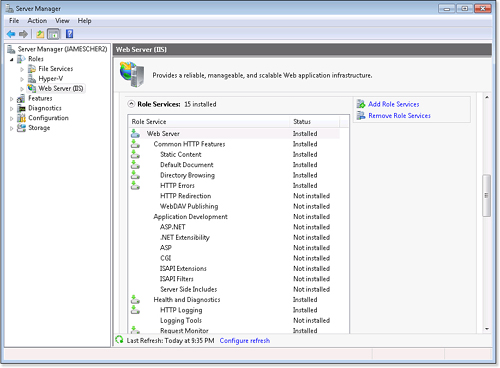
- In the Role Services section, click the Add Role Services link, as shown in Figure 28.23.
Figure 28.23. Click the Add Role Services link to add a new role service to IIS.
- Check the ASP.NET check box.
- Click the Add Required Role Services button in the Add Role Services dialog.
- Click Next, and then click Install to complete the process.
After ASP.NET support has been installed, the steps for configuring ASP.NET membership are identical on Windows Server 2008, Windows Vista, and Windows 7.
Enabling Forms Authentication
The first step in configuring ASP.NET membership in IIS 7 is to enable Forms authentication for your application.
Follow these steps to enable Forms authentication:
- Open Internet Information Services (IIS) Manager.
- In the Connections pane, navigate to your application and click to select it.
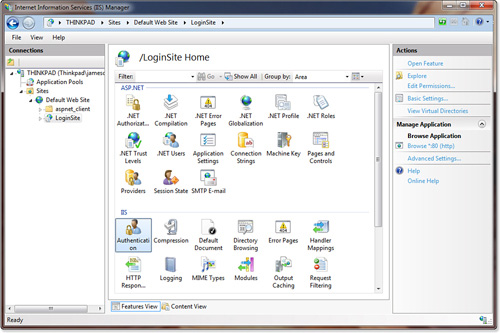
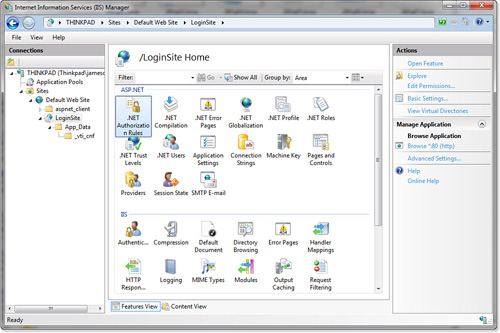
- Double-click Authentication in the IIS section of Features View, as shown in Figure 28.24.
Figure 28.24. The Authentication icon in the IIS section enables you to easily configure the authentication method used for your application or site.
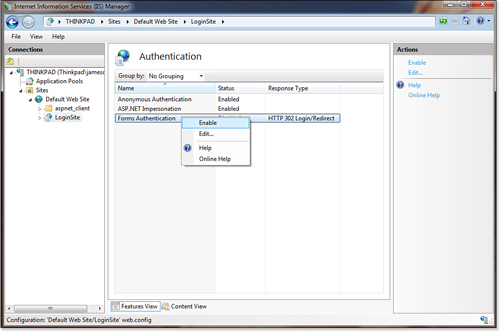
- Right-click Forms Authentication and select Enable, as shown in Figure 28.25.
Figure 28.25. To enable Forms authentication, right-click Forms Authentication and select Enable from the menu.
Adding Users
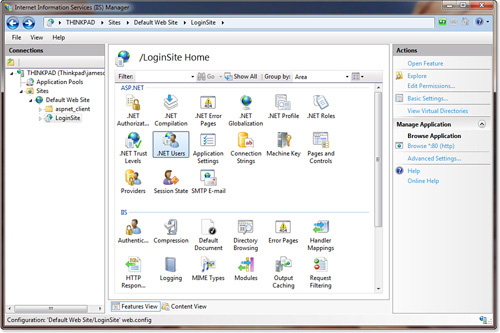
After Forms authentication is enabled, you can add users for your membership site using the .NET Users icon in the ASP.NET section, as shown in Figure 28.26.
Figure 28.26. You add ASP.NET using the .NET Users icon.
After you double-click .NET Users, right-click and select Add (shown in Figure 28.27) to access the Add .NET User dialog shown in Figure 28.28.
Figure 28.27. Add ASP.NET users by selecting Add from the context menu.

Figure 28.28. Using the Add .NET User dialog is a convenient way to add ASP.NET users to your membership site.
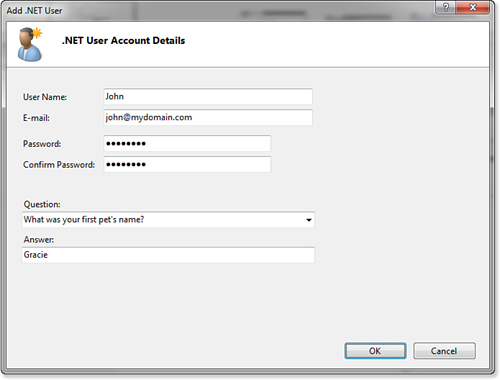
Fill out the Add .NET User dialog; then click OK to add your user.
Configuring Authorization Rules
After you’ve created users for your membership site, use the .NET Authorization Rules settings to configure access (see Figure 28.29). Doing so configures URL authorization for IIS, so authorization rules that you apply here will apply to all requests, ASP.NET pages, and other pages and files as well.
Figure 28.29. To configure authorization rules, double-click the .NET Authorization Rules icon.
After double-clicking the .NET Authorization Rules icon, you can add a new Allow rule to specify content that is allowed and a Deny rule to specify content that is denied, as shown in Figure 28.30.
Figure 28.30. IIS URL authorization rules are similar to ASP.NET authorization rules except that they apply to all requests and not just to ASP.NET pages.

Note
![]()
The Authorization Rules icon is available only when URL Authentication is installed in IIS. If you don’t see the Authorization Rules icon, install URL Authentication in the Security section of IIS setup.
Configuring the Website (Microsoft Expression Development Server)
The Microsoft Expression Development Server does not have a Windows interface for modifying the configuration of your site, so you’ll need to create a configuration file for that purpose. To make matters even more confusing, Expression Web does not have IntelliSense for ASP.NET configuration files.
![]() For information on controlling the color-coding of files within Expression Web, see Chapter 11, “Configuring Page Editor Options.”
For information on controlling the color-coding of files within Expression Web, see Chapter 11, “Configuring Page Editor Options.”
Note
![]()
For details on how IIS 7 authorization rules differ from ASP.NET authorization rules, see www.iis.net/articles/view.aspx/IIS7/Managing-IIS7/Configuring-Security/URL-Authorization/Understanding-IIS7-URL-Authorization?Page=5.
Note
![]()
Because ASP.NET configuration files are XML files, Expression Web provides color-coding for the files.
To control the configuration of a specific web application, ASP.NET uses a special configuration file in the root of the site called web.config. The web.config file contains XML code that controls many aspects of the site.
To configure our site for ASP.NET membership, we need to do the following:
• Configure the site for ASP.NET Forms authentication.
• Disable the ability for unauthenticated users to browse the site.
• Turn on ASP.NET Impersonation.
Caution
![]()
ASP.NET configuration files are case-sensitive. If you enter information in the wrong case, you’ll see errors in your application.
Begin by selecting File, New, Page and selecting XML from the list of file types. Place your cursor after the XML code that Expression Web adds by default and enter the following code:

Now save the file as web.config. Make sure to select All Files (*.*) from the Save as Type drop-down; otherwise, Expression Web automatically adds an .xml file extension to your file.
Note that the outermost element in the web.config file is the <configuration> section. Within that section is a <system.web> section. This is where you make changes to ASP.NET configuration.
Note
![]()
ASP.NET Impersonation is a feature that allows you to run ASP.NET code under a user identity other than the default identity.
Tip
![]()
If you want a better method of creating a configuration file (and many other ASP.NET tasks), I encourage you to download Microsoft Visual Web Developer Express Edition from http://www.microsoft.com/express/vwd/Default.aspx.
In this case, the first element inside the <system.web> section is the <authentication> element. We have enabled ASP.NET Forms authentication by setting the mode of the <authentication> element to Forms.
The next element defines the <authorization> section. The <authorization> section enables you to control who has access to the site. In this case, we want to disallow anyone from browsing the site unless they have been authenticated. The <deny> tag allows us to do that. By specifying a users attribute with a value of ?, we are telling ASP.NET that any user who is not authenticated should be denied access.
The next element is the <identity> element. We use this element to turn on ASP.NET Impersonation. The ASP.NET application would normally execute under the identity of the process in which it runs. By enabling ASP.NET Impersonation, we’re forcing our page to run under the identity of the user who is authenticated to our application.
Creating the Web Pages
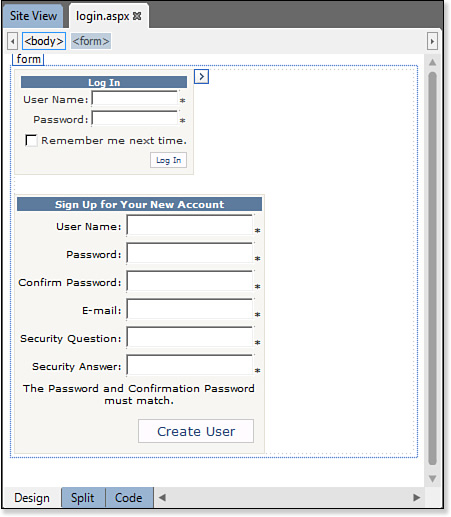
Our membership site requires only two pages: the login page and a content page. In a real application, you’d probably want to have a separate login page and new user page, but in this sample, we use one page for both functions.
- Create a new ASP.NET Web Form and save it as
login.aspx. - Create a second ASP.NET Web Form and save it as
default.aspx. - Add a
Logincontrol and aCreateUserWizardcontrol to thelogin.aspxpage. Thelogin.aspxpage should now look like Figure 28.31.Figure 28.31. The login page serves two purposes: It allows users to log in or create a new account if they’ve never visited the site before.
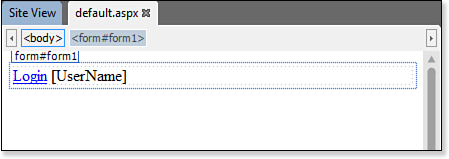
- Add a new
LoginStatuscontrol to thedefault.aspxpage and set the view to LoggedIn. - Place the insertion point just to the right of the
LoginStatuscontrol and press the spacebar on your keyboard. - Insert a new
LoginNamecontrol.
Your default.aspx page should now look like Figure 28.32. When a user logs in and sees this content, the controls allow him to log out easily.
Figure 28.32. The content page uses ASP.NET login controls to allow a user to easily log out.
Now you’re ready to try the site. Try browsing to the default.aspx page. You should be redirected automatically to the login.aspx page because you have not yet logged in.
- Right-click the root folder of the site (
c:inetpubwwwrootby default). - Select Properties from the menu.
- Select the Security tab.
- Click Add.
- Enter ASPNET in the box if you are using Windows 2000 or Windows XP and IISWPG if you are using Windows 2003.
- Click the Advanced button.
- Place a check in the box Replace Permission Entries on All Child Objects with Entries Shown Here That Apply to Child Objects.
- Click OK.
- Click OK again.
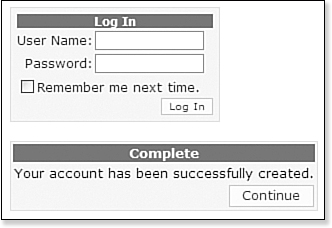
Fill out the form to sign up for a new account, as shown in Figure 28.33; then click the Create User button to create your account. You’ll be presented with a message letting you know that the account has been successfully created, as shown in Figure 28.34.
Figure 28.33. The CreateUserWizard control not only collects all the information for a new user, but also creates the user database when the first user is created.

Figure 28.34. Your new user account has been created and you can now log in using your new user credentials.
When you create the first user in an ASP.NET membership application, the SQL Server 2005 Express Edition database is created for you automatically.
As you’ve seen in this chapter, creating a powerful membership system in ASP.NET and Expression Web is as simple as just dropping the controls on the page. We created an entire application without writing a single line of code.
Using Web Deploy to Publish a Membership Database
ASP.NET’s membership features make it simple to create a login system for your site. However, many people run into trouble once they move the site to a hosting company. Most hosting companies don’t support SQL Server Express Edition databases, which can be a problem given that ASP.NET uses SQL Server Express Edition by default for storing membership information.
As I mentioned earlier, many hosts provide tools for moving users created in a SQL Server Express database into a SQL Server database running on the host’s server. However, if your host doesn’t offer such a feature, you’re still in luck. Microsoft’s Web Deploy tool can take a local copy of your application and deploy it to a remote server. When it does, it can also change the connection information for your database and migrate the information from your local SQL Server Express database to the remote SQL Server database.
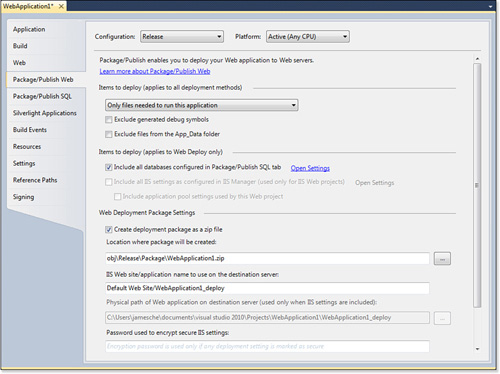
By far, the easiest way to use the Web Deploy tool is to use it within Visual Studio 2010. As shown in Figure 28.35, even the free Express edition offers a nice user interface for not only configuring how a site is packaged for deployment to a remote server, but also for easily publishing the files to your host.
Figure 28.35. The Package/Publish Web features in Visual Studio and Visual Web Developer Express provide a powerful and flexible deployment toolset.
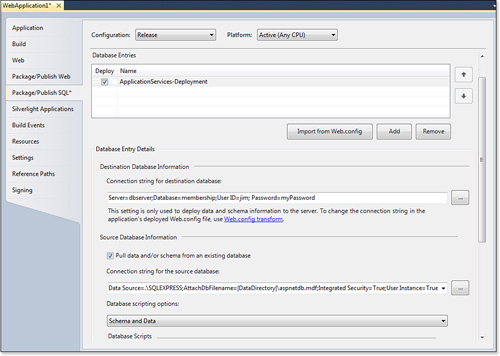
Where the deployment tools in Visual Studio really shine is in copying data from your local SQL Server Express membership database to your hosting company’s SQL Server instance. Figure 28.36 shows the Package/Publish SQL settings in Visual Web Developer 2010 Express. My ApplicationServices database entry (which is stored in the web.config file of my application) appears in the Database Entries section. Below that is the connection string for the destination database. When Visual Studio copies my application to my hosting company, it automatically changes the connection string for my application, and because I’ve selected Schema and Data in the Database Scripting Options drop-down, it also copies my ASP.NET membership database as well as any users and roles that I’ve added to it from my local machine.
Figure 28.36. The Package/Publish SQL features in Visual Studio 2010 make it easy to deploy your ASP.NET membership database.
Once you’ve configured all of these settings, you can use the Publish toolbar in Visual Studio to deploy your application (see Figure 28.37). Selecting <New> from the drop-down on the toolbar launches the Publish Web dialog shown in Figure 28.38. From here, you can create a Publish profile that will deploy your application.
Figure 28.37. The Publish toolbar is new to Visual Studio 2010 and allows you to create Publish profiles for publishing your application.
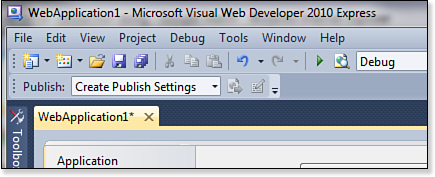
Figure 28.38. The Publish Web dialog is where you’ll configure Publish profiles that specify how your application should be published. I’m using Web Deploy in this figure.
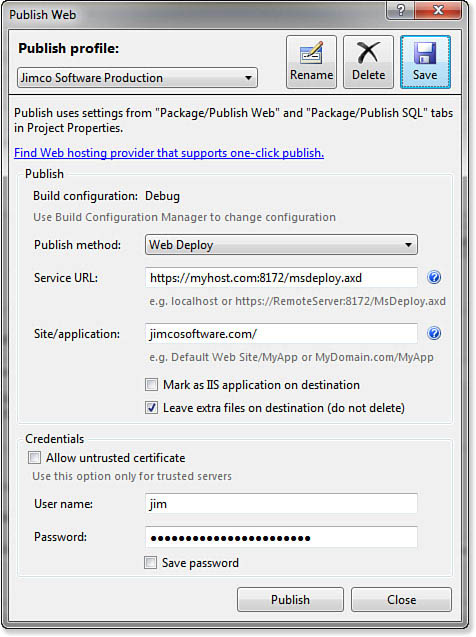
When you use Publish profiles in Visual Studio, you can publish your application with a single click using the Publish toolbar. This feature is called One-Click Publish, and it’s a great way to deploy your ASP.NET application. If you choose to use these features in Visual Studio, I strongly suggest that you find a host that supports One-Click Publish. There’s a link in the Publish Web dialog (shown previously, in Figure 28.38) that takes you to a site where you can locate a host. You may also want to check out my host, DiscountASP.NET (www.discountasp.net). I’ve been using them for many years, and they’ve always been a top-notch hosting company.
Because this is a lengthy topic for discussion, I’ve only touched on these features in this section. If you want to learn more about how you can take advantage of these powerful deployment features, check out http://msdn.microsoft.com/en-us/library/dd394698.aspx.