
3. Creating Pages and Basic Page Editing
Creating Pages
Expression Web gives you plenty of choices when creating new pages. Not only can you choose between standard HTML pages, ASP.NET pages and files, PHP files, and ASP files, but you can also create new pages that have an existing CSS layout.
To create a new page in Expression Web, select File, New, Page to display the New dialog shown in Figure 3.1.
Figure 3.1. The New dialog makes it easy to create any type of page.
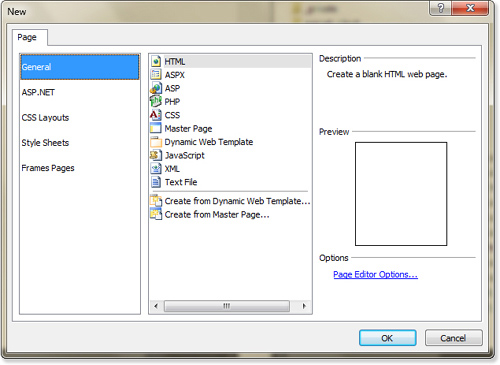
The left side of the New dialog contains a list of page types. When a page type is selected, the list at the right is populated with numerous pages that can be created.
Many of the page types listed aren’t really pages in the traditional sense. For example, if you select ASP.NET as the page type, you see options such as Web Configuration and Site Map, both of which are Extensible Markup Language (XML) files instead of actual pages.
Creating a page is literally as easy as selecting the type of page in the New dialog and clicking OK. After you create the new page, you need to add content to it before it will serve any useful purpose. Let’s review the types of page formats you can choose when using the New dialog to create new pages.
General Page
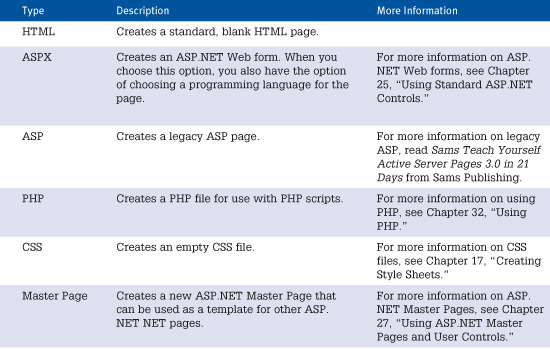
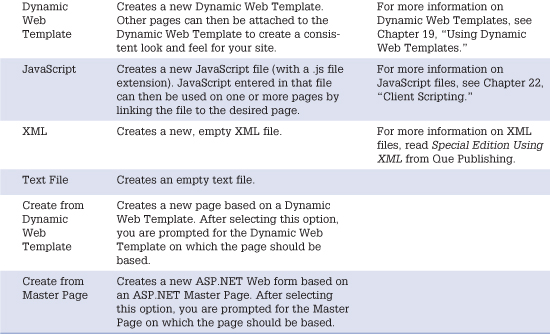
Table 3.1 shows the page formats available when you select General in the New dialog and where you can find more information on certain formats.
Table 3.1. General Page Formats
Note
![]()
The Create from Dynamic Web Template and Create from Master Page options only appear if a site is already open in Expression Web.
ASP.NET Pages
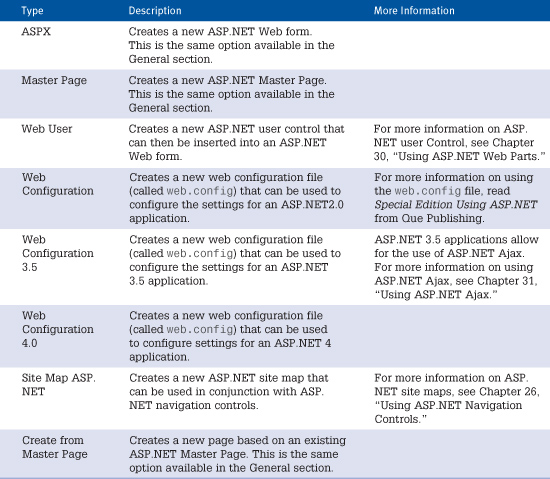
The page types shown in Table 3.2 are available when you choose ASP.NET in the New dialog.
Table 3.2. ASP.NET Page Formats
CSS Layouts
When you choose the CSS Layouts option in the New dialog, you have the option of selecting from a series of page layouts. When you choose a particular layout, Expression Web creates a new CSS file as well as a new HTML page and then links the new CSS file to the HTML page. Code also is added to both the HTML page and the CSS file that creates the layout you choose.
After selecting the desired layout, you can modify the CSS file to customize the appearance of the page.
Tip
![]()
The CSS Layouts option allows you to easily create page layouts that are CSS-based instead of using tables or other traditional layout techniques. CSS-based layouts are growing in popularity, largely because today’s browsers are capable of rendering them consistently. However, if you choose to use a CSS layout, you should check your site carefully in a variety of browsers.
![]() For more information on modifying CSS files, see Chapter 18, “Managing CSS Styles.”
For more information on modifying CSS files, see Chapter 18, “Managing CSS Styles.”
Style Sheets
The Style Sheets section offers a wide assortment of precreated CSS files that you can use in your site. Unfortunately, Expression Web doesn’t provide a preview of the styles present in the CSS files, so you will need to apply one to your site to see what kind of formatting it will provide.
These CSS files are a great way to move to CSS, as long as you are willing to do some modification to them when they don’t give you what you want. For example, in my experience, the colors applied by these CSS files are a bit loud and unpleasant in appearance. However, they are easily modified.
Tip
![]()
You might be better off using the CSS files supplied with Expression Web as a way to learn CSS techniques. After you’ve gained a better understanding of CSS, it’s often best to create your own CSS files so you have complete control over them.
Frames Pages
The Frames Pages section provides a series of frame layouts. When you choose one of the frame layouts, Expression Web creates all the pages that make up the layout for you.
![]() For more information on using frames, see Chapter 6, “Using Frames.”
For more information on using frames, see Chapter 6, “Using Frames.”
Importing Files
Adding content often is more than just entering and configuring text. In many cases, you also are adding graphic files, Flash animations, video files, and other files.
To import files into your site, select File, Import, File to display the Import dialog shown in Figure 3.2.
Figure 3.2. You’ll likely want to import some graphics and other files into your site. The Import dialog makes it easy.
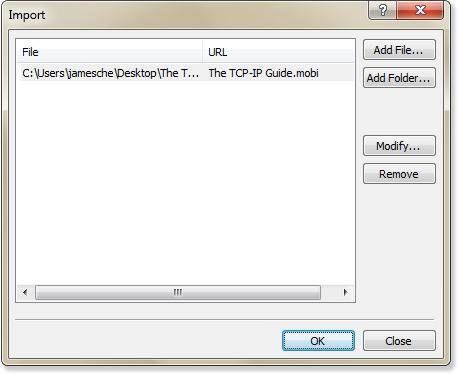
Click the Add File button to import one or more files. You can also click Add Folder to import a folder and all the files inside that folder. After you’ve added files or folders, they appear in the list in the Import dialog. If you want to change the name of an imported file, select the file and click the Modify button.
To complete the import process, click OK. The files will not be imported into the site until you click OK.
Tip
![]()
Files and folders added to the Import dialog remain there until you complete the import process, remove them, or close the site. That means you can add files or folders and then click Close and import them later.
If you close a site with files still on the import list, Expression Web asks whether you want to import them before closing the site.
Formatting Text
Adding text to a page in Expression Web is similar to creating a document in your favorite word processor. Many of the same tools are available.
I’m not going to go into the details of basic text formatting because I’m sure you already understand how to bold and italicize text. Instead, I explain how to work with HTML-specific formatting.
How Expression Web Formats Text
Before you start formatting text in your page, you should become familiar with how Expression Web applies formatting. Because Expression Web is designed to create standards-compliant sites, it often uses CSS to apply formatting. How it goes about doing so is based on the CSS Mode setting.
The current CSS Mode setting is displayed using an icon in the status bar when a page is open. To adjust the CSS Mode setting, click the CSS Mode icon on the status bar and select the desired mode, as shown in Figure 3.3.
Figure 3.3. The CSS Mode setting controls how styles are applied and can be adjusted via the status bar.
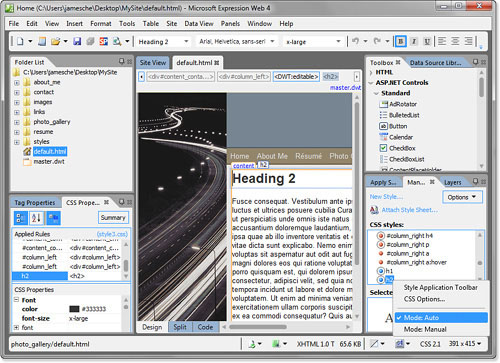
By default, the CSS Mode setting is set to Auto. In this mode, Expression Web applies formatting using CSS rules that are configured on the CSS tab of the Page Editor Options dialog.
![]() For more information on using the CSS tab in the Page Editor Options dialog, see Chapter 11, “Configuring Page Editor Options.”
For more information on using the CSS tab in the Page Editor Options dialog, see Chapter 11, “Configuring Page Editor Options.”
When the CSS Mode setting is Manual, Expression Web automatically displays the Style Application toolbar shown in Figure 3.4. The Style Application toolbar allows you to specify how to apply styles when edits are made.
Figure 3.4. You can control how styles are applied by setting the CSS Mode to Manual and using the Style Application toolbar.
![]()
When the CSS Mode setting is set to Auto (the default), you are at the mercy of Expression Web when it comes to where CSS styles get defined. In many cases, that’s a suitable situation. However, you might want more granular control over where styles are created. For example, you might have a CSS file attached to the current page, and you may want to ensure that all newly created CSS styles are created inside that CSS file.
By setting the CSS Mode setting to Manual, you can use the Style Application toolbar to specify where new styles are created using the Target Rule drop-down shown in Figure 3.4. Based on what is currently selected, the following options are available in the Target Rule drop-down.
• An Existing CSS Element—If the selected page element already has a CSS class or ID applied to it, you can select the CSS ID or class from the Target Rule drop-down. If you then make modifications to the selected element, Expression Web modifies the CSS class or ID applied to it.
• Inline Style—If the selected element has an inline style applied to it, selecting Inline Style from the Target Rule drop-down causes the inline style to be modified when formatting is changed.
• New Inline Style—Formatting changes are reflected in a new inline style.
• New Auto Class—Causes Expression Web to create a new, auto-generated CSS class for any formatting changes that are applied. Expression Web creates the new CSS class in an embedded style sheet inside the current page.
• Apply New Style—Allows you to create a new style using the New Style dialog. The location for the new style can be specified in the New Style dialog.
Tip
![]()
Font families that you create are used in the Font dialog, the Font drop-down, and in IntelliSense, which is displayed when editing HTML and CSS code.
![]() For more information on creating and editing CSS styles, see Chapter 17, “Creating Style Sheets.”
For more information on creating and editing CSS styles, see Chapter 17, “Creating Style Sheets.”
Font Families
In a word processing application, the font you apply to text will always be the font the viewer of the document sees. Web pages don’t work that way. For you to see text formatted in a particular font on a page, that font must be installed on your machine. If it’s not, the browser substitutes a font you have.
Note
![]()
Some fonts are installed on almost all computers; Arial, Helvetica, and other common sans-serif fonts are considered the safest of all fonts. Times New Roman (a serif font) is another common font. It is the font Expression Web uses by default.
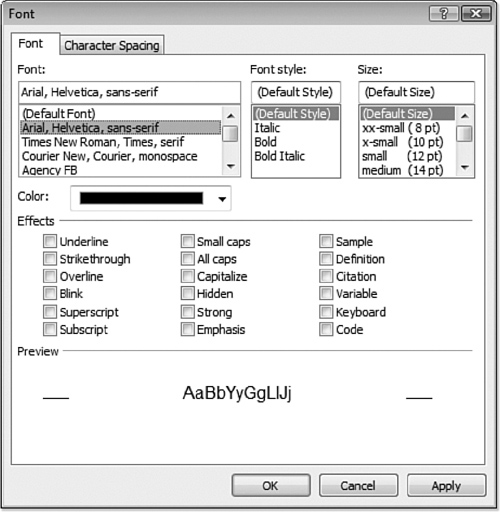
It’s a good idea to always specify a series of fonts to use and specify a generic font (such as sans-serif and monospace) as the last choice. By doing this, if a visitor to your site doesn’t have the first font listed, the browser attempts to use the next font in the list and so on. You can easily configure fonts in Expression Web by selecting Format, Font to display the Font dialog shown in Figure 3.5. Alternatively, you can use the Font drop-down on the main toolbar.
Figure 3.5. The Font dialog lets you easily choose a font family and otherwise modify the appearance of text.
![]() For information on customizing and configuring font families, see Chapter 11, “Configuring Page Editor Options.”
For information on customizing and configuring font families, see Chapter 11, “Configuring Page Editor Options.”
Font Sizes
Font size is one of those things many developers take for granted. Many Web designers say you should always use pixel dimensions (for example, 12 px) for font sizes. In fact, if you want your site to be as user-friendly and accessible as possible, you should use relative font sizes.
![]() For complete details on making your site compliant with accessibility standards, see Chapter 12, “Maintaining Compatibility and Accessibility.”
For complete details on making your site compliant with accessibility standards, see Chapter 12, “Maintaining Compatibility and Accessibility.”
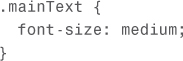
When you use the Font Size drop-down on the toolbar or adjust the font size using the Font dialog, Expression Web automatically uses relative font sizes. The following code shows a CSS style that defines a relative font size that equates to approximately 14-point type:
![]() For more information on CSS styles, see Chapter 17, “Creating Style Sheets.”
For more information on CSS styles, see Chapter 17, “Creating Style Sheets.”
Using relative fonts is a good idea because it gives your site visitor control over the size of the text. When you change the text size in your browser, text that is sized with a relative font size resizes accordingly while text that is sized with an absolute size remains the same size.
Creating Hyperlinks
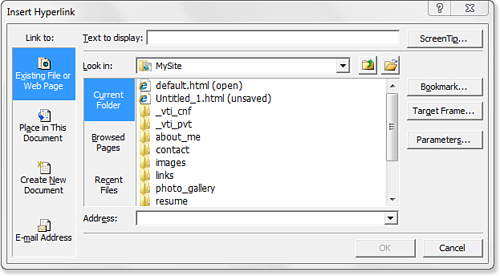
Expression Web provides tools to create hyperlinks quickly and easily. To create a hyperlink, select the text or graphic you’d like to use for the link and then select Insert, Hyperlink to display the Insert Hyperlink dialog shown in Figure 3.6.
Figure 3.6. The Insert Hyperlink dialog contains all the tools needed to create your hyperlinks.
Tip
![]()
You can also right-click the selection and select Hyperlink from the menu to display the Insert Hyperlink dialog.
Along the left edge of the Insert Hyperlink dialog are four buttons that define the type of hyperlink to create. By default, Existing File or Web Page is selected. You can also choose to create a link to a place in the current document (an HTML bookmark), a link to a new document, or an email address.
Tip
![]()
To open a new window that is a specific size or at a specific position, do not use a hyperlink target. Instead, use the Open Browser Window behavior so you can fully control the new window.
New windows opened using this method can be named with any name you choose, and you can then use that name as the target for any hyperlinks you want to load in the window.
Targeting Hyperlinks
By default, hyperlinks to other pages or other sites load into the current browser window. In many cases, that might be exactly what you want, especially when linking to files within your own site. However, if you are linking to another site or you have some other reason for wanting the current page to still be available after someone clicks your link, you need to override that default behavior.
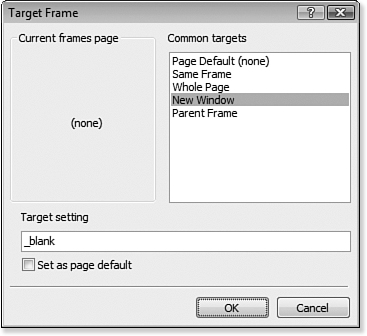
To change the window in which a hyperlink opens, specify the target for the hyperlink. Click the Target Frame button in the Insert Hyperlink dialog to display the Target Frame dialog shown in Figure 3.7. Expression Web provides a list of common target frames, but you can also specify your own frame name when you are targeting a specific frames page.
Figure 3.7. The Target Frame dialog lets you easily specify a target for a hyperlink.
![]() For more information on using frames, see Chapter 6, “Using Frames.”
For more information on using frames, see Chapter 6, “Using Frames.”
![]() For more information on using the Open Browser Window behavior, see Chapter 21, “Using Behaviors.”
For more information on using the Open Browser Window behavior, see Chapter 21, “Using Behaviors.”
Hyperlink Parameters
When you’re using ASP.NET, PHP, or another server-side technology, you might need to pass information to the web server in a hyperlink in the form of a query string. A query string is appended to the end of a hyperlink as a series of names and values. Code that runs on the web server can access the values that are passed by referencing the name in the query string.
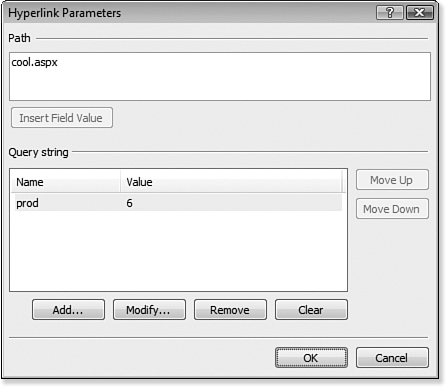
The following hyperlink passes a value called prod with a value of 6:
cool.aspx?prod=6
Note that a question mark appears before the query string value.
You can easily create a query string hyperlink in Expression Web by clicking the Parameters button in the Insert Hyperlink dialog. Doing so displays the Hyperlink Parameters dialog. In Figure 3.8, you see the hyperlink parameter that created the hyperlink shown previously.
Figure 3.8. The Hyperlink Parameters dialog allows you to create query string parameters in a hyperlink. It’s actually just as easy to enter them into the hyperlink text.
The Hyperlink Parameters dialog is convenient if you have a lot of parameters and want to work with them often, but I find it just as easy to type parameters manually.
HTML Bookmarks
Most hyperlinks take you to the top of the page to which it is linked, but you can also link to a specific point in a page using an HTML bookmark.
Tip
![]()
HTML bookmarks are often used on FAQ pages so readers can easily navigate directly to a specific place in the page.
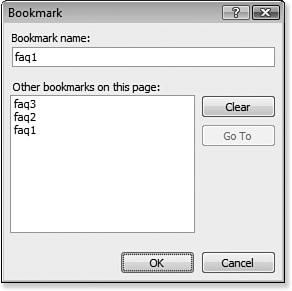
An HTML bookmark defines a point within a document. To create a link to an HTML bookmark, you first must create the bookmark in the page. Place the insertion point on the line where you want the bookmark, and then select Insert, Bookmark to display the Bookmark dialog shown in Figure 3.9.
Figure 3.9. HTML bookmarks are managed in the Bookmark dialog and allow you to link to a specific point within a page.
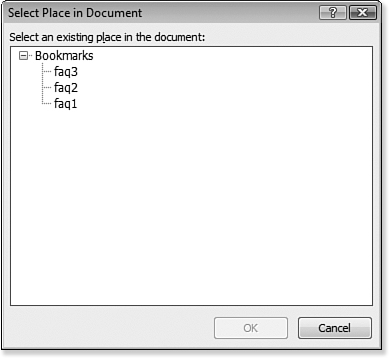
After a bookmark has been created, you can link to the bookmark using the Bookmark button in the Insert Hyperlink dialog to display the Select Place in Document dialog, as shown in Figure 3.10. Select the bookmark for your hyperlink to link to that point in the document.
Figure 3.10. Expression Web lists all bookmarks on the page you’re linking to so you can select the correct point for your hyperlink.
You can link to bookmarks on pages in external sites as well. When you click the Bookmark button, Expression Web parses the remote page for bookmarks and displays them in the Bookmark dialog.
Hyperlink Screentips
To make your site accessible, include a title attribute for all your links. The title attribute is configured using the ScreenTip button in the Insert Hyperlink dialog. The text you enter for the ScreenTip appears as a pop-up when a site visitor hovers over the link. It will also be read by screen readers.
Tip
![]()
Expression Web notes that ScreenTips are supported by Internet Explorer 4.0 or greater. In fact, ScreenTips are supported by all current browsers and are part of the HTML specification.
Spell-Checking
Nothing ruins a professional appearance faster than spelling errors. Even if you’re not a bad speller, you’re bound to make a mistake or two, so having background spell-checking is convenient.
By default, Expression Web does not check your spelling as you type. If you want to check your spelling, select Tools, Spelling, Spelling. If Design view is active, Expression Web checks the spelling in the active document. If one or more files or folders are selected in the Folder List, Expression Web gives you the choice of checking spelling for the selected page(s) or for your entire site.
Expression Web underlines words it believes to be misspelled with a red line. Right-clicking the underlined text presents you with a menu, allowing you to ignore the problem or take some action to correct it.

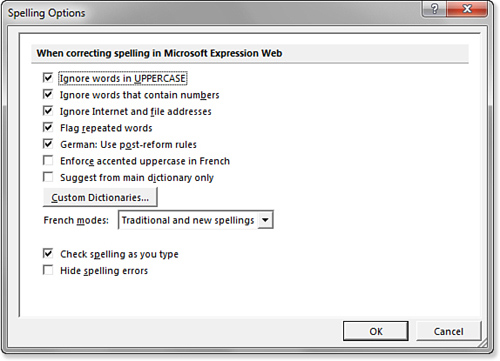
You can also configure Expression Web so that it checks your spelling as you type. To do that, select Tools, Spelling, Spelling Options and make sure Check Spelling As You Type is checked and Hide Spelling Errors is not checked (see Figure 3.11). You can also set other spelling options from this dialog and edit your dictionary.
Figure 3.11. Spelling options are configured in the Spelling Options dialog. From here, you can also edit your custom dictionary.
Tip
![]()
Unlike previous versions of Expression Web, Expression Web 4 does not share a dictionary with Microsoft Office applications.
Configuring Page Properties
Properties for a specific page are configured using the Page Properties dialog. You can access page properties by opening a page and selecting File, Properties.
The Page Properties dialog has five tabs.
Tip
![]()
If a Dynamic Web Template or ASP.NET Master Page is applied to the current page, many of the options in the Page Properties dialog will likely be disabled because they will be controlled by the Dynamic Web Template of Master Page.
General Tab
The General tab allows you to easily configure the page title, description, keywords, and other general information (see Figure 3.12).
Figure 3.12. The General tab in the Page Properties dialog provides settings for page title and other general page settings.
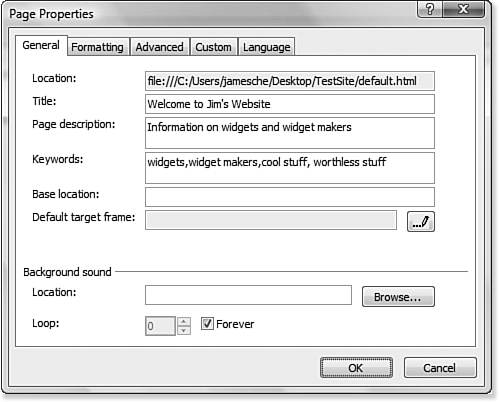
The title you enter in the General tab displays in the title bar of the web browser when the page is viewed. The description and keywords you enter are added as META tags on the page to aid in search engine indexing.
You can also specify a base location, also known as a base href. The base href is the base URL for the page. For example, if you enter http://www.mysite.com/products as the base href, a link that points to software.htm will actually link to http://www.mysite.com/products/software.htm. This is convenient when your site’s directory structure changes often. By using a base href, you can easily update the absolute location of all links by changing one property of the page.
The Default Target Frame property allows you to specify a default frame for links that don’t explicitly specify a frame. This is most often used when you want links on a particular page to open in a new window. By setting the default target to New Window, you can force all links to open in a new window by default.
A background sound can also be set on the General tab. The sound is then played when the page is loaded. You can also choose to loop the sound a specific number of times or infinitely. Keep in mind that most people find background sounds annoying and are likely to leave your site if you force them to listen to a background sound. Before you choose to add a background sound, give it careful consideration.
Formatting Tab
The Formatting tab contains properties for a background image, hyperlink colors, and other page colors (see Figure 3.13).
Figure 3.13. Formatting a page’s background and colors is accomplished using the Formatting tab.
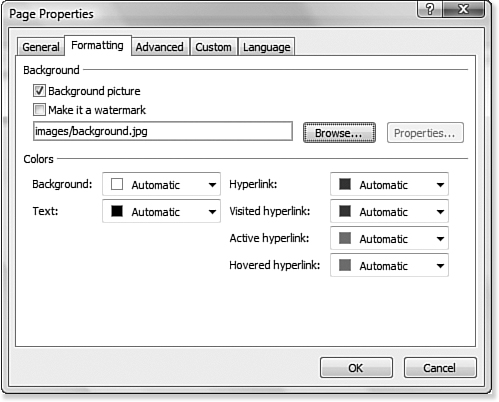
In addition to specifying a background image, you can also specify that an image be added as a watermark. A watermark background remains stationary when the page is scrolled.
Hyperlink color and other page colors are also configured on the Formatting tab. Color changes made here are added to the page as embedded style sheets.
![]() For more information on style sheets, see Chapter 17, “Creating Style Sheets.”
For more information on style sheets, see Chapter 17, “Creating Style Sheets.”
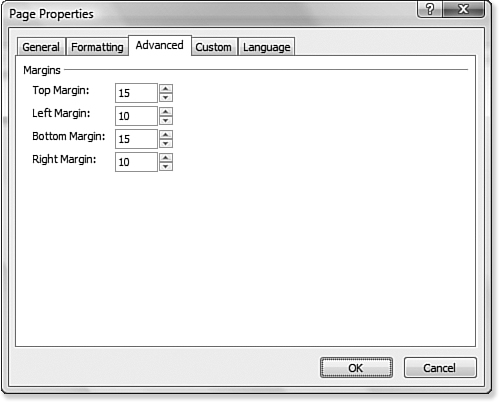
Advanced Tab
The Advanced tab, shown in Figure 3.14, contains settings for the page margins. Margin entries made here are applied to the page as an inline style on the <body> tag.
Figure 3.14. Page margins are applied as an inline style so they work with all modern browsers.
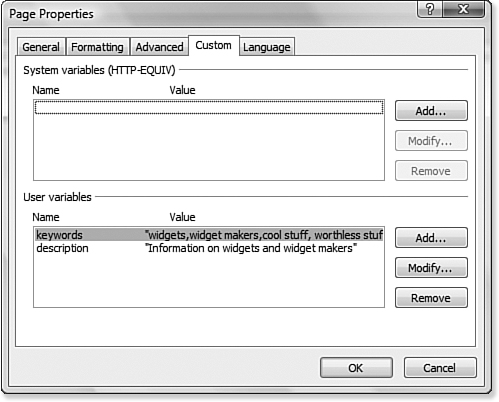
Custom Tab
The Custom tab configures META tags for the current page (see Figure 3.15). The top section is for system variables (HTTP-EQUIV META tags), and the bottom section is for user variables such as keywords and description META tags.
Figure 3.15. META tags are easily configured on the Custom tab. Note that settings made on the General tab carry over to this tab.
Note
![]()
An in-depth discussion of the META element is outside the scope of this book. If you’d like more information on this powerful HTML element, see http://www.informit.com/articles/article.aspx?p=28768&seqNum=8.
As shown here, any keywords and description information entered on the General tab shown previously in Figure 3.12 carry over to the Custom tab.
Language Tab
The Language tab configures the language for your page (see Figure 3.16). The language setting determines the page encoding for the page.
Figure 3.16. Page language and encoding are configured on the Language tab.
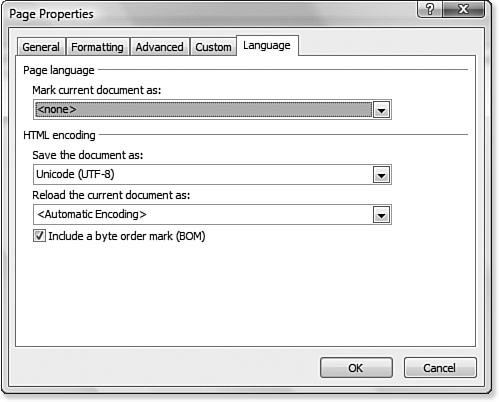
Web browsers rely on the page encoding and language settings to determine how to properly display your page. Make sure you have correctly set these for the language and region you are targeting. In almost all cases, the default settings are fine. However, if you are designing a page for a specific region or language, be sure you set the encoding appropriately and test the site for the correct appearance.
The Language tab also enables you to control whether Expression Web includes a byte order mark (BOM) on your page. A byte order mark is a hidden sequence of characters at the beginning of a file that can be used to determine encoding characteristics of the file. Some file types (such as PHP files) can experience problems when a BOM is added to the page, so Expression Web enables you to configure which file types will and will not have a BOM added by default. You can override these settings in the Language tab for a particular file as shown in Figure 3.16.
![]() For more information on configuring BOM settings in Expression Web, see Chapter 11, “Configuring Page Editor Options.”
For more information on configuring BOM settings in Expression Web, see Chapter 11, “Configuring Page Editor Options.”
Using Code Snippets
Web designers commonly reuse code in several pages. Whether you’re reusing a single line of code or a code block, you need to avoid typos at all costs. Code snippets can prevent typos and add a high degree of convenience to code reuse.
To insert a code snippet into your page, switch to Code View and press Ctrl+Enter. Select the desired code snippet from the list and press Enter, as shown in Figure 3.17, and it will be added to your page automatically. You can also double-click the code snippet and it will be added to your page.
Figure 3.17. Code snippets can be added easily by pressing Ctrl+Enter while in Code View.

To add, delete, or modify existing code snippets, select Tools, Page Editor Options and then click the Code Snippets tab in the Page Editor Options dialog, as shown in Figure 3.18.
Figure 3.18. Code snippets make reusing code convenient. Expression Web comes with plenty of existing snippets.
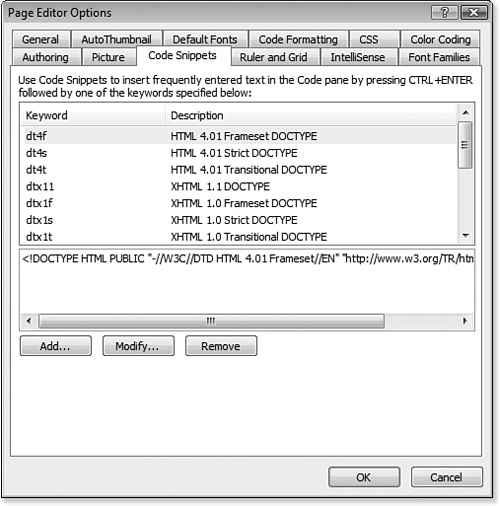
You can add a new code snippet by clicking Add and entering the required information. You can control where the insertion point appears after inserting the snippet by adding a pipe symbol (|) to the snippet code. If you add two pipe symbols, all code between the two pipe symbols is automatically selected when the snippet is inserted.
When you add your own snippets, they are stored in an XML file located in the AppDataRoamingMicrosoftExpressionWeb 4Snippets folder in your profile directory. To move your snippets to another machine or back them up (something I strongly recommend), you can simply back up the Snippets.xml file in the Snippets folder.
Note
![]()
By default, your profile directory is c:users<username> on Windows 7, Windows Vista, and Windows Server 2008. On Windows XP, it’s c:Documents and Settings<username>.
Configuring File Editors
By default, when you double-click most files in the Folder List, Expression Web opens that file in its own window. In most cases, that’s what you want to happen; in some cases, however, you might want to override that behavior so certain file types are opened in a different application.
Note
![]()
Some file types (such as images) are not opened in Expression Web by default when you double-click them in the Folder List.
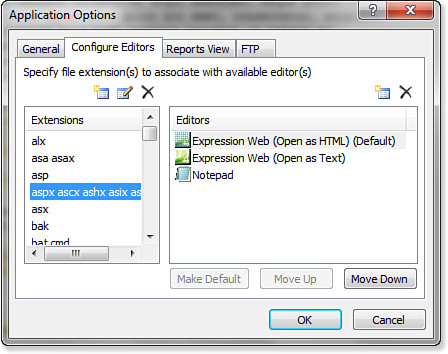
To specify the application to open for a specific file type, select Tools, Application Options and click the Configure Editors tab. The dialog for configuring editors contains a list of file extensions along with the associated editor or editors for each (see Figure 3.19). Available editors can be rearranged in the list or moved to the top of the list so it is used as the default editor. When a file is double-clicked in the Folder List in Expression Web, it will be opened in the default editor for that file type.
Figure 3.19. The Configure Editors tab allows you to configure specific file types to open with the application of your choice.
Caution
![]()
The editor you configure for a specific file extension in Expression Web does not affect Windows file associations. Settings made in Expression Web are specific only to Expression Web.
The following buttons are available on the Configure Editors tab as shown in Figure 3.19:
• New Extension—Allows you to add a new file extension and configure the appropriate editors for it.
• Modify Extension—Allows you to change the selected extension. For example, if HTML is selected, you can click Modify Extension to change the extension to HTM. This does not modify the application used to edit that file type.
• Delete Extension—Removes the selected extension from the list. If the file type is then double-clicked in Expression Web, you are prompted to select which program should be used to edit that file type.
• New Editor—Adds a new editor for the selected file type.
• Delete Editor—Deletes the selected editor from the selected file type.
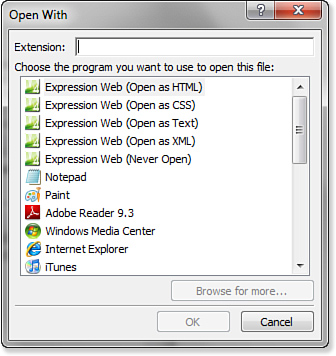
To configure a new file extension, click the New Extension button to display the Open With dialog, as shown in Figure 3.20. Enter the file extension (with no dot in front of it) and select the program to use for editing that file type from the list of available applications. If the program you want to use for the new file type is not listed, click Browse for More and browse to the executable for the application you want to use.
Figure 3.20. The Open With dialog contains a preset list of applications. Click Browse for More if the application you want to use isn’t listed.
To configure a new editor for an existing file type, select the file type and then click the New Editor button to display the Open With dialog. Select the editor or click Browse for More; then browse to the executable. You can then use the Move Up, Move Down, or Set as Default buttons to adjust the hierarchy of the new editor.
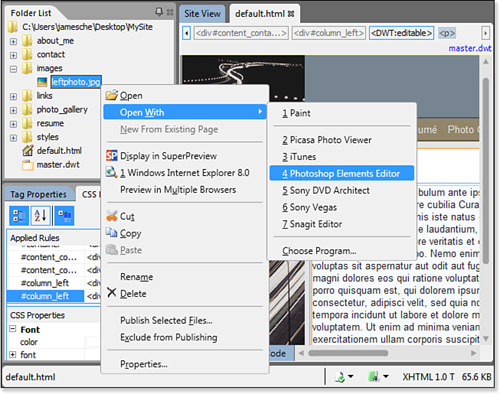
To select from one of the listed editors when editing a file, right-click the file in the Folder List and select Open With as shown in Figure 3.21. Choose the desired editor from the list to open the selected file in that editor.
Figure 3.21. Expression Web displays a list of configured editors. Choose the editor you’d like to use to edit the selected file.
Making the Most of Code Snippets
Because Microsoft targeted Expression Web toward designers rather than developers, support for writing code in Expression Web is limited. PHP and JavaScript developers will find some IntelliSense and color-coding (features that are missing for ASP.NET developers), but even those features are limited.
The lack of these coding features is more than just an inconvenience; it can lead to coding errors that are hard to find and can be incredibly frustrating. Code snippets help alleviate such problems.
As your site grows in complexity, you’re likely to accumulate a lot of code that you use regularly on your pages. By creating code snippets for sample code you find on the Internet or code you write yourself, you can always have access to a quick and easy repository of code that you can insert without unintentionally creating errors in your site.