
Chapter 6
Baskets Full of Math
Do serious math with weaving.
Oodles of mathematics await the careful observer of Timor’s basketry. I must break it to you that many of the most fascinating secrets we’ve found in the baskets here will be nearly impossible for me to pass along, because you can’t buy these remarkable works of folk engineering at your local big-box store, so you won’t be able to hold them in your hand and discover these secrets for yourself.
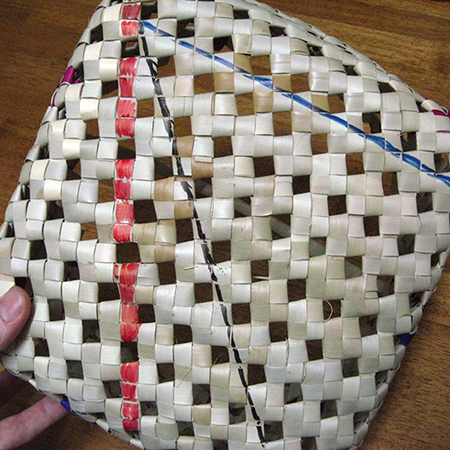
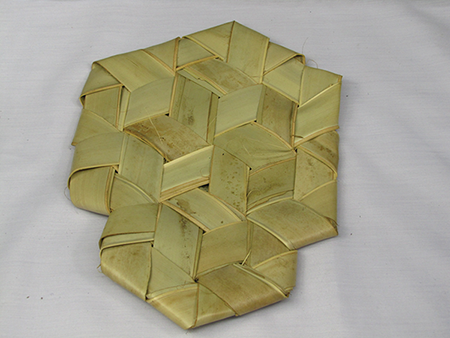
For example, exploring the mysteries of the hyperbolic surfaces, counting surface areas in terms of woven squares and then comparing that to the formula result, discovering the factors and divisors in the pattern around the walls of the betel nut basket, or using trigonometry to figure the angle of the strange slant of the raga weave (that photo up top here): these things are just not going to happen in this here book.
Never fear: I can still show you a bunch of interesting weaving math to tinker with.
Gather stuff
- Something with a square grid that you can mark on: mat, basket, checker board, or graph paper
- Optional: Something with the rhombus pattern (which I explain in a bit)
Gather tools
- Ruler
- Protractor
- Pencil
- Scientific calculator
Tinker
Check this out: In anything woven, you find the surface is composed of small figures; on the local mats, they’re squares. The surface can also be seen as a grid of lines and intersections between these figures. If you connect the intersection points, you’ll get lines going at many angles.

(I’ve put clear packing tape over the mat, so I can use dry erase markers on it like a whiteboard. My clever Timorese colleagues thought of that one—it’s worth a Nobel Prize for teaching.)
Some are special, like the 90- and 45-degree angles.
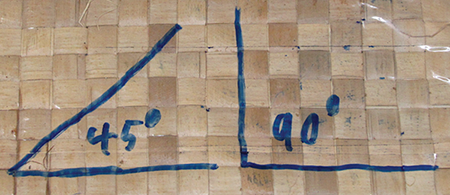
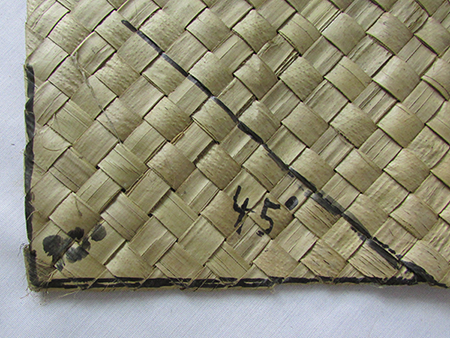
These two angles come up all the time in the square weave baskets and the mat. Look at the edge of the mat; it’s all 45-degree angles where the strips turn around to get woven back into the mat. And of course the corner is 90 degrees.
On baskets with the rhombus weave, you can find 60- and 120-degree angles all over the place. These two angles are based on that tiny, ever-present rhombus itself.

This fan is made with the rhombus weave, and all the edge corners are 120 degrees, either the inner or outer angle.
Other angles between arbitrary lines are harder to figure.

Measuring and Calculating Angles
You can measure these angles with a protractor. If you don’t have one, please put the book down and go buy one. Like a ruler or tape measure, it’s one of the essential tools of a mathematician, as well as a physicist or an engineer. Here’s how you use it: Put the line at the bottom of the protractor on top of the line leading to the vertex of your angle. Put the center dot of the protractor right on the vertex. (If you’re reading this on a device, zoom in until the image fills your screen and slap your protractor right on the screen.)

Now read the number where the other line crosses the protractor going up. Careful; there are usually two numbers. On the protractor shown here, the inner one is red and the outer one is black. One is the resulting angle if you count from the left end of the protractor up, the other the number if you start from the right end and count up. The two numbers added together will always equal 180 degrees, which is a “straight” angle. Notice the two zeros, one on each side of the protractor?
Which one of the scales do you use? You’ll always know, because you’ll start from the zero at the first line and count up to the other. In this picture, you’ll start with the red zero on the right at the bottom and count up to around 52 degrees.
When you make one line coming up off of another line, you’ll get two angles, both of which you can measure with your protractor. I’ll call them α and β, the first two Greek letters. Mathematicians often use Greek letters for angles in figures, to keep them separate from lengths.
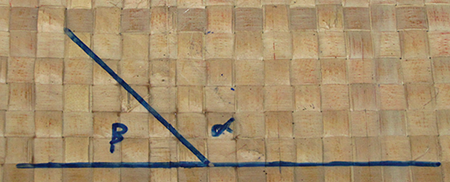
Put your protractor smack on that center point, and you can measure both angles without flinching.

See it? The right side one, α, is 135 degrees measured on the red scale, and the left side one, β, is 45 degrees, measured on the black scale.
You can make and measure all manner of angles on a mat like this; go for it! Draw more angles and measure them with your protractor!
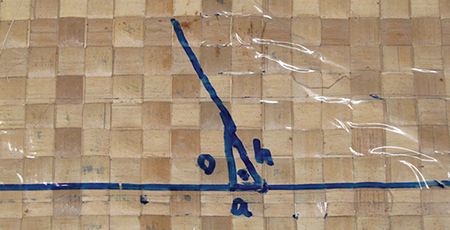
You can also calculate angles using the tangent function and a calculator. Never heard of the tangent function? Follow me: First I’ll draw a horizontal base line. Then I’ll connect the opposing corners of three squares stacked up vertically, then continue the line upward until it’s long enough to cross the protractor. Then I’ll form a right triangle with a vertical line back down to the base.
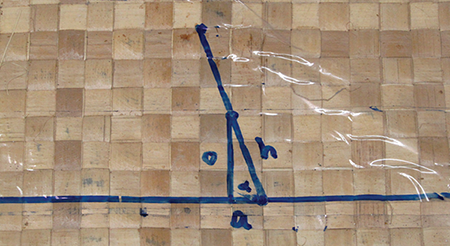
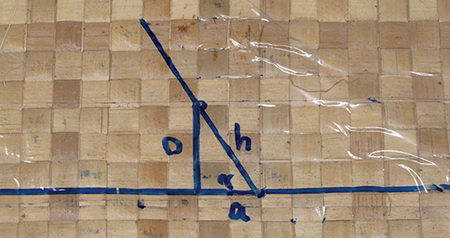
Here I’ll call the inside angle at the lower right alpha—α. The sides of the triangle are given names in relation to that angle. The left side vertical one here is called the “opposite” side—o—because it’s sort of opposite, or in front of, the angle. The short one at the bottom is called “adjacent”—a—meaning it’s right beside the angle. The name of the long diagonal one labeled h on the right you have probably heard before: “hypotenuse.”
The tangent of α is defined to be the length of the opposite side divided by the length of the adjacent side:

You can look up the answer for what angle has a tangent of 3. In the past you had to look it up in tables in the back of your math textbook, but now you “look it up” on your scientific calculator (which is probably waiting for you on your phone or device—take a look). You use the button tan-1—“inverse tangent”—which means we know the tangent and we want to know the angle that has that tangent. So push tan-1 and then push 3, then =.1 You should get 71.56blahblahblah.2 We can round that off to 72, and that means the angle α is more or less 72 degrees.
α = 72°
Ain’t that slick? This kind of mathematics is called trigonometry. You usually get it around 10th or 11th grade, but here it is, right in the middle of a palm leaf mat.
Just to confirm this, while 71.56blahblahblah is still on your calculator, push the tan button and see what you get. It should get you back to 3, meaning that’s the tangent of this angle.
You can also confirm it with your protractor—there in black you see 72 degrees, right on the money.

Here are some more diagonals of triangles, and you can find the angle α by using the inverse tangent function on your scientific calculator. Just hit the tan-1, enter the number of squares opposite the angle in question, hit the divided-by button, enter the number of squares adjacent, and then hit the = button. Set your protractor down on the line to check it. Then make some yourself and try them too!

You can do that with any triangle you like.
We used the tangent to find these angles because it was easy to read off the length of the two perpendicular sides. There are two other main functions in trigonometry—the sine and the cosine—and they both involve the hypotenuse, which would be harder to figure on these palm-leaf mat triangles.
Graphs and Special Triangles
Let me show you a few more things we use these mats for. If you can find any sort of woven object, or anything else with a square grid, you can do these things too!
You can make a bar graph.

You can make a Cartesian plane and graph points on it.

You can show how square numbers and square roots are related.

You can show the relationship to square and triangular numbers.

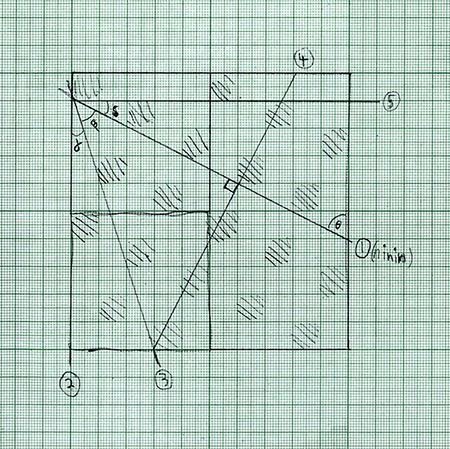
Now let’s tinker with some special triangles. Some you’ve seen already.
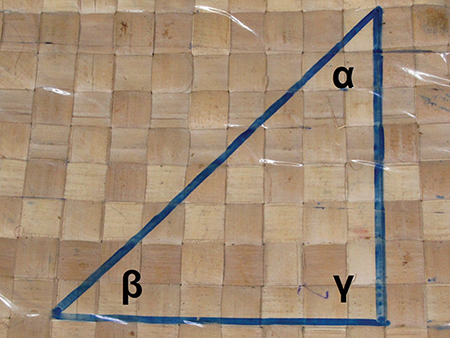
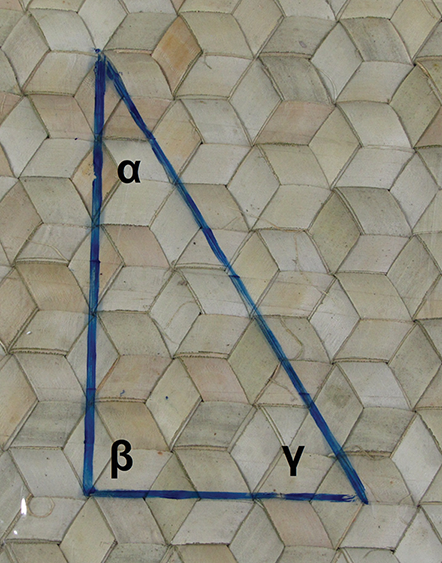
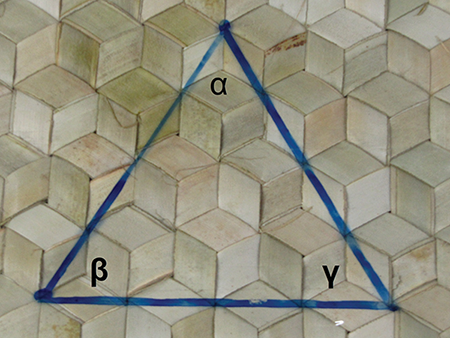
Use your protractor to measure the three angles in the following triangles and write down what you get. I’ll name the angles alpha, α, beta, β, and gamma, γ, the first three Greek letters.
1.
2.

3.
4.
Here’s what we got:
| α | β | γ | name | |
| Triangle 1 | 45 | 45 | 90 | 45-45-90 Right Isosceles |
| Triangle 2 | 53 | 37 | 90 | 3-4-5 |
| Triangle 3 | 30 | 90 | 60 | 30-60-90 |
| Triangle 4 | 60 | 60 | 60 | Equilateral |
Triangles number 1, 3, and 4 are old friends you’ll get to know intimately whenever you do geometry. Triangle number 2 is also cool. Its name comes from the length of the three sides. This one is actually 6-8-10, which is twice 3-4-5. That’s nice, but the angles don’t come out so neatly. (You saw that one already, up in the trigonometry part above with a triangle made in a set of squares 3 wide and 4 high.)
Did you notice that these inside angles always added up to 180 degrees? Good; now you can believe it when your textbook tells you that.
Did you notice triangle 3 was half of triangle 4? Those two 30-degree angles add up nicely to 60 degrees up top.
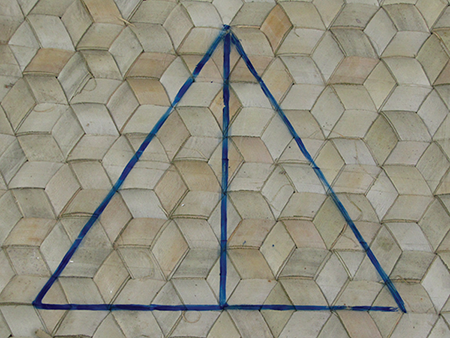
Notice also that those last two triangles were drawn on the lafatik, because of its different weave that creates 60-degree angles all over the place.
But now enough of this mathematics. Let’s do some actual weaving!