
Chapter 2 Installing ZENworks 7 Suite
This chapter provides a walk-through for getting all the components of ZENworks working in your environment. The chapter is organized into several main sections to help you easily install ZENworks. It will be most effective to follow the steps in order; however, if you are not installing some optional components, skip that section and move on to the next.
The installation steps are written to aid in installing ZENworks in either a Windows-only or a NetWare environment. Sections unique to the specific operating system will be marked.
The first step to install ZENworks is to make sure that your network hardware and software meet the requirements. The following sections discuss the hardware and software requirements that must be met on your servers to install ZENworks on them. Preinstall checklists are given for you to verify that you are ready to begin the install. Taking the time to review the hardware and software requirements will help you resolve any deficiencies in your network and help eliminate problems during and after installation.
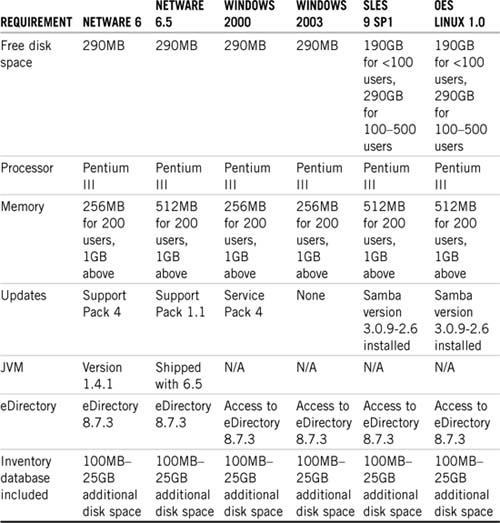
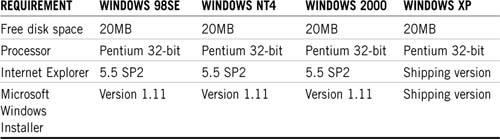
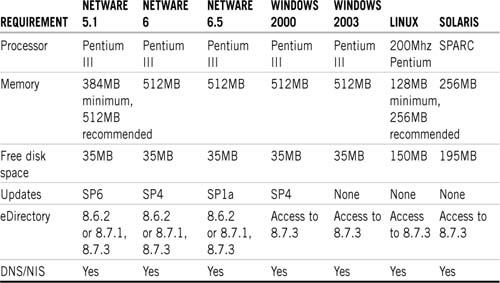
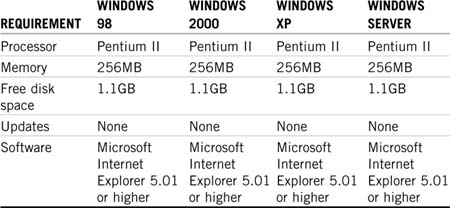
The ZENworks Desktop Management portion of ZENworks is composed of the server services, middle-tier web services, and the agents on the workstations. Table 2.1 lists the requirements for the ZENworks server, Table 2.2 lists the requirements for the ZENworks Middle-Tier Server, and Table 2.3 lists the managed workstation requirements.

If you are placing ZENworks in a Windows only environment, it is expected that the workstations, servers, and middle-tiers are all in the same domain.
Table 2.4 shows the Desktop Management combinations (that is, the ZENworks Middle-Tier Server platform connecting to the Desktop Management Server platform) that have been fully tested and are fully supported by Novell ZENworks 7 Desktop Management for Windows and NetWare servers.

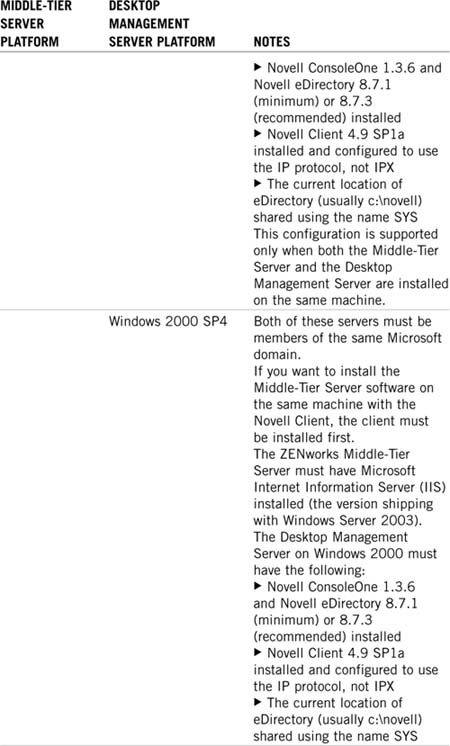


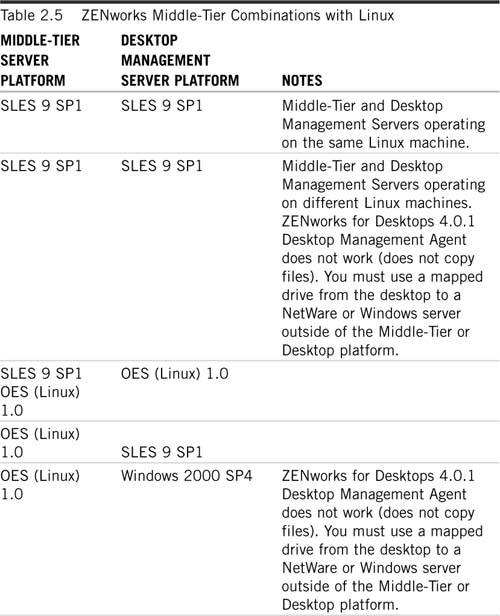
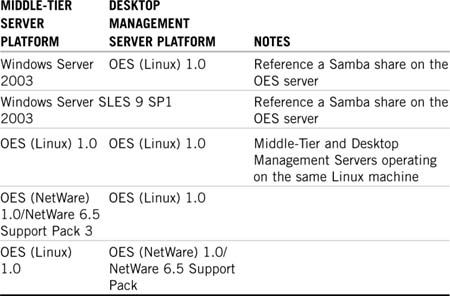
Table 2.5 shows the Desktop Management combinations (that is, the ZENworks Middle-Tier Server platform connecting to the Desktop Management Server platform) that have been fully tested and are fully supported by Novell ZENworks 7 Desktop Management.

When there is no firewall in place, the agents have direct access to CIFS file systems.
ZENworks Server Management is composed of Policy and Distribution Services (PDS), inventory, and inventory agents. The following tables list the hardware and software requirements for each of these components.
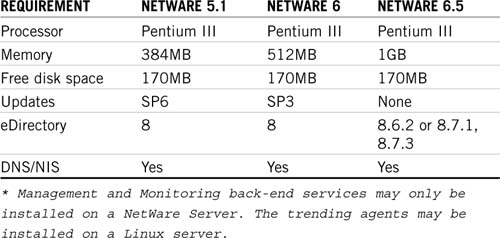
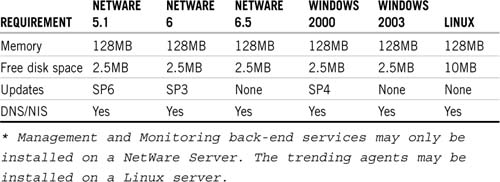
Any server running the inventory components requires a minimum of 5GB free disk space. The root server requires a minimum of 20GB free disk space. Table 2.7 lists the requirements for the back-end ZENworks policy and distribution server, Table 2.8 lists the ZENworks management and monitoring back-end server requirements, and Table 2.9 lists the requirements for the managed device.
The supported Linux distributions are
![]() SUSE LINUX Enterprise Server 8
SUSE LINUX Enterprise Server 8
![]() SUSE LINUX Enterprise Server 9
SUSE LINUX Enterprise Server 9
![]() SUSE LINUX Standard Server 8
SUSE LINUX Standard Server 8
![]() SUSE LINUX Standard Server 8
SUSE LINUX Standard Server 8
![]() Red Hat Advanced Server 2.1
Red Hat Advanced Server 2.1
![]() Red Hat Enterprise Server 2.1
Red Hat Enterprise Server 2.1
![]() Red Hat Enterprise Linux AS 3
Red Hat Enterprise Linux AS 3
![]() Red Hat Enterprise Linux ES 3
Red Hat Enterprise Linux ES 3
The supported Linux distributions are
![]() SUSE LINUX Enterprise Server 8
SUSE LINUX Enterprise Server 8
![]() SUSE LINUX Enterprise Server 9
SUSE LINUX Enterprise Server 9
![]() SUSE LINUX Standard Server 8
SUSE LINUX Standard Server 8
![]() SUSE LINUX Standard Server 9
SUSE LINUX Standard Server 9
![]() Red Hat Advanced Server 2.1
Red Hat Advanced Server 2.1
![]() Red Hat Enterprise Server 2.1
Red Hat Enterprise Server 2.1
![]() Red Hat Enterprise Linux AS 3
Red Hat Enterprise Linux AS 3
![]() Red Hat Enterprise Linux ES 3
Red Hat Enterprise Linux ES 3
The agents in Table 2.9 include the server management agent, traffic analysis agent, and advanced trending agent.
Asset Inventory is composed of the discovery, scanning, and reporting components of ZENworks Asset Management (a separater ZENworks product). When you purchase ZENworks Suite, you are entitled to the Asset Inventory components of ZENworks Asset Management. Tables 2.10 and 2.11 identify the hardware and software requirements for Asset Inventory.


With stand-alone deployment of Asset Inventory, all of the scanning, management, and control of inventory collection is performed by a single server and an MSDE installation is placed on that server as part of the installation. This server must have the minimum requirements shown in Table 2.10.
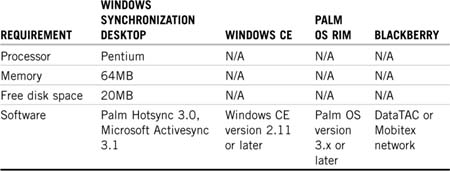
ZENworks Handheld Management is composed of the following components: Management Server, Access Point, and Handheld Client. The following tables identify the hardware and software requirements for each of these components.
Table 2.12 lists the requirements for the back-end ZENworks Handheld Management server; Table 2.13 lists the requirements for the Handheld Management Access point server; and Table 2.14 shows the requirements for the PDA device to hold the client.


ZENworks Linux Management consists of two components: ZENworks Linux Management Server and ZENworks Linux Management agents. Table 2.15 specifies the hardware and software requirements for these components.
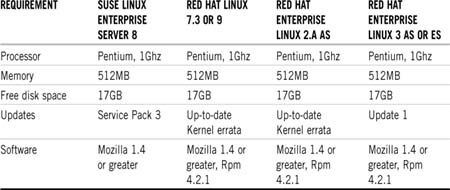
ZENworks Linux Management agents function on any system that meets the Linux OS requirements.
The ZENworks Data Management system consists of a ZENworks Data Management Server and ZENworks Data Management agents installed on Windows workstations. Table 2.16 identifies the hardware and software requirements for these components.
The ZENworks Data Management client functions and installs properly on any supported Windows (98, NT4, 2000, XP) configuration.
ZENworks Patch Management consists of two components: ZENworks Patch Management Server and a ZENwork Patch Management agent installed on the managed device. Table 2.17 identifies the hardware and software requirements for these components.
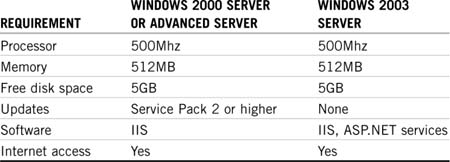
ZENworks Patch Management requires a dedicated server with the following requirements.
The ZENworks Patch Management agent functions in any supported Windows or NetWare configuration.
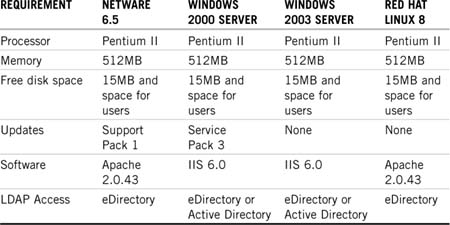
If your ZENworks system is installed in a Windows-only (Active Directory or NT Domain) network and you don’t already have eDirectory installed, you will need to install eDirectory (to hold ZENworks objects) and Identity Manager (formally DirXML, to synchronize users and passwords into the ZENworks eDirectory tree).
If you have NetWare systems only, or a mixed NetWare and Windows network, eDirectory is already in your system, and no installation is required. If you will be using Active Directory or NT domains for identity management, you will need to install IDM to synchronize your users.
The Windows server that runs eDirectory must be in the same domain as the server running ZENworks Middle-Tier server. Although the ZENworks servers can be on the domain server, it is not recommended.
As you set up ZENworks in a Windows network environment, you need to access one of the two Novell ZENworks Companion CDs. You need the following components from the Companion CDs:
![]() IDM 2 for Windows Server 2003, available on the Novell ZENworks Companion 2 CD in the
IDM 2 for Windows Server 2003, available on the Novell ZENworks Companion 2 CD in the
ovell dirxml starter pack folder.
![]() Novell eDirectory 8.7.3 for Windows Server 2003. eDirectory 8.7.3 is available from the Novell ZENworks Companion 1 CD in the
Novell eDirectory 8.7.3 for Windows Server 2003. eDirectory 8.7.3 is available from the Novell ZENworks Companion 1 CD in the
ovell edirectory for windows 2k folder.
![]() Novell iManager 2.5 for configuring and administering the IDM 2 drivers is available from the Novell ZENworks Companion 1 CD in the
Novell iManager 2.5 for configuring and administering the IDM 2 drivers is available from the Novell ZENworks Companion 1 CD in the
ovell edirectory for windows 2k folder.
ZENworks provides a one-for-one license of eDirectory for Windows. You can obtain an eDirectory 8.7.x evaluation license from the Novell eDirectory 8.7.x Evaluation License Download website (http://www.novell.com/products/edirectory/licenses/eval_87.html). You are required to complete some contact information to enable Novell to send you an email with two files attached: an .NFK file and an .NLF file.
Although not required, we recommend that you format a diskette, create a license directory off the root of this diskette, and save the two files in this directory. You are prompted for this diskette/file during the product installation.
To start the eDirectory installation program for the server in your Windows network environment (for example, ZENSVR), perform the following steps:
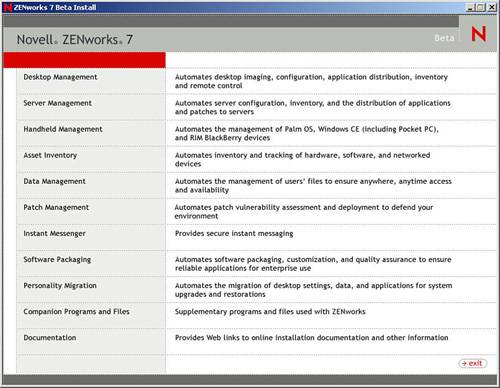
1. Log on to the Windows Server 2003 as the administrator and launch the eDirectory installation program from the Novell ZENworks Companion 1 CD. A startup screen, like that shown in Figure 2.1, appears.
2. Select Companion Programs and Files. Select Novell eDirectory to launch a program that unpacks the eDirectory installation files into a specified directory, specify the c:edir873 directory to unzip the files, and then click Close when the files are extracted.
3. Browse to the c:edir873 directory and launch setup.exe. Select Install Novell eDirectory and Install Novell Client; then click Install.
Now that you have completed the initial installation of eDirectory, the installation of the Novell Client automatically begins. The following section describes this portion of the installation process.
The first subinstallation of the eDirectory product is for the Novell Client, which is executed by the Novell Client Installation Wizard. The following steps walk through this:
1. In the Novell Client license agreement dialog box, click Yes.
2. Select Custom Installation; then click Next.
3. Verify that only the client is selected on the modules list; then click Next.
4. Verify that NMAS and NICI are selected; then click Next.
5. Select IP Only and Remove IPX (if present); then click Next.
6. Select NDS to instruct the client to default to using NDS connections. Click Next and then click Finish.
Now that the client is installed, the eDirectory installation will proceed. This is discussed in the next section.
When theNovell Client has been installed, the Novell eDirectory License Installation Wizard helps you install the server license for eDirectory. The steps to follow are
1. On the Welcome page of the License Installation Wizard, click Next to view the license agreement.
2. Read the license agreement; then click I Accept if you agree with the terms of the license agreement.
3. In drive A:, insert the license diskette you created in the section “Creating an eDirectory Evaluation License Diskette” earlier in the chapter.
4. Select Specify Path to License File, browse to and select the .NFK license file in the directory you created on the diskette, and then click Next.
5. In the Licensing Success dialog box, click Close.
After the licensing portion of the installation is complete, the NICI portion of eDirectory is installed. The following sections discuss this installation.
When the Novell Client and the eDirectory license are installed, the Novell International Cryptographic Infrastructure (NICI) Installation Wizard automatically runs. When the NICI installation is complete, the Windows server prompts for a reboot. Follow these steps to complete the NICI subinstallation:
1. Remove the licensing diskette from drive A:; then click OK in the reboot request dialog box. The server reboots, and the eDirectory installation sequence continues.
2. At the Novell Client login dialog box, press Ctrl+Alt+Delete.
3. In the login dialog box, select Workstation Only, log on to the server as the administrator, and then click OK.
After the first portion of the eDirectory system is installed, the server reboots and continues the eDirectory installation as described in the next section.
When the Novell Client, the eDirectory license, and NICI are installed, the eDirectory installation continues. Continue with the installation of eDirectory by following these steps:
1. At the eDirectory Installation Welcome dialog box, click Next.
2. Read the license agreement; then click I Accept if you agree with the terms of the license agreement.
3. Select a language for the installation; then click Next.
4. Click Next to accept the default installation path.
5. Click Yes to create a new directory that does not exist.
6. Select Create a New eDirectory Tree; then click Next.
7. Set up the access to the new tree and server (see Figure 2.2) by specifying a name for the new tree, such as ZENTREE, and specifying a server object context, such as ZENSVR.SERVICES.ZEN.
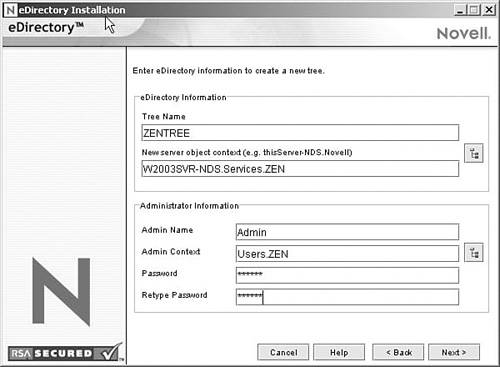
8. Specify the name of the Admin user object, such as Admin.
NOTE
This document assumes that you are creating an organization container in eDirectory named ZEN, an organizational unit container named SERVICES where ZENSVR will reside, and an organizational unit container named USERS where the Admin user object will reside.
9. Specify the password of the Admin user object, such as Novell; then click Next.
10. On the HTTP Server Port Configuration page, accept the HTTP Stack Ports as default because there will be no conflicting ports on this server; then click Next.
11. On the LDAP Configuration page, specify which LDAP ports to use. Because eDirectory must not interfere with default Active Directory ports 389 and 636, you need to choose other LDAP ports (see Figure 2.3).
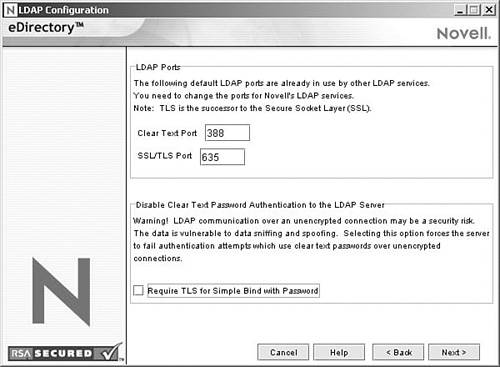
12. Change the Clear Text Port number to 388, and change the SSL Port to 635.
13. Deselect Require TLS for Simple Bind with Password to allow password synchronization to function; then click Next.
14. Click Next to accept the default NMAS login method.
15. Click Finish to complete the eDirectory installation.
16. The eDirectory installation program performs the installation on the ZENSVR server. When the program completes successfully, click Close in the Success dialog box.
Now that you have completed the installation of eDirectory. To manage ZENworks, you must install the ConsoleOne management tool. Follow the instructions in the next section to install ConsoleOne.
When the eDirectory installation is complete, you need to manually install ConsoleOne on ZENSVR. Use the following steps to install ConsoleOne:
1. Insert the Novell ZENworks Companion 1 CD into the CD drive of ZENSVR2. If the CD does not automatically start, run winsetup.exe from the root of the CD.
2. Select Companion Programs and Files; then select Novell ConsoleOne.
3. On the WinZip self-extractor dialog box, click Setup to launch the extraction and to start the ConsoleOne installation program.
4. On the ConsoleOne Installation Wizard welcome page, click Next.
5. Read the license agreement; then click I Accept if you agree with the terms of the license agreement.
6. Accept the default installation path; then click Next.
7. Accept the default components for installation; then click Next.
8. On the Additional Languages page, select any additional languages you want to install; then click Next.
9. Read the JInfoNet Licensing Agreement page; then click I Accept if you agree with the terms of the license agreement.
10. On the ConsoleOne Installation Summary page, click Finish to install ConsoleOne on the ZENSVR server.
11. On the ConsoleOne Installation Success page, click Close.
Now that the ConsoleOne installation is completed, you need to verify that your tree is working properly by following the steps of the next section.
The iManager tool is required for configuring NSure Identity Manager DirXML drivers that are used to synchronize Active Directory and eDirectory.
NOTE
We recommend that you install Novell iManager on a server where the Microsoft IIS Web server has already been installed. Although iManager can run on Windows 2003 servers without IIS installed, the absence of IIS requires that you install the Apache Web server with the Tomcat servlet.
When the eDirectory installation is complete, you need to manually install and set up Novell iManager. Use the following steps to install iManager:
1. Insert the Novell ZENworks 7 Companion 1 CD into the CD drive. If the CD does not autorun, run winsetup.exe from the root of the CD.
2. Select Companion Programs and Files, and then select Novell iManager.
3. On the Novell iManager Installation Wizard welcome page, click OK.
4. On the iManager Introduction page, click Next.
5. Read the License agreement, click I Accept if you agree with the terms of the License Agreement, and then click Next.
If you do not agree with the terms of the license agreement, do not install the software. Click Cancel.
6. On the Detection Summary page, make sure that the IIS Web server is already installed (version 6 on Windows Server 2003), visually check the other default values, and then click Next.
NOTE
If the IIS Web server is not already installed, the iManager installation program installs the Apache Web server with the Tomcat servlet.
7. On the Choose Install Folder page, accept the default on the installation path, and then click Next.
8. On the Get User and Tree Names page, fill in the fields
![]() Username—Specify the username and context (for example,
Username—Specify the username and context (for example, admin.users.novell) of the administrative account with which you will configure iManager and its modules.
![]() Tree Name—Specify the name of the eDirectory Tree that iManager will primarily manage, for example ZENTREE.
Tree Name—Specify the name of the eDirectory Tree that iManager will primarily manage, for example ZENTREE.
9. On the Pre-Installation Summary page, click Install.
10. On the Install Complete page, click Done to finish the iManager installation on the server.
Use the following steps to complete the setup of iManager for launching:
1. From the Windows desktop, double-click the Novell iManager shortcut to launch Internet Explorer and display the Getting Started with Novell iManager help page.
2. In Internet Explorer, click Tools→Internet Options to open the Internet Options dialog box.
3. From the Internet Options dialog box, click Security, click Trusted Sites, and then click Sites to open the Trusted Sites dialog box.
4. In the Add This Website to the Zone field of the Trusted Sites dialog box, specify the URL of the server (for example, http://server_IP_address), click Add, click Close, and then click OK to open the iManager Login page.
5. From the iManager Login page, make sure the username, tree name, or IP is supplied, and then enter the user password to launch iManager.
6. From the iManager Home page, click the View Objects icon, and then click the Browse tab in the left pane to locate the tree (ZENTREE) and to verify that the Admin object and the server are present.
When the installation of eDirectory and ConsoleOne is complete, verify that the tree is viable by performing the following steps:
2. From the Windows server desktop, right-click the red N in the taskbar and select Login.
3. Type Admin in the Username field (see Figure 2.4).

4. Type in the password of the admin user in the Password field.
5. Click Advanced to open the NDS page of the login dialog box.
6. Type ZENTREE in the Tree field.
7. Type USERS.ZEN in the Context field.
8. Type ZENSVR in the Server field; then click OK to log in to eDirectory.
9. To verify that you are logged in to the tree as Admin, right-click the red N in the taskbar, select NetWare Connections, and verify that a resource is listed for ZENTREE and for the username (CN=Admin). The authentication state for this connection should be listed as Directory Services.
10. Click Close to close the NetWare Connections dialog box.
11. In ConsoleOne, verify that the tree object is visible, that the Admin user is visible in the Users container, and that the ZENSVR server is visible in the Services container.
12. Create a shortcut on your server for c: ovell ds dscons.exe.
NOTE
NDSConsole is a utility that lets you view the state of the eDirectory tree and the services that are running.
13. Click the NDSConsole shortcut and verify that at least ds.dlm and nldap.dlm are running.
You now have an eDirectory tree running on your Windows Server 2003.
When eDirectory is running and stable, you need to install IDM 2 so that users can be synchronized between your Active Directory domain and eDirectory. The following steps are used to accomplish this:
1. Log on to the SRV-02 Windows Server 2003 as administrator and into eDirectory as admin.
2. Insert the Novell ZENworks 7 Companion 2 CD into the CD drive of the server, and then use Windows Explorer to browse to the Nsure Identity Manager 2 Bundle Edition folder.
3. Double-click setup.bat to launch the IDM2 installation program.
4. On the DirXML Welcome page, click Next.
5. Read the License agreement, and then click I Accept if you agree with the terms of the license agreement.
CAUTION
If you do not agree with the terms of the license agreement, do not install the software. Click Cancel.
6. On the DirXML Overview page, click Next twice.
7. On the component selection page, select DirXML Server, select DirXML Web Components, deselect Utilities, and then click Next.
8. On the Select Drivers for Engine Install page, click Clear All, select DirXML Engine, select Active Directory (in the DirXML Drivers list), and then click Next.
9. (Conditional) On the DirXML Warning: Activation Notice dialog box, you are reminded to license DirXML. Click Next.
NOTE
If you continue without activating the license, these components function only for a 90-day evaluation period. A license for the DirXML engine and Active Directory driver is included as part of the overall ZENworks 7 license.
10. (Conditional) In the Password Synchronization Upgrade Warning dialog box, you are informed that older versions of Password Synch need to be upgraded. Read the information in the dialog box if applicable, and then click OK.
11. On the Schema Extension page, verify that the tree is appropriate (ZENTREE), type or browse to and select the fully distinguished name (DN) of the admin user and the user’s password (admin username is CN=admin,OU=Users,O=ZEN), and then click Next.
12. On the Select Components to Install page, retain the selected defaults, and then click Next.
13. Read the Summary page, and then click Finish.
14. On the Installation Complete dialog box, click Close for DirXML to finish the installation.
15. Reboot the server to allow the drivers to be properly registered.
When you have finished installing Nsure Identity Manager 2.02 Bundle Edition, you must configure the DirXML drivers before synchronization can occur.
When you have finished installing eDirectory and DirXML on the server, you need to configure the DirXML drivers to begin synchronization between Active Directory Domain and eDirectory by following these steps:
1. Log on to the SRV-01 server as the Active Directory administrator.
2. Insert the ZENworks 7 Companion 2 CD into the server’s CD drive, browse to the nsure identity manager 2 bundle edition
tdirxmlutilitiesad_disc folder, and then double-click admanager.exe to run the Active Directory Driver Preparation Tool.
2a. Click Discover. The tool runs and discovers data for the fields on the tool window.
2b. In the Proposed DirXML Driver Account grouping of the tool window, locate the Password field, type the password, locate the Re-enter Password field, type the password again, and then click Update.
2c. In the Create Account Notification dialog box, click OK.
2d. Copy and paste the Domain, Domain DN, Domain Controller, and Account DN into a text file, and then save the file to the desktop so you can have access to the data later.
NOTE
If you prefer, you can leave the tool running. You will then be able to retrieve (copy) this data directly from the tool one field at a time for pasting into the fields of another configuration tool.
2e. Click Done to close the Preparation tool.
3. Complete the security setup for the DirXML account user.
3a. From the Windows desktop, click Start→Programs→Administrative Tools, and then select Domain Controller Security Policy.
3b. In the Tree view, click Security Settings→Local Policies→User Rights Assignment.
3c. Double-click Log on As a Service. Click Security→Add User or Group→Browse→Advance→Find Now.
3d. Select the user you created (ADDriver_zendemo), click OK, and then click OK again in the three succeeding dialog boxes.
3e. Close the Domain Controller Security Policy.
4. At the server, extend the eDirectory schema to accommodate the new Active Directory driver.
4a. In the Windows Control Panel, double-click Novell eDirectory Services.
4b. In the Novell eDirectory Services dialog box, select install.dlm, and then click Start.
4c. Click Install Additional Schema Files, and then click Next.
4d. Type the eDirectory admin login name (admin), type the context (ZENUsers), type the password (novell), and then click OK.
4e. Browse to and select c:
ovell
dsdvr_ext.sch, and then click Open.
4f. Click Finish to apply the schema.
4g. Click the close (X) button in the Novell eDirectory Services dialog box.
5. At SRV-02, launch iManager and then click the Roles and Tasks icon to open the iManager Roles and Tasks pane of the main iManager page.
6. From iManager, create a new organizational unit (OU) container under the ZEN organizational container, and then name this OU container DIRXML.
7. In the Roles and Tasks pane, click DirXML Utilities, and then click New Driver to open the Create New Driver Wizard.
8. On the Create Driver Wizard opening page, click In a New Driver Set, and then click Next to open the Create Driver page.
9. On the Create Driver page, fill in the fields
![]() Name—Type a driver set name, for example
Name—Type a driver set name, for example ADDriverSet.
![]() Context—Browse to and select the DirXML container.
Context—Browse to and select the DirXML container.
![]() Server—Browse to and select the SRV-02 server.
Server—Browse to and select the SRV-02 server.
10. Click Next. The wizard creates the objects for the driver set, and then displays the ADDriver Set page.
11. Select Import a Driver Configuration from the Server (.XML file), browse to and select Active Directory from the drop-down menu, and then click Next to display the Active Directory Driver Set page of the Create Driver Wizard.
12. Configure the driver parameters that are listed (visible by scrolling) on the Create Driver Wizard by filling in the fields
![]() Driver Name—Leave the name of the driver as the default.
Driver Name—Leave the name of the driver as the default.
![]() Authentication Method—Use the default value (Negotiate).
Authentication Method—Use the default value (Negotiate).
![]() Authentication ID—Type the AD Domain Name (NetBios) followed by a forward slash and the Driver Account User that was created earlier. You can obtain the Driver Account User from the Account DN name you copied.
Authentication ID—Type the AD Domain Name (NetBios) followed by a forward slash and the Driver Account User that was created earlier. You can obtain the Driver Account User from the Account DN name you copied.
For example, enter ZENDEMO/ADDriver_zendemo on this line.
![]() Authentication Password—Use the same password used to create the Proposed DirXML Driver Account in the admanager.exe tool.
Authentication Password—Use the same password used to create the Proposed DirXML Driver Account in the admanager.exe tool.
![]() Reenter the Password—Re-enter the password you used in the field above.
Reenter the Password—Re-enter the password you used in the field above.
![]() Authentication Server—Copy and paste the Domain Controller name from the line items that you saved in a text file as you used admanager.exe.
Authentication Server—Copy and paste the Domain Controller name from the line items that you saved in a text file as you used admanager.exe.
![]() Domain Name—Copy and paste the Domain DN name from the line items that you saved in a text file as you used admanager.exe.
Domain Name—Copy and paste the Domain DN name from the line items that you saved in a text file as you used admanager.exe.
![]() Domain DNS Name—Copy and paste the domain name from the line items that you saved in a text file as you used admanager.exe.
Domain DNS Name—Copy and paste the domain name from the line items that you saved in a text file as you used admanager.exe.
![]() Driver Polling Interval—Specify the polling interval you want. In a lab environment, the interval should be set at approximately one minute. In a production environment, you should set the interval at approximately 15 minutes.
Driver Polling Interval—Specify the polling interval you want. In a lab environment, the interval should be set at approximately one minute. In a production environment, you should set the interval at approximately 15 minutes.
![]() Password Sync Timeout (minutes)—Retain the default value (five minutes).
Password Sync Timeout (minutes)—Retain the default value (five minutes).
![]() Base Container in eDirectory—Specify the container where you want your users to be created and synchronized with Active Directory (for example, users.zen). You can browse for this container by clicking Browse. If you are going to mirror the Active Directory containers, this would be the top container in eDirectory.
Base Container in eDirectory—Specify the container where you want your users to be created and synchronized with Active Directory (for example, users.zen). You can browse for this container by clicking Browse. If you are going to mirror the Active Directory containers, this would be the top container in eDirectory.
![]() Base Container in Active Directory—Type the name of the base container in Active Directory. This is the container where you want users to be synchronized with eDirectory (for example, CN=Users,DC=zendemo,DC=com).
Base Container in Active Directory—Type the name of the base container in Active Directory. This is the container where you want users to be synchronized with eDirectory (for example, CN=Users,DC=zendemo,DC=com).
![]() Configure Data Flow—Retain the default value (bidirectional).
Configure Data Flow—Retain the default value (bidirectional).
![]() Publisher Placement—Select Flat or Mirror. If you choose Flat, all user objects coming from Active Directory are placed in the same container. If you choose Mirror, all user objects and containers are re-created in eDirectory.
Publisher Placement—Select Flat or Mirror. If you choose Flat, all user objects coming from Active Directory are placed in the same container. If you choose Mirror, all user objects and containers are re-created in eDirectory.
![]() Subscriber Placement—See the Publisher Placement field to choose your placement.
Subscriber Placement—See the Publisher Placement field to choose your placement.
![]() Password Failure Notification User—Leave the field blank.
Password Failure Notification User—Leave the field blank.
![]() Support Exchange 2000/2003—Retain the default value (No).
Support Exchange 2000/2003—Retain the default value (No).
![]() Enable Entitlements—Retain the default value (No.)
Enable Entitlements—Retain the default value (No.)
![]() Driver Is Local/Remote—Retain the default value (Local).
Driver Is Local/Remote—Retain the default value (Local).
13. Click Next to launch the Security Equivalences page of the Create Driver Wizard.
14. Click Define Security Equivalences to launch the Security Equals window.
15. Click Add to launch the browser window, browse to and select the Admin.Users.ZEN user, add this user to the Selected Objects list, click OK, and then click OK again.
16. On the Security Equivalences page of the Create Driver Wizard, click Exclude Administrative Roles.
17. In the Security Equals window, click Add, browse to and select all users that are administrators of eDirectory, and then click OK.
This prevents the users from being created in the Active Directory domain and synchronized later. The Summary—Current Driver Configuration page of the wizard is displayed.
18. Click Finish.
Before the DirXML driver can run, you need to install the Password Synchronization software. For more information, see the next section, “Installing Password Synchronization.”
Before the DirXML driver can run, you need to install the Password Synchronization software. This is discussed in the next section.
Password synchronization allows each user object automatically created in IDM 2 to have the same password as the corresponding user you created in Active Directory. This is necessary to allow for single-login to both Active Directory and eDirectory when users log in to their workstations.
Password synchronization requires that platform-specific password policies are not in conflict with each other. Password policies that are in conflict will prevent successful password synchronization. For example, if eDirectory passwords are required to be at least eight characters in length and Windows passwords have no length requirements, users could create shorter Windows passwords that would not be accepted by eDirectory. Password Synchronization does not override platform policies.
IDM 2 lets you generate an initial password for an account based on the account’s attributes or other information available through Java services. For instance, you can generate a password based on a user’s surname plus a four-digit number. Generating an initial password requires driver customization, but it is a good way for you to manage passwords when you provision an account through an existing personnel management toolset.
ConsoleOne lets you set an initial password when you create a user account if you select Assign NDS Password and then select Prompt During Creation. In this case, ConsoleOne sets the password before an account is associated in NT or Active Directory accounts. This prevents the initial password from being synchronized. Passwords are synchronized only after the first password change. To avoid this delay, you can do one of the following things:
![]() Deselect Assign NDS Password During User Creation and assign the password later. A brief delay allows account associations to be completed.
Deselect Assign NDS Password During User Creation and assign the password later. A brief delay allows account associations to be completed.
![]() Select Prompt User on First Login so that password setting is delayed until the account is actually used.
Select Prompt User on First Login so that password setting is delayed until the account is actually used.
The Microsoft Management Console (MMC) lets you set an initial password on a user account by typing the password when you create the account. The password is set before Password Synchronization can associate an eDirectory account with the Active Directory account, so the Password Synchronization service cannot update the eDirectory account immediately. However, the service will retry the password update, and the account will be properly updated within several minutes.
To install Password Synchronization on your servers, make sure that ConsoleOne is not running and then follow these steps:
1. Log in to the SRV-02 server as an administrator, and then log in to eDirectory as Admin.
2. In iManager, click the Roles and Tasks icon. Then in the left pane, click Passwords, click Password Policies, and then click New to open the Password Policy Wizard.
3. Configure the Password Policy.
3a. In the Policy Name field, enter a name for the policy (such as DirXML UnivPassword), and then click Next to display the Step 2 page of the wizard.
3b. On the Step 2 page of the wizard, click View Options to open the password synchronization options.
3c. Select Synchronize Simple Password When Setting Universal Password, and then click Next.
3d. On the Advanced Password Rules page, click Next.
3e. On the Step 4 page of the wizard (Enable Forgotten Password Feature), retain the default (No), and then click Next.
3f. On the Step 7 page of the wizard (Assign the Password Policy), select Browse to open the browse window, select the Users.ZEN container, click OK, and then click Next to display the Step 8 page of the wizard (Summary of the Password Policy).
3g. Click Finish, and then click Close.
4. From the Windows desktop, click Start→Settings→Control Panel, and then double-click DirXML PassSync.
5. In the PassSynchConfig dialog box, click Yes to the question Is This Machine Where the DirXML Driver Is Configured to Run? The Password Synchronization dialog box is displayed.
6. In the Password Synchronization dialog box, click Add. The Password Synchronization—Add Domain dialog box is displayed.
7. In the Password Synchronization—Add Domain dialog box, open the drop-down list in the Domain field, select ZENDEMO from the list, and then click OK. Do not add information to the Computer field.
8. On the PassSyncConfig dialog box, click Yes.
9. Highlight the Domain DNS Name, and then click Filters to display the Password Filters dialog box.
10. In the Password Filters dialog box, select the Domain Controller name, and then click Add. This option copies files to the Domain Controller. After the copy is complete, the status changes to Installed—Needs Reboot.
11. Click Reboot, and then wait until the server reboots and the dialog box shows that it is running. Click Refresh after SRV-01 restarts (if the status has not changed).
12. Click OK, and then click OK again.
13. Make sure to reboot the SRV-02 server to complete the installation.
When you have installed and configured both the DirXML drivers and the PasswordSync driver, you need finalize the configuration so these drivers start automatically and function properly. Use the following steps to finalize the configuration:
1. Log on to the SRV-02 server as administrator.
2. From the Windows Server 2003 desktop, click Start→Settings→Control Panel→Novell eDirectory Services to open the Novell eDirectory Services dialog box.
3. Click Services, select the dstrace.dlm service, and then click Start to display the Novell eDirectory Trace window.
4. In the Novell eDirectory Trace window, click Edit→Options to open the Novell eDirectory Trace Options dialog box.
5. On the Events page of the dialog box, click Clear All, select DirXML, select DirXML Drivers, and then click OK.
6. Launch iManager, and then click the server link to log in as Admin.
7. In iManager, click the Roles and Tasks icon to open the Roles and Tasks left pane, click DirXML, and then click DirXML Overview to open the DirXML Overview utility in the right pane.
8. In the DirXML Overview utility, select Search Entire Tree, and then click Search to open the Active Directory—eDirectory configuration page.
9. Click the icon to open a menu options list and then select Start Driver. When you start the driver, the Novell eDirectory Trace window displays red messages as errors, yellow messages as warnings, and green messages as successful processes. Although there might be initial errors and warnings, the final message should be green and the status shown as Success for the Active Directory DirXML log event. When the driver is running successfully, the icon changes to the icon.
10. Click the icon, and then select Edit Properties to open the Modify Object window.
11. In the Modify Object window, select the DirXML tab, click Driver Configuration, scroll to the Startup Option section of the window, select Auto Start, and then click OK. A message dialog box displays the question, “Do you want to restart the driver to put your changes into effect?”
12. Click OK on the message dialog box to restart the driver.
13. Roll your mouse pointer over the icon to reveal the status message Driver Is Running. Now that the IDM 2 is completely configured, you need to test the system to make sure that it is functioning properly.
To verify that eDirectory, DirXML, and password synchronization are working properly in your environment, you need to create a few users in Active Directory to verify that they are automatically created in eDirectory with the proper passwords. The following steps allow you to verify that these elements are working properly:
1. Log on to Domain Server as the administrator of the Active Directory domain.
2. Launch the Active Directory administration tool and create a test user in Active Directory—for example, [email protected].
3. Log in to ZENSVR as the administrator of the domain and as admin in eDirectory.
4. Open ConsoleOne; then verify that TestUser1 has been created in the administered container. You might have to wait for a synchronization cycle to complete before the user is listed in eDirectory.
5. Log in to eDirectory as TestUser1, verify that the password is the same as the one given in Active Directory, and then verify that you successfully authenticated to eDirectory. Another synchronization cycle might be necessary before the password is updated.
6. For completeness, create a user in eDirectory (using ConsoleOne while logged in as Admin); then verify that the user is now in the domain and that you can log in to the domain as that user using the password you specified in eDirectory.
The default synchronization rules do not create an Active Directory user until the full name attribute field is populated in eDirectory. Check this in ConsoleOne→User_object→Properties→General.
This section assumes that you have already installed eDirectory and have it properly functioning in your environment. ZENworks Desktop Management is constructed of three components: ZENworks Desktop Management Server, ZENworks Middle-Tier Server, and ZENworks Management Agents.
You will install ZENworks Desktop Management components by completing the following sections. The installation is performed on a Windows 2000/XP workstation with a Novell Client 4.9 SP1a or later installed.
Use the following steps to get the Novell ZENworks Desktop Management Server up and running on a NetWare or Windows server:
1. Select a Windows 2000/XP workstation (or a Windows 2000/2003 server) to run the Desktop Management installation. You can install from any of these systems as long as they have access to the eDirectory tree you created previously.
2. At a Windows workstation, insert the Novell ZENworks Desktop Management CD. The winsetup.exe program runs automatically. If it does not start automatically, launch the program from the root of the CD.
NOTE
If you remove the Novell ZENworks Desktop Management CD from the CD drive during the installation, the installation program will stop and will not proceed. To terminate the installation process, in the Windows Task Manager, click Processes, select javaw.exe, and then click End Process.
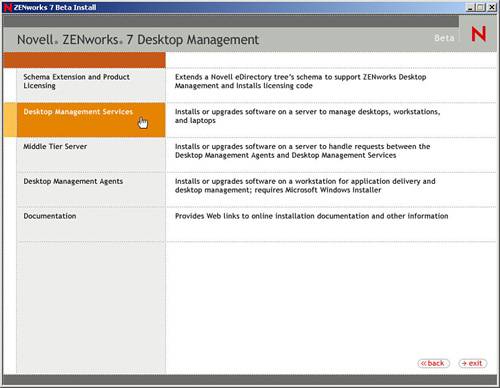
3. Click Desktop Management to display a page with options to install in various languages.
4. Click English to display a page with Desktop Management installation options.
From this page, you can choose to either extend the schema before you actually install the new Desktop Management product, or you can choose to extend the schema as part of the installation procedure.
If the network environment where you want to install the Desktop Management Server is a large tree, you might want to extend the schema and let the Novell eDirectory tree stabilize before you actually install the new Desktop Management product. To extend the schema first, follow these steps:
1. Select Schema Extension and Product Licensing to launch the ZENworks Desktop Management Schema Extension and Product Licensing Wizard.
2. After you accept the terms of the license agreement and click Next, complete the eDirectory Tree for Creating Objects page of the wizard by browsing to or entering the name of an eDirectory tree where you want to add ZENworks Desktop Management schema extensions, select Extend Schema, and then click Next (see Figure 2.5).
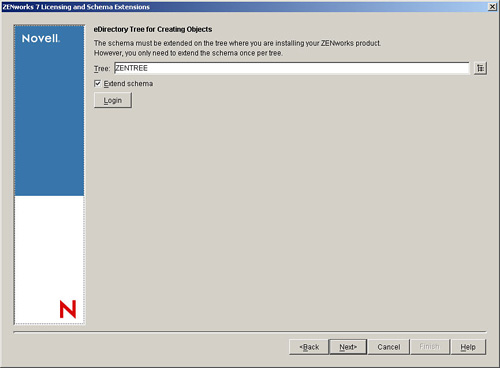
You need to extend the schema on a tree only once. You can authenticate to a tree by clicking the Login button and entering a user ID and password with the appropriate rights.
The duration of the schema extension operation depends on the size and complexity of your tree.
3. On the ZENworks License page, enter the license code that was emailed to you as part of the SmartCert product registration package; then click Next (see Figure 2.6).
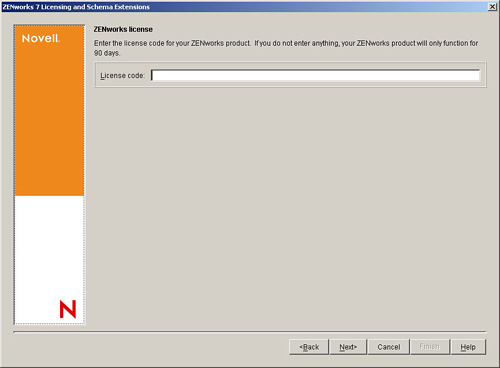
If you do not enter a license code on this page, the wizard considers this installation of ZENworks Desktop Management to be an evaluation version. If you install for an evaluation, you will be reminded to license the product at periodic intervals. After 90 days, the product evaluation will no longer function.
When the schema extension operation is complete, you can view a log file stored in c: ovellzfdtempzwextsch.log.
If you want to install the Desktop Management Server software after extending the schema, or if you want to extend the schema of the tree as part of the installation, use the following steps:
1. Click Desktop Management Services to launch the Desktop Management Server Installation Wizard (see Figure 2.7).
2. On the first Installation page, read the details about running the installation program; then click Next.
3. Read the license agreement; then click Accept if you agree with the terms of the license agreement.
4. On the Installation Requirements page, read the requirements for installing the Desktop Management Server software, make sure that the server where you plan to install meets the listed requirements, and then click Next.
5. On the Tree Selection page, type or browse to the name of the Novell eDirectory tree where you want to install the Desktop Management Server. If you have not already extended the schema for this installation, select Extend Schema to extend the schema on the tree where you will be installing Desktop Management Server software; then click Next.
NOTE
You cannot install Desktop Management Server software on multiple trees at the same time.
You need to extend the schema on a tree only once. You can authenticate to a tree by clicking the Login button and entering a user ID and password with the appropriate rights.
6. On the ZENworks Desktop Management Licensing page, specify the license code that was emailed to you as part of the SmartCert product registration package.
If you do not specify a license code on this page, the wizard considers this installation of ZENworks Desktop Management to be an evaluation version. If you install for an evaluation, you will be reminded to license the product at periodic intervals. After 90 days, the product evaluation version no longer functions.
7. On the Server Selection page, click Add Servers to browse to the names of the servers where you want to install Desktop Management Server software (see Figure 2.8).
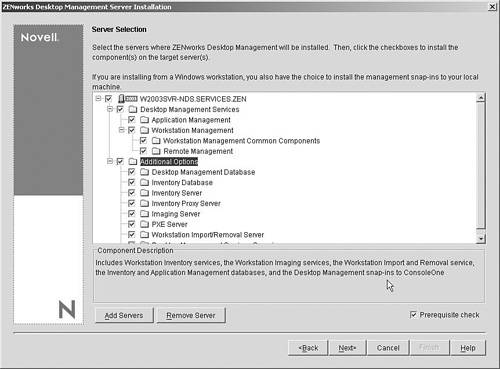
You can select servers only from the tree you selected in step 5. You can install up to seven servers at a time.
8. (Optional) In the Add Servers dialog box, you can list servers by their eDirectory tree names. To install to a server, select eDirectory Trees, browse to and click the name of the server you want to install to. Or click Add All Servers to select all the servers in a container, click the right-arrow button to move your selected servers to the Selected Servers pane, and then click OK.
NOTE
If you want to add a Windows server that you might not be authenticated to, you can double-click the server icon to display a dialog box where you can enter credentials to allow for Windows authentication.
9. (Optional) In the Add Servers dialog box, you can specify the hostname or IP address of a server in the Add Server Via Hostname/IP Address field. The value that you provide must be resolvable to the name of a server. Click to begin the name resolution process and add the server to the Selected Servers list.
10. On the now-populated Server Selection page, you can further specify the services you want to install for the Desktop Management components you previously selected and then click Next to save your settings. The list of settings includes the following:
![]() Local Workstation—Even though the ConsoleOne 1.3.6 installation program lets you install ConsoleOne files to a local hard drive, such an installation will not include the Desktop Management Services snap-ins. You have the option of installing Desktop Management Services snap-ins to your local workstation by selecting Desktop Management Service Snap-ins under the Local Workstation option. ConsoleOne must be installed on the workstation before the snap-ins can be added.
Local Workstation—Even though the ConsoleOne 1.3.6 installation program lets you install ConsoleOne files to a local hard drive, such an installation will not include the Desktop Management Services snap-ins. You have the option of installing Desktop Management Services snap-ins to your local workstation by selecting Desktop Management Service Snap-ins under the Local Workstation option. ConsoleOne must be installed on the workstation before the snap-ins can be added.
![]() Desktop Management Services—Desktop Management Services (collectively referred to as the Desktop Management Server) are commonly used files and programs that enable the configuration and distribution of workstation applications and policies. These services provide automatic management of Windows applications, user and workstation configurations, processes, and behaviors.
Desktop Management Services—Desktop Management Services (collectively referred to as the Desktop Management Server) are commonly used files and programs that enable the configuration and distribution of workstation applications and policies. These services provide automatic management of Windows applications, user and workstation configurations, processes, and behaviors.
![]() Application Management—Select this option to install software that enables the automated application distribution, launching, and healing.
Application Management—Select this option to install software that enables the automated application distribution, launching, and healing.
![]() Workstation Management Common Components—Select this option to install workstation-resident modules that are used to authenticate the user to the workstation and network, and used to transfer configuration information and policies from eDirectory.
Workstation Management Common Components—Select this option to install workstation-resident modules that are used to authenticate the user to the workstation and network, and used to transfer configuration information and policies from eDirectory.
![]() Remote Management—Select this component to install files and programs that enable the remote management of workstations from a central console; including remote control, remote file transfer, remote execute and remote diagnostics. Make sure that the selected servers do not have the ZENworks for Servers 3.0.2 (or earlier) Remote Management component already installed.
Remote Management—Select this component to install files and programs that enable the remote management of workstations from a central console; including remote control, remote file transfer, remote execute and remote diagnostics. Make sure that the selected servers do not have the ZENworks for Servers 3.0.2 (or earlier) Remote Management component already installed.
![]() Additional Options—If you want to customize your deployment of Desktop Management Services, there are a number of services to choose from, each with a specialized purpose:
Additional Options—If you want to customize your deployment of Desktop Management Services, there are a number of services to choose from, each with a specialized purpose:
![]() Desktop Management Database—Select this option if you want to install a network database to be used by the Novell Application Window as a repository for data about application events (install, launch, cache, and so forth) that have occurred.
Desktop Management Database—Select this option if you want to install a network database to be used by the Novell Application Window as a repository for data about application events (install, launch, cache, and so forth) that have occurred.
![]() Inventory Database—Select this option if you want to install a network database to be used by Workstation Inventory as a repository for hardware and software inventory information collected from inventoried workstations.
Inventory Database—Select this option if you want to install a network database to be used by Workstation Inventory as a repository for hardware and software inventory information collected from inventoried workstations.
NOTE
If you want to use the Inventory database with an existing Oracle or MS SQL setup, do not select this option during the Server Inventory installation.
![]() Inventory Server—Select this option if you want to install files and programs to enable the gathering and viewing of hardware and software inventory information for managed workstations. If the selected servers have the Server Inventory component of ZENworks for Servers 3.0.2 or earlier installed, you must upgrade the component to ZENworks Server Management.
Inventory Server—Select this option if you want to install files and programs to enable the gathering and viewing of hardware and software inventory information for managed workstations. If the selected servers have the Server Inventory component of ZENworks for Servers 3.0.2 or earlier installed, you must upgrade the component to ZENworks Server Management.
![]() Inventory Proxy Server—Select this option if you want to install a proxy service that enables the roll-up of inventory scan data to an inventory server located across a network firewall. Make sure that the selected servers do not have the ZENworks for Servers 3.0.2 (or earlier) Inventory component already installed.
Inventory Proxy Server—Select this option if you want to install a proxy service that enables the roll-up of inventory scan data to an inventory server located across a network firewall. Make sure that the selected servers do not have the ZENworks for Servers 3.0.2 (or earlier) Inventory component already installed.
![]() Imaging Server—Select this option if you want to install a Linux imaging environment to be used to create, store, send, or restore workstation image files to a workstation.
Imaging Server—Select this option if you want to install a Linux imaging environment to be used to create, store, send, or restore workstation image files to a workstation.
NOTE
Install the Imaging Server service and the PXE Server service on the same server; do not install the PXE Server service separately.
![]() PXE Server—Select this option if you want to install Preboot Execution Environment (PXE) protocols and programs to be used by the server to communicate with a PXE-enabled workstation and to enable sending imaging tasks to that workstation. When you install Preboot Services, one of the components installed is the Proxy DHCP server. If the standard DHCP server is on the same server where you are installing the Proxy DHCP server, you must set option tag 60 in DHCP services.
PXE Server—Select this option if you want to install Preboot Execution Environment (PXE) protocols and programs to be used by the server to communicate with a PXE-enabled workstation and to enable sending imaging tasks to that workstation. When you install Preboot Services, one of the components installed is the Proxy DHCP server. If the standard DHCP server is on the same server where you are installing the Proxy DHCP server, you must set option tag 60 in DHCP services.
NOTE
Install the Imaging Server service and the PXE Server service on the same server; do not install the PXE Server service separately.
![]() Workstation Import/Removal Server—Select this option if you want to install files and programs that add workstation objects into eDirectory (or remove those already added), where they can be managed to receive applications or computer settings.
Workstation Import/Removal Server—Select this option if you want to install files and programs that add workstation objects into eDirectory (or remove those already added), where they can be managed to receive applications or computer settings.
![]() Desktop Management Services Snap-Ins—Select this option if you want to install additions to ConsoleOne to enable you to launch Desktop Management tools and utilities, to view Desktop Management object property pages in eDirectory, and to browse and configure those objects.
Desktop Management Services Snap-Ins—Select this option if you want to install additions to ConsoleOne to enable you to launch Desktop Management tools and utilities, to view Desktop Management object property pages in eDirectory, and to browse and configure those objects.
NOTE
You can perform a custom selection by selecting one or more servers and right-clicking to display a pop-up menu with options to add Database Services, Inventory Services, or Imaging Services to all the servers you have selected. The Default option returns the selections to their initial state. The custom selection launches another dialog box that you can use to select specific components for all the selected servers. This selection overrides any other selections you might have made.
11. (Optional) The Prerequisite Check check box is selected by default. Retain the selection if you want the installation program to verify that the server or servers meet the installation requirements for ZENworks Desktop Management Services. The installation program checks the version of the server’s network operating system (including any required service or support packs), the presence and version of the Novell Client (4.9 SP1a) on Windows servers and on the installing workstation, and the presence of ConsoleOne (1.3.6).
If the server operating system and support/service packs are not the correct version, the installation displays a warning message and does not continue until the required software is installed and detected or until you deselect the check box.
12. (Optional if Workstation Inventory or Remote Management is selected.) On the File Installation Location page, select one or more target servers in the Selected Servers list; then browse for or enter the volume or drive where you want the Workstation Inventory or Remote Management files to be installed. The default is SYS: for Novell NetWare and C: for Windows servers (see Figure 2.9).
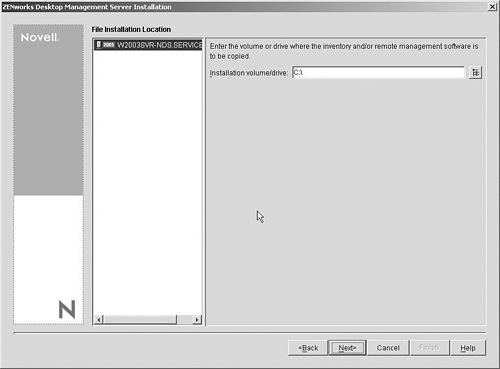
NOTE
If a previous installation of ZENworks Workstation Inventory or Remote Management component is detected on the machine, the existing path is displayed and dimmed. The current installation installs all the files in the same path.
13. (Optional) The Database Location Installation page is displayed if you choose to install the Inventory database or the Desktop Management database. Select a previously designated server in the left pane. Then in the Database Path field, browse for or type in the name of the volume or drive where the database file will be installed; then click Next.
You can provide a different volume or drive for each database server. For example, the volume names might be different on your various NetWare servers. However, you cannot have multiple instances of the database files on the same server because you can run only one instance of the database engine per server. For NetWare servers, this path cannot include extended or double-byte characters.
NOTE
SYS: is the default for NetWare servers. We recommend that you do not select SYS: on NetWare servers because the database file can become large.
14. (Optional) The Inventory Standalone Configuration page is displayed if you choose to install the Inventory server and the Inventory database on the same server. If you want the installation program to automatically create the server package and the database location policy within the server package, and to start the inventory service on the server, configure the settings on the Inventory Standalone Configuration page.
Select Configure Standalone, select the server or servers that you want to point to a common database location search policy, type in the name or browse to the tree container where you want to create and configure the Server Package containing this policy, and then click Next.
15. (Optional) On the Inventory Proxy Service Configuration page, select the server or servers with a port you want to designate as one to allow XMLRPC requests to pass through to the Inventory Proxy service. Then in the Proxy Port field, designate the port you want to use.
You can configure the same port number for all servers by selecting all of them, or you can define the values individually by selecting the servers one at a time. If you want to change the Port 65000 default, specify a value between 0 and 65535. Make sure that the port number is not used by other services on the server.
16. On the Summary page, review the list of components and their parts to be installed. If the summary is correct, click Finish to launch the installation program. You can click Back as many times as necessary to make changes. If you click Cancel, no installation information is saved.
You can review the installation log file after the installation has completed. The log filename is datestamp_timestamp_zdmserver_install.log (for example: 20040304_024034_zdmserver_install.log). The log file is located in the
ovellzfdtemp directory on the machine you are installing from. This log file indicates whether any component failed to install.
You can also review the installation summary to review the selections you made. The summary is saved in a log file named datestamp_timestamp_zdmserver_installsummary.log (for example: 20040304_024034_zdmserver_installsummary.log). The summary log file is also located in c:
ovellzfdtemp.
If you install Sybase on a NetWare server that has CIFS as a default component, the server IP address or DNS name of the Inventory database server name object might not be configured correctly after the Sybase installation. To configure the database object correctly, follow these steps:
The ZENworks Middle-Tier server allows the ZENworks features to be delivered to device agents via this web server. Use the following steps to get the ZENworks Middle-Tier Server up and running on a NetWare or Windows server.
The workstation used to install the Middle-Tier Server must be a Windows 2000/XP workstation with a Novell Client 4.9 SP1a install. The installation is accomplished through the following steps:
1. At a Windows workstation or server, insert the Novell ZENworks Desktop Management CD. The winsetup.exe program will autorun. If it does not autorun, launch the program from the root of the CD.
NOTE
If you remove the Novell ZENworks Desktop Management CD from the CD drive during the installation, or if you lose your connection to the server you are installing to, the installation program stops and will not proceed. To terminate the installation process, in the Windows Task Manager click Processes, select javaw.exe, and then click End Process.
2. Click Desktop Management to display a page with options to install in various languages.
3. Click English to display a page with Desktop Management installation options.
4. Click Middle-Tier Server to launch the Middle-Tier Server installation program.
5. On the first Installation page, read the details about running the installation program; then click Next.
6. Read the license agreement; then click Accept if you agree with the terms of the license agreement.
7. On the Installation Requirements page, read the requirements for installing the Middle-Tier Server software, make sure that the server where you plan to install meets the listed requirements, and then click Next.
8. On the eDirectory Location and Credentials page, fill in the following fields (see Figure 2.10):
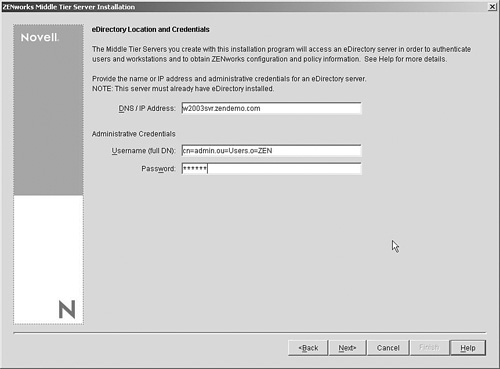
![]() DNS/IP Address—Specify the DNS name or IP address of the server where eDirectory is installed.
DNS/IP Address—Specify the DNS name or IP address of the server where eDirectory is installed.
![]() Username (full DN)—Specify the fully qualified distinguished username of the Middle-Tier proxy user account (for example, midtier-proxy.org-unit.org). To ensure that these credentials remain secure, you can set up an arbitrary user with specific administrative rights.
Username (full DN)—Specify the fully qualified distinguished username of the Middle-Tier proxy user account (for example, midtier-proxy.org-unit.org). To ensure that these credentials remain secure, you can set up an arbitrary user with specific administrative rights.
![]() Password—Specify the eDirectory password for the Middle-Tier proxy user.
Password—Specify the eDirectory password for the Middle-Tier proxy user.
9. On the ZENworks User Context page (User Context field), specify the eDirectory context where the Middle-Tier Server can look for user objects that will be used by Desktop Management.
Use the context of the highest-level container where user objects reside. This value is passed to the ZENworks Middle-Tier Server, which will use it as a starting point in searching for a user.
For example, if users exist in many subcontainers, specify the context of the container that holds all those subcontainers. When a user logs in through the ZENworks Middle-Tier Server, the server begins searching for a user in the designated eDirectory container and then searches subcontainers in that container until the correct user is found.
For any Middle-Tier Server you designate during this installation, currently configured authentication domains (for example, the authentication domain configured for NetStorage) are replaced by a single authentication domain having the context that you specify here.
After the installation, you can reconfigure this authentication domain context using the NSAdmin utility. You can open the utility in a web browser (http://middle_tier_server_name/oneNet/nsadmin).
NOTE
The installation program verifies the existence of the context (that is, the container) before continuing.
10. On the ZENworks Files Location page, select the network location where you will access application and policy files managed by ZENworks (see Figure 2.11).
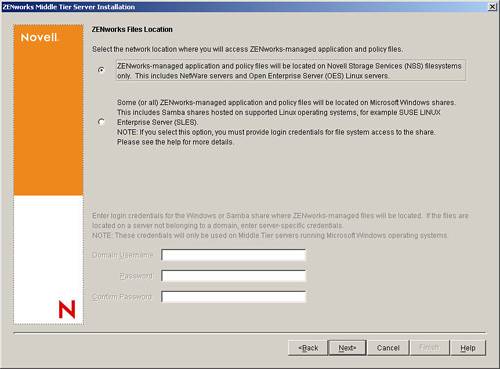
The ZENworks Middle-Tier Server requires access to ZENworks files installed elsewhere on your network. As the ZENworks administrator, you define the location of these files when you create policies or applications for distribution. The information you provide on this page is used to help the Middle-Tier Server determine how to access different file systems. This decision is necessary for the installation now, even if you have not yet created any ZENworks files. The two choices available to you are as follows:
![]() Select the first option button if your ZENworks-managed application and policy files will be located on NetWare servers only.
Select the first option button if your ZENworks-managed application and policy files will be located on NetWare servers only.
![]() Select the second option button if some or all of your ZENworks-managed application and policy files will be located on Microsoft Windows servers.
Select the second option button if some or all of your ZENworks-managed application and policy files will be located on Microsoft Windows servers.
If your ZENworks files will be located in a Windows file system, the Middle-Tier Server might not be able to access them using a username and password for Novell eDirectory; instead, it requires Windows domain credentials to access the files.
If the files are located on a server not belonging to a domain, enter server-specific credentials:
![]() Domain Username—Specify the username of any user in the Microsoft domain who has Windows file system rights to the ZENworks file locations.
Domain Username—Specify the username of any user in the Microsoft domain who has Windows file system rights to the ZENworks file locations.
![]() Password—Specify the password for the user in the Microsoft domain who has file system rights to ZENworks files.
Password—Specify the password for the user in the Microsoft domain who has file system rights to ZENworks files.
![]() Confirm Password—Specify the same password to confirm that it was entered correctly.
Confirm Password—Specify the same password to confirm that it was entered correctly.
11. On the Server Selection page, you need to build a list of target servers that you want to function as Middle-Tier Servers. The Add Servers button opens a dialog box used to find and add servers to the list. The Remove Servers button lets you delete servers from the target list after they are added. Click Add Servers.
12. (Optional) Prerequisite Check is selected by default. You can retain this selection if you want the installation program to verify that the server or servers meet the installation requirements for ZENworks Middle-Tier Servers.
The installation program checks the version of any previously installed Middle-Tier Server software, the server’s network operating system (including any required service or support packs), the presence and version of the IIS web server on Windows servers, the presence and version of the appropriate web server on NetWare servers, and the presence and version of NetStorage (2.6.0) on target servers.
If the server operating system and support/service packs are not the correct version, the installation displays a warning message but can continue. If other requirements are not met, the installation displays a warning and does not continue until the required software is installed and detected.
13. On the Add Servers dialog box, open the List Servers By drop-down list to show the options of listing the servers according to their location in Novell eDirectory trees, in Microsoft Windows Network structures, or in Microsoft Active Directory trees.
You can install the ZENworks Middle-Tier Server software to several servers during the installation. After you finish adding servers to the list, click OK.
14. (Conditional if you want to list servers in eDirectory trees.) In the List Servers By drop-down box, select eDirectory Trees to list all the eDirectory trees to which you are currently authenticated, browse the tree to the server of your choice, and then click the double right-arrow to move it to the Selected Servers list box. Other options in this dialog box include the following:
![]() You can click Browse Unlisted Tree to open a dialog box listing all the trees in your network. Double-clicking any one of these trees moves it to the Available Servers list, even though you are not authenticated to that tree.
You can click Browse Unlisted Tree to open a dialog box listing all the trees in your network. Double-clicking any one of these trees moves it to the Available Servers list, even though you are not authenticated to that tree.
![]() You can specify the hostname or IP address of a server in the Add Server via Hostname/IP Address field. The value that you enter must be resolvable to the name of a server.
You can specify the hostname or IP address of a server in the Add Server via Hostname/IP Address field. The value that you enter must be resolvable to the name of a server.
Click to begin the name resolution process and add the server to the Selected Servers list.
To remove a server from the Selected Servers box and return it to the Available Servers list box, click the server name in the Selected Servers box; then click the double left-arrow. You can remove multiple servers from the Selected Servers box by selecting them with the Shift and Ctrl keys.
15. (Conditional if you want to list servers in Microsoft Windows Network structure.) In the List Servers By drop-down list, select Microsoft Windows Network to list all the Windows workgroups and Microsoft domains to which you are currently authenticated, browse the structure to the server of your choice, and then click the double-right arrow to move it to the Selected Servers list. Other options in this dialog box include the following:
![]() You must be an administrative user for a server to add it to the Selected Servers list. If you are not authenticated to a server, the object is designated by a question mark. You can double-click the question mark to authenticate to the server, and then click the double-right arrow to move the server to the Selected Servers list, provided it is a supported server platform for ZENworks Desktop Management.
You must be an administrative user for a server to add it to the Selected Servers list. If you are not authenticated to a server, the object is designated by a question mark. You can double-click the question mark to authenticate to the server, and then click the double-right arrow to move the server to the Selected Servers list, provided it is a supported server platform for ZENworks Desktop Management.
![]() When you list servers in Microsoft domains, NetWare servers are not listed for browsing because ZENworks files located on a Windows server cannot be obtained through a Middle-Tier Server installed on NetWare.
When you list servers in Microsoft domains, NetWare servers are not listed for browsing because ZENworks files located on a Windows server cannot be obtained through a Middle-Tier Server installed on NetWare.
![]() You can specify the hostname or IP Address of a server in the Add Server via Hostname/IP Address field. The value that you enter must be resolvable to the name of a server located in the designated operating environment.
You can specify the hostname or IP Address of a server in the Add Server via Hostname/IP Address field. The value that you enter must be resolvable to the name of a server located in the designated operating environment.
Click to begin the name resolution process and add the server to the Selected Servers list.
If you are using multiple hostname aliases for a Windows server, the first alias must be the physical name of your Windows server. Other things to note:
![]() If the credentials you provided for authentication to the server are not administrative credentials, you can add it as a target server, but you will be reprompted for Administrative credentials when you close the Add Servers dialog box.
If the credentials you provided for authentication to the server are not administrative credentials, you can add it as a target server, but you will be reprompted for Administrative credentials when you close the Add Servers dialog box.
![]() Click Add All Servers to add all the servers in a selected domain or workgroup. Selecting a domain or workgroup selects all the authenticated servers in that domain or workgroup.
Click Add All Servers to add all the servers in a selected domain or workgroup. Selecting a domain or workgroup selects all the authenticated servers in that domain or workgroup.
![]() To remove a server from the Selected Servers list and return it to the Available Servers list, click the server name in the Selected Servers list; then click the double left-arrow. You can remove multiple servers from the Selected Servers box by selecting them with the Shift and Ctrl keys.
To remove a server from the Selected Servers list and return it to the Available Servers list, click the server name in the Selected Servers list; then click the double left-arrow. You can remove multiple servers from the Selected Servers box by selecting them with the Shift and Ctrl keys.
16. (Conditional if you want to list servers in a Microsoft Active Directory.) In the List Servers By drop-down list, select Microsoft Active Directory. If your workstation is a member of an Active Directory, the domains in the Active Directory trees are displayed.
You can browse to all the servers listed in Active Directory (on a per-domain basis), browse the structure to the server of your choice, and then click the double right-arrow to move it to the Selected Servers list. Other options in this dialog box include the following:
![]() You can also click Browse Unlisted Tree to open a dialog box where you can specify the name of the domain you want to add and then authenticate to it with the proper credentials prior to displaying its servers in the List Servers By drop-down list.
You can also click Browse Unlisted Tree to open a dialog box where you can specify the name of the domain you want to add and then authenticate to it with the proper credentials prior to displaying its servers in the List Servers By drop-down list.
![]() You can specify the hostname or IP address of a server in the Add Server Via hostname/IP Address field. The value that you enter must be resolvable to the name of a server located in the designated operating environment.
You can specify the hostname or IP address of a server in the Add Server Via hostname/IP Address field. The value that you enter must be resolvable to the name of a server located in the designated operating environment.
Click to begin the name resolution process and add the server to the Selected Servers list. Right-click a domain object to select one of three search methods:
![]() Search Standard Locations—Lists the computers and domain controllers at the root of the domain. This is the default search method.
Search Standard Locations—Lists the computers and domain controllers at the root of the domain. This is the default search method.
![]() Search Entire Directory—Lists all directory containers where computers are located.
Search Entire Directory—Lists all directory containers where computers are located.
![]() Browse Directory Hierarchy—Lists all the containers in the directory, which you can expand and browse one at a time to find the computer you want. This search method might be useful if you have computers in a nonstandard location of a large directory.
Browse Directory Hierarchy—Lists all the containers in the directory, which you can expand and browse one at a time to find the computer you want. This search method might be useful if you have computers in a nonstandard location of a large directory.
Click Add All Servers to add all the servers in a selected domain or container. Selecting a domain or container selects all the servers in that domain or container.
To remove a server from the Selected Servers box and return it to the Available Servers list box, click the server name in the Selected Servers box; then click the double left-arrow. You can remove multiple servers from the Selected Servers box by selecting them with the Shift and Ctrl keys.
17. On the Summary page, review the location where you have chosen to install the ZENworks Middle-Tier Server software and the Desktop Management Server to which it is associated; then click Finish to begin the installation process if the summary is correct.
The Middle-Tier Server Installation Wizard launches another installation program. Wait until this program is completed.
NOTE
You can review the installation log file after the installation has completed. The log file name is datestamp_timestamp_zdmmidtier_install.log (for example: 20040304_024034_zdmmidtier_install.log). It is located in the
ovellzfdtemp directory on the machine you are installing from. This log file indicates whether any component failed to install.
You can also review the installation summary to review the selections you made. The summary is saved in a log file named datestamp_timestamp_zdmmidtier_installsummary.log (for example: 20040304_024034_zdmmidtier_installsummary.log). It is also located in c:
ovellzfdtemp.
18. In ConsoleOne pointing to eDirectory on the Desktop Management Server, make sure that you have set up the Desktop Management Server to allow clear text passwords.
19. Reboot the server where you installed the ZENworks Middle-Tier Server software.
20. Verify that the ZENworks Middle-Tier Server is installed and running by entering one of the following URLs at a browser on the workstation:
![]() If the ZENworks Middle-Tier Server is running, this URL opens a web page where server statistics are displayed. You should be able to see where the request count increases by clicking the Refresh button on your browser. The URL is http://Middle_Tier_Server_DNS_or_IP/oneNet/xtier-stats.
If the ZENworks Middle-Tier Server is running, this URL opens a web page where server statistics are displayed. You should be able to see where the request count increases by clicking the Refresh button on your browser. The URL is http://Middle_Tier_Server_DNS_or_IP/oneNet/xtier-stats.
![]() This URL launches a dialog box that prompts for user credentials: http://Middle_Tier_Server_IP_address/oneNet/zen.
This URL launches a dialog box that prompts for user credentials: http://Middle_Tier_Server_IP_address/oneNet/zen.
![]() This URL launches a web page where a message is displayed stating that XZEN (the Xtier module in the Middle-Tier Server) is running: http://Middle_Tier_Server_IP_address/oneNet/xzen.
This URL launches a web page where a message is displayed stating that XZEN (the Xtier module in the Middle-Tier Server) is running: http://Middle_Tier_Server_IP_address/oneNet/xzen.
The information in this section includes a procedure for installing all Novell ZENworks Desktop Management features on a SLES 9 or OES Linux server.
Use the following steps to install all of the ZENworks 7 Desktop Management features on a SLES 9 or OES Linux server:
1. From the terminal console, use the su command to switch to the root user.
2. Run mount /CD_mount_point to mount the ZENworks 7 Desktop Management Installation program CD or CD recorder.
3. Change to the CD mount directory, and run ./setup to display the first page of the installation program that looks as follows:
========================================================
Introduction
— — — — — —
InstallAnywhere will guide you through the installation
of ZENworks Desktop Management.
It is strongly recommended that you quit all programs
before continuing with this installation.
Respond to each prompt to proceed to the next step in
the installation. If you want to change something on a
previous step, type 'back'.
You may cancel this installation at any time by typing
'quit'.
PRESS <ENTER> TO CONTINUE:
4. Read the introduction, and then press Enter to display the Installation Prerequisites page.
5. Read the prerequisites, pressing Enter to page down as you read. At the end of the prerequisites, press Enter to display the License Agreement page.
6. Read the terms of the license, pressing Enter to page down as you read. At the end of license agreement, enter Y if you accept the terms of the license.
NOTE
Enter back on any page of the installation program to go back to the previous page. Enter quit on any page to cancel the installation program.
The first page of the installation is displayed:
========================================================
Choose Install Set
— — — — — — — — —
Please choose the Install Set to be installed by this
installer.
->1- All Features
2- ZENworks Desktop Management Server
3- ZENworks Middle Tier Server
4- Customize...
ENTER THE NUMBER FOR THE INSTALL SET, OR PRESS <ENTER>
TO ACCEPT THE DEFAULT
:
7. Enter 1 or press Enter to accept the default. The tree information is prompted for next:
========================================================
Tree information
— — — — — — — —
Please enter authentication information for the tree
where you want to configure ZENworks.
Tree (zentree):
8. On the Tree Information page, enter the name of the local host (that is, this server’s) tree where you want to configure ZENworks. This field is not case sensitive.
9. Enter the eDirectory distinguished name (DN) for the Administrative User. This field is not case-sensitive.
10. Enter the password for the Administrative User. This field is case sensitive.
NOTE
Pressing Enter at any prompt causes the installation program to accept the default, which is the value shown in parentheses.
After your credentials are validated, the ZENworks License Key page is displayed:
========================================================
ZENworks License Key Information
— — — — — — — — — — — — — — — —
Please enter a valid ZENworks license code. (90 Day
Trial):
11. Enter the license code that you received in an email from Novell after you purchased Novell ZENworks. You are periodically reminded to license the product until you provide this license code. If you don’t enter an appropriate code, ZENworks Desktop Management functions for only 90 days.
The Middle-Tier Server Configuration Information page is displayed:
========================================================
Middle Tier Server Configuration Information
— — — — — — — — — — — — — — — — — — — — — —
The Middle Tier Server you configure with this program
will access an eDirectory server in order to
authenticate users and workstations and to obtain
ZENworks configuration and policy information.
Please provide the name or IP address and administrative
credentials for an eDirectory server.
Server Name/IP Address (zenmidt):
12. Enter the DNS name or IP address of the server where eDirectory is installed:
Enter Administrative Credentials:
Proxy User (admin.myCompany):
13. Enter the full distinguished username of the Middle-Tier proxy user account (for example, admin.mycompany):
Password():
14. Enter the eDirectory password for the Middle-Tier proxy user. The ZENworks Middle Tier software searches for ZENworks user objects in a specified eDirectory context and below.
Please Specify the ZENworks user context.
NOTE: This context must already exist.
Users Context (users.novell):
15. Enter the eDirectory context where the Middle-Tier Server can look for user objects that will be using Desktop Management.
The installation program verifies the existence of the context (that is, the directory container) before continuing. The Inventory Standalone Configuration page is displayed:
========================================================
Inventory Standalone Configuration
— — — — — — — — — — — — — — — — —
Do you want to configure as a Standalone? (Y/N) (Y):
16. (Optional) The Inventory Standalone Configuration page is displayed if you choose to install the Inventory Server and the Inventory Database on the same server. If you want the installation program to automatically create the Server Package and the Database Location policy within the Server Package, and to start the Inventory Service on the server, configure the settings on the Inventory Standalone Configuration page.
Enter Y to select Inventory Standalone configuration:
Inventory Server Context (novell):
17. Enter the context for the standalone inventory server. The Inventory Proxy Configuration page is displayed:
========================================================
Inventory Proxy Configuration
— — — — — — — — — — — — — —-
XML Proxy port (65000):
18. Enter the port number you want to designate as one to allow XMLRPC requests to pass through to the Inventory Proxy service. If you want to change the Port 65000 default, specify a value between 0 and 65,535. Ensure that the port number is not used by other services on the server. The SSL Configuration page is displayed:
========================================================
SSL Configuration
— — — — — — — —-
Do you want to configure SSL? (Y):
19. (Optional) If you want the ZENworks 7 Inventory server to establish a secure connection with eDirectory using LDAP, enter Y, and then enter the complete path and the filename of the SSL certificate. The NetBIOS Configuration page is displayed:
========================================================
NetBIOS Configuration
— — — — — — — — — —-
NetBIOS Name (NetBIOS_name):
20. (Conditional). The NetBIOS Configuration page is displayed only if the NetBIOS name is not present in /etc/samba/smb.conf, and the Linux server name where you run the ZENworks installation is more than 13 characters.
If the NetBIOS name is not present in /etc/samba/smb.conf and the Linux server name is more than 13 characters, the installation program generates a NetBIOS name using the first 13 characters of the Linux server name where you run the installation. This name is displayed as the default value during the ZENworks Linux installation:
========================================================
NetBIOS Configuration
— — — — — — — — — —-
NetBIOS Name(NetBIOS_name_generated_by_the_ZENworks_
installation_program):
You can either accept the default value or enter a new value, but make sure that the NetBIOS name is unique.
21. The Pre-Installation Summary page is displayed:
Pre-Installation Summary
— — — — — — — — — — — —
We are ready to install ZENworks to your server. Press
<Enter> to continue, type "back" to change your choices
or "quit" to exit this install.
Product Name:
ZENworks Desktop Management
Product Components:
Inventory Server,
Remote Management,
Application Management,
Inventory Proxy,
Inventory Database,
NAL Database,
Autoworkstation Import/Removal,
PXE,
Imaging,
Middle Tier,
ZENworks Desktop Agent Installer
ZENworks License Key:
90 Day Trial
Schema Extensions:
Schema extensions will be applied.
PRESS <ENTER> TO CONTINUE:
22. Press Enter to begin the installation. When the installation process is complete, InstallAnywhere creates an installation log file. Press Ctrl+C to abort the creation of the log file. If the installation is successful, the View Readme page is displayed:
============
View Readme
— — — — —-
Do you want to view the readme file?
->1- YES
2- NO
ENTER THE NUMBER FOR YOUR CHOICE, OR PRESS <ENTER> TO
ACCEPT THE DEFAULT:
:
23. (Optional) Enter 1 to open the readme file. Read the file, pressing Enter to page down as you read. At the end of the readme, press Enter to display the Installation Complete page.
24. (Optional) Enter 2 to display the Installation Complete page:
========================================================
Installation Complete
— — — — — — — — — —-
Congratulations. ZENworks Desktop Management has been
successfully installed to:
/opt/novell/zenworks/
All installed ZENworks services have been started.
Please see the log file (/var/log/ZENworks_Desktop_
Management_InstallLog.log)
for more details.
PRESS <ENTER> TO EXIT THE INSTALLER:
25. Press Enter to exit the installation program.
Breathe a huge sigh. You have now successfully finished the installation.
The workstation functionality afforded by Novell ZENworks Desktop Management components is available only if you install the Desktop Management agent. This is true even if you currently have the Novell Client installed on a workstation. The Desktop Management agent installation removes the ZENworks features previously installed by the Novell Client and replaces them with selected ZENworks workstation features.
The installation program utilizes Microsoft Windows Installer functionality. For detailed information about Microsoft Windows Installer, see the MSI website (http://www.microsoft.com/windows2000/techinfo/administration/management/wininstaller.asp).
The Desktop Management agent installation program, zfdagent.msi, requires a minimum of Microsoft Windows Installer (MSI) version 1.11 on each workstation during the installation process.
If you are installing the Desktop Management Agent on a workstation that already has MSI 1.11 (or later) installed (such as a Windows 2000 or Windows XP system), the Agent MSI installation program runs normally.
This section includes information about installing the Desktop Management agent using the Novell ZENworks Desktop Management CD or images you create yourself from a downloaded copy of zfdagent.msi.
Use the following steps if you want to manually install the Desktop Management agent to individual workstations from the Novell ZENworks Desktop Management CD:
1. At a Windows workstation, insert the Novell ZENworks Desktop Management CD. The winsetup.exe program autoruns. If it does not automatically start, launch the program from the root of the CD.
NOTE
If you remove the Novell ZENworks Desktop Management CD from the CD drive during the installation, or if you lose your connection to the server you are installing to, the installation program stops and does not proceed. To terminate the installation process, in the Windows Task Manager select Processes→javaw.exe→End Process.
2. Click Desktop Management to display a page with options to install in various languages.
3. Click English to display a page with Desktop Management installation options.
4. Click Desktop Management Agents to launch the ZENworks Desktop Management Agent Installation Wizard.
5. On the first Installation page, read the details about running the installation program; then click Next.
6. Read the License Agreement. If you agree to the terms of the license, click I Accept the Terms in the License Agreement.
7. On the Custom Setup page, select the features that you want to install to the workstation; then click Next. The features you can install include the following:
![]() Application Management—Uses the Novell Application Window to provide users access to workstation applications that the administrator can install and then manage.
Application Management—Uses the Novell Application Window to provide users access to workstation applications that the administrator can install and then manage.
NOTE
Application Management is installed by default, even if it is not selected, to accommodate future updates to the Desktop Management agent.
![]() Workstation Manager—Lets administrators configure and manage workstations through policies.
Workstation Manager—Lets administrators configure and manage workstations through policies.
![]() Workstation Inventory—Helps administrators collect hardware and software inventory information from scanned workstations.
Workstation Inventory—Helps administrators collect hardware and software inventory information from scanned workstations.
![]() Remote Management—Lets an administrator manage remote workstations from a management console.
Remote Management—Lets an administrator manage remote workstations from a management console.
![]() Mirror Driver—Provides video adapter independence and coexistence with other remote control solutions. If this feature is selected, the MSI installation overrides video driver checks and suppresses any Windows messages. If you do not want this driver, you can deselect it (optimization will be disabled).
Mirror Driver—Provides video adapter independence and coexistence with other remote control solutions. If this feature is selected, the MSI installation overrides video driver checks and suppresses any Windows messages. If you do not want this driver, you can deselect it (optimization will be disabled).
![]() Workstation Imaging—Lets an administrator take an image of a workstation’s hard drive and put it on other workstations over the network.
Workstation Imaging—Lets an administrator take an image of a workstation’s hard drive and put it on other workstations over the network.
8. On the General Settings page, fill in the fields and then click Next.
Enter the DNS Name or IP Address of the Middle-Tier Server: Specify the DNS name or IP address of the ZENworks Middle-Tier Server that this workstation will use. If you are running ZENworks in a NetWare server environment where a Novell Client will be installed on the workstation, this field may be left empty because eDirectory and the files should be accessible through the Novell client.
Enter the Port Value Used by the Middle-Tier Server: Specify the HTTP or HTTPS port number that the Apache web server (NetWare) or the IIS web server (Windows) will use to listen for the agent login.
The IP address or DNS name and the port number let the workstation access the Apache web server running alongside the Middle Tier, which passes on the authentication credentials to the Desktop Management Server. The IP address or DNS name is optional if the Novell Client is installed.
9. (Conditional) If you are installing to a workstation that does not have a Novell Client installed, the Workstation Manager Settings page is displayed. Customize the settings for the Workstation Manager feature by selecting either Display ZENworks Middle-Tier Server Authentication Dialog or Allow Users to Change Middle-Tier Server Address, or both. Then click Next and click Next again to display the Novell Application Window/Windows Startup Options page.
10. Choose to launch either the Application Explorer or Application Window (or neither) on startup; then click Next.
11. (Conditional) If you are installing the Workstation Manager or the Application Window, the ZENworks Tree page is displayed. Select Limit Application Window to One Tree Only if you want to limit the user of that workstation to accessing applications available on the eDirectory tree you designate in the field.
If you want to limit the user to receiving applications on one tree, specify the name of that eDirectory tree in the ZENworks Directory Tree field; then click Next to display the Ready to Install the Program page.
If you did not select Limit Application Window to One Tree Only, you can still specify the name of a tree in the ZENworks Tree field. This tree is recognized by the Workstation Manager as the tree where policies are accessed and applied to workstations. Click Next to display the Ready to Install the Program page.
12. Click Back if you want to review the settings you have selected for the Desktop Management agent installation. If the settings are correct, click Install to launch the installation program.
13. On the InstallShield Wizard Completed page, click Finish.
This completes the installation of the agents on a managed workstation.
ZENworks Server Management has two main components: Policy and Distribution Services and Management and Monitoring. The following sections identify how to install these components.
The following steps identify how to install the ZENworks Server Policy and Distribution Services:
1. On the installation machine, insert the ZENworks Server Management Program CD. The main menu is displayed. If it is not automatically displayed after inserting the CD, run winsetup.exe at the root of the CD.
2. Select the Server Management option.
3. The schema must be extended on the eDirectory tree where you want to create the ZENworks objects. This menu option can also be used to update a 90-day evaluation license to a full license by identifying the tree where ZENworks objects have been created and entering a license code. To extend the schema, select the Server Management option to display the ZENworks Server Management menu.
4. To extend the schema for ZENworks Server Management objects, click Schema Extensions and Product Licensing to display the ZENworks License Agreement page.
5. If you agree with the software license agreement, click Accept; then click Next to display the eDirectory Tree for Creating Objects page; otherwise, click Decline and Cancel to exit.
6. Select the tree where you want the ZENworks objects created and then click OK to display the ZENworks Server Management Licensing page.
7. The Login button allows you to log in to the tree if you are not already authenticated. ZENworks Server Management schema extensions need to be done only once for a tree. If you have multiple trees, you need to extend the schema only on the trees where you will be installing ZENworks objects.
Schema extensions for all ZENworks Server Management components (Policy and Distribution Services, Server Inventory, Remote Management, and Management and Monitoring Services) are installed at the same time when extending the schema.
8. Enter a license code, or leave the field blank and click Next to display the Summary page. If you leave the field blank, the 90-day evaluation license goes into effect. You can return to this page at a later date to enter a license code.
9. To extend the schema, click Finish. After the schema extension process is complete, the main installation menu is displayed.
10. Click Policy-Enabled Server Management to start the installation program. The License Agreement page is the first installation page displayed when the program has loaded.
11. If you agree with the Software License Agreement, click Accept and then click Next to display the Installation Type page; otherwise, click Decline and click Cancel to exit.
12. On the Installation Type page, click Next to perform a new installation and display the Installation Options page.
or
To install from a saved installation configuration file, click Template Installation, browse for or specify the path and the filename, and then click Next.
13. On the Installation Options page, click Next to accept the defaults and display the eDirectory Tree for Creating Objects page, or configure the options and then click Next (see Figure 2.12).
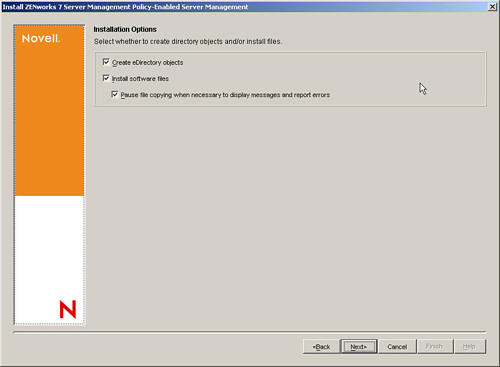
Three check boxes appear beneath the installation options:
![]() Create eDirectory Objects—For a first-time installation, this check box must be selected.
Create eDirectory Objects—For a first-time installation, this check box must be selected.
NOTE
Select this check box if you want to install additional subscribers. This creates the subscriber’s eDirectory object, installs its subscriber software, and assigns its trusted tree to be the tree that you select in the next installation page.
Deselect this check box if you only want to install subscriber software to a server that does not have a server object in any eDirectory tree, such as a Windows server that is in a Microsoft domain. You can identify its trusted tree in a later installation page.
If you install or reinstall the Inventory server or database, you must select the Create eDirectory Objects check box.
![]() Install Software Files—Must be selected to install the distributor or subscriber software.
Install Software Files—Must be selected to install the distributor or subscriber software.
![]() Pause File Copying When Necessary to Display Messages and Report Errors—By default, this check box is selected. If you want to have an unattended installation (and check the installation logs later), deselect this check box.
Pause File Copying When Necessary to Display Messages and Report Errors—By default, this check box is selected. If you want to have an unattended installation (and check the installation logs later), deselect this check box.
The eDirectory Tree for Creating Objects page is displayed only if you select the Create eDirectory Objects option on the Installation Options page. If this is displayed, you need to browse for the target tree, click OK, and then click Next to display the Server Selection page.
This is the tree where you want the ZENworks objects to be created during installation. This installation page displays only if you selected installation of ZENworks Server Management objects.
This automatically becomes the trusted tree for all subscriber servers selected in the next installation page. The trusted tree is where the subscriber receives its configuration updates.
NOTE
If you select the Create eDirectory Objects check box on the Installation Options page, both NetWare and Windows servers will have eDirectory subscriber objects created in the tree that you identified in the eDirectory Tree for Creating Objects page. However, if you deselected this check box, you should identify a trusted tree for each subscriber in the File Installation Paths and Options page.
On the File Installation Paths and Options page, you can create different configurations for different sets of objects. Therefore, you can select objects that might have different installation paths and different trusted trees.
Clicking Next advances the wizard to the Server Selection page. If you installed ConsoleOne on your installation machine, enable the ConsoleOne Snap-ins check box for Local Machine on this page (see Figure 2.13).
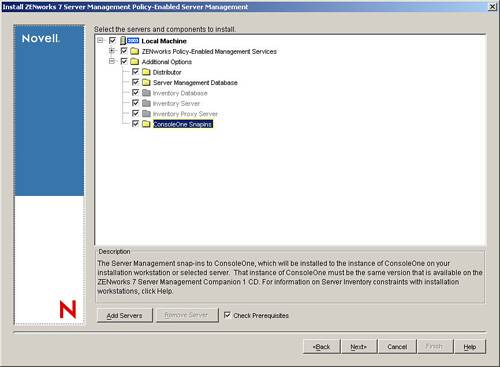
Local Machine refers to the Windows machine you are using to perform the installation, or to the Windows machine where you intend to install ZENworks Server Management locally.
If the local machine is a Windows 2000/XP workstation, you can install only the ZENworks Server Management ConsoleOne snap-ins for Policy and Distribution Services, Server Inventory, and Remote Management. If the local machine is a Windows 2000 server (with or without eDirectory installed), you can install the following:
![]() ZENworks Server Management ConsoleOne snap-ins for Policy and Distribution Services, Server Inventory, and Remote Management
ZENworks Server Management ConsoleOne snap-ins for Policy and Distribution Services, Server Inventory, and Remote Management
![]() Remote Management agent
Remote Management agent
![]() Inventory agent
Inventory agent
![]() Inventory proxy service
Inventory proxy service
![]() Inventory database
Inventory database
NOTE
The Inventory server can only be installed on a Windows server that also has eDirectory installed.
On the server selection page, click Add Servers to display the Add Servers dialog box.
Browse for the servers where you want to install Server Management software; then click OK. The selected servers are displayed below the Local Machine option on the server selection page. The Add Servers option displays the Add Servers dialog box, where you can browse for both NetWare and Windows servers by selecting either NetWare trees or Microsoft domains from a drop-down box. You can select servers individually or in multiples (using Ctrl and Shift). You can also select groups of servers by selecting eDirectory containers, Windows workgroups, and Microsoft domains.
To install to a Windows server that does not have Novell Client running on it (and therefore you cannot install to it locally), browse for and select the Windows server that doesn’t have the client so that you can install ZENworks Server Management to it.
The Inventory server can only be installed on a Windows server that also has eDirectory installed.
You can choose to install the Inventory database on a server that does not have eDirectory installed, but the database objects will not be created automatically. You must manually create the database objects.
Make sure that you have selected all the NetWare and Windows servers before exiting the Add Servers dialog box. Also browse for the workstations where you want the ConsoleOne snap-ins installed. You must have previously installed ConsoleOne to each of these workstations.
The installation program requires an eDirectory context for placing subscriber objects. If you add a Windows server from a Microsoft domain that does not have an eDirectory object, in another installation page you are asked to browse and select an eDirectory context where the subscriber object can be created and associated with the Windows server.
If you intend for this Windows server to be used only as an external subscriber, however, do not install the subscriber object and software at this time. Instead, you can later install the subscriber software locally on that machine (which will not have a subscriber object) and then create the external subscriber object for it in ConsoleOne.
You next need to configure each server listed on the server selection page (refer to Figure 2.13).
NOTE
To quickly configure a specific role or set of roles for one or more servers, select the servers, right-click the selection, and then select the role for the server. The options that apply to that role are automatically selected. Repeat for additional roles.
The following three options are all selected by default. If you want to install the inventory agent, you must also select to install the policy and distribution server.
![]() Policy and Distribution Server—For each server that you want to be a subscriber, select this check box.
Policy and Distribution Server—For each server that you want to be a subscriber, select this check box.
![]() Inventory Agents—Select this check box for each server that you want to inventory.
Inventory Agents—Select this check box for each server that you want to inventory.
![]() Remote Management—Select this check box for each server that you want to remotely manage.
Remote Management—Select this check box for each server that you want to remotely manage.
Additional options are also available. The installation program detects whether these options are already installed on a target server and dims the option label. You can still select the check box to reinstall the component. The choices are
![]() Distributor—The subscriber service is installed automatically to all target servers. Select this check box to also make a server a distributor.
Distributor—The subscriber service is installed automatically to all target servers. Select this check box to also make a server a distributor.
![]() Server Management Database—This is the Policy and Distribution Services database that the distributor logs to. Install it on the same server as the distributor to minimize network traffic for database logging.
Server Management Database—This is the Policy and Distribution Services database that the distributor logs to. Install it on the same server as the distributor to minimize network traffic for database logging.
NOTE
You can install the database to multiple servers per run of the installation program; however, you can only install one database per server. On the Database Settings page, you can individually configure each database being installed. On the Database Logging page, you identify which of the databases being installed is to be the one database for initial logging.
![]() Inventory Database—Select this check box for the servers where you want to install the Inventory database to run on Sybase.
Inventory Database—Select this check box for the servers where you want to install the Inventory database to run on Sybase.
![]() Inventory Server—Select this check box for the server where you want to run the inventory services.
Inventory Server—Select this check box for the server where you want to run the inventory services.
NOTE
If you choose to install on servers not residing in the tree, but you have logged in to the tree and chosen to create eDirectory objects, the installation program also creates eDirectory objects in this tree.
![]() Inventory Proxy Server—Select this check box for the servers where you want to install and configure an XML proxy server. If you want to send or roll up the scan data to an Inventory server across the firewall, you must configure a NetWare or Windows server to run the XML Proxy service.
Inventory Proxy Server—Select this check box for the servers where you want to install and configure an XML proxy server. If you want to send or roll up the scan data to an Inventory server across the firewall, you must configure a NetWare or Windows server to run the XML Proxy service.
![]() ConsoleOne Snap-ins—For any server where you installed ConsoleOne, enable the ConsoleOne Snap-ins check box.
ConsoleOne Snap-ins—For any server where you installed ConsoleOne, enable the ConsoleOne Snap-ins check box.
NOTE
ZENworks Server Management does not support using a server’s console to run ConsoleOne installed on that NetWare server. To use the server’s installation of ConsoleOne, you must map a drive from a workstation to that server and run ConsoleOne from the workstation.
You can configure a group of selected servers with the same options by selecting the group and right-clicking the group. This displays the Custom Selection dialog box.
After you finish configuring the selected servers, click Next to display the File Installation Paths and Options page.
NOTE
If you have invalid DNS names, you could receive an error message asking whether to continue installing using IP addresses. Either fix the DNS name problems, or continue by using IP addresses for the affected servers. If you continue with only IP addresses, you must manually enter the correct DNS hostname on the Other tab in the server object properties of these servers to use Server Management.
The File Installation Locations and Options page is displayed only if you chose the ZENworks Policy-Enabled Management Services option for one or more servers. This includes Policy and Distribution Services, Server Inventory, and Remote Management.
You can click Next to accept the defaults on the File Installation Paths and Options page and display the Distributor Object Properties page. If you change the beginning of the path to a different volume or drive, all subsequent paths displayed in the installation program automatically match your changes. Each field on this page is configurable per server. You can make configuration changes server by server, or select multiple servers and make the same configuration changes to all of them. For example, you might want the same installation volume for all of your NetWare servers.
If you deselected installation of eDirectory objects for ZENworks Server Management, an empty Trusted Tree field is displayed and must be filled in. When you install the subscriber software to a server in another tree or in a Microsoft domain, and you do not want to create a subscriber object in your distributor’s tree, you must identify the trusted tree for the subscriber server.
The trusted tree has two purposes:
![]() To locate a distributor that can give the Tiered Electronic Distribution configuration information to the Subscriber
To locate a distributor that can give the Tiered Electronic Distribution configuration information to the Subscriber
![]() To indicate which tree to accept policies from
To indicate which tree to accept policies from
If you do not select a tree to be recognized as the subscriber server’s trusted tree during installation of only the subscriber software (no object installation), your policy package distributions cannot extract and be enforced on that subscriber server because policies often point to objects in a tree.
Leave the Launch Policy and Distribution Services on Startup check box selected to have the installation program configure the startup processes to automatically launch Policy and Distribution Services any time a server is started.
Leave the Start Services When the Installation Is Finished check box selected because the subscribers’ passwords are reset when the service starts.
The Distributor Object Properties must be configured, as shown in Figure 2.14.
FIGURE 2.14 Distributor Object Properties page of the ZENworks Server Management Installation Wizard.
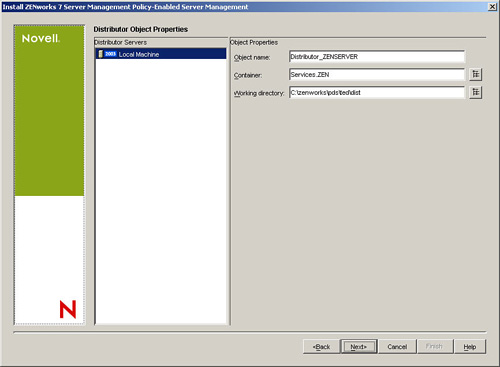
This page is displayed only if you chose the ZENworks Policy-Enabled Management Services option for one or more servers.
You can change the default settings for distributors individually or in groups by selecting multiple distributors listed in the left pane.
To change the defaults for any of the distributors, select one or more distributors in the left pane; then edit the following fields as necessary:
![]() Object Name—The default distributor object name includes the server’s name. If you want to rename the distributor objects, Novell recommends that you maintain the servers’ identities in their names, including the fact that they are distributors.
Object Name—The default distributor object name includes the server’s name. If you want to rename the distributor objects, Novell recommends that you maintain the servers’ identities in their names, including the fact that they are distributors.
![]() Container—The location of the distributor server’s NCP server object is the default. Novell recommends that you use the containers that you may have created for distributor objects. Where eDirectory is not installed on a Windows server, that server will not have a default container object displayed. You must select a container for the distributor object.
Container—The location of the distributor server’s NCP server object is the default. Novell recommends that you use the containers that you may have created for distributor objects. Where eDirectory is not installed on a Windows server, that server will not have a default container object displayed. You must select a container for the distributor object.
![]() Working Directory—For NetWare servers, the default working directory is on the SYS: volume.
Working Directory—For NetWare servers, the default working directory is on the SYS: volume.
If you change any part of the default path, such as a directory name, and that new entry does not yet exist on the server, the distributor creates that new path the first time it needs to use it.
The default volume on a NetWare server is SYS:. If the working directory has the potential to become large because you expect to have many large distributions and/or many revisions of large distributions for this distributor, we recommend that you specify a different volume. For most distributors, you can retain the SYS: volume.
Click Next to display the Subscriber Object Properties page.
The Subscriber Object Properties are shown in Figure 2.15. This page is displayed only if you chose the ZENworks Policy-Enabled Management Services option for one or more servers.
FIGURE 2.15 Subscriber Object Properties page of the ZENworks Server Management Installation Wizard.
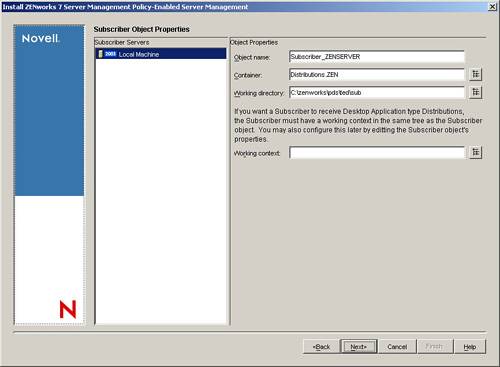
You can change the default settings for subscribers individually or in groups by selecting multiple subscribers listed in the left pane. To change the defaults for any of the subscribers, select one or more subscribers in the left pane; then edit the following fields as necessary:
![]() Object Name—The default subscriber object name includes the server’s name. If you want to rename the subscriber objects, Novell recommends that you maintain the servers’ identities in their names, including the fact that they are subscribers.
Object Name—The default subscriber object name includes the server’s name. If you want to rename the subscriber objects, Novell recommends that you maintain the servers’ identities in their names, including the fact that they are subscribers.
![]() Container—The location of the subscriber server’s NCP server object is the default. If you created containers for subscriber objects, Novell recommends using these containers. You should use the same context for all subscriber servers of the same operating system type. For example, place all NetWare subscriber servers’ objects under a NetWare container, and all Windows subscriber servers’ objects under a Windows container. Where eDirectory is not installed on a Windows server, that server does not have a default container object displayed. You must select a container for the subscriber object.
Container—The location of the subscriber server’s NCP server object is the default. If you created containers for subscriber objects, Novell recommends using these containers. You should use the same context for all subscriber servers of the same operating system type. For example, place all NetWare subscriber servers’ objects under a NetWare container, and all Windows subscriber servers’ objects under a Windows container. Where eDirectory is not installed on a Windows server, that server does not have a default container object displayed. You must select a container for the subscriber object.
![]() Working Directory—For NetWare servers, the default working directory is on the SYS: volume. If you change any part of the default path, such as a directory name, and that new entry does not yet exist on the server, the subscriber creates that new path the first time it needs to use it.
Working Directory—For NetWare servers, the default working directory is on the SYS: volume. If you change any part of the default path, such as a directory name, and that new entry does not yet exist on the server, the subscriber creates that new path the first time it needs to use it.
![]() Working Context—If you anticipate Desktop Application Distributions will be received by a subscriber, browse for where you want related objects to be stored. You can add a working context later in ConsoleOne for any subscriber that receives Desktop Application Distributions.
Working Context—If you anticipate Desktop Application Distributions will be received by a subscriber, browse for where you want related objects to be stored. You can add a working context later in ConsoleOne for any subscriber that receives Desktop Application Distributions.
Click Next to display the Database Settings page.
Figure 2.16 shows the Database Settings page. This page is displayed only if you chose to install the Policy and Distribution Services database (the Server Management Database option) or the Server Inventory database (the Inventory Database option) on a server.
FIGURE 2.16 Database Settings Properties page of the ZENworks Server Management Installation Wizard.

Click Next to accept the defaults, or—for each database being installed—edit the applicable fields:
![]() Database Path—The default for NetWare servers is SYS: and for Windows servers is C:, which you can change.
Database Path—The default for NetWare servers is SYS: and for Windows servers is C:, which you can change.
![]() Object Name—The default name is Server Management Database
Object Name—The default name is Server Management Database server name, which you can change. However, if you select the same container for all database objects, each must have a unique object name. A database object is not created for the Server Inventory database.
![]() Container—The default container is where the server’s NCP server object resides. Novell recommends that you use the container that you created for database objects. For ease of management, Novell also recommends that you place all database objects in the same container.
Container—The default container is where the server’s NCP server object resides. Novell recommends that you use the container that you created for database objects. For ease of management, Novell also recommends that you place all database objects in the same container.
Click Next and continue with the applicable section for the installation page that is displayed next.
The Inventory Standalone Configuration page is shown in Figure 2.17. This page is displayed only if you chose to install Inventory Server and the Inventory Database on the same server.
FIGURE 2.17 Inventory Standalone Configuration page of the ZENworks Server Management Installation Wizard.

To automatically create the server package and start the Inventory Services, click the Configure Standalone box to enable it. You can select one or more Inventory servers in the left pane to have the same configuration.
NOTE
If you have already configured server package policies for these servers, do not enable the Configure Standalone check box. You can manually configure the policy to act as a standalone feature wherever applicable.
To specify the container for the server package object, browse for and select the container. You can select one or more Inventory servers in the left pane to assign the same container for creating the server package.