
Chapter 20 Using ZENworks Workstation Inventory
ZENworks Desktop Management includes powerful workstation inventory software that allows you to gather complete hardware and software inventory for all managed workstations on your network. After workstations have been imported into eDirectory by ZENworks, the inventory software can be used to collect, store, and report information about the client workstations on your network. This information can be useful in helping to make business decisions on how to manage workstations. The following are some examples of business decisions that can be made from workstation inventory information:
![]() Which workstations need new applications
Which workstations need new applications
![]() Which workstations need updated hardware and drivers
Which workstations need updated hardware and drivers
![]() Which workstations should receive an application object
Which workstations should receive an application object
![]() Which workstations are running the corporate software standard
Which workstations are running the corporate software standard
![]() Which workstations conform to the corporate hardware standard
Which workstations conform to the corporate hardware standard
The following sections describe the workstation inventory process, how to set up inventory in your environment, and what tasks can be performed after it has been properly installed and configured.
To better help you understand how to make the most of the workstation inventory feature of ZENworks Desktop Management, you need to know how the process works and what components are involved. The following sections describe the inventory process, the servers involved, and the roles they play in various inventory database designs.
The inventory process is the act of acquiring hardware and software information from the workstation, relaying that information to the inventory server, and then storing it in a database for later retrieval. The following sections describe how workstations are scanned, how inventory data is rolled up to the database, what information is collected, and the files and directories involved.
Scanning is done by an application that runs on the workstation. The inventory scanner and all necessary components were installed on the workstation when the ZENworks management agent was installed. That application scans the workstation and collects data based on the various configurations of the inventory settings. If the workstation is Desktop Management Interface (DMI) compliant or Web-based Management Interface (WMI) compliant, the scanner can also query the DMI and WMI service layers to collect data.
After the scanner has collected information about the workstation, it stores it in an .STR file in the scan directory of the inventory server. The scanner tracks the changes in the scan data by storing it in the HIST.INI file, located in the ZENworks installation directory. Any errors that the scanner reports are stored in the ZENERRORS.LOG file, located in the ZENworks installation directory on the workstation.
Workstation inventory scanning uses the following steps to update the inventory server and eDirectory:
1. The inventory policies in eDirectory define the inventory settings, such as scanning time, whether to include software scanning of workstations, and the location of the scan directory.
2. The Scanner reads the settings in the inventory policies and uses them to collect the workstation inventory information.
3. The Scanner stores the scan data of each workstation as an .STR file in the scan directory (SCANDIR) at the server.
4. The Scanner also stores a minimal subset of workstation inventory information of the workstation, in the eDirectory workstation object.
5. The Selector, running on the inventory server, validates the .STR file and places the file in the enterprise merge directory (ENTMERGEDIR). If a database is attached, the Selector places the files in the Database directory (DBDIR).
6. If a database is attached to the server, the server updates the database with the inventory information of the .STR file.
After these steps are complete, the network administrator then can view the inventory information, query the database, and generate inventory reports in ConsoleOne.
In many networks, one server is not enough to collect and store inventory data for every workstation in the tree. For this reason, multiple servers can be configured to collect inventory data and roll that information up to other servers.
ZENworks uses the following steps to roll scanned data up after it is collected on a server:
1. After the Selector validates the .STR file and places the file in the enterprise merge directory (ENTMERGEDIR) for roll-up of scan data, the sending server uses a roll-up policy to identify the server to which it will transmit the scan data. It also reads the roll-up schedule to determine the specified time for roll-up of data.
2. The sending server compresses the .STR files as a .ZIP file and places the .ZIP file in the enterprise push directory (ENTPUSHDIR). The Sender then sends the .ZIP file to the receiver on the next-level server.
3. The receiving server on the next level receives the .ZIP file and places the file in ENTPUSHDIR. If this server has a database attached to it or if the server is a root server, the compressed files are placed in the database directory (DBDIR).
4. The receiving server extracts the .ZIP file containing the .STR files into a temp directory (DBDIRTEMP) and updates the database with the inventory information of the workstation .STR file.
When these steps are complete, the network administrator then can view the inventory information, query the database, and generate inventory reports in ConsoleOne.
The scan program also scans the workstation software for Desktop Management Interface (DMI) software as well as Web-based Management Interface (WMI) systems. If neither of these is present, the scanner contacts the hardware directly and continues to scan the drive for installed software. The software scan performs the following functions based on its setup and configuration:
![]() Check the existence of the software at the workstations and servers.
Check the existence of the software at the workstations and servers.
![]() Gather information about the application file.
Gather information about the application file.
![]() Report the information about the scanned software (such as software vendor, software title, file size, and so on).
Report the information about the scanned software (such as software vendor, software title, file size, and so on).
![]() Check for the software specified in the inventory policy associated with the workstation object.
Check for the software specified in the inventory policy associated with the workstation object.
![]() Customize the software scanning based on the software list configured.
Customize the software scanning based on the software list configured.
![]() Collect configuration file information and report details and contents of the system files.
Collect configuration file information and report details and contents of the system files.
![]() Report information about the installed drivers.
Report information about the installed drivers.
Workstation inventory uses several files and directories during the scanning and roll-up process. You should be aware of the following files used during the scanning and roll-up process:
![]()
HIST.INI—Located in the Windows ZENworks directory on the workstation. Contains the history of the scan data for each workstation.
![]() .STR—Formatted:
.STR—Formatted: macaddress_gmt_sequencenumber.STR. Located in the SCANDIR directory on the inventory server. Created by the scanning program. Contains all inventory information scanned from the workstation.
![]() .ZIP—Formatted:
.ZIP—Formatted: scheduletime_inventoryservername_siteID_sitename.ZIP. Located in the ENTPUSHDIR and DBDIR. Contains the compressed scan data for several workstations, up to 1,000 .STR files, collected by a receiving inventory server. Used to transmit the data from one server to another.
![]() .PRP—Formatted:
.PRP—Formatted: scheduletime_inventoryservername.PRP. Located in the .ZIP files. Identifies the information for roll-up from the enterprise push directory to the next-level server. The properties file contains the schedule time, inventory server name, and signature that helps to authenticate the .ZIP file.
After the scan program has run and the hardware and software information about the server has been recorded, that information is stored on the inventory servers in the following directory locations:
![]()
SCANDIR—Contains the .STR files, which is the raw data collected by the scan programs run at the workstation.
![]()
DBDIR—Contains the .STR files for workstations scanned on the network. The .STR files in the DBDIR directory are used to update the workstation objects in the database.
![]()
ENTMERGEDIR—Stores the .STR files created and transferred by the workstation scan programs.
![]()
EntPushDir—Stores the .STR and .ZIP files used to roll inventory data up in an enterprise tree.
Data collected from each scan is stored in directories and databases located on inventory servers. The following are the types of servers used in the inventory process.
The root server acts as the highest point in the inventory tree. A root server, by default, must have a database attached to it. The root server can collect data from intermediate servers, leaf servers, or from workstations attached to it. A root server can only be configured to receive data, not to roll it up to another level.
The intermediate server acts as a staging server to receive data from a lower server in the tree and send it to another intermediate server or to a root server. By default, the intermediate server does not have a database attached, nor does it have workstations attached. You can, however, configure the intermediate server to have both workstations and a database attached to it. The intermediate server typically receives data from a leaf server or another intermediate server and then rolls it up higher in the tree, eventually to the root server.
The leaf server acts as the gathering server of inventory information from workstations. By default, the leaf server must have workstations attached but does not have a database attached to it. The leaf server simply gathers data and rolls it up higher in the tree. Typically the data is rolled up to an intermediate server, but a leaf server can also roll data up to a root server.
The standalone server acts as a single point of inventory data collection for workstations. The standalone server must have both a database and workstations attached to it. The data collected by a standalone server cannot be rolled up to another server, nor can information collected by a leaf server be rolled up to a standalone server. Typically, the standalone server is used in small networks where only one inventory server is needed to collect data.
Now that you understand the types of servers used for workstation inventory, you need to know the roles they can provide. Depending on their types, each server can be configured to perform one or both of the following two roles:
![]() Workstations attached
Workstations attached
![]() Database attached
Database attached
Each of these options is explored in the following sections.
The first role a server can perform is to have workstations attached. Setting this option for the server means that the server accepts data from the scan programs being run at the workstations. At least one server on the network must perform this role, but usually most of the servers configured for workstation inventory will perform the role of collecting data from the workstations. Leaf servers and standalone servers always have this option set, but you can configure root server and intermediate servers to have workstations attached as well.
The second role a server can perform is to have a database attached to it. Setting this option means that the server is configured to enter the information scanned by the workstation, either locally or up from a server below, into a local database. This means that a database must be running on the server to accept the information from ZENworks. Root servers and standalone servers always have this option set, but you can configure intermediate servers and leaf servers to have a database as well.
Now that you understand the types of servers and the roles they play in workstation inventory, you need to design an inventory tree that matches your network. The following sections describe some common designs for generic networks.
The standalone inventory is the simplest design; only one server is involved. That server acts as the collection and storage service for inventory data scanned from workstations. It has an inventory database installed on it and workstations attached.
This type of design is perfect for smaller networks with 5,000 or fewer workstations. It is easy to maintain and configure; however, it is not scalable.
The centralized inventory design, shown in Figure 20.1, is for large networks where all servers are connected on a LAN. In this approach, allowance is made for a large number of users by adding a number of leaf and intermediate servers for workstation scanners to send their data to.
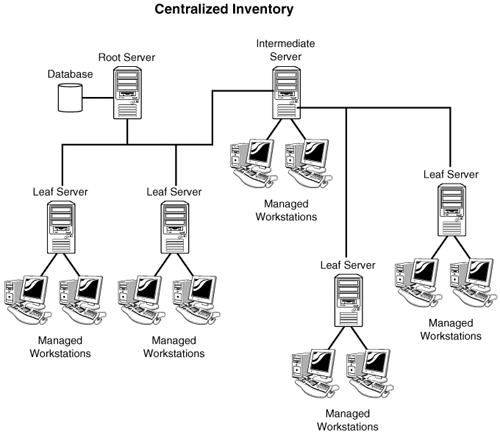
The centralized inventory approach is still fairly easy to maintain; however, roll-up policies must be configured for the intermediate and leaf servers.
The distributed inventory design, shown in Figure 20.2, is for large networks where several remote sites are connected through a WAN. In this approach, allowance is made for a large number of users by creating several root servers, one at each remote site, and then leaf and intermediate servers for workstation scanners to send their data to.
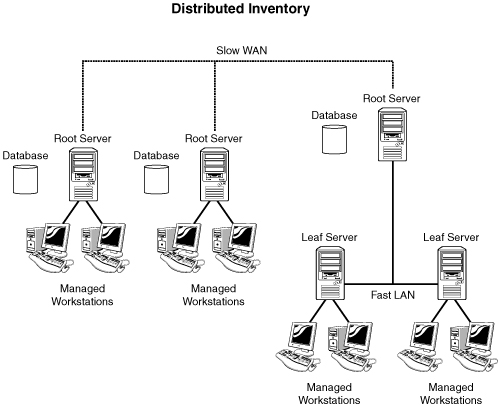
The distributed inventory approach is still much more difficult to maintain because you need to manage several inventory trees. However, the distributed approach overcomes problems that can occur rolling up large numbers of workstations from remote offices.
The final type of inventory design is the enterprise inventory design shown in Figure 20.3. Most enterprise networks take this approach in one form or another. In the enterprise design, accommodations exist for the large number of users, yet a single management point is made by creating a single root server and interlacing intermediate and leaf servers at strategic locations in the network to ensure optimal performance.

The best way to achieve an optimal enterprise design is to follow the steps outlined in the following sections.
The first step in designing an enterprise workstation inventory tree is to describe the entire network of your company by doing the following:
![]() List the various sites in your company (buildings, cities, countries, and so on).
List the various sites in your company (buildings, cities, countries, and so on).
![]() List the physical links between the various sites.
List the physical links between the various sites.
![]() Identify the type of links in terms of bandwidth and reliability.
Identify the type of links in terms of bandwidth and reliability.
After you list the sites in your enterprise network, you need to determine the best place to put the root server. The inventory information stored in the inventory database of the root server consists of all lower-level sites on the network as well as the root server site.
The location of the root server determines the behavior and scalability of your inventory tree. Consider the following factors when determining its location:
![]() The root server should be on the site with high network bandwidth.
The root server should be on the site with high network bandwidth.
![]() A console administrator can collect workstation inventory information from any of the sites connected on high-speed links from the root server, or from the root server level site.
A console administrator can collect workstation inventory information from any of the sites connected on high-speed links from the root server, or from the root server level site.
![]() A database server of suitable configuration can be provided for the inventory server. For a network with 250,000 workstations, the recommended configuration for the root server is 25GB of disk space and 1GB RAM.
A database server of suitable configuration can be provided for the inventory server. For a network with 250,000 workstations, the recommended configuration for the root server is 25GB of disk space and 1GB RAM.
Now that you have determined the location of the root server, you need to determine whether you need to maintain database servers at different sites. You may want to maintain additional databases if sites or subtrees are managed for inventory at different locations over a slow link.
Also consider specific reasons to have a separate database for a single site or a set of sites. There may be some organizational needs of your company to have the database server on different sites.
NOTE
For a majority of enterprises, there may be no need to have any other database besides the enterprisewide single database. All site-specific reports can be generated from this database easily.
If you determine that another database is required, consider the following to determine the appropriate location and setup:
![]() Identify the sites that need a database. Additionally, you need to examine whether the database will cater to the local site or a site of sites (subtree). Then identify the sites that require data in each inventory database.
Identify the sites that need a database. Additionally, you need to examine whether the database will cater to the local site or a site of sites (subtree). Then identify the sites that require data in each inventory database.
![]() All the sites served by a single database should typically access this database rather than the database at root server for inventory management. This reduces the load on the database at root server.
All the sites served by a single database should typically access this database rather than the database at root server for inventory management. This reduces the load on the database at root server.
![]() Database administrators should be available for these sites.
Database administrators should be available for these sites.
After you determine any additional databases needed, you need to identify the routes for inventory data for all sites to the nearest database. From those routes you then need to determine the final route to the database on the root server.
The route plan can become complex, so to help devise a route plan follow these guidelines:
![]() Each route can have an intermediate server at a staging site. The intermediate server receives and transmits the data to the next destination. These are application-layer level routes for inventory data. There can be various network-layer level routes between two adjacent servers, which is determined and managed by the routers in the network.
Each route can have an intermediate server at a staging site. The intermediate server receives and transmits the data to the next destination. These are application-layer level routes for inventory data. There can be various network-layer level routes between two adjacent servers, which is determined and managed by the routers in the network.
![]() The route answers the basic question: To which site will the inventory data travel from a particular site so that it eventually reaches the database at the root server, which is its final destination?
The route answers the basic question: To which site will the inventory data travel from a particular site so that it eventually reaches the database at the root server, which is its final destination?
![]() There may be multiple routes. Choose the fastest and most reliable route. To determine the route, consider the physical network links.
There may be multiple routes. Choose the fastest and most reliable route. To determine the route, consider the physical network links.
![]() Routes identified once and made operational can be changed later; although there may be some cost in terms of management and traffic generation. If no intermediate database is involved, you can change the route by changing the eDirectory based policy only.
Routes identified once and made operational can be changed later; although there may be some cost in terms of management and traffic generation. If no intermediate database is involved, you can change the route by changing the eDirectory based policy only.
![]() Put intermediate servers on sites where the link parameters change substantially. Criteria to consider are difference in bandwidth, difference in reliability of the links, and need for different scheduling.
Put intermediate servers on sites where the link parameters change substantially. Criteria to consider are difference in bandwidth, difference in reliability of the links, and need for different scheduling.
![]() Availability of servers on the intermediate site for staging the inventory data should be considered in deciding the sites for intermediate servers. Provide enough disk space on these servers to store all the inventory data on the disk until the roll-up policy asks to send them to the next destination.
Availability of servers on the intermediate site for staging the inventory data should be considered in deciding the sites for intermediate servers. Provide enough disk space on these servers to store all the inventory data on the disk until the roll-up policy asks to send them to the next destination.
![]() Workstations should not be connected to the inventory server over a WAN because the scanning of workstations should not happen across a WAN.
Workstations should not be connected to the inventory server over a WAN because the scanning of workstations should not happen across a WAN.
After you plan the routes that data will take to the root server, you need to identify servers on each site to perform the roles necessary to achieve the route. Specifically, you need to identify servers to act as inventory, intermediate, and database servers.
A single server can have different roles if it has sufficient resources. For example, an inventory server can be a leaf server with database. You could also designate a server as an intermediate server with database, which receives inventory from the workstations and also has an inventory database.
When considering the roles of the server, take into account the following factors:
![]() The number of workstations attached to the server also determines the load.
The number of workstations attached to the server also determines the load.
![]() Take an average of 50KB inventory data from each workstation to calculate the load.
Take an average of 50KB inventory data from each workstation to calculate the load.
![]() Any inventory server that has workstations attached to it requires 100KB per workstation.
Any inventory server that has workstations attached to it requires 100KB per workstation.
![]() The server that has the inventory database requires 200KB per workstation.
The server that has the inventory database requires 200KB per workstation.
![]() An intermediate server that rolls up data requires 5KB for roll-up of 50KB scan data.
An intermediate server that rolls up data requires 5KB for roll-up of 50KB scan data.
After you determine the roles that inventory servers will take at each site, you need to create the tree of servers that will be used for workstation inventory.
After the inventory server tree is designed, make sure that the following are true:
![]() The root of the tree is the root server.
The root of the tree is the root server.
![]() Servers on each site of the tree represent all the sites in the company.
Servers on each site of the tree represent all the sites in the company.
![]() At least one server exists per site.
At least one server exists per site.
![]() Assuming that workstations to be scanned exist on each site, there is an inventory server role on each site.
Assuming that workstations to be scanned exist on each site, there is an inventory server role on each site.
![]() Optimally, database and intermediate servers exist at the appropriate sites.
Optimally, database and intermediate servers exist at the appropriate sites.
After you design your inventory server tree, you need to create an implementation plan. The implementation plan should cover the phased deployment of inventory throughout the network.
To help with creating an implementation plan use the following guidelines:
After you install the appropriate components and complete your workstation inventory tree design, you are ready to begin configuring your network to start scanning workstation data and storing it into the inventory database. The following sections describe the configuration necessary to implement your tree design.
The first step in configuring workstation inventory is to configure the settings for the inventory service object. The inventory service object controls how, when, and where the inventory server collects inventory scan data. The following sections discuss how to configure the inventory service object.
The first things you must configure for the inventory service object is the role, scan data time and path in the Inventory Service Object property page.
From within ConsoleOne, right-click the inventory service object and select Properties. Then select the Inventory Service Object Properties tab, as shown in Figure 20.4. The following sections describe the configuration options on the Inventory Service Object property page.
FIGURE 20.4 The Inventory Service Object Properties tab for inventory service objects in ConsoleOne.
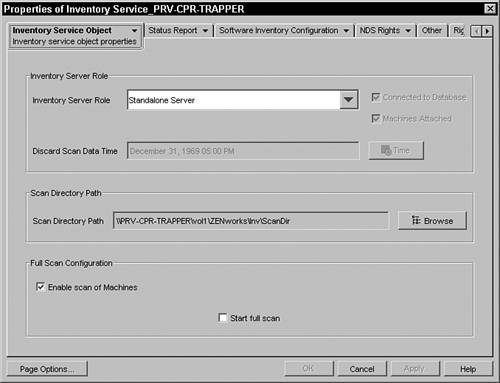
Based on the servers that you have deployed for scanning inventory, you must specify the role of the server. You can select root server, intermediate server, leaf server, or standalone server based on your inventory configuration.
Select the time and date. Any scan data files (.ZIP files) that have scan information before this date and time will be discarded. The scan data files are removed from the server at the time specified in the Discard Scan Data Time field. This can be useful in keeping your servers from running out of disk space.
When you install ZENworks Desktop Management, you specify the volume on the server for storing the scan data files. If required, you can modify the volume or the directory of the Scan Directory (SCANDIR) setting from the Inventory Service Object property page.
To modify the setting you must click on the Browse button to browse to the new SCANDIR directory path on the server. The format of the scan directory path is as follows:
\server_namevolumenamepath
To select the enable scanning of workstations option to scan the workstations associated with the policy, you must check the Enable Scan of Machines option listed in the Inventory Service Object property page. By default, the scanners collect only hardware information of the workstations.
When scanning the workstation for the first time the Scanner collects the complete inventory of the workstation. A complete inventory scan of the workstation is referred as a full scan.
After the workstation is inventoried, the next time the Scanner runs, it compares the current inventory data to the history data that it maintains. If any changes to the workstation exist, the Scanner creates a delta scan, which collects the changes in inventory since the last scan was reported. The Delta scan setting is the default scan operation for each successive scan after the first scanning of the workstation.
If the Status Log reported by the inventory component indicates that the scanning on the workstation is not successful, you can enforce a full scan. This policy’s settings are applicable for all workstations associated with it. To override this policy, you set this option for an individual workstation.
After you configure the settings on the Inventory Service Object Properties page, you need to configure the sync schedule for the inventory service. The Inventory Sync Service runs on all inventory servers that have inventoried workstations attached to them. The Inventory Sync Service is a service loaded by the Inventory Service Manager. It removes the redundant or obsolete inventoried workstations from the Inventory database.
Use the following steps in ConsoleOne to configure the Inventory Sync Service Schedule to schedule the Inventory Sync Service to run:
1. Right-click on the Inventory Service object and select Properties from the pop-up menu.
2. Select Inventory Service Object tab→Inventory Service Sync Schedule shown in Figure 20.5.
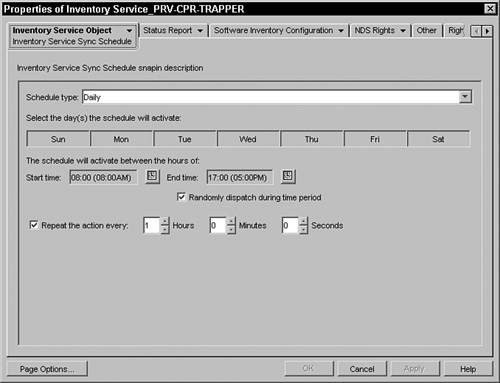
3. Modify the schedule settings to schedule the Inventory Sync Service to run at the appropriate time.
4. Click OK to apply the settings and close the window.
If your workstation inventory tree design includes multiple levels, you need to configure roll-up of scan data in your inventory setup. You need to specify the details, such as the next-level server for roll-up in the roll-up policy contained in the server package. Use the procedures outlined in the following sections to create and configure a roll-up policy for scan data.
After you configure the inventory service sync schedule, use the following steps to create a server package that contains the roll-up policy for identifying the next-level server for roll-up:
After you configure the next-level server for roll-up, use the following steps to enable the roll-up policy in the server package and associate the server package to eDirectory objects.
1. In ConsoleOne, right-click the Server Package and select Properties→Policies. Then click one of the following subtabs: General, NetWare or Windows.
2. Check the Enabled Column for the Inventory Roll Up Policy box.
3. Click Properties. The Inventory Roll-Up Policy tab appears.
4. Browse to select the DN of the inventory service object and click OK.
5. Select the IP address or DNS name of the inventory server you want to assign the roll-up policy to. You can also specify a proxy server address and port.
At the completion of these steps, click OK to assign the roll-up policy.
After you enable the roll-up policy in the server package, use the following steps to schedule the date and time when the roll-up should occur:
1. In ConsoleOne, right-click the Server Package and select Properties. Select Policies and click one of the following subtabs: General, NetWare, or Windows.
2. Select the Roll-Up Policy row and then select Properties. Click the Roll-Up Policy tab and select Roll-Up Schedule. Modify the settings for scheduling the roll-up time and click OK.
The installation program creates the database object for Sybase and configures the database server. However, you need to set up the associations for the database server.
If you are maintaining the Inventory database in Oracle or MS SQL Server, perform the tasks outlined in the following sections before making the associations.
The first step in configuring policies for the database is to configure the database server options of the database object. The following steps describe configuring the database server options:
1. In ConsoleOne, right-click the Inventory Database object and select Properties→ZENworks Inventory Database.
2. Browse for the DN of the server or type the server IP address.
3. Type the values for the following options: Database (Read-Write) User Name: MW_DBA; Database (Read-Write) Password: <inventory password>; Database (Read Only) User Name: MW_READER; Database (Read Only) Password: <inventory password>; Database (Write Only) User Name: MW_UPDATER; Database (Write Only) Password: <inventory password>.
4. Click OK.
After you configure the database server options of the database object, use the following steps to ensure that the JDBC driver properties are correct as per your database configuration:
1. In ConsoleOne, right-click the database object and select Properties. Then click the Jdbc Driver Information tab.
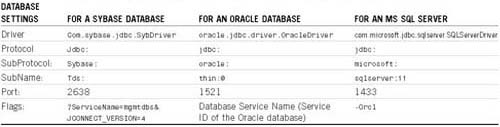
2. Select Oracle; then populate the fields for an Oracle database as shown in Table 20.1. Then click Populate Now.
3. Click OK.
After you complete the steps for having the Inventory database in Oracle or MS SQL—or if you are simply using the Sybase database—perform the following steps to do the associations for the server.
You must set up the ZENworks database policy to establish the location of the database; otherwise, no information can be logged to the database. To establish the service location of the database, use the following steps:
1. In ConsoleOne, right-click the Service Location Package and select Properties. Then click the Policies tab.
2. Check the box under the Enabled column for the ZENworks database.
3. Click Properties.
4. Browse to the DN of the ZENworks inventory database object and click OK to accept the object. Click OK again to close the ZENworks database properties window.
5. Select the Associations tab and then click the Add button.
6. Browse to select the container under which the database object is present and click OK twice.
After you configure the server database and service location policies you need to configure the inventory policies for the workstation. In the workstation inventory policy, you configure the following settings for scanning workstations:
![]() Scanning time at the workstations
Scanning time at the workstations
![]() Inventory server to which the workstations send scanned data
Inventory server to which the workstations send scanned data
![]() Include software scanning of workstations
Include software scanning of workstations
![]() List of software applications for scanning
List of software applications for scanning
Use the following steps to configure the workstation inventory policy.
You need to create a policy package for the workstations to configure the inventory policies for them. Use the following steps to create and configure a policy package for the workstations:
After you create a policy package for the workstaions, use the following steps to enable and associate the workstation inventory policy:
1. In ConsoleOne, right-click the Workstation Package and select Properties→Policies. Then click one of the following subtabs: Windows 9x, Windows NT-2000-XP, Windows NT, Windows 2000, or Windows XP.
2. Check the Enable the Workstation Inventory Policy box and click Apply.
3. Click the Associations tab and click Add.
At the conclusion of these steps, browse to select the container object under which the workstations are registered and then click OK twice.
After you enable and associate the workstation inventory policy, use the follwing steps to specify the inventory server to which the scanner sends the workstation scan data:
1. In ConsoleOne, right-click the workstation package and Properties→Policies. Then select one of the following subtabs: Windows 9x, Windows NT-2000-XP, Windows 2000, or Windows XP.
2. Select the Workstation Inventory Policy row. Then select Properties and select the Workstation Inventory tab.
3. Configure the workstation inventory policy as described in the section “Configuring the Workstation Inventory Policy” later in this chapter.
4. Click OK.
After you specify the inventory server to which the scanner will send the workstation scan data, use the following steps to schedule the time for activating scanning at the workstations:
1. In ConsoleOne, right-click the Workstation Package and select Properties→Policies. Then select one of the following subtabs: Windows 9x, Windows NT-2000-XP, Windows 2000, or Windows XP.
2. Click the Workstation Inventory Policy row and select Properties. Then select the Policy Schedule tab.
3. Modify the settings for scheduling the scan of the workstations. Click OK twice.
After you schedule the time for activating scanning at the workstations, use the following steps to ensure that the scanning is enbabled:
1. In the Inventory Service Object property page, you enable the scan of the workstations associated with the selected inventory server.
2. From ConsoleOne, right-click the Inventory Service object (Inventory servername_ZenInvService) and select Properties. Then select the Inventory Service Object Properties tab.
3. Check Enable Scan of Machines and click OK.
After you finish configuring the workstation inventory policies for workstations, make the following check in your environment to make sure that the inventory scanning process can complete properly.
If you configured the inventory server that is a Windows server and Windows 98 workstations are present that will send their scan data to that Windows server, you must do the following for the scanners to collect data:
![]() If eDirectory users are present who are also Windows domain users, make sure that the users logged in are valid users of the Windows domain in the existing share created by ZENworks.
If eDirectory users are present who are also Windows domain users, make sure that the users logged in are valid users of the Windows domain in the existing share created by ZENworks.
![]() If users are logged in to a different domain, make sure that the users are trusted users of the domain in the existing share created by ZENworks.
If users are logged in to a different domain, make sure that the users are trusted users of the domain in the existing share created by ZENworks.
![]() If eDirectory users are present who are not users of any Windows domain, make sure that the users do not log in to eDirectory during workstation startup. However, these users can log in to eDirectory later.
If eDirectory users are present who are not users of any Windows domain, make sure that the users do not log in to eDirectory during workstation startup. However, these users can log in to eDirectory later.
The workstation inventory policy allows you to configure which inventory service the workstations associated with this workstation policy package will use. It also allows you to enable and configure hardware and software scanning.
To configure the server inventory policy for a workstation policy package, right-click on the package and select Properties from the pop-up menu. Then select the Policies tab for the operating system you want to configure. ZENworks Desktop Management allows you to select Windows 9x, Windows NT-2000-XP, Windows 2000, or Windows XP—or General to configure for all those operating systems. Next, enable the workstation inventory policy by checking the box next to it. Finally, select the workstation inventory policy and click the Properties button to bring up the Workstation Inventory Policy Properties window. The following sections discuss how to configure the workstation inventory policy from this window.
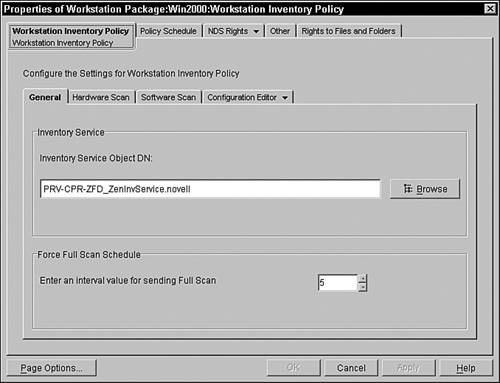
The first step in configuring the workstation inventory policy is to configure which inventory service workstations associated with this policy will use. Select the General tab in the Workstation Inventory Policy page, as shown in Figure 20.6, and configure the following settings:
![]() Inventory Service Object DN—Use the Browse button to navigate through the eDirectory tree and locate the inventory service policy, the correct roll-up schedules, and locations configured for servers associated with this workstation policy package.
Inventory Service Object DN—Use the Browse button to navigate through the eDirectory tree and locate the inventory service policy, the correct roll-up schedules, and locations configured for servers associated with this workstation policy package.
![]() Force Full Scan Schedule—After you select the inventory service object, you need to specify, in the Force Full Scan Schedule field, the number of delta scans that will occur before a full scan is required.
Force Full Scan Schedule—After you select the inventory service object, you need to specify, in the Force Full Scan Schedule field, the number of delta scans that will occur before a full scan is required.
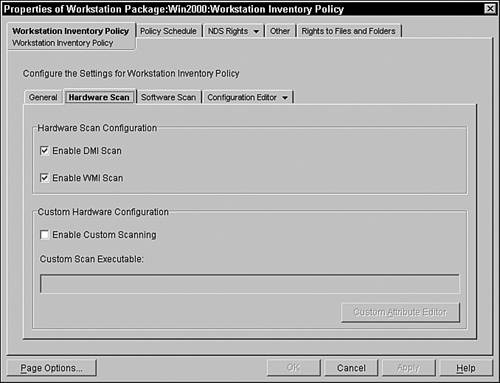
Next you need to configure hardware scanning by selecting the Hardware Scan tab, shown in Figure 20.7, and setting the following options:
![]() Enable DMI Scan—Enables ZENworks to collect hardware inventory data from Windows workstations using the Desktop Management Interface (DMI) 2.0 specification.
Enable DMI Scan—Enables ZENworks to collect hardware inventory data from Windows workstations using the Desktop Management Interface (DMI) 2.0 specification.
![]() Enable WMI Scan—Enables ZENworks Desktop Management to collect hardware inventory data from Windows workstations using the Web-based Management Interface (WMI) 1.5 specification.
Enable WMI Scan—Enables ZENworks Desktop Management to collect hardware inventory data from Windows workstations using the Web-based Management Interface (WMI) 1.5 specification.
![]() Enable Custom Scanning—Allows you to enable custom hardware scanning and specify a custom scan executable to be run on inventoried workstations.
Enable Custom Scanning—Allows you to enable custom hardware scanning and specify a custom scan executable to be run on inventoried workstations.
![]() Custom Attribute Editor—Allows you to specify a list of custom hardware attributes that should be scanned for during the workstation scanning process.
Custom Attribute Editor—Allows you to specify a list of custom hardware attributes that should be scanned for during the workstation scanning process.
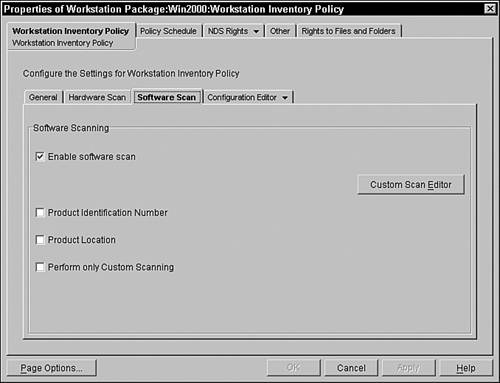
Next you need to configure software scanning. From the Software Scan tab, shown in Figure 20.8, you have the option to enable the following software inventory options to use when scanning workstations:
![]() Enable Software Scan—Enables software scanning on workstations associated with this workstation policy package.
Enable Software Scan—Enables software scanning on workstations associated with this workstation policy package.
![]() Product Identification Number—Scans for product identification numbers of applications installed on inventoried workstations. The product identification number can be useful in sorting and organizing inventory software reports.
Product Identification Number—Scans for product identification numbers of applications installed on inventoried workstations. The product identification number can be useful in sorting and organizing inventory software reports.
![]() Product Location—Allows you to specify software scanning to include scanning of the full path of the product executable installed on the inventoried workstations.
Product Location—Allows you to specify software scanning to include scanning of the full path of the product executable installed on the inventoried workstations.
![]() Perform Only Custom Scanning—Allows you to specify software scanning to scan only for the software defined by the custom scan editor.
Perform Only Custom Scanning—Allows you to specify software scanning to scan only for the software defined by the custom scan editor.
![]() Custom Scan Editor—Clicking on the Custom Scan Editor button brings up the Custom Scan Editor window.
Custom Scan Editor—Clicking on the Custom Scan Editor button brings up the Custom Scan Editor window.
After you enable and configure software scanning, you can modify the INI file that ZENworks Desktop Management uses when reporting software inventory by selecting the Configuration Editor tab, shown in Figure 20.9. From the Configuration Editor tab, you can edit the SWRules file by clicking on the Set Default button to open the default file and then modifying the entries. ZENworks uses this file when you create inventory reports.
FIGURE 20.9 Configuration Editor for the workstation inventory policy for a workstation policy package.

If you are modifying the workstation inventory policy for Windows, the Configuration Editor tab will have a drop-down arrow allowing you to modify the entries’ INI files for Zipped Names. This allows you to specify the manufacturers of software being used to zip files as well as the identifiers they are using for the zipped files.
You can also modify the entries in the INI file for Asset Information. You can specify the DMI class names and attributes for things such as a workstation model, model number, serial number, and computer type.
After you install, configure, and start the workstation inventory process for your network, you should be aware of several tasks. The following sections describe common tasks that you need to be aware of and perform to use and maintain your workstation inventory.
One important task you should be familiar with is improving the database performance by improving database cache size. You can improve the performance of the Inventory database maintained in Sybase on NetWare or Windows servers. The default database cache size is 32MB; however, this database cache size may not be adequate for large databases with more than 10,000 workstations.
You should change the database cache size to an optimum size. We recommend a database cache size that is one-fourth of the database size. You must also consider server memory size while assigning a cache size. For example, if you have 256MB RAM, a cache size of 64MB is recommended.
Use the following steps to change the database cache size on a NetWare server:
1. Close all connections to the Inventory database.
2. Quit the Sybase server.
3. Open the MGMTDB.NCF file in the SYS:SYSTEM directory.
4. Modify the -c parameter. For example, -c 64M sets the cache size to 64MB.
5. Save the file.
6. On the server console, load the Inventory database. Enter MGMTDBS.
Use the following steps to change the database cache size on a Windows server:
Another inventory task you should be aware of is backing up the Inventory database. ZENworks Desktop Management provides an option to back up the Inventory database from the server. We recommend that you back up the database weekly. However, if you are tracking the inventory of workstations frequently, increase the frequency of backup.
The Database Backup tool can be run from ConsoleOne by selecting Tools→ZENworks Inventory→Configure DB→ZENworks Database object and clicking OK. Then click Tools→ZENworks Inventory→Database Backup. Specify the location to back up the database to and then click the Start Backup button.
Use the following steps to restore the database:
1. If the Inventory database server is up, stop the database storing service. At the database server console, enter StopSer Storer.
2. Quit from the Sybase database.
3. On NetWare servers, at the database server prompt, enter q to stop the Sybase database.
4. On Windows, stop the Sybase service (Adaptive Service Anywhere - ZENworks Desktop Management).
5. Copy the backup files, overwriting the working database files.
6. Restart the database server.
NOTE
The backup tool creates a .LOG file located in the ZENworks database directory on NetWare and Windows servers. The log records the status of the backup operation. This file increases in size for every backup operation. Remove the existing contents of the file if you do not need the details.
These steps work for the Sybase database only. For detailed instructions on backing up the Oracle database, refer to the online ZENworks Desktop Management documentation.
Another important task you should be familiar with for workstation inventory is how to customize software scanning. You can customize the list of software applications that you want to scan for at the managed workstations by specifying the Software Scan settings in the Workstation Inventory Policy page.
By default, the Scanner does not scan for software applications at the workstation. You must check the Enable Software Scan option in the workstation inventory policy and should use the Custom Scan Editor to configure the list of applications for scanning. The Custom Scan Editor provides a powerful tool to optimize software scanning for your network. Use the Custom Scan Editor to specify the vendor, product name, product version, filename, and file size of the software you want to scan for on servers. This allows you to selectively inventory only software that is important to track, reducing the size of inventory reports as well as network and server utilization.
Use the following steps to configure custom application scanning for workstations:
1. In ConsoleOne, select the Workstation Inventory Policy and click Properties. Select the Software Scan tab of the Workstation Inventory Policy page and make sure that the Enable Software Scan option is checked.
2. Click the Custom Scan Editor button to bring up the Custom Scan Editor, shown in Figure 20.10.
FIGURE 20.10 The Custom Scan Editor window for software scanning in the workstation inventory policy for a workstation policy package.

3. Click the Add button to add a custom application to be scanned for.
4. Fill in the details of the application: Vendor Name, Product Name, Product Version, File Name, and File Size (in Bytes).
5. Click OK.
6. To save the application entry in eDirectory, click OK in the Custom Scan Editor dialog box.
You can also add application entries to the Custom Scan table by importing a file with the list of application entries by using the following steps:
1. Open a text editor.
2. Create a file with the following format:
total_ _application_entries_in_Custom_Scan_file>;
total_ _columns_in_the_application_entry
vendor_name;product_name;product_version;file_name;
file_size(in Bytes)
vendor_name;product_name;product_version;file_name;
file_size(in Bytes)
3. Save the application as a text file with any extension you want.
4. In ConsoleOne, select the Workstation Inventory Policy and click Properties. Make sure that the Enable Software Scan option is checked.
5. Click Custom Scan Editor.
6. Click Import. To save the application entry in eDirectory, click OK in the Custom Scan Editor dialog box.
Keep the following guidelines in mind if you decide to create your own custom scan files:
![]() The default total number of columns in the application entry is 5.
The default total number of columns in the application entry is 5.
![]() The separator between the columns is a semicolon (;).
The separator between the columns is a semicolon (;).
![]() Fill in all the columns for each application entry.
Fill in all the columns for each application entry.
![]() Do not use a comma (,) in the File Size parameter.
Do not use a comma (,) in the File Size parameter.
ZENworks Desktop Management includes a tool that allows you to customize the inventory data you want from the Inventory database and export it to a file. After you select the inventory components that you need and further filter the data, the export program exports the data into XML or a Comma Separated Value (CSV) file format.
All workstations satisfying the filter you specify in the selected database are exported to an XML or CSV file. If you save the settings, you can later reload the configuration file to export the data. The following sections describe how to set the filters and queries and export the data from either a client or a server.
The Data Export tool can be run from ConsoleOne by selecting Tools→ZENworks Inventory→Configure DB→ZENworks Database object and then clicking OK. Then select Tools→ZENworks Inventory→Data Export to open the data export tool.
After the tool is open use the following steps to export the inventory data into an XML or a CSV file:
1. Select Create a New Database Query to open the Defined Query dialog box shown in Figure 20.11. This option lets you add a new query that defines the inventory fields such as hardware, software, network, and others that you want to export. You can also specify the criteria to limit the workstations and the database to be included in the query. Based on the inventory components and criteria you specify, the inventory data from the database is exported to a CSV file. Click Next.
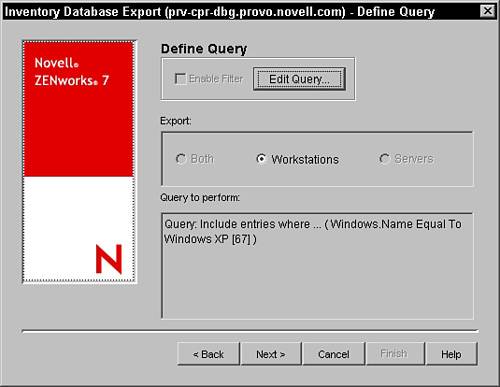
2. Specify the scope of the query to be Workstations, Servers, or both.
3. Form the query and specify the filter conditions as described in the following section by clicking on the Edit Query button shown in Figure 20.11. Click Next.
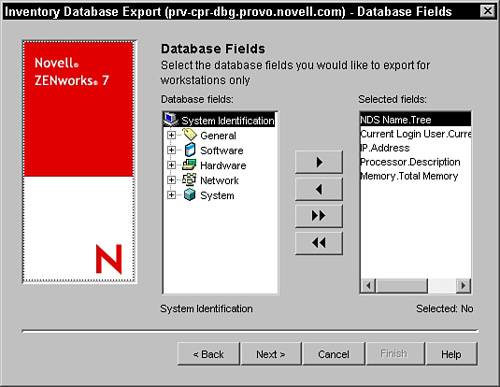
4. Configure the database fields that you want to be exported for the workstations that match the criteria you specified in step 3. The fields can be added and removed by navigating the Database Fields and Selected Fields lists, shown in Figure 20.12, and using the arrow button to add and remove entries. Click Next.
5. View the summary data export settings. Click Save Configuration to save the configuration settings to an .EXP file, specify the filename for the .EXP file, and click Save. The configuration file (.EXP) contains the settings such as the inventory components you selected and also the query formed for filtering the workstation data export. You create an .EXP file so that you can reload the configuration settings and generate the XML or .CSV files any time you need to. Click Next.
6. Click Perform the Query from This Computer to run the data export processing from the workstation computer. This option accesses the Inventory database on the specified database server and exports the data into an XML or a .CSV file. Click Finish.
7. Specify the file type and then name the XML or .CSV filename and click OK.
This generates the file in the specified directory. You can then open the XML file in a web browser or other application that supports XML files or the .CSV file in any CSV-supported viewer to view the exported data.
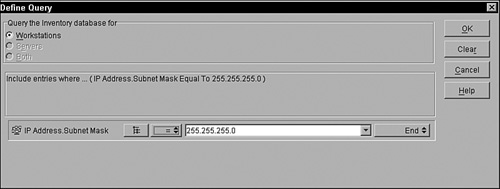
The following sections discuss setting the appropriate query values on the Define Query window shown in Figure 20.13.
Click the Browse Attribute button to select component attributes in the Select Attribute dialog box shown in Figure 20.14. For example, to specify the version of Bios as a component in the data export, select Bios as the component, and select Version as the component attribute.
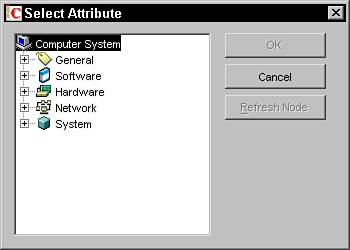
Components are as follows: Software, Hardware, Network System, DMI, and General Information.
Relational operators show the relationship between the component and the value. Use the Matches option to specify the wildcard characters in the Value field.
Description values are the possible values of an inventory component. For example, 6.0 is a possible value for the DOS-Version attribute. Description values are not case-sensitive. Use the wildcard character % to substitute any number of characters, or the ? character to substitute one character in the Value field.
The list of description values displayed for an Inventory component is taken from the Inventory database corresponding to the component.
The connectors and controls available for building filter conditions include the following:
![]() AND—The expressions before and after the AND must be true.
AND—The expressions before and after the AND must be true.
![]() OR—Either the expression before the OR or the expression after the OR must be true.
OR—Either the expression before the OR or the expression after the OR must be true.
![]() Insert Row—Lets you build the filter condition for this current row.
Insert Row—Lets you build the filter condition for this current row.
![]() Delete Row—Deletes the row.
Delete Row—Deletes the row.
![]() New Group—Lets you form a new filter condition group and specify the criteria for it. This group is combined with the previous group by using the relational operator specified between the groups.
New Group—Lets you form a new filter condition group and specify the criteria for it. This group is combined with the previous group by using the relational operator specified between the groups.
![]() End—Ends the filter condition.
End—Ends the filter condition.
Accessing the Inventory database from a server is recommended if you are exporting data from a large database or if you have specified complex queries for filtering the workstation.
Use the following steps to run the data export program from the server:
1. Make sure that you have generated the data configuration files. Then perform steps 1 through 5 of the “Exporting Inventory Data from ConsoleOne” section of this chapter. Also make sure that you save the settings in the .EXP file.
2. Click Perform the Query on a Remote Server to run the data export program from any server that has workstation inventory components installed. Click Finish.
3. From the server console, run DBEXPORT.NCF on NetWare servers or DBEXPORT.BAT on Windows servers, by typing DBEXPORT configuration_filename.exp csv_filename.csv where configuration_filename.EXP is an existing file that contains the data export settings. The data exported from the database is stored in the csv_filename.csv. The corresponding .CFG file for the .EXP file should be in the same folder as the .EXP file. The .CFG file contains the list of the database attributes to be exported.
4. Choose the inventory sites.
5. If you want to export the data from all database sites, satisfying the filter conditions, type 0.
6. To choose the database sites, type the numbers corresponding to the site names in the displayed list.
7. To select multiple site databases, separate the site numbers corresponding to the site names by commas.
8. The data export displays the number of workstations that satisfy the query and filter conditions for export.
You can now open the .CSV file in Microsoft Excel or any other CSV-supported viewer to view the exported data.
Another important inventory task you should be familiar with is viewing the information in the workstation inventory. The following sections describe how to view information about managed workstations.
Workstation inventory scanners store a subset of the scan data directly into the workstation object in eDirectory. You can view that information by right-clicking on the workstation object and selecting Properties. Then click the ZENworks Inventory tab and select Minimal Information.
The minimal view, shown in Figure 20.15, displays the following information about that workstation: Asset Tag, BIOS type, Computer Model, Computer Type, Disk Information, IP Address, IPX Address, Last Scan Date, MAC Address, Memory Size, Model Number, NIC Type, Novell Client, OS Type, OS Version, Processor, Serial Number, Subnet Mask, and Video Type.

If the minimal inventory information does not show all you need, you can see the complete listing from ConsoleOne by selecting Tools→ZENworks Inventory→Configure DB and then right-clicking on the workstation object and selecting Actions→Inventory.
The summary view, shown in Figure 20.16, allows you to view the entire listing of the inventory scan data for the workstation object.

If the entire listing for the workstation object is too much for you, you can view only the information that you requested by performing a query. Use the following steps to view the information formed by a query:
1. In ConsoleOne, click a container.
2. Select Tools→ZENworks Inventory→Configure DB.
3. Select Tools→ZENworks Inventory→Inventory Query.
4. From the Inventory Query from Database dialog box, shown in Figure 20.17, specify the criteria for the query. Set the Find In, Search Entire Database, Find Type, Attributes, Operator, Value, and Save options for the query.
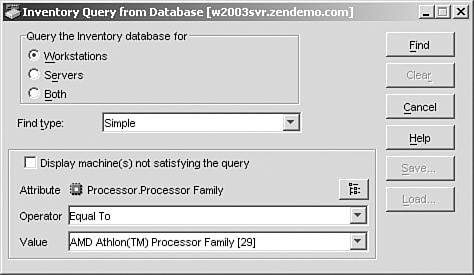
5. Click Find.
A query is run on the database, and the results are displayed for you to view.
Another inventory task that is useful to know is how to run inventory reports. You can run reports from a predefined list to gather inventory information from the Inventory database. After you run the report, it can be printed or exported as desired.
Use the following steps to generate the inventory report:
1. In ConsoleOne, click a server object.
2. Select Tools→ZENworks Reports.
3. Select the report you want to generate. See Table 20.2 for a list of reports and their descriptions.

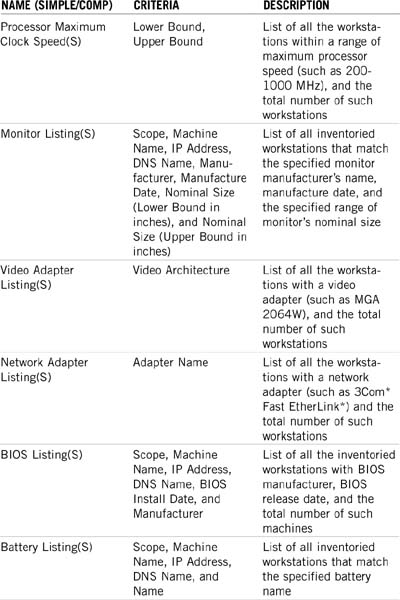


4. Specify the Selection Criteria. See Table 20.2 for a list of reports and their criteria.
5. Click the Run Selected Report button.
A status box appears displaying the progress of the report generation. When the report is generated, it appears in the viewer. Use the buttons on the toolbar to page through, print, or export the report.
ZENworks Desktop Management includes a utility called the Quick Report to simplify using the inventory database schema to retrieve data from the Inventory database.
Quick Report allows administrators to create custom views of the inventory data that contain a custom view name, database query, and custom defined attributes. These views give administrators the ability to quickly query the Inventory database and retrieve and view only the pertinent information they want.
Quick Report created by administrators are stored in the Inventory database. A copy of the data used to define the custom view is also stored in configuration files with the .EXP extension. The custom view configuration files are located in the following directory on the management console by default:
Consoleone1.2 eportingexport
Administrators can also specify a different location to store the quick report configuration files.
Quick Report, shown in Figure 20.18, can be started using one of the following two methods from ConsoleOne:
![]() Right-click a database object and then select ZENworks Inventory→Quick Report.
Right-click a database object and then select ZENworks Inventory→Quick Report.
![]() From the main menu, select Tools→ZENworks Inventory→Quick Report.
From the main menu, select Tools→ZENworks Inventory→Quick Report.
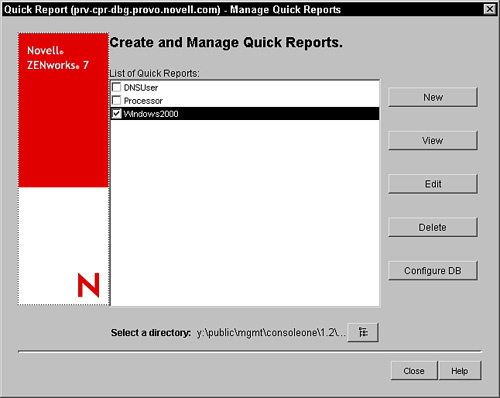
After you start Quick Report, you can use the following steps in the Create and Manage Quick Reports dialog box to create a new quick report to access inventory data:
1. Click the New button.
2. Specify whether the report should include workstations, servers, or both.
3. Click the Edit Query button shown in Figure 20.19.

4. From the Define Query window shown in Figure 20.13, define a query that includes the specific information you need in the custom view and click Next.
5. Select the required attribute field by clicking on the Select Attributes button.
6. Specify the logical operation to apply to the attribute by clicking on the Select Relational Operator button.
7. Specify an appropriate value for the operation on the attribute, and then add additional attributes using the logical operator button to the right of the value text box and repeat steps 5–7.
8. After you have added all attributes to use for the query criteria, click the OK button to return to to Quick Report and click Next.
9. From the Database Fields window, shown in Figure 20.12, add fields that you want to appear in the report.
10. When you have finished selecting fields to apear in the report, click the Save button and specify the name of the report.
11. Click Close.
You have now created a custom Quick Report with which you can easily access inventory data.
After you start Quick Report, you can use the following steps in the Create and Manage Quick Reports dialog box to view Quick Reports that has already been created:
1. Select the report that you wish to view from the List of Quick Reports list, shown in Figure 20.18.
2. Click the View button to view the report.
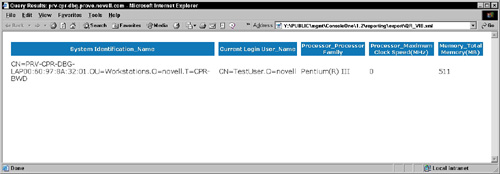
3. You can also view the report in a web browser by clicking on the View in Browser button in the Quick Report viewer, shown in Figure 20.20.

A useful advantage of using the View in Browser feature of Quick Report is the capability to print directly from the browser in a formatted form, shown in Figure 20.21. The browser file is an XML document, so you also have the capability to use Save As from the browser to store the report for your records.
Another valuable task that you should use frequently is viewing the status and scan logs generated by workstation inventory. The following sections list the logs, what they contain, and how to access them.
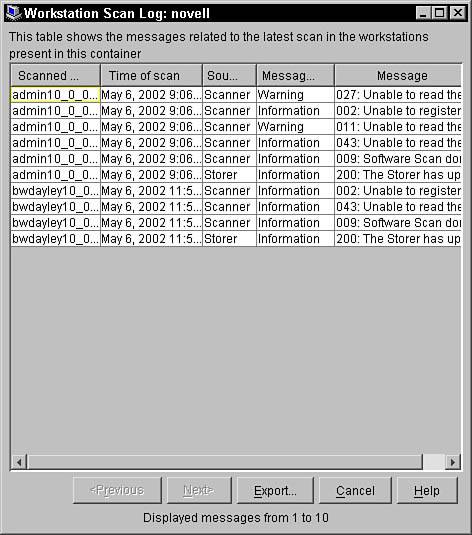
The workstation scan log monitors information from scan programs and the database storage process on the server. It contains the scanned workstation name, time of scan, inventory component, message type, and status message.
To access the workstation scan log from within ConsoleOne, select the container and then select Tools→ZENworks Inventory→Workstation Scan Log. The workstation scan log, shown in Figure 20.22, displays a listing of inventory scans that have occurred on the configured inventory database.
The roll-up log contains information collected from data sending servers, data receiving servers, and the database storage process. The roll-up log contains information about where the roll-up initiated from, roll-up start time, inventory component, message type, and status message.
To access the roll-up log from within ConsoleOne, select the container for the inventory service object and then select Tools→ZENworks Inventory→Roll-Up Log.
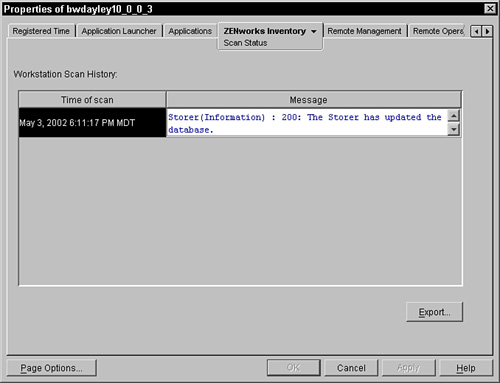
The workstation scan status monitors information from the scan programs and the database storage process. It contains the time of scan and status message.
To access the workstation scan status from within ConsoleOne, right-click the workstation object and select Properties. Then click the ZENworks Inventory tab and select Scan Status. The Scan Status tab, shown in Figure 20.23, displays the time of each scan as well as status messages that occurred during the scan. You can use the up and down arrows to navigate through the status messages.
FIGURE 20.23 Scan status of inventory scans that have occurred on a workstation object in ConsoleOne.
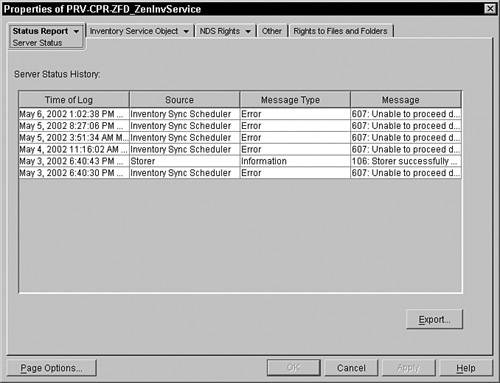
The status of inventory components on the server contains information gathered from sending server, receiving servers, the Selector on the server, the database storing process, the service manager, and the roll-up scheduler. It shows the time of log, source, message type, and a textual message.
To access the status of inventory components on the server from within ConsoleOne, right-click the inventory service object and then select Properties→Status Report→Server Status (see Figure 20.24).
The roll-up status contains information gathered from the sending server, receiving servers, and the database storing process. It shows the roll-up start time and message.
To access the roll-up status from within ConsoleOne, right-click the inventory service object and then select Properties→Status Report→Roll-Up Status.