
Chapter 26 Understanding and Creating Server Software Packages
This chapter discusses the creation of server software packages and how you can use them to manage your servers. With server software packages, you can create a package that runs scripts for pre-installation and post-installation, for loading and unloading of NLMs and Java classes, for installation prerequisites to restrict package installation, and for installing software on your servers.
Server software packages are much like any other installation package that you may be familiar with for other systems. This package system enables you to specify that certain features of the hardware and system need to be present (disk space, OS version, and so forth), and you can look for the existence of particular files and registry keys or set parameters. You may also specify variables that are substituted into the package when installation occurs to enable you to customize the package for several different target machines. Additionally, you may include the loading and unloading of NLMs and Java classes and the execution of specified scripts both before and after the installation of the package.
A software package is made up of a set of components. You can have any number of components within a software package. Within a component, you may have any number of files and folders copied to the server.
Before you can install a software package on the server, the server must satisfy the requirements that have been administered as part of the package. In addition to those for the package, each component may have its own set of requirements that must be fulfilled before it’s installed. If the requirements are not met for a particular component, it will not be installed.
Consequently, only portions of a software package may actually be installed on the server. Additionally, because of the logic placed in the components and the fact that the package installs the portions in order, you could have components later in the package check to see whether a previous part has been installed. By doing this, you can have subsequent components fail and not be installed if a previous component has not been installed. You could, for example, have component 2 look for the existence of a file on the server that should have been installed if component 1 was successful. If component 1 does not install properly, component 2 will not run because the file from component 1 will not be found on the server.
The specifications you give are all stored in a file with the suffix of .SPK. This file is stored on the file system and contains the configuration information for all components of the package. The .SPK file cannot be sent to a server or installed on a server; it must first be compiled into a .CPK file. At compile time, the ConsoleOne snap-in takes the references to the files in the .SPK file and retrieves these files, placing them into the single .CPK file so that no references are in the file. All the data for the installation is compacted and stored into the single .CPK file. This complete file can then be used to install the features onto your servers.
The compiled .CPK file may be sent over to the servers via the TED distribution system, or it may be manually copied to those servers (through CDs, Jaz drives, a network, and so forth) and then executed locally. The TED system subscribers (see Chapter 25, “Setting Up Tiered Electronic Distribution (TED),” for more information) receive the .CPK file, and, if the ZENworks Policy Manager is running on the server, activate that agent to have it unpack and execute the .CPK file. This can also be done manually by copying the file to the server (or having it accessible from the server drivers—for example, CD-ROM) and then entering the command PACKAGE PROCESS <path to .CPK file>. This performs the unpacking and execution of the .CPK file.
ZENworks Server Management provides the capability to roll back an installation that has occurred via a .CPK file. The rollback can remove any installation changes that have occurred on the last applied package. You can find yourself needing to perform several rollbacks to get back to previous packages. For example, if packages A, B, and C have been applied, you can roll back only C. And after package C has been rolled back, you can roll back package B.
When ZENworks applies a package, it creates a rollback package in the working directory of the policy engine, under the ROLLBACK subdirectory. Each rollback file is itself a .CPK file and is named by a GUID (globally unique identifier). When you request that a rollback occur, the rollback .CPK file is processed and then deleted. Rerunning the same installation .CPK file (unchanged version) does not create multiple rollback files. But if you recompile the .SPK file, a new .CPK file is created, even if you give it the same name, and the package will be installed again on the server even though the .SPK file was unchanged.
You can request a rollback by going to the ZENworks console and entering the command package rollback. Additionally, you can go through the browser-based management system and request that a rollback occur on the server.
As mentioned earlier, you can create and manage .SPK files in ConsoleOne. The ZENworks install establishes a new namespace in ConsoleOne to manage these packages. A namespace in ConsoleOne results in a new rooted entry under your My World icon, at the same level as eDirectory in the ConsoleOne hierarchy display in the left panel.
When you create or insert an .SPK file, an entry is placed in ConsoleOne configuration files that, when ConsoleOne comes up, displays the known software packages without requiring the namespace to search all possible drives to find the .SPK file. Consequently, if you delete the .SPK file from the file system, ConsoleOne is not aware of this and continues to display the software package entry in the server software packages namespace. But if you attempt to modify the package parameters, an error occurs because the file is not found. You need to manually delete the entry from ConsoleOne by choosing the Remove Package entry from the menu.
Should the processing of a .CPK run into problems installing the components (for example, running out of file space), the package installation is aborted, an error log is created, and a message is displayed. The components of the package that were installed are automatically rolled back and uninstalled.
You can create server software packages inside ConsoleOne. When you installed ZENworks (policies and TED components), a ConsoleOne snap-in registered itself, displaying a new rooted entry under your My World icon in ConsoleOne. The name of this container under My World is called Server Software Packages.
Two methods are used to introduce software packages into ConsoleOne and the system. You may create a new software package, or you may insert a previously constructed software package. When you insert a software package (by right-clicking the Packages container and choosing Insert Package on the pop-up menu), you are prompted through the wizard to specify the location of the .SPK file. This file is then read, and the information is displayed and is modifiable in ConsoleOne as if the package was just created. This is the one way that you can reintroduce a package that you had created and then removed from ConsoleOne.
At a high level, the steps to follow in administering a server software package include
1. Create a server software package and administer any rules associated with installation of the package.
2. Create components in the software package and administer any additional rules (beyond the package rules), if necessary, for the component to install.
3. Compile the package and place the resulting .CPK file on the distribution server.
4. Deliver the package to the target server manually or through Tiered Electronic Distribution (TED).
5. Install the package. Tiered Electronic Distribution services and the ZENworks Server Management agent do this automatically. You can also install the package manually by typing PACKAGE PROCESS <path to CPK file> at the ZENworks Server Management console.
To create a new server software package, follow these steps:
1. Launch ConsoleOne.
2. Select the Server Software Packages container in the left panel of ConsoleOne (the hierarchical browser).
3. Right-click the Server Software Package container and select New Package from the menu that appears. This launches the Software Package Wizard that prompts you through the initializations of the .SPK file.
4. Click Next.
5. Specify the name of the package and the filename of the .SPK file. You can browse through the file system to find an existing .SPK file to overwrite or specify the name of a new file. You may give the file any extension you want, but parts of the system expect the extension to be .SPK, so that is your best bet. If you do not enter a suffix, the system automatically puts the .SPK suffix on the package.
6. Click Next. The basic package is created, and an entry is placed in the ConsoleOne Server Software Packages namespace for this new package. The new package is now displayed under the Server Software Packages container.
7. Right-click the new software package. From the menu, you may choose Properties to set up the package requirements and rules, or New Component to add a new component to the package. You may also choose Remove if you want to delete this package from the namespace. Removing this package from the display in ConsoleOne does not remove the associated .SPK and .CPK files from the file system.
The following sections discuss package rule administration and the addition of components to your software packages.
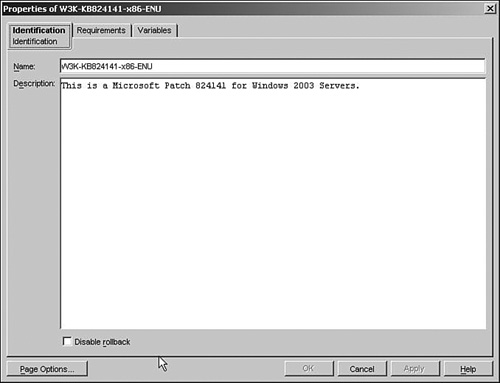
When you select a package under the Server Software Packages container, the pathname to the package .SPK file appears in the right view window, and you see the administered description of the package (which is empty the first time). To administer the rules and features of the package as a whole, you must right-click the package in the container to bring up the menu choices. From that menu, select Properties, and the screen shown in Figure 26.1 appears.
The following property pages are available for administration under the package.
Under the Identification property page, you may administer the name and the description of the package. The name of the package appears under the Server Software Packages container in ConsoleOne, and the description appears in the right window of ConsoleOne when the package is selected.
If you select the Disable Rollback check box, this package will not be available for rollback on the installed servers. It will be installed normally, but the rollback scripts and information associated with them will not be created.
The Requirements property page enables you to specify the requirements that must be satisfied for any portion of the package to be installed. If any requirement is not satisfied, no component will be installed from the package. Figure 26.2 shows a sample of the Requirements page.

Within the Requirements property page, you may set up any number of requirements that must be satisfied for the package to be installed. You may even set up multiples of the same type of rule (such as two file requirements) for the requirements. Be careful not to place contradictory rules. This causes the package to never install because all rules must be satisfied for any portion of the package to be installed on the server.
To add a rule, click the Add button and select the type you want. The rules appear in the left panel. To administer or modify a rule, select the rule on the left and administer its values in the right panel. To remove a rule, select it and then click the Remove button. The types of rules you can choose from are Operating System, Memory, Disk Space, Set Commands, Registry, File, and Products.dat. The following sections describe each type of rule.
Within the Operating System requirement, you may choose from the NetWare, Windows, Solaris, and Linux operating systems.
After you choose an operating system type, you may also keep the default, which states that it will install on any version of the operating system. Should you choose to be selective, you can enter the version number (major, minor, revision) of the operating system and then choose one of the appropriate rules to apply to the comparison between the administered value and the actual version number of the target servers. You may choose one of the following:
![]() Any—Ignore the version number of the operating system.
Any—Ignore the version number of the operating system.
![]() Less Than—The target server version number is less than the entered value.
Less Than—The target server version number is less than the entered value.
![]() Less Than or Equal To—The target server version number is less than or equal to the administered value.
Less Than or Equal To—The target server version number is less than or equal to the administered value.
![]() Equal To—The target server version is exactly the same as the administered value.
Equal To—The target server version is exactly the same as the administered value.
![]() Greater Than—The target server version is greater than the specified version number.
Greater Than—The target server version is greater than the specified version number.
![]() Greater Than or Equal To—The target server is greater than or equal to the specified version.
Greater Than or Equal To—The target server is greater than or equal to the specified version.
The Memory rule enables you to specify the amount of RAM that must be present on the server. This is not the amount of current free memory space, but the total amount of RAM installed on the server. You may choose the following options on the rule and specify the amount to compare (for example, 128) in megabytes:
![]() Less Than—The target server has less installed memory than the specified amount of RAM.
Less Than—The target server has less installed memory than the specified amount of RAM.
![]() Less Than or Equal To—The target server has the same or less than the amount of RAM specified.
Less Than or Equal To—The target server has the same or less than the amount of RAM specified.
![]() Greater Than—The target server has more RAM than the specified amount.
Greater Than—The target server has more RAM than the specified amount.
![]() Greater Than or Equal To—The target server has as much or more than the RAM specified.
Greater Than or Equal To—The target server has as much or more than the RAM specified.
This rule enables you to specify the amount of free disk space that must be available on the server prior to the package being installed. The amount of free space is specified in megabytes (MB), and you can specify either the SYS volume or a specific volume name. If the specified volume name (for example, VOL1) is not found on the server, the package will not be installed on the server. You can choose from the following rules:
![]() Less Than—The target server volume has less space than the specified amount.
Less Than—The target server volume has less space than the specified amount.
![]() Less Than or Equal To—The target server volume has the same or less than the amount of disk space specified.
Less Than or Equal To—The target server volume has the same or less than the amount of disk space specified.
![]() Greater Than—The target server volume has more space than the specified amount.
Greater Than—The target server volume has more space than the specified amount.
![]() Greater Than or Equal To—The target server volume has as much or more than the amount of space specified.
Greater Than or Equal To—The target server volume has as much or more than the amount of space specified.
Within this rule, you can specify the expected value for any of the possible set parameters. When you select this rule, the Set Parameters Wizard walks you through contacting only a NetWare server that is running ZENworks Policy Manager, which retrieves from the specified server the list of potential set parameters. Because different servers with different software installed may have different set commands, the wizard has you browse for a server running ZENworks to use as the model server. The set commands from the server you select should represent the other servers in your network. From this list you may choose which set parameters (by category or specific parameter) you are interested in having contained in the rule. After the list is selected, the wizard terminates, and the list of chosen parameters is displayed on this page.
Then you may create the rule by selecting the parameter and specifying the value that the parameter must have to enable the package to be installed. If any of the specified parameters is not set as administered, no component of the software package will be installed.
This page enables you to place a rule on the existence or value of a registry key from the Windows or NetWare registry. You may first select whether the registry interest is either a key, a name, or data. Currently, the data values may only be represented as strings, and an exact match is the only type of compare supported.
When you select a key type, you may choose to accept the installation depending on whether the key exists. Then you must specify the name of the key.
By selecting the name type on this rule, you can also choose to accept the installation based on whether the name exists in the registry. If this is chosen, you must specify the name to be matched.
When you choose to look for a data value, you must specify whether the data value equals the specified value. Then you must specify the key, the name, and the value of the data. The page is set up to enable you to compare based on several different types of values; currently, the only value type is string.
With the File rule, you may specify whether a particular file exists on the server. You specify the name of the file (including the volume; SYS is assumed if not specified) and the flag to succeed if the file exists, or if you want to base the rule on the date of the file. Should you choose to look at the date of the file, you can choose from the following:
![]() Before—The target server file has a date and/or time earlier than the specified date and time.
Before—The target server file has a date and/or time earlier than the specified date and time.
![]() On or Before—The target server’s file has a time stamp that is the same or before the specified date and time.
On or Before—The target server’s file has a time stamp that is the same or before the specified date and time.
![]() On—The target server file has the same time stamp as specified.
On—The target server file has the same time stamp as specified.
![]() On or After—The target server file has the same time stamp or later than the one specified.
On or After—The target server file has the same time stamp or later than the one specified.
![]() After—The target server file has a date that is after the given date and/or time.
After—The target server file has a date that is after the given date and/or time.
After choosing the comparison function, click the Calendar button to be given a calendar control enabling you to select a date and enter a time value for the file.
This rule enables you to match strings stored in the products.dat file on the server. The products.dat file identifies the various features and NetWare components that have been installed on the server.
This rule enables you to specify the name of the product ID and then look at the version and the description of the ID to see whether a match exists. With both the version and the description, you may identify whether the specified value contains, begins with, or matches the entry in the products.dat file. All comparisons of the values, including the ID, use case-sensitive matching. If the matched ID exists and has the value identified, the package satisfies this rule.
This property page enables you to specify variables used by the installation package to customize the filenames and locations in the software package.
Several variables can be used in this and other places in ZENworks. These variables are enclosed in % (percent signs) and can be either a defined set, an environment variable from the server, an attribute of the server object, or an attribute of a specified eDirectory object. The order that ZENworks uses to recognize environment variables is as follows:
1. If the string between the %s is a predefined variable, that value is placed in that string. Predefined variables are one of the following:
![]()
LOAD_DIR—The directory where the NetWare server was loaded
![]()
TREE_NAME—The name of the tree where ZENworks Server Management is located
![]()
WORKING_PATH—The working directory for the temporary files
![]()
SERVER_DN—eDirectory distinguished object name for the server
![]()
IP_ADDRESS—IP address of the server
![]()
BASE_PATH—The base path showing where the ZENworks Server Management policy engine is located (such as, SYS:SMANAGER)
![]()
SERVER_NAME—Name the server was given at install time
2. If the string has the format %object distinguished name;attribute%, the attribute value of the specified object is placed in the string.
3. If the string has no semicolon, the system looks for an environment variable of that name and replaces the value in the string. The system looks in both the NetWare and the Java environments for this variable.
4. If no environment variable exists with that name, the name is assumed to be a server attribute, and the system attempts to place the attribute’s value in the string.
5. If the variable is not a server attribute, the unchanged variable string (including the % signs) is used as the value.
After you create a package, you need to add components to the package. The components that actually contain the files will be installed on the target server.
To add a component to a package, right-click the package in ConsoleOne to bring up the menu. From the menu, choose the New Component option. After selecting the option, a dialog box prompts you for the name of the component. Remember, multiple files can be installed in a single component, and a component can have its own set of rules to enable it to be installed independently in the package. Choose a name that will help you remember the types of files in the component. When a name is supplied, the component is created and displayed under the package title. When you select the component, its description is displayed in the right pane.
To manage a component, right-click on it and select Properties from the menu. After selecting Properties, you are presented with the property pages for the component. Figure 26.3 shows sample property pages for a component.
From these property pages you may administer the following pages in the component.
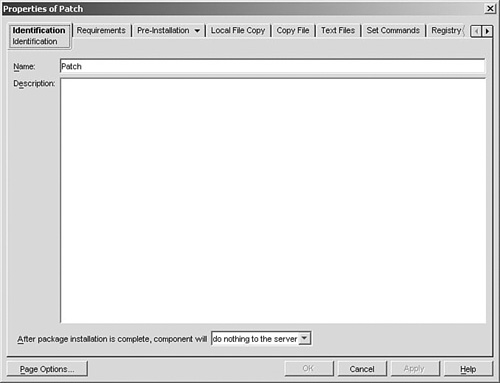
As shown in Figure 26.3, you may administer the name of the component and the description of the component. The name of the component is displayed in ConsoleOne under the package, and the description is displayed in the right panel of ConsoleOne when the component is selected.
Additionally, you can request that an action on the server be performed after the entire package is successfully installed on the server. This is administered at the bottom of the page and has the following values:
![]() Do Nothing to the Server—Continue and perform no particular action
Do Nothing to the Server—Continue and perform no particular action
![]() Down the Server—Down the server without restarting system
Down the Server—Down the server without restarting system
![]() Restart the Server—Down the server and restart it, which causes the server hardware to be rebooted
Restart the Server—Down the server and restart it, which causes the server hardware to be rebooted
![]() Reset the Server—Down the server and reset the server
Reset the Server—Down the server and reset the server
This Requirements property page enables you to specify various requirements that must be met for the component to be installed on the server. No component will be installed if the server does not meet the requirements of the package. In addition to the requirements of the package, the component pre-installation requirements must also be met for the component to be installed. Components may have different requirements, resulting in the possibility of only some components being installed on the server, whereas other components are not installed.
See the section “Working with Package Management” earlier in the chapter, which discusses its property page. The same components are available to the package.
From this page you can request that the system load or unload an NLM or Java process or a service. Despite what some documentation states, you can unload/kill an NLM process with the unload process request. Figure 26.4 shows a sample of this property page.
FIGURE 26.4 The Pre-Installation Load/Unload property page for a component of a server software package.

To add an action on this page, click the Add button and select whether you want to load an NLM, load a Java class, or unload a process. When selected, an entry is placed in the left panel. You may edit the name of the entry by selecting the entry and typing in a new name. In the right panel, associated with each entry, you need to provide information such as a filename and any parameters.
Each loading or unloading of processes occurs in the order specified in the left panel. You can rearrange the order by selecting an item in the list and clicking the up and down arrows on the page to move the item either up or down in the list.
When you select to have an NLM loaded prior to installation, you need to provide the following information in the right panel:
![]() File Name—Enter the filename to be loaded. Make sure to include the full path if the NLM is not in the
File Name—Enter the filename to be loaded. Make sure to include the full path if the NLM is not in the SYS:SYSTEM or in the path of the server. The path can include variable names.
![]() Parameters—Enter any parameters that you want to pass to the NLM. These parameters can include variable names.
Parameters—Enter any parameters that you want to pass to the NLM. These parameters can include variable names.
![]() Wait for Termination—Tells the system to wait until the NLM loads, does its work, and then unloads itself before proceeding in the installation process. If the NLM does not terminate and unload, the installation does not continue until you manually unload the NLM.
Wait for Termination—Tells the system to wait until the NLM loads, does its work, and then unloads itself before proceeding in the installation process. If the NLM does not terminate and unload, the installation does not continue until you manually unload the NLM.
NOTE
If the software package agent tries to load an NLM that is already loaded on the server, it will fail, and the entire package will be rolled back. It is recommended that you unload the NLM first in the unload parameters (the attempt to unload an NLM not currently loaded does not result in a failure) and then ask that it be loaded.
When you select to load a Java class, you must also provide the following information:
![]() File Name—The filename, or traditionally referred to as the class name, to load into the JVM (for example,
File Name—The filename, or traditionally referred to as the class name, to load into the JVM (for example, com.novell.application.zenworks.ted.Distributor).
![]() Parameters—The parameters that you want included on the command line when the process is launched (such as
Parameters—The parameters that you want included on the command line when the process is launched (such as ZENTREE "Distributor_ZEN1.servers.novell"). This parameter is the parameter passed to the Java process; traditionally, these parameters follow the process name when launching the Java Virtual Machine.
![]() JVM Parameters—The parameters to be passed to the Java virtual machine. Traditionally, these parameters are such items as the class path or other Java configuration parameters. These parameters can include variable names.
JVM Parameters—The parameters to be passed to the Java virtual machine. Traditionally, these parameters are such items as the class path or other Java configuration parameters. These parameters can include variable names.
![]() Wait for Termination—Tells the system to launch the Java class, wait for it to run, and then terminate. If the class does not self-terminate, the installation will not continue until you manually terminate the Java class.
Wait for Termination—Tells the system to launch the Java class, wait for it to run, and then terminate. If the class does not self-terminate, the installation will not continue until you manually terminate the Java class.
When you choose to unload an NLM or Java process, you must also provide the following information:
![]() File Name—The class name, or NLM filename (with the .NLM extension), of the process that the system should attempt to unload. The system first attempts to unload (as if it was an NLM) the filename you specify, and then the system attempts to perform a
File Name—The class name, or NLM filename (with the .NLM extension), of the process that the system should attempt to unload. The system first attempts to unload (as if it was an NLM) the filename you specify, and then the system attempts to perform a java –kill by using the name given. If the name matches both an NLM and a Java process, both are terminated. The Java process name must match exactly the process names that appear with the java –show command given at the console.
![]() Wait for Termination—Notifies the system to wait until the process is terminated before proceeding. If the process does not unload, the installation process will not continue until you manually terminate the process.
Wait for Termination—Notifies the system to wait until the process is terminated before proceeding. If the process does not unload, the installation process will not continue until you manually terminate the process.
ZENworks allows you to start a service on a Windows NT/2000/2003 server when you are distributing a software package to it. This enables you to start any services required for the software package to be applied. When you choose to Start a Service, you must also provide the following information:
![]() Service Name—The name of the Windows server you want to start.
Service Name—The name of the Windows server you want to start.
![]() Wait for This Service to Start Before Continuing—Tells ZENworks whether to verify that the service has actually started before applying the software package.
Wait for This Service to Start Before Continuing—Tells ZENworks whether to verify that the service has actually started before applying the software package.
ZENworks allows you to stop a service on a Windows NT/2000/2003 server when you are distributing a software package to it. This enables you to stop any services that will interfere with applying the software package. When you choose to stop a service, you must also provide the following information:
![]() Service Name—The name of the Windows server you want to stop.
Service Name—The name of the Windows server you want to stop.
![]() Wait for This Service to Stop Before Continuing—Tells ZENworks whether to verify that the service has actually stopped before applying the software package.
Wait for This Service to Stop Before Continuing—Tells ZENworks whether to verify that the service has actually stopped before applying the software package.
You add a script to the policy by clicking the Add button on this property page. When you click the Add button, an entry is placed in the left window, and you are allowed to edit the name of the script. After you name the script, you can choose on the right the type of script that you will be creating. The choices of script types are currently NCF, NETBASIC, and PERL. After you identify the script type, you are free to type in the script in the provided window. ZENworks provides no syntax checking or validation for the script you enter.
You can add multiple scripts of any of the available types into this component. The scripts are executed in the order shown on the administration screen (from top to bottom). If you want to reorder the running of the scripts, you must select a script name in the left pane and click the up or down arrows to move the script into a different order.
When the ZENworks policy engine runs the pre-installation scripts of this component, it creates a temporary script file (in its working directory) that contains the specific script and then launches the corresponding NLM that works with the identified script, passing the NLM the name of the script to run. Consequently, netbasic.nlm and perl.nlm must already exist on the server where the script is to be run. These are installed by default on NetWare servers. Regardless as to whether a script fails or succeeds, the engine proceeds to the next script.
ZENworks allows you to specify local file copy operations to be performed when applying a software package. This can be useful if you need to copy or move files that exist on the local file system to a new directory without making them part of the software package.
For example, suppose that you have configuration files for a software package that are specific to each server, but they need to be moved to a new location for the software package. You can have ZENworks move the files as part of applying the software package to the server.
You can set up a local file copy by selecting the Local File Copy tab of the software package Component object and specifying the following options:
![]() Source Path—Specifies path to the source file(s).
Source Path—Specifies path to the source file(s).
![]() Destination Path—Specifies path to copy the files to.
Destination Path—Specifies path to copy the files to.
![]() Include Subdirectories—Indicates whether ZENworks includes any subdirectories located under the source path in the copy.
Include Subdirectories—Indicates whether ZENworks includes any subdirectories located under the source path in the copy.
![]() Maintain Attributes—Indicates whether to maintain the file attributes (read-only, hidden, and so on).
Maintain Attributes—Indicates whether to maintain the file attributes (read-only, hidden, and so on).
![]() Overwrite Destination Files—Specifies whether ZENworks overwrites files during the copy. This overwrites files regardless of file date.
Overwrite Destination Files—Specifies whether ZENworks overwrites files during the copy. This overwrites files regardless of file date.
![]() Maintain Trustees—(NetWare only) Determines whether ZENworks maintains the file system trustees of objects copied. This option is important because improperly setting it could give users access to files that they should not have, or users could lose access to files they need.
Maintain Trustees—(NetWare only) Determines whether ZENworks maintains the file system trustees of objects copied. This option is important because improperly setting it could give users access to files that they should not have, or users could lose access to files they need.
![]() Retry When Locked—Specifies whether to retry if the file is locked and, if so, specifies the number of times to retry before failing the copy.
Retry When Locked—Specifies whether to retry if the file is locked and, if so, specifies the number of times to retry before failing the copy.
![]() Kill Connection of Opened Files—Allows you to tell ZENworks to kill the connection of a user if a file is locked because they have it opened. Turning on this option has the potential for users to lose data in the file they have opened when their connection is terminated.
Kill Connection of Opened Files—Allows you to tell ZENworks to kill the connection of a user if a file is locked because they have it opened. Turning on this option has the potential for users to lose data in the file they have opened when their connection is terminated.
![]() Error Processing—Allows you to specify whether ZENworks fails or continues when it encounters an error copying a file. This is useful to allow you to apply the package even if the file copy fails.
Error Processing—Allows you to specify whether ZENworks fails or continues when it encounters an error copying a file. This is useful to allow you to apply the package even if the file copy fails.
![]() Operation—Allows you to specify whether ZENworks moves or copies the file. Use the Move option unless you need to maintain a copy of the file on the system.
Operation—Allows you to specify whether ZENworks moves or copies the file. Use the Move option unless you need to maintain a copy of the file on the system.
This property page handles the placement of source files onto the server. It places a copy of the specified file (placed into the package) onto the target server. Figure 26.5 displays a sample of this page.
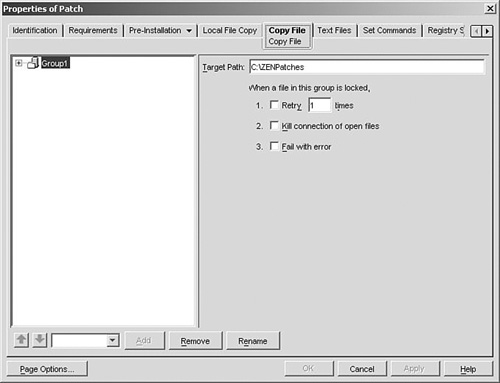
The first step in the Copy File page is to define a file group. A group is a set of files copied onto the server into the same root directory. You may have more than one group in the software package to enable you to copy files to a different root directory. You define a new group by clicking the Add button, and the system prompts you for a group name and a target path. The target path may contain variables. Groups are processed in the order shown in the left panel. If you want to modify the order, select a group and click the up or down arrows to rearrange the order of the groups. Folders and files cannot be reordered.
After you create a group, you may add files or directories under that file group to have these files and subdirectories created on the target server under the group target path. Select the addition of either subdirectories (folder) or files from the Add menu after your first group is created. You can also select the creation of additional groups through the Add button.
When you create each item, you have the option of naming the folder or file by editing the item name in the left panel. In the right panel, you may choose options with each type to describe how you want to have the system create or delete your files.
A folder identifies a subdirectory under the target path. Select the folder in the left panel with a click of the mouse, and then type in the name you want. The right panel enables you to select whether this folder should be created or deleted. If it is to be created and already exists, nothing happens. If the folder is to be deleted, this folder and all contained files and subfolders are deleted from the server file system.
Now you may identify a file to be sent to or removed from the target server. Browsing through your file system mapped drives and selecting the file enters the filename. This represents the source path of the file (which can be different from the target path you are generating with the series of paths and folders). In the right pane, you administer the following actions associated with the designated file:
![]() Copy Mode—Identifies the method that should be used when copying the file onto the target server from the package. The choices are as follows:
Copy Mode—Identifies the method that should be used when copying the file onto the target server from the package. The choices are as follows:
![]() Copy Always—Copies the file onto the target server, either creating the file or overwriting an existing file of the same name.
Copy Always—Copies the file onto the target server, either creating the file or overwriting an existing file of the same name.
![]() Copy If Exists—Copies the file only if the file already exists on the server, overwriting the original target file.
Copy If Exists—Copies the file only if the file already exists on the server, overwriting the original target file.
![]() Copy If Does Not Exist—Copies the file only if the file does not already exist in the specified location.
Copy If Does Not Exist—Copies the file only if the file does not already exist in the specified location.
![]() Copy If Newer—Copies the file onto a target server only if the file date is newer than the current file on the target server with the same name. If the file does not exist, this will not copy the file to the target server.
Copy If Newer—Copies the file onto a target server only if the file date is newer than the current file on the target server with the same name. If the file does not exist, this will not copy the file to the target server.
![]() Copy If Newer and Exists—Copies the file only if it is newer than the existing file or if the file does not exist in the specified target directory.
Copy If Newer and Exists—Copies the file only if it is newer than the existing file or if the file does not exist in the specified target directory.
![]() Delete—Removes the file from the server and does not copy anything from the package.
Delete—Removes the file from the server and does not copy anything from the package.
![]() Attributes—Enables you to specify the attributes that should exist on the file after it is placed on the target server. This does not modify any existing file that was not changed in the process. The possible attributes that can be set are Read Only, Archive, Hidden, and Execute.
Attributes—Enables you to specify the attributes that should exist on the file after it is placed on the target server. This does not modify any existing file that was not changed in the process. The possible attributes that can be set are Read Only, Archive, Hidden, and Execute.
This page enables you to enter multiple text file changes into this single package. Text file changes are edits that you want to occur to existing ASCII files on the server. You create the changes by clicking the Add button at the bottom of the screen. When you click the Add button, you are prompted to enter the name of the file (on the target server) to modify. The name should include the full path to the file to ensure that you are modifying the file you want. You can modify more than one text file by selecting Text File from the Add button menu.
You can also make multiple changes to the same text file by selecting the text file, clicking the Add button, and selecting Change. A new change is placed in the left panel with the cursor at the change name, enabling you to edit the name of the change. The changes are applied to the specified file in the order shown. Should you want to change the order of the changes or the order of the files, select the item and move it in the list by clicking the up or down arrow.
After you select a text file to change, choose the corresponding change mode. You may choose either Prepend to File, Append to File, or Search File as one of your modes.
When you choose to prepend text to the file, the right side of the Administration page changes to display a large text box. You may enter any text strings that you want in the text box and click OK to store this entry. When the change is applied, the exact strings that you typed are placed before the first lines in the existing file.
When you choose to append text to the file, the right side of the Administration page changes to display a large text box. You may enter any text strings that you want in the text box and click OK to store this entry. When the change is applied, the exact strings that you typed are placed after the last lines in the existing file.
If this change is a search file change, you need to administer the following additional information to make the change effective:
1. Identify the search type that you need for this change. The search types are as follows:
![]() Sub-String—Search for the search string in any of the text. The text specified may be contained anywhere in the file, even in the middle of a word. If you have the substring of day, the following text would all match with this substring: today, day, yesterday, daytime, and so forth.
Sub-String—Search for the search string in any of the text. The text specified may be contained anywhere in the file, even in the middle of a word. If you have the substring of day, the following text would all match with this substring: today, day, yesterday, daytime, and so forth.
![]() Whole Word—Search for the string such that it is surrounded by white space or beginning or end of line. If you have the string of day, only the word day would be a match. The words today, yesterday, daytime, and so forth do not constitute a match.
Whole Word—Search for the string such that it is surrounded by white space or beginning or end of line. If you have the string of day, only the word day would be a match. The words today, yesterday, daytime, and so forth do not constitute a match.
![]() Start of Line—This is a successful match if the beginning of a line (first line of file, or characters following a carriage return) starts with the string, regardless of whether the string is a whole word. If you had the string day, this type would match only with the following lines—daytime is set, day by day, and so forth.
Start of Line—This is a successful match if the beginning of a line (first line of file, or characters following a carriage return) starts with the string, regardless of whether the string is a whole word. If you had the string day, this type would match only with the following lines—daytime is set, day by day, and so forth.
![]() End of Line—This is a successful match if the end of a line (characters preceding the carriage return or end of file) contains the string, regardless of whether the string is a whole word. If you had the string day, this type would match only with the following lines: the time to act is today, day by day, and so forth.
End of Line—This is a successful match if the end of a line (characters preceding the carriage return or end of file) contains the string, regardless of whether the string is a whole word. If you had the string day, this type would match only with the following lines: the time to act is today, day by day, and so forth.
![]() Entire Line—The entire specified string must consume the entire line of text (from text following a carriage return, or beginning of the file, to the next carriage return, or end of the file) including any white space. It must be the only characters, other than the carriage returns, on the line. If the string were day, only a line with the single word day on it would match.
Entire Line—The entire specified string must consume the entire line of text (from text following a carriage return, or beginning of the file, to the next carriage return, or end of the file) including any white space. It must be the only characters, other than the carriage returns, on the line. If the string were day, only a line with the single word day on it would match.
2. Specify the search string you’re trying to match. Enter this into the Search String field.
3. Specify whether you want the search to be case-sensitive by checking the box to make the search match only if the case matches.
4. Change the Find all Occurrences field if you want to find only the first occurrence of the string in the file. The default is to have this field checked, meaning that all occurrences in the file will have this policy applied to them.
5. Choose a result action that will be applied to the string after it is located in the file. The possible result actions are as follows:
![]() Delete All Lines After—All lines (characters following the next carriage return) are deleted from the file. The file is basically truncated, ending with the line that held the first matching string. Obviously, searching for all occurrences is not effectual when this is the resulting action, as a match truncates the rest of the file.
Delete All Lines After—All lines (characters following the next carriage return) are deleted from the file. The file is basically truncated, ending with the line that held the first matching string. Obviously, searching for all occurrences is not effectual when this is the resulting action, as a match truncates the rest of the file.
![]() Delete All Lines Before—All lines (characters before and including the previous carriage return) are deleted from the file. The file is reset so that it begins with the line that held the first matching string. With this result action, another search continues, and if another match is found, all the lines before it are deleted as well.
Delete All Lines Before—All lines (characters before and including the previous carriage return) are deleted from the file. The file is reset so that it begins with the line that held the first matching string. With this result action, another search continues, and if another match is found, all the lines before it are deleted as well.
![]() Prepend to File If Not Found—This result action places the replacement text in the file at the beginning of the file should the search string not be found in the file. This action only adds text; it doesn’t delete or modify text.
Prepend to File If Not Found—This result action places the replacement text in the file at the beginning of the file should the search string not be found in the file. This action only adds text; it doesn’t delete or modify text.
![]() Append to File If Not Found—This result action places the replacement text at the end of the file should the specified search string not be found. This action only adds text; it doesn’t delete or modify text.
Append to File If Not Found—This result action places the replacement text at the end of the file should the specified search string not be found. This action only adds text; it doesn’t delete or modify text.
![]() Replace String—This action takes the matching string and removes it from the file, placing the replacement string in the exact location of the deleted string. If the replacement string is of a different length than the search string, the surrounding characters are shifted to the left or right depending on whether less or more room is required. Basically, the new text is inserted in the location where the search string was removed.
Replace String—This action takes the matching string and removes it from the file, placing the replacement string in the exact location of the deleted string. If the replacement string is of a different length than the search string, the surrounding characters are shifted to the left or right depending on whether less or more room is required. Basically, the new text is inserted in the location where the search string was removed.
![]() Replace Word—This result action takes the word where a substring was matched and replaces the whole word (from beginning of line or space to space or end of line) with the replacement text. If the substring were day, the following words would be replaced with the replacement text: day, today, daytime, and so forth.
Replace Word—This result action takes the word where a substring was matched and replaces the whole word (from beginning of line or space to space or end of line) with the replacement text. If the substring were day, the following words would be replaced with the replacement text: day, today, daytime, and so forth.
![]() Replace Line—This action takes the line where the match has occurred and removes the complete line from the file. The replacement text is placed in the same location where the removed line was located in the file.
Replace Line—This action takes the line where the match has occurred and removes the complete line from the file. The replacement text is placed in the same location where the removed line was located in the file.
![]() Append Line—This action appends the replacement string to the line that contained the match. The matching string is not removed from the file; the only change is the addition of text to the end of the line.
Append Line—This action appends the replacement string to the line that contained the match. The matching string is not removed from the file; the only change is the addition of text to the end of the line.
6. Specify the new string. In the text box provided, enter the text that will be applied to the file based on the result action specified.
This property page enables you to set parameters on the NetWare server as part of the installation of this package. If there is a policy that also modifies a set parameter, the next time that the policy runs it will reset the set parameter to the value defined in the policy.
To add parameters, click the Add button. This activates a wizard to collect potential parameters. Because the set parameters on NetWare are dynamic and can be enhanced by various sets of NLMs, there is not a known set of set parameters. Consequently, ZENworks walks you through a wizard that goes to an identified NetWare server (the server must be running ZENworks Server policy engine) and queries the server for the set of parameters. This list is then transmitted back to the wizard and used as a model for other servers in your network.
To complete the wizard and to add parameters to this component, follow these steps:
1. Click the Add button in the Set Parameters Policy window to activate the wizard.
2. Click the browse button and browse the EDIRECTORY tree to the server that has a representative set parameter list. Select that server and click Next. This causes the wizard to query the server and retrieve all possible set parameters.
3. Select the set of parameters that you want to have contained in the component. You can select an entire category by clicking the check box next to the category, or you can open the category and select individual set parameters. After you select the set of parameters you want to administer with the component, click Finish.
4. You return to the Set Commands property page with the list of only the categories and/or the parameters that you had selected in the wizard. To administer an individual parameter, select the parameter and click the Edit button.
5. When you click Edit, you are presented with a dialog box that is unique for each parameter type. From this dialog box you may administer the value of the parameter. You may also select one of the following choices that administer how the parameter is given to the server:
![]()
Console—The command is passed to the server console by the policy engine.
![]()
Autoexec.ncf—In addition to passing the command to the console for immediate activation, the set parameter is placed into the autoexec.ncf file so that following a reboot the server will set the parameter.
![]()
Startup.ncf—In addition to passing the command to the console for immediate activation, the set parameter is placed into the startup.ncf file so that following a restart the server will set the parameter.
6. Complete the list of parameters and click OK to have these items set as part of the software package.
NetWare 5 introduced a registry to the server; this page enables you to modify or set registry keys into the server. This page is ignored on previous versions of NetWare. This page also allows the setting of registry keys on Windows servers. Figure 26.6 shows this page.
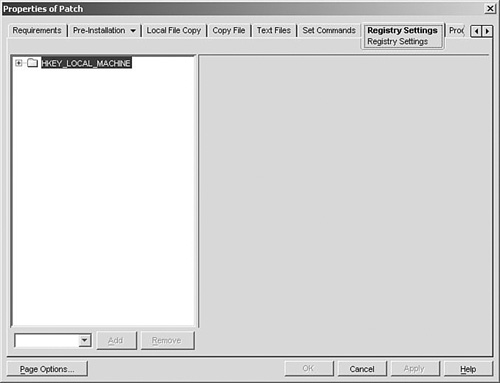
You add a key to the list by clicking the Add button and then selecting the Key menu entry. Each key may have any number of values based on the value syntax. The possible key types are Binary, Expand String, (Default), Dword, Multi-Valued String, and String.
Each type of key is presented with the value name in the left pane and the actual data value in the right pane. Depending on the type of the value, the right pane will have appropriate fields to enable you to enter the values for the registry key.
You can add multiple values or keys to this property page by continuing to click the Add button and selecting the item you want.
See the section “The Products.dat Rule” earlier in this chapter, which discusses the Products.dat property page. The same rules and modifications are available to the component.
This page allows you to specify any changes you would like to make to the products.dat file as a part of this CPK delivery. The choices on this page include no action, add, modify existing entry, or replace existing entry.
![]() No Action—No change will be made to the
No Action—No change will be made to the products.dat file.
![]() Add—This will add the specified entry into the
Add—This will add the specified entry into the products.dat file. When this is chosen, you are prompted to enter the following information: ID, Version, and Desctiption.
![]() Modify Existing Entry—This will search for a specified entry and then modify it with the specified values. When this option is chosen, you must enter the following values: Find Product ID, New Version, and New Description.
Modify Existing Entry—This will search for a specified entry and then modify it with the specified values. When this option is chosen, you must enter the following values: Find Product ID, New Version, and New Description.
![]() Replace Existing Entry—This will search for a specified entry and then replace it with the specified values. When this option is chosen, you must enter the following values: Find Product ID, Find Version, Id, Version, and Description.
Replace Existing Entry—This will search for a specified entry and then replace it with the specified values. When this option is chosen, you must enter the following values: Find Product ID, Find Version, Id, Version, and Description.
This identifies the set of NLMs or Java processes that should be loaded or unloaded after the installation process is completed. See the section “The Pre-Installation Load/Unload Property Page” earlier in this chapter for more information.
This identifies the set of scripts that should be executed after the installation process is completed. See the section “The Script Property Page” earlier in this chapter for more information.
After you complete the administration of the software package to include all the files and changes that you want for the installation, you must compile the package before it can be installed on the target server. The compilation process checks the rules and package for any errors and also retrieves the files specified and includes them in the compressed package file. The target package file is expected to have the suffix .CPK. Obviously, because all the files that are to be installed on the target server are contained in the compiled package, the .CPK file will be significantly larger than its .SPK counterpart. So, be prepared to consume some disk space for this process.
To compile a package, right-click the package under the Servers Software Packages container on the ConsoleOne main window and select the Compile menu choice. This brings up the Compile Wizard that prompts you for the output filename and places the .CPK suffix on that file, if a suffix is not specified. The wizard then compiles the .SPK file into the resulting .CPK file and places it on the disk as specified. The .CPK file can then be installed on the target server after it has been placed on the distribution server and a distribution object has been created and distributed to the target server, or you can copy the .CPK file to the target server manually.
After you create a .CPK file by compiling a defined .SPK package, you can place this .CPK file on a target server and request that the ZENworks system install the package and perform the actions specified in the package.
You can get the .CPK file to your target servers a number of different ways: Copy the file to the server, place the file on an external media and take it to the server, or send the .CPK file to the server with TED.
One alternative is to send your packages through the TED services available through ZENworks. You can create a distribution that contains a server software package and place this distribution into a channel. When the subscriber receives the software package through the channel, it automatically notifies the policy engine (at extraction schedule time) and begins processing the installation package. See Chapter 25 for a more detailed description of how to do this.
You can get the .CPK file to the server by either creating a movable media that you can then take to your target servers and mount or by copying the file through the file system to a volume on the target server. Be aware that the .CPK file can be extremely large, depending on the files included in it.
After the target server has access to the .CPK file from its local file system, you can request that ZENworks Server Management process the .CPK file by entering the following command on the ZENworks Server Management policy engine console:
package process <full path to .CPK file>
This spins off a thread that begins the unpacking and installation of the server software package onto the server.
When you modify a server software package, the .SPK file automatically updates when you save the changes. The .CPK file, however, is not updated automatically. When you want to update the .CPK file, you need to recompile the package.
If you have set up TED to distribute your software packages, when you update the .CPK file in the same place as listed in TED in a distribution, the package will automatically be sent on the next scheduled update (because it is changed), and the changed package will be installed on the server.
ZENworks Server Management provides server software packages as a way to deliver and install files onto your servers across your network. You can consider software packages as an installation tool (for example, InstallShield, MSI) for your servers. Software packages are primarily useful for NetWare servers. Windows and Linux servers, although capable of receiving and deploying software packages, have other formats such as MSI and RPM packages, which ZENworks Server Management can deliver and install as well.