
Chapter 5 Getting Asset Inventory 7 Working In Your Environment
This chapter will provide a step-by-step walkthrough on how to get ZENworks Asset Inventory up and running quickly in your environment.
Install ZENworks Asset Management (Asset Inventory only) by following the instructions specified in Chapter 2, “Installing ZENworks 7 Suite.” As part of ZENworks suite you are entitled to the inventory portions of ZENworks Asset Management. To have the other components, including software usage tracking and license compliance, you must purchase ZENworks Asset Management separately.
This how-to assumes that you have installed the Asset Inventory components of ZENworks Asset Management. There are several ways to get the agent onto the devices in order to begin collecting inventory. You can install the agent from the ZENworks Asset Management CD, through a login script, through a group policy (delivered by AD), through a website, or by using ZENworks Desktop Management. In this how-to we will discuss a new method that has not been available to previous ZENworks Desktop Management customers: Network Discovery.
ZENworks Asset Management can find workstations, servers, printers, routers, hubs, and other devices on the network. From this list of possible devices, you can select the devices to receive the agent. After they are selected, the agent will be installed and will collect its first inventory scan.
To get the most information about the devices through Network Discovery, you need to have SNMP and/or WMI installed and enabled on the devices.
To configure and start Network Discovery, complete the following:
1. Launch the ZENworks Asset Manager and log in as the enterprise administrator.
2. Click on the Management tab (next to the Query and Report tabs).
3. Expand Public Network Discovery Tasks.
4. Double-click on the Default Network Discovery Task. This opens a window similar to Figure 5.1.
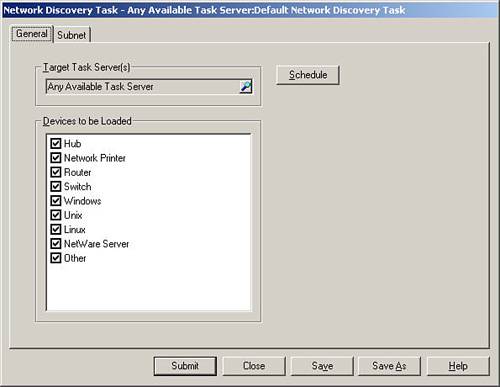
5. Select the Subnet tab (see Figure 5.2).

6. Select one of the following to scan:
![]() Local Subnet Only—To scan the subnet that is the same as the server.
Local Subnet Only—To scan the subnet that is the same as the server.
![]() Specify a Range of Addresses—Enter the beginning and ending IP address values.
Specify a Range of Addresses—Enter the beginning and ending IP address values.
![]() Select Subnets—From the list of available subnets, select the ones you desire.
Select Subnets—From the list of available subnets, select the ones you desire.
NOTE
Limit your initial Network Discovery to one or two subnets, as each subnet can take up to 40 minutes to scan.
7. Click on the General tab.
8. Click on the Schedule button to set the schedule for the network scan. Choose Immediately from the drop-down menu, and then click OK to save. Click Submit to start the network discovery task on the server and then click Yes to save the information.
9. To see the status of Network Discovery, click the Tasks tab at the bottom of the ZENworks Asset Manager window. You might need to press F5 in that window to get it to update with the task list.
The system now scans each of the possible IP addresses and attempts to discover if there is a device with that address and, if there is, what kind of device is found.
You can view the list of discovered devices from the Web Console. Complete the following to see the list of discovered devices along with collected information:
1. Launch the Web Console and log in as the enterprise administrator.
2. Click on the Network Discovery tab. This displays a set of expandable folders on the left that contain reports that can be run.
3. Click on the plus sign next to the Device List branch. This opens up that part of the branch and displays it. Click on the All Types branch label.
4. This displays on the screen a brief report that lists a count of all devices, Windows devices, and other devices.
5. Click on the number on the right in the row you are interested in. For this how-to, click on the All row. This displays a list of IP addresses discovered to have a device, along with some basic OS product information.
6. Drill in further by selecting the IP address. This displays the SNMP or WMI information discovered about this device.
Now that you are discovering devices, you need to place the ZENworks Asset Management agent on the devices about which you want to collect more detailed inventory.
From the ZENworks Asset Manager application you can push out the Asset agent to the selected devices. Complete the following to push the agent to a device:
1. Launch and log into the Manager application as the enterprise administrator.
2. Click on the Tools→Remote Client Install menu. This displays a screen similar to Figure 5.3.

3. Expand the Entire Network, Network Discovered (Windows machines) part of the tree. This displays the list of IP addresses that represent Windows machines.
4. Select an IP address root and expand that to display the devices that have been discovered in that subnet.
5. Select the device under this list. After it is highlighted, choose the Edit→Add to Workstation List menu item. This places that device on the list to install the agent.
6. Select the workstation in the list and then press the Install→Start Install menu item. This brings up a dialog similar to what is shown in Figure 5.4.
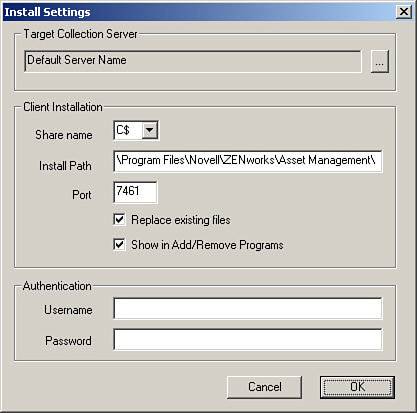
7. Enter an administrator account and password that will be accepted by the remote device. Click OK to begin the installation process.
Now the installation begins. After the installation has completed, an inventory scan will be taken and sent to the ZENworks Asset Management server.
Now it is time to see if the scanning is occurring and begin looking at the reports that show the scanned devices in your network. You can view the inventory reports by completing the following:
1. Launch the Web Console and log in as the enterprise administrator.
2. Click on the Reports tab.
3. Click on the plus sign next to the System List folder item on the left.
4. Click on the All Departments entry and you see a count list of inventoried devices.
5. Click on a hot-linked number to the right to display those devices. You can drill into those devices by selecting the specific device and seeing the collected inventory.
Explore other reports that are available under the Reports folder to see additional ways to explore your collected inventory information.