
Chapter 33 Using ZENworks Server Management Web-based Management
The ZENworks Server Management provides web-based management components that plug-in to the Novell iManager utility. These components allow you to use Novell iManager as an alternative to ConsoleOne for managing TED (Tiered Electronic Distribution) objects and distributions.
The following sections discuss how to access the ZENworks web-based management role and how to use it to administer TED objects. The tiered distribution view is also discussed and how to use it to track distributions throughout your network. You also learn about the Remote Web Console and how to use it to monitor and maintain the distribution agent, subscriber agent, and policy/package agent.
NOTE
The ZENworks Server Management installation guide discusses how to set up the necessary components in your network to install the web components for Policy-Enabled Server Management. The installation can be somewhat picky, so you should spend some time understanding the installation steps to make sure that they are followed correctly.
After you have correctly configured and set up the web-based management components on a NetWare, Windows, Linux, or Solaris server, you can access the iManager interface by simply opening the following URL in your web browser:
http://server_name_or_IP_address/nps
Where server_name_or_IP_address is the name or IP address of the server that has the web-based management components installed on it.
The first web page you see is a login screen prompting you for login information to authenticate to Novell eDirectory. After you log in, you see a page similar to the one shown in Figure 33.1. Expand the ZENworks Server Management section by clicking on the plus sign next to it, and you have access to the ZENworks Server Management web-based management tool.

If you do not see the ZENworks Server Management section, the web-based management components are not properly installed. You might need to install the plug-in by clicking on the configuration button in iManager and selecting Available Novell Plug-in Modules from the Module Installation option. If the ZENWorks 7.0 Server management module is listed, select it and click Install. After you have installed the plug-in, you need to restart Tomcat and Apache for the module to be available.
One specific feature of iManager you should become familiar with is the object selector icon, shown in Figure 33.2. This icon is displayed next to fields that require a Novell eDirectory object. If you do not know the exact Distinguished Name (DN) of the object, you can click on the object selector icon and bring up the Object Selector window shown in Figure 33.3.

The object selector allows you to navigate through the eDirectory tree and select objects you need to fill out forms in the iManager interface. You will use the object selector frequently when managing TED through the web-based management role.
A great feature that the web-based management tool offers is the ability to quickly administer TED objects even when ConsoleOne is not available. This can be useful for an administrator who needs to make changes while traveling or working from home. The following sections discuss using the web-based management tool to create, edit, and delete TED objects.
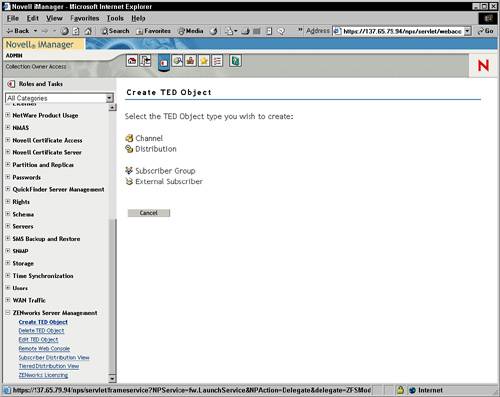
To create a TED object from the web-based management tool, click on the Create TED Object option under the ZENworks Server Management section from the main page shown previously in Figure 33.1. A new page, shown in Figure 33.4, opens in your browser. From this page, you have the option of creating a channel, distribution, subscriber group, or external subscriber.
NOTE
A distributor or subscriber is created at the time that ZENworks Server Management software is installed on the server.
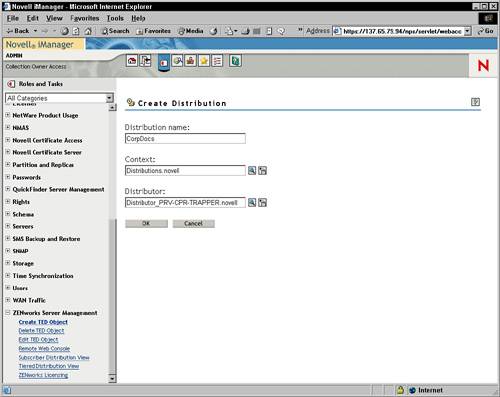
When you select the type of object you want to create from the creation page (refer to Figure 33.4), a new page is opened in your browser allowing you to enter the information required to create the type of object you selected. Figure 33.5 shows the object creation page for a distribution object. After you fill out the form with the required information, click OK, and the object is created.
You can edit TED objects in the web-based management tool in two ways. The first way is to click on the Edit TED Object option under the ZENworks Server Management section from the main page. The second way is to select a TED object in the tiered distribution view and click the eDirectory button (see Figure 33.10).
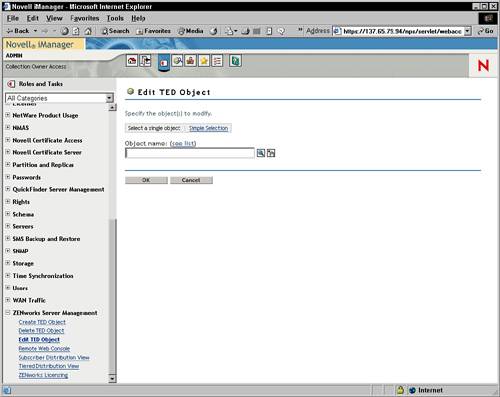
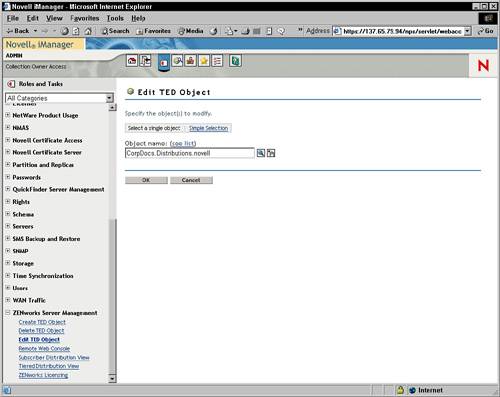
When you click on the Edit TED Object option under ZENworks Server Management, you are prompted to enter the object name or use the object selector to specify the TED object you want to edit, as shown in Figure 33.6.
After you select the object and click OK, the edit page for the object is displayed in your browser, as shown in Figure 33.7. From this edit page you can select tabs and different pages that allow you to configure the object’s properties. The edit screens try to mimic the look and functionality of ConsoleOne as much as possible.
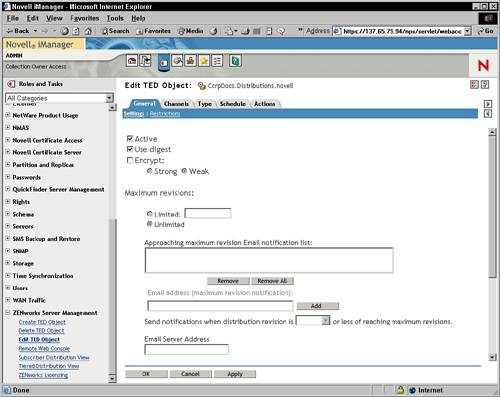
Figure 33.7 shows the General Settings edit page for a distribution object. Notice that it has the same settings as the Settings property page for the General tab of a distribution object in the ConsoleOne interface.
Deleting TED objects from the web-based management tool is quick and simple. First, click on the Delete TED Object option under the ZENworks Server Management section from the main page. Next, from the Delete page, shown in Figure 33.8, click on the object selector icon and find the object you want to delete. After it is selected, simply click OK, and the object is deleted.

One of the most useful tools provided with ZENworks Server Management web-based management is the ability to monitor TED distributions. You can use this tool to track the progress of distributions down through the channel and determine which subscriber servers have received the distribution, which distributor sent it to them, and when they received it.
To monitor a TED distribution from the web-based management tool, click on the Tiered Distribution View option under the ZENworks Server Management section from the main page shown previously in Figure 33.1. A new page, shown in Figure 33.9, opens in your browser. From this page, simply click on the object selector and select the distribution that you want to monitor.
FIGURE 33.9 Select Distribution page for tiered distribution view of the ZENworks Server Management role in iManager.

After you select the distribution you want to monitor, click Next, and select the channel on which you want to monitor the distribution. After you have selected a channel, click Next, and the tiered distribution view, shown in Figure 33.10, displays the status of the distribution. From this page you can specify a browser refresh frequency that allows you to keep the page up and monitor the progress of the distribution in real-time.
FIGURE 33.10 Tiered distribution view of a TED distribution in the ZENworks Server Management role in iManager.
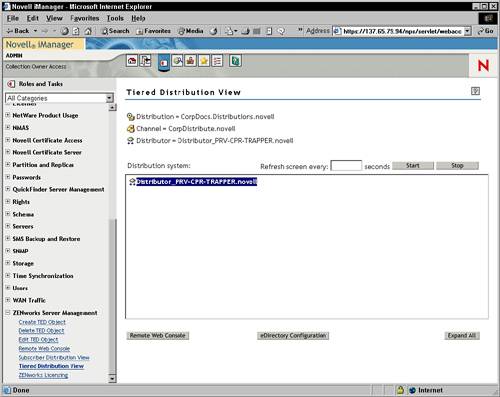
You also have the following three options from the tiered distribution view:
![]() Remote Web Console—Brings up the Remote Web Console page (discussed later in the chapter) for the object that you have selected in the distribution screen.
Remote Web Console—Brings up the Remote Web Console page (discussed later in the chapter) for the object that you have selected in the distribution screen.
![]() eDirectory Configuration—Brings up the edit page (discussed earlier) for the object that you have selected in the distribution screen.
eDirectory Configuration—Brings up the edit page (discussed earlier) for the object that you have selected in the distribution screen.
![]() Expand All—Provides a quick way to expand all the entries in the distribution screen. This is useful to quickly get a picture of the entire distribution.
Expand All—Provides a quick way to expand all the entries in the distribution screen. This is useful to quickly get a picture of the entire distribution.
Another powerful tool provided with ZENworks Server Management web-based management is the ability to monitor TED distributions at the subscriber level. You can use this tool to track the status of distributions on a set of watched subscribers.
To monitor the status of distributions for specific subscribers from the web-based management tool, click on the Subscriber Distribution View option under the ZENworks Server Management section from the main page shown previously in Figure 33.1. A new page, shown in Figure 33.11, displays the status of the distributions on the subscribers that have been added to the watch list.
FIGURE 33.11 Subscriber distribution view of a TED distribution in the ZENworks Server Management role in iManager.

From this page you can specify a browser refresh frequency that allows you to keep the page up and monitor the progress of the distribution in real-time.
You also have the following options available by clicking the buttons below the subscriber distribution watch list:
![]() Remote Web Console—Brings up the Remote Web Console page (discussed later in the chapter) for the object that you have selected in the distribution screen.
Remote Web Console—Brings up the Remote Web Console page (discussed later in the chapter) for the object that you have selected in the distribution screen.
![]() eDirectory Configuration—Brings up the edit page (discussed earlier) for the object that you have selected in the distribution screen.
eDirectory Configuration—Brings up the edit page (discussed earlier) for the object that you have selected in the distribution screen.
![]() Expand All—Provides a quick way to expand all the entries in the distribution screen. This is useful to quickly get a picture of the entire distribution.
Expand All—Provides a quick way to expand all the entries in the distribution screen. This is useful to quickly get a picture of the entire distribution.
![]() Add—Allows you to add a subscriber to the watch list.
Add—Allows you to add a subscriber to the watch list.
![]() Remove—Allows you to remove a subscriber from the watch list.
Remove—Allows you to remove a subscriber from the watch list.
![]() Remove All—Allows you to quickly remove all subscribers from the watch list.
Remove All—Allows you to quickly remove all subscribers from the watch list.
Another useful tool provided with ZENworks Server web-based management is the Remote Web Console tool. The Remote Web Console tool allows you to monitor and maintain the distribution agent, subscriber agent, and policy/package agent from a web browser. This allows you to view configurations, distributions, schedules, events, and so on, about the agents for one easy-to-access location.
You access the Remote Web Console in the web-based management tool in two ways. The first way is to click on the Remote Web Console option under the ZENworks Server Management section from the main page. The second way is to select a TED object in the tiered distribution view and click the Remote Web Console button (see Figure 33.10).
When you click on the Remote Web Console option under ZENworks Server Management, you are prompted to enter the name of the object or use the object selector to specify the TED or policy/package agent you want to monitor.
The following sections discuss using the ZENworks Server Remote Web Console tool to monitor policy/package agents and TED agents.
The Remote Web Console tool is easily accessible and useful for quickly viewing configuration and schedule information for policies and software packages in your tree.
The following sections discuss the type of policy/package information you can monitor from the Remote Web Console.
When you first enter Remote Web Console, it automatically displays the information regarding Tiered Electronic Distribution on that server. You need to first select the Policy Package Agent in the Display field at the top of the page (see Figure 33.12).
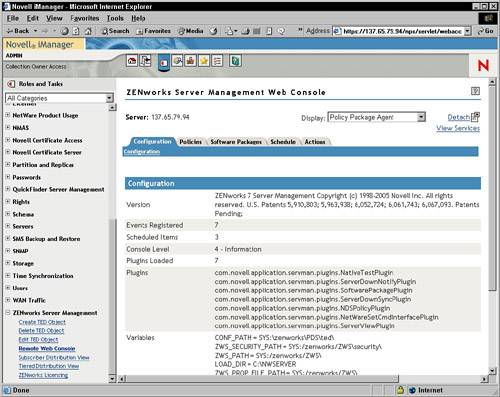
The Configuration tab, shown in Figure 33.12, displays the configuration information about the selected agent. The information shown includes such items as the version, events registered, console level, and variables.
The Policies tab of a policy/package agent in the Remote Web Console view displays all policies associated with the agent and allows you to enforce, refresh, and reschedule them. This page also displays a list of scheduled policies, including their schedules, and a list of enforcers for the agent.
The Software Packages tab of a policy/package agent in the Remote Web Console view displays a list of the package name, install date, status, and available actions for all software packages managed by the agent. It also allows you to add a software package.
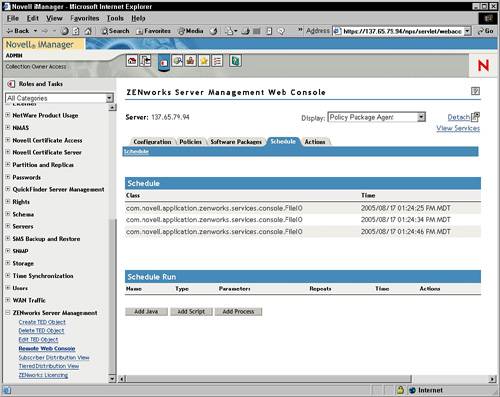
The Schedule tab (see Figure 33.13) of a policy/package agent in the Remote Web Console view displays the scheduled classes and times for the agent. It also displays the name, type, parameters, repeats, time, and actions for each time a schedule is run. You can also add a Java class, script, or executable to the agent’s schedule from this page.
The Remote Web Console also allows you to monitor and maintain the TED distribution and subscriber agents running on your network. From the Tiered Electronic Distribution Agents view in the Remote Web Console, you can quickly see the configuration and status of distributors and subscribers, distributions, channels, and security as well as events for both successful and unsuccessful distributions occurring in your distribution channel.
The following sections discuss the type of policy/package information that you can monitor from the Remote Web Console.
The Configuration tab of a TED agent in the Remote Web Console view displays the configuration information about the distributor or subscriber selected. The following is a list of pages under the Configuration tab for a TED agent:
![]() Configuration—Shows the object name, object revision, current working directory, distribution timeout, concurrent distributions, console messaging level, logging level, log file path, I/O rates, schedule, variables, and so on for a distributor or subscriber agent’s server. This is a fast way to view the entire configuration for a distributor or subscriber.
Configuration—Shows the object name, object revision, current working directory, distribution timeout, concurrent distributions, console messaging level, logging level, log file path, I/O rates, schedule, variables, and so on for a distributor or subscriber agent’s server. This is a fast way to view the entire configuration for a distributor or subscriber.
![]() Subordinate Configuration—Shows the object name, object revision, current working directory, distribution timeout, concurrent distributions, console messaging level, logging level, log file path, I/O rates, schedule, variables, and so on for a subordinate subscriber agent’s server.
Subordinate Configuration—Shows the object name, object revision, current working directory, distribution timeout, concurrent distributions, console messaging level, logging level, log file path, I/O rates, schedule, variables, and so on for a subordinate subscriber agent’s server.
![]() Threads—Displays TED thread information on the agent’s server.
Threads—Displays TED thread information on the agent’s server.
![]() Route to Subscriber (distributor only)—Shows the routing hierarchy to subscriber servers.
Route to Subscriber (distributor only)—Shows the routing hierarchy to subscriber servers.
![]() Database (distributor only)—Displays information about the ZENworks Server Management database used by the distributor agent.
Database (distributor only)—Displays information about the ZENworks Server Management database used by the distributor agent.
![]() Refresh Distributor (distributor only)—Allows you to force the distributor to refresh the configuration information it holds (distributor, subscribers, channels, and so on). Remember that this causes “Run Immediately” distributions to be regathered and possibly re-sent.
Refresh Distributor (distributor only)—Allows you to force the distributor to refresh the configuration information it holds (distributor, subscribers, channels, and so on). Remember that this causes “Run Immediately” distributions to be regathered and possibly re-sent.
The Distributions tab of a TED agent in the Remote Web Console view displays the distribution information about the distributor or subscriber selected. The following is a list of pages under the Distributions tab for a TED agent:
![]() Received Distributions—Displays a list of all distributions that this agent has received. You have the option of selecting a distribution from that list, clicking OK, and then being presented with status information about the selected distribution.
Received Distributions—Displays a list of all distributions that this agent has received. You have the option of selecting a distribution from that list, clicking OK, and then being presented with status information about the selected distribution.
![]() Active Distributions—Displays a list of the ingoing and a list of the outgoing distributions for the agent. From this page, you can view the IP address of the agent sending or receiving the distribution, whether the distribution is currently active, its priority, the version number, distribution, channel, bytes sent or received, total size, heartbeat status, and actions.
Active Distributions—Displays a list of the ingoing and a list of the outgoing distributions for the agent. From this page, you can view the IP address of the agent sending or receiving the distribution, whether the distribution is currently active, its priority, the version number, distribution, channel, bytes sent or received, total size, heartbeat status, and actions.
![]() Distribution Information (distributor only)—Allows you to view information about any distribution on the agent.
Distribution Information (distributor only)—Allows you to view information about any distribution on the agent.
![]() Build Distribution (distributor only)—Allows you to rebuild on the distributor and create a new version, if required (see Figure 33.14).
Build Distribution (distributor only)—Allows you to rebuild on the distributor and create a new version, if required (see Figure 33.14).

The Channels tab of a TED agent in the Remote Web Console view displays the channel information for distributions on the distributor agent selected. The following is a list of pages under the Channels tab for a TED distributor agent:
![]() Channel Information—Allows you to view the configuration of the channel for distributions on the agent.
Channel Information—Allows you to view the configuration of the channel for distributions on the agent.
![]() Distribute Channel—Allows you to select a channel object and send it.
Distribute Channel—Allows you to select a channel object and send it.
The Events tab of a TED agent in the Remote Web Console view displays the distribution events on the subscriber or distributor agent selected. The following is a list of pages under the Events tab for a TED agent:
![]() Subscriber Event Log—Displays a list, including severity, time, and message, for all events that have occurred on the subscriber, shown in Figure 33.15.
Subscriber Event Log—Displays a list, including severity, time, and message, for all events that have occurred on the subscriber, shown in Figure 33.15.
FIGURE 33.15 Subscriber Events page for a policy package in the Remote Web Console tool in iManager.

![]() Distributor Event Log—Displays a list, including severity, time, and message, for all events that have occurred on the distributor.
Distributor Event Log—Displays a list, including severity, time, and message, for all events that have occurred on the distributor.
![]() Scheduled Events—Displays a list of events scheduled on the TED Agent.
Scheduled Events—Displays a list of events scheduled on the TED Agent.
The Security tab of a TED agent in the Remote Web Console displays the certificates of trusted distributors for distributions on the subscriber or distributor agent selected. The following is a list of pages under the Security tab for a TED agent:
![]() Show Certificates—Displays the data for all certificates on the agent, including who issued the certificate, subject, date/time created, and date/time that it expires.
Show Certificates—Displays the data for all certificates on the agent, including who issued the certificate, subject, date/time created, and date/time that it expires.
![]() Sign CSR (distributor only)—Allows you to have the distributor agent sign a Certificate Signing Request (CSR).
Sign CSR (distributor only)—Allows you to have the distributor agent sign a Certificate Signing Request (CSR).