
Appendix B. OpenGL ES and WebGL
While the OpenGL API is great for many computer graphics applications, under certain circumstances, it may not be the best solution, which is why the OpenGL API has spawned two other APIs. The first is OpenGL ES (where the ES stands for embedded subsystem) and was crafted from the “desktop” version of OpenGL for use in embedded devices like mobile phones, Internet tablets, televisions, and other devices with color screens but limited system resources. The other API is WebGL, which enables OpenGL-style rendering within most Web browsers using the JavaScript Web programming language.
This appendix introduces OpenGL ES and WebGL, highlighting the differences between OpenGL as described throughout the rest of this book and these derivative versions. It contains the following major sections:
• “OpenGL ES”
• “WebGL”
OpenGL ES
OpenGL ES is developed to meet the need of early embedded devices like mobile phones and set-top boxes. The original version, OpenGL ES Version 1.0 was derived from OpenGL Version 1.3 and was quickly expanded to OpenGL ES Version 1.1, which is based on OpenGL Version 1.5, and released in April of 2007. This version reached much popularity in original mobile phones with fixed-function graphics hardware.
As mobile graphics hardware became more capable, principally by programmable shaders, a new version of OpenGL ES was required, and OpenGL ES Version 2.0, based on OpenGL Version 2.0, was originally specified in January of 2008. Keeping with its minimalist mantra of supporting only a single method for processing graphics, the API switched to an entirely shader-based rendering pipeline using both vertex and fragment shaders (which also broke source-code compatibility with OpenGL ES Version 1.1). OpenGL ES Version 2.0 has become very influential in dictating hardware requirements for many different types of devices. With the release of OpenGL Version 4.1, all functionality for OpenGL ES Version 2.0 was added to OpenGL, making OpenGL ES a proper subset of OpenGL’s functionality.
At SIGGRAPH 2012, OpenGL ES Version 3.0 was announced, expanding on the rendering capabilities of OpenGL ES (however, not adding any additional programmable shader stages like geometry or tessellation shading). This version did retain backward compatibility with OpenGL ES Version 2.0, with most of the new features focusing on increased shader programmability (leveraging sampler objects, for example), instanced rendering and transform feedback, and extended pixel and framebuffer formats.
As OpenGL ES is a subset of OpenGL in terms of both features and functions, everything you’ve read in this text applies in terms of techniques it supports. In fact, perhaps the largest noticeable difference between an OpenGL ES program and that of OpenGL core profile may be in creating a window for rendering. OpenGL ES in most systems (but notably not Apple’s iOS) is connected to the system’s windowing system by a binding layer named EGL.
We now provide a brief example of creating an OpenGL ES Version 2.0 context (because, at the time of this writing, there are no OpenGL ES Version 3.0–capable devices available). Example B.1 demonstrates creating an RGB-capable rendering context with a depth buffer for use in a window.
Example B.1 An Example of Creating an OpenGL ES Version 2.0 Rendering Context
EGLBoolean initializeWindow(EGLNativeWindow nativeWindow)
{
const EGLint configAttribs[] = {
EGL_RENDER_TYPE, EGL_WINDOW_BIT,
EGL_RED_SIZE, 8,
EGL_GREEN_SIZE, 8,
EGL_BLUE_SIZE, 8,
EGL_DEPTH_SIZE, 24,
EGL_NONE
};
const EGLint contextAttribs[] = {
EGL_CONTEXT_CLIENT_VERSION, 2,
EGL_NONE
};
EGLDisplay dpy;
dpy = eglGetNativeDispay(EGL_DEFAULT_DISPLAY);
if (dpy == EGL_NO_DISPLAY) { return EGL_FALSE; }
EGLint major, minor;
if (!eglInitialize(dpy, &major, &minor)) { return EGL_FALSE;
EGLConfig config;
EGLint numConfigs;
if (!eglChooseConfig(dpy, configAttribs, &config, 1, &numConfigs)) {
return EGL_FALSE;
}
EGLSurface window;
window = eglCreateWindowSurface(dpy, config, nativeWindow, NULL);
if (window == EGL_NO_SURFACE) { return EGL_FALSE; }
EGLContext context;
context = eglCreateContext(dpy, config, EGL_NO_CONTEXT,
contextAttribs);
if (context == EGL_NO_CONTEXT) { return EGL_FALSE; }
if (!eglMakeCurrent(dpy, window, window, context)) {
return EGL_FALSE;
}
return EGL_TRUE;
}
WebGL
WebGL takes OpenGL (or, specifically, OpenGL ES Version 2.0) to the Internet by adding high-performance 3D rendering within HTML5’s Canvas element. Virtually all functions from OpenGL ES Version 2.0 are available in their exact form except for small changes necessitated because of its JavaScript interface.
This section provides a brief introduction to WebGL through a simple example, which works natively in all modern Web browsers (except Microsoft’s Internet Explorer, which requires a plug-in for support). Our example focuses exclusively on rendering; event processing and user interaction aren’t discussed.
Setting Up WebGL Within an HTML5 Page
To provide a “window” for WebGL to use for rendering, you first create an HTML5 Canvas element within you Web page. Example B.2 demonstrates creating a 512 × 512-sized Canvas with a blue background. In the case that the browser doesn’t support WebGL, a simple page stating that the browser doesn’t support Canvas elements is shown. In the example, we name the Canvas gl-canvas by setting its id attribute. We’ll use its id later when we initialize WebGL.
Example B.2 Creating an HTML5 Canvas Element
<html>
<style type="text/css">
canvas { background: blue; }
</style>
<body>
<canvas id="gl-canvas" width="512" height="512">
Oops ... your browser doesn't support HTML5's Canvas elements!
</canvas>
</body>
</html>
Assuming this worked in your browser, we can now continue to the next step: creating a WebGL context. There are multiple ways to do this; however, we’ll use a utility function defined in a JavaScript file hosted by the Khronos Group from their Web site, https://www.khronos.org/registry/webgl/sdk/demos/common/webgl-utils.js. You will likely find it convenient to include this JavaScript file in your WebGL applications.1 It includes the package WebGLUtils and its method setupWebGL(), which makes it easy to enable WebGL on an HTML5 Canvas. Example B.3 expands on the previous example and handles setting up a WebGL context that works in all supported Web browsers. The return value from setupWebGL() is a JavaScript object containing methods for all OpenGL functions supported in WebGL.
1. This file can also be hosted from the Web server serving the pages composing the WebGL application.
Example B.3 Creating an HTML5 Canvas Element That Supports WebGL
<html>
<style type="text/css">
canvas { background: blue; }
</style>
<script type="text/javascript"
src="https://www.khronos.org/registry/webgl/sdk/demos/common/
webgl-utils.js">
</script>
<script type="text/javascript">
var canvas;
var gl;
window.onload = init;
function init() {
canvas = document.getElementById("gl-canvas");
gl = WebGLUtils.setupWebGL(canvas);
if (!gl) { alert("WebGL isn't available"); }
gl.viewport(0, 0, canvas.width, canvas.height);
gl.clearColor(1.0, 0.0, 0.0, 1.0);
gl.clear(gl.COLOR_BUFFER_BIT);
}
</script>
<body>
<canvas id="gl-canvas" width="512" height="512">
Oops ... your browser doesn't support HTML5's Canvas elements!
</canvas>
</body>
</html>
Example B.3 specifies an init() function that is executed when the page loads (specified by the line window.onload = init). Our init() function retrieves our gl-canvas Canvas ID and passes it to setupWebGL(), which will return a WebGL object that we can use if initialization was successful or false otherwise, which we use to emit an error message. Assuming that WebGL is available, we set up some WebGL state, and clear the window—to red now. Once WebGL takes over the Canvas, all of its contents are controlled by WebGL.
Now that we know WebGL is supported, we’ll expand our example by initializing the required shaders, setting up vertex buffers, and finally rendering.
Initializing Shaders in WebGL
OpenGL ES Version 2.0, and therefore WebGL, is a shader-based API, like OpenGL, requiring every application to use vertex and fragment shaders for its rendering. As such, you encounter the same requirement of loading shaders as you saw in OpenGL.
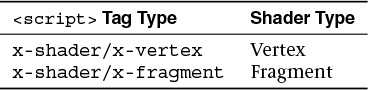
To include vertex and fragment shaders in a WebGL application, it’s simplest to include the shader as a script in the HTML page.2 A shader within an HTML page needs to be identified correctly. There are two mime-types associated with WebGL shaders, shown in Table B.1.
2. It is possible to store the shader in a separate file from the original HTML page, but the mechanism is cumbersome with current Web technology. We opted for the simple approach here.
For our WebGL application, Example B.4 shows our main HTML page, including the shader sources. Notice that we include two more JavaScript files, which are as follows:
• demo.js, which includes the JavaScript implementation of our application (including the final version of our init() routine)
• InitShaders.js, which is a helper function for loading shaders similar to our LoadShaders() routine
Example B.4 Our WebGL Application’s Main HTML Page
<html>
<style type="text/css">
canvas { background: blue; }
</style>
<script id="vertex-shader" type="x-shader/x-vertex">
attribute vec4 vPos;
attribute vec2 vTexCoord;
uniform float uFrame; // Frame number
varying vec2 texCoord;
void
main()
{
float angle = radians(uFrame);
float c = cos(angle);
float s = sin(angle);
mat4 m = mat4(1.0);
m[0][0] = c;
m[0][1] = s;
m[1][1] = c;
m[1][0] = -s;
texCoord = vTexCoord;
gl_Position = m * vPos;
}
</script>
<script id="fragment-shader" type="x-shader/x-fragment">
#ifdef GL_ES
precision highp float;
#endif
uniform sampler2D uTexture;
varying vec2 texCoord;
void
main()
{
gl_FragColor = texture2D(uTexture, texCoord);
}
</script>
<script type="text/javascript"
src="http://www.khronos.org/registry/webgl/sdk/demos/common/
webgl-utils.js">
</script>
<script type="text/javascript" src="InitShaders.js"></script>
<script type="text/javascript" src="demo.js"></script>
<body>
<canvas id="gl-canvas" width="512"" height="512"
Oops ... your browser doesn't support the HTML5 canvas element
</canvas>
</body>
</html>
To simplify compiling and linking our shaders in WebGL, we created a routine similar to LoadShaders() that we’ve used in the book. In Example B.5, we call it InitShaders() because there are no files to load; shaders are defined in the HTML source for the page. In order to organize our code better, we created a JavaScript file named InitShaders.js to store the code.
Example B.5 Our WebGL Shader Loader: InitShaders.js
//
// InitShaders.js
//
function InitShaders(gl, vertexShaderId, fragmentShaderId)
{
var vertShdr;
var fragShdr;
var vertElem = document.getElementById(vertexShaderId);
if (!vertElem) {
alert("Unable to load vertex shader " + vertexShaderId);
return -1;
}
else {
vertShdr = gl.createShader(gl.VERTEX_SHADER);
gl.shaderSource(vertShdr, vertElem.text);
gl.compileShader(vertShdr);
if (!gl.getShaderParameter(vertShdr, gl.COMPILE_STATUS)) {
var msg = "Vertex shader failed to compile. "
+ "The error log is:"
+ "<pre>" + gl.getShaderInfoLog(vertShdr) + "</pre>";
alert(msg);
return -1;
}
}
var fragElem = document.getElementById(fragmentShaderId);
if (!fragElem) {
alert("Unable to load vertex shader " + fragmentShaderId);
return -1;
}
else {
fragShdr = gl.createShader(gl.FRAGMENT_SHADER);
gl.shaderSource(fragShdr, fragElem.text);
gl.compileShader(fragShdr);
if (!gl.getShaderParameter(fragShdr, gl.COMPILE_STATUS)) {
var msg = "Fragment shader failed to compile. "
+ "The error log is:"
+ "<pre>" + gl.getShaderInfoLog(fragShdr) + "</pre>";
alert(msg);
return -1;
}
}
var program = gl.createProgram();
gl.attachShader(program, vertShdr);
gl.attachShader(program, fragShdr);
gl.linkProgram(program);
if (!gl.getProgramParameter(program, gl.LINK_STATUS)) {
var msg = "Shader program failed to link. "
+ "The error log is:"
+ "<pre>" + gl.getProgramInfoLog(program) + "</pre>";
alert(msg);
return -1;
}
return program;
}
While InitShaders() is JavaScript, most of it should look recognizable. The major difference here is that compared to LoadShaders(), which took file names for our vertex and fragment shaders, InitShaders() takes HTML element ids (vertex-shader and fragment-shader in our example). The routine returns a program name that can be passed into the JavaScript equivalent of glUseProgram(), as shown in Example B.6.
Example B.6 Loading WebGL Shaders Using InitShaders()
var program = InitShaders(gl, "vertex-shader", "fragment-shader");
gl.useProgram(program);
Armed with a method for compiling and linking our shaders, we can move on to initializing our graphics data, loading textures, and completing the setup of the rest of our WebGL application.
Initializing Vertex Data in WebGL
One major addition to JavaScript that came from WebGL were typed arrays, which extend the concept of a JavaScript array but match the type support required for OpenGL-style rendering. Several types of typed arrays are listed in Table B.2.

You first allocate and populate (both of which you can do in a single operation) a typed array to store your vertex data. After that, setting up your VBOs is identical to what you’ve done in OpenGL. We show our initialization in Example B.7.
Example B.7 Initializing Vertex Buffers in WebGL
var vertices = {};
vertices.data = new Float32Array(
[
-0.5, -0.5,
0.5, -0.5,
0.5, 0.5,
-0.5, 0.5
]);
vertices.bufferId = gl.createBuffer();
gl.bindBuffer(gl.ARRAY_BUFFER, vertices.bufferId);
gl.bufferData(gl.ARRAY_BUFFER, vertices.data, gl.STATIC_DRAW);
var vPos = gl.getAttribLocation(program, "vPos");
gl.vertexAttribPointer(vPos, 2, gl.FLOAT, false, 0, 0);
gl.enableVertexAttribArray(vPos);
Using Texture Maps in WebGL
Using textures in WebGL is also the same as in OpenGL, but handling the loading and setup is much simpler because HTML lends a helping hand. In fact, loading a texture from a file is a one-line operation. In our demo, we use a single texture named OpenGL-logo.png.
var image = new Image();
image.src = "OpenGL-logo.png";
Yes; that’s all there is to loading the pixels from the image into a variable. However, HTML pages load asynchronously, so knowing when the image file has been received and loaded needs to be handled in a callback. Fortunately, JavaScript has a ready-made method in the Image class for handling that situation: onload(). We can specify the onload() method as follows:
image.onload = function () {
configureTexture(image);
render();
}
The onload() method just defined will be called once our image has been completely loaded and ready for use by WebGL. We group all of our texture-initialization code in a local function: configureTexture.
function configureTexture(image) {
texture = gl.createTexture();
gl.activeTexture(gl.TEXTURE0);
gl.bindTexture(gl.TEXTURE_2D, texture);
gl.pixelStorei(gl.UNPACK_FLIP_Y_WEBGL, true);
gl.texImage2D(gl.TEXTURE_2D, 0, gl.RGB, gl.RGB, gl.UNSIGNED_BYTE,
image);
gl.generateMipmap(gl.TEXTURE_2D);
gl.texParameteri(gl.TEXTURE_2D, gl.TEXTURE_MIN_FILTER,
gl.NEAREST_MIPMAP_LINEAR);
gl.texParameteri(gl.TEXTURE_2D, gl.TEXTURE_MAG_FILTER, gl.NEAREST);
}
The code sequence in configureTexture should look similar to what was presented in Chapter 6, “Textures and Framebuffers.” The one notable addition is the WebGL extension to glPixelStore*() for flipping image data. The WebGL token UNPACK_FLIP_Y_WEBGL will orient the image data to match what WebGL is expecting.
Note
As with OpenGL ES Version 2.0, WebGL supports only power-of-two textures.
Having covered the important parts of our demo.js, we now show the file in its entirety and the resulting image in Example B.8 and Figure B.1.

Example B.8 demo.js WebGL Application
var canvas;
var gl;
var texture;
var uFrame; // vertex shader angle uniform variable
window.onload = init;
function CheckError(msg) {
var error = gl.getError();
if (error != 0) {
var errMsg = "OpenGL error: " + error.toString(16);
if (msg) { errMsg = msg + "
" + errMsg; }
alert(errMsg);
}
}
function configureTexture(image) {
texture = gl.createTexture();
gl.activeTexture(gl.TEXTURE0);
gl.bindTexture(gl.TEXTURE_2D, texture);
gl.pixelStorei(gl.UNPACK_FLIP_Y_WEBGL, true);
gl.texImage2D(gl.TEXTURE_2D, 0, gl.RGB, gl.RGB, gl.UNSIGNED_BYTE,
image);
gl.generateMipmap(gl.TEXTURE_2D);
gl.texParameteri(gl.TEXTURE_2D, gl.TEXTURE_MIN_FILTER,
gl.NEAREST_MIPMAP_LINEAR);
gl.texParameteri(gl.TEXTURE_2D, gl.TEXTURE_MAG_FILTER, gl.NEAREST);
}
function init() {
canvas = document.getElementById("gl-canvas");
gl = WebGLUtils.setupWebGL(canvas);
if (!gl) { alert("WebGL isn't available"); }
gl.viewport(0, 0, canvas.width, canvas.height);
gl.clearColor(1.0, 0.0, 0.0, 1.0);
//
// Load shaders and initialize attribute buffers
//
var program = InitShaders(gl, "vertex-shader", "fragment-shader");
gl.useProgram(program);
var vertices = {};
vertices.data = new Float32Array(
[
-0.5, -0.5,
0.5, -0.5,
0.5, 0.5,
-0.5, 0.5
]);
vertices.bufferId = gl.createBuffer();
gl.bindBuffer(gl.ARRAY_BUFFER, vertices.bufferId);
gl.bufferData(gl.ARRAY_BUFFER, vertices.data, gl.STATIC_DRAW);
var vPos = gl.getAttribLocation(program, "vPos");
gl.vertexAttribPointer(vPos, 2, gl.FLOAT, false, 0, 0);
gl.enableVertexAttribArray(vPos);
var texCoords = {};
texCoords.data = new Float32Array(
[
0.0, 0.0,
1.0, 0.0,
1.0, 1.0,
0.0, 1.0
]);
texCoords.bufferId = gl.createBuffer();
gl.bindBuffer(gl.ARRAY_BUFFER, texCoords.bufferId);
gl.bufferData(gl.ARRAY_BUFFER, texCoords.data, gl.STATIC_DRAW);
var vTexCoord = gl.getAttribLocation(program, "vTexCoord");
gl.vertexAttribPointer(vTexCoord, 2, gl.FLOAT, false, 0, 0);
gl.enableVertexAttribArray(vTexCoord);
//
// Initialize a texture
//
var image = new Image();
image.onload = function() {
configureTexture(image);
render();
}
image.src = "OpenGL-logo.png";
gl.activeTexture(gl.TEXTURE0);
var uTexture = gl.getUniformLocation(program, "uTexture");
gl.uniform1i(uTexture, 0);
uFrame = gl.getUniformLocation(program, "uFrame");
// window.setInterval(render, 100);
}
var frameNumber = 0;
function render() {
gl.uniform1f(uFrame, frameNumber++);
gl.clear(gl.COLOR_BUFFER_BIT | gl.DEPTH_BUFFER_BIT);
gl.drawArrays(gl.TRIANGLE_FAN, 0, 4);
window.requestAnimFrame(render, canvas);
}