
Chapter 2. Shader Fundamentals
Chapter Objectives
After reading this chapter, you’ll be able to do the following:
• Identify the various types of shaders that OpenGL uses to create images.
• Construct and compile shaders using the OpenGL Shading Language.
• Pass data into shaders using a variety of mechanisms available in OpenGL.
• Employ advanced GLSL shading capabilities to make shaders more reusable.
This chapter introduces shaders and explains how to use them with OpenGL. Along the way, we describe the OpenGL Shading Language (commonly called GLSL), and detail how shaders will influence your OpenGL applications.
This chapter contains the following major sections:
• “Shaders and OpenGL” discusses programmable graphics shaders in the context of OpenGL applications.
• “OpenGL’s Programmable Pipeline” details each stage of the OpenGL programmable pipeline.
• “An Overview of the OpenGL Shading Language” introduces the OpenGL Shading Language.
• “Interface Blocks” shows how to organize shader variables shared with the application or between stages.
• “Compiling Shaders” describes the process of converting GLSL shaders into programmable shader programs usable in your OpenGL application.
• “Shader Subroutines” discusses a method to increase the usability of shaders by allowing them to select execution routines without recompiling shaders.
• “Separate Shader Objects” details how to composite elements from multiple shaders into a single, configurable graphics pipeline.
• “SPIR-V” discusses how to set shaders compiled to the SPIR-V binary intermediate language.
Shaders and OpenGL
The modern OpenGL rendering pipeline relies very heavily on using shaders to process the data you pass to it. About the only rendering you can do with OpenGL without shaders is clearing a window, which should give you a feel for how important shaders are when using OpenGL.
Shaders, whether for OpenGL or any other graphics API, are usually written in a specialized programming language. For OpenGL, we use GLSL, the OpenGL Shading Language, which has been around since OpenGL Version 2.0 (and before as extensions). It has evolved along with OpenGL, usually being updated with each new version of OpenGL. While GLSL is a programming language specially designed for graphics, you’ll find it’s very similar to the C language, with a little C++ mixed in.
Shaders are so fundamental to the operation of OpenGL, it’s important to introduce them early and get you comfortable with writing them. Any OpenGL program will essentially be divided into two main parts; the part that’s running on the CPU, written in a language such as C++, and the part that’s running on the GPU, which is written in GLSL.
In this chapter, we describe how to write shaders, gradually introducing GLSL along the way, discuss compiling and integrating shaders into your application, and show how data in your application passes between the various shaders.
OpenGL’s Programmable Pipeline
While Chapter 1 provided a brief introduction to OpenGL’s rendering pipeline, we glossed over the mechanics of the shaders themselves and didn’t even show you what the simple shaders used by the first example contained. Here, we describe in greater detail the various stages and what operations they carry out. Version 4.5’s graphical pipeline contains four processing stages, plus a compute stage, each of which you control by providing a shader.
1. The Vertex shading stage receives the vertex data that you specified in your vertex-buffer objects, processing each vertex separately. This is the only mandatory stage, and all OpenGL programs must have a shader bound to it when drawing. We describe vertex shading operation in Chapter 3, “Drawing with OpenGL.”
2. The Tessellation shading stage is an optional stage that generates additional geometry within the OpenGL pipeline, as compared to having the application specify each geometric primitive explicitly. This stage, if activated, receives the output of the vertex shading stage and does further processing of the received vertices.
The tessellation stage is actually divided into two shaders known as the tessellation control shader and the tessellation evaluation shader. These will be explained in more detail in Chapter 9, “Tessellation Shaders.” We use the term tessellation shader to mean either or both of these shading stages, and will sometimes use the terms control shader and evaluation shader as shorthand for its two parts.
3. The Geometry shading stage is another optional stage that can modify entire geometric primitives within the OpenGL pipeline. This stage operates on individual geometric primitives allowing each to be modified. In this stage, you might generate more geometry from the input primitive, change the type of geometric primitive (e.g., converting triangles to lines), or discard the geometry altogether. If activated, a geometry shader receives its input either after vertex shading has completed processing the vertices of a geometric primitive or from the primitives generated from the tessellation shading stage, if it’s been enabled. The geometry shading stage is described in Chapter 10, “Geometry Shaders.”
4. Finally, the last part of the OpenGL shading pipeline is the Fragment shading stage. This stage processes the individual fragments (or samples, if sample-shading mode is enabled) generated by OpenGL’s rasterizer and must have a shader bound to it. In this stage, a fragment’s color and depth values are computed and then sent for further processing in the fragment-testing and blending parts of the pipeline. Fragment shading operation is discussed in many sections of the text.
5. The Compute shading stage is not part of the graphical pipeline like the stages above, but stands on its own as the only stage in a program. A compute shader processes generic work items, driven by an application-chosen range, rather than by graphical inputs like vertices and fragments. Compute shaders can process buffers created and consumed by other shader programs in your application. This includes framebuffer post-processing effects or really anything you want. Compute shaders are described in Chapter 12, “Compute Shaders.”
An important concept to understand in general is how data flows between the shading stages. Shaders, as you saw in Chapter 1, are like a function call: Data is passed in, processed, and passed back out. In C, for example, this can either be done using global variables or arguments to the function. GLSL is a little different. Each shader looks a complete C program, in that its entry point is a function named main(). Unlike C, GLSL’s main() doesn’t take any arguments; rather all data going into and out of a shader stage is passed using special global variables in the shader. (Please don’t confuse them with global variables in your application; shader variables are entirely separate from the variables you’ve declared in your application code.) For example, take a look at Example 2.1.
Example 2.1 A Simple Vertex Shader
#version 450 core
in vec4 vPosition;
in vec4 vColor;
out vec4 color;
uniform mat4 ModelViewProjectionMatrix;
void
main()
{
color = vColor;
gl_Position = ModelViewProjectionMatrix * vPosition;
}
Even though that’s a very short shader, there are a lot of things to take note of. Regardless of which shading stage you’re programming for, shaders will generally have the same structure as this one. This includes starting with a declaration of the version using #version.
First, notice the global variables. Those are the inputs and outputs OpenGL uses to pass data through the shader. Aside from each variable having a type (e.g., vec4, which we’ll get into more momentarily), data is copied into the shader from OpenGL through the in variables and likewise copied out of the shader through the out variables. The values in those variables are updated every time OpenGL executes the shader (e.g., if OpenGL is processing vertices, then new values are passed through those variables for each vertex; when processing fragments, then for each fragment). The other category of variable that’s available to receive data from an OpenGL application are uniform variables. Uniform values don’t change per vertex or fragment, but have the same value across geometric primitives until the application updates them.
An Overview of the OpenGL Shading Language
This section provides an overview of the shading language used within OpenGL. GLSL shares many traits with C++ and Java, and is used for authoring shaders for all the stages supported in OpenGL, although certain features are available only for particular types of shaders. We will first describe GLSL’s requirements, types, and other language constructs that are shared between the various shader stages, and then discuss the features unique to each type of shader.
Creating Shaders with GLSL
Here, we describe how to create a complete shader.
The Starting Point
A shader program, just like a C program, starts execution in main(). Every GLSL shader program begins life as follows:
#version 330 core
void
main()
{
// Your code goes here
}
The // construct is a comment and terminates at the end of the current line, just like in C. Additionally, C-type, multi-line comments—the /* and */ type—are also supported. However, unlike ANSI C, main() does not return an integer value; it is declared void. Also, as with C and its derivative languages, statements are terminated with a semicolon. While this is a perfectly legal GLSL program that compiles and even runs, its functionality leaves something to be desired. To add a little more excitement to our shaders, we’ll continue by describing variables and their operation.
Declaring Variables
GLSL is a typed language; every variable must be declared and have an associated type. Variable names conform to the same rules as those for C: You can use letters, numbers, and the underscore character (_) to compose variable names. However, a digit cannot be the first character in a variable name. Similarly, variable names cannot contain consecutive underscores; those names are reserved in GLSL.
Table 2.1 shows the basic types available in GLSL.

These types (and later, aggregate types composed of these) are all transparent. That is, their internal form is exposed and the shader code gets to assume what they look like internally.
An additional set of types, the opaque types, do not have their internal form exposed. These include sampler types, image types, and atomic counter types. They declare variables used as opaque handles for accessing texture maps, images, and atomic counters, as described in Chapter 4, “Color, Pixels, and Fragments.”
The various types of samplers and their uses are discussed in Chapter 6, “Textures and Framebuffers.”
Variable Scoping
While all variables must be declared, they may be declared any time before their use (just as in C++). The scoping rules of GLSL, which closely parallel those of C++, are as follows:
• Variables declared outside of any function definition have global scope and are visible to all subsequent functions within the shader program.
• Variables declared within a set of curly braces (e.g., function definition, block following a loop or “if” statement, etc.) exist within the scope of those braces only.
• Loop iteration variables, such as i in the loop
for (int i = 0; i < 10; ++i) {
// loop body
}
are scoped only for the body of the loop.
Variable Initialization
Variables may also be initialized when declared. For example:
int i, numParticles = 1500;
float force, g = -9.8;
bool falling = true;
double pi = 3.1415926535897932384626LF;
Integer literal constants may be expressed as octal, decimal, or hexadecimal values. An optional minus sign before a numeric value negates the constant, and a trailing ‘u’ or ‘U’ denotes an unsigned integer value.
Floating-point literals must include a decimal point, unless described in scientific format, as in 3E-7. (However, there are many situations where an integer literal will be implicitly converted to a floating-point value.) Additionally, they may optionally include an ‘f’ or ‘F’ suffix as in C on a float literal. You must include a suffix of ‘lF’ or ‘LF’ to make a literal have the precision of a double.
Boolean values are either true or false and can be initialized to either of those values or as the result of an operation that resolves to a Boolean expression.
Constructors
As mentioned, GLSL is more type safe than C++, having fewer implicit conversion between values. For example,
int f = false;
will result in a compilation error due to assigning a Boolean value to an integer variable. Types will be implicitly converted as shown in Table 2.2.

These type conversions work for scalars, vectors, and matrices of these types. Conversions will never change whether something is a vector or a matrix, or how many components it has. Conversions also don’t apply to arrays or structures.
Any other conversion of values requires explicit conversion using a conversion constructor. A constructor, as in other languages like C++, is a function with the same name as a type, which returns a value of that type. For example,
float f = 10.0;
int ten = int(f);
uses an int conversion constructor to do the conversion. Likewise, the other types also have conversion constructors: float, double, uint, bool, and vectors and matrices of these types. Each accepts multiple other types to explicitly convert from. These functions also illustrate another feature of GLSL: function overloading, whereby each function takes various input types, but all use the same base function name. We will discuss more on functions in a bit.
Aggregate Types
GLSL’s basic types can be combined to better match core OpenGL’s data values and to ease computational operations.
First, GLSL supports vectors of two, three, or four components for each of the basic types of bool, int, uint, float, and double. Also, matrices of float and double are available. Table 2.3 lists the valid vector and matrix types.

Matrix types that list both dimensions, such as mat4x3, use the first value to specify the number of columns, the second the number of rows.
Variables declared with these types can be initialized similar to their scalar counterparts:
vec3 velocity = vec3(0.0, 2.0, 3.0);
Converting between types is equally accessible:
ivec3 steps = ivec3(velocity);
Vector constructors can also be used to truncate or lengthen a vector. If a longer vector is passed into the constructor of a smaller vector, the vector is truncated to the appropriate length.
vec4 color;
vec3 RGB = vec3(color); // now RGB only has three elements
Scalar values can be promoted to vectors, but that’s the only way a vector constructor takes fewer components than its size indicates:
vec3 white = vec3(1.0); // white = (1.0, 1.0, 1.0)
vec4 translucent = vec4(white, 0.5);
Matrices are constructed in the same manner and can be initialized to either a diagonal matrix or a fully populated matrix. In the case of diagonal matrices, a single value is passed into the constructor, and the diagonal elements of the matrix are set to that value, with all others being set to zero, as in
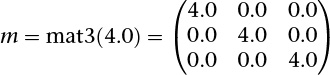
Matrices can also be created by specifying the value of every element in the matrix in the constructor. Values can be specified by combinations of scalars and vectors as long as enough values are provided and each column is specified in the same manner. Additionally, matrices are specified in column-major order, meaning the values are used to populate columns before rows (which is the opposite of how C initializes two-dimensional arrays).
For example, we could initialize a 3 × 3 matrix in any of the following ways:
mat3 M = mat3(1.0, 2.0, 3.0,
4.0, 5.0, 6.0,
7.0, 8.0, 9.0);
vec3 column1 = vec3(1.0, 2.0, 3.0);
vec3 column2 = vec3(4.0, 5.0, 6.0);
vec3 column3 = vec3(7.0, 8.0, 9.0);
mat3 M = mat3(column1, column2, column3);
or even
vec2 column1 = vec2(1.0, 2.0);
vec2 column2 = vec2(4.0, 5.0);
vec2 column3 = vec2(7.0, 8.0);
mat3 M = mat3(column1, 3.0,
column2, 6.0,
column3, 9.0);
all yielding the same matrix,

Accessing Elements in Vectors and Matrices
The individual elements of vectors and matrices can be accessed and assigned. Vectors support two types of element access: a named-component method and an array-like method. Matrices use a two-dimensional array-like method.
Components of a vector can be accessed by name, as in
float red = color.r;
float v_y = velocity.y;
or by using a zero-based index scheme. The following yield identical results to the previous listing:
float red = color[0];
float v_y = velocity[1];
In fact, as shown in Table 2.4, there are three sets of component names, all of which do the same thing. The multiple sets are useful for clarifying the operations that you’re doing.

A common use for component-wise access to vectors is for swizzling components, as you might do with colors, perhaps for color space conversion. For example, you could do the following to specify a luminance value based on the red component of an input color:
vec3 luminance = color.rrr;
Likewise, if you needed to move components around in a vector, you might do
color = color.abgr; // reverse the components of a color
The only restriction is that only one set of components can be used with a variable in one statement. That is, you can’t do
vec4 color = otherColor.rgz; // Error: 'z' is from a different group
Also, a compile-time error will be raised if you attempt to access an element that’s outside the range of the type. For example,
vec2 pos;
float zPos = pos.z; // Error: no 'z' component in 2D vectors
Matrix elements can be accessed using the array notation. Either a single scalar value or an array of elements can be accessed from a matrix:
mat4 m = mat4(2.0);
vec4 zVec = m[2]; // get column 2 of the matrix
float yScale = m[1][1]; // or m[1].y works as well
Structures
You can also logically group collections of different types into a structure. Structures are convenient for passing groups of associated data into functions. When a structure is defined, it automatically creates a new type and implicitly defines a constructor function that takes the types of the elements of the structure as parameters.
struct Particle {
float lifetime;
vec3 position;
vec3 velocity;
};
Particle p = Particle(10.0, pos, vel); // pos, vel are vec3s
Likewise, to reference elements of a structure, use the familiar “dot” notation as you would in C.
Arrays
GLSL also supports arrays of any type, including structures. As with C, arrays are indexed using brackets ([ ]). The range of elements in an array of size n is 0 ... n – 1. Unlike in C, however, neither negative array indices nor positive indices out of range are permitted. As of GLSL 4.3, arrays can be made out of arrays, providing a way to handle multidimensional data. However, GLSL 4.2 and earlier versions do not allow arrays of arrays to be created (that is, you cannot create a multidimensional array).
Arrays can be declared sized or unsized. You might use an unsized array as a forward declaration of an array variable and later redeclare it to the appropriate size. Array declarations use the bracket notation, as in
float coeff[3]; // an array of 3 floats
float[3] coeff; // same thing
int indices[]; // unsized. Redeclare later with a size
Arrays are first-class types in GLSL, meaning they have constructors and can be used as function parameters and return types. To statically initialize an array of values, you would use a constructor in the following manner:
float coeff[3] = float[3](2.38, 3.14, 42.0);
The dimension value on the constructor is optional.
Additionally, similar to Java, GLSL arrays have an implicit method for reporting their number of elements: the length() method. If you would like to operate on all the values in an array, here is an example using the length() method:
for (int i = 0; i < coeff.length(); ++i) {
coeff[i] *= 2.0;
}
The length() method also works on vectors and matrices. A vector’s length is the number of components it contains, while a matrix’s length is the number of columns it contains. This is exactly what you need when using array syntax for indexing vectors and matrices. (m[2] is the third column of a matrix m.)
mat3x4 m;
int c = m.length(); // number of columns in m: 3
int r = m[0].length(); // number of components in column vector 0: 4
When the length is known at compile time, the length() method will return a compile-time constant that can be used where compile-time constants are required. For example:
mat4 m;
float diagonal[m.length()]; // array of size matching the matrix size
float x[gl_in.length()]; // array of size matching the number of
// geometry shader input vertices
For all vectors and matrices, and most arrays, length() is known at compile time. However, for some arrays, length() is not known until link time. This happens when relying on the linker to deduce the size from multiple shaders in the same stage. For shader storage buffer objects (declared with buffer, as described shortly), length() might not be known until render time. If you want a compile-time constant returned from length(), just make sure you establish the array size in your shader before using the length() method.
Multidimensional arrays are really arrays made from arrays and have a syntax similar to C:
float coeff[3][5]; // an array of size 3 of arrays of size 5
coeff[2][1] *= 2.0; // inner-dimension index is 1, outer is 2
coeff.length(); // this returns the constant 3
coeff[2]; // a one-dimensional array of size 5
coeff[2].length(); // this returns the constant 5
Multidimensional arrays can be formed in this way for virtually any type and resource. When shared with the application, the innermost (rightmost) dimension changes the fastest in the memory layout.
Storage Qualifiers
Types can also have modifiers that affect their behavior. There are several modifiers defined in GLSL, as shown in Table 2.5, with the behaviors they exhibit when used at global scope.
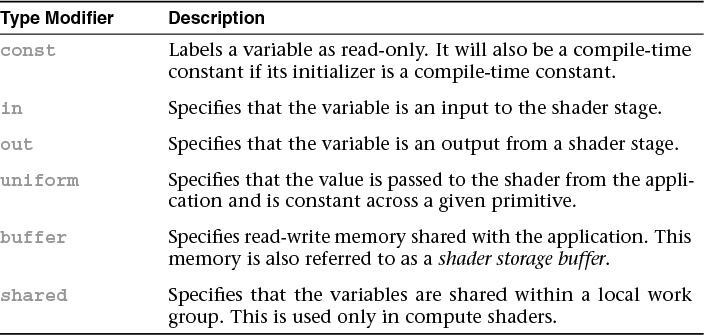
const Storage Qualifier
Just as with C, const type modifier indicates that the variable is read-only. For example, the statement
const float Pi = 3.141529;
sets the variable Pi to an approximation of π. With the addition of the const modifier, it becomes an error to write to a variable after its declaration, so const variables must be initialized when declared.
in Storage Qualifier
The in modifier is used to qualify inputs into a shader stage. Those inputs may be vertex attributes (for vertex shaders) or output variables from the preceding shader stage.
Fragment shaders can further qualify their input values using some additional keywords that we discuss in Chapter 4, “Color, Pixels, and Fragments.”
out Storage Qualifier
The out modifier is used to qualify outputs from a shader stage. For example, the transformed homogeneous coordinates from a vertex shader or the final fragment color from a fragment shader.
uniform Storage Qualifier
The uniform modifier specifies that a variable’s value will be specified by the application before the shader’s execution and does not change across the primitive being processed. Uniform variables are shared among all the shader stages enabled in a program and must be declared as global variables. Any type of variable, including structures and arrays, can be specified as uniform. A shader cannot write to a uniform variable and change its value.
For example, you might want to use a color for shading a primitive. You might declare a uniform variable to pass that information into your shaders. In the shaders, you would make the declaration
uniform vec4 BaseColor;
Within your shaders, you can reference BaseColor by name, but to set its value in your application, you need to do a little extra work. The GLSL compiler creates a table of all uniform variables when it links your shader program. To set BaseColor’s value from your application, you need to obtain the index of BaseColor in the table, which is done using the glGetUniformLocation() routine.
Once you have the associated index for the uniform variable, you can set the value of the uniform variable using the glUniform*() or glUniformMatrix*() routine. Example 2.2 demonstrates obtaining a uniform variable’s index and assigning values.
Example 2.2 Obtaining a Uniform Variable’s Index and Assigning Values
GLint timeLoc; /* Uniform index for variable "time" in shader */
GLfloat timeValue; /* Application time */
timeLoc = glGetUniformLocation(program, "time");
glUniform1f(timeLoc, timeValue);
buffer Storage Qualifier
The recommended way to share a large buffer with the application is through use of a buffer variable. Buffer variables are much like uniform variables, except that they can be modified by the shader. Typically, you’d use buffer variables in a buffer block, and blocks in general are described later in this chapter.
The buffer modifier specifies that the subsequent block is a memory buffer shared between the shader and the application. This buffer is both readable and writable by the shader. The size of the buffer can be established after shader compilation and program linking.
shared Storage Qualifier
The shared modifier is used only in compute shaders to establish memory shared within a local work group. This is discussed in more detail in Chapter 12, “Compute Shaders.”
Statements
The real work in a shader is done by computing values and making decisions. In the same manner as C++, GLSL has a rich set of operators for constructing arithmetic operations for computing values and a standard set of logical constructs for controlling shader execution.
Arithmetic Operations
No text describing a language is complete without the mandatory table of operator precedence (see Table 2.6). The operators are ordered in decreasing precedence. In general, the types being operated on must be the same, and for vector and matrices, the operands must be of the same dimension. In the table, integer types include int and uint and vectors of them; floating-point types include float and double types and vectors and matrices of them; arithmetic types include all integer and floating-point types; and any additionally includes structures and arrays.

Overloaded Operators
Most operators in GLSL are overloaded, meaning that they operate on a varied set of types. Specifically, arithmetic operations (including pre- and post-increment and -decrement) for vectors and matrices are well defined in GLSL. For example, to multiply a vector and a matrix (recalling that the order of operands is important; matrix multiplication is noncommutative, for all you math heads), use the following operation:
vec3 v;
mat3 m;
vec3 result = v * m;
The normal restrictions apply, that the dimensionality of the matrix and the vector must match. Additionally, scalar multiplication with a vector or matrix will produce the expected result. One notable exception is that the multiplication of two vectors will result in component-wise multiplication of components; however, multiplying two matrices will result in normal matrix multiplication.
vec2 a, b, c;
mat2 m, u, v;
c = a * b; // c = (a.x*b.x, a.y*b.y)
m = u * v; // m = (u00*v00+u01*v10 u00*v01+u01*v11
// u01*v00+u11*v10 u10*v01+u11*v11)
Additional common vector operations (e.g., dot and cross products) are supported by function calls, as well as various per-component operations on vectors and matrices.
Control Flow
GLSL’s logical control structures are the popular if-else and switch statements. As with the C language, the else clause is optional, and multiple statements require a block.
if (truth) {
// true clause
}
else {
// false clause
}
Similar to the situation in C, switch statements are available (starting with GLSL 1.30) in their familiar form:
switch (int_value) {
case n:
// statements
break;
case m:
// statements
break;
default:
// statements
break;
}
GLSL switch statements also support “fall-through” cases—case statements that do not end with break statements. Each case does require some statement to execute before the end of the switch (before the closing brace). Also, unlike in C++, no statements are allowed before the first case. If no case matches the switch and a default label is present, then it is executed.
Looping Constructs
GLSL supports the familiar C form of for, while, and do ... while loops.
The for loop permits the declaration of the loop iteration variable in the initialization clause of the for loop. The scope of iteration variables declared in this manner is only for the lifetime of the loop.
for (int i = 0; i < 10; ++i) {
...
}
while (n < 10) {
...
}
do {
...
} while (n < 10);
Control-Flow Statements
Additional control statements beyond conditionals and loops are available in GLSL. Table 2.7 describes available control-flow statements.

The discard statement is available only in fragment programs. The execution of the fragment shader may be terminated at the execution of the discard statement, but this is implementation-dependent.
Functions
Functions permit you to replace occurrences of common code with a function call. This, of course, allows for smaller code and fewer chances for errors. GLSL defines a number of built-in functions, which are listed in Appendix C, as well as support for user-defined functions. User-defined functions can be defined in a single shader object and reused in multiple shader programs.
Declarations
Function declaration syntax is very similar to C, with the exception of the access modifiers on variables:
returnType functionName([accessModifier] type1 variable1,
[accessModifier] type2 variable2,
...)
{
// function body
return returnValue; // unless returnType is void
}
Function names can be any combination of letters, numbers, and the underscore character, with the exception that it can neither begin with a digit nor with gl_ nor contain consecutive underscores.
Return types can be any built-in GLSL type or user-defined structure or array type. Arrays as return values must explicitly specify their size. If a function doesn’t return a value, its return type is void.
Parameters to functions can also be of any type, including arrays (which must specify their size).
Functions must be either declared with a prototype or defined with a body before they are called. Just as in C++, the compiler must have seen the function’s declaration before its use, or an error will be raised. If a function is used in a shader object other than the one where it’s defined, a prototype must be declared. A prototype is merely the function’s signature without its accompanying body. Here’s a simple example:
float HornerEvalPolynomial(float coeff[10], float x);
Parameter Qualifiers
While functions in GLSL are able to modify and return values after their execution, there’s no concept of a pointer or reference, as in C or C++. Rather, parameters of functions have associated parameter qualifiers indicating whether the value should be copied into, or out of, a function after execution. Table 2.8 describes the available parameter qualifiers in GLSL.
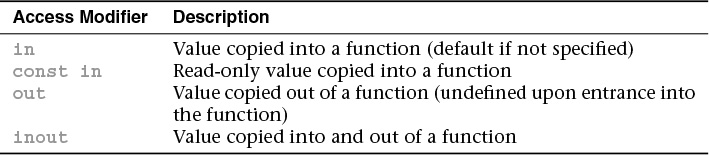
The in keyword is optional. If a variable does not include an access modifier, an in modifier is implicitly added to the parameter’s declaration. However, if the variable’s value needs to be copied out of a function, it must either be tagged with an out (for copy out-only variables) or an inout (for a variable both copied in and copied out) modifier. Writing to a variable not tagged with one of these modifiers will generate a compile-time error.
Additionally, to verify at compile time that a function doesn’t modify an input-only variable, adding a const in modifier will cause the compiler to check that the variable is not written to in the function. If you don’t do this and do write to an input-only variable, the write only modifies the local copy in the function.
Computational Invariance
GLSL does not guarantee that two identical computations in different shaders will result in exactly the same value. The situation is no different than for computational applications executing on the CPU, where the choice of optimizations may result in tiny differences in results. These tiny errors may be an issue for multipass algorithms that expect positions to be computed exactly the same for each shader pass. GLSL has two methods for enforcing this type of invariance between shaders, using the invariant or precise keywords.
Both of these methods will cause computations done by the graphics device to create reproducibility (invariance) in results of the same expression. However, they do not help reproduce the same results between the host and the graphics device. Compile-time constant expressions are computed on the compiler’s host, and there is no guarantee that the host computes in exactly the same way as the graphics device. For example:
uniform float ten; // application sets this to 10.0
const float f = sin(10.0); // computed on compiler host
float g = sin(ten); // computed on graphics device
void main()
{
if (f == g) // f and g might be not equal
;
}
In this example, it would not matter if invariant or precise was used on any of the variables involved, as they affect only two computations done on the graphics device.
The invariant Qualifier
The invariant qualifier may be applied to any shader output variable. It will guarantee that if two shader invocations each set the output variable with the same expression and the same values for the variables in that expression, both will compute the same value.
The output variable declared as invariant may be a built-in variable or a user-defined one. For example:
invariant gl_Position;
invariant centroid out vec3 Color;
As you may recall, output variables are used to pass data from one stage to the next. The invariant keyword may be applied at any time before use of the variable in the shader and may be used to modify built-in variables. This is done by declaring the variable only with invariant, as was shown earlier for gl_Position.
For debugging, it may be useful to impose invariance on all varying variables in shader. This can be accomplished by using the vertex shader preprocessor pragma.
#pragma STDGL invariant(all)
Global invariance in this manner is useful for debugging; however, it may likely have an impact on the shader’s performance. Guaranteeing invariance usually disables optimizations that may have been performed by the GLSL compiler.
The precise Qualifier
The precise qualifier may be applied to any computed variable or function return value. Despite its name, its purpose is not to increase precision, but to increase reproducibility of a computation. It is mostly used in tessellation shaders to avoid forming cracks in your geometry. Tessellation shading in general is described in Chapter 9, “Tessellation Shaders,” and there is additional discussion in that chapter about a use case for precise qualification.
Generally, you use precise instead of invariant when you need to get the same result from an expression, even if values feeding the expression are permuted in a way that should not mathematically affect the result. For example, the following expression should get the same result if the values for a and b are exchanged. It should also get the same result if the values for c and d and exchanged, or if both a and c are exchanged and b and d are exchanged, and so on.
Location = a * b + c * d;
The precise qualifier may be applied to a built-in variable, user variable, or function return value.
precise gl_Position;
precise out vec3 Location;
precise vec3 subdivide(vec3 P1, vec3 P2) { ... }
The precise keyword may be applied at any time before use of the variable in the shader and may be used to modify previously declared variables.
One practical impact in a compiler of using precise is an expression like the one above cannot be evaluated using two different methods of multiplication for the two multiply operations—for example, a multiply instruction for the first multiply and a fused multiply-and-add instruction for the second multiply. This is because these two instructions will get slightly different results for the same values. Because that was disallowed by precise, the compiler is prevented from doing this. Because use of fused multiply-and-add instructions is important to performance, it would be unfortunate to completely disallow them. So there is a built-in function in GLSL, fma(), that you can use to explicitly say this is okay.
precise out float result;
...
float f = c * d;
float result = fma(a, b, f);
Of course, you do that only if you weren’t going to have the values of a and c permuted, as you would be defeating the purpose of using precise.
Shader Preprocessor
The first step in compilation of a GLSL shader is parsing by the preprocessor. Similar to the C preprocessor, there are a number of directives for creating conditional compilation blocks and defining values. However, unlike in the C preprocessor, there is no file inclusion (#include).
Preprocessor Directives
Table 2.9 lists the preprocessor directives accepted by the GLSL preprocessor and their functions.

Macro Definition
The GLSL preprocessor allows macro definition in much the same manner as the C preprocessor, with the exception of the string substitution and concatenation facilities. Macros might define a single value, as in
#define NUM_ELEMENTS 10
or with parameters like
#define LPos(n) gl_LightSource[(n)].position
Additionally, there are several predefined macros for aiding in diagnostic messages (that you might issue with the #error directive, for example), as shown in Table 2.10.

Likewise, macros (excluding those defined by GLSL) may be undefined by using the #undef directive. For example,
#undef LPos
Preprocessor Conditionals
Identical to the processing by the C preprocessor, the GLSL preprocessor provides conditional code inclusion based on macro definition and integer constant evaluation.
Macro definition may be determined in two ways. Use the #ifdef directive:
#ifdef NUM_ELEMENTS
...
#endif
Or use the defined operator with the #if or #elif directives:
#if defined(NUM_ELEMENTS) && NUM_ELEMENTS > 3
...
#elif NUM_ELEMENTS < 7
...
#endif
Compiler Control
The #pragma directive provides the compiler additional information regarding how you would like your shaders compiled.
Optimization Compiler Option
The optimize option instructs the compiler to enable or disable optimization of the shader from the point where the directive resides forward in the shader source. You can enable or disable optimization by issuing either
#pragma optimize(on)
or
#pragma optimize(off)
respectively. These options may be issued only outside of a function definition. By default, optimization is enabled for all shaders.
Debug Compiler Option
The debug option enables or disables additional diagnostic output of the shader. You can enable or disable debugging by issuing either
#pragma debug(on)
or
#pragma debug(off)
respectively. As with the optimize option, these options may be issued only outside of a function definition, and by default, debugging is disabled for all shaders.
Global Shader-Compilation Option
One final #pragma directive that is available is STDGL. This option is currently used to enable invariance in the output of varying values.
Extension Processing in Shaders
GLSL, like OpenGL itself, may be enhanced by extensions. As vendors may include extensions specific to their OpenGL implementation, it’s useful to have some control over shader compilation in light of possible extensions that a shader may use.
The GLSL preprocessor uses the #extension directive to provide instructions to the shader compiler regarding how extension availability should be handled during compilation. For any or all extensions, you can specify how you would like the compiler to proceed with compilation:
#extension extension_name : <directive>
for a single extension, or
#extension all : <directive>
which affects the behavior of all extensions.
The options available are shown in Table 2.11

Interface Blocks
Shader variables shared with the application or between stages can be, and sometimes must be, organized into blocks of variables. Uniform variables can be organized into uniform blocks, input and output variables into in and out blocks, and shader storage buffers into buffer blocks.
These all have a similar form. First, we use uniform to demonstrate, showing first an anonymous form and second a named form:
uniform b { // 'uniform' or 'in' or 'out' or 'buffer'
vec4 v1; // list of variables
bool v2; // ...
}; // no name; access members as 'v1' and 'v2'
Or:
uniform b { // 'uniform' or 'in' or 'out' or 'buffer'
vec4 v1; // list of variables
bool v2; // ...
} name; // named; access members as 'name.v1' and 'name.v2'
Specific interface block details are provided in the following sections. Generally, the block name at the beginning (b above) is used for interface matching or external identification, while the name at the end (name above) is used in the rest of the shader for accessing the members.
Uniform Blocks
As your shader programs become more complex, it’s likely that the number of uniform variables they use will increase. Often, the same uniform value is used within several shader programs. As uniform locations are generated when a shader is linked (i.e., when glLinkProgram() is called), the indices may change, even though (to you) the values of the uniform variables are identical. Uniform buffer objects provide a method to optimize both accessing uniform variables and enabling sharing of uniform values across shader programs.
As you might imagine, given that uniform variables can exist both in your application and in a shader, you’ll need to both modify your shaders and use OpenGL routines to set up uniform buffer objects.
Specifying Uniform Blocks in Shaders
To access a collection of uniform variables using routines such as glMapBuffer() (see Chapter 3, “Drawing with OpenGL” for more details), you need to slightly modify their declaration in your shader. Instead of declaring each uniform variable individually, you group them, just as you would do in a structure, in a uniform block. A uniform block is specified using the uniform keyword. You then enclose all the variables you want in that block within a pair of braces, as demonstrated in Example 2.3.
Example 2.3 Declaring a Uniform Block
uniform Matrices {
mat4 ModelView;
mat4 Projection;
mat4 Color;
};
Recall types are divided into two categories: opaque and transparent. The opaque types include samplers, images, and atomic counters. Only the transparent types are permitted to be within a uniform block. Additionally, uniform blocks must be declared at global scope.
Uniform Block Layout Control
A variety of qualifiers are available to specify how to lay out the variables within a uniform block. These qualifiers can be used for each individual uniform block or to specify how all subsequent uniform blocks are arranged (after specifying a layout declaration). The possible qualifiers are detailed in Table 2.12.
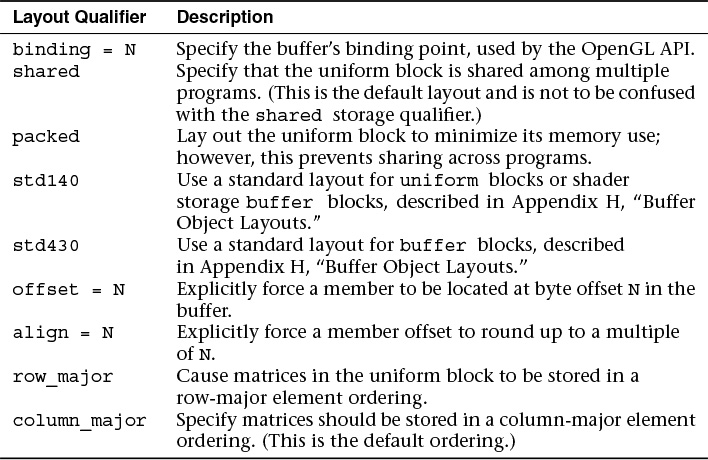
For example, to specify that a single uniform block is shared and has row-major matrix storage, declare it in the following manner:
layout (shared, row_major) uniform { ... };
Multiple qualifying options must be separated by commas within the parentheses. To affect the layout of all subsequent uniform blocks, use the following construct:
layout (packed, column_major) uniform;
With this specification, all uniform blocks declared after that line will use that layout until the global layout is changed or unless they include a layout override specific to their declaration.
When you share a buffer between shaders and the application, both need to agree on what memory offsets are holding the members. Thus, an explicit layout is needed, and this is what std140 and std430 provide.
While std140 and std430 give a well-defined explicit layout of a buffer, you might want finer control over how the buffer is laid out. You can control exact locations of members using offset or align members at a coarser level using align. You only need to use these on some members, to keep layout in sync between the application and shader.
Subsequently unqualified members are automatically assigned offsets, as is standard for std140 or std430.
#version 440
layout (std140) uniform b {
float size; // starts at byte 0, by default
layout(offset=32) vec4 color; // starts at byte 32
layout(align=1024) vec4 a[12]; // starts at the next multiple
// of 1024
vec4 b[12]; // assigned next offset after a[12]
} buf;
In your application, set up the buffer’s structure to match, using language tools decorating a C/C++ struct or just directly writing to the buffer at the right offsets. The only catch is the offsets and alignments all have to be sensible. The members still go in order of increasing offsets and still must be aligned as required by the std140 and std430 rules. Generally, this is natural alignment of floats and doubles, for anything containing them, with std140 having the extra constraint of needing 16-byte alignment for things smaller than a vec4.
Note on N: Any time a GLSL layout qualifier has the form layout (ID = N), the value N must be a non-negative integer. Under #version is 430 or earlier, it must be a literal integer. However, starting with #version 440, N can be a constant integer expression.
Accessing Uniform Variables Declared in a Uniform Block
While uniform blocks are named, the uniform variables declared within them are not qualified by that name. That is, a uniform block doesn’t scope a uniform variable’s name, so declaring two variables of the same name within two uniform blocks of different names will cause an error. Using the block name is not necessary when accessing a uniform variable, however.
Accessing Uniform Blocks from Your Application
Because uniform variables form a bridge to share data between shaders and your application, you need to find the offsets of the various uniform variables inside the named uniform blocks in your shaders. Once you know the location of those variables, you can initialize them with data, just as you would any type of buffer object (using calls such as glNamedBufferSubData(), for example).
To start, let’s assume that you already know the names of the uniform blocks used inside the shaders in your application. The first step in initializing the uniform variables in your uniform block is to obtain the index of the block for a given program. Calling
glGetUniformBlockIndex() returns an essential piece of information required to complete the mapping of uniform variables into your application’s address space.
To initialize a buffer object to be associated with your uniform block, you’ll need to bind a buffer object to a GL_UNIFORM_BUFFER target using the glBindBuffer() routine. (Chapter 3, “Drawing with OpenGL,” will add more details.)
Once we have a buffer object initialized, we need to determine how large to make it to accommodate the variables in the named uniform block from our shader. To do so, we use the routine glGetActiveUniformBlockiv(), requesting the GL_UNIFORM_BLOCK_DATA_SIZE, which returns the size of the block as generated by the compiler. (The compiler may decide to eliminate uniform variables that aren’t used in the shader, depending on which uniform block layout you’ve selected.) glGetActiveUniformBlockiv() can be used to obtain other parameters associated with a named uniform block.
After obtaining the index of the uniform block, we need to associate a buffer object with that block. The most common method for doing so is to call either glBindBufferRange() or, if all the buffer storage is used for the uniform block, glBindBufferBase().
Once the association between a named uniform block and a buffer object is made, you can initialize or change values in that block by using any of the commands that affect a buffer’s values.
You may also want to specify the binding for a particular named uniform block to a buffer object, as compared to the process of allowing the linker to assign a block binding and then querying the value of that assignment after the fact. You might follow this approach if you have numerous shader programs that will share a uniform block. It avoids having the block be assigned a different index for each program. To explicitly control a uniform block’s binding, call glUniformBlockBinding() before calling glLinkProgram().
The layout of uniform variables in a named uniform block is controlled by the layout qualifier specified when the block was compiled and linked. If you used the default layout specification, you will need to determine the offset and date-store size of each variable in the uniform block. To do so, you will use a pair of calls: glGetUniformIndices(), to retrieve the index of a particular named uniform variable, and glGetActiveUniformsiv(), to get the offset and size for that particular index, as demonstrated in Example 2.4.
Example 2.4 Initializing Uniform Variables in a Named Uniform Block
// Vertex and fragment shaders that share a block of uniforms
// named "Uniforms"
const char* vShader = {
"#version 330 core
"
"uniform Uniforms {"
" vec3 translation;"
" float scale;"
" vec4 rotation;"
" bool enabled;"
"};"
"in vec2 vPos;"
"in vec3 vColor;"
"out vec4 fColor;"
"void main()"
"{"
" vec3 pos = vec3(vPos, 0.0);"
" float angle = radians(rotation[0]);"
" vec3 axis = normalize(rotation.yzw);"
" mat3 I = mat3(1.0);"
" mat3 S = mat3( 0, -axis.z, axis.y, "
" axis.z, 0, -axis.x, "
" -axis.y, axis.x, 0);"
" mat3 uuT = outerProduct(axis, axis);"
" mat3 rot = uuT + cos(angle)*(I - uuT) + sin(angle)*S;"
" pos *= scale;"
" pos *= rot;"
" pos += translation;"
" fColor = vec4(scale, scale, scale, 1);"
" gl_Position = vec4(pos, 1);"
"}"
};
const char* fShader = {
"#version 330 core
"
"uniform Uniforms {"
" vec3 translation;"
" float scale;"
" vec4 rotation;"
" bool enabled;"
"};"
"in vec4 fColor;"
"out vec4 color;"
"void main()"
"{"
" color = fColor;"
"}"
};
// Helper function to convert GLSL types to storage sizes
size_t
TypeSize(GLenum type)
{
size_t size;
#define CASE(Enum, Count, Type)
case Enum: size = Count * sizeof(Type); break
switch (type) {
CASE(GL_FLOAT, 1, GLfloat);
CASE(GL_FLOAT_VEC2, 2, GLfloat);
CASE(GL_FLOAT_VEC3, 3, GLfloat);
CASE(GL_FLOAT_VEC4, 4, GLfloat);
CASE(GL_INT, 1, GLint);
CASE(GL_INT_VEC2, 2, GLint);
CASE(GL_INT_VEC3, 3, GLint);
CASE(GL_INT_VEC4, 4, GLint);
CASE(GL_UNSIGNED_INT, 1, GLuint);
CASE(GL_UNSIGNED_INT_VEC2, 2, GLuint);
CASE(GL_UNSIGNED_INT_VEC3, 3, GLuint);
CASE(GL_UNSIGNED_INT_VEC4, 4, GLuint);
CASE(GL_BOOL, 1, GLboolean);
CASE(GL_BOOL_VEC2, 2, GLboolean);
CASE(GL_BOOL_VEC3, 3, GLboolean);
CASE(GL_BOOL_VEC4, 4, GLboolean);
CASE(GL_FLOAT_MAT2, 4, GLfloat);
CASE(GL_FLOAT_MAT2x3, 6, GLfloat);
CASE(GL_FLOAT_MAT2x4, 8, GLfloat);
CASE(GL_FLOAT_MAT3, 9, GLfloat);
CASE(GL_FLOAT_MAT3x2, 6, GLfloat);
CASE(GL_FLOAT_MAT3x4, 12, GLfloat);
CASE(GL_FLOAT_MAT4, 16, GLfloat);
CASE(GL_FLOAT_MAT4x2, 8, GLfloat);
CASE(GL_FLOAT_MAT4x3, 12, GLfloat);
#undef CASE
default:
fprintf(stderr, "Unknown type: 0x%x
", type);
exit(EXIT_FAILURE);
break;
}
return size;
}
void
init()
{
GLuint program;
glClearColor(1, 0, 0, 1);
ShaderInfo shaders[] = {
{ GL_VERTEX_SHADER, vShader },
{ GL_FRAGMENT_SHADER, fShader },
{ GL_NONE, NULL }
};
program = LoadShaders(shaders);
glUseProgram(program);
/* Initialize uniform values in uniform block "Uniforms" */
GLuint uboIndex;
GLint uboSize;
GLuint ubo;
GLvoid *buffer;
// Find the uniform buffer index for "Uniforms", and
// determine the block's sizes
uboIndex = glGetUniformBlockIndex(program, "Uniforms");
glGetActiveUniformBlockiv(program, uboIndex,
GL_UNIFORM_BLOCK_DATA_SIZE, &uboSize);
buffer = malloc(uboSize);
if (buffer == NULL) {
fprintf(stderr, "Unable to allocate buffer
");
exit(EXIT_FAILURE);
}
else {
enum { Translation, Scale, Rotation, Enabled, NumUniforms };
/* Values to be stored in the buffer object */
GLfloat scale = 0.5;
GLfloat translation[] = { 0.1, 0.1, 0.0 };
GLfloat rotation[] = { 90, 0.0, 0.0, 1.0 };
GLboolean enabled = GL_TRUE;
/* Since we know the names of the uniforms
** in our block, make an array of those values */
const char* names[NumUniforms] = {
"translation",
"scale",
"rotation",
"enabled"
};
/* Query the necessary attributes to determine
** where in the buffer we should write
** the values */
GLuint indices[NumUniforms];
GLint size[NumUniforms];
GLint offset[NumUniforms];
GLint type[NumUniforms];
glGetUniformIndices(program, NumUniforms, names, indices);
glGetActiveUniformsiv(program, NumUniforms, indices,
GL_UNIFORM_OFFSET, offset);
glGetActiveUniformsiv(program, NumUniforms, indices,
GL_UNIFORM_SIZE, size);
glGetActiveUniformsiv(program, NumUniforms, indices,
GL_UNIFORM_TYPE, type);
/* Copy the uniform values into the buffer */
memcpy(buffer + offset[Scale], &scale,
size[Scale] * TypeSize(type[Scale]));
memcpy(buffer + offset[Translation], &translation,
size[Translation] * TypeSize(type[Translation]));
memcpy(buffer + offset[Rotation], &rotation,
size[Rotation] * TypeSize(type[Rotation]));
memcpy(buffer + offset[Enabled], &enabled,
size[Enabled] * TypeSize(type[Enabled]));
/* Create the uniform buffer object, initialize
** its storage, and associated it with the shader
** program */
glGenBuffers(1, &ubo);
glBindBuffer(GL_UNIFORM_BUFFER, ubo);
glBufferData(GL_UNIFORM_BUFFER, uboSize,
buffer, GL_STATIC_RAW);
glBindBufferBase(GL_UNIFORM_BUFFER, uboIndex, ubo);
}
...
}
Buffer Blocks
GLSL buffer blocks or, from the application’s perspective, shader storage buffer objects, operate quite similarly to uniform blocks. Two critical differences give these blocks great power, however. First, the shader can write to them, modifying their content as seen from other shader invocations or the application. Second, their size can be established just before rendering rather than at compile or link time. For example:
buffer BufferObject { // create a read-writable buffer
int mode; // preamble members
vec4 points[]; // last member can be unsized array
};
If this array is not provided a size in the shader, its size can be established by the application before rendering, after compiling and linking. The shader can use the length() method to find the render-time size.
The shader may now both read and write the members of the buffer block. Writes modifying the shader storage buffer object will be visible to other shader invocations. This can be particularly valuable in a compute shader, especially when manipulating nongraphical memory rather than an image.
Memory qualifiers (e.g., coherent) and atomic operations apply to buffer blocks and are discussed in depth in Chapter 11, “Memory.”
You set up a shader storage buffer object similarly to how a uniform buffer was set up, except that glBindBuffer(), glBindBufferRange() and glBindBufferBase() take the target GL_SHADER_STORAGE_BUFFER. A more complete example is given in Chapter 11, “Memory,” in “Shader Storage Buffer Objects” on page 589.
If you don’t need to write to a buffer, use a uniform block, as your device might not have as many resources available for buffer blocks as it does for uniform blocks. Also, keep in mind that only buffer blocks can use the std430 layout, while uniform blocks can use either std140 or std430.
In/Out Blocks, Locations, and Components
Shader variables output from one stage and input into the next stage can also be organized into interface blocks. These logical groupings can make it easier to visually verify interface matches between stages, as well as to make linking separate programs together easier.
For example, a vertex shader might output
out Lighting {
vec3 normal;
vec2 bumpCoord;
};
This would match a fragment shader input:
in Lighting {
vec3 normal;
vec2 bumpCoord;
};
A vertex shader might output material and lighting information, each grouped into its own block.
Throughout this book, layout (location=N) is used on individual input or output variables. As of OpenGL Version 4.4, this can also be applied to members of input and output blocks, to explicitly assign a location:
#version 440
in Lighting {
layout(location=1) vec3 normal;
layout(location=2) vec2 bumpCoord;
};
Whether in a block or not, each such location can hold the equivalent of a vec4. If you want to put multiple smaller objects into the same location, that can be done by further specifying a component:
#version 440
in Lighting {
layout(location=1, component=0) vec2 offset;
layout(location=1, component=2) vec2 bumpCoord;
};
This is much better than trying to declare a vec4 combined and using combined.xy and combined.zw to simulate offset and bumpCoord. It can also be done outside of blocks.
The interfaces built into the OpenGL Shading Language are also organized into blocks, like gl_PerVertex, which contains the built-in variable gl_Position, among others. A complete list of these is available in Appendix C, “Built-in GLSL Variables and Functions.”
Compiling Shaders
Writing shaders for use with OpenGL programs is similar to using a compiler-based language like C. You have a compiler analyze your program, check it for errors, and then translate it into object code. Next, you combine a collection of object files together in a linking phase to generate an executable program. Using GLSL shaders in your program is a similar process, except that the compiler and linker are part of the OpenGL API.
Figure 2.1 illustrates the steps to create GLSL shader objects and link them to create an executable shader program.

For each shader program you want to use in your application, you’ll need to do the following sequence of steps:
For each shader object:
1. Create a shader object.
2. Compile your shader source into the object.
3. Verify that your shader compiled successfully.
Then, to link multiple shader objects into a shader program, you’ll
1. Create a shader program.
2. Attach the appropriate shader objects to the shader program.
3. Link the shader program.
4. Verify that the shader link phase completed successfully.
5. Use the shader for processing.
Why create multiple shader objects? Just as you might reuse a function in different programs, the same idea applies to GLSL programs. Common routines that you create might be usable in multiple shaders. Instead of having to compile several large shaders with lots of common code, you’ll merely link the appropriate shader objects into a shader program.
To create a shader object, call glCreateShader().
Once you have created a shader object, you need to associate the source code of the shader with that object created by glCreateShader(). This is done by calling glShaderSource().
To compile a shader object’s source, use glCompileShader().
Similar to when you compile a C program, you need to determine if the compilation finished successfully. A call to glGetShaderiv(), with an argument of GL_COMPILE_STATUS, will return the status of the compilation phase. If GL_TRUE is returned, the compilation succeeded, and the object can be linked into a shader program. If the compilation failed, you can determine what the error was by retrieving the compilation log. glGetShaderInfoLog() will return an implementation-specific set of messages describing the compilation errors. The current size of the error log can be queried by calling glGetShaderiv() with an argument of GL_INFO_LOG_LENGTH.
Once you have created and compiled all of the necessary shader objects, you will need to link them to create an executable shader program. This process is similar in nature to creating shader objects. First, you’ll need to create a shader program to which you can attach the shader objects. When you use glCreateProgram(), a shader program will be returned for further processing.
Once you have your shader program, you’ll need to populate it with the necessary shader objects to create the executable program. This is accomplished by attaching a shader object to the program by calling glAttachShader().
For parity, if you need to remove a shader object from a program to modify the shader’s operation, detach the shader object by calling glDetachShader() with the appropriate shader object identifier.
After all the necessary shader objects have been attached to the shader program, you will need to link the objects for an executable program. This is accomplished by calling glLinkProgram().
As with shader objects, there’s a chance that the linking phase may fail due to errors in the attached shader objects. You can query the result of the link operation’s success by calling glGetProgramiv() with an argument of GL_LINK_STATUS. If GL_TRUE was returned, the link was successful, and you’re able to specify the shader program for use in processing vertices or fragments. If the link failed, represented by GL_FALSE being returned, you can determine the cause of the failure by retrieving the program link information log by calling glGetProgramInfoLog().
After a successful program link, you can execute the shaders in the program by calling glUseProgram() with the program’s object handle.
When you’re done using a shader object, you can delete it using glDeleteShader(), even if it’s attached to an active program. Just as in linking a C program, once you have an executable, you don’t need the object files until you compile again.
Similarly, if you’re done using a shader program, you can delete it by calling glDeleteProgram().
Finally, for completeness, you can also determine if a name is already been reserved as a shader object by calling glIsShader() or a shader program by calling glIsProgram():
To simplify using shaders in your applications, we created LoadShaders() to help in loading and creating shader programs. We used it in our first program in Chapter 1 to load a simple set of shaders.
Shader Subroutines
Advanced
While GLSL allows you to define functions in shaders, the call flow of those functions was always static. To dynamically select between multiple functions, you either created two distinct shaders or used an if statement to make a runtime selection, as demonstrated in Example 2.5.
Example 2.5 Static Shader Control Flow
#version 330 core
void func_1() { ... }
void func_2() { ... }
uniform int func;
void
main()
{
if (func == 1)
func_1();
else
func_2();
}
Shader subroutines are conceptually similar to function pointers in C for implementing dynamic subroutine selection. In your shader, you specify a subroutine type and use that type when declaring the set of subroutines eligible for dynamic use. Then you choose which subroutine from the set to execute in the shader by setting a subroutine uniform variable.
GLSL Subroutine Setup
When you want to use subroutine selection inside of a shader, there are three steps required to set up the pool of subroutines:
1. Define the subroutine type using the subroutine keyword
subroutine returnType subroutineType(type param, ...);
where returnType is any valid type that a function can return, and subroutineType is any valid name. As with function prototypes, only the parameter types are required; the parameter names are optional. (Hint: Think of this like a typedef in C, with subroutineType as the newly defined type.)
2. Using the subroutineType you just defined, define the set of subroutines that you would like to dynamically select from using the subroutine keyword. The prototype for a subroutine function looks like this:
subroutine (subroutineType) returnType functionName(...);
3. Finally, specify the subroutine uniform variable that will hold the function pointer for the subroutine you’ve selected in your application:
subroutine uniform subroutineType variableName;
Demonstrating those steps together, in Example 2.6 we dynamically select between ambient and diffuse lighting.
Example 2.6 Declaring a Set of Subroutines
subroutine vec4 LightFunc(vec3); // Step 1
subroutine (LightFunc) vec4 ambient(vec3 n) // Step 2
{
return Materials.ambient;
}
subroutine (LightFunc) vec4 diffuse(vec3 n) // Step 2 (again)
{
return Materials.diffuse *
max(dot(normalize(n), LightVec.xyz), 0.0);
}
subroutine uniform LightFunc materialShader; // Step 3
A subroutine is not restricted to being a single type of subroutine (e.g., LightFunc in Example 2.6). If you have defined multiple types of subroutines, you can associate any number of the types with a subroutine by adding the type to the list when defining the subroutine, as shown here:
subroutine void Type_1();
subroutine void Type_2();
subroutine void Type_3();
subroutine (Type_1, Type_2) Func_1();
subroutine (Type_1, Type_3) Func_2();
subroutine uniform Type_1 func_1;
subroutine uniform Type_2 func_2;
subroutine uniform Type_3 func_3;
For this example, func_1 could use either Func_1 or Func_2 because of Type_1 appearing in each of their subroutine lines. However, func_2, for example, would be limited to using only Func_1, and similarly, func_3 could use only Func_2.
Selecting Shader Subroutines
Once you have all your subroutine types and functions defined in your shaders, you need only query a few values from the linked shader program and then use those values to select the appropriate function.
In step 3 described on page 80, a subroutine uniform value was declared, and we will need its location in order to set its value. As compared to other shader uniforms, subroutine uniforms use glGetSubroutineUniformLocation() to retrieve their locations.
Once we have the subroutine uniform to assign values to, we need to determine the indices of the subroutines inside of the shader. For that, we can call glGetSubroutineIndex().
Once you have both the available subroutine indices and subroutine uniform location, use glUniformSubroutinesuiv() to specify which subroutine should be executed in the shader. All active subroutine uniforms for a shader stage must be initialized.
Assembling those steps, the following code snippet demonstrates the process for the vertex shader described in Example 2.6.
GLint materialShaderLoc;
GLuint ambientIndex;
GLuint diffuseIndex;
glUseProgram(program);
materialShaderLoc = glGetSubroutineUniformLocation(
program, GL_VERTEX_SHADER, "materialShader");
if (materialShaderLoc < 0) {
// Error: materialShader is not an active subroutine
// uniform in the shader.
}
ambientIndex = glGetSubroutineIndex(program,
GL_VERTEX_SHADER,
"ambient");
diffuseIndex = glGetSubroutineIndex(program,
GL_VERTEX_SHADER,
"diffuse");
if (ambientIndex == GL_INVALID_INDEX ||
diffuseIndex == GL_INVALID_INDEX) {
// Error: the specified subroutines are not active in
// the currently bound program for the GL_VERTEX_SHADER
// stage.
}
else {
GLsizei n;
glGetIntegerv(GL_MAX_SUBROUTINE_UNIFORM_LOCATIONS, &n);
GLuint *indices = new GLuint[n];
indices[materialShaderLoc] = ambientIndex;
glUniformSubroutinesuiv(GL_VERTEX_SHADER, n, indices);
delete [] indices;
}
Note
Calling glUseProgram() will reset all of the subroutine uniform values to an implementation-dependent ordering.
Separate Shader Objects
Advanced
Previous to OpenGL Version 4.1 (and not considering extensions), only a single shader program could be bound at any one time in an application’s execution. This was inconvenient if your application used multiple fragment shaders for a collection of geometry that was all transformed using the same vertex shader. This caused you to need to have multiple programs around that duplicated the same vertex shader, wasting resources and duplicating code.
Separate shader objects allows shader stages (e.g., vertex shading) from various programs to be combined into a program pipeline.
The first step is to create a shader program that’s usable in a shader pipeline. This is done by calling glProgramParameteri() with the parameter GL_PROGRAM_SEPARABLE before linking the shader program. This marks the shader program as eligible to be used in a program pipeline. To simplify this process, a new command glCreateShaderProgramv() was added that encapsulates the shader-compilation process, including marking the program as sharable (as discussed earlier) and linking it to produce the final object.
Once your collection of shader programs is combined, you need to use the new shader pipeline constructs to combine shader stages from multiple programs into a usable program pipeline. As with most objects in OpenGL, there is a gen-bind-delete sequence of calls to make. A shader pipeline is created by calling glCreateProgramPipelines(), which will create an unused program pipeline identifier that you pass into glBindProgramPipeline(), making that program available for use. Similarly to other generated objects, program pipelines are deleted with glDeleteProgramPipelines().
Once you’ve bound a program pipeline, you can attach program objects that have been marked as separable to the pipeline by calling glUseProgramStages(), which takes a bitfield describing which stages from the provided program should be employed when this pipeline is used to process geometry and shade fragments. The older glUseProgram() when called with a program will replace the current program pipeline binding.
The interfaces between shader stages, the in and out variables, must match in order for the pipeline to work. As compared to using a non-separate shader object, where those interfaces can be verified during program linkage, shader pipelines with separate program objects need to be checked at draw-call issue. If the interfaces don’t match correctly, all varying values (out variables) are undefined.
The built-in gl_PerVertex block must be redeclared in shaders to explicitly indicate what subset of the fixed pipeline interface will be used. This will be necessary when using multiple programs to complete your pipeline.
For example:
out gl_PerVertex {
vec4 gl_Position; // makes gl_Position is part of interface
float gl_PointSize; // makes gl_PointSize is part of interface
}; // no more members of gl_PerVertex are used
This establishes the output interface the shader will use with the following pipeline stage. It must be a subset of the built-in members of gl_PerVertex. If a built-in block interface is formed across shaders in different programs, the shaders must all redeclare the built-in block in the same way.
Because separable shader objects can each have their individual set of program uniforms, two methods are provided for assigning uniform variable values. First, you can select an active shader program with glActiveShaderProgram(), which causes calls to glUniform*() and glUniformMatrix*() to assign values to that particular shader program’s uniform variables. A preferred alternative is to call glProgramUniform*() and glProgramUniformMatrix*(), which take an explicit program object in addition to the other parameters used to identify the program’s uniform variable.
SPIR-V
SPIR-V is a Khronos-standard intermediate language that provides an alternative for distributing shaders. OpenGL accepts shaders in SPIR-V form much like it accepts shaders in GLSL form. Typically, for SPIR-V form, an offline tool chain will generate SPIR-V from a high-level shading language such as GLSL, and rather than distributing GLSL source with your application, you would distribute the generated SPIR-V.
SPIR-V is created, distributed, and consumed as binary units called modules. A SPIR-V module can live in memory as a sequence of 32-bit words, or it can be stored as a file, again, as a sequence of 32-bit words. However, as with GLSL, OpenGL does not deal with files, so SPIR-V must be handed to OpenGL as a pointer to an in-memory sequence of 32-bit words.
Each SPIR-V module contains one or more entry points, as places to begin shader execution, and each entry point knows what OpenGL pipeline stage it belongs to. Each of these entry points must form a single, complete OpenGL pipeline stage. That is, unlike in desktop GLSL, SPIR-V shaders don’t hold multiple compilation units to later link together to form a single stage. For SPIR-V, such linkage would be done offline by a front end when it translates the high-level language form to SPIR-V, yielding a result that is a fully linked stage. A single SPIR-V module may contain many entry points, even for the same stage.
SPIR-V modules can be specialized, which means changing the values of some specially identified constants inside the module before final compilation at run time. This is done to reduce the number (or size) of SPIR-V modules needed to represent multiple slight variations of a shader.
Reasons to Choose SPIR-V
There are several potential reasons you might distribute shaders in SPIR-V rather than GLSL. Some might apply to your situation, and some might not:
• Better portability. One problem with portability is that each platform’s driver can have a slightly different interpretation of the high-level rules for GLSL. High-level languages are in part high-level because of the freedom of expressiveness they allow the coder. However, the limits of this freedom are sometimes hard to completely pin down, leading to variance in interpretation. SPIR-V is much stricter and much more regular about how constructs are expressed, leaving less room for interpretation. This in turn leads to less variance between platforms’ interpretation of SPIR-V and, hence, improved portability. Of course, you are not coding in SPIR-V, so you still have GLSL (for example) to contend with. However, for generating SPIR-V, you can select a single front end for all the platforms you target. That is, you can eliminate portability problems that originate from different GLSL interpretations by sticking with a single GLSL front end. Someone else might select a different front end for their shaders, and that’s fine too. What matters is that one application’s GLSL shaders get the same GLSL interpretation for all platforms on which the SPIR-V ends up running.
• Other source languages. SPIR-V enables use of high-level languages other than GLSL. As long as the distributed SPIR-V is of correct form, it does not matter how it was generated.
• Reduced distribution size. SPIR-V has multiple features to dramatically reduce the size of shader collections as they are distributed. Individual shaders, on their own, are typically larger in SPIR-V than in GLSL, but individual shaders are small in either case. Collections of related shaders can, however, be quite large, and two SPIR-V features in particular are aimed at addressing such collections: specialization and multiple entry points per module. Specialization allows late changing of some constant values, and multiple entry points in the same SPIR-V module allow shipping a single instance of a function body that might be used by many entry points. GLSL distribution might have distributed a copy of the function for each shader in the collection, whereas SPIR-V distribution is able to ship only one copy.
• Protecting your source code. This is sometimes referred to as obfuscation, as there are times you don’t want to distribute your shader source code in an easy-to-leverage form. Shader source code can represent novel ideas or intellectual property, which you don’t want to distribute to other parties in a transparent, easily modifiable format. You can avoid distributing your source code by offline compilation of your source to SPIR-V and distribution of the SPIR-V instead. This makes it much harder to see how a shader achieves an effect. Yes, it is still conceivable that a reverse compiler can re-create GLSL or some other high-level shading language, which would compile down to the SPIR-V you distributed. However, the need for a recipient to undertake such a reverse-engineering activity provides real protection to your intellectual property.
Runtime compiler performance is often sought as another reason to select an intermediate language over a high-level language, but caution is needed here. A high-performing shader executable will typically require scheduling and register allocation algorithms, executed at runtime, that are themselves time-consuming. These later steps cannot be eliminated by using a portable intermediate language. Runtime compiler performance, however, is improved in a number of ways. For one, parsing a high-level language takes some time. Although parsing is normally a small portion of the compilation stack, it becomes more significant for shaders that have lots of unused code or when multiple shaders compile down to the same intermediate result. In these cases, notable parsing time is eliminated through use of SPIR-V. Also, some high-level optimizations can be performed offline, but take care not to perform platform-specific optimizations that would hurt performance on some targets. For example, it might be platform-dependent whether all functions should be inlined at all call sites.
Using SPIR-V with OpenGL
Using SPIR-V shaders in OpenGL is quite similar to using GLSL shaders. After you create your shader objects, in the same way we described earlier, there are two steps needed to associate a SPIR-V entry point with each of those shader objects. The first step is to associate a SPIR-V module with each shader object by calling glShaderBinary():
Because SPIR-V is normally specified and manipulated as a stream of 32-bit words, make sure you translate the size of your SPIR-V to bytes to use glShaderBinary(). This glShaderBinary() function can be used for other non-source forms of shaders, so this is a generic function, not specific to SPIR-V, unless SHADER_BINARY_FORMAT_SPIR_V_ARB is specified.
The second step needed to associate SPIR-V entry points with your shader objects is glSpecializeShader(), which, if successful, changes their compile status from the GL_FALSE set by glShaderBinary() to GL_TRUE:
We discuss using GLSL for specialization later in this section.
After this, you use glAttachShader() and glLinkProgram(), just as we did earlier when using GLSL with glShaderSource(), and everything else works the same way.
Using GLSL to Generate SPIR-V for OpenGL
There are no requirements on how you generate SPIR-V, only that the SPIR-V itself be well formed. While this is great for supporting a broad range of high-level languages and novel tools for creating SPIR-V, it is also convenient to have a standard high-level language for writing and exchanging shaders. To aid in this, Khronos has standardized a form of GLSL for creating SPIR-V.
There are two flavors of GLSL for making SPIR-V shaders: one that creates SPIR-V suitable for Vulkan (via the KHR_glsl_vulkan extension), and one that creates SPIR-V suitable for OpenGL (via the ARB_gl_spirv extension). Here, of course, we will discuss GLSL for generating SPIR-V for OpenGL. GLSL for this purpose is the same as standard GLSL, with a small number of additions, a small number of deletions, and a few minor changes. Generally, all inputs and outputs need a location specified, and I/O is similar to using the SSO model. Otherwise, it is identical to the GLSL already presented in this chapter.
Validating SPIR-V
OpenGL drivers won’t fully validate SPIR-V at runtime, as it is a performance advantage that valid SPIR-V is created offline. OpenGL only needs to behave properly when given fully valid SPIR-V. That is, invalid SPIR-V may lead to unexpected behavior. Khronos has made a SPIR-V validator, along with other tools, available at https://github.com/KhronosGroup/SPIRV-Tools to help you verify, offline, that the SPIR-V you want to distribute is valid SPIR-V. This tool should be integrated into your offline tool chain for generating SPIR-V to give maximum portability to your shaders.
Additions to GLSL for SPIR-V Generation
The key addition to GLSL for SPIR-V for OpenGL is specialization. Specialization constants can greatly reduce the number of variants of shaders you distribute. They allow late changing of a shader constant without having to manually generate a new shader.
Generally, knowing what values are constant at compile time helps optimizers generate faster executing code, as compared to accessing a variable that always has the same value. Loops can get known counts, and computations can simplify. Because of these positive impacts of using constants, GLSL shaders are often parametrized with preprocessor macros or some form of computer-generated code. Then multiple distinct shaders are created for different values of the parameter. With specialization constants, such a parameter is explicitly identified, given a default value, and allowed to be treated as a constant, even though its value can be changed before final runtime compilation. Thus, a single shader can be created and distributed with specialization constants, which later on take their correct final values. In GLSL, this looks like this:
layout (constant_id = 17) const int param = 8;
This declares that param is a specialization constant (because of the constant_id), with a default value of 8. The value 17 is how param will be later referred to if the application wants to change the default through the OpenGL API, as was done earlier with glSpecializeShader().
When compiled to SPIR-V, the SPIR-V shader tracks this param as a specialization constant. When it is time to create a rendering pipeline with the shader, the correct constant value is provided with the SPIR-V shader, and it is then optimized for that value. Thus, a frequent reason to ship multiple variants of the same shader is avoided.
Deletions from GLSL for SPIR-V Generation
There are a few traditional GLSL features that SPIR-V does not support. We list these here, with suggestions about what you can do instead.
Subroutines: The OpenGL GLSL subroutine feature is not available in SPIR-V. It is possible to express similar functionality using other constructs in GLSL, including switch statements and function calls. For example:
switch (material) {
case 1: result = material1(...); break;
case 2: result = material2(...); break;
case 3: result = material3(...); break;
}
Deprecated features: Deprecated features should always be avoided, but some are fully missing when generating SPIR-V. This includes the old deprecated texturing functions, such as texture2D(), which are no longer allowed because texture2D is now reserved as a type for making a sampler2D out of a separate sampler and 2D texture. Instead, simply use the modern version, texture, and its family of texture lookup built-in functions.
The compatibility profile: Generally, features belonging only to the compatibility profile are not supported by SPIR-V, and the GLSL compatibility profile is not allowed when generating SPIR-V from GLSL. You’ll need to express your shader using features from the core profile, including those added to GLSL for SPIR-V for OpenGL, which were discussed earlier.
gl_DepthRangeParameters: SPIR-V has no built-in variable for depth-range parameters. Any such information you want to share with your shaders, you can instead share by declaring your own uniform variables and setting them explicitly through the API.
Changes to GLSL for SPIR-V Generation
gl_FragColor broadcast: When GLSL is used directly, not through SPIR-V, writing to gl_FragColor can generate a broadcast write to all color-output attachments. However, SPIR-V does not support this feature. Ideally, you will declare the output variables you want to write and explicitly write them. If you do use gl_FragColor, writing to it will write only the one color output that is attached at location 0.
Glslang
The Khronos Group provides a reference front end for GLSL that is capable of generating SPIR-V from GLSL for either OpenGL or Vulkan. Note that you must specify which API you are generating SPIR-V for, as they have different features and hence different GLSL semantics. While it is the Khronos reference front end for validating correct GLSL, it is just one example of a SPIR-V compiler and should not be considered the only way of doing this.
Glslang is maintained as an open-source project on GitHub at https://github.com/KhronosGroup/glslang.
Note that glslang is a Khronos reference for valid semantic checking of valid GLSL for direct OpenGL, or ESSL for OpenGL ES, consumption. This high status is not yet bestowed on it for SPIR-V generation, which should be considered an example implementation, not a Khronos-sanctioned reference.
What’s Inside SPIR-V?
SPIR-V is a simple pure binary form, representing a high-level intermediate language. It stores this form as a simple linear sequence of 32-bit words.
When you get a result from an offline compiler or set into an API, it will be as such a stream of 32-bit words (but you do have to multiply by four to get the byte count expected by glShaderBinary()). It is self-contained; there is no wrapper around the sequence words; simply get or set the raw sequence of words from a file or API entry point. Within this sequence, the first few words provide sanity checks about the rest, including the very first word being the SPIR-V magic number, which you can verify is 0x07230203. If you have that, but with the bytes in reverse order, you are either not looking at it one 32-bit word at a time, or some step has reversed endianness.
SPIR-V loses very little information from a shader written in a high-level language. It can retain nested control and other high-level constructs, types native to GLSL, and decorations regarding built-in variable semantics, so that no target platform is missing the information it needs to do high-performance optimizations.
Further internal details about SPIR-V are outside the scope of this book, which aims to show you how to use GLSL to generate SPIR-V that you can then distribute with your application, but not how to make SPIR-V on your own.