
Before Windows XP’s arrival, nobody but hard-core geeks enjoyed connecting digital cameras or video cameras to their PCs. The cameras came packaged with clumsy software, often thrown in as an afterthought. And most older PCs just couldn’t handle video’s obsessive, 15-pictures-per-second demands for attention.
With Windows XP at the helm, today’s fast PCs work almost seamlessly with digital picture and video gear. Microsoft realized both these technologies were moving from geek to consumer, so they built Windows XP to recognize most digital cameras and camcorders as soon as you plug them into your PC.
This chapter explains how to perform the following tasks on your PC:
Copy a digital camera’s photos onto your computer, where you can view and edit them.
Copy a flash card’s photos directly onto your computer, bypassing the camera’s cable to speed up transfers.
View photos on your computer, rotating or editing them, if necessary.
Email photos to friends, letting them see how they really behaved at last night’s party.
Share photos with friends by posting the pictures to a Web site.
Copy movie footage from your camcorder to your PC for viewing.
Edit camcorder footage into a complete movie.
Connect a Webcam to your PC for video chats or to enhance your Web site.
Digital cameras first outsold film cameras in 2003; now they’ve nearly pushed film cameras off the shelves entirely. Some people fondly recall pawing through the little envelopes at the developer; others recall the agony of being limited to only 24 shots during an entire day at Disneyland. Digital photos break both those barriers, freeing their owners to snap more pet pictures than ever, and view them instantly.
The following sections explain how to move those photos off your camera and into your PC, be it through a cable or card reader. You can then edit them into shape and share them with friends via email or a photo-sharing Web site.
Don’t bother installing the software packaged with your digital camera; it’s generally of mediocre quality, and you don’t need it to see your photos. But do hang onto that little cable that comes with your camera. That’s the tube for pouring your photos from your camera into your PC. Connect the cable between them, and Windows XP automatically welcomes your digital camera and shuttles your photos into your new digital shoebox: your PC’s My Pictures folder.
Follow these steps to move the photos out of your camera and into your PC.
Tip
Lost your camera’s connection cable? Most cameras use standard USB cables, available at any camera or computer store. Bring your camera when cable shopping; the camera may use any one of three different USB ports (Section 1.8.1). For even faster photo transfers, buy a card reader instead; card readers are covered in the next section (Section 5.3).
Connect the smaller connector on your camera’s cable to your camera and turn on your camera.
Find a tiny port on your camera. Sometimes named “Digital” or “USB,” it’s occasionally hidden underneath a little cover, and it’s usually near the port that connects your camera to the TV for viewing photos. Plug the cable’s small end into your camera’s port.
With some cameras, you need to set them to View or Cable Connection mode before they’ll start talking to your PC.
Note
Some really old digital cameras connect through the serial port (Section 1.8.8). These oldsters force you to wade through their own, original software. If this program somehow slipped from your grasp, visit the downloads area of the manufacturer’s Web site. Sometimes a special Archive area still offers original software for obsolete electronics.
Plug the cable’s larger, rectangular end into your PC’s USB port.
USB ports sprout from all but the oldest PCs (see Section 1.8.2.1 for a quick visual reminder). Start looking for the little rectangular port on the case’s front, and then move to the backside of your PC if there’s nothing on the front. For added convenience, some keyboards and monitors offer little ports along their sides. Windows XP recognizes your camera and displays a brief “New Hardware Found” message in the lower-right corner of your screen.
Choose a program to move your photos onto your computer, and then click OK.
Windows lists your PC’s photo editing software and lets you choose your favorite to handle the incoming photos (see Figure 5-1). Select one, and Windows assigns it the job of transferring your photos. If your PC doesn’t have any photo-editing software, Windows XP’s built-in Scanner and Camera Wizard automatically steps in to handle the job.
Figure 5-1. Once you connect your camera to your PC, Windows XP lists all the software on your PC that can talk to cameras. To skip this menu in the future, turn on the checkbox marked “Always use this program for this action.” Then choose the program Windows XP should automatically summon the next time you plug in your camera.
Start the Scanner and Camera Wizard.
Windows XP’s friendly wizard pops up with a greeting, ready to handle your photo-moving chores, step by step.
Tip
If you’re already a whiz at moving files, dump the wizard. When the wizard opens, click Cancel and the wizard disappears. Then navigate directly to your camera (My Computer → [Your camera’s name]), where you can drag, cut, or copy your files to other folders on your hard drive. This trick comes in especially handy when your camera holds several separate photo sessions, and you’d rather sort them into separate folders for each session.
Choose the photos you want to copy to your PC.
The wizard shows you a contact sheet of your camera’s photos (Figure 5-2); each photo has a checkmark in its upper-right corner. Click Next to move them all onto your PC.
On the rare occasion you want to keep some photos on your camera—perhaps you want to move those to a different computer—remove the checkmarks from those photos.
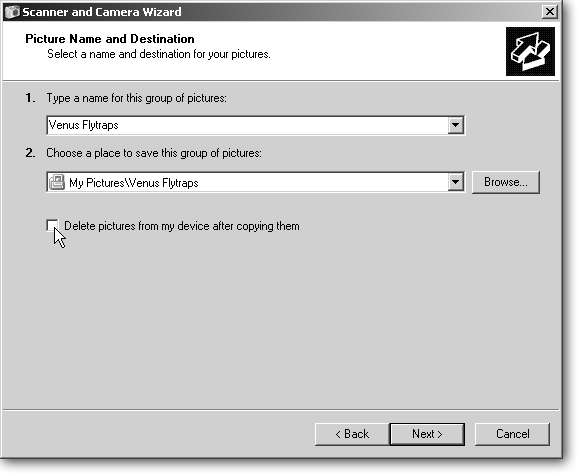
Choose a descriptive name for the photos and select a folder to store them in.
The name DSC03612.JPG doesn’t help much when searching for your carnivorous plant photos next month. To help you relocate your pix, type a descriptive name in this dialog box (Figure 5-3), like “Venus Flytraps.” Windows creates a folder with that name inside your My Pictures folder, tosses your photos into the folder, and renames each photo in sequence: Venus Flytraps001, Venus Flytraps002, and so on. Click Next.
Choose “Nothing. I’m finished working with these pictures” to exit the wizard.
Although Windows XP offers three choices here, opt for the third choice—Nothing—because the other two are so abysmal:
Figure 5-2. Click Next to move all your photos off your camera quickly, freeing up room to take more shots. Don’t stop here and rotate your photos to “right side up.” The rotate feature works more quickly if you wait for the pictures to move onto your hard drive.
Figure 5-3. Windows XP creates a folder with the name you entered here, and then renames all the photos in sequence with that name, making it easy for you to find photos later. Be sure to turn on the “Delete pictures from my device after copying them” checkbox. Otherwise, Windows XP copies, rather than moves the camera’s photos, leaving them to hog precious storage space.
Publish photos to a Web site. This offer certainly sounds gracious, but the wizard isn’t offering to publish your photos to your blog, your own Web site, or even your choice of photo-sharing sites (Section 5.5.2). This option simply sends your photos to Microsoft’s own MSN Groups—if you have an existing account or want to set one up. Competing sites (which you can learn about in the online appendix, “Other Cool Things You Can Do Online,” available on the “Missing CD” page at http://www.missingmanuals.com) allow more free photo storage space, easier photo transfers, and simpler menus.
Order Prints. This emails your photos to an online photo developer, which mails back your prints less than a week later. It’s convenient, but certainly not the fastest, best, or cheapest way to print photos (Section 4.7 shows you some better options).
Nothing. The Wizard vanishes, but not before opening your newly created folder where you can ogle your new photos.


The Scanner and Camera Wizard leads you steadily through the camera-to-PC photo transfers, but all that hand-holding takes time. For quicker grabs, connect your camera to your PC as described above and then choose Start → My Computer. Look for your digital camera’s icon nestled among your PC’s disks and drives. Double-click the camera icon to open it, like any folder. Select the camera’s photos and drag them to your My Pictures folder.
Although that method speeds things up by bypassing the wizard, bypassing your camera’s cable altogether speeds up transfers even more. For the speediest transfers, buy a card reader, like the one shown in Figure 5-4. Available for around $20, the card reader plugs into your PC’s USB port and creates tiny disk drives for inserting your camera’s cards. Push your camera’s card into the reader and use Windows XP’s standard copy tools to move the photos to any other folder on your computer. Card readers hold several advantages over the wizard:
Battery life. With a card reader, your camera stays turned off during transfer sessions, keeping your battery alive longer for more picture taking.
Speed. Card readers give your PC direct access to the card, and they’re built for speed. Camera transfer circuitry isn’t nearly as quick.
Price. Card readers cost less than 20 dollars, usually much less than the cost of replacing the camera cable you left in the hotel room.
Versatility. Most card readers read every card format, including cards used by your friends, relatives, and strangers at coffee shops. (They’ll also work with your next camera, as well.)
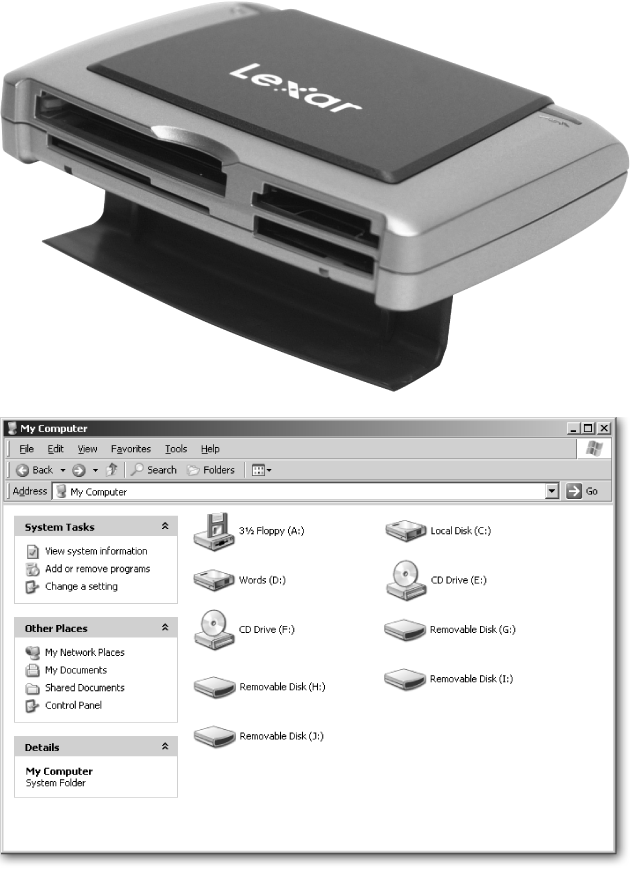
Figure 5-4. Top: Card readers provide a handy alternative to replacing a camera’s lost cable. They also work up to 40 times faster than some cables, particularly those from older cameras. Card readers come with tiny drives that accept storage cards from your camera, cell phone, PDA, and other gadgets. Plug a USB 2-capable card reader into your PC’s USB 2.0 port for the fastest transfers. Bottom: When plugged in, a card reader adds several Removable Disk drive icons to My Computer, letting you insert a wide variety of card types. Unfortunately, the drives in My Computer rarely identify which removable drive contains your newly inserted card, forcing you to double-click them all until the correct one opens (you’ll know you’ve hit pay dirt when you see your images inside the drive).
Once you move your photos from your camera onto your PC, Windows lets you play with them in several ways without adding smudges or finger prints. Windows XP’s built-in photo management tools handle a few minimal chores, but you need third-party programs to handle the rest. Here’s how to view, locate, rotate, edit, and share photos with your friends. Chapter 4 explains how to print digital photos (Section 4.7).
POWER USERS’ CLINIC: Forensic Photo Sleuthing with EXIF
When guessing your age in your baby pictures, you probably glance at the photo developer’s date stamp along the photo’s side or bottom edge. That, and perhaps a jotted note, provide your only clues.
The dating game will be much easier for your kids and grandkids, though: your digital camera stamps every photo with the date and time you snapped it. It also throws in your camera’s shutter speed, lens aperture, focal length, exposure time, flash, and much more. A few advanced digital cameras even stamp GPS (Global Positioning System) information on a photo, letting you pinpoint where you stood when taking the snap. To view a photo’s EXIF info, right-click the photo, choose Properties, and then click the Summary tab.
Although casual viewers appreciate the date stamps, EXIF (Exchangeable Image File Format) information offers other benefits:
Education. Examining the EXIF settings of your favorite shots helps you become a better photographer, letting you see how variations in exposure, flash usage, and depth-of-field affect your photos.
Better prints. Some photo printers examine the EXIF data and adjust the tonal values to enhance prints automatically.
Editing. Some photo-editing software reads EXIF data to enhance images.
Although EXIF data proves quite useful, many older photo editors ignorantly erase it as soon as you start editing. Windows XP is no exception, often wiping out this valuable data when you rotate a photo. The cure? Avoid using Windows XP’s built-in tools to rotate or edit your photos. Instead, use only digital-editing software that supports EXIF like the free Picasa 2 (http://www.picasa.com), Adobe Photoshop Elements (http://www.adobe.com), or others.
Until you pick up a good photo editor, copy your original
photo files to CDs as soon as you transfer them onto your PC, and
then store them in a safe place. If you have to make any changes
using Windows XP, edit only the copies.
Windows XP’s My Picture folder (Start → My Pictures) displays your photos three different ways, each one designed to help you sort through a pile of photos, narrow down your search to a specific folder, or display the photo on your monitor.
Thumbnail. When searching all the photos and folders in your My Pictures folder, turn on Thumbnail view (View → Thumbnail), shown in Figure 5-5, top. To help you see each file and folder’s contents, each photo’s icon morphs into a miniaturized photo; each folder’s icon shows tiny views of the first four photos inside.
Filmstrip. For searching photos within a single folder, turn on that folder’s Filmstrip view (View → Filmstrip). Windows XP lines the window’s bottom with a row of thumbnails (Figure 5-5, middle), and then displays the currently selected photo along the top.
Viewer. When you find the photo you want, confirm your suspicions by giving its thumbnail a double-click. Windows XP’s Picture and Fax viewer (Figure 5-5, bottom) hops to life, resizing your photo to fit the size of your current window. (Enlarge or resize the viewer like any other window in Windows XP.)
In addition to letting you create a full-screen slideshow of every picture in a folder, Windows Picture and Fax Viewer comes in handiest when you need to whip through every photo in a hurry. To advance from one photo to the next, click the two blue left-and-right pointing arrows at the bottom of the viewer.
When your snapshots show people walking on walls, let Windows XP’s rotate feature set them gently back on earth. Right-click the incorrectly rotated photo, and then choose Clockwise or Counter Clockwise. Windows XP lets you access the rotate feature wherever you spot a turned photo, be it in thumbnail view, filmstrip view, or even within the Windows Picture and Fax Viewer (all shown in Figure 5-5).
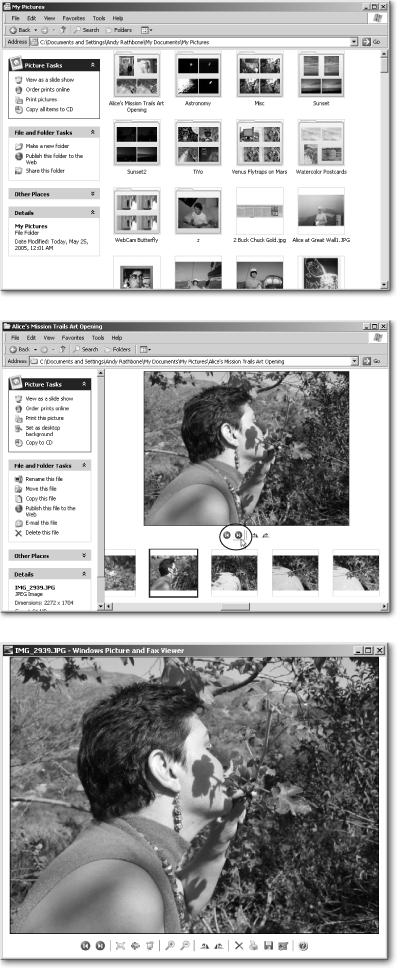
Figure 5-5. Top: Rather than using the Windows standard 4-photo grid, you can assign a single photo to represent what’s inside a folder: Right-click the folder and choose Properties → Customize → Choose Picture. Double-click a favorite photo for Windows to stick on your folder. Middle: Move back and forth quickly between photos by clicking the little round blue arrows (circled). You can use the adjacent two buttons to rotate pictures either clockwise or counterclockwise. Bottom: Double-click any photo to see it in Windows Picture and Fax Viewer. To start a full-screen slideshow of the photos inside that picture’s folder, press F11. (Press Esc to stop the show.) The buttons along the bottom reveal their purposes when you hover your mouse pointer over them.
When it comes to editing photos, though, don’t look within Windows XP’s built-in tools. Windows XP offers nothing for fixing photos, changing their lighting, or even removing red-eye. Click the Editing button in Windows Picture and Fax Viewer, for instance, and Windows XP simply hauls out Paint—a decades-old drawing program for creating colored lines and circles.
To its credit, Windows XP resizes photos for emailing (Section 5.5), but when you need more than that, pick up a free copy of Picasa 2 (http://www.picasa.com ). The program offers basic fixes (Figure 5-6) like cropping photos to standard print sizes, straightening slanted horizons, removing red-eye, and automatically adjusting contrast and color.

Figure 5-6. Picasa, a free photo-editing program distributed by Google, offers a wide variety of easy-to-use, one-button editing tools. When stuck with a slanting horizon, for instance, click the Straighten button, and then slide the lever to the left or right until the horizon becomes horizontal. Click the Apply button to save your changes.
Automatically enhance your photo’s contrast, lighting, and color by clicking the program’s I’m Feeling Lucky button. (If that phrase rings a bell from Google’s search menu, that’s because Google owns Picasa.) Picasa’s robotic eye ain’t perfect, but it’s a great starting point for further tweaks. Picasa’s photo management tools outshine Windows XP as well, letting you view your photos in a linear "timeline” of thumbnails. If you recall the general day, month, or year you snapped a missing photo, call up the Timeline and watch your photos “float” past in the order you took them.
If you need more advanced editing than Picasa offers, check your digital camera’s box and packaging. Most manufacturers slip in a software CD or two, and you occasionally find Photoshop Elements, an easier-to-use version of Adobe’s Photoshop program for professional photographers. Although more difficult to figure out and use than Picasa, Elements’ advanced tools let you remove dust and scratches from scanned photos, merge photos to create panoramas, and airbrush away wrinkles, moles, and that little smear of BBQ sauce from your right cheek.
To go retro when sharing photos, just print them out (Section 4.7) and pass them around in person. But digital photos cry out for a more immediate approach. Here’s how to share them through email or a file-sharing site.
Sending photos through email is like dropping a block of ice into a drinking glass: the photos’ immense size keeps them from fitting comfortably into an email message, which works best with text and small attachments. You may not have noticed your digital photos’ mammoth size because Windows XP hides it from you. To keep you from examining nose pores instead of portraits, Windows XP politely shrinks opened photos to make them suitable for onscreen viewing.
For instance, Figure 5-7, top, shows a digital photo opened with Windows Picture and Fax Viewer—note the tiny fly on the railing. When viewed at actual size (see Figure 5-7, bottom), that tiny fly’s really a monster.
Large digital photos (usually around 1 or 2 MB apiece) make for great prints but lousy email attachments. Even if your ISP lets you send the photo (and many won’t, because of size restrictions), the photo would probably bounce back when it overflowed your friend’s mail storage limit (usually 5 or 10 MB).
The only answer is to shrink the photo, leaving you two options:
Resize. Windows shrinks your photos automatically if you email them. Right-click a selected photo or photos and choose Send To → Mail Recipient. When you take up Windows’ offer to “Make all my pictures smaller,” Windows shrinks them to 640 x 480 pixels—a comfortable viewing size for most displays. (If the recipient owns an extra large monitor, click “Show more options” and choose either 800 x 600 pixels or 1024 x 768 pixels.)
Crop. Resizing a photo doesn’t work well for shots where you need to preserve details. Those three cute deer grazing in the field, for instance, become three small brown dots in a sea of green. Cropping lets you trim away most of the field, yet save the deer at actual size. Windows XP doesn’t offer any cropping tools, but Picasa crops very easily, as shown in Figure 5-8.
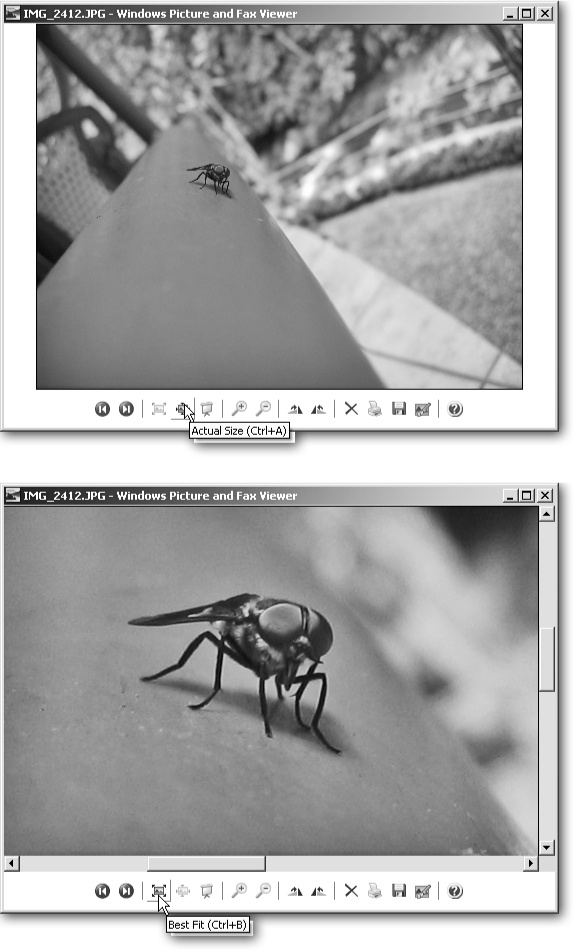
Figure 5-7. Top: Windows XP automatically shrinks digital photos to fit into the Windows Picture and Fax Viewer. To see your photo’s true size, click the Actual Size button—the fourth button from the bottom left. Bottom: When Windows displays the actual-sized photo, most of it hangs beyond the window’s borders, leaving just a tiny portion visible. (To shrink the entire photo back into the window, click the Best Fit button—the third button over from the bottom left.) Although Windows XP lets you see portions of photos at their actual size, it doesn’t provide a way to save that portion separately from the photo. For that, you need photo-editing software with a cropping feature (Figure 5-8).
When emailing photos, never dump a huge batch into email and mass-mail. No matter how great a time you had in Belize, few friends want to wade through a wad of vacation photos. Instead, choose a favorite or two to sum up the experience, and send those. Snap-happy people occasionally end up on "twit filters” (Section 12.7.2), especially when they send photos to friends at work. For better etiquette, upload your photos to a photo-sharing site and send your friends the link to view your masterpieces on their own time.
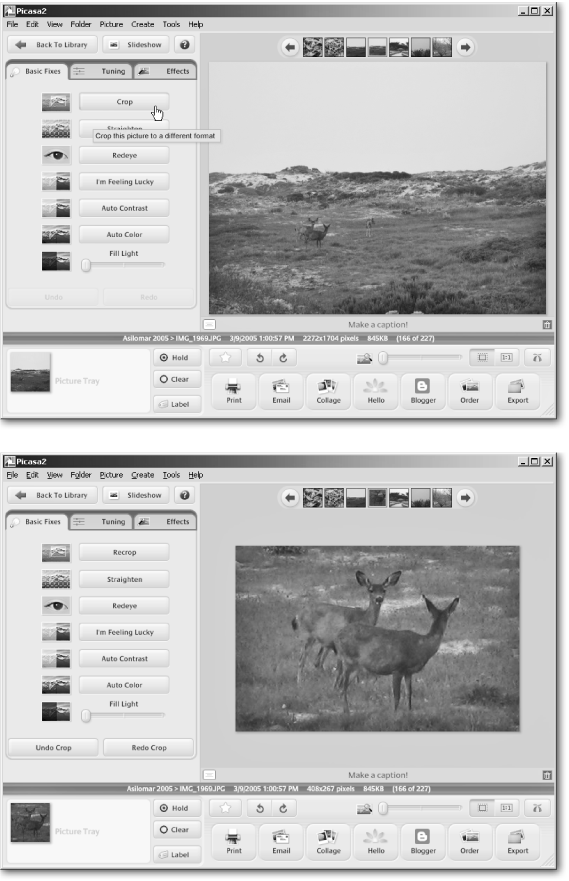
Figure 5-8. Top: Like Windows, Picasa can resize a photo for sending through email. But in this case, resizing the entire photo shrinks the deer into little specks, which makes for a pretty boring photo. Bottom: Unlike Windows, Picasa offers a crop tool, letting you place a resizable rectangle around the most important portion of your photo—then save just that portion. By cropping out all of the photo except for the deer, for instance, this photo becomes small enough to send through email, yet still shows the portion that matters: those cute deer and their big ears.
Instead of emailing digital photos to a few select friends, some folks share their pet, party, and parade photos with the world. Photo-sharing sites give you an easy-to-use Web page to display your photos, whether sent from a computer or a camera phone. Send friends the link, and they can drop by to see your photos in a slide show, complete with your captions or annotations.
Here are some of the most popular.
Six hundred thousand people worldwide dump their photos at Flickr (http://www.flickr.com), but the site’s much more than an online picture frame. Sure, Flickr offers the usual photo-sharing tools: send friends a link to your Flickr “photostream” for browsing or viewing in a slide show. Flickr even lets you annotate parts of photos, showing friends exactly where in the river that big lunker took the lure yesterday.
But Flickr takes sharing to the extreme, making it easy for not only you, but also the entire world, to retrieve your photos. It shares photos through the use of tags—simple, descriptive words like “Large Green Beetle Costa Rica” that you append to your uploaded photos. Your tagged photos become part of the collective photographic consciousness, letting you and Costa Rican entomologists and bug fetishists worldwide locate your photos quickly and easily.
Should you choose, your photos can remain hidden to all but selected friends. But most uploaders enjoy Flickr’s groupthink spirit, granting strangers access to almost everything. Visitors can view where you caught your bass, and leave a comment pointing out where they got lucky. Of course, visitors could just as easily leave a note saying, “You stink,” revealing a potential problem: Flickr’s open philosophy could easily sink into a pit of spam and crude vandalism.
But so far, it’s grown quickly into an easily searchable, eight-million-photo library that’s much more than the sum of its parts.
Free account holders may upload up to 20 MB of photos (roughly 20 to 100 photos, depending on their size) every month. Professional account members ($24.95 a year) may upload 2 GB (10 times as many photos) each month, send larger sized photos, and enjoy other privileges.
Flickr’s partnership with Qoop (http://www.qoop.com ) allows members to print bound books of their photos starting at $8.95 or print a poster for $9.99. Calendars, postcards, coffee mugs, and single prints are also available.
Whereas Flickr lets anybody with a camera walk in the door, Kodak’s EasyShare Gallery (http://www.kodakgallery.com) prefers privacy. Drop-by visitors must create an account before viewing any photos.
The online site brims with more than 20 million members and one billion photos, partly from Kodak’s 2001 purchase of Ofoto, a popular online photo-sharing site. Renamed to Kodak EasyShare Gallery in mid-2005, the site also collects visitors straight from Windows XP: your My Pictures folder shuttles you to Kodak’s site, among others, when you click the “Order Photos Online” link (Section 5.3).
Like most online photo-sharing sites, the EasyShare Gallery lets you store, view, and share photos with specified friends and family. But it’s no secret that Kodak caters primarily to people who want to print digital photos on Kodak paper. (Or on Kodak’s line of calendars, cards, mugs, mouse pads, aprons, frames, and other swag.)
In addition to printing photos, the site offers simple online editing tools for removing red-eye, cropping and rotating, and adjusting color. Toss on a few borders and effects, send your work to Kodak, and wait a few days for your prints to arrive in the mail.
Fotolog (http://www.fotolog.com) bills itself as a photo blog—a sort of online diary based on images, rather than words. To reduce the deluge of photos, members may upload only a single photo each day. As the Web site puts it, “Fotolog is more the kind of place where you’d put up a different photo of your children each day or each week so your friends and family could check in to see how they’re growing up.”
Even with a limit of one photo per day, the site boasts more than a million “Fotologgers,” who’ve swollen the database to more than 44 million photos. The site doesn’t offer searches, so you need the account holder’s name to ferret out their photos from the jumble.
Fotolog offers neither printing services nor professional accounts. So, how does it pay the bills? Three hobbyists run Fotolog, and request donations of $5 a month to help pay their bills.
When your digital camera’s not working properly, make sure the batteries are charged and a digital card’s in the camera’s memory slot. Once you’ve ruled out those two main culprits, move on to these:
Small or lower quality photos. Most cameras offer three or four quality settings, giving owners a choice between fewer, better-quality photos or packing more, lower-quality photos onto the storage card. Lower settings create smaller pictures, lower quality, or both. To increase a photo’s size and/or quality, poke through your camera’s menus and bump the quality to Fine or Best. Then buy a larger memory card, pronto.
Battery life. When your camera battery’s fading fast, and you want to take some more snaps before heading back to the recharger in the hotel room, turn off the camera’s LCD display while taking your photos. In fact, some people double their battery life by never using the LCD display. After all, the lowly viewfinder worked fine for previous generations of photographers. Plus, you can always crop your photos (Section 5.5) for that perfect frame when it’s on your computer.
Flash problems. The flash wastes battery power and robs your photo of the subtlety found in natural lighting. Use a tripod, if you carry one, or make one: press one side of the camera against a wall or table and tilt until you’ve framed the photo. If your camera has a strap, hold it in between your teeth, extend the camera to straighten the cord, and take your snap—the cord’s tension keeps the camera steadier than your hand.
Complicated menus. Digital cameras contain more menu options than a Chinese restaurant. If you think you’ve changed a setting for the worse, but don’t know which one, look for the menu’s magic fix-all: Return to Default Settings. Some older cameras lack this setting, so remove their batteries and let the camera sit for 48 hours. That should reset everything to the way it was when it came out of the box.
Date and time. As soon as you take your new digital camera out of the box, head for the camera’s menu and set the camera’s date and time. That information’s embedded into every photo, making it easy for digital photo programs to sort them by shooting date. Without it, your folder of digital photos becomes a pile of numbered files, with no easy way for you to sort them. Keep an eye on the date when you recharge the batteries; some older cameras forget it and need resetting.
Before PCs, editing video was so labor intensive that most people didn’t bother, much to the dismay of family members forced to watch these uncut, unedited, and generally unwatchable marathons. Editing required recording bits of camcorder footage to a VCR in exactly the right sequence, and then recording the VCR’s tape back to the camcorder—a process consuming more time than the two-week Hawaiian vacation the video was meant to capture.
But just as word processors simplified writing, video-editing programs transform video editing into a simple matter of dragging and dropping clips into their playing order. Editing clips is as easy as editing paragraphs, neatly trimming out belches from family picnics.
The following sections explain how to connect your camcorder to your PC, dump its video, and work in Windows XP’s built-in video editor, Movie Maker, to transform isolated clips that tell a poignant story. Or, at the very least, an order that leaves out those embarrassing blank stretches of footage where you left the camcorder turned on in the bag.
The first obstacle to editing your video stems from its location: it’s on a tape, not in your PC. Moving the movie from the tape to the PC is fairly easy if you own a digital video (DV) camcorder. Those camcorders ease the transfer by storing your insightful picnic footage in the same language your PC speaks: digitally, using long strings of numbers.
Analog camcorders—often that older model that served you well before you got a DV camcorder—don’t understand NumberSpeak, making the PC connection much more difficult.
Here’s how to connect both types of camcorders to your PC.
Among the many small holes in their cases, nearly every digital camcorder sports a FireWire port—a high-speed communications channel that spits data through a cable into your PC’s matching FireWire port (Section 1.8.3.1). If your PC lacks a FireWire port, they’re easy enough to install (Section 1.7), and nearly any computer, camera, or office-supply store sells FireWire cables.
When connecting a digital camcorder to a PC, FireWire’s more than a mere conduit for flowing video. The cable also lets you control your camcorder with your PC: click an onscreen Play button, for instance, and the camcorder you’ve left on the floor, tethered to your PC, dutifully begins playing back the video. Placing the camera’s controls onscreen lets you concentrate on your editing, rather than having to fiddle with the camera’s tiny buttons.
Follow these steps to connect your digital camcorder to your PC.
Connect the FireWire cable between the ports on your PC and the turned-off camcorder.
Normally, FireWire devices are hot-swappable—you can leave them turned on when plugging and unplugging them. Some camcorders prove the exception, however, and generate small sparks that can burn out the circuitry. To be safe, keep your camcorder turned off when plugging it into a PC.
Turn on your camcorder and set it to VCR or Playback mode.
Your PC immediately sends the welcome message shown in Figure 5-9, asking you which program should handle the chores of copying your footage to your PC. That message means the connection’s a success—definitely a good sign.
If you’re already familiar with a video-editing program listed on the menu, click its name and then click OK to launch it. For instance, if you choose “Capture Video using Windows Movie Maker,” Windows XP automatically opens that program and leaves you at step 3 of the “"Capture Video” section (Section 5.9.1).
Otherwise, choose “Take no action.” That lets you choose a video-editing program at your leisure—either Movie Maker or something else—and use that program’s menus to import your video.

Figure 5-9. When you connect a FireWire cable between the FireWire ports on your PC and your digital camcorder, Windows XP immediately notices, and offers to grab the video using one of the video-editing programs on your PC. If your PC came with a DVD burner, your PC may also include a video editor with more features than Windows XP’s bundled Movie Maker. Try them both to see which one you prefer, and then use that program to grab your video.
If Windows XP doesn’t greet your camcorder with enthusiasm (aka the Digital Video Device window shown in Figure 5-9), make sure you’ve connected the cables tightly, and the camcorder’s both turned on and set to play video—not record it. To make sure your camcorder didn’t fall asleep into Standby mode, turn it off and on again.
If you still don’t see a greeting, open My Computer. If you spot your camcorder’s name listed as an icon, the connection’s fine. No icon? Then something’s wrong with your cable, the FireWire ports, or your camcorder itself. Now’s a good time to pull out your camcorder’s manual and start looking in the index under "PC connections.” You may need to tweak a menu setting.
Analog camcorders don’t store their images as numbers (that is, digitally), which means you need to hire a translator so the device can talk to your computer. Translators fall into three categories:
Third-party conversion services. Dropping off the tapes at a video-conversion service is your easiest, but most expensive, option. Found in the “Video Tape Duplication and Reproduction” section of nearly every city’s yellow pages, the technicians at these shops read comic books as your tapes play through a digital converter. A few days later, they hand you a few DVDs containing your unedited digital footage—along with a hefty bill for their Advanced Video Technician services.
Video capture devices. The second, less-expensive way, is to install some type of video capture device (Section 1.7), costing between $50 and $100, to your PC. Some video capture devices install into your PC as cards; others plug into a USB port. Both types offer two ports: one for sound, and one for video.
Connect a video cable between the video ports on the camcorder and the capture device, then connect an audio cable between the audio port on the camcorder and your PC’s line-in port (Section 7.2.1). Run the capture software, play your tape, and read your own comic books while your PC saves the video to a file on your hard drive.
The digital camcorder solution. The third and easiest transfer method comes if you own a digital camcorder. Connect your analog camcorder to your digital camcorder and convert the footage yourself by following these steps:
Locate your analog camcorder’s Sound and Video Out ports.
Ever watched your analog camcorder’s videos on your TV? Then you connected the camcorder to the TV using these same ports, which are usually called RCA or S-Video ports (both of them are discussed on Section 3.5.1).
Find your digital camcorder’s Sound and Video In ports.
Unless you’ve recorded TV shows or video tapes onto your digital camcorder, you may need to crack the camcorder’s manual to find these—especially on tiny camcorders where one port doubles as an In port and an Out port, depending on a menu setting.
Connect the analog camcorder’s Sound and Video Out ports to your digital camcorder’s Sound and Video In ports.
Use the cables that came with either camcorder to connect their ports. If the two camcorders use different types of ports, buy some cable converters, which are available at Radio Shack and most stereo stores.
Connect a FireWire cable between the FireWire ports on your digital camcorder and your PC.
Set your PC’s video capture software to record a live video stream.
Windows XP’s built-in Movie Maker software (Start → All Programs → Movie Maker) can handle the job: Choose File → Capture Video, the same option you use when recording a digital camcorder’s own tape.
Push the analog camcorder’s Play button.
Your analog camcorder plays the video into your digital camcorder, which quickly converts the incoming footage to digital and does one of two things:
Sends the video to the PC. If you see your analog camcorder’s footage playing on your PC, you’re in great shape: your digital camcorder supports DV Passthrough mode, which passes the incoming video straight to your PC. You’re lucky, as that saves you considerable time.
Records it to tape. If your digital camcorder doesn’t support DV Passthrough, or you can’t find that mode on its menus, then forget about the PC connection for now. Just tell the digital camcorder to record the incoming video to a digital tape. When you finish recording the tape, play it back for the PC to grab, just as you would for any other digital tape.
Once you move the analog video into your PC as digital video, fire up Movie Maker 2, described next, and convert your raw, newly digitized footage into that sensitive, artistic statement you’ve been yearning to share with the world.
Windows XP’s free movie editor, the imaginatively named “Windows Movie Maker,” does an adequate job of stringing together movie clips. The latest version, “Windows Movie Maker 2,” includes a wide variety of editing tricks to spice up your footage. Some effects go overboard, but most audiences prefer even a corny edited video over a boring, unedited video.
Windows XP’s Service Pack 2 (Section 15.4) automatically upgrades Movie Maker to Movie Maker 2. To check the version on your PC, choose Start → All Programs → Movie Maker → Help → About. If you’re not using Service Pack 2, download Movie Maker 2 for free at Windows XP’s downloads area (http://www.microsoft.com/windowsxp/downloads).
Windows Movie Maker 2 leads you through editing video in three separate phases:
Capture Video. Movie Maker scoops video from your camcorder or other video files on your PC. This step also lets you import sound files for background music, as well as digital photos, which come in handy as backdrops for opening and closing credits.
Edit Movie. The most labor-intensive part, here’s where you drag and drop your best clips onto a “storyboard”—a long strip representing your finished movie—rearranging the clips to create your actual movie.
Finish Movie. The easiest part—this one’s all up to Movie Maker itself. The program reads in your edited clips, creates smooth transitions between them, adds your soundtrack or sound effects, and saves it all into a movie. In fact, it lets you save the movie in several sizes: tiny files that fit on a camera phone or a huge ones aimed at a widescreen TV.
Note
Movie Maker works best when you’ve adjusted your monitor’s “Screen resolution” setting (Section 3.8.1) to 1024 x 768.
Here’s how to handle each of those three steps.
Although Movie Maker’s Task Pane calls this step “Capture Video,” it’s really about collecting all your movie’s raw materials, including video, digital photos, and music. Everybody knows how much music enhances a movie, but photos add interest, as well. For instance, a photo of your vacation destination’s entrance sign, be it Motel 6 or Yosemite National Park, works well as an opener for a travel video.
To import photos or sound files, choose File → Import into Collections. Select the files you want, and Media Player tosses them into the Collections area along its right side.
Gathering photos and sounds requires lots of pointing and clicking on your part, but Windows Movie Maker takes care of capturing the video on your camcorder. To tell Movie Maker to copy the video from your camcorder into your PC, follow these steps:
Open Movie Maker (Start → All Programs → Movie Maker) and choose File → Capture Video.
This tells Movie Maker to search your PC for any gadget that’s storing useable video.
Click the icon for the device containing your video, usually the camcorder, and then click Next.
If your PC can capture video in several different ways—an attached Webcam, a video capture card, and a digital camcorder, for instance—Movie Maker stops to ask you which device has the goods (see Figure 5-10, top). Click the one containing your video—most likely your digital camcorder.
Figure 5-10. Top: Choose your digital camcorder icon on the Video Capturer Device screen. Or, if you’re capturing from a Webcam or video capture card, choose that icon instead, and Movie Maker immediately lets you adjust that device’s settings. Second from top: Choose a file name and location where you want to store your incoming video. Third from top: Choose the video quality settings for your movie. Bottom: When you tell Movie Maker to begin the capture process, the program automatically rewinds your digital camcorder and starts recording from the beginning of your footage. Be sure to turn on the “Create clips when wizard finishes” checkbox. That tells Movie Maker to break each shot into separate clips, which makes them much easier to edit.
Enter a file name and folder for your incoming video, and then click Next.
Type a file name for your incoming video, and a stashing spot on your hard disk (Figure 5-10, second from the top). Movie Maker normally stashes the footage in your My Videos folder, but click Browse to choose someplace else—perhaps a second, larger hard drive (Section 9.2), if your PC has one. Captured video fills several gigabytes of space fairly quickly.
Choose Video Settings and then click Next.
Naturally, you want the best quality video, but that can easily fill your entire hard drive with one video of Aunt Daisy’s visit. To keep your video to a manageable size, tailor its quality by choosing one of these three options:
Best quality for playback on my computer. This option offers a good compromise between quality and space and creates reasonably sized videos that play back well on a PC. The resulting file won’t be small enough to email or offer for download on a Web site, but it’ll look good when played on a PC.
Digital device format. The highest quality offered. Choose this for movies you want to burn to a DVD. Also choose this option even if you’re still saving your coins for a DVD burner; when you eventually buy the device, you’ll be able to burn your stored footage to DVDs. Finally, remember that Movie Maker can store your edited movie back onto your digital camcorder (using a different tape than the original, of course, since you don’t want to overwrite your raw footage). If you plan on performing that maneuver (see Section 5.10.1 for details), you’ll want to pick this setting.
Other settings. Designed for serious video hounds, this option tailors the file size to fit more esoteric options—three different sizes of Pocket PC screen, for instance, or playing back on a computer network from a server, which is handy mostly for corporate settings.
Choose between capturing automatically or manually, and then click Next.
If you have some time, choose to capture the entire tape automatically: Movie Maker rewinds to the tape’s beginning, if necessary, and begins collecting everything on the tape. (Want to collect only the first few minutes or so? When you reach that point, click the Stop Capture button, as explained in step 7.) To pick and choose a few selected tidbits from the tape, choose manually. Then, you start and stop the tape by clicking Movie Maker’s onscreen buttons, alternatively clicking the Start Capture and Stop Capture buttons to grab the good parts.
Turn on the “Create clips when wizard finishes” checkbox.
This little checkmark makes all the difference. Turn on this checkbox for most hand-shot videos—family gatherings, sports games, trips, and other things you’ve filmed. That tells Movie Maker to keep track of when you filmed each shot and break each segment into a separate clip. Turn off this option only when you want your original recording left intact.
Click Stop Capture when Movie Maker has captured all the video you need.
When the ball game ends, click this button to stop Movie Maker before it begins capturing all that “Cat Playing with Yarn Ball” footage you used to pad the end of your tape. Movie Maker stops recording, and, if you chose the “Create clips” option in step 6, spends a few moments breaking your video into clips.

Editing a movie is like threading chunks of meat and vegetables onto a shish kabob. You cut each piece to the right size, position each one onto a long skewer so the flavors intermingle, and, hopefully, wind up with something tasty when you’re done cooking.
Similarly, you take your movie’s raw materials (your imported video, digital photos, and music), cut each piece to the right size, and position each one in an order that enhances the rest. When you’re done, Movie Maker cooks your work into a finished movie.
Movie Maker’s Collection area, shown in Figure 5-11, serves as the platter holding all your parts. The Storyboard along the bottom of Figure 5-11 serves as the skewer, where you thread the parts together. For a sneak preview of any clip or sound in your Collection area, double-click it, and it plays in the Preview area along the right side of the window.
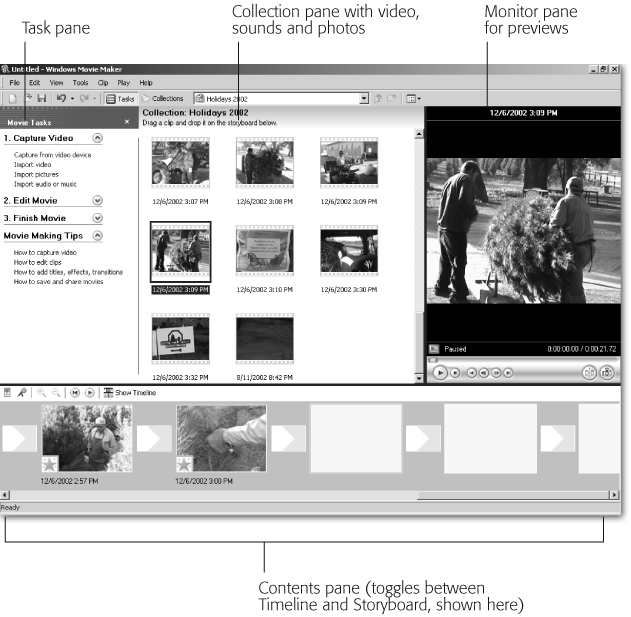
Figure 5-11. Movie Maker lets you work in three separate areas: the Collection area, the Storyboard, and the Preview window. All your imported clips, songs, and photos live in the Collection area. Weed out any awful clips from the Collection area by right-clicking them and choosing Delete. To view or hear a particular clip in the Collection area, double-click it; the Preview window to the right immediately begins playing it. In addition to the Preview window’s standard Stop and Play controls, the Next Frame and Previous Frame buttons let you find the best moment to start and stop each clip. When you familiarize yourself with the content in each of your clips, drag them onto the large squares in the Storyboard area, piecing them together into a movie. Rearrange clips on the Storyboard by dragging them to different spots as needed.
Follow these steps to assemble your clips into a movie.
Drag your clips onto the Storyboard in a rough order for your movie.
The Collection area shows only the first frame of each clip. To remember how a particular clip looked, give it a double-click and watch the Preview pane. If it’s worth including in the movie, drag it onto the Storyboard below. Got a stinker? Right-click the clip and then choose Delete.
Changed your mind about something you’ve just added to the Storyboard? Drag it back to the Collection area. Don’t worry if a clip needs a little editing; right now, just capture the movie’s general flow.
Trim each clip.
Most of your clips probably need a bit of editing. Your camcorder sometimes jiggles a bit when you press the Record button, for instance, or the pitcher takes too long before throwing the ball. Once you place a clip on the Storyboard, Movie Maker lets you trim away its boring sections.
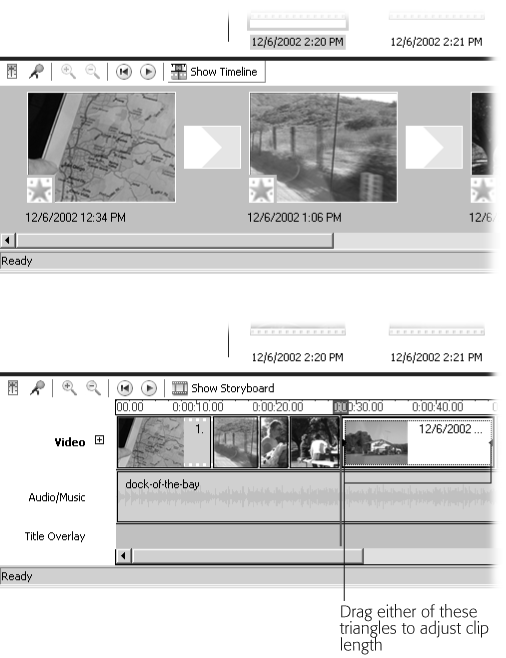
To apply the knife, switch from Storyboard to Timeline view: click Show Timeline (Figure 5-12, top), and Movie Maker displays your clips by their length. Longer clips consume more space on the Timeline than shorter ones.
Figure 5-12. Top: The film strip along Movie Maker’s bottom edge toggles between two views, each designed for different work. The Storyboard view shows each clip as a single frame, which is handy when placing your clips into the correct playback sequence. To change where a clip appears in your movie, drag it to a different location on the strip. Bottom: The Timeline view shows your clips by their length, so you immediately see when one long clip needs trimming to keep the pacing even. Shorten a clip by clicking it, and then drag inward or outward on the little black triangle poking from each edge. Below the filmstrip lies your Audio/Music layer, waiting for you to add a soundtrack with a quick drop of an MP3 file.
To trim a clip’s beginning or end, click it; the clip sprouts a “handle,” a little black triangle on each side of the clip. Drag the triangles inward to trim the beginning or end. For instance, to edit out the camcorder jigglies from your clip’s beginning, drag the black triangle inward from the clip’s left edge. As you drag, the Preview window updates to show the clip’s new opening frame. When you’ve removed the jiggles, stop dragging. Click the Preview window’s Play button to check your edit. Dragged too far? Drag it back, and Movie Maker restores the trimmed edge.
Admittedly, the Timeline’s small size makes for clumsy edits. For more precise editing, spread out your view by choosing View → Zoom In or pressing Page Down. The Timeline expands, letting that one little clip fill the entire screen. A drag on the black triangle then trims the clip one frame at a time.
Tip
To edit a clip’s boring middle section, but keep the beginning and ending, play the clip in the Preview window until the boring stuff starts to appear. Click Pause, and then choose Clip → Split (or press Ctrl+L). Movie Maker neatly breaks that clip into two sections. Edit the tail end of the first section, and the beginning of the second section, to remove that boring part.
Add Transitions between each clip.
Transitions control how one clip moves to the next. As your movie stands now, one clip stops, and then another immediately starts. But just as new word processor fans immediately start decorating their letters with fancy fonts, new movie editor fans quickly add wild transitions between their clips: one clip shatters into pieces, for instance, revealing the next clip “beneath” it.
To see Movie Maker’s frenzy of transitions, choose Video Transitions from the drop-down menu in the Collections area. Movie Maker temporarily replaces your collection of clips with transitions. Double-click any transition to view its effect in the Preview window.
Add your favorite transitions by switching to Storyboard view, shown in Figure 5-12, top; then drag the transition to the small squares between the frames.
Add opening titles and credits.
You’ve assembled your movie’s order, edited the clips, added the soundtrack, and sprinkled in a few transitions. To begin wrapping it up, add your opening title and ending credits by choosing Tools → Titles and Credits. Movie Maker guides you through typing in your title and credits and inserting them anywhere in the movie—the beginning and end (if you want to go for the traditional look), or overlaid on certain clips (if you’re looking for something a bit more artsy).
Unless you took careful pains both when filming and editing, your movie’s a jumble of cut-off sentences. Cover up the hubbub with a soundtrack: drag a music file from your Collections area onto the Timeline’s Audio/Music layer, which is located right below your movie.
Drag the end of the soundtrack inward to match the ending of your movie. Then, with a deft flourish, give it a right-click and choose Fade Out so the music tapers off to coincide with your movie’s ending.
Save your movie.
Movie Maker offers several ways to save your movie, which you can get to by choosing File → Save Movie File. Unfortunately, your movie’s probably too big for any of the listed choices but the first and last.
My Computer. This saves your edited movie onto your hard drive. (Your captured, unedited version remains on your hard drive, too.) Choose this option if your PC has a writable DVD drive, and then burn it with your DVD-burning software. (Windows XP requires third-party software to burn DVDs.)
Recordable CD. This option fits your movie onto a CD, cutting its quality, if necessary, to fit a CD’s 700-MB size limit. Microsoft stores the movie in its own High-MAT format, playable on Windows PCs and a tiny handful of Panasonic DVD players.
Email. Since most email accounts can barely send a high-quality digital photo (Section 5.5), Windows shrinks your video to a postage stamp before popping it into an email.
The Web. Again, Windows saves it to a miniscule size, and then tries to get you to sign up with their partner, Neptune, to store your video on the Internet—for a fee, of course.
DV camera. Your best option by far if you don’t own a DVD burner, this setting saves your edited video to a fresh tape in your digital camcorder at the highest quality. When you finally buy your DVD burner, import the edited version from the tape and burn it to the DVD.
PCs have enough trouble handling large digital photos. Movies pack anywhere from 15 to 30 photos into a single second of digital footage. To edit movies successfully, your PC needs a large drive, a fast video card, and something for you to do while waiting for your PC to process those fancy transitions between your stunning vacation clips.
Movie Maker works best on a Pentium 4; the video may appear choppy on slower computers or take exceptionally long to save to a file. Movie Maker may make the following complaints while you’re working; here’s how to solve them.
FAT32 4 GB file size error. This message pops up when your captured video file has swollen larger than 4 GB—which is larger than the limit of your hard drive’s storage system, known affectionately as FAT32. The solution is to stop, close Movie Maker, and convert your hard drive to the more modern storage system known as NTFS (Section 9.7.2). Then restart your PC, reload Movie Maker, and start over. Newer PCs with large hard drives rarely display this message, but it turns up on older PCs, laptops, or newer PCs with small hard drives (40 GB and less).
Can’t capture video automatically. Movie Maker usually controls your digital camcorder with confidence when automatically capturing video. But if your digital camcorder brushes off its advances, switch to Manual capture mode (Section 5.9.1). Rewind the camcorder yourself, push its Play button, and click Movie Maker’s Start Capture button.
Not enough disk space available. This message appears when your hard drive’s too stuffed to save your edited video. That leaves you three options: cut the movie’s length by snipping clips, choose a lower quality setting to save space, or buy an external hard drive (Section 9.6.3) to hold your movie.
Attracting voyeurs worldwide, Webcams provide a Web site’s visitors with a regularly updated glimpse into another place. Thousands of free Webcams, viewable from Web sites worldwide compete for your attention, dishing up live-action ant farm excitement, sleeping cats, and even volcanic eruptions—if you happen to be watching at the right moment.
Most Webcams just take snaps of the action every 30 seconds or so, automatically updating the Web site with the latest photo at regular intervals. The fanciest Web sites display a live video stream, just as if you were behind a camcorder’s lens. Posting a video stream is much more complicated than posting a single picture, so “live video” Webcams are still the exception, rather than the rule.
Setting up your own Webcam takes considerable time and tweaking to make everything run correctly. Once you set the thing up, however, your work’s over. Your PC automatically grabs an updated picture from your video camera and posts it on your Web site to share with the world.
The following sections take you through everything you need to add a Webcam to your PC, and then show you how to share your pictures with the world.
Most Webcams are really just video cameras. They create video streams—live movies of whatever they may be aiming at, be it a waterfall, a massive swell, or a sleeping cat. When you attach these to your own PC, you can watch the entire video stream. Your PC extracts a single image from that video stream every 30 seconds, and then sends that particular picture to your Web site for the rest of the world to see.
When installed, most Webcams place their icon in Windows XP’s My Computer program; open My Computer to see the camera’s icon. Double-click the camera’s icon to view the stream and adjust your camera’s position slightly should the cat move.
Webcams fall into the following general categories; a few models are shown in Figure 5-13.
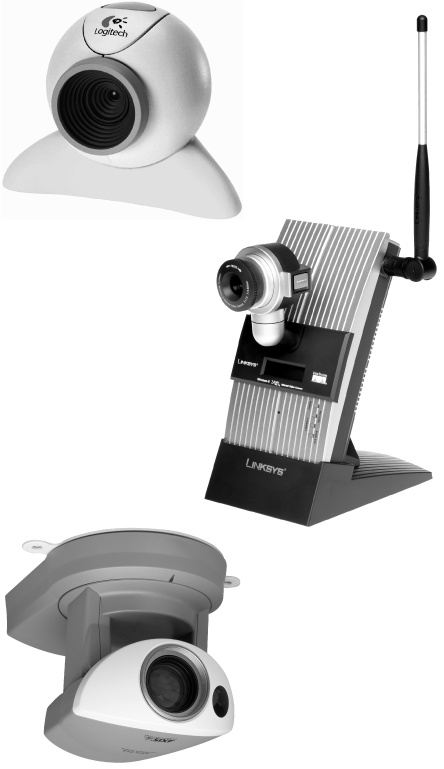
Desktop Webcam. At the lowest end of the scale, small, often ball-shaped video cameras (as shown in Figure 5-13, top) cost less than $50 at most computer or office supply stores. Once plugged into a USB port and taped to your monitor, the Webcam lets your friends watch you during instant messaging chats (see the online appendix, “Other Cool Things You Can Do Online,” available on the “Missing CD” page at http://www.missingmanuals.com). The small camera’s ease of use comes with some drawbacks, as they don’t allow much (or any) control over focus, brightness, or clarity. But, hey, at least some include their own doublesided sticky tape.
Digital camcorder. If you already own a digital camcorder, connect it to your PC’s FireWire port (Section 1.8.3.1) to create a makeshift Webcam that’s a huge leap in quality from the desktop Webcam models.
Network Webcam. Most Webcams remain tethered to your PC with a short USB or video cable. Network Webcams come with a network port so you can plug them right into your network. Since network cables can extend for hundreds of feet, network Webcams can sit far from your PC, which can be handy for rooftop or front-door surveillance. These models are more expensive than desktop Webcams and include extra circuitry to convert the camera’s video into your PC’s network signals. Cheap models start around $200, with prices rising quickly for higher-quality cameras.
Figure 5-13. Top: Logitech’s QuickCam Express ($50) doesn’t offer large, clear pictures or automatic focus. But it’s fine for close quarters or instant chat programs where the video looks a little grainy, anyway. Middle: The Linksys WVC54g wireless Webcam ($200) comes in handy when mounting the camera far away from the PC—on the rooftop, for instance, letting you view the front door or yard. Bottom: On the high-end, Axis Communications’ $1,669.99 roof-mounted, fully trackable Webcam sends streaming video accessible over the Internet. You can view many network Webcams, both wired and wireless, from any Internet-connected PC. Therefore it’s important to password-protect your network Webcam if you don’t want strangers peeking in.
Wireless Webcams. Wireless Webcams remove the PC’s tether altogether, and convert the video to network signals, which the camera then transmits wirelessly to your PC. Wireless Webcams grant free movement, letting you move the camera to the room’s other bookshelf during the party, for instance, or you can attach it to the cat’s collar for a CatCrawlCam.
Viewer-controllable Webcams. The high-end of the scale. These cameras offer “point and zoom” controls to let site visitors watch all angles of the action, be it cars in the Plantation Pancake House parking lot or surfers zipping between the Ocean Beach Pier’s pillars. Logitech’s computer-controlled desktop model, QuickCam Orbit, sells for around $100. Axis Communications (http://www.axis.com) sells high-quality outdoor models costing more than $1,500.
Once you plug in your Webcam, Windows XP lets you view the camera’s images immediately—just double-click its icon inside My Computer. To share those images with others, you need extra software. Many Webcams come with their own software. Alternatively, instant messaging software automatically recognizes any Webcam installed on your PC and handles the chores of transmitting video to your friends during chats.
But uploading photos to a Web site requires more work on your part, as well as Webcam software to periodically grab the camera’s images and upload them to the Internet. Luckily, Webcam software’s quite inexpensive, and some Webcams even toss free software into their boxes. If yours doesn’t have any, Microsoft offers the free but minimalist Timershot software (http://www.microsoft.com/windowsxp/downloads/powertoys/xppowertoys.mspx). For a simple Webcam that uploads photos automatically to the Internet, Timershot may be all you need.
The more advanced TinCam Webcam software (http://www.tincam.com) offers easier controls and more features, letting you grab images from two or more cameras simultaneously, send video streams, and send files to several Internet destinations. TinCam offers a free trial for 30 days, letting you toy with the settings before committing to the full $19 price.
Your Webcam and its software chug along as a team, letting you peek at your PC for a view of an exotic remote location, should your camera be pointing that way. But to place that view onto the Internet, you need Web space (see the online appendix, “Other Cool Things You Can Do Online,” available on the “Missing CD” page at http://www.missingmanuals.com)—a little storage area on the Internet for housing files, including a Web site. You may already have some but don’t know it: many ISPs offer their customers free Web space. Most limit that space to between 5 and 15 MB, which is more than enough for a photo.
Setting up your Webcam software so that you can funnel images to a Web site works much like setting up a Web browser (Section 13.1) or email program (Section 12.2). The Webcam software demands these five all-important pieces of knowledge:
Note
The following information serves as your “house key” for entering your Web space. Write it down and store it in a very safe place.
Host address. Your Web site provider gives you this. It specifies your Web space’s parking place on the Internet. The address looks like ftp.myisp.com, members.isp.net, or something similar.
User name. Your Web site provider gives you your user name, too. You probably already use this same name to log onto the Internet, or perhaps to check your email.
Password. Your Web site provider also gives you your password. Just like the user name, this is often the same password you use to log onto the Internet or check your email.
Folder name. Web space lets you create folders, just like on your PC. You probably create this folder yourself when you create your Web site.
File name. Most Webcam software automatically supplies you with the name of the file that contains your snapped image.
Enter all five items into your Webcam software so it knows where to send the image, and then tell it how often to send each new image. Once the image appears on your site—constantly updated courtesy of your Webcam software—you need one more thing: a page that displays the image. Most Webcam software, including TinCam, include sample Web pages. Place that Web page in your Web space and list that Web page on your Web site’s menu so visitors can choose to see it in their Web browsers.
Windows XP makes setting up Webcams fairly easy. When Windows XP recognizes the camera, it automatically passes that information along to your Webcam software. But when Windows XP doesn’t recognize your camera, you’re in trouble.
Fortunately, that rarely happens. Windows XP manages to stay on good terms with most USB devices (Section 1.8.1), recognizing them as soon as you plug them in. If it doesn’t recognize your Webcam, you probably need to install its latest driver—the piece of software that lets Windows XP and your Webcam communicate on cheery terms. Download the driver from the Webcam manufacturer’s Web site and run the driver’s installation program.