
Early computers didn’t use monitors; they simply printed everything on paper, limiting computer games to pretty slow rounds of tic-tac-toe. Monitors arrived a few years later, and once engineers got a taste of steering their first spaceships, video technology was quick to (and of course, continues to) improve.
Today’s PCs connect to a huge variety of video gear, and this chapter guides you through how to:
Connect any monitor, TV, or digital projector to the correct port on your PC.
Connect two or more monitors to your PC to double your workspace, letting you work with more programs (or view more documents) simultaneously.
Share one display between two or more PCs to save money.
Adjust the monitor to get the best display possible.
Improve your PC’s video quality by adding a new video card.
Install a new monitor.
Troubleshoot problems when the display doesn’t look right.
Laptops and PCs share monitor technology, so nearly everything in this chapter applies to laptops, as well. The “Laptop Life” boxes explain any significant differences.
Monitors, those screens you stare at all day, come in two basic types: the old-school, TV-shaped Cathode Ray Tube (CRT) monitors from yesteryear, and the newer, flat, and thin Liquid Crystal Display (LCD) monitors filling the store shelves today.
When dealing with either breed of monitor, the same confusing terms pop up on sales floors and Windows menus. These terms top the list:
Screen size. Borrowing some trickery from TV-land, the computer industry measures monitors diagonally to create the illusion of executive-sized desktops. However, a 17-inch monitor gives you only a 13.6-inch-wide Windows desktop. Even an expensive 21-inch monitor offers only about 16 inches of workspace.
Pixels. Like the Sunday funnies, a monitor displays pictures by using tiny colored dots. The industry refers to the dots as pixels. A monitor displays text by simply stacking dots in different configurations, shown in Figure 3-1.
Resolution. Resolution refers to the number of pixels your monitor can use when filling up the screen. For instance, a low resolution setting like 640 x 480 turns the screen into a grid of 640 lines of 480 pixels. A higher resolution of 1024 x 768 creates a grid of 1024 rows of 768 pixels. A higher resolution produces a larger grid, which means a larger desktop—something everybody appreciates when trying to place two large windows next to each other.
Refresh rate. CRT monitors work much like movie projectors, constantly flashing new frames onto the screen. Even when you’re viewing a static image—a Web page, for instance—your monitor constantly refreshes the screen. If the monitor’s not speedy enough, the screen flickers noticeably, like you’re watching an old movie. Measured in hertz, the refresh rate refers to the speed with which the monitor updates the screen. CRT monitors work best at the highest refresh rate they offer, usually from 75–100 Hz. LCD monitors display images differently than CRT monitors, so they don’t have flicker problems. Keep their refresh rate set at 60 Hz. (See Section 3.8.2 for instructions on how to adjust the refresh rate.)
Contrast ratio. Found on a monitor’s list of technical specifications, contrast ratio measures the ratio of the brightest color to the darkest color that a monitor can display. Higher numbers are best, as they let a monitor display very dark blacks along with very bright whites and colors. CRT monitors average a 700:1 contrast ratio; most LCD monitors now match or exceed that.
Response time. This rating, measured in milliseconds (ms), refers to the time required for an LCD monitor’s pixels to turn from black to white, and then return to black. Lower numbers mean faster response times. A lower response time lets a character dash across the screen without leaving a trail of ghostly images following it.
Viewing angle. Another term applied only to LCD monitors. The viewing angle measures how wide an arc viewers can be positioned within and still see everything that’s on a display. A wide viewing angle lets lots of people see the monitor, even if they’re standing off to the side. A narrow viewing angle restricts the view to yourself, and perhaps the guy peering over your shoulder.
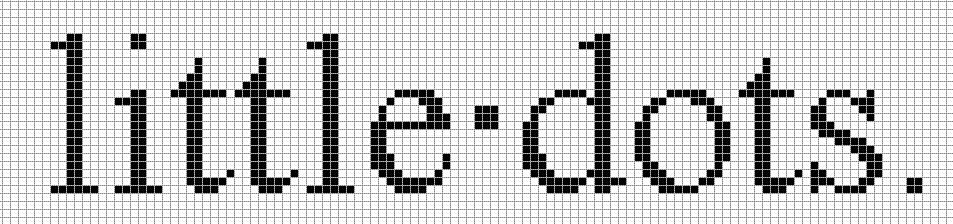
Figure 3-1. Everything displayed on your screen consists of pixels—little dots like the ones shown here. Your computer turns pixels on or off in different colors to display text or images. To give your monitor more (or fewer) dots to play with, adjust its resolution. A resolution of 640 x 480, for instance, gives your monitor a grid that’s 640 pixels wide and 480 pixels high. Switching your monitor to a higher resolution, like 1280 x 1024, gives it a larger grid, meaning you can pack even more information into the screen. The tradeoff? The monitor shrinks everything to fit the screen.
Today, nearly everybody buys an LCD monitor (also called a digital monitor); these are the sleek, flat-screen models like the one shown in Figure 3-2. As is the case with most technological innovations, problems plagued early LCD monitors. The screens faded when viewed from the sides, for instance—great for privacy when working on an airplane’s seat tray, but not so good for presentations. Also, early LCD screens didn’t update their displays quickly enough to satisfy hardcore gamers: fast-moving characters left unwanted “ghosts.” Manufacturers earned their chops building LCD monitors for laptops, so they fine-tuned desktop LCD displays fairly quickly. Today, LCD monitors surpass CRT monitors in nearly every way: they provide clearer screens, consume less desk space, require much less energy, give off less heat, are easier on the eyes, and, well, they just plain look nicer.
Just like their predecessors, most LCD monitors connect to a PC’s VGA port (Figure 1-13, top). The best LCD monitors come with a DVI (Digital Visual Interface) port (Figure 1-13, bottom)—a newer port specifically designed to let these new digital monitors display their clearest images.

Figure 3-2. Top: With their sleek look, small footprint, and vivid displays, LCD monitors like this one have pretty much pushed CRT monitors out of the marketplace. Bottom: Like many new LCD monitors, this one comes with two ports, letting it connect to a wider range of PCs. The monitor’s DVI port (left) lets the monitor plug into the digital cards found on newer PCs and video cards. Next to it, an old-style VGA port (right) lets the monitor plug into the VGA ports found on nearly every PC, especially older ones.
To make things simple, some LCD monitors come with both a VGA and a DVI port, shown in Figure 3-2, bottom, so you can plug them into PCs bearing either one of those openings.
Tip
When shopping for an LCD monitor with a DVI port, give bonus points to ones that come with their own digital cable. Those cables aren’t cheap; they cost anywhere from $15 to $50, depending on their quality and manufacturer.
Today, the biggest problem with LCD monitors comes from dead pixels—pixels that don’t light up correctly. Some dead pixels constantly display an annoying pinpoint of one color; others stay black. Dead pixels aren’t very noticeable when you view digital photos; after all, one dead pixel blends in easily among 786,432 working ones. But when viewed on a background of one color—a completely blue or white desktop, for instance—dead pixels stand out like a pinhole in the window blinds shading an afternoon sleeper.
Manufacturers don’t want to scrap an entire monitor because of one or two dead pixels, so they ship the monitors to stores anyway. Some people never notice the dead pixels or don’t rank them high on their worry list. Others find the dead pixels bothersome, and want their monitors replaced.
Since dead pixels don’t irritate everybody, manufacturers rarely publicize their replacement policies. Some limit replacements to monitors with a certain number of dead pixels—three or more, for instance. Others hinge their replacement on the dead pixel’s location—dead pixels near the corners or edges don’t garner as much sympathy as those living near the center. Others replace monitors only for customers who protest loudly and make several phone calls. Before buying a monitor, ask the salesperson or vendor about the store’s replacement policy.
CRT monitors are bulky and heavy, and they resemble TV sets (Figure 3-3), but they do bear one redeeming quality: they’re relatively cheap, usually costing less than $150—if you can still find any for sale.
Gamers and graphic artists held on firmly to CRT monitors, as they preferred CRT monitors’ fast screens and vivid colors. But when LCD monitors finally caught up, those two camps packed up and moved along the technological trail toward LCD displays.
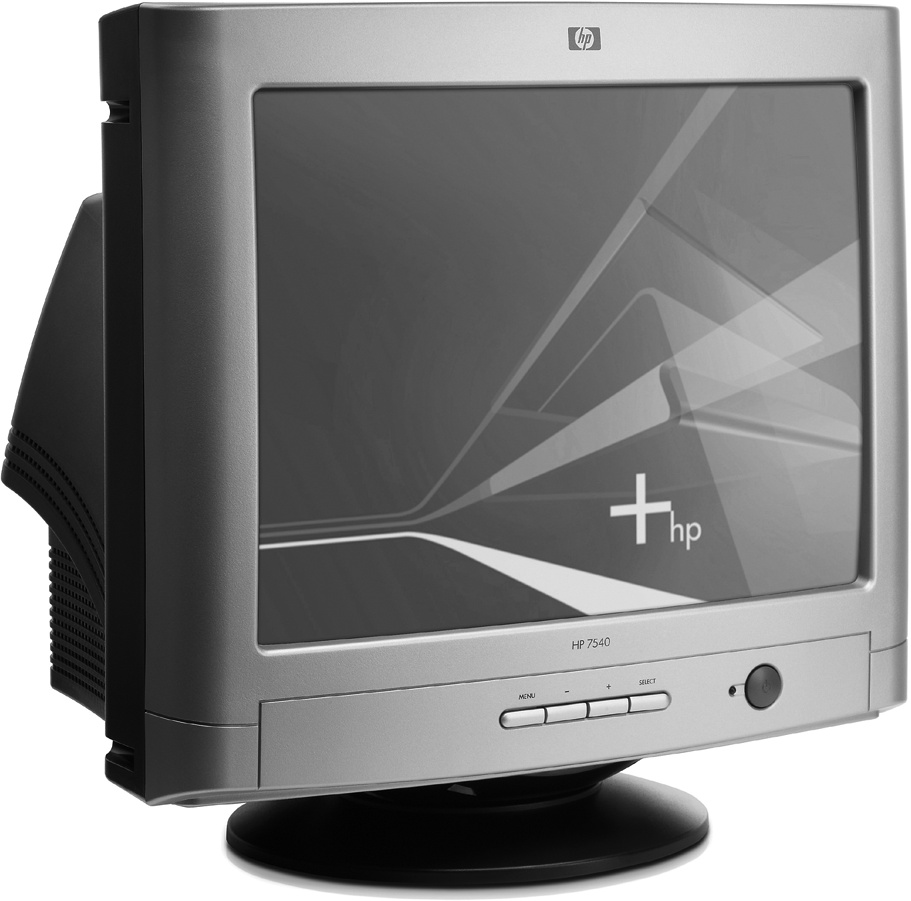
Figure 3-3. A computing mainstay for many years, CRT monitors no longer fill the shelves of computer stores. These bulky and heavy monitors lost popularity when higher-quality LCD monitors came down in price.
As CRT monitors slide toward the computer graveyard, they aren’t finding a welcome funeral. The monitors contain toxins like cadmium, mercury, and large amounts of lead—enough to define them as hazardous waste in California, Florida, Maine, Massachusetts, and Minnesota, with other states passing similar restrictions to keep them out of their landfills.
On the plus side, CRT monitors have been around so long that nearly every PC recognizes them on contact. Plug nearly any CRT monitor into your PC’s VGA port (Section 1.8.1), and Windows jumps onto the screen.
CRT monitors just plug into a plain old VGA port (Section 1.8.1): a 15-hole, D-shaped, round port found on nearly every computer.
Digital LCD monitors can often plug into either of two ports, depending on their connectors. Some plug straight into a VGA port, just like CRT monitors. The more expensive ones just plug into a DVI port (Section 1.8.1), found only on a digital video card. If your LCD monitor comes with only a DVI port—and your PC doesn’t come with a DVI port to connect the monitor’s cable—you need to buy and install a video card (Section 3.8.2) with a DVI port.
Once you plug a video cable into its port, twist the two knobs next to the connector to hold it in place.
Windows XP graciously lets you plug up to 10 monitors into your PC, a feature used mostly by hobbyists adding cockpit windows to their garage-sized flight simulators. Most people who take advantage of this feature stick with just two monitors, placing them side by side to double their desktop’s size. Devote one monitor to your work, for instance, while the other displays notes, email, or a handy Web page. A second monitor also works well for files that don’t fit well on one screen—extra-wide spreadsheets, for instance, or that panorama you created with your new digital camera.
Windows XP seamlessly merges the two desktops with a feature called Dualview, letting you drag tidbits from one monitor to the other. And Windows doesn’t care whether you plug in CRT or LCD monitors or a combination of the two; Windows remembers each monitor’s mechanics and sends it the signals it expects.
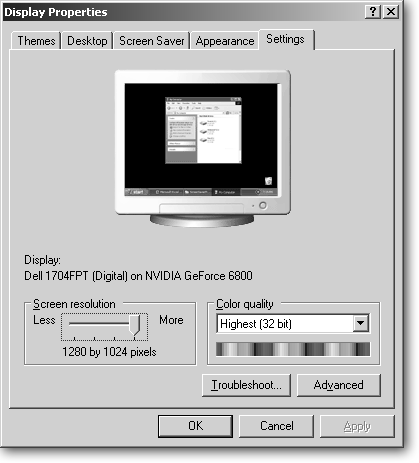
Before embracing the two-monitor lifestyle, make sure your PC or laptop supports two monitors by choosing Start → Control Panel → Display → Settings tab. If you spot two monitors in the window, as shown in Figure 3-4, you’re halfway there: Windows XP can expand your desktop onto a second monitor.
Spot only one monitor in the window? Then your computer can’t handle a second monitor until you install a second video card—something not possible with a laptop, but fairly easy to do on a desktop PC (see Section 3.8.2 for details).
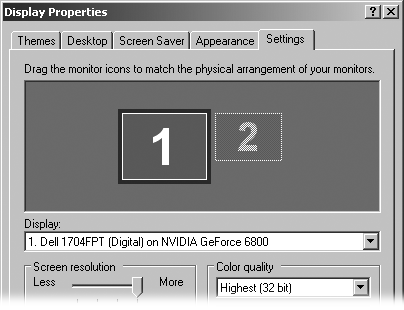
Figure 3-4. To see if your PC or laptop supports more than one monitor, choose Start → Control Panel → Display → Settings tab. If you spot two numbered monitors, like the ones in this figure, your PC supports a second monitor, letting you double your desktop’s size (or watch movies at work, on slow days).
Laptop owners, peek under your laptop’s backside plastic flaps to see if you can find a video port.
Once you know Windows XP supports two monitors, look for a place to plug in that second monitor. Examine your monitor to see if it bears a VGA or DVI port (Figure 3-2, bottom). Some monitors help out by including one of each.
Next, examine the sea of ports on the back of your PC for a VGA or DVI port that matches the port on your monitor.
After reviewing your monitor’s connector and the back of your PC, you’ll be facing one of two scenarios:
If a video port on your PC matches a port on your second monitor, connect the appropriate cable between them, be it VGA or DVI. Need a cable? Drop by any electronics, office supply, or computer store for either type of cable.
If your second monitor’s ports don’t match the ports on your PC, you’ve reached a minor impasse. DVI doesn’t work with a VGA port, nor vice versa. (Converter boxes exist, but cost several hundred dollars.) To install your second monitor, you must buy and install another video card (Section 3.8.2) into your PC that matches your monitor’s connector. One minor salvation: this new video card needn’t be an expensive, high-performer; any run-of-the-mill card for under $75 will do the trick.
Note
You may spot one video port on your PC’s video card, and a second—a VGA port—hiding up near your USB ports. That VGA port, built into your motherboard, is probably turned off because your current monitor plugs into your video card. To turn it back on, head for your BIOS (Section 17.2) and change your PC’s Onboard Video setting, a fairly simple matter of selecting On from the Onboard Video menu.
Once you plug the second monitor into your PC, tell Windows about your new monitor by following these steps:
Right-click anywhere on your Desktop and, from the shortcut menu, choose Properties.
Or, choose Start → Control Panel → Display.
Click the Settings tab, and then click the monitor with the “2” on the screen.
The Settings tab (Figure 3-4) displays both monitors on the screen, whether or not the second one’s currently connected.
Choose “Extend my Windows desktop onto this monitor” and then click Apply.
Windows activates the second monitor: The screens on both monitors flash a bit, and when they awaken, Windows appears on the second monitor.
The second monitor wears the same background or “wallpaper” as your first monitor. Since Windows treats them as two pieces of one large desktop, you can’t assign each one different wallpapers or screensavers.
To test your second monitor, click the Identify button on the Settings tab and watch the numbers “1” and “2” appear on the two monitors, as shown in Figure 3-5. Windows places the number “1” on the primary monitor. The primary monitor, the one used to turn on the Dualview wonderland, earns special honors. That monitor turns on first when you turn on your PC and log in; newly launched programs appear there, as well. (A laptop’s monitor is always the primary monitor.)
When you turn on Dualview, Windows assumes your second monitor sits to the right of your primary monitor, the same way the two monitors appear in Figure 3-5. That’s important to know because dragging items off your primary monitor’s right edge makes the pointer vanish, and then reappear on the second monitor’s screen.
Tip
The mouse pointer tends to vanish on the wide pastures offered by two monitors. To increase its visibility, head to the Control Panel’s Mouse icon, click the Pointer Options page, and turn on any or all of the options on the Visibility area (Section 2.2.3.7).
If your cat’s sleeping to the right of your primary monitor, feel free to put your second monitor on the left. But tell Windows about it: drag the second onscreen monitor to the left of the primary monitor. Windows then lets your mouse pointer move off the left edge, instead, letting your sleeping cat lie.
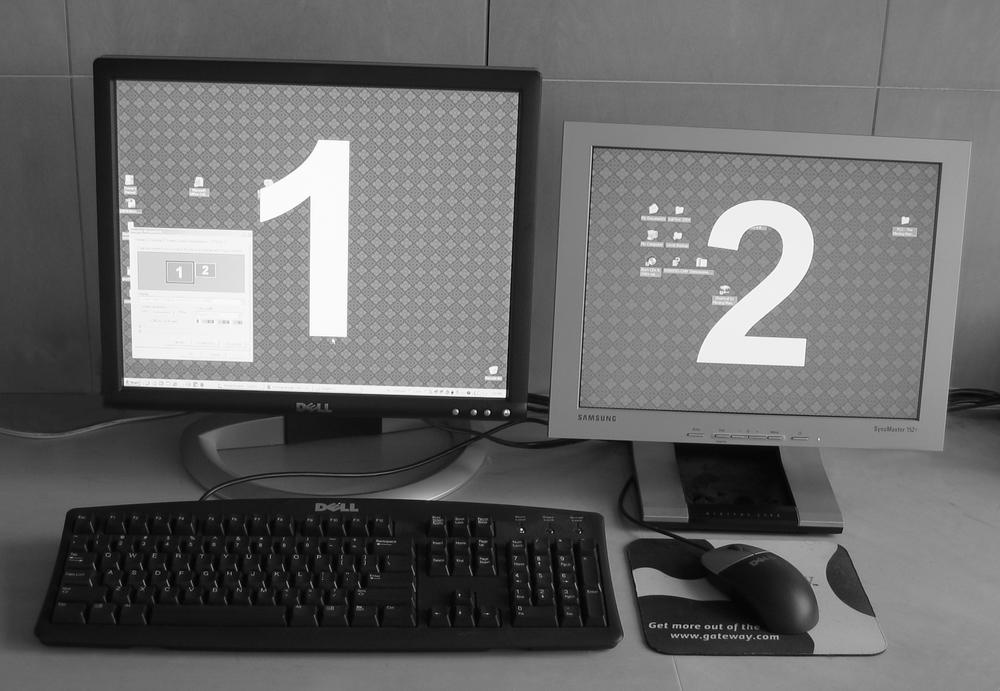
Figure 3-5. The Dualview setting lets you connect two monitors to one PC, stretching your desktop across them both. To see which one is which, click the Identify button (on the Display Properties’ Settings tab). Windows XP places a “1” on the primary monitor—the one you log onto when Windows starts—and a “2” on the monitor you added. Windows XP initially places the second monitor on your right side—that means your mouse pointer disappears off your primary monitor’s right edge before appearing on your second monitor. To change the pointer’s “disappearing edge,” return to the Dualview setting window and drag the onscreen monitors into different positions.
Dualview’s monitor positioning proves quite versatile. For instance, if you want to “stack” your monitors for viewing extra long Web sites, drag and drop the onscreen monitor to the top or bottom of the primary monitor. If you ever forget which monitor corresponds to Windows onscreen monitors, just click the Identify button (on the Display Properties’ Settings tab [Section 3.3.4]), and Windows numbers them for you.
If you find yourself working on your second monitor more than your primary monitor, tell Windows to assign primary status to the second monitor: click the number 2 monitor onscreen and choose “Use this device as the primary monitor” from the Settings page.
Note
Video cards with two video ports sometimes contain built-in software that conflicts with Windows XP’s Dualview feature. If Dualview doesn’t work properly, look for your card’s icon in the Control Panel (Start → Control Panel). Most dual-port cards come from nVidia, ATI, or Matrox. If you spot an icon with one of those names in the Control Panel, open it and try turning its own dual-desktop feature on or off to see if Windows XP’s Dualview kicks in.
Sometimes you end up with more PCs than monitors. For instance, some households keep their old PC’s monitor when buying a new PC, effectively decapitating the old PC. In other cases, folks share their desktop PC’s monitor with their laptop. And some families share a monitor with the kids—if they can get away with it. Whenever you share a monitor between two PCs, a KVM (Keyboard Video Mouse) switch (Figure 3-6) spares you the hassle of crawling behind the desk to switch the cables from one PC to the other.
You plug your monitor, mouse, and keyboard into the switch, which usually costs between $20 and $50. Then, on the other end of the switch, you get two sets of cables: one for each PC’s monitor, keyboard, and mouse ports. To work on the PC you currently see on your monitor, start working as normal, typing and moving your mouse.
When the kids want to play with the other PC, press a button on the switch or type a certain key sequence—the Scroll Lock key twice, for instance. That places the second PC’s screen on the monitor, letting the kids do their homework.
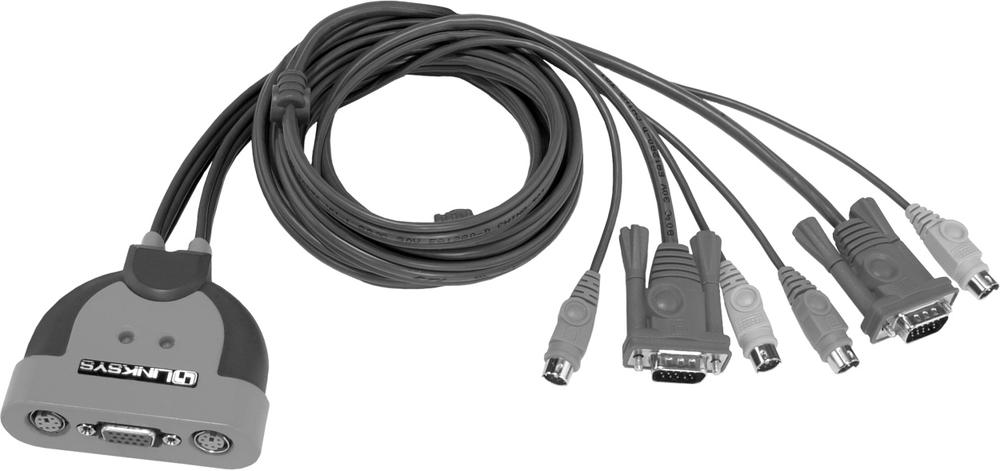
Figure 3-6. This Linksys KVM switch, available for under $40, lets two PCs share a single monitor (and a mouse and a keyboard, for that matter). Plug your monitor, mouse, and keyboard into the switch. Then, plug the switch’s cables into the monitor, mouse, and keyboard ports of the two PCs. To switch between PCs, push a button on the switch or type a special key sequence on your keyboard.
Some businesses juggle dozens of PCs with one KVM switch, letting one operator handle any problems that crop up with computers that are otherwise unattended.
Admittedly, a KVM switch comes with a few drawbacks. Unless you connect the two PCs to a network (Section 14.1), you can’t copy information between them. And some wireless keyboards and mice don’t work well when plugged into KVM switches. But like all niche products, a KVM switch provides a handy solution under the right conditions.
Sharing a monitor can be more practical than it first sounds. In some setups, for instance, a PC serves only as a backup system (Section 15.1), or it sends music and photos to a TiVo or other entertainment center. Since these PCs usually run unattended, a $30 KVM switch makes more sense than a second $250 monitor.
Early computer adopters lamented having to buy a second “TV” when they bought their first computer. Why couldn’t they just hook the darn thing up to the TV? For the answer, sit close to your TV screen while a movie’s credits roll by; you’ll quickly realize that televisions lack the crisp detail needed for close-up editing.
Televisions work best when displaying pictures, not text, so they usually make lousy PC monitors. However, hooking your PC to a TV works well for several things: showing off digital photos to a group, viewing movies through the PC’s built-in DVD player, or playing some video games.
Unfortunately, TVs and PCs sprouted from two different evolutionary seeds. The branches began to intertwine a few years ago, so your PC and TV may share the same ports. In that case, connecting a PC to a TV is as easy as connecting a VCR. When they don’t share ports, however, be prepared to weave a long thread of cables and connectors.
The next two sections explain how to route both your PC’s video and sound so you can see and hear everything on your TV.
Note
There’s one area where the TV-PC connection is growing stronger by the day: many TV stations already broadcast their signal over the Internet, which means you don’t have to bother hooking up your PC to your TV. You can watch the tube right on your PC’s monitor. Broadband (Section 11.1.2) Internet subscribers can tune into TV stations broadcast from Albania to Zimbabwe simply by clicking a link.
A few PCs and laptops—often the newer, more expensive models—come fully equipped to send video to your TV. Connecting the two machines mostly involves using a single cable—the same one that connects a VCR or a DVD player to a TV (this makes sense since you’re essentially using your PC as an input device, to route a signal from your PC to your TV). Older PCs and laptops require add-on equipment, extra cables, and more than a little patience.
Follow the steps described next to test the friendliness level between your PC and television.
Note
The terms “port” and “jack” are synonymous when it comes to the openings on the back of your PC and TV where you plug in cables.
Look for a Video Out port on your PC or laptop.
PCs and laptops often include an S-Video port (Figure 3-7, top left). Standing for "Separated Video,” S-Video cables often connect high-quality TVs with game consoles, camcorders, and DVD players. If your PC or laptop has an S-Video jack, it often lives next to where the monitor plugs in.
PCs occasionally send video through an RCA port (Figure 3-7, top right). Named after the venerable Radio Corporation of America, RCA ports live on the back of nearly every TV; they’re often used for plugging in a VCR.
Figure 3-7. Top: Look for either an S-Video (left) or an RCA (right) port on the back of your PC. Then examine the back of your TV for a matching connector labeled Video In. If you find matching ports, run the appropriate cable between the two ports to connect your PC or laptop to the TV. Bottom: This TV has three RCA ports (also known as jacks). One RCA port, labeled Video In, accepts video. (The other two accept stereo sound—one left channel and one right channel.) To connect this particular TV to your PC, connect an RCA cable between the TV’s Video In port and your PC’s Video Out RCA port.
Look for a Video In port on your TV.
Most TVs come with at least one of three possible Video In ports. They’re easy to spot, because most TV manufacturers do you the favor of labeling their ports.
—RCA port. This connects many TVs to a VCR or DVD player. Figure 3-7, bottom, shows a TV set’s Video In RCA port. (TVs use RCA ports for sound, as well as video; the yellow RCA port carries the video.) —Antenna or RF port. Almost every TV sports an Antenna port (Figure 3-7, bottom). The cable from your cable or satellite TV provider almost always plugs in here. —S-Video port. More expensive TVs offer S-Video ports as well as RCA ports. S-Video delivers a higher quality signal.

Here’s how to handle the ports you find on your PC and your TV:
If your PC and TV have ports that match, you’re in great shape. Connect the two with a cable that matches them, be it S-Video or RCA. Steal the cable from your VCR, if it matches, or buy a new cable at Radio Shack or an electronics store.
If your PC has S-Video and your TV has RCA—or vice versa—buy an S-Video/RCA converter, available for less than $20 from Radio Shack and other electronics stores. Plug the converter into the S-Video port, thus converting it to an RCA port. The ports then match, letting you connect an RCA cable between them.
If your PC doesn’t have a Video Out port, or your TV has only an Antenna port, buy a PC-To-TV converter. Available for less than $50, the little box plugs into your PC’s USB port (Section 1.8.1) and provides S-Video, RCA, and Antenna ports for connecting to any port your TV offers.
Note
An Antenna port, shown in Figure 3-7, bottom, is often called an “RF” or “Coax” port.
To help you comb through the combination of cables, connectors, and converters you may encounter, Table 3-1 provides a quick reference guide. Identify the ports on your PC and TV and then look them up in the table to find your connection solution.
Table 3-1. Connection ports between your PC and your TV
All the rules in this section apply to a High-Definition TV’s ports, too. However, some HDTV sets simplify the job by including standard PC monitor ports: VGA and/or DVI. If you spot one of those, unplug your PC’s video cable from its monitor, and plug the cable into your HDTV set instead. Add a DVI port to your PC, if needed, by installing an updated video card (Section 3.8.2).
RamElectronics (http://www.ramelectronics.net) sells many converters to use between PC ports and HDTV ports. The store’s a gold mine for high-quality—but cable-and-port-challenged—home stereo gear.
Once you connect the video, the hard part is over. Long ago, PCs and TVs agreed on the same cable for connecting sound. Follow these steps to send your PC’s sound to your TV:
Find your PC’s Line Out or Speaker port.
This 1/8-inch round port lives on your sound card (Section 1.8.7). It looks just like the headphone jack on an iPod or other music player. Of course, the sound card’s other four or five ports look identical, so be sure to choose the one for Line Out or Speaker. (The icon shows a little outward-pointing arrow, as shown on Section 1.8.7.)
Find your TV’s Audio In ports.
Shown in Figure 3-7, almost all TVs offer one or two RCA ports for incoming sound. If you’re lucky enough to have a stereo TV, you see two RCA ports, shown in Figure 3-7: the red port carries the stereo sound’s right channel. (Remember red for right to always hook up your stereo correctly.) The other port carries the left channel. Mono TVs come with one port only, usually the red one.
Be sure to choose the pair of ports labeled “Audio In”—not “Audio Out.”
Connect the cable between your sound card’s Line Out or Speaker port to your TV’s Audio In RCA ports.
If you’ve ever plugged your iPod or music player into your stereo or boombox, you already own this cable (Figure 3-8). The cable has a stereo 1/8-inch plug on one end and two RCA ports on the other. Can’t salvage a spare cable? Pick one up for a few bucks at any drug store, Radio Shack, or stereo store.
Push the small stereo plug into the Line Out or Speaker port on your PC’s sound card (Section 1.8.7) and plug the two RCA plugs into your TV’s Audio In ports. If you have a mono TV, just plug the red (right) side of the cable into the TV’s Audio in port; leave the cable’s other sound connector dangling and unattached.
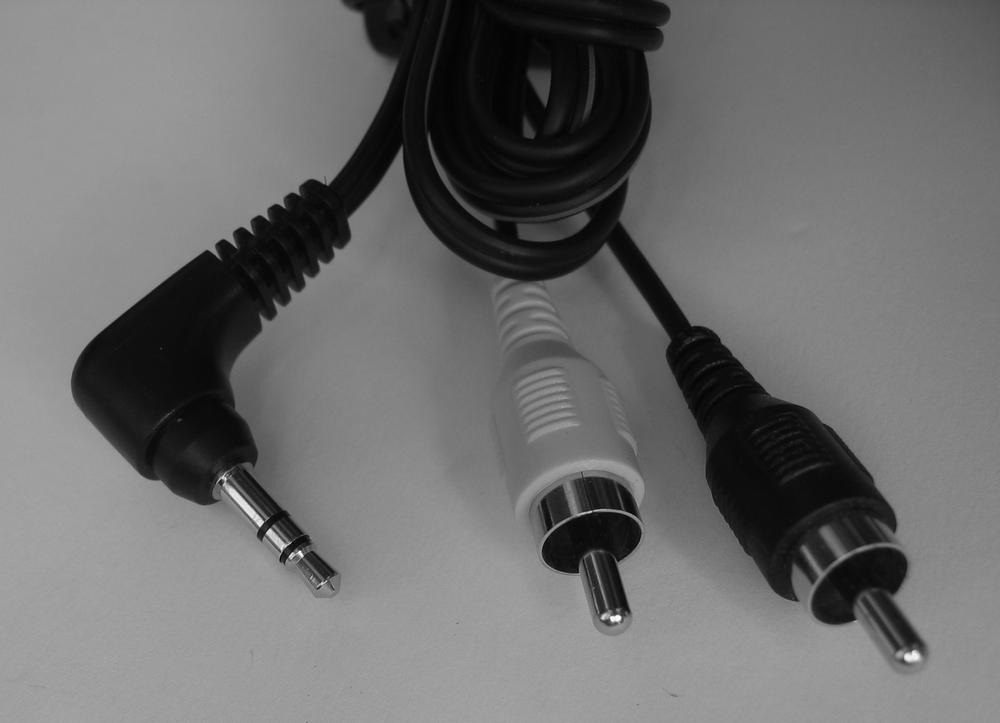
Figure 3-8. Push the tiny, 1/8-inch plug into your PC’s Line Out or Speaker jack, and plug the two RCA plugs into your TV’s Audio In ports. (The red plug goes into the right port; the other plug goes into the left port.)
Once you connect the cable between the PC and TV, your PC’s screen immediately appears on the TV, and any noise or music plays through the TV’s speakers.
You may need to adjust the TV’s picture so the PC screen lines up along the sides. Adjusting a TV works just like adjusting a CRT monitor (Section 3.7.1.2), since those monitors borrow TV technology—find the TV’s picture alignment knobs and turn them until the PC’s screen centers itself on the TV.
TV sets make lousy PC monitors, but PCs and their displays make great TV sets. In fact, some PCs already include a TV tuner that lets them double as high-quality TV sets. If you’re not lucky enough to own one of those fancy models, though, upgrading your PC to display television rarely merits the cost, for several reasons.
First, most PCs have small, 15-or 17-inch monitors that are usually parked in front of a single chair—a far cry from the living room’s big TV, comfy couch, and nearby popcorn maker.
Second, adding TV to a PC costs between $50 and $150—that’s more cash than it takes to pick up some new TVs. Finally, TV-equipped PCs can record shows to your hard drive, but they lack the finesse of dedicated TV recorders like TiVo or Replay TV ($100 to $250), which automatically record shows according to your tastes.
So, why bother? Some upgraders don’t own TVs or don’t want to buy a second one for their offices. Others want to record shows, but despise paying the monthly dues required by TiVo or ReplayTV. Some newshounds want CNN sitting in a corner of their desktop. And some folks simply like to tinker with their PCs.
Your PC needs two things to morph into a TV:
The TV signal. TV shows already stream into your house from the cable company, satellite dish, or a roof antenna; they then enter your house through a cable. Unplug that cable from the back of your TV (if you use an antenna) or from your cable or satellite box. Plug that cable into a signal splitter—a two-dollar gadget (shown in Figure 3-9) that splits one cable into two ports.
Plug two additional cables into the splitter’s two ports; one of those cables plugs back into your TV (if you use an antenna) or cable box, and the other plugs into your PC’s new TV tuner, described next.
The TV tuner. TV tuners, which cost between $50 and $150, come mainly as drop-in cards (Section 1.7), although a few come as plug-in USB (Section 1.8.1) boxes. Add one to your PC, plug the cable carrying your TV shows into the tuner card’s port, and install the tuner’s bundled software.
Both Hauppauge (http://www.hauppauge.com) and ATI (http://www.ati.com) sell TV tuners for PCs. For more information about adding TV tuners or recording shows to your PC, check out The Build Your Own PVR Web site (http://www.byopvr.com).
To switch between channels 2 through 99, load the software bundled with your PC TV tuner. The software places a little keypad on your screen for switching between channels with the mouse or keyboard’s numeric keypad.
Note
To tune in channels above 99—including pay channels—connect the splitter after the cable leaves your cable/satellite box. That lets the cable box unscramble the signals before routing them to your PC, which then displays the signal on channel 3 or 4. Unfortunately, this also means you need to use the cable box’s remote to change channels.
When figuring out what’s wrong with a monitor, the biggest problem boils down to fingering the troublemaker: your monitor or video card (Section 3.8). Since the video card feeds your monitor everything it displays, it’s the prime suspect in most problems. Still, try the following troubleshooting steps on the rare chance your monitor’s on the fritz. If none of these fix your problem, then the fault lies with the video card; head for its Troubleshooting section (Section 3.8.3) instead.
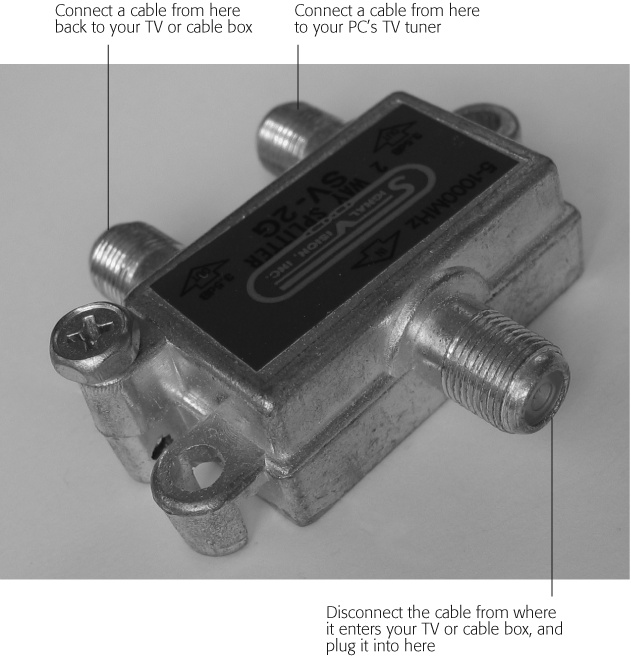
Figure 3-9. Disconnect the TV cable where it enters your cable box or TV, and then connect it to the single end of this RF splitter, a handy gadget sold at most electronics stores for a few dollars. The splitter breaks the signal into two identical signals. Plug a second cable into one of the two new ports and connect it back to your TV or cable box. Then connect another cable between the splitter’s remaining port and your PC’s tuner.
When your monitor presents you with an empty black screen, look at its power switch. Most monitors light up their On button—or an adjacent light—to let you know that they’re plugged in, saving you from crawling beneath the desk. If you don’t spot a light, check the power cord at the wall, as well as where it plugs into the back of your monitor. Once everything’s plugged in, check for the following problems:
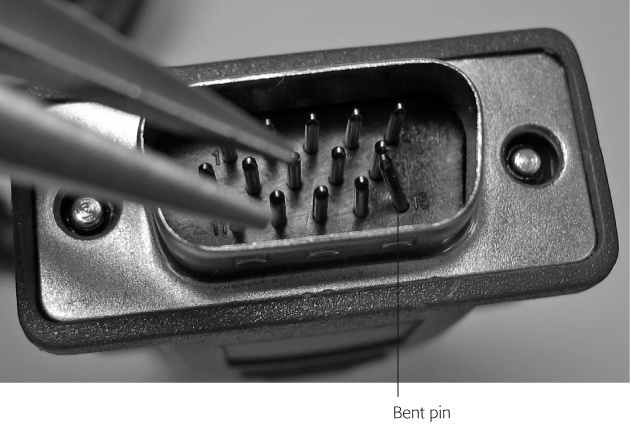
Check the cable for bent pins. If the monitor’s plugged in with a lit power button, unplug the cable from your PC’s port and the monitor. Then carefully inspect the cable’s connectors. If any pins look bent, like the one in Figure 3-10, carefully straighten it with needle-nose pliers, and then plug it back in. You may get lucky. If you’re not lucky and are left holding a broken pin, replace the video cable to solve the problem.
Look for a menu. When a monitor doesn’t receive any signal from the PC, it splashes a message or menu on the screen. If you spot that message or menu, the monitor’s working fine. The culprit then lies with your video card (Section 3.8.2), the video cable, or some of the video card’s settings (Section 3.8.1). No menu? Keep suspecting the monitor.
Plug in a spare video cable. You’re lucky if this fix works; you may simply need to replace a bad cable. Pick one up for less than $20 at most stores selling computers or office supplies.
Plug in a spare monitor. Plugging in a spare monitor, either borrowed from another computer or a neighbor, provides a foolproof diagnosis. If the spare monitor works but your monitor doesn’t, it’s time to start shopping for a replacement monitor.
CRT monitors require much more adjusting than LCD monitors to keep their pictures looking pretty. Every time you change the monitor’s resolution (Section 3.8.1), for instance, the sides of the screen creep away from the monitor’s margins.
CRT monitors rely on knobs for calibration, unlike the push-button controls of LCD monitors. The knobs usually hide inside a flip-down panel along the monitor’s front bottom edge. Before reaching for the knobs, though, be sure your monitor’s been turned on for at least 30 minutes so it’s warmed up.
Little icons next to the knobs explain their purposes. The icons usually show a picture of the monitor and arrows showing how turning the knob affects the screen, either by condensing, widening, or shifting it to the left or right.
Several free programs simplify adjusting a CRT monitor. Nokia’s freebie Nokia Test (http://www.freepctech.com/rode/004.shtml) places different patterns on the screen, each designed for a specific function. One pattern fills the entire screen with squares; turn your CRT monitor’s vertical and horizontal controls until the squares stop falling off the screen’s corners or edges. You can use the shades of grays on another pattern to adjust your brightness and contrast settings for optimum visibility without eyestrain.
Johannes Wallroth’s Test Screens program (http://www.programming.de/download/testscreens.zip) walks you through similar adjustments. Among other things, you can check its displays of tiny text so that you can judge your monitor’s focus, or even perform amateur eye exams.
Almost all LCD monitors come with built-in software for changing their settings, which you usually control by poking at four buttons along the monitor’s front. Pushing the buttons in the correct sequence adjusts the brightness and contrast, and neatly aligns the picture with the monitor’s edges. The terse and unfriendly menu quickly traps unsuspecting visitors with dead-end menus. (If you’re stuck and can’t figure out how to just get rid of the adjustment menu, ignore the monitor. Most automatically remove their menu 30 seconds after you stop pushing buttons.)
To adjust the monitor’s settings when the display shakes, blurs, or doesn’t fit on the screen, try the adjustments listed in the order below.
Tip
To control the menu system on most LCD monitors, press the Menu button to summon the monitor’s adjust menu and see its options. The Plus and Minus buttons move up or down the menu’s list of options, highlighting each one in turn. Press the Menu button again to select a highlighted option. And press the Exit button (or choose Exit from a menu) to leave the menus.
Auto button. Before spelunking through your monitor’s cavernous adjustment menus, look for its handy guide: the Auto button. Built into most modern monitors, the Auto button reads the incoming signal and automatically adjusts your monitor’s screen. By all means, press the Auto button if the image doesn’t fit the screen correctly, or if the color looks awful.
Adjustment menu. If the Auto adjustment button fails, start spelunking. Push the monitor’s Menu button—it often bears a little picture of the monitor—to see a list of options; press the adjacent Plus or Minus buttons to move between options.
After highlighting an option you want to adjust—Brightness, for instance—press the Menu button again to enter the Brightness menu. Press the Plus or Minus buttons to increase or decrease the Brightness to your personal comfort level. Press the Menu button again to exit the Brightness settings and move onto another category.
Tip
Adobe Photoshop and Photoshop Elements, a digital photo editor bundled with some digital cameras, places an Adobe Gamma icon in your Control Panel. Running Adobe’s Gamma utility walks you through adjusting your monitor’s brightness, contrast, and color settings with ease.
Foreign language menus. Manufacturers sell your monitor on many continents, so most monitors let you switch the menu’s languages. If your monitor’s menu traps you in a foreign land, keep pressing the Plus or Minus buttons until you see the word “English” on a menu. Push Menu to enter the Language settings, and then push the Plus button until you highlight “English.” Finally, push the Exit menu to revert to English.
Factory Reset. If the monitor looks worse than when you started tinkering with its settings, look for the menu’s Factory Reset option and choose it by pushing Menu. Your monitor instantly looks the way it did when it left the factory, giving you a clean slate for starting over—or leaving well enough alone, should the screen suddenly look fantastic.
Windows XP calls it a “Display Adapter,” most people call it a “video card” or “graphics card,” but no matter what it’s called, your PC’s video circuitry translates your PC’s numbers into something visible, and then passes the images along to your monitor. Think of it as the projector for your monitor’s screen.
To suit different people, from accountants to kids with joystick-calloused fingers, video circuitry comes in two main styles, described below.
Most people simply need enough graphics power to display words, photos, and maybe a few games on the screen. To cut costs, the PC industry shrunk low-power video circuitry onto a single chip and popped it onto your motherboard (Section 1.4). Known as "onboard video,” this works fine for most people—except gamers, who want to explore computer-generated galaxies.
Standalone card.
Other people want more powerful video, often for editing video or playing games. This more elaborate video circuitry works like a minicomputer, calculating the geometry needed to update the screen instantly, whether you’re repositioning a window, or watching changing shadows on a mermaid as she undulates through rippling sea grass. With prices averaging $200 to $400, a high-performance video card could be the most expensive thing inside your computer.
Whether your PC creates video through a chip or a standalone card, this section explains how to adjust its settings to work best with what you’re doing.
Most video settings hail from early years when video cards rarely matched your PC’s power. Back then, people needed to dial back some settings in order to let the card focus on other areas. For example, they’d cut back on the number of colors displayed onscreen to squeeze higher resolutions from their video card.
When first installed, Windows XP automatically squeezes your video card’s muscles and adjusts the video settings to showcase Windows XP at its best. With today’s cheap and powerful video cards, Windows XP usually sets everything to full strength.
Occasionally, you need to tweak some settings, like increasing the resolution to view a large digital photo, for instance. To adjust any of your video card’s settings, head to Windows XP’s command central of video settings: Start → Control Panel → Display → Settings tab (Figure 3-11). (If you don’t see the Display option inside the Control Panel, click “Switch to Classic View” in the Control Panel’s left-side pane.)
Here’s the rundown of how these settings affect what you see on the screen.
Display. This area names your PC’s currently connected monitor—or at least the one Windows XP thinks is attached. If the name listed here matches the one on your monitor, everything’s fine. But when this says “Generic,” Windows XP has resorted to its own general purpose driver—a bare-bones driver that won’t correctly list all your monitor’s capabilities. To update the driver, visit the Web site of your monitor’s manufacturer, drop by its Customer Support section, and then download the driver for your specific model of monitor. Run its installation program, and Windows XP updates the items on this window to match your monitor’s specifications.
If you’ve connected two or more monitors to your PC, Windows XP lists their names here in a drop-down list.
Figure 3-11. The choices in this window let you adjust your screen resolution, so you can pack more or less information onto your screen, and choose the number of displayed colors. Most people leave both settings at their highest levels, since that produces the best image on most digital monitors. If the high resolution makes the text difficult to read, click the Advanced button and increase the “DPI” setting. That makes the letters larger, but preserves your screen’s crisp, detailed look.
Screen resolution. This sliding control lets you choose your display’s resolution—the size of the pixel grid it uses to display images. LCD monitors come with a fixed number of pixels, so they work best when set to the highest resolution available. Choosing a lower setting still works, but looks awful, forcing the monitor to blur together adjacent pixels to mimic lower resolutions. (CRT monitors don’t have this problem, as they can change the size of the pixels to match lower resolutions.)
Tip
If the highest resolution shrinks your LC monitor’s text beyond legibility, click the Advanced button (Section 3.8.2) to increase the DPI (Dots Per Inch) setting. Your letters will be larger and clearer when you restart your computer.
Color quality. Windows added this drop-down control several years ago to let people choose the number of colors displayed at one time. (Older video cards lacked the power to display many colors simultaneously.) Today’s video cards fixed that problem, so people usually leave this at its highest setting, usually “32-bit.” (That works out to 16,777,216 colors, enough for all but the most finicky graphic artists.)
If Windows looks bloated and lacks its usual vivid colors when first started, Windows XP probably started in “Safe Mode,” a troubleshooting mode used when something’s wrong. The picture looks terrible, but it’s enough to let you control Windows while diagnosing the problem. (The video card’s often the culprit, usually because it can’t find the correct driver, which is usually available for download on the manufacturer’s Web site.
Troubleshoot. This button summons the Video Display Troubleshooter in Windows’ Help menu. Useful as a last resort (provided you can still see the monitor), it interviews you about your problem and offers suggestions.
Advanced. Click this button when you’re having serious trouble with the display; it grants quick access to the drivers (Section 16.5.4) for your video adapter and monitor. The General Tab’s DPI setting is an often overlooked gem; it lets you beef up the size of your letters and menus should the high Screen Resolution shrink them beyond legibility.
Owners of older, CRT monitors should check the Refresh Rate on the Monitor tab. Set it to the highest rate the monitor offers (usually 75 Hz or more) to avoid flickers. (LCD monitors work fine at 60 Hz.)
Most people never upgrade their PC’s video card. When the video works, it works fine for years—usually for the life of the monitor. Still, you may want to upgrade the quality of your PC’s video for these reasons:
Speed. These days, two of the best ways to speed up an old PC come by adding memory (Section 1.6) or adding a faster video card. Your PC may be plenty powerful, but if the video card can’t sling the information onto the screen quickly enough, your PC slows down.
Dual monitors. A second video card lets you attach a second monitor (Section 3.3) to your PC for a wider desktop vista.
Television. Many new video cards come with a built-in TV tuner, letting you watch TV on your desktop. With a TV tuner, you can even keep your favorite channel running in a little window in your screen’s corner.
Upgrading your LCD monitor. If your current LCD monitor accepts digital video (Section 3.1.2) but you’re plugging it in through a VGA port, you’re not seeing your display at its best. Replace that old video card with a digital one to put some dazzle in your monitor’s display.
Follow these steps to upgrade your motherboard’s built-in video with a new video card, replace an existing video card, or add a second video card to your computer.
Identify your PC’s video slot.
Powerful video cards demand lots of attention from your PC. Consequently, your PC’s motherboard—that flat plate holding all your PC’s circuitry—gives the card a special communications channel: a high-powered slot created just for the video card.
But since video technology changes so quickly, engineers redesign that slot’s capabilities nearly every year. And that brings trouble: before you know what type of card to buy, you must figure out what type of video slot lives on your motherboard.
You can open the PC’s case (Section 1.3), look at the slot (Section 1.7.1, and examine the fine print written next to the slot. Or, you can find your motherboard’s manual and look up its AGP Bus specifications.
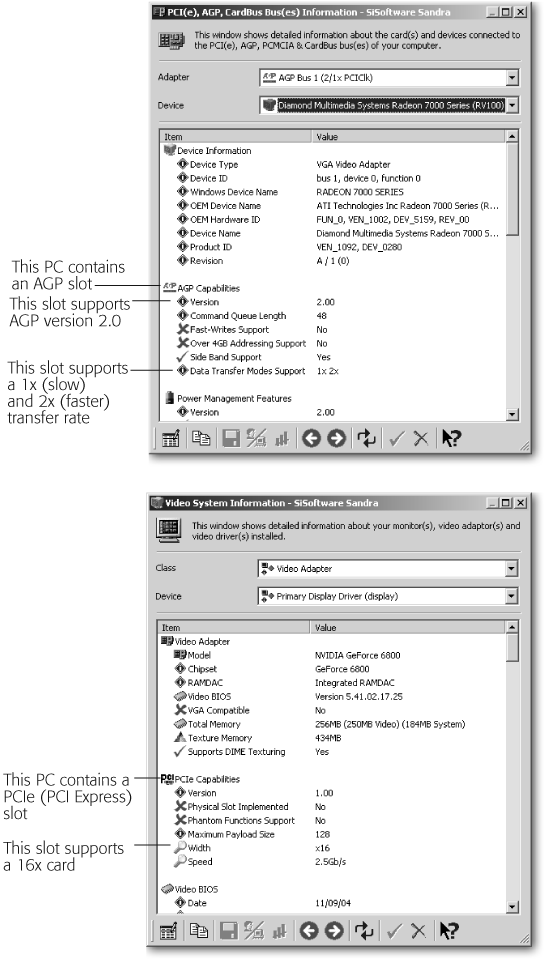
But it’s much less work to run SiSoftware’s free Sandra software (Section 1.3). When the program starts, run the module named “PCI(e), AGP, CardBus Bus(es) Information.” Sandra examines your video slot and spits up the dirt, as shown in Figure 3-12.
Buy the right card for the slot.
If your motherboard contains a PCI-Express slot, you’re in luck. Buy a card matching the speed of your slot (that’ll almost always be a 16X card) and count your blessings. PCI-Express is a newer standard that’s faster than AGP, and is well-supported by the latest video card manufacturers.
But if your motherboard contains an AGP slot, fasten your seatbelt. The AGP slot evolved through six different specifications over the years, with each new breed using a perplexing variety of voltages, slot sizes, and holding latches. Sprinkling in more anguish for the consumer, AGP card manufacturers consistently mislabel their cards’ speeds, voltages, types, and capacities.
The solution? First, don’t buy AGP cards from stores that don’t accept returns. Second, buy a card that’s the same speed as your slot: 2x, 4x, or 8x. (Each “x” shows how much faster the card is than the original AGP slot.) Cards with faster speeds are generally backward compatible—they still fit into slower-rated slots, but they’ll fall back to meet that slot’s slower speed. Buying a faster card than your PC’s slot supports is a waste of money.
Figure 3-12. Top: The free program Sandra identifies the video slot on this 1999 PC as AGP (Accelerated Graphics Port) Version 1.0. The card supports speeds of 1x and 2x, meaning it’s compatible with the first released AGP cards, as well as that card’s twiceas-fast replacement. To buy a video card for this computer, buy an AGP card that supports both 1x and 2x transfer rates. (Look for the words “AGP 2x” somewhere on the new card’s box.) Bottom: Sandra identifies the video slot on this 2004 PC as PCIe (Peripheral Connect Interface Express) with a width of 16x—the longest and fastest of the PCIe slots. To upgrade this PC, buy a PCIExpress card with a width of 16x. The card’s box should say “PCI-Express 16x.”
Insert the card into the slot.
After identifying your slot and buying a card that works with it, the hard part’s over. Push the card into your motherboard’s video slot and secure it as described on Section 1.7.3. If the card doesn’t fit, then you bought one that’s incompatible with your slot. Return it, and buy a different brand or model that’s the same speed as your AGP slot.
When you turn your PC back on, Windows XP discovers the new card and shuffles around, looking for the card’s driver. To help Windows XP find it, run the Setup program on the CD that came with the new video card. If the driver gives you trouble or you need help installing it, Section 16.5.4 contains a detailed guide to installing drivers.
If your PC doesn’t start at all—it begins beeping at you or displays an error message—your new card isn’t compatible with your motherboard. Make sure you’ve identified your video slot correctly in step 1, and then exchange the card for a different, more compatible model.
When something’s wrong with the display—the colors don’t look right, a moving window leaves a trail across the screen, or you spot other video oddities—fingering the culprit often proves difficult. The monitor displays only what the video card sends it, so when something on the monitor looks off, the problem usually lies with the video card. Run through this list of fixes to solve the problem.
Update the driver. Video companies update their drivers more quickly than any other PC industry. Sometimes new drivers appear on a weekly basis. Before assuming something’s wrong with your monitor or video card, be sure to visit the Web site of the video card’s manufacturer. Visit the Customer Service or Support area and download the latest driver for your particular video card. That cures most problems.
If the latest driver makes things worse, “roll back” to the old driver (see Section 16.5.5). Then try a slightly older driver from the video card manufacturer’s Web site. Video card drivers are picky, and some people find that older drivers work better with their PC’s equipment than the newer ones. When you find one that works, make a note of its version (see Figure 16-7) and stick with it.
Check the card’s fan. Being tiny computers themselves, video cards generate enough heat to fry a finger. Today, most video cards include built-in fans. Remove your PC’s case (Section 1.3), and make sure the card’s fan is still spinning. If it’s not, check to see if the fan’s power connectors are tightened. On the other hand, if your computer’s main fan isn’t working, you need a new power supply (Section 1.9).
Verify the slot type. AGP slots and cards use a special notch and groove system to ensure that only compatible AGP cards and slots fit together. If a little notch in the slot keeps your card from fitting, be thankful: the card and slot use different voltages, and the little notch keeps you from frying both your new (but wrong voltage) video card and your motherboard.