
PCs treat compact discs and DVDs as data suitcases, letting you store and transport mammoth amounts of large files: digital camera photos, audio books, home movies, and digital music, to name a few.
Yet compact discs and DVDs also let your PC pull extra shifts as both a stereo and home theater, which presents new problems: PCs, CD players, and DVD players all speak slightly different languages. That forces you to create the discs slightly differently depending on their ultimate destination: PC, CD player, or DVD player.
This chapter explains how to create data CDs for your computer, music CDs for your CD player, and video CDs for your DVD player. You’ll also learn how to create DVDs for your PC and DVD player, should your PC be lucky enough to have a DVD burner (recorder). And to start you on the right path, you’ll find out how to choose the right type of blank discs for your particular need. Finally, you’ll get detailed instructions on buying and installing a new or replacement CD or DVD burner for your PC.
CDs, the miraculous shiny discs that migrated from the stereo to the PC (to the everlasting dismay of the record industry), hold about 700 MB of information, which translates to about 80 minutes of music—plenty of room for In-A-Gadda-Da-Vida and the extended live version.
Every PC sold in the last decade includes a CD drive for playing CDs; PCs sold in the last five years include CD burners that let you save files to a CD as well. DVD burners, now appearing on many new PCs, let you burn DVDs and CDs.
The following sections explain how to play CDs, how to buy the right blank CDs for your CD burner, and how to copy a CD’s contents to your PC (also known as ripping). You’ll also learn about saving files on blank CDs (aka burning), duplicating CDs, and erasing them.
Windows XP goes out of its way to simplify playing CDs no matter what kind of files they contain: data, music, or digital photos. To play any CD in Windows XP, follow these steps:
Place the CD into the drive, printed side up. Close the drive.
That’s it. Windows XP peeks at your CD’s contents, checks to see which application’s assigned to play that CD’s files, and deploys the right program for the job. This bit of intuitiveness, known as AutoPlay, takes care of your CD-playing needs in pretty much every situation. Just inserted a music CD? Enter Windows Media Player to start playing your tunes. Got yourself a program’s setup disc? Windows XP automatically launches the installation program. Popped in a CD with digital photos? Windows XP is at your service, offering to play the pictures in a slideshow.
AutoPlay’s eagerness to please sometimes causes problems, though. For instance, you may want to copy a CD’s music to your PC, not listen to it. And some sneaky record companies pull a fast one with AutoPlay by slipping a small program onto their music CDs. Instead of automatically playing the CD’s music, Windows XP launches the program, which just happens to be a copy-protection utility that stops you from copying the CD. Even worse, some viruses and worms live on CDs, ready for AutoPlay to install them as soon as you insert the CD into your drive.
To turn AutoPlay back into a helper rather than a hindrance, you can adjust its settings yourself: choose Start → My Computer, right-click your CD drive, and then choose Properties → AutoPlay tab, as shown in Figure 10-1. There, Windows lets you specify which program should jump to attention, depending on what’s on your CD.
Choose one type of content—Music CD, for instance—from the drop-down menu. Then choose how Windows XP should automatically handle that content.
Or, disable AutoPlay completely—the best idea, if you trade a lot of CDs with friends—by choosing “Take no action.”
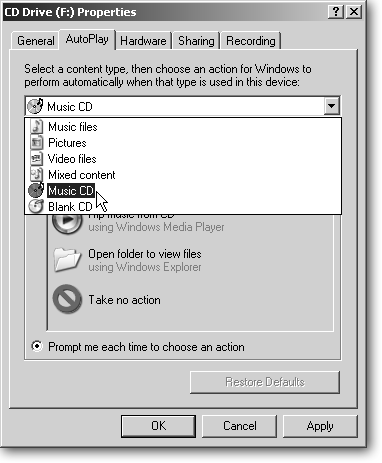
Figure 10-1. AutoPlay determines how Windows XP responds when you insert a CD, or any other type of storage device (a DVD, memory card, or USB drive). If AutoPlay is launching the wrong program, feel free to change it. Run down the list of file types, and select the action Windows XP should take for each one. Or, to avoid picking up CD-based viruses, choose “Take no action” for each file type. That lets you open the CD or other device manually and choose which program to run every time you insert a CD.
Tip
You can temporarily disable AutoPlay any time by holding down the Shift key as you push your CD into the drive. That tells Windows XP to call off its AutoPlay hounds and let the CD simply sit in the drive. You can then manually call a program into action, conveniently stopping any viruses, defeating any copy protection, or letting you rip the CD to your hard drive.
Blank CDs come in two main formats: the vastly popular CD-R (CD-Recordable) shown in Figure 10-2, and the less common CD-RW (CD-Read/Write). Both types of CDs look identical, but they have some important differences:
CD-R (Compact Disc–Recordable). The mainstay of the blank CD business, CD-Rs are designed for permanent storage. You save information to them until they’re full, and then store them away for reference (or enjoyment, if you’re recording tunes on your CD). Since each CD costs less than a quarter and holds 650 MB or more, they’re perfect for making backup copies of files for safekeeping, creating music CDs for your stereo, or duplicating CDs to give copies to others.
CD-RW (Compact Disc–ReWritable). Less common (and more expensive), you can write to CD-RW discs, completely erase them, and then write to them again. These discs are designed for temporary storage rather than permanent backups. They work best for backing up files each evening, letting you replace the previous day’s files with your new ones. They’re also a handy way to shuttle files between two PCs, erasing each time to start over. Since CD-RW discs are reusable, don’t buy very many. Just keep a handful around for specific projects.
CD-RW discs work with PCs, not CD players. Don’t burn music to them, as most CD players and boom boxes can’t handle them.
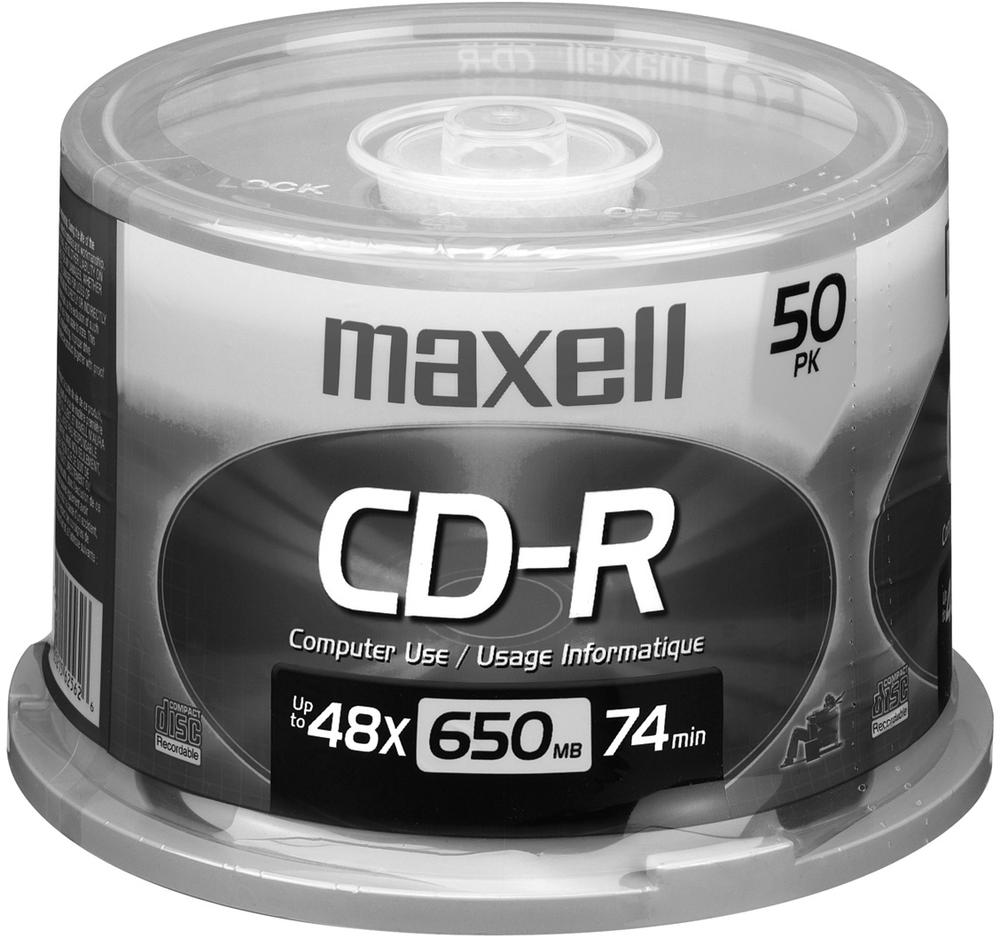
Figure 10-2. You can record to a blank CD-R one time only. Buying them in a bulk pack keeps down the cost, supplies you with a bunch for impromptu backups, and lets you give copies to friends. Bulk packs of CD-Rs are sold at office supply stores, drug stores, and computer shops, but you can usually find the best prices online. Different brands work best with different burners, so experiment until you find the right combination that produces the most successful burns.
Some CD burners work fine with blank CDs made by any manufacturer; other drives are pickier, working only with certain brands of discs. When in doubt, buy blank CDs created by your CD drive’s manufacturer, which is often printed along the drive’s front, next to the CD tray. If you don’t spot the name there, right-click the drive’s icon in My Computer, choose Properties → Hardware tab, and look for the name next to the drive’s model number. If you still don’t spot the manufacturer’s name, remove the PC’s case and peek at the drive’s label (Figure 9-7).
Once you decide on the disc you need, either CD-R or CD-RW, it helps to decipher the letters and numbers on the packaging. The following two factors have the most influence on whether your PC can burn to a CD:
Writing speed. This number, usually followed by an “x,” (like 12x, 24x, 48x, or 52x), refers to how quickly the CD can burn files. Bigger “x” numbers means it accepts data more quickly. Feel free to buy CDs with a writing speed that’s faster than your CD drive, but don’t buy CDs with a slower write speed; they may not burn reliably.
To find out your drive’s writing speed, right-click its icon in My Computer (Start → My Computer), and then choose Properties → Recording tab. The bottom drop-down menu, shown in Figure 10-4, lists the write speeds your drive can handle. (This menu also lets you slow down your drive’s speed to match that old box of 12x CDs your neighbor gave you; you may be able to still use them.)
WORKAROUND WORKSHOP: Taming the Bickering Media Players
When you insert a music CD into your PC, Windows XP’s Media Player normally jumps in and starts playing. But if you’ve installed other media players, like iTunes, Music- Match Jukebox, Winamp, or Real Player, the players often bicker over the right to play your tunes and other types of media. Music comes stored in a wide variety of file formats, and every media player wants to “associate” itself with every music format stored on your PC.
That aggravates people who want Media Player to handle their CDs, but like Winamp playing their Internet radio stations, or vice versa. When the wrong player constantly jumps in to play your files, fix the problem by dishing out the playing rights to your player of choice.
From My Computer, right-click a certain type of file—an MP3 file, for instance—and then choose Open With → Choose Program.
Select the program you want to open that type of file.
If you don’t spot your favorite MP3 playing program on the list, as shown in the illustration, click the Browse button, navigate to your favorite program’s folder, and click the program’s name.
Turn on the checkbox called, “Always use the selected program to open this kind of file” and click OK.
This trick works with more than media players, by the way. Any time the wrong program jumps in when you double-click a file, this trick lets you assign your preferred program to that type of file.
Unfortunately, some possessive media players sabotage your efforts. The next time you run them, they check to see if they’re still the assigned player for all your files. And if they’re not, they yank back control. That leaves you with one solution: Track down and turn off the menu option that authorizes that particular program’s renegade activities. Here’s what you need to do:
iTunes. Edit → Preferences and turn off the checkbox called, “Use iTunes as the default player for audio files.”
Windows Media Player. Tools → Options and click the File Types tab. Turn on the checkboxes for the file types you want Media Player to open, leaving the rest turned off. (CDA files are tracks on music CDs.)
Winamp. Options → Preferences. Remove checkmarks from “Restore file associations at Winamp startup” and “Enable Winamp agent.”
RealPlayer. Tools → Preferences → File Types tab. Turn off checkbox next to CDs.
As these programs frequently release new versions, and they sometimes change the wording slightly; if you can’t find the exact option, look for something similar.

Minutes/ capacity. CDs come in two main sizes. Some offer 74 minutes of music, which is about 650 MB of storage, while the most common CDs hold 80 minutes, which is about 700 MB of data. Although some CDs claim to offer even more storage space, not all CD burners handle them reliably. If you’re that pressed for storage, it’s time to buy a DVD burner (Section 10.14.1).
Early hackers used the term “ripping” to describe the process of snagging music, graphics, and digital grunts from their old video games. Twenty years later, a new generation defines “ripping” as copying a CD’s songs onto a hard drive. From there, you can copy the songs to a portable music player, save them onto a customized “Greatest Hits” CD, or convert them to other sound formats (Section 7.3.1) to work with different portable players.
Some people even use the term “ripping” to describe copying sound from a phonograph record (Section 7.2.4) or VHS tape onto a hard drive. (iTunes dignifies the term by labeling the process, “importing.”) This section explains ripping with both Windows Media Player and iTunes.
Windows XP’s Media Player can rip CDs, but with two pretty important caveats:
Digital Rights Management. When Windows Media Player rips a CD to your hard drive, it wants to compress the songs into copy-protected WMA files, Microsoft’s early attempt to rule the digital recording industry. But most digital music players play MP3 files, not WMA files. And some WMA players can’t handle copy-protected files. To keep Media Player from adding copy protection to your ripped WMA files, head to Tools → Options → Rip Music tab and turn off the checkbox marked, “Copy protect music.” Even better, bypass WMA completely and rip your CDs to MP3 files, as described in this section.
Tip
If you’ve already ripped music into copy-protected WMA files that won’t play on your iPod or other MP3 player, burn the WMA files onto a CD (Section 10.5.2), and then rerip that CD to create unprotected files. You still need a valid license (Section 8.4.2) to burn the songs to a CD, though. And should you ever lose your licenses, you’ll also lose access to your songs.
Lower quality. Media Player rips songs and leaves you with either MP3 or WMA files, both of which are compressed formats that remove some of the song’s quality to reduce its file size. That’s great for packing more files onto an MP3 player; few people notice the quality difference on tiny earbuds.
But it’s not so good if you’re looking to create a “Greatest Hits” CD. Songs never sound as good when they’re ripped to the MP3 format and then burned back to an audio CD. To avoid that kind of sound degradation, skip Media Player and create your CDs with a third-party program like Roxio’s Record-Now (http://www.roxio.com). It copies songs from several CDs onto your hard drive, but doesn’t compress them into MP3s, thereby preserving their fidelity. Then the program copies those decompressed songs back onto a blank CD in the order you choose. You need nearly 1 GB of free hard drive space to serve as a temporary holding tank during the process—but in exchange, you get a copy of your songs in all their high-fidelity glory.
Before ripping, be sure you’re using Windows Media Player 10. (To see your version, choose Start → All Programs → Media Player → Help → About Windows Media Player.) As opposed to all earlier versions, Media Player 10 lets you rip MP3 files for free rather than paying $10 for the privilege. If you need the new version, download it (http://www.microsoft.com/mediaplayer) before ripping your CDs.
Once you’ve installed Media Player 10, follow these steps to rip a CD to an MP3 file.
Open Media Player and tell it to rip your CD using the MP3 format rather than WMA.
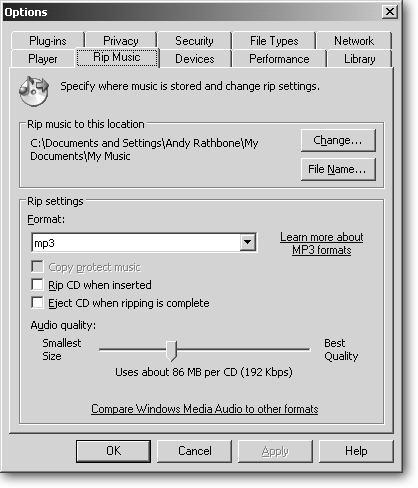
Choose Start → All Programs → Media Player → Tools → Options → Rip Music and choose MP3 under the Rip settings, as shown in Figure 10-3. If Media Player’s hiding its menus, right-click anywhere near its top border to bring them to life.
Figure 10-3. The Rip Music tab lets you tailor how Media Player rips your CDs. Leave your stored songs in your My Music folder, as Windows adds special music-related menus to that particular folder. In the “Rip settings” section, choose MP3 to stay compatible with the widest variety of MP3 players. (If you choose WMA, be sure to turn off the “Copy protect music” checkbox to spare yourself the bother of dealing with licenses.) Move the Audio Quality slider to 192 to strike a fair balance between file size and quality. Feel free to slide it either way to suit your own ears and available hard drive space.
Insert your CD label-side up into the CD drive’s tray, close the tray, and choose File → CDs and Devices → Rip Audio CD.
Or, start ripping by clicking the Rip button at the top of the Media Player window. If your PC has two drives, you also need to choose the drive containing your CD.
Choose which songs to copy to your hard drive.
Media Player normally selects all your CD’s songs, skipping any that you previously copied. Turn off the checkboxes next to any awful songs to keep them off your PC.
Click Rip Music.
Media Player begins copying your selected songs from the CD, converting them to MP3 files, and placing them inside your My Music folder (Start → My Music). For example, if you’re ripping a copy of Ravi Shankar’s “Ragas,” for instance, Media Player creates a folder named Ravi Shankar, and then puts your songs in the Ragas folder inside that folder.
If Media Player creates a folder named “Unknown” instead of “Ravi Shankar,” make sure you’ve allowed Media Player to connect to the Internet (Tools → Options → Privacy → “Update music files by retrieving media info from the Internet”). That lets Media Player grab the information from an online database. If you’re ripping CDs while offline (say, on an airplane), or the names are wrong, you need to fill out the tags manually (Section 8.5.6).
Compared to Media Player’s minimal ripping options, iTunes (Section 8.3) offers a vast array of options for transferring a CD’s songs onto a hard drive. That lets the experts fiddle around, and the impatient beginners whip through using the factory-set options. iTunes takes three basic steps to rip a CD.
Choose an audio format.
Open iTunes (Start → All Programs → iTunes → iTunes) and choose Edit → Preferences → Advanced tab → Importing tab. There, you can choose between several file formats, including the most common: MP3 and AAC. AAC creates slightly smaller files than MP3, but limits your playback choices to an iPod. If you want to play your files on other players, now or in the future, choose MP3.
Insert your CD into the tray, label side up, and let iTunes download song names and track information.
Like Media Player, iTunes reads the sequence and lengths of the CD’s songs, searches an online database for the match, and then automatically fills out the titles for the CD and its songs.
If iTunes comes up blank, the laborious task of naming your songs falls into your own lap: To fill out the information quickly, right-click Audio CD in iTunes Source pane, and then choose Get Info. When the CD Info window arrives, fill in the Artist, Album, Genre, and Year entries. Click OK, and iTunes applies that information to every song. That leaves you one final chore: fill in each song’s title. Right-click the first song, choose Get Info, type in that song’s name and click OK, and then repeat until you’ve named them all.
Rip the CD.
Once iTunes has identified your CD’s title and song names, weed out the mood killers by turning off the checkboxes next to their names, then click Import in the screen’s upper-right corner. iTunes rips the songs from the CD and stuffs them into its library.
For more information about iTunes and iPods, check out Section 8.3; for a full reference, pick up a copy of iPod & iTunes: The Missing Manual.
Unlike the word “ripping,” the term “burning” describes what’s actually happening when you save data to a CD. A tiny laser inside your PC’s CD (and DVD) drive burns tiny pits into the spinning disc’s surface, all without creating an awful smell.
An optical reader inside the drive reads the pits to convert what it finds there back into data.
FREQUENTLY ASKED QUESTION: CD Rainbow Books
I sometimes hear the words “Red Book” and “Yellow Book” applied to CDs. What’s that all about?
When engineers set a technology standard for all PCs to follow, they usually choose a bizarre string of numbers or acronyms; “IEEE-1394” comes to mind, for example. When the engineers bound a bunch of books describing different ways to store information on CDs, they named each standard after the color of the book’s cover.
The “Red Book” standard, for instance, describes the proper way to write information onto a music CD so every CD player can read it. So, when technoweenies say that a CD subscribes to the “Red Book” standard, they mean it’s a plain old music CD. “Orange Book” refers to a CD-R—those blank discs your PC can write on.
If a company swerves from a standard—adding copy protection to a music CD, for instance, or tossing in some videos—that CD’s no longer considered a “Red Book” CD, so it doesn’t qualify for the official "Compact Disc Digital Audio” logo shown below. Worse than that, it may no longer be compatible with the CD players in your computer, stereo, and car.
To avoid arousing consumer suspicion over their copy-protected products, many record companies dropped the “Compact Disc Digital Audio” logo from all their CDs, even the ones that follow Red Book standards to the letter. Here are the standards, and the type of discs they describe. Most start by following the Red Book standard, and then toss in some extra features.
Red Book (CD Digital Audio). The basic standard for all CDs, including, of course, music CDs.
Yellow Book (CD-ROM and CD-ROM XA). CDs designed for a PC to read.
White Book (Video CD). CDs with video content that plays in most DVD players.
Blue Book (Enhanced CD, CD+G, and CD-Plus). Music CDs with extra features like videos or photos.
Beige Book (Photo CD). Kodak’s format for storing photos on a CD.
Green Book (CD-i). Rarely used. CD-Interactive contains educational material and games.
Purple Book (DDCD). Eclipsed by the DVD market, Double-Density CDs hold more storage than CDs and require a special reader.
Scarlet Book (SACD). Super Audio CDs carry high-fi audio that’s playable on fancy SACD players, but not on PCs, CD players, or DVD players.

Not all CD drives can write to CDs, though; some old drives only read CDs, and some early CD burners aren’t compatible with Windows XP. To see if your CD drive can write to CDs, open My Computer, right-click your CD drive, and then choose Properties. If the Properties window shows a tab named Recording, shown in Figure 10-4, Windows XP knows how to write to your CD.
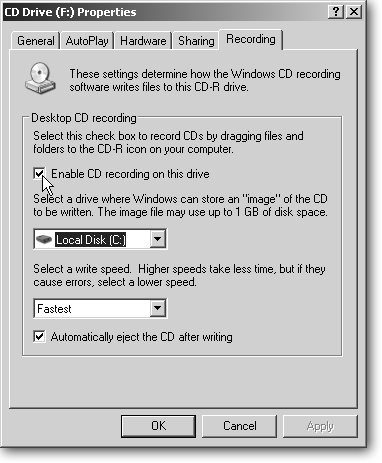
Figure 10-4. A Recording tab on the Properties box means Windows XP recognizes the drive as a CD burner. Note the checkbox marked, “Enable CD recording on this drive.” If your PC has two CD burners (or a CD burner and a DVD burner), turn on that checkbox for your fastest drive and use that drive for burning CDs. Oddly enough, Windows XP’s built-in burning tools let you designate only one drive as the burner. (Most third-party burning programs ignore this setting, letting you burn to the drive you choose.)
No Recording tab? Then Windows XP doesn’t recognize your CD as a recordable drive—it’s a regular old CD drive that’s still fine for playing music or installing programs. On the other hand, if your drive burned CDs in the past—perhaps before you upgraded to Windows XP—reach for the usual bag of fixes: hunt down a Windows XP compatible driver (Section 16.5.4) for your drive model, install the driver, and see if Windows XP recognizes the drive. If that doesn’t work—and you need to burn CDs—your only solution is to buy a newer burner, particularly if your drive is more than five years old (a date of manufacture often appears on CD drives.)
Some CD-and DVD-recording software removes the Recording tab from a burner’s Properties page, forcing you to abandon Windows XP’s built-in tools and use their software, instead. That’s no sacrifice, though, as most third-party CD burning software works much better than Windows XP’s burning program.
But whether you’re using third-party software or Windows XP’s built-in tools, CD burners can write information to a CD in three different formats: data, music, or video. Each burns the files using a slightly different format designed for the appliance that will be reading them: a PC, a CD player, or a DVD player.
Data. This format creates CDs with files intended for your PC. This includes any backups you’re making of digital photos, MP3 files, documents, programs, and other PC-related files.
Music. This format creates a music CD for playing back on a CD player. This includes CD players on your home stereo, PC, car, or private helicopter. Also choose this format to convert compressed music files—MP3, WMA, or AAC files—to a music CD.
Video. This rather obscure format saves video and slideshows onto a CD in the VCD format, letting you play them back on a DVD player to watch on your television. (See Section 10.6 for more on this format.)
The next sections explain how to burn a CD with data, music, or video, ensuring that the CDs play back on your player of choice.
Tip
To avoid any stutters or gaps in the CDs you burn, defragment your hard drive (Section 9.5) before starting the burn process.
If you’ll be reading your newly burned CD on your PC, save the files as data. Your PC treats the CD just like a thin, portable folder, letting you store files on it for later reference or moving to another PC. When storing data files on a CD, burning the files works just like copying the files to a folder, USB drive, or other storage device, but with one hitch: Windows XP burns the data to a CD in a two-step process.
Select the files you want, and tell Windows XP you want them copied to the CD.
You can do this several ways.
Drag and drop. Drag the data directly onto the drive’s icon in My Computer, or, if you’ve double-clicked the drive’s icon, directly into the drive’s window.
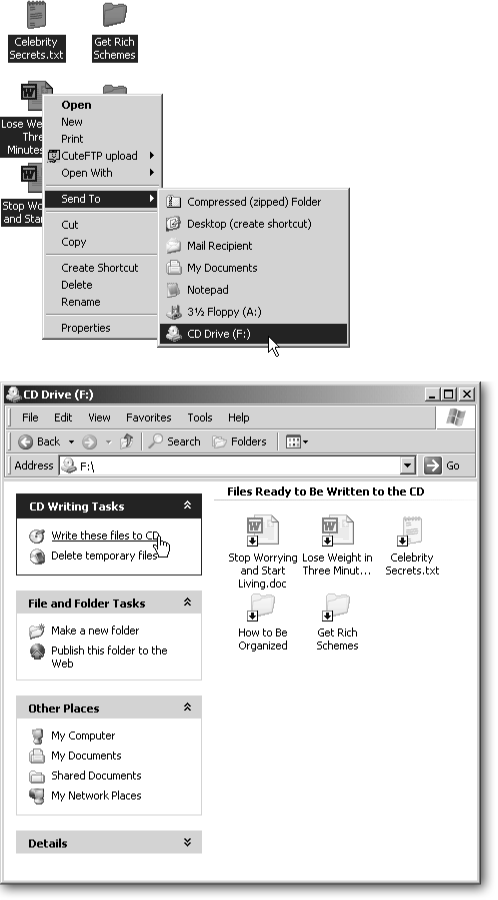
Right-click. Right-click any data files you’ve selected, choose Send To, and then choose your drive from the pop-up menu, as shown in Figure 10-5, top.
My Pictures. Select any pictures in the My Pictures folder, and then choose Copy to CD from the Picture Tasks menu along the folder’s left side.
Once you tell Windows which files you want copied, the CD drive’s window looks like Figure 10-5, bottom.
Insert a blank CD into your drive, label side up, and tell Windows to burn the files to the CD.
Windows XP doesn’t immediately copy the files straight to the CD, however. Instead, it copies the files to a temporary holding tank called a “staging area” on your hard drive. There, Windows arranges the files into one big, streamlined batch for smooth writing to the CD. If you’re copying lots of information, this can consume 650 MB or more of space.
Finally, tell Windows XP to begin burning by using either of the following methods.
Figure 10-5. Top: Windows XP offers several ways to save files or folders to a CD. Perhaps the easiest method is to select them, right-click them, choose Send To, and select your CD burner from the pop-up menu as shown here. (DVD burners can write to CDs, too.) Bottom: You can see the waiting files when you double-click the CD’s drive; the icons appear as shortcuts. Click “Write these files to CD” from the window’s CD Writing Tasks pane, and Windows burns the files to your inserted CD. Although this method works fine for creating a data CD for your PC, don’t try to create a music CD this way. CD players won’t recognize the disc.
Right-click the drive’s icon in My Computer and choose “Write these files to CD” from the pop-up menu.
Double-click the drive and choose “Write these files to CD” from the pane along the left side (see Figure 10-5, bottom).
Choose one of those options, and Windows XP’s CD Writing Wizard takes over, walking you through naming the CD and writing the files.
Most CD-burning drives support multisession recording, meaning you can write information to a CD-R, use it for awhile, and then stick the CD back in and add more information to it. Each time you add more information, you save it as a “session.” Once the disk is “finalized,” or there’s no more room left on the CD, you can’t record anything else onto the CD.
Note
Many newer CD and DVD players can play MP3 files from a CD, letting you store more than 10 hours of music on a single CD. These players can still play your regular music CDs, too, if you burn them to their own discs; don’t try to mix the two formats on one CD. If your player can handle MP3 files, burn the MP3 files to the CD as data, just as described in this section. Don’t burn them as music CDs, described in the next section, or you’ll get only about an hour of sound.
Your PC can create music CDs for your stereo or car CD player, but only if you specifically tell your PC what type of CD to create. That means you can’t simply drag and drop files onto a CD drive’s icon, as you do when creating data CDs.
Instead, you need a media player like Windows Media Player or iTunes, or a third-party CD burning program. Those programs decompress your MP3s into WAV files—the format used by music CDs—before writing them to disc.
This section explains how to create music CDs with both Media Player and iTunes.
Media Player lets you create music CDs, but, as with some of this program’s other music-saving functions, this feature comes with a twist that serious music lovers may find annoying. Media Player creates music CDs only from compressed files stored in either the MP3 or WMA format (Section 7.3.2). (Files on a commercial CD you buy in a music store are always in the higher quality WAV format.) Since the MP3 and WMA formats leave out some of the WAV format’s audio fidelity, your music CD won’t sound nearly as good as the original. Dedicated CD-burning software like Nero Ultra Edition (http://www.nero.com) and Roxio Easy CD and DVD Burning (http://www.roxio.com) do a much better job.
But if this limitation doesn’t bother you, here’s how to turn your MP3s or WMA files into a music CD.
Open Media Player’s Library.
Click Media Player’s Library button along its top to see the program’s library, an organized list of all your music files arranged by artist, album, genre, and release year. The Library also lists any playlists you created, as well as playlists that Media Player automatically created based on your listening habits (Section 8.4.2).
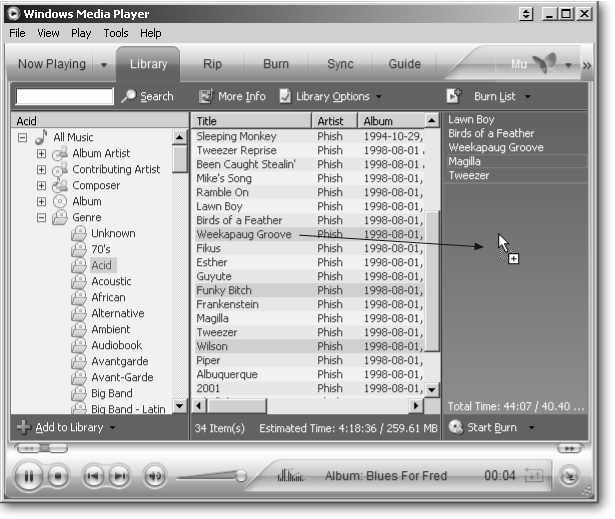
When you view the Library, Media Player displays the three columns shown in Figure 10-6.
Figure 10-6. To burn songs onto a music CD, start by choosing a category from your Library, shown in the left pane; that category’s songs show up in the middle pane. When you spot songs you want to burn to the CD, drag them to the Burn List on the right pane. The higher a file’s bit rate number, the better it sounds when burned to a CD. (To see any song’s bit rate, right-click its name in Media Player’s Library and choose Properties.) For best results, try to burn songs with a bit rate of 256 Kbps or higher.
The first column lists all your music, organized by artist, album, genre, categories, and more.
The middle column shows items you’ve selected from the first pane. If you clicked on Zydeco, for instance, the middle pane shows all your Zydeco songs.
The third column shows the list you’re assembling, which is usually your Now Playing List—the list of the music you’re currently listening to. It can also show the list of music you’re burning (Burn List) or the list of tracks you’re copying to your portable music player (Sync List); see Section 8.4.2.
Create a Burn List, if needed.
If you want to burn an existing playlist from your library, right-click the playlist’s name in the left column, and, from the shortcut menu, choose “Add to Burn List.” Simple. You’re through.
To create a Burn List from scratch, click the drop-down menu atop the right column—the menu usually says Now Playing List—and then choose Burn List. When the Burn List appears, remove any leftover songs from previous burning sessions by choosing Clear List from that same drop-down menu.
Create your Burn List by dragging songs from the middle pane to the Burn List in the right pane, as shown in Figure 10-6. Keep dragging until you’ve created your Desert Island Disc for the day.
Weed out songs from your Burn List that won’t fit on the CD.
Keep a measured eye on the Total Time numbers along the Burn List’s bottom edge. Your CD holds only 80 minutes (see Section 10.4 for more on disc length), so if your Burn List’s Total Time shows more than 80 minutes, your songs won’t all fit. (If you’re cutting it close, remember that Media Player sticks two seconds between each song, which could add another 20–30 seconds to your total.)
Insert a blank CD-R disc in the CD drive and then click Start Burn.
The Start Burn button is the tiny icon just beneath the Burn List. As the CD burns, Media Player shows you approximately how much time it’s taking.
When you finish burning your CD, be sure to label it with a permanent marker. Blank CDs and written CDs look identical; now’s your best chance to add a distinguishing feature.
Just like Windows Media Player, iTunes can burn any file in its library to a music CD that you can listen to in a CD player. Just follow these steps:
Select an existing playlist you want to burn, or create one from scratch.
If you already have a playlist—a file containing an ordered list of songs—in mind, right-click its name, choose Burn Playlist to Disc, and then leap ahead to step 3.
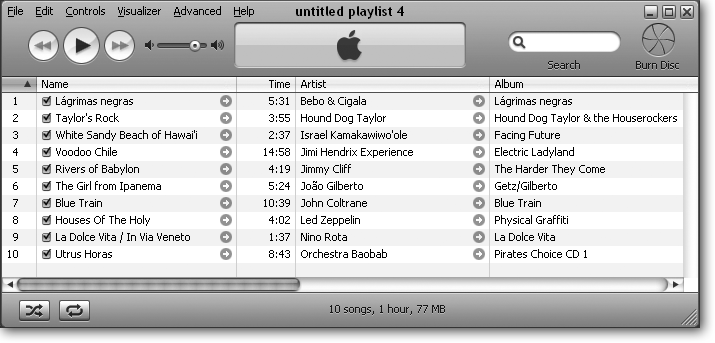
If you don’t have suitable playlist yet, create one by choosing File → New Playlist. (Feel free to leave the list with the default name of “Unnamed Playlist,” as you’ll probably delete it right after burning your CD.) When your newly created blank playlist appears in iTunes’ Source list, double-click its name to open it, as shown in Figure 10-7. Then populate your playlist by dragging favorite tunes onto it from iTunes library.
Figure 10-7. An untitled playlist in iTunes. If you drag more tunes onto your playlist window than will fit onto a CD, iTunes burns only as many as will fit. When the CD fills up, iTunes ejects it and asks you to insert another blank CD to fill with the rest. Remember that you can burn only seven CDs from a particular playlist. After seven, you must either recreate that playlist from scratch, or alter it by switching the song’s order or adding/deleting songs. It’s an inconvenience, but it keeps the record companies happy.
Alternatively, you can drag and drop files onto the playlist’s name on iTunes Source list, but the name’s a pretty small target for dropping.
Just as with Windows Media Player, the bottom of iTunes lists the amount of time your selected songs consume; keep it under 80 minutes to fit onto a CD.
Click the Burn Disc button in iTunes’ top-right corner.
The Burn Disc button turns into a black and yellow nuclear fallout shelter symbol, and iTunes sits there, waiting for you to realize you need to insert a blank CD into your PC’s newly opened drive tray.
Insert a blank CD, printed side up, and click the Burn Disc button again.
The Burn Disc button begins whirling as iTunes starts converting the files to the format used by music CDs and writing them onto the CD.
Remember to label your new CD with a Sharpie or other permanent marker before you lose track of which CD is which.
A VCD is a CD containing up to 74 minutes of video and stereo sound. Although it plays fine on most DVD players, the quality’s closer to video tape than a DVD. That’s fine for many people, including those in many Asian countries, where movie studios release hundreds of movies in VCD format.
Although Windows XP can’t create VCDs, many third-party programs (including most CD- and DVD-burning programs) create them without a hitch. This odd format comes in handy for several reasons.
Showing digital photos on TV. Most cameras can connect directly to a TV for showing photos to a group. But once you’ve transferred your photos from your camera to your PC, that’s no longer an option. You can show everybody your photos on your PC’s monitor, but a better crowd pleaser is to create a VCD with the photos in a slideshow. Put the VCD into your DVD player and let everybody watch the show on TV. Most VCD-creation software lets you juice up the photos by adding soundtracks, as well.
Showing videos on TV. Not everybody shoots hour-long videos with a high-quality DV camcorder. Most digital cameras, as well as some less expensive camcorders, shoot short, low-quality videos. Many people download short, lo-fi videos from the Internet, as well, showing everything from movie trailers to demos of self-built robots. You can watch those short videos on your TV by lugging over your PC and connecting the right cables (Section 3.5.1). But burning them to a VCD is faster and easier. Plus, if your PC doesn’t have a DVD burner, VCDs are the best way to store your short videos for easy access right beside your TV set.
A standard-but-obscure format for more than a decade, VCDs play on PCs, Macs, most DVD players, standalone VCD players, and even some game consoles. Mail a VCD slideshow to your friends, and they probably own something to play it on, whether they know it or not. (Be sure to tell them to insert it into their DVD player.)
Note
Some software and DVD players also support SVCD (Super VCD) format, which offers a step up in video quality. That extra quality comes with a price, though, as it limits the amount of video on the CD from 74 minutes to about a half hour. Before burning a lot of SVCDs, create a test disc to make sure your DVD player handles the format.
Neither Windows Media Player nor iTunes will help you quickly duplicate a CD. (You can, of course, go through the whole rigmarole of ripping any commercial CDs you own, creating a playlist, and then burning a CD from that playlist, as explained earlier, but where’s the fun in that?) So when it comes to making quick copies of your CDs, push Media Player and iTunes aside. Plenty of third-party programs like Nero Burning ROM (http://www.nero.com) and RecordNow (http://www.roxio.com) will duplicate CDs for you, quickly, easily, and legally.
GEM IN THE ROUGH: Burning Labels onto CDs
A fairly new technology called LightScribe helps solve the problem of identifying burned CDs and DVDs. Previously, you had two solutions: write the album’s name onto the CD with a magic marker, perhaps adding an artistic rendition of Jimi Hendrix above it; print a label, apply it to the CD, and hope it doesn’t gum up your $200 car stereo.
LightScribe solves that by adding a third solution: Reinserting your disk upside down and telling your CD or DVD burner to fire up its laser, etching a digital picture or title onto the disk. The results, shown here, don’t look half bad.
It’s not color, but it’s smudge-proof, won’t peel off, and it’s certain to boost your status among your CD-burning peers. You need three things before etching Jimi Hendrix photos onto your discs:
LightScribe burner. Your CD or DVD drive must come with LightScribe technology. You can’t add it to an existing burner. Many companies have added LightScribe technology to their CD and DVD burner’s arsenal of tricks. (Hewlett Packard’s an early adopter.)
Software. LightScribe must be written with LightScribe software, which is usually tossed in with the drive.
Media. You need special LightScribe blank discs. Regular discs lack the special coating needed for the laser to burn.
Unfortunately, blank LightScribe discs command a premium
price, costing up to 10 times as much as regular discs. As more
drives incorporate the technology, the price should drop
quickly.
You don’t even need to own two CD drives to make copies. Most third-party CD burning programs can copy the CD to your hard drive; when you remove the original CD and insert a blank CD-R, the program copies it from your hard drive to the CD-R, and then erases the hard drive copy.
Here’s where the difference between CD-Rs and CD-RW really becomes noticeable (see Section 10.3 for a refresher on the difference between these two formats). Windows XP treats a CD-RW disc just like a folder or hard drive. When you delete files from it, the files disappear, and you can add more files to fill up that freshly revealed space.
When it comes to CD-Rs, however, you can’t erase them, at least not in the normal sense. When you right-click a CD-R and choose Delete, Windows tells you it contains Read-Only files that can’t be deleted. The confusing part is that Windows XP says you can replace any of the files by writing another identically named file to the CD. That sounds handy, as you could update a file by writing it to the same CD, constantly overwriting the older version. In actuality, though, Windows doesn’t erase the earlier files; their carcasses remain on the CD, taking up space.
Therefore, if you want a CD you can write to and repeatedly erase, a CD-RW is the only way to go. If your PC is less than five years old, it can probably handle CD-RW discs. Look for the word “Rewritable” on the drive’s front panel for a sure clue. But sometimes the only way to verify that your drive can handle CD-RW discs is to test it: save some files to a CD-RW disc, and then try to delete them.
Follow these steps to delete files from a CD-RW disc:
Open My Computer (Start → My Computer), right-click your CD burner, and then choose Open.
Windows lists any files waiting to be written to that CD, as well as the contents of any CD in the drive.
Choose “Erase this CD-RW” from the CD Writing Tasks pane, shown earlier in Figure 10-5, bottom.
The Welcome to the CD Writing Wizard appears, walking you through the process of erasing the CD’s existing contents.
That empties the CD-RW disc, letting you fill it up with more goodies. If you don’t see the words “Erase this CD-RW” in the Writing Tasks pane, though, your drive can’t handle the CD-RW format.
Depending on who you ask, DVD stands for either “Digital Video Disc” or “Digital Versatile Disc.” The dozen corporations on the DVD creation committee never agreed upon an official name. Whatever they’re called, DVDs hold either 4.7 GB or 8.5 GB of information, making them especially suited for digital video and other whopper files.
CD drives and DVD drives look almost identical in a PC. But DVD drives are always stamped with the letters “DVD” on the front. For a sure-fire test, insert a DVD into the drive, and see if you can see any files on it. Open My Computer (Start → My Computer), right-click your DVD drive, and from the shortcut menu, choose Explore. A DVD drive lets you see the disc’s files; a CD drive won’t even be able to tell you’ve inserted a disc.
Unfortunately, DVDs somehow slipped in under Microsoft’s radar. Windows XP doesn’t contain any built-in tools for saving files to DVDs, or even for watching the movies stored on them. The following sections explain how to do both on your PC with a little help from some additional programs.
Windows XP lets you see the files and folders stored on a data DVD, which it treats just like any CD or hard drive folder. But Windows lets you open only files that it recognizes. And unfortunately, Windows XP doesn’t recognize the most common file found on a DVD: a DVD movie.
That’s because Microsoft left out one key component required to play DVD movies: a codec file. Short for COmpress DECompress, a codec contains the formula used to compress sound and video when stuffing them into a file, as well as decompressing them upon playback. Since Windows XP lacks DVD’s essential "MPEG-2” codec, your movies stay locked onto the DVD—at least initially.
To avoid fielding angry consumer phone calls, most PC manufacturers install third-party DVD software like "PowerDVD” when they sell a PC with a DVD drive. Once you or the PC’s manufacturer install DVD player software, Windows Media Player sneaks over and borrows that program’s codec, letting you watch DVD movies with Media Player, as well.
If your PC doesn’t let you watch DVD movies, you have two options:
Buy a codec. You can buy the codec that lets you watch DVDs in Media Player. They’re available for $15 to $20 from DVD XPack (http://www.intervideo.com), NVidia DVD Decoder (http://www.nvidia.com), PowerDVD (http://www.gocyberlink.com), or Cineplay DVD Decoder (http://www.sonic.com).
Buy DVD burner/player software. All of the companies listed above except NVidia sell DVD software for watching and burning DVDs. Since you need to buy DVD-burning software anyway (if you’ve got DVD burner), buying the two together may save you a few bucks.
Like blank CDs, blank DVDs come sold in bundle packs, helping most people solve their never-ending disc shortage problem. Unlike CDs, however, blank DVDs come in way too many formats. That’s because two large groups bickered over control of the official DVD format. The groups parted just before resorting to fisticuffs, and each released its own version of blank DVD to let the consumer decide which is best. The two formats are known as DVD-R and DVD+R.
Many consumers, fearful of being stuck with the loser format, responded by not buying DVD burners. That upset the DVD burner manufacturers, so they wised up and decided to support both formats.
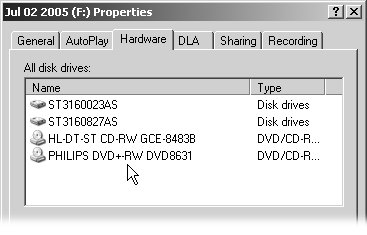
To see which formats your DVD burner supports, right-click its drive icon in My Computer, and click the Hardware tab, shown in Figure 10-8. The formats usually appear as part of the model name.
Here are the DVD drives on the market, and the type of discs they create:
DVD-R, DVD+R (Read). The DVD equivalent of a CD-R, these blank DVDs record up to 4.7 GB, and most standard DVD players can play back their videos. These discs are intended for permanent storage, usually for movies, but also for stashing a backup of your digital photo library or other large files in a safe place. The DVD-R format is compatible with slightly more players than DVD+R.
DVD-RW, DVD+RW (Read Write). The DVD equivalent of a CD-RW, these blank DVDs also record up to 4.7 GB, and you can write to them, erase them, and write to them again. They’re intended for temporary backups that you write over with the next backup.
Figure 10-8. Before buying blank discs, look at the model number of your DVD burner to see what DVD formats it supports: DVD-R, DVD+R, or both (DVD+/-R). The Philips drive shown here supports both DVD formats; you can tell because it lists DVD+/-R in its model number. If your drive shows only a “+” or a “-”, buy blank disks that match that particular format.
DVD-RAM (Random Access Memory). The oddball format. These don’t require DVD-burning software because your PC writes to them just like a floppy or hard drive. Sold mostly for dedicated PC backups, the discs usually come enclosed in a little case that requires a special drive. You may never see one of these, but if you do, don’t mistake it for a DVD-R. These discs won’t play in most standard DVD drives, and they certainly won’t play in DVD players, even if you copy a movie to them.
DVD+R DL (Double Layer). The speedy new discs. These slip in an extra layer of recording material to store up to 8.5 GB—if your DVD burner can write in the DVD+R DL format, that is. They began appearing in the middle of 2005.
Remember, most DVD burners can also burn CDs (Section 10.4.2); when you slip a blank CD inside them, DVD burners pretend they’re CD burners, letting you create music CDs as well as data CDs.
Buy blank DVDs with a writing speed that’s faster than your DVD drive, just as with CD burners (Section 10.3). Blank DVDs with a slower write speed may not burn reliably.
To see how quickly your DVD burner can burn CDs, right-click its icon in My Computer (Start → My Computer) and then choose Properties → Recording tab. The bottom drop-down menu, seen earlier in Figure 10-4, lists the CD writing speeds your drive can handle. Unfortunately, Windows XP doesn’t list the drive’s speed for burning DVDs because Windows XP doesn’t even acknowledge that burnable DVDs exist.
Note
If your DVD burner supports LightScribe (Section 10.7) for etching titles and images onto the disc, be sure to buy LightScribe-capable blank DVDs.
Several other odd disc formats appear in record stores: DualDisc, DVD-Audio, and Hybrid SACD. All three contain better sound than regular CDs or DVDs. PCs can’t create any of them easily, and can play only one of the three formats. And although they’re market failures so far, the industry still pushes the discs for several reasons.
Most of these specialty discs contain releases of older, classic material, making the serious fan part with his money a second (or third) time. To play them at their highest fidelity, most specialty discs require their own players, making more money for player manufacturers. Perhaps most important of all, the discs are much more difficult to copy.
DualDisc. The friendliest of the bunch, DualDiscs have a regular DVD on one side, and a normal CD glued to the other. They work just like a regular CD or DVD; simply flip it over to play the other side. (Each side is labeled.) Most PCs can handle both sides, although a few drives can’t handle the extra thickness.
Hybrid SACD (Super Audio CD). These work much like a DualDisc, but instead of gluing two discs together, SACDs place both layers on one side. A CD player (or a PC’s CD drive) can read the first layer to play back CD sound. But it takes a dedicated SACD player to read the extra, hi-fidelity layer hidden underneath the first.
DVD Audio. These work in most (but not all) DVD players, but not on CD players or PCs. But to hear the extra, high-fidelity sound, you need a dedicated DVD Audio player. (Or, if you can find one, a player that supports both Hybrid SACD and DVD Audio.)
Many new DVD players now support both SACD and DVD Audio, but PC drive manufacturers have been slow to support them. (Besides, you’d need some pretty expensive speakers to be able to hear the difference.)
It’s easy to rip CDs onto your hard drive, making it simple to convert the files to other formats and play them on any device you want. It’s not hard to duplicate CDs, either. But get ready to enter another world when you want to start ripping DVDs. You can’t make an exact copy of a DVD for several reasons.
Size. Most PC’s DVD burners can burn 4.7 GB of video to a blank DVD, but movie studios stuff about 7 GB of video onto a DVD. Sheer size alone rules out making an exact duplicate for most DVD burners, although the new, dual-layer DVD burners can hold 8 GB. Some third-party programs like the DivX Create Bundle (http://www.divx.com) take a DVD’s content, compress the video with the DivX codec, and burn it to a DVD, a CD in VCD format (Section 10.6), or formats for portable video players. The compression removes some of the quality, but that may not matter when you’re eager to watch The Simpsons on your cell phone.
Copy protection. Movie studios encrypt their DVD’s video with a Content Scrambling System, and the U.S. government has ruled it illegal to decrypt it— even to make a backup copy.
As you search the Internet, you’ll find some programs that can duplicate copy-protected DVDs. These programs are usually stored on Web sites run in countries that don’t observe United States copyright laws. The legality of these programs depends on the soil your PC sits on when using them. For more information about copying DVDs, drop by Doom9.net (http://www.doom9.net).
Although Microsoft finally let Windows XP write to CDs, it missed the boat on DVDs: Windows XP can’t write to DVDs by itself; it needs third-party software. Many new PCs come with DVD burners, but since Windows XP can’t do anything with them, the manufacturers usually slip in a DVD-burning program.
Like CD-burning programs, DVD-burning programs write to DVDs in different ways, depending on where you intend to play back the DVD.
Data. Intended for DVDs that never leave a PC, data-burning programs give your DVD that familiar look and feel of your CD burner. To copy information onto the DVD, stick a blank DVD into the drive, then drag your files onto the drive’s icon or into its open window. These programs work well for people who enjoy DVDs for their large storage capabilities, letting them make large backups for safekeeping.
To burn CDs on a DVD burner, slip a blank CD in the drive. The drive examines every newly inserted disc; once it identifies it, it knows whether to behave like a CD burner or a DVD burner.
Video. Much more complicated (and expensive) than data-burning programs, these programs walk you through the process of creating a video DVD intended for the DVD player next to your TV (see Figure 10-9). Some programs include minor editing features for trimming the beginning or ending of a video, which is great for adjusting the starting and ending times of recorded TV shows or movies. If you’re doing more serious video editing—splicing together pieces of footage into a movie complete with stereo soundtrack, for instance—try Windows XP’s bundled Movie Maker (Section 5.9). When you outgrow that, you’ll want to buy a separate video editing program, as well.
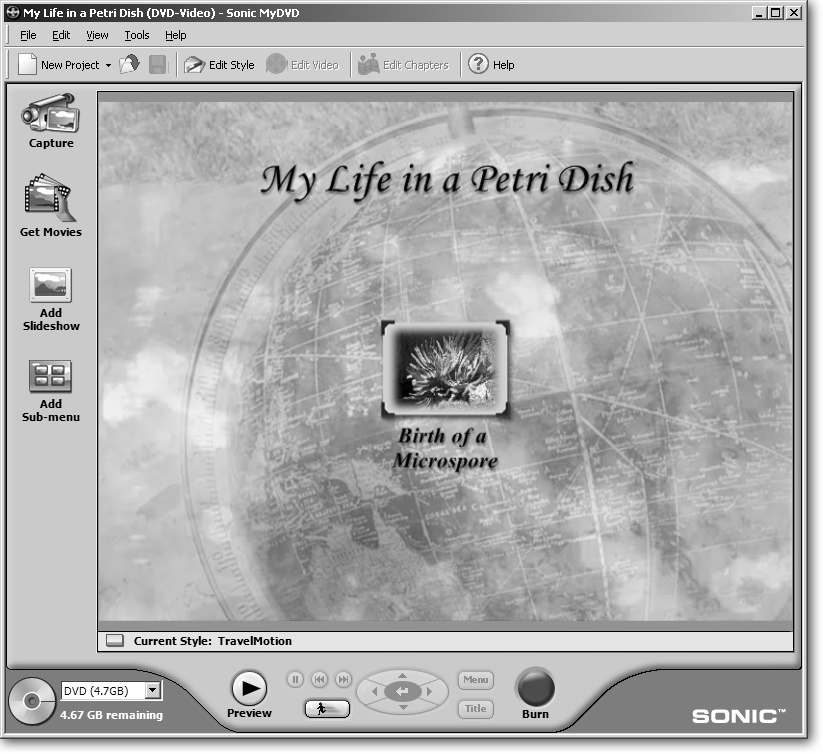
Figure 10-9. Video DVD creation programs like Roxio’s MyDVD walk you through the process of copying your camcorder movies from your hard drive to a DVD so that you can watch them on a regular DVD player. You can create the opening menu that appears when you insert the DVD into a DVD player. You can also add background music, submenus, and buttons to the menu for jumping quickly to different sections of your video.
When shopping, make sure the software can handle your needs, be it data or video. If you find a program just for data, consider picking one up that handles video, as well. The data-only writers may be cheaper, but they won’t help when your friend inevitably walks over with his camcorder and says, “Hey, I hear you have a new DVD burner…”
Just as with hard drives, CD and DVD drives come in both internal and external versions. External drives are a snap to install. Just plug them into your USB 2.0 or FireWire port; install the software, if necessary, and you’re ready to burn. Internal drives take longer to install, and they require removing your PC’s case and connecting cables—not a task for the timid.
If your laptop didn’t come with a CD or DVD burner, an external burner’s the only way to add one. Plus, only mythical teenagers haunting the minds of record company executives use their CD burners on a 24-hour basis; a real family can easily share one external burner among several PCs and laptops.
Internal drives usually aren’t any faster than external drives, and they’re priced about the same. Your decision may ultimately depend upon how cluttered your desk looks. If there’s no room for an external burner, buy the internal.
Once you decide where the drive will live—inside or outside your PC—the next step is deciphering the drive’s numbering system. CD drives come rated in a string of three “x” numbers: 32x16x40x, for instance. Here’s the breakdown:
The first “x” number carries the most weight; it refers to how quickly your drive burns CD-Rs, the discs used for creating music CDs and just about every other project. CD burners have maxed out at 52x, so a drive at that speed won’t be obsolete by the weekend. Before putting down your money, though, look for a 48x drive at a bargain price. There’s not a noticeable speed difference between 48 and 52.
The second “x” number is also the drive’s writing speed, but it reflects how quickly your drive burns CD-RWs (Section 10.3), the discs used for temporary storage. Unlike their brethren, CD-RW discs are erasable, so they’re ideal for temporary backups that you write over on a regular basis.
The third “x” number refers to how quickly the drive reads information from the CD. You probably notice this most when viewing slideshows off digital photos stored on a CD. The higher the number, the less time you wait for the CD to grab your information. (Even the slowest speed has no trouble playing music CDs.)
Shopping for a DVD drive feels like an exercise in polynomials. Anxious to prove that their drives have metaphysical powers, drive manufacturers pack their spec sheets with long strings of numbers.
For instance, DVD burners also can burn CDs, so they carry the three strings of CD specs described above. Combine that with DVD’s two compatibility modes, and a typical DVD burner’s specs look like this: 16x/4x/16x DVD+RW, 16x/4x/16x DVD-RW.
The numbers are easier to understand if you break apart the strings at the commas, like this:
16x/4x/16x DVD+RW
16x/4x/16x DVD-RW
These are the same familiar numbers used in rating CD drives, but here they describe a DVD’s reading and writing speed. In order, the numbers listed above describe the following speeds: writing to regular DVDs, writing to rewritable DVDs, and reading from DVDs. The manufacturer repeated the numbers to show that the drive supports both – (minus) and + (plus) DVD formats. (They could have simplified things by using the “−+” or “±” abbreviation, but they’re trying to make their drive sound super compatible.) Here’s another DVD rating string:
4x DVD+R DL
This drive supports the new DVD Dual Layer format, so it can pack 8.5 GB onto a DVD—if you remember to buy blank 8.5 GB–sized DVDs. And finally, here’s a rating in which the CD burning specs appear at the end of the string:
32x/24x/40x CD-RW
Some friendly DVD burner manufacturers graciously label each “x” number, making it easier to figure out what they’re talking about. As a rule of thumb, the bigger the numbers, the faster the drive.
Reliability and compatibility with other players are much more important than speed, though, so ask your friends about their drives and read reviews at sites like PC World (http://www.pcworld.com), CD Freaks (http://www.cdfreaks.com), Tom’s Hardware Guide (http://www.tomshardware.com), PC Magazine (http://www.pcmag.com), and Amazon (http://www.amazon.com).
Installing a CD or DVD drive into your PC works much like adding a new hard drive (Section 9.6), although the process is even easier—if you mess something up, you won’t lose your tax records from the past six years. The worse that can happen is Windows XP doesn’t recognize the drive, something you can usually fix by checking the cable connections.
Both CD/DVD drives and hard drives connect to your PC using the same type of connectors, so if you’ve installed a hard drive, this procedure’s a breeze. Just follow these steps:
Buy a new CD or DVD drive.
DVD burners can also read and write to CDs. If you need a CD burner, consider picking up a DVD burner, instead. They can still write to CDs, and they don’t cost much more than a CD burner. And they’re not limited to storing movies: the latest DVD burners can hold as much information as a dozen CDs, making them that much more valuable for backups.
Although a few CD/DVD drives use SATA cables, the vast majority of CD and DVD drives use flat ribbon cables known as IDE (cables). See Section 9.6.1 for a quick recap on how to figure out which type of cables your PC uses.
Turn off your PC and remove its case (Section 1.3).
Set the drive’s jumper settings to Master, Slave, or Cable Select, depending on the drive’s position on the internal cable it’s going to be attached to.
Since two CD/DVD drives often connect to the same ribbon cable, your PC needs to know how to talk to each drive individually. So it gives the drives one of two names: “Master” or “Slave.” Your job is to tell each drive which one is Master and which one is Slave. (No one has ever accused the PC industry of being politically correct.)
Although a simple toggle switch would have done the job nicely, drives instead use a weird communication system. They make you move a little cover called a jumper over certain rows of pins, as shown in Figure 10-10. Covering one pair of pins sets the drive to Master status, while covering a different pair of two pins sets the drive to Slave status. A label on the drive tells you which pins are Master and which are Slave.
Armed with that knowledge, you have three rules:
Figure 10-10. A little sticker on the top or side of the drive’s case contains a diagram explaining which pair of pins you must cover for each of the three possible settings: Master, Slave, or Cable Select. When you decide which setting applies to your drive, push the jumper over the pair of pins that match your drive’s setting.
If you’re replacing the only drive on the cable, set the new drive’s jumper settings to Master.
If you’re adding a second drive to a cable, set its jumper settings to Slave.
If you’re replacing one of two drives on the cable, set its jumpers to match the drive you’re replacing.
Note
The rules change slightly if your PC has what is known as a “Cable Select” cable, which does away with some of the messy master/slave decision making. One of the cable’s connectors is marked “Master”; the other connector is marked “Slave.” When attaching any drive to a Cable Select cable, set the drive’s jumpers to “Cable Select.” The PC then talks to the drives according to what cable connector they’re plugged into, either Master or Slave.
Insert the new drive into the docking bay.
If you’re replacing an existing drive, slide the old drive out of its bay (Figure 1-2) and slide in the new drive to replace it. Fasten the new drive in place with the old drive’s screws or latches.
If you’re adding a second drive, slide it into the bay adjacent to the existing drive. Then fasten it in place with screws and/or latches. Most computer stores sell mounting screws or latches; if they don’t, your PC manufacturer probably sells them.
Attach the cables from your PC into the back of your new drive.
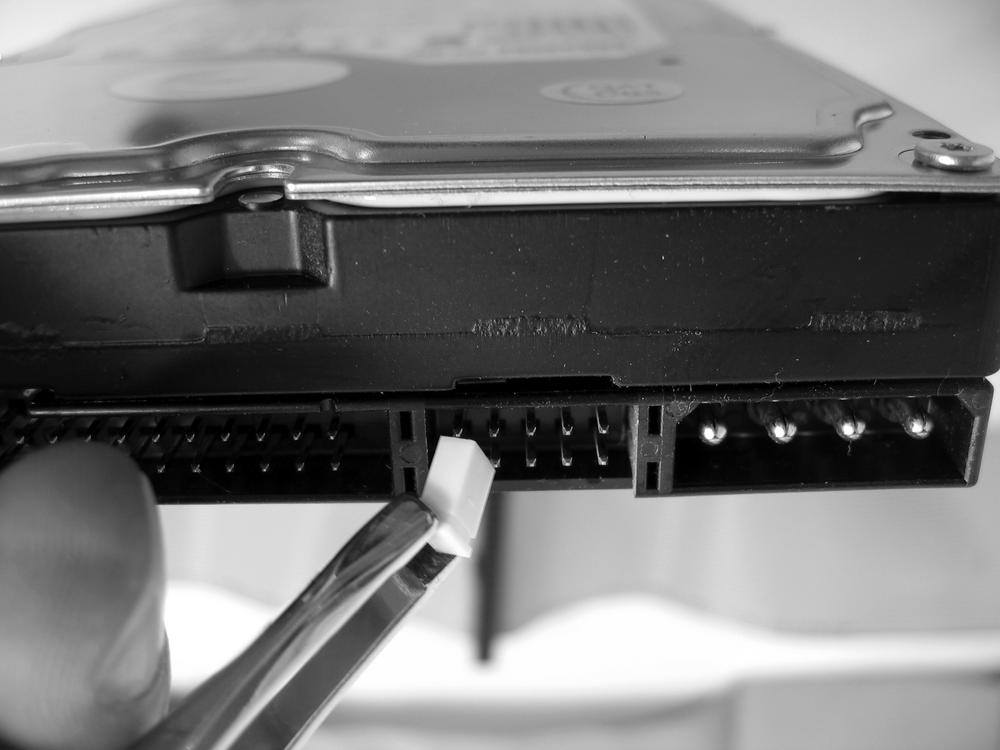
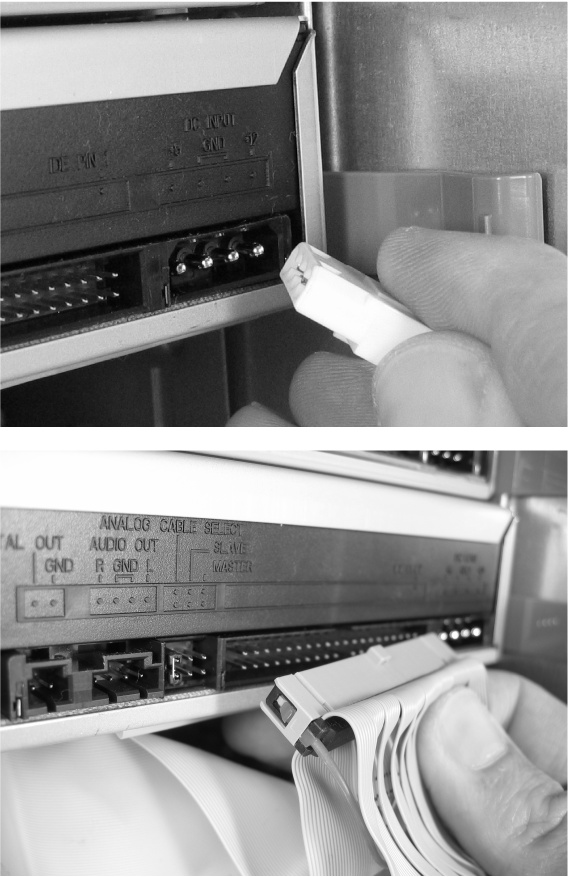
You need to plug at least two kinds of cables into the rear connectors of a newly arriving CD or DVD drive: a power cable and a ribbon cable (see Figure 10-11). Some drives also come with two largely unused connectors, leftovers from older technology. Here’s the rundown on the four connectors you find on today’s drives:
Power. A four-pin “Molex” connector, shown in the top of Figure 10-11, pushes onto the four large pins. Sometimes you need to push with a little force to make a firm connection.
Motherboard. The vast majority of drives connect to the motherboard via a flat ribbon cable called an IDE cable. The cable has three connectors: one plugs into the motherboard; the cable’s other two connectors let you plug in one or two drives.
Although each ribbon cable comes with connectors for two drives, don’t mix hard drives with CD or DVD drives on the same cable. That’s not usually a problem, as most motherboards have jacks for two ribbon cables. You can keep up to two hard drives on one cable, and up to two CD/DVD drives on the other.
Audio Out. On some older PCs and drives, a little four-pin cable connects your drive’s four-pin Audio Out connector to the four-pin CD IN connector on your PC’s sound card (Section 7.2.1). Almost all of today’s PCs grab the sound straight through the ribbon cable, so don’t connect this cable unless you’re sure you need it.
Digital Out. Another leftover from yesteryear, this two-pin Digital Out connector on some DVD drives connects to a two-pin Digital In connector on some sound cards. Today’s PCs grab the sound through the ribbon cable, so don’t connect this cable, either.
Figure 10-11. Top: Your PC’s internal power supply comes outfitted with extra power cables (like the one white-tipped one shown here), ready for you to plug them into any newly installed devices (a new CD drive, for instance). Push the white “Molex” connector onto the four waiting pins on your drive and—presto—you’ve got juice. Bottom: Most new drives come packaged with their own ribbon cable, which connects between the drive’s rear-side connector (shown here) and an identical connector, usually labeled IDE 1, on your motherboard. If you’re just replacing a drive, feel free to reuse the old cable on the new drive. Ribbon cables fit only one way; make sure the notch and raised spot on the two connectors mesh as you push the ribbon cable into the drive.
Turn on your PC.
Your PC recognizes the drive when it boots up.
When your PC can’t play back a CD or DVD that you’ve just burned, your first course of action should be to try a different brand of disc. Some brands just work better with certain drives. Don’t spend much time reading reviews of blank discs, since they don’t mean much unless the reviewer used your brand and model of burner. Instead, experiment with a wide variety of brands. When you find a brand that burns consistently, buy the bulk pack.
The rest of this section describes some common troubles found when using CDs, DVDs, and their drives.
Unlike hard drives, which suck up data as soon as your PC sends it, CD and DVD drives are much more finicky, demanding undivided attention. Your PC must send data to the drives at a steady, controlled pace, with no interruptions. Any disturbances can cause skips in music or lost data glitches. If your burned CDs or DVDs show any signs of skipping or data loss, the following steps help your PC, particularly older ones, work undisturbed.
Close any programs to let your PC work uninterrupted while burning. Also, try logging off your PC (Start → Log Off), and then log back into your User Account again. That gives your PC a relatively clean slate.
Don’t work on other programs or browse the Internet while burning discs. Instead, let your PC sit undisturbed until the burn’s finished.
When burns aren’t turning out right, lower your drive’s writing speed (Start → My Computer → right-click your drive’s icon → Properties → Recording tab; adjust the setting in the bottom drop-down menu). Keep moving lower until you find a setting that works consistently with the particular brand of blank disc you’re using.
Turn on error correction. Some burning software offers error correction, a way of double-checking to make sure that written information has arrived on the disc successfully. This extra checking slows down the burning process, so it’s often disabled. If you’re having trouble carrying out glitch-free burns, look for your software’s error correction checkbox and turn it on.
If your screen saver kicks in while you’re burning, turn it off before burning the next disc. (Start → Control Panel → Display → Screen Saver tab. Choose None in the Screen saver drop-down menu.) Screen savers take away resources from your PC.
Defragment your hard disk. When you tell your PC to burn a CD or DVD, your PC gathers all the information, writes it to its hard drive, and then slowly feeds that chunk of information to the CD or DVD drive. Defragmenting your hard drive (Section 9.5) lets your PC write everything to the hard drive in one smooth strip, making it easy to feed the data back to the CD or drive without pauses or delays.
Clean your discs with a lint-free cloth before burning them. Make sure no dust rests on the disc’s surface.
Free up disc space. If you don’t have 700 MB of free hard drive space (or 4 GB of free space, if you’re creating a DVD), free up some space on your drive (Section 9.4).
Movie studios don’t release each movie simultaneously worldwide. Instead, they release the same movie at different times in different regions, sometimes tailoring a movie’s content and price for a specific part of the world. That’s why DVDs come with region codes—embedded signals detailing where a DVD can play. All DVD players, including your DVD drive, obey those region codes.
To see your DVD drive’s region code, right-click its icon in My Computer (Start → My Computer) and choose Properties → Hardware tab. Double-click your drive’s name, and then click the Region tab. There, buried beneath all those clicks, Windows XP lists your drive’s Region code (Figure 10-12). Once you’re looking at it, you’ll see in which DVD region your drive is authorized to play.
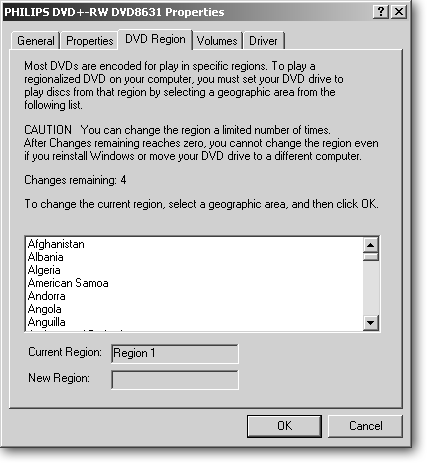
Figure 10-12. Your DVD drive’s Region Code tab lists its current region setting, as well as settings for other countries. If that DVD you bought on vacation uses a different Region Code than your drive, head to this tab and change your drive’s Region Code to match your DVD’s code. You can change your drive’s code only five times, though, and the PC’s manufacturer used up your first change. Some retailers sell “region free” DVD drives, and The Firmware Page (http://rpc1.org) carries firmware-flashing software to “unlock” your drive’s Region Code, if necessary.
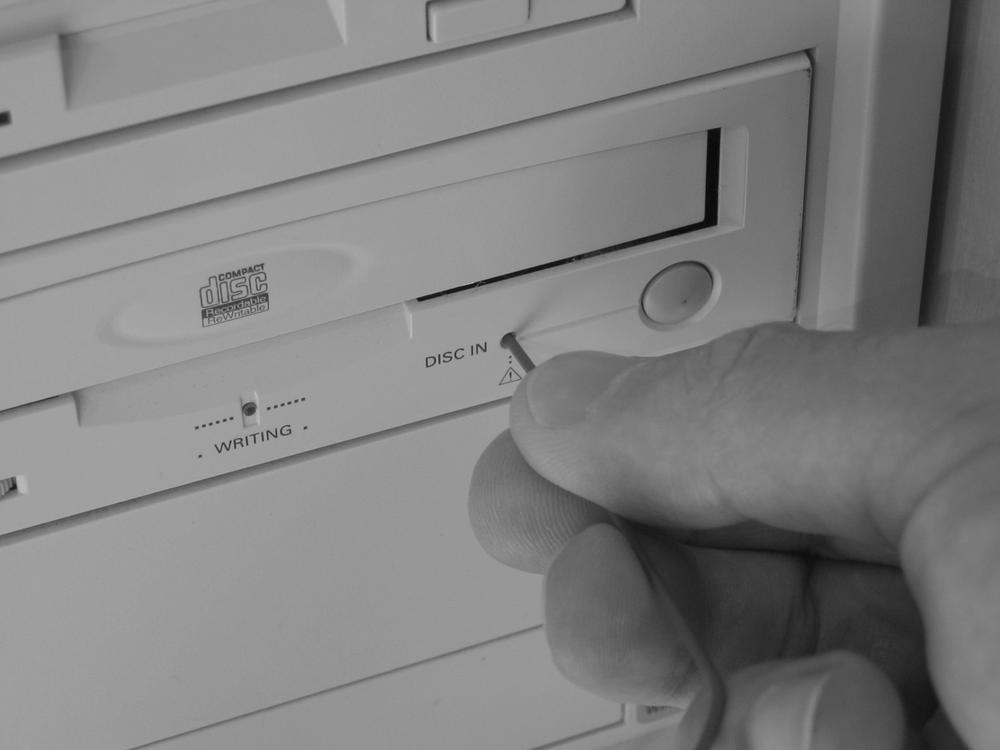
Occasionally, a CD or DVD ends up stuck in the drive, keeping the tray from sliding out when you push the eject button. The drive manufacturers standardized on a single tool to remove the drive: a straightened-out paper clip.
Look in the front of the drive for a tiny hole, usually located below the slide-out tray. With your PC turned off, push one prong of the paper clip into the hole, shown in Figure 10-13. The paper clip triggers the release mechanism, pushing the tray out and letting you extract the disc.
A codec contains the magic formula for compressing and decompressing large media files. Hundreds of codecs exist, each compressing sound or video in a slightly different way. If you don’t have the particular codec used to compress a song or video, you can’t listen to or view the content. Some hardcore hobbyists create codecs and give them away. But much more often, large corporations are the ones creating, licensing, and selling codecs.
For instance, Windows XP’s Media Player includes the codec for decompressing MP3 files, letting you play them on your PC. But until Media Player 10, Microsoft left out the codec for creating MP3 files. That forced you to scramble for a free codec, pay $10 for an official codec (http://www.microsoft.com/mediaplayer), or resort to Microsoft’s own conveniently included WMA codec, instead.
Faced with the iPod explosion, Microsoft added an MP3 creation codec to Media Player 10, which now creates as well as plays back MP3 files. But Media Player still doesn’t include a codec for viewing or creating DVD movies.
Movies, especially those downloaded from the Internet, come encoded with a wide variety of codecs. When you try to play material compressed with a codec that Media Player doesn’t have, Media Player heads online to look in Microsoft’s stash of collected codecs. (To make sure Media Player searches the Internet, choose Start → All Programs → Media Player → Tools → Options → Player tab → “Download codecs automatically.”) If Media Player can’t find the codec used for that file—or you’re not connected to the Internet—it gives up.
When faced with a video that Media Player can’t handle, you may find help at Free Codecs (http://www.free-codecs.com). Download their tools, Gspot and AVIcodec. The programs examine your problem file, find out what codec you need, and tell you whether your computer can handle it. If your PC needs the codec, the site offers a wide variety of codecs you can download.
Many online movies come encoded with DivX, a free codec available from the company’s Web site (http://www.divx.com).