
Many people use magnets to stick little notes onto their refrigerator doors. Your PC also uses magnets to store your information, but with a slightly different approach. Every time you save a file, your PC transforms your data into little magnetic codes, and then spits the magnetic charges onto flat platters that whirl more than 5,000 times every minute. Even more miraculously, your computer’s able to retrieve these codes on demand and turn them back into your words, pictures, and songs.
This chapter—and the two that follow—don’t even try to explain how any of that happens. But these chapters do explain how to find all the drives connected to your PC, keep them running smoothly, clean them up when they get too full, and add new ones when you just plain need more space.
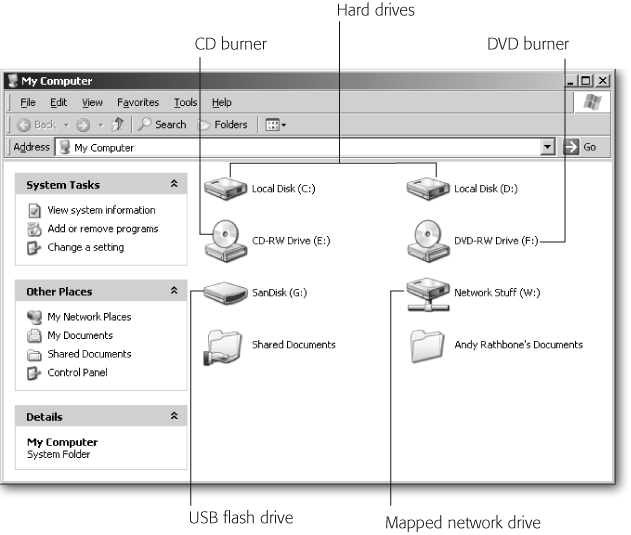
Today’s PCs stuff information onto a wide variety of drives, each designed to store information in different-sized helpings. To see the drives connected to your PC, open My Computer (Start → My Computer). Figure 9-1 shows some samples of almost every kind of drive Windows can communicate with. The list below gives you an overview of the drives you’re likely to find on your computer.
Floppy drives (storage capacity: 1.44 MB). Standard on most PCs for the past 20 years, floppy drives (Section 9.8) read information from little plastic squares known as floppy disks. Most new PCs no longer include floppy drives, because they’re so rarely used today. But almost every PC still comes with the required connectors for you to install a floppy drive (Section 9.9) if you really need to read some important old disks.
Figure 9-1. Windows XP’s My Computer lists all the working drives on your PC. The PC shown here contains two hard drives (top), a CD burner and DVD burner (second row), and a USB flash drive and a network drive (third row). Windows XP lists drives even if you haven’t yet slipped a disk inside them. That’s why My Computer still lists your CD and DVD drives, as well as any flash card readers plugged into your PC’s USB port. You may also spot icons for attached digital cameras or MP3 players; in Windows’ mind, these all count as drives too, since they’re capable of storing picture and audio files.
Hard drives (20 GB to 500 GB). Your PC’s main storage tank, its hard drive, continues to stay popular because advances in hard drive technology constantly ups the storage capacity of these drives. Early hard drives held about 10 MB of data—enough for 1 or 2 MP3 files. Hard drives now commonly hold 100 GB or more—one thousand times more than their ancestors.
Hard drives come in two main flavors. Internal drives fit inside your PC’s case; external drives come inside a box that plugs into your PC’s USB or FireWire port. Since they live outside your PC, external drives are much easier to install than internal drives.
Note
If My Computer notices an attached iPod music player (Section 8.3.4), it lists the iPod as an external hard drive, not a music player. My Computer can copy files, including MP3 files, onto the iPod as data, but the iPod won’t let you listen these songs until you remove them and then reimport them using iTunes.
CD drives (650 MB). What floppy drives lost in popularity, CD burners quickly grabbed. Today, every new PC comes with a CD burner (Section 10.5.1) for creating music CDs, data CDs, or a combination of both.
DVD drives (4.3 GB). DVD drives (Section 10.8) first caught on with movie buffs, who liked to watch flicks on their PCs and laptops. PC engineers have since figured out how to let common folk save data on DVDs. The result? DVD burners look to replace CD burners as the drive of choice. Unfortunately, until Microsoft figures out how to make Windows XP easily save info on DVDs, you must buy a DVD burner program (Section 10.12) from another company.
Flash drives (64 MB to 4 GB). A curious engineer connected a USB port to a flash memory card, and gave birth to the flash drive. The modern equivalent of a floppy drive, these go by many names: keychain drives, thumb drives, USB drives, and jump drives. They’re lightweight, portable, and durable, with no moving parts. Being the technological newcomers, they’re more expensive than other drives, but prices are dropping.
Zip drives (100, 250, and 750 MB). Created in the day when people needed more storage than a floppy could offer, Zip disks resembled fat floppies and offered 100 times more storage space. Stiff competition from cheaper storage disks like flash drives, burnable CDs, and DVDs—combined with quality-control problems—severely diminished their popularity.
Network drives (any size). When two or more PCs share information through a network (Section 14.1.1), clicking your way to a game folder buried on another PC can wear out your fingers before the game loads. To speed things up, Windows XP lets you assign a drive letter to a frequently-used-but-far-away folder, and call it a network drive (Section 14.8.5). That lets you click your kitchen PC’s “R” drive to see the files stored in another PC’s “recipes” folder. (The letters you see after these drive names—Network Stuff (W:), Kitchen Goodies (K:), and so on—don’t mean anything. Except for a few reserved letters, you get to pick out which letter to assign to a network drive.)
Windows XP insists on a hard drive for living quarters, as do most large programs. Every PC sold today comes with one hard drive, and sometimes two, three, or even a stack about a mile high if it’s being shipped to Google.
The majority of consumer PCs come with only one hard drive, dubbed "Local Disk (C:)” when you view it in My Computer. For most people, one drive is plenty—until it starts filling up with information.
After you’ve owned your PC for awhile, that once huge drive starts feeling a little crowded, what with all those digital photos and new programs. Windows XP starts complaining; it sends “Insufficient Disk Space” messages as you work, and large programs take longer to load. The following sections describe Windows XP’s built-in data pruning shears, which can help you clear away the brush.
It’s easy to take a large hard drive for granted, until you begin to read the fine print on most software boxes. Some software needs less than a megabyte of hard disk space; other programs, like Adobe Photoshop and Microsoft Word, require several hundred megabytes. Some computer games consume two gigabytes all by themselves.
Before buying a new program, take a look at how much disk space your hard drive holds, as well as how much free space it has left for new files and programs. Windows XP shows a running tally when you right-click your drive’s icon in My Computer and choose Properties. A nifty pie chart appears (Figure 9-2), displaying how many slices of hard drive your data currently consumes and how much is left over for new arrivals.
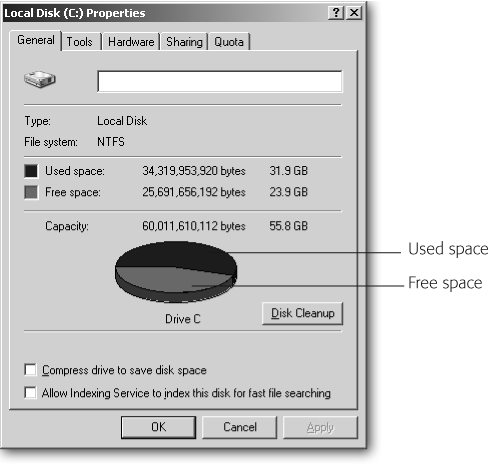
Figure 9-2. You can use the two checkboxes along the bottom of this window to compress and/or index your files. If you’re running short on disk space, turn on “Compress drive to save disk space”; Windows XP packs your files more tightly to make extra room. Compressing your entire drive consumes several hours, however, so choose this option when you’ll be away from your PC. The Indexing Service eats up a lot of your hard drive space; it’s listed here so you can turn it off. Windows XP’s Search feature still runs without it. Turning the indexer on only speeds up searches for words stored inside of files, a task you’d probably do better assigning to Google’s Desktop Search utility (http://www.google.com/downloads).
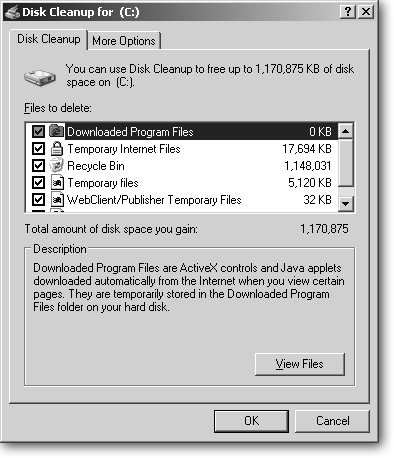
The first stop on your “free up some space” campaign should be Windows XP’s built-in Disk Cleanup program; it lets you dump garbage left behind by your programs, as well as any mess you may have scattered yourself. Fire up the program by choosing Start → All Programs → Accessories → System Tools → Disk Cleanup. Disk Cleanup lets you pick and choose which of your PC’s various trash bins to empty (see Figure 9-3). Here’s a rundown of what each bin holds:
Downloaded Program Files. You may not notice, but some Web sites dump little programs known as "ActiveX controls” and "Java applets” onto your PC. They’re not (necessarily) anything evil, just small programs that let you access certain features: controlling the view of an online Webcam, for instance, or playing an online game. All these are fair game for deletion; the Web site will send you the latest version on your next visit.
Figure 9-3. Although Windows XP refers to it as one program, Disk Cleanup actually brings together a suite of tools for freeing up space on your hard drive. With a few clicks, it lets you quickly empty the Recycle Bin, delete unused programs, and remove parts of Windows XP you never use. Depending on your hard drive’s size, Disk Cleanup can free up anywhere from a few megabytes to several gigabytes of space.
Temporary Internet Files. To speed up your browsing, Internet Explorer places every Web page you view into a folder and hangs onto it for a week or so. (Google’s downloadable Desktop Search program [http://www.google.com/downloads] indexes these pages, letting you retrieve important ones.) Feel free to delete these archives if you need the space. If you think Internet Explorer hangs onto too much of this information, reduce the amount it saves by choosing Internet Explorer → Tools → Internet Options → Settings, and then adjust the “Amount of disk space to use” value.
Note
Adjusting this disk space setting in Internet Explorer doesn’t remove temporary Internet files from FireFox (Section 13.1.2). Nor does it delete Internet Explorer’s History of all the Web sites you’ve visited for the past few weeks. To do that, choose Tools → Options → General → Clear History.
Offline Web Pages. Internet Explorer lets you create an automated schedule for saving a Web site or some its pages onto your PC for reading when you’re not online (Section 13.4.3.4). Called “Synchronize,” this feature lets people read favorite sites on their laptops on the subway. Internet Explorer saves those pages in a special folder, and this is your chance to clear out anything that’s grown stale.
To make sure you’re not deleting something important, click the Offline Web Pages line and choose View Pages to see the saved page’s icons. Double-click any icon to view the site in your browser. If everything looks disposable, turn on the Offline Web Pages checkbox to have Disk Cleanup delete them.
Recycle Bin. Turning on this checkbox is typically the best way to free up space, but it also defeats the purpose of a Recycling Bin: being able to retrieve files that you thought you no longer needed. If your Recycling Bin’s consuming too much space, lower its size instead. To do so, right-click the Recycle Bin, choose Properties, and then slide the bar toward the right so the bin doesn’t consume quite as much as its normal 10 percent of your hard drive.
Setup Log Files. When programs install themselves on your PC, they take notes on their progress and save those notes in a file. When something goes wrong during installation, tech support people like to examine the notes—they’re the only people who can understand them. If you’re not having problems with recently installed programs, get rid of these files by turning on this checkbox.
Temporary files. Windows offers programs some hard drive space to use as a makeshift scratch pad when working. The programs are supposed to wipe it clean when they’re through, but they rarely do. Turn Temporary files on, and Disk Cleanup removes leftover files that are older than a week.
WebClient/Publisher Temporary Files. Only a few kinds of relatively uncommon corporate networks make use of these files. If you have any doubt, leave them alone, or check with your tech support department if your PC’s part of a corporate network. If that’s not the case, feel free to delete these files. (And don’t be alarmed when Disk Cleanup can’t seem to delete the last 32K of files; you can safely ignore those tiny remnants.)
Compress old files. A relic from the days of small hard drives, Microsoft intended this setting to be a handy tool for compressing files you haven’t used for awhile. In reality, many people find that the compression calculator makes Disk Cleanup freeze in action. If your Disk Cleanup freezes, download Kelly Theriot’s program from this book’s “Missing CD” page (http://www.missingmanuals.com) for a quick fix.
Catalog files for the Content Indexer. Windows XP creates an index to speed up some file searches. The index not only hogs file space, but leaves behind these catalog file leftovers as slop. Delete them. (If you rarely search for words inside of your files, you can save additional disk space by turning off the indexer; to do so, right-click your hard drive’s icon in My Computer, choose Properties, and then turn off the checkbox that mentions "Index Services.”)
You may spot checkboxes from other programs, like Microsoft Office 2003, listed in Disk Cleanup. Feel free to turn them on as well. Finally, click OK to delete all the items you selected.
When Windows XP finishes emptying the trash, return to Disk Cleanup and then click the More Options tab, shown in Figure 9-4. That page lists several more ways to prune your hard drive of unwanted growths. Clicking a section’s “Clean up” button usually lets you handpick that section’s unneeded items. All three categories are described below.
Windows Components. The overzealous Windows Installer places plenty of software onto your PC that you’ll never need. Click this section’s “Clean up…” button to see that software, sorted into categories, and start weeding it out. As you click each category in the Windows Components window, shown in the bottom of Figure 9-4, Windows lists a description beneath it.
Keep an eye out for the Details button. It’s normally “grayed out,” but it becomes available when you select a category that contains more than one item; at that point, clicking the Details button lets you pick and choose individual items to delete within that category. For instance, click Details after selecting “Accessories and Utilities” to delete those Internet Games that keep the kids up all night playing online checkers.
Tip
You can also install programs Windows left out. Turn on the checkbox next to Fax Services, for instance, and Windows XP Home Edition installs a fax program for sending faxes through your dial-up modem (covered in the online appendix, “"Other Cool Things You Can Do Online,” available on the “Missing CD” page at http://www.missingmanuals.com).
Installed Programs. This calls up the Control Panel’s Add or Remove Programs wizard. Windows lists all your installed programs, including those trial programs you tried but never liked. Here’s your chance to delete them.
System Restore. System Restore (Section 16.3) saves copies of your PC’s most important settings for several weeks, which is a great thing to discover when your PC’s gone haywire. It stakes out 12 percent of your hard drive for storing all that data, however. If your PC’s been running smoothly, this area lets you remove all but your most recentRestore Points, those delightful Windows safety nets that let you return your system to an earlier point in time. (To give System Restore a little less than its whopping 12 percent of real estate, right-click My Computer → System Restore tab → Settings.
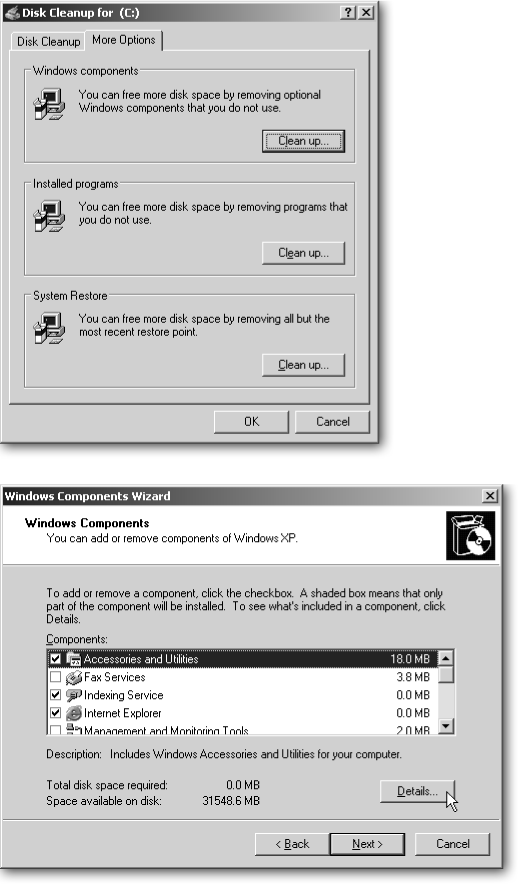
Figure 9-4. Top: After choosing Disk Cleanup and deleting your files, be sure to click its More Options tab to find these extra disk cleaners. Here, you can delete unwanted programs, and even unwanted parts of Windows itself by clicking the “Clean up” button next to “Windows components.” Bottom: The Windows Components window lets you handpick unused Windows XP items you never use. (MSN Explorer, for instance, is a prime candidate, hogging 20 MB.) However, Windows XP pulls a fast one when listing Internet Explorer, Windows Messenger, and Media Player as removable items. If you tell Windows XP to delete them, Microsoft deletes only the programs’ names from the menus; the programs still hog space on your hard drive.
Your PC treats its hard drive like a shelf in the garage. Just as you store all your paint cans on one shelf, your computer saves all its data using the electronic equivalent of one long strip of magnetic space. And just as things can quickly get messy on your garage shelf, your PC’s hard drive can easily get cluttered.
FREQUENTLY ASKED QUESTION: The Mysterious Missing Bytes
My drive is supposed to be 60 GB. But Windows XP says it’s only 55.8 GB. Was I ripped off?
You’re experiencing a historical oddity that worked out in favor of the drive’s marketing department. Hard drive manufacturers measure their drive’s size using the metric system. Indeed, your drive probably holds 60 GB of data.
Windows XP however, measures storage using the binary system—powers of 2. That means Windows XP considers a kilobyte to be 1024, or 2 to the 10th power.
So although the hard drive manufacturers measure their drive’s byte capacity in terms of 1,000, Windows XP needs to pack 1024 bytes of data into that same space. Now that drive storage has reached the gigabytes, the slight difference between 1,000 and 1,024 is no longer “close enough” and some people feel they’re being ripped off.
You can see how both parties are technically correct by right-clicking a drive in My Computer and choosing Properties. As you can see in this figure, Windows XP shows a 60 GB drive’s capacity as 60,011,610,112 bytes using the metric system, or 55.8 GB using Windows’ binary system.
A rule of thumb is to remember that a hard drive advertised as 10 GB holds only 9.31 GB of data; a 100 GB drive holds about 93.13 GB of data.
Hoping to clear up the confusion, the International
Electro-technical Commission (IEC) decreed in 1998 that drives should be measured in, get this:
kibibytes, mebibytes, and gibibytes. Nobody
wants to stutter when shopping for drives, so the old terms
remain.
As you begin working with files, deleting some and moving others, Windows XP begins leaving gaps in that once-smooth strip of data. As your PC looks for available storage space, it breaks files apart, stuffing pieces wherever they’ll fit. After a few months, the files on your hard drive look more like your messy garage shelf.
Rest assured that, unlike you, your PC keeps track of everything and nothing gets lost. But the drive has to work harder as it fetches all those scattered pieces. That slows everything down.
Enter Windows XP’s built-in Disk Defragmenter, shown in Figure 9-5. The program picks up all the scattered pieces of your files and inscribes them back on the hard drive in long, contiguous, and easily accessible strips. That speeds up retrieval, letting your hard drive pick up a file in one pass.
To begin organizing your drive’s virtual paint cans, run the Disk Defragmenter: go to Start → All Programs → Accessories → System Tools → Disk Defragmenter. The program takes several hours to run, and works best undisturbed. So run it in the evenings, when you’re away from your computer.
Start by shutting down any programs to release any data they’re clutching. Then click the Analyze button to make sure your drive is fragmented enough to be worth the effort. If Windows says “You should defragment this volume,” then click the Defragment button and let it run all night. (It may take several hours to finish.)
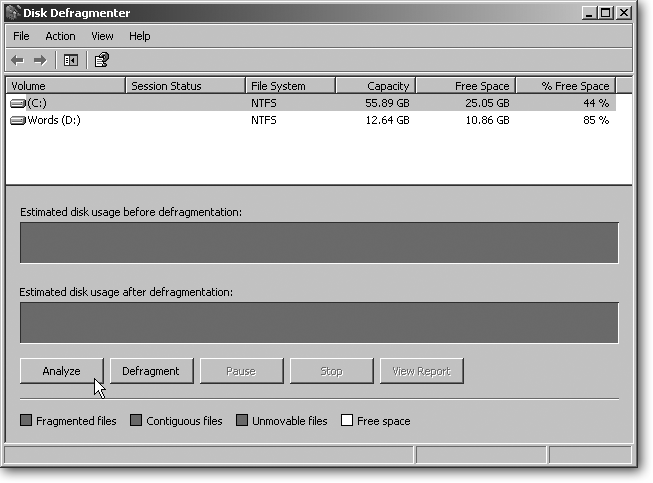
Figure 9-5. Before running Disk Defragmenter, run Disk Cleanup (Section 9.4) so you’re not spending time defragmenting all your trash. Then let the Defragmenter run all night, especially if you haven’t run it for awhile. If you’re working in the background, your PC won’t be able to defragment files belonging to the program you’re using.
Your PC should run a bit faster the next morning, making you wish your messy garage came with such a handy one-click organizer.
Installing a new hard drive inside your PC is fairly easy; it’s almost like sliding a shoebox into a hall closet. That’s because hard drives slide into standard-sized parking places called docking bays that live inside your PC. Plug two cables into the drive, and when you turn on your PC, it immediately recognizes the new drive. Even easier is attaching an external hard drive. The only real difficulties arise when you’re replacing a drive that has data you want to save. Then the job becomes extraordinarily difficult, expensive, and time consuming. Here’s how to distinguish between the easy jobs and the ugly ones.
Adding an external hard drive. Astonishingly easy, since this contraption is nothing more than a hard drive inside a box. Connect the drive’s cable to a port on your PC—usually USB or FireWire—and you’re done. Windows XP automatically recognizes the drive and assigns it a letter, letting the drive appear in My Computer. From there, you’re ready to fill it with your photos, movies, or any other digital spillovers that no longer fit on your C drive. Section 9.6.3 shows you how to add an external drive.
Note
External hard drives connect with one of two fairly new ports, USB 2.0 or FireWire. Before shopping, check to see which of these ports your PC offers (Section 1.8.1). If necessary, you can add the port to your PC by installing a card (Section 1.7).
Adding a second internal hard drive. Several steps up the difficulty ladder, this procedure requires buying a drive that uses the right interface, or connector. You must open your PC’s case; insert and screw down the drive; connect the drive’s cables; and, depending on the drive, move a little jumper to bridge two rows of pins. It’s fairly easy, but requires about a half hour’s time. Full details start in the next section.
Replacing a PC’s dead C drive. On the sweat scale, this operation rates much like adding a second internal hard drive, described above, but it’s a little easier because it removes much of the guesswork. Your replacement drive uses the same settings, cables, and screws as your old one. The time-intensive part is reinstalling Windows and your data, but that’s unavoidable whenever your C drive dies.
Upgrading your Windows drive to a larger drive. This one’s best left to professionals. Physically installing the replacement drive is easy enough. The hard part is moving all your data—including Windows XP—from the old drive to the new. Sometimes third-party software can make the move seamless. If not, you must reinstall Windows XP, reinstall and customize all your programs, and move all your data (if you know exactly where it’s stored) from the old drive to the new. The job can easily consume two or three days.
Hard drives come with one of two different types of interfaces—the connector that attaches it to your PC’s motherboard (Section 1.4). If the interfaces don’t match, you’ll end up like an American trying to plug an electric toothbrush into a European power outlet. Today’s drives come with one of two interfaces: IDE/ATA (Integrated Drive Electronics/Advanced Technology Attachment) and S-ATA (Serial Advanced Technology Attachment).
Before shopping for a new drive, you need to know whether to buy an ATA or S-ATA drive so it can connect with your PC’s motherboard. You can figure out which type of connector your PC uses by either of these two methods.
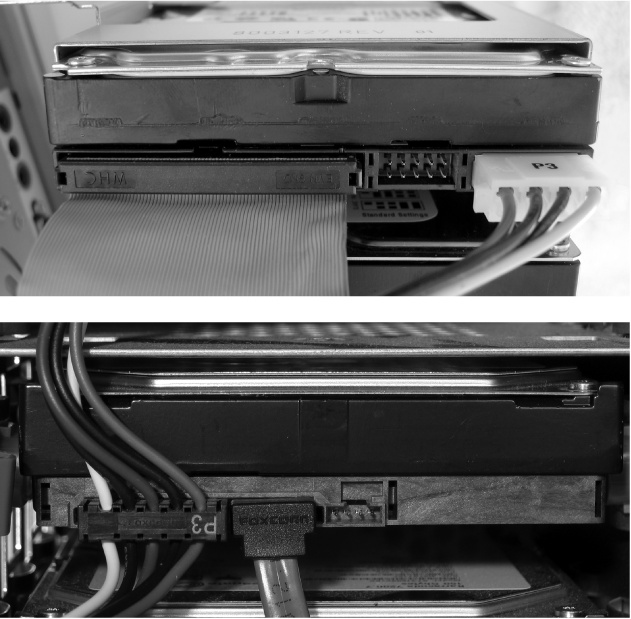
Visual inspection. Since you need to open your PC’s case anyway, open it now, and look for the two cables that connect to the current hard drive in your PC. One cable weaves its way up from the drive to the power supply. The other cable meanders down from the drive to a connection on the motherboard. If the motherboard’s cable looks like a two-inch-wide flat ribbon, as shown in Figure 9-6, top, your drive uses an IDE/ATA interface. If it’s a thin cable (Figure 9-6, bottom), your drive uses an S-ATA interface.
Figure 9-6. Top: The thick, 2-inch ribbon cable on this hard drive gives it away as an IDE/ATA drive—by far the most common interface found in PCs for the past 20 years. The four-wire cable to the drive’s right supplies electricity from the PC’s power supply. Bottom: The thinner cable on this drive identifies it as an S-ATA drive. S-ATA drives began appearing on more expensive PCs around 2003. The four-wire cable to the drive’s left supplies electricity from the power supply.
Research existing drives. Find the manufacturer and model number of your existing drive. (Start → Control Panel → System → Hardware tab → Device Manager. Double-click “Disk drives” and double-click the name of your drive.) If you’re lucky, you see both the drive’s manufacturer and the model number. If you just see a model number, search on Google for the manufacturer’s name and Web site. Visit the site, look up the model number in its Downloads section, and read that drive’s specifications.
Note
You may hear IDE/ATA drives referred to by a wide variety of names, including EIDE, UDMA, ATA/66, ATA/133, ATA/166, and others. Those terms relate to how the drive fetches information and the speed the drive grabs it, not the connector it uses. Treat these drives as more or less synonymous with a plain IDE/ATA drive. Most fairly new PCs shouldn’t have a problem with them.
Once you know what type of drive to shop for, either IDE/ATA or S-ATA, you must weed through all the specifications listed on the sales sheets to choose a drive that meets your needs.
Capacity. Hard drives come measured in gigabytes, with 40 GB being the low end of the scale and 400 GB being on the high end. If you’re doing mostly word processing, a fairly small drive’s fine. But if you’re editing video or graphics, or storing lots of digital music or photographs, aim toward the larger end of the spectrum. (An hour of digital camcorder footage eats up 13 GB all by itself, and editing it usually requires making a copy.)
Speed. Most drives spin at 5,400, 7,200, or 10,000 RPM (Revolutions Per Minute). The faster the drive, the less time you’ll wait when loading large files. But you rarely need much speed unless you’re editing video or doing high-end graphics work—chores that constantly pour information on and off of your hard drive. If your work centers around Web browsing, word processing, and other less-disk-intensive chores, pick up a slower drive and pocket the price difference. (Backup drives, since they usually run unattended in the evenings, are perfect candidates for slower speeds.)
Average seek time. Measured in milliseconds, this rating determines how quickly your drive can locate a particular piece of information. Yes, it’s measured in milliseconds, so it’s rarely noticeable until you grab lots of small pieces of information, like when moving a huge folder of small files from one place to another. You can still work while your PC fetches files in the background, so don’t give seek time much weight.
Buffer. Your drive examines the files it grabs for your PC, and then grabs a few extra files it thinks your PC may want next. It sticks the extra files into its own speedy memory—a buffer—in the hopes the PC will return for it. If the PC returns for it, the buffer dishes up it up, about five times faster than normal. A buffer of about 2 MB works fine for most tasks.
Warranty. Most drives come with warranties from one to five years, but don’t wrinkle your brow much over warranties. If a drive works fine for its first week, it usually lasts more than six or eight years—which is probably longer than the life of your PC.
Cylinders, heads, and sectors. A decade ago, hard drive installers needed to tell this information about the drive’s inner workings to their PCs. Today, the PC’s BIOS (Section 17.2) figures it out automatically. Don’t bother evaluating your potential new drive based on any of these specifications.
LAPTOP LIFE: Upgrading Your Laptop’s Hard Drive
Not a task for the timid, upgrading a laptop’s hard drive involves working with tiny screws, fragile connectors, and cramped spaces. Plus, upgraders face the problem of moving both Windows and their data off the old drive and onto the new one. Most owners bite the bullet and let a shop handle the job.
As an alternative, consider a small portable hard drive. Western Digital’s Passport series shown here, for instance, packs 80 GB of space into a rugged palm-sized drive. The little beggar draws power from your laptop’s USB port, saving you from adding yet another power supply to your laptop bag. An external hard drive also provides an easier-to-carry solution if you’re using only your laptop to transport its files. Instead of lugging the laptop, copy the files to the portable hard drive. Then bring the drive and leave the laptop back at your desk.
The drive fetches a premium price, since you’re paying for
both the metal box and the extra electronics stuffed inside. But
compare its price to the estimate the shop gives you for
installing a new drive and copying all your data
from your old drive to your new one.
It’s much easier to add extra storage to your PC by plugging in an external hard drive. By enclosing a drive and its electronics in a box with a USB or FireWire port, manufacturers have made installation as easy as a plugging in a mouse. You don’t need to open the PC’s case, find the right connectors, and hope you bought the right drive for your PC. External drives cost a little more than an internal hard drive, but by plugging it in yourself, you save the cost of a trip to the repair shop.
Some people prefer external hard drives for several other reasons, as well.
Backups. External hard drives make it so easy to back up your PC that you may be cursing yourself down the road if you don’t install one. You don’t want to lose your digital shoebox full of family photos. Backing up information to a portable external drive has the added advantage of letting you keep the backups in a separate location (like the office), away from your PC. If your house burns down, you may lose your family heirlooms, but at least your MP3 collection stays safe. Some external hard drives come with backup software included.
Transporting information. External hard drives are almost as portable as CDs, but give you a hundred times the storage. With an external hard drive, you can easily move large files from one PC to another. These data suitcases let you move digital video from your home office PC to the PC connected to your TV for quick viewing. An easily detachable hard drive also lets you grab your data and run during an emergency, preserving all your records.
Stashing information. External drives give you the luxury of storing large files you’re not quite ready to delete: downloaded movies, music, games, programs, or even that little flash animation cartoon you saved for your friends to see. Some people store backup copies of their music CDs, so they can create a new CD if their car’s CD player eats the original.
Security. For the ultimate in security, keep your personal data on an external hard drive and stash it in a safe or security deposit box while you’re on vacation. To keep your personal data absolutely safe from hackers who have found the latest unpatched browser exploit, unplug the hard drive when you’re online. If you share computers with roommates, your own removable hard drive lets you keep your data away from the PC unless you’re the one at the keyboard.
Follow these steps to install an external hard drive on your PC.
Plug the drive’s power adapter into the wall.
All drives need power, and most draw it from the wall itself. Some small portable drives aimed at the laptop market draw the power straight from the USB port; those drives will work on a PC, as well.
Connect the drive to your PC’s USB or FireWire port.
Most drives come with their own cable that uses either USB or FireWire. Connect the cable between the port on your drive and the USB 2.0 or FireWire port on your PC. If your PC doesn’t include the USB or FireWire port you need, install one by installing a card (Section 1.7) into your PC.
Windows XP doesn’t need drivers for most external hard drives, and it recognizes them as soon as you plug them in. Make sure you’ve installed Windows XP’s Service Pack 1 or 2, however, or your PC won’t be able to use its USB 2.0 ports at full speed. It’s easy to check your PC’s USB 2.0 friendliness level (Section 1.8.2.1).
Test the drive.
When you plug in the drive, Windows XP’s My Computer recognizes it, assigns it a drive letter, and lists it in My Computer. Double-click the new drive letter in My Computer to open it up, and then copy a few files onto it to make sure it works.
Warning
To keep from losing any data, let Windows XP know before you unplug a drive from your PC. Click the drive’s icon on the taskbar, choose Safely Remove USB Mass Storage Device, and wait until Windows XP says the drive’s been disconnected. That gives Windows XP time to save any last bits of data to the drive before you unplug it.
Installing a second hard drive into your PC takes a lot more effort than plugging in an external hard drive. However, an internal drive’s cheaper, faster, and doesn’t take up desk space or wall outlets. Here’s how to add a one to your PC:
Buy a drive.
Be sure to buy the drive that supports your PC’s interface, either S-ATA or IDE/ATA. Section 9.6.1 shows you how to determine which format’s suitable for your PC.
Turn off the PC and remove its case.
This procedure’s covered on Section 1.3.
Set the drive’s jumper settings, if necessary.
Skip this section if you’re fortunate enough to be installing an S-ATA drive.
If you’re installing an IDE/ATA drive, on the other hand, here’s the problem. Two of these drives (that is, your original hard drive, and the new one you’re adding) connect to the same cable. Since your PC needs to know which drive it’s talking to, it gives the drives these unfortunate names: “Master” and “Slave.” You need to tell each drive whether it should respond to “Master” or “Slave.”
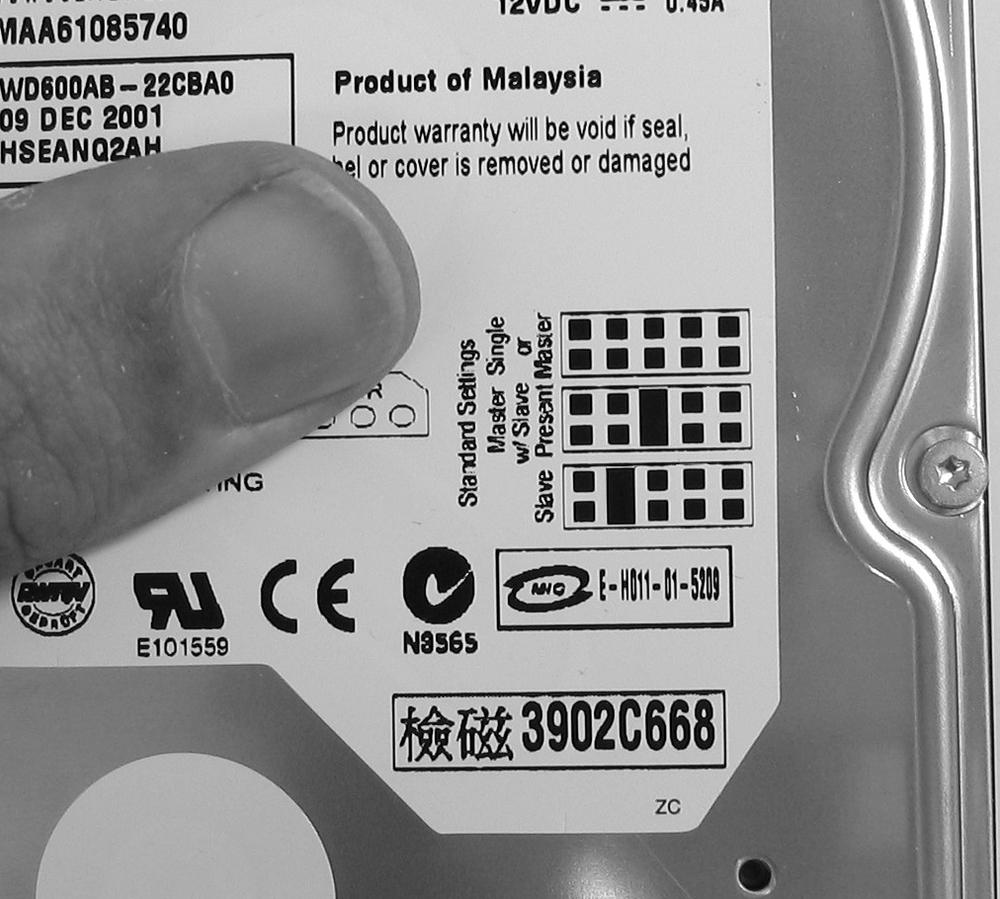
PC engineers decided that flipping a drive’s switch to either Master or Slave would be too easy. Instead, they make you snap a tiny plastic cover, called a jumper, over certain rows of pins, as shown in Figure 9-7.
Figure 9-7. Every drive’s label includes a little diagram that shows its two rows of pins, and which pairs of those pins you should cover with a jumper to designate the drive as either “Master” or “Slave.” Take a look the diagram on your drive to see which pair of pins you need to cover. Then grab the jumper with a pair of tweezers and push it onto the pair of pins that matches the setting you want for that drive.
If you’re replacing your existing (and presumably dead) C: drive, set your new drive to Master. If you’re adding a second drive, set its jumper settings to Slave.
Note
Some drives use a newer setting called Cable Select. To see if yours does, look at the connectors on the drive’s ribbon cable. If one connector is marked “Master,” and the other connector’s marked “Slave,” then set the jumpers on both drives to “Cable Select.” The PC then names the drives according to what cable connector they’re plugged into, either Master or Slave.
Insert the new drive into the docking bay.
If you’re replacing an existing drive, slide the old drive out of its bay (Figure 1-2) and slide the new drive in to replace it. Fasten the new drive in place using the old drive’s screws or latches.
If you’re adding a second drive, slide it into the bay adjacent to the existing drive. Then fasten it in place with screws and/or latches. Most computer stores sell mounting screws or latches; if they don’t, your PC manufacturer probably sells them.
Attach the two cables, one for power and the other for the motherboard.
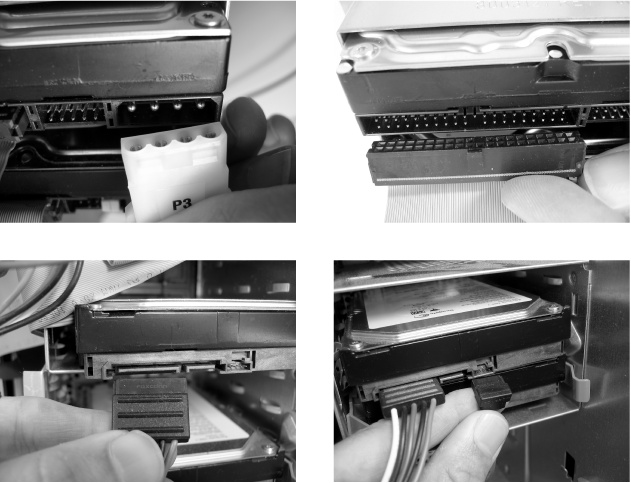
One cable connects from the motherboard to the drive; the other cable sprouts from a bundle of cables connected to the power supply. The cables fit onto their connectors in only one way, keeping you from accidentally pushing one into the wrong place or upside down. Push them into their drive’s connectors as shown in Figure 9-8.
Figure 9-8. Top left: The ATA drive’s power cable connector, known as a “Molex” connector, requires quite a bit of force to push into the drive’s four-pin connector. Top right: The ATA drive’s wide ribbon cable fits into the drive’s connector one way; make sure the little notch on the cable’s connector meshes with the little groove on the drive’s connector. Bottom left: The S-ATA drive’s power connector is the larger of the two cables. Bottom right: The S-ATA drive’s small motherboard cable pushes onto the drive’s small connector.
Turn on your PC.
Don’t bother putting your PC’s case back on until Windows starts up; you may need to tweak the jumper settings. If Windows doesn’t load or the PC doesn’t recognize the drive, make sure you set the drive’s jumpers to the correct setting. Also make sure you pushed in the connectors all the way.
Partition the drive with Windows XP.
Windows refers to all the space on a new drive as “unallocated” and won’t touch the new drive until you stake out a partition—a designated spot on the drive—and tell Windows XP it can start playing with it. Windows XP’s Disk Manager (Start → right-click My Computer → Manage → Disk Management) is your control center for making these changes.
Disk Manager lists all your attached drives, including hard drives, CD and DVD drives, and even drives attached through USB ports. The drives with blue bars across their tops are partitioned, and ready to work. Drives with black bars receive the name “unallocated,” which means they need a partition.
To partition your newly installed drive, right-click it in Disk Manager and then choose New Partition. The New Partition Wizard wakes from its slumber and leads you through creating a partition (see Figure 9-9).
Choose Primary, select the Wizard’s suggested size, drive letter, and formatting values, and Windows XP begins preparing the drive—which could take longer than it took you to install the thing. Formatting a large drive can take more than an hour.
When you plug an external hard drive or card reader (Section 5.3) into your PC, Windows XP handles the background chores automatically so you can concentrate on more pressing matters, like checking your new digital photos to see that awesome close-up of the bumblebee landing on the flower.
Those background chores include assigning the drive a letter, so it shows up in My Computer as a bona fide destination. Windows XP normally assigns new drives the first unclaimed letter of the alphabet. For instance, if your hard drive owns “C” and your CD drive grabs “D,” your new hard drive ends up with “E.” My Computer lists drives alphabetically, so your two drives won’t be next to each other.
If that bothers you, Windows XP lets you change a drive’s letter, giving your new drive the “D” and bumping the CD drive to “E.” Although this all looks better cosmetically, changing drive letters often confuses your PC in several ways:
Programs. Programs remember the drive letter that gave them birth, not the drive itself. The next time you try to install a new feature in Word, for instance, the program will protest with an error message, saying it didn’t find its installation CD in the correct drive. CD burners will continue to look for CDs using the wrong letter as well. Eventually some programs catch on to your switch, but prepare yourself for many error messages early on.
Playlists. Some playlists (Section 8.4.2.2) from Media Player, iTunes, and other programs remember file locations by using the drive letter. If you move your songs to a drive with a new letter—placing them on a portable hard drive, for instance—you may need to recreate any playlists containing those songs.
Networks. Be prepared to recreate any shortcuts pointing to drives with newly changed letters.
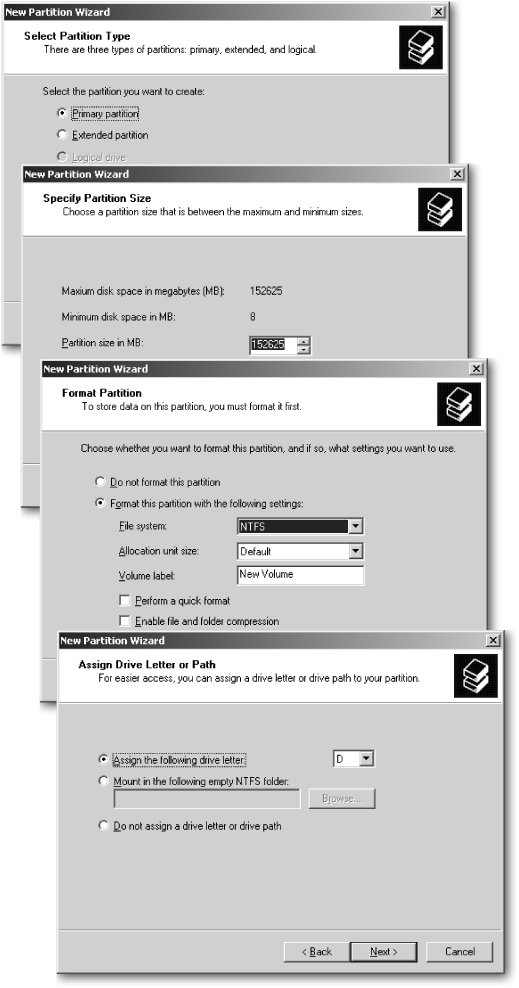
Figure 9-9. Windows XP’s New Partition Wizard walks you through the process of introducing a new drive to Windows XP by partitioning, formatting, and assigning the new drive a letter. Most people keep things simple by creating one large partition from the entire drive, and then accept all the wizard’s suggested values. Other people break the drive into several partitions, using the different partitions to run other operating systems like Linux or older versions of Windows versions (so they can run software Windows XP has trouble handling). To save time when formatting previously used drives, turn on the “Perform a quick format” checkbox (second figure from the bottom). Using the quick format option tells the wizard not to bother scanning the disk for bad sectors, saving oodles of time.
But if you’d rather annoy your programs than live with a letter scheme that annoys you, change a drive’s letter by opening Windows XP’s Disk Management program (Start → right-click My Computer → Manage → Disk Management). By right-clicking a listed drive’s name, you can change or remove its currently assigned letter. Figure 9-10 demonstrates the procedure.
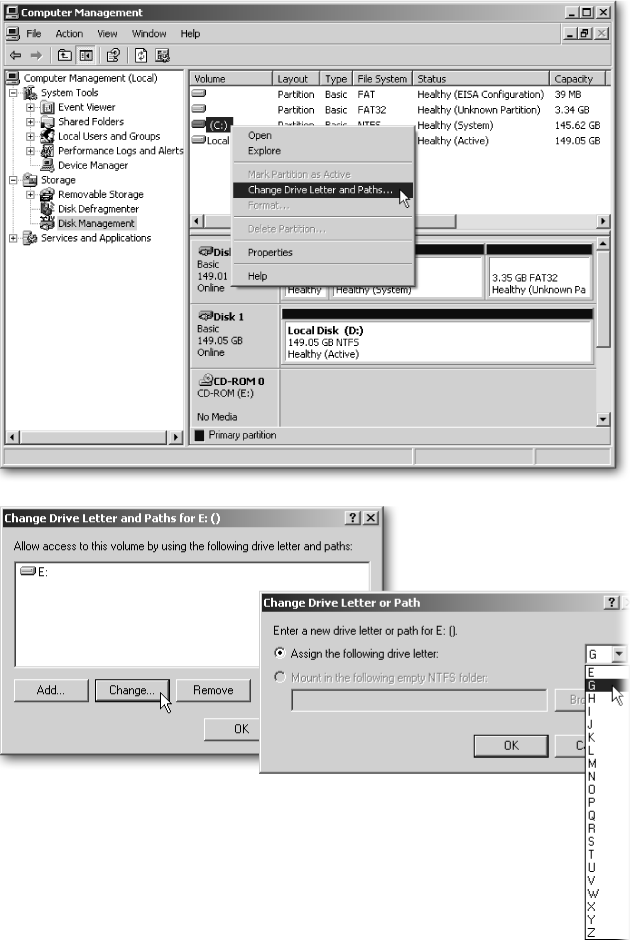
Figure 9-10. Top: Right-click the name of the drive you want to change, and choose Change Drive Letter and Paths. Bottom: Click the Change button to change the drive’s letter, and then select the drive’s new letter assignment. If you want to swap two drive’s letters, don’t choose Change. Instead, click each drive and choose Remove to remove their assigned letters. Once you strip the drives of their letters, reassign different letters by clicking them and then choosing Change.
Windows XP won’t let you change letters assigned to your floppy drives (they always snap up A and B). Nor does it let you change your C drive—Windows XP insists on living on the C drive. But any other drives are fair game.
New drive letters can make networked drives (Section 14.8.5) easier to remember as well. If all your digital music lives buried on a folder inside another computer, for instance, create a Mapped Network Drive with the letter “M.” To go really wild, create a “J” folder that leads straight to your Jimi Hendrix files.
Hard drives are pretty dependable. But if you ever notice your drive making any unusual noises, like clicking, buzzing, or scraping sounds, stop working and back up your information as quickly as you can, preferably to a portable hard drive or a networked PC. Those noises usually mean that the drive’s readers are scraping the platters that contain data. Performing a backup (Section 15.1) may be your last chance to save your data.
When you’re done with the backup, turn off your PC, and check the backup on another PC. If it’s good, breathe a sign of relief. If some of the data remains missing, take your drive to a data recovery specialist and ask for a retrieval estimate. Compare the cost to the value of your data and make your decision.
If you suspect that your hard drive is on the blink, confirm or alleviate your fears by giving it a checkup. Windows XP offers a small error-checking clinic (right-click the drive and then select Properties → Tools → Check Now). But for a real thorough diagnosis, download the error-checking program offered by the drive’s manufacturer. (Section 9.6.2 explains how to find the drive’s model and manufacturer.)
Visit the manufacturer’s Web site and download their diagnostic program from their Customer Support or Downloads area. Since Windows XP clings so tightly to your drive as it runs, some of these diagnostic programs come in the form of ISO files—images of a CD that you need to first burn to a CD using your CD burner program (Section 10.9). When you’ve done that, insert the burned CD, and then restart your PC; your PC loads the program from the CD, before Windows XP gets its grip on the drive. That lets the program examine all of your drive, giving you the most thorough analysis possible.
Here are some of the more popular tools for different hard drive brands:
Seagate’s SeaTools Diagnostic Suite (http://www.seagate.com)
Maxtor/Quantum’s PowerMax (http://www.maxtor.com)
Western Digital’s Data Lifeguard Diagnostic for Windows (http://www.wdc.com)
Fujitsu’s ATA Diagnostic Tool (http://www.fujitsu.com)
IBM/Hitachi Drive Fitness Test (http://www.hitachigst.com)
You can search for these programs on their manufacturer’s site or download them from this book’s “Missing CD” page (http://www.missingmanuals.com). These custom-made programs are designed by manufacturers to work on their own drives; sometimes they even perform repairs.
Today’s cars constantly monitor their health. When you take a car to the shop for repairs, the mechanic doesn’t lift the hood as much as he plugs his PC into the car’s diagnostic center. It feeds him the codes explaining what’s going wrong, letting the mechanic replace the right part.
Since hard drives inscribe data onto disks sealed inside a metal box, you can’t inspect them for any damage. To keep an eye on them, hard drive manufactures invented Self-Monitoring, Analysis, and Reporting Technology, creating an acronym you know they were proud of: S.M.A.R.T. The S.M.A.R.T.-enabled hard drives take notes on their temperature, missed readings, errors, and other information. Then they send the information to you.
How? Unfortunately, not very well. Some motherboards read the drive’s S.M.A.R.T. signals each time you turn on your PC. If the drives send out any warnings, the PC displays it on the screen, leaving it for you to read before Windows takes the helm.
But if you suspect your drive’s having problems, visit the drive manufacturer’s Web site and download the S.M.A.R.T. utility. At Seagate’s Web site, for instance, a program probes your drive while you’re connected over the Internet, and it feeds you notice of any oddities that may signal impending doom (Figure 9-11).
Just as you must put shelves on a wall before storing your books, you must format a hard drive before Windows can store any files on it. Several formats exist, but Windows XP runs best on a hard drive formatted in NTFS (New Technology File System). It’s more secure and better suited to today’s larger hard drives—especially if you need to dump digital camera footage onto your hard drive. Some PCs still run Windows XP on an earlier format system called FAT or FAT32 (File Allocation Table), but converting these drives to NTFS is easy. Microsoft even offers to perform the transformation as an option if you’re upgrading your PC to Windows XP.
Note
You don’t lose any data when converting a FAT32 drive to NTFS. The data stays safe. The only caveat to keep in mind is that the procedure isn’t reversible. Once you convert a drive from FAT32 to NTFS, you’re stuck with NTFS. Since most people don’t have any reason to switch back, that doesn’t usually present a problem. If for some reason you do need to convert back to FAT32 from NTFS, make sure to first back up the NTFS drive’s data. Then reformat the drive using FAT32. When you’re finished formatting the drive, copy everything back over to the drive from wherever you backed up your data.
To see how your PC’s hard drives are currently formatted, choose Start → My Computer. Then right-click your hard drive icon, choose Properties, and look for the File system entry. If you spot the word NTFS, your hard drive’s already running NTFS. If you see FAT or FAT32, it’s time to convert your drive. It’s an easy process.

Figure 9-11. If you suspect your hard drive may be on its last legs, drop by the manufacturer’s Web site and download its S.M.A.R.T checkup utility. Seagate’s program checks your hard drive’s S.M.A.R.T. readings while you’re online, letting you know if the drive’s showing any signs of stress that signal it may soon fail.
Open a command prompt.
Click Start → All Programs → Accessories → Command Prompt.
Type:
convert drive_letter: /fs:ntfsInsert the letter of the drive you want to convert. For instance, to convert your D drive, you’d type
convert D: /fs:ntfsand press Enter.
Windows XP takes over from there, converting the drive immediately—unless you’re asking to convert the C drive, which is where Windows XP lives, that is. In that case, the utility converts the drive the next time you start your PC.
Floppy drives have gone the way of punch cards. Many PC makers no longer include floppy drives on new computers, and few people miss them. Before writing them off as horse-and-buggy relics, though, think about these reasons to keep a floppy drive in your PC.
Boot disk. When Windows XP acts up and doesn’t kick in when you turn on your PC, you may need another operating system to take over for troubleshooting. For years, floppy disks provided that operating system on what’s called a boot disk. Insert the floppy, turn on your PC, and the PC loads the operating system from the floppy. Today most people boot directly from their Windows XP CD when their PC won’t load, but floppies still come in handy for older PCs that don’t know how to boot from a CD.
Tip
The Web site BootDisk (http://www.bootdisk.com) offers a wide variety of boot disks for troubleshooting PCs from DOS, an older operating system that rarely fails to load, as well as for loading older versions of Windows for troubleshooting purposes. When a PC won’t load, a boot disk’s skeletal frame provides enough structure for you to navigate to your My Documents folder and retrieve important files.
Password Recovery Disk. Windows XP turns a floppy disk into a key that lets you back into your User Account, should you forget your password. To create a Password Recovery Disk, choose Start → Control Panel → User Accounts. Click your User Account, and then click “Prevent forgotten password” in the upper left-hand corner. Windows XP guides you through creating your own Password Recovery Disk. (This procedure works only for your User Account.) Keep the floppy in a safe but handy place should a forgotten password ever lock you out of your own computer.
Flashing firmware. Your PC’s motherboard and other parts come with tiny morsels of software written directly onto their circuits. Known as firmware rather than software, this data occasionally needs updating, usually by booting from a floppy that contains an automatic firmware installation program.
Utilities. Some utility programs need to boot from a floppy, which lets them control your PC before Windows XP gets its hands on your machine. That lets the programs do things like wipe the hard drive clean before you sell it or give it to a friend.
Backup. Microsoft’s built-in Backup program won’t save data to CDs, but it does work with floppies. Sure, you need a stack taller than a stalagmite to back up your hard drive, but for small jobs, they’ll do the trick.
Floppy drives offer one other peculiarity compared to hard drives: when you delete files from a floppy disk, Windows XP deletes them; it doesn’t send them to the Recycle Bin for possible retrieval. If you really need to recover the deleted files, use an undelete program provided by many security programs or download Brian Kato’s Restoration (http://www.geocities.jp/br_kato).
Most floppies sold in stores today are preformatted, meaning they’re ready for Windows XP to save data to them. (If your local stores no longer carry floppies, Amazon [http://www.amazon.com] still offers them for sale.) But if your PC can’t read a floppy, formatting it may give it a second life. Formatting deletes anything stored on the floppy, but if you can’t read anything from it, you don’t have much to lose.
To format a floppy, insert it (label side-up) into your floppy drive, and then right-click it in My Computer. Choose Format, and then click the Start button. If Windows XP has trouble formatting the floppy, throw it away and start with a fresh one. If a floppy can’t be formatted, it’s not worth saving.
Chances are slim that you still need a floppy drive. But if you find yourself in need of a new or replacement floppy drive, think about buying an external drive that simply plugs into your USB port. That lets you plug it into any PC you want, including your laptop.
If one of the PCs on your network has a floppy drive, share the drive via the network (Section 14.8.5). You can’t boot from a shared floppy drive, but you can read and write files to it.
If you still want to install an internal floppy drive, look for one that combines a floppy drive with a card reader or some easily accessible USB ports. You may end up using those features more than the floppy drive itself.
Whether you’re replacing an existing floppy drive or adding one to a PC, follow these steps.
Choose a drive bay, remove the drive’s face plate, if necessary, and then slide in the floppy drive.
Like space ships, floppy drives slide into a docking bay. Those rectangles along the front of your computer are actually face plates for your PC’s docking bays. (Your CD drive lives inside a docking bay, as well.) Pry off the plastic face plate, if necessary, usually working from the inside out.
If you’re installing a 3 ½” drive into a 5 ¼” bay, you need a special front panel to fit; most floppy drives come with one.
Slide the floppy drive into the bay, ugly end first, so the slot for feeding floppies lives in front.
Connect the ribbon and power cables to the floppy drive.
Just like hard drives, floppy drives need two cables. The ribbon cable connects between the drive and the motherboard, and the four-wire cable comes from the power supply.
Ribbon cable. This flat ribbon cable pushes into the drive’s long connector, which looks just like the one in Figure 9-8, top right. The ribbon cable’s other end pushes into a similarly shaped connector on the motherboard, right next to where the hard drive plugs in. (The motherboard’s floppy connector’s marked “Floppy” to distinguish it from the hard drive connector, usually called “IDE 0,” “IDE 1,” or “IDE Pri.” A little notch on the ribbon’s connector meshes with a little groove on the motherboard’s connector to keep you from pushing it in the wrong way.
Power cable. Many strands of cables dangle from the back of your power supply. Most connect to the other drives, but the one that fits into the floppy drive should be hanging unused. Pull off its plastic cap, if necessary, and push it into the drive.
Other cables. If your new floppy drive came with other goodies—USB ports, for instance, or card readers—connect their cables to the USB jacks on your motherboard. (If you can’t find one, look at the cables from your PC’s existing USB ports. You may need to steal one of their cables to connect it to your new, more easily accessible port.)
Tighten the drive in place.
See how the little screws hold your hard drives and CD drives to the side of the metal docking bay? Screws hold the floppy drive in place the same way. If your floppy drive didn’t come with screws, they’re sold at any computer store.
Turn on your computer.
Your computer notices the newly installed floppy drive as soon as it starts up, tells Windows XP about it, and lets you begin using it immediately.
If your PC doesn’t notice your new floppy drive, however, it’s time to head for your PC’s BIOS (Section 17.2), that mysterious area in charge of telling your PC what’s connected to your motherboard’s ports.