
Printers let you move work from your monitor to paper. But when you need to move things in the other direction—from the printed page to your monitor—nothing beats a scanner. Scanners once lived only on the desktops of graphics professionals; today, they’re so inexpensive that they’re just as affordable as a printer. For a growing crowd of consumers, they’ve also become just as indispensable.
And scanners come with one advantage that almost all other PC accessories lack: no lingering costs. Scanners don’t require periodic refreshing of paper, ink, batteries, or memory cards. They’re especially handy for people without digital cameras; a $75 scanner lets them email their photos to friends, just like the hip crowd does with their $200 digital cameras.
Scanners also provide the missing link for your modem’s built-in fax, letting you fax printed letters and forms. (For tips on using your fax, check out the online appendix, “Other Cool Things You Can Do Online,” available on the “Missing CD” page at http://www.missingmanuals.com.) Plus, scanners turn your PC into a make-shift copy machine: scan an item, and then send it to your printer for quick copies.
This chapter explains how to choose a scanner, set it up, and scan color and black and white photos, as well as line drawings, receipts, and pretty much anything else that fits on a scanner’s bed.
You’ll find these three types of scanners on the shelves at most office supply and computer stores.
Flatbed (price range: $50 to $200). Flatbed scanners hide a large plate of glass beneath a large lid. Lift the lid, place your photo or other item on the glass, and close the lid. When you tell Windows to scan, the scanner converts your photo or other item into an image file. Flatbed scanners are the most popular model for consumers because they work so well at the most common tasks: scanning in occasional photos, articles, receipts, and handwritten documents. Once you scan something, you can save it, reprint it, or send it to friends or coworkers.
Sheet-fed (price range: $400 to $1,000). Sheet-fed scanners are built for scanning lots of items quickly. Instead of standing by the scanner, constantly lifting and closing its lid for each scan, you simply insert your stack of pages into the scanner’s feeder tray. The scanner’s spinning rollers suck in each page, scan it, spit it back out, and grab the next. Built for speed, they carry a sports car price tag compared to flatbed models.
Unless they come with a detachable document feeder, sheet-fed scanners are limited to scanning sheets of paper—ruling out quick scans of vintage album covers, bound books, cloth, flowers, or other items that end up on the flatbeds of the adventurous.
All-in-One (price range: $150 to $300). These scanners come as part of an all-in-one printer (Section 4.1.3), which places a scanner atop a printer, and then throws in the smarts of a copier and fax machine. All-in-one models pack four gadgets into something that costs much less than the sum of its parts. These devices are heavy, making them awkward to carry in the front door, as well as move from one room to another. And the individual components are never as versatile as the dedicated models. But if you’re shopping for both a scanner and printer, they’re certainly convenient, and you can’t beat the cost savings.
Installing a scanner works pretty much like installing a digital camera, but with one exception: Windows XP embraces most digital cameras as soon as they’re plugged in. Installing a scanner, by contrast, works better if you install the scanner’s bundled software before plugging in the scanner.
Follow these steps to connect your scanner to your PC.
Tip
Lost your scanner’s connection cable? Most scanners use USB or FireWire cables, which are available at any computer or office supply store.
Install the scanner’s installation software.
Install the software before plugging in the scanner. That way Windows XP recognizes your new device as soon as you plug it in.
Unlock the scanner, if necessary.
To keep the UPS man from banging around a scanner’s large and sensitive lenses, most scanners come with a built-in mechanical locking mechanism inside that clenches all the delicate parts together tightly. You need to unlock the scanner before using it, or you’ll hear frightening grinding sounds.
Unlocking most models simply means turning a switch along one side of the scanner; on more advanced models, you need to unscrew a panel along one edge of the scanner to access the switch. Some locking switches hide beneath a strip of bright-plastic tape that says, “Unlock before use.”
Plug the scanner into the wall, and turn on its power switch.
The scanner’s light turns on, and the scanner makes some reassuring power-on test noises.
Connect the scanner’s cable to your PC.
Most scanners plug into a computer’s USB 2.0 (Section 1.8.1) or FireWire (Section 1.8.3.1) port. Both ports let the scanner send large amounts of data to your PC as quickly as possible. Don’t have the right port on your PC? They’re easy enough to install (Section 1.7). (A USB 2 scanner still works when plugged into an older USB port, but the connection’s pretty darn slow; see Section 1.8.2.1 for instructions on how to figure out what flavor of USB port your computer has.)
When you’re finished with the installation, your PC recognizes your scanner, automatically locates the software you installed in step 1, and adds its icon to your My Computer list of attached scanners and cameras (Start → My Computer).
Chances are, your PC lets you control your scanner in three different ways: using Windows built-in scanning wizard; using your graphics program’s own menus; or using the scanner’s own software. Here’s the rundown on each method and when to select it.
Windows XP’s Scanner and Camera Wizard. This wizard works well for quick, on-the-fly scans: faxing documents, placing images on a Web site, emailing them to friends, or for treating your scanner like a simple copy machine. If you want to summon the wizard when using a graphics program, look for the menu choice labeled WIA, which stands for Windows Image Acquisition. Most programs stick their WIA choices in the File → Import menu. Full details on how to use the scanner wizard start on Section 6.4.
The easy-to-use wizard offers another bonus: the wizard works the same way on every modern scanner. Once you learn the wizard’s controls, you can apply those skills to operate the scanner at work or a friend’s house, or even on your next scanner.
TWAIN. Whereas Windows XP’s wizard resembles the easy-to-operate, “Point and Shoot” setting on a camera, TWAIN is like switching the camera to “Manual. " Here, you can adjust a scan’s size by tenth-of-an-inch increments, save “presets” of custom settings, tweak color values, and perform other adjustments valued by those who need them—but TWAIN’s not essential for most jobs.
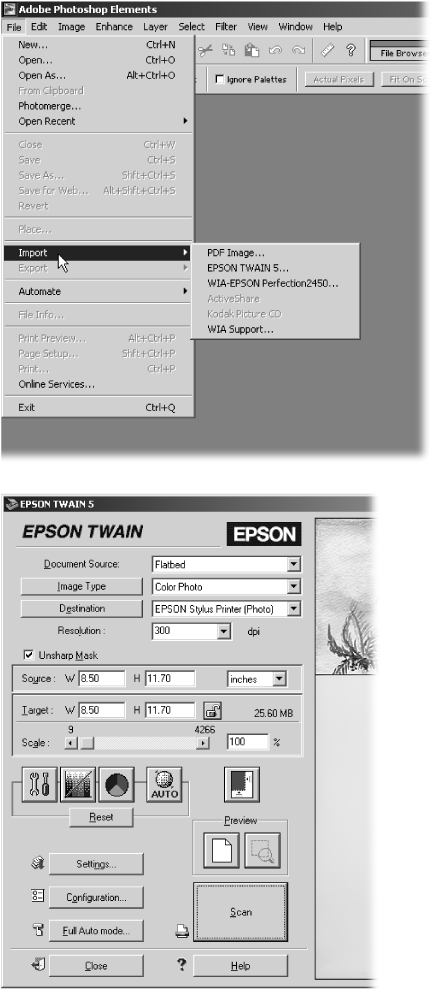
A nonprofit group created TWAIN in the early 90s as a way for software and scanners to talk to each other—quite a feat in those days. Most scanners and graphics software still support TWAIN. For instance, choosing TWAIN in Adobe Photoshop Elements brings up the advanced controls shown in Figure 6-1, which let you tweak settings that the wizard can’t—helpful when choosing specific settings requested by a friend, coworker, graphics shop, or a particular piece of software.
Note
Unlike most juxtaposed uppercase letters in TechTalk, TWAIN isn’t an acronym. Rather, the words refer to a line in Rudyard Kipling’s “The Ballad of East and West:” “And never the twain shall meet.” The words summed up the frustration of connecting scanners and PCs in the early 90s.
Figure 6-1. Top: The menus in popular graphics programs like Paint Shop Pro, CorelDraw, and Adobe Photoshop Elements (seen here) let you control your scanner directly in different ways. The Photoshop Elements menu here, for instance, lets you import the attached scanner’s images using either TWAIN or WIA (Windows’ built-in “wizard”). Bottom: Choosing TWAIN from the Photoshop Elements menu brings up this window, which lets you tweak your scan’s color, size, and exposure settings, much like a digital camera’s manual controls. If you spot TWAIN listed on your graphics software’s menus, select it for a few test scans; you may prefer its controls over Windows XP’s built-in scanner wizard.
Scanner’s bundled software. Although many scanner manufacturers stick with TWAIN controls, others feel they can do better than the Windows wizard or TWAIN’s admittedly technical approach. So they write their own set of controllers, usually trying to make things as simple as possible. The result is a program resembling the wizard, with the same ease of use, but adding choices tailored to your specific scanner model.
For instance, one scanner’s built-in software may offer an option for using an automatic sheet feeder or a Kodachrome slide holder. If the Windows wizard doesn’t offer what you need and TWAIN looks too complicated, give the scanner’s bundled software a try.
The bottom line? If you’re happy with Windows XP’s built-in wizard scanner controls, stick with it. But if you plan to spend a lot of time with your scanner, give each method a try; they each put a different steering wheel on your scanner.
A scanner is simply an enormous digital camera that points in a fixed direction: up. And just like a camera, your scanner comes with scads of settings that most folks live a long and happy life without ever adjusting. That’s where Windows XP’s built-in Scanner and Camera Wizard comes in. It’s your ticket to a remarkably pain-free scanning experience. Follow these steps for quick, almost decision-free scanning.
Clean your scanner’s surface, and place the item you want to scan in the upper-right corner of the scanning bed.
Before scanning, always wipe the scanner’s glass bed with a clean, lint-free cloth. Add a little rubbing alcohol to the cloth for the really nasty goo spots. You want to remove every dust speck before those fibers end up magnified 200 times on your scanned image. Place your image in the corner for one simple reason. Doing so squares the edges, so the image sits nice and straight in the scanned image you create.
Turn on your scanner, choose the Scanner and Camera Wizard (if necessary), and then click Next at the Welcome screen.
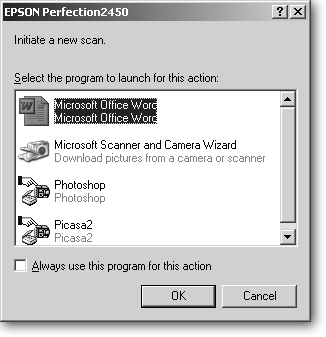
As soon as you turn on your scanner or plug it into your computer, the wizard appears with a greeting. When you click Next, the wizard lists all the programs on your PC capable of handling scans (Figure 6-2); your first decision is choosing the program you want to handle the job. For the quickest and easiest scanning, choose Windows XP’s built-in Scanner and Camera Wizard, the same sorcerer who conjures pictures out of your digital camera.
Don’t see the wizard? You can summon it manually with a double-click the scanner’s icon in My Computer. Don’t see the scanner’s icon? Then you’re probably limited to the software that came with the scanner, described in the “Installing a Scanner” section (Section 6.2).
Figure 6-2. Turn on your scanner, and Windows XP lists all the software on your PC capable of handling scans. Choose the Scanner and Camera Wizard for creating quick scans and saving them as files on your hard drive. If you select a graphics program like Photoshop, the wizard routes the scan into the software, letting you touch it up before saving it. That saves time when scanning old photographs, for instance, where you may need to repair tears and scratches.
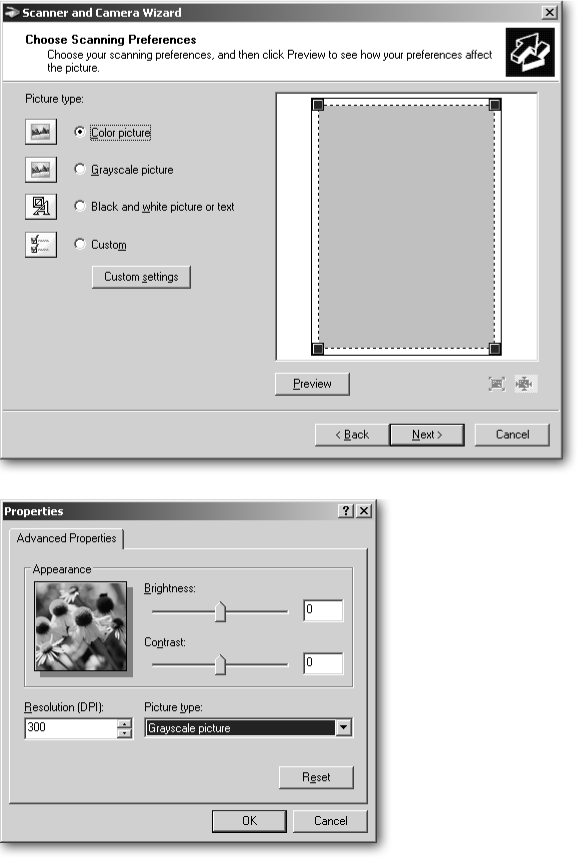
In an attempt to simplify matters, the wizard offers you four choices, shown in the top of Figure 6-3, each tailored to match the image you’re scanning: color photo, black and white photo, or text, each explained in step 5.
However, those choices don’t take account what you’ll be doing with your image. For instance, if you choose “Color picture,” the wizard scans the photo in at a resolution of 150 dots per inch (dpi)—twice the size you need when sending through email. (See Section 6.2 for a quick primer on resolution.) For best results, skip the wizard’s preset options and tailor your scans by choosing Custom.
Figure 6-3. Top: Although the first three preset options sound tempting, they’re too basic. For instance, choosing “Color picture” makes the scan too large to email, but too small to reprint later. For better results, choose the setting called Custom. Bottom: When you click Custom, this Properties box lets you choose a resolution suitable for whatever you intend to do with your scanned image. The Resolution’s menu lists all the resolutions your scanner can handle, usually 50 to 2400 dpi or more, but you rarely want anything more than 300. As a general rule of thumb, choose 75 dpi for items you’re going to email, 150 when using your scanner as a copy machine, and 300 for photos you want to print out. Select the “Picture type” to match what you’re scanning, and leave the Brightness and Contrast controls set to 0; you can adjust these settings much more effectively using imageediting software like Photoshop Elements. If you don’t have an image-editing program, the best thing to do is play with these controls using the trial and error method; your changes aren’t fixed until you click OK.
Choose the Resolution setting for your scan.
The wizard lets you choose any resolution your scanner offers. Resolution, measured in dots per inch (dpi), controls the amount of detail shown on your image, as well as its size. You want high resolution for printouts, for instance, but low resolution for items meant to be seen onscreen (email, for instance). If you’re feeling overwhelmed by the resolution options, use this table for guidance:
Table 6-1.
Scanned Item or Destination
Its Resolution
Onscreen (images sent by email or posted on a Web site)
75 dpi
Miscellaneous letters, receipts, and text (for archiving)
150 dpi
Line drawings (for faxing or printing)
200 dpi
Photos (for printing), or an article (to be converted to text with an OCR program; [see Section 6.4])
300 dpi
Scan only at resolutions higher than 300 dpi when you want to enlarge something tiny—a postage stamp, for instance—to view minute details.
Choose the type of picture you’re scanning.
The choices listed in the "Picture type” drop-down menu let your scanner know how many colors to grab—there’s no sense making a color scan of Doonesbury unless it’s from Sunday’s paper, for instance. Limiting the colors is an easy way to keep the file size manageable. Choose your image from one of these options:
Color picture. The natural choice for color scans. Selecting this option takes a color snapshot of anything you place on the scanner’s bed.
Grayscale picture. When scanning a black and white photograph or a newspaper clipping, choose this option. Doing so means your scan will preserve up to 256 shades of gray, which is what most people consider to be “black and white.”
Black and white picture or text. Don’t choose this for black and white photos, since the wizard narrows down the colors to either “black” or “white,” thereby turning Dalmatians into groups of small black spots. Choose this option only when scanning line drawings, text, diagrams, flowcharts, and other monotone items.
Tip
Choose “Black and white picture or text” when scanning in your signature. A scanned signature comes in handy for signing digital forms, like a rebate form downloaded from the Internet. Use Paint (Start → All Programs → Accessories → Paint) or other graphics software to paste your digital signature onto the Signature Here line of any form.
When you’re finished making all your selections in the Properties box, click OK.
Back in the Scanner and Camera Wizard main window, click the Preview button, “lasso” your image (if necessary), and then click Next.
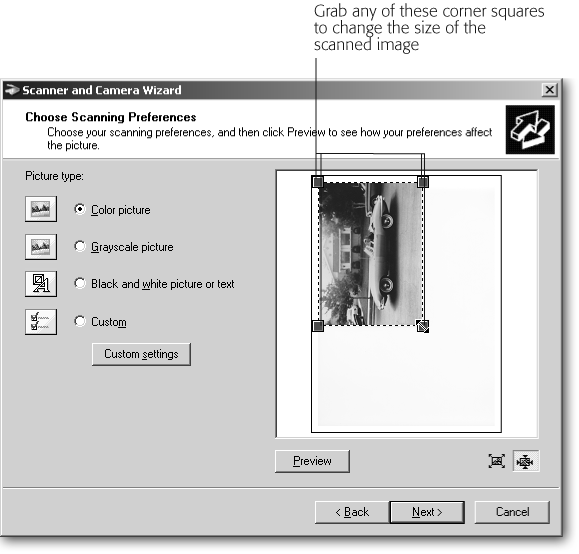
Don’t skip this important step: clicking the Preview button tells the scanner to make a quick scan, locate your image’s position, and “lasso” it—outline the image’s edges with a little square. By locating the image, the scanner then knows to scan only that portion of its bed. If you skip the preview, the scanner simply scans its entire bed, creating a huge file with your image floating somewhere inside.
The wizard’s usually pretty good with its lasso, but if it’s a little off target, drag inward or outward on the lasso’s little corner squares, as shown in Figure 6-4, until it completely surrounds your image.
Figure 6-4. When you click the Preview button, the scanner locates where you placed your item on the scanner’s bed. The dotted outline indicates movable borders. The wizard generally identifies the perimeter of your item fairly accurately, but often leaves out the white border around printed photographs. If you want your scan to include the border, drag the corner squares out a bit. Similarly, when scanning a page to fax, the wizard sometimes lassos only the outlines of the text. To scan the entire page, drag the corner squares out until they reach the page’s edge.
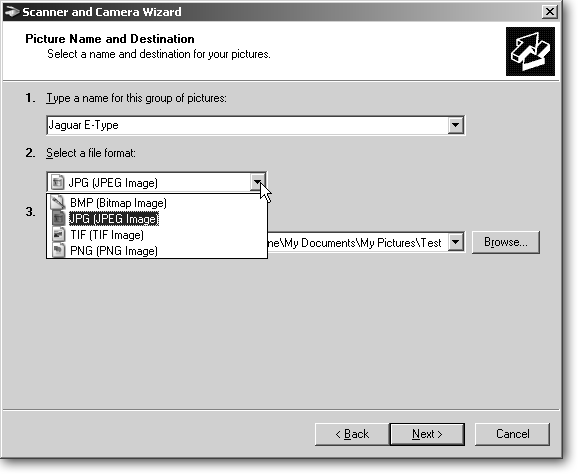
Choose a file format that matches your scan’s contents.
The “Picture Name and Destination” dialog box, shown in Figure 6-5, also appears when you retrieve photos from a digital camera (Section 5.2), but with one major exception: the scanner lets you choose the format it uses to save your file. Here are your options.
BMP (Bitmap image). Avoid this one, as it creates files large enough to store blimps. Nevertheless, graphics programs always offer it because BMP’s been around for years, and nobody collects patent fees on the format.
JPG (JPEG image). The best choice for photographs. JPG (Joint Photographic Experts Group) compresses photos by removing subtle nuances imperceptible to most mortal eyes.
TIF (TIF image). Choose TIF (Tagged Image File Format) when you can’t afford to lose any quality—when creating archives of family photos, for instance, or sending images to a print shop. The images are substantially larger than JPGs, but sometimes quality’s more important than saving on storage space.
PNG (PNG image). This works best for color images with smooth, defined edges—logos, for instance, color charts, or line drawings. Most Internet browsers support PNG (Portable Network Graphics), which is slowly replacing the old standard, GIF (Graphics Interchange Format).
Figure 6-5. Choose JPG for photos and nearly all other scans. Although the wizard doesn’t let you choose an image’s compression level, most graphics software does. Open an image in Paint Shop Pro, for instance, and you can watch the file as you compress it, stopping the compression when you notice the image quality drop.
Choose a descriptive name for your scan, select a folder in which to store it, and then click Next.
After choosing the file format, enter a descriptive name (in the “Type a name for this group of pictures” box) and select a storage folder for your scan. The wizard creates a folder with that name inside your My Pictures folder, and tosses in your scan using that same name. (Alternatively, you can click the Browse button if you want to select a folder on your PC that already exists.)
Choose Nothing to exit the wizard.
The wizard offers the same three choices as when you use it to transport digital photos to your PC (Section 5.2). None really belong here—few people would order prints of something after they’ve just scanned the print version, for instance—so choose Nothing. The wizard closes, dropping you off in the folder that holds your newly created scanned image file.
Once your document’s turned into a file, you can email it as an attachment (Section 5.5), fax it (described in the online appendix, “Other Cool Things You Can Do Online,” available on the “Missing CD” page at http://www.missingmanuals.com), or print it (Section 4.7).
Scanners let you retrieve dusty photos and slides from the closet and place them inside your PC for easy sharing with another generation. (A CD full of old photos makes a great gift for parents.) However, scanners faithfully digitize everything about your photos, including their scratches, thumbprints, faded images, lost colors, and the wild lighting shifts that occurred when grandpa messed up the camera settings. Restoring a photo takes much more time than simply scanning it onto your computer. When it comes to digitally preserving your old photos and slides, you have two options.
Scan them yourself. Many scanners come with attachments for scanning in slides and photographs. It’s a slow process, since each slide must be cleaned meticulously, scanned, and then touched up in a graphics program. Don’t clean the photos, though, as they’re easily damaged. Instead, remove their blemishes with the photo-editing tools found in most graphics software.
Scan them professionally. Some local camera stores offer photo restoration services; many companies offer the service through the Internet. Prices vary widely depending on the condition of the image. Some service providers charge a flat fee per photo; others charge an hourly rate. The U.S. National Archives and Records Administration (http://www.archives.gov/preservation/preservation/family_archives/ offers tips on caring for old photos, as well as recommendations for finding professional restoration services in your area.
Tip
If you choose to scan and restore old photos yourself, make sure you don’t do more harm than good. For instance, scan the photos directly from within the photo album you’re storing them in. Removing the photos, especially if they’re old and fragile, can easily cause damage. Don’t peel off any tape, either. The tape’s easier to remove using an image-editing program like Photoshop Elements.
Restoring damaged photos is an art, requiring detailed work using sometimes complex graphics software. If you’d like to take a stab at it, most graphics programs offer tools like a Clone Stamp that turns the mouse into a tool that blots out dust, scratches, and other blemishes, leaving the image relatively intact (see Figure 6-6). Expect to spend an hour or so correcting each photo’s blemishes.
On the positive side, even if you accidentally blot out Uncle Pete’s face, you can always press Ctrl+Z or choose Edit → Undo to put it back. And no matter what you do on the screen, the original photo stays safe.
Eliminate the obvious culprits by making sure your scanner’s plugged in, turned on, and plugged into your computer. If the scanner’s plugged into a USB hub (Section 1.8.3), try plugging it directly into a USB port. Also make sure you’ve installed the scanner’s latest drivers, which usually requires a trip to the Downloads or Support area of the scanner manufacturer’s Web site.
Your digital camera’s lens usually focuses on the people in front of it, so a few pieces of dust on the lens don’t matter. Your scanner keeps its gaze fixed directly on the glass surface, so any dust not only shows up clearly, it gets magnified. To keep little specks off your scans, thoroughly clean your scanner with glass cleaner before starting any scans.
Spray the glass cleaner on a cotton cloth, not on the scanner’s surface. Then wipe the glass free of any debris. Between each scanning session, wipe the cloth over the glass, being careful to remove any fingerprint smudges left from picking up the old item from the scanner surface.
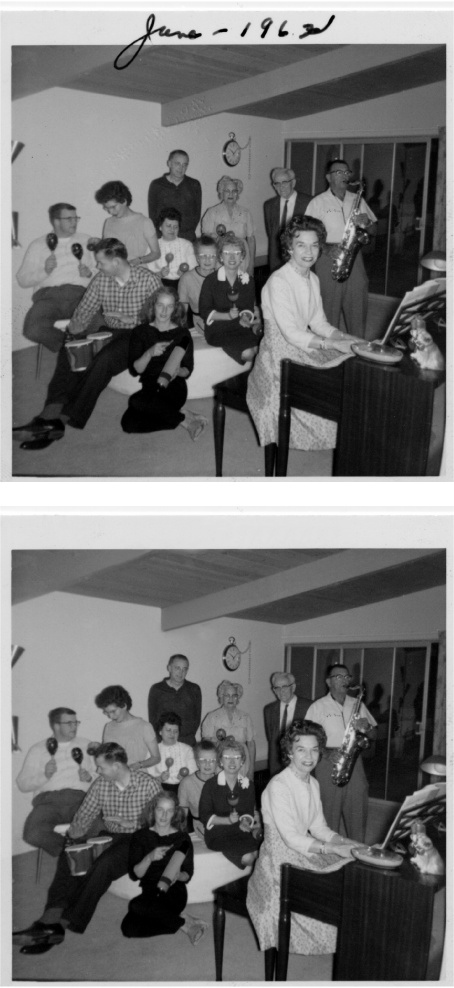
Figure 6-6. Left: Don’t try to remove tape or writing from a photo, as that almost always damages it in some way. Instead, scan the photo and make your changes using an image editing program. Right: Photoshop Element’s Clone Stamp tool lets you copy one area of the photo to another. In this case, the tool copied undamaged portions of the photo’s border over the written area, removing it. The tool also copied parts of the ceiling beam over the handwriting, to completely remove it.
These problems surface most often when scanning:
Grinding noises. Many scanners lock down their scanning mechanism during shipping. A grinding noise often means your scanner’s trying to run while its carriage is locked in place. Find the scanner’s lock (Section 6.2), switch it to off, and try again.
Lack of response from scanner or error messages. When the scanner stops responding, the problem usually boils down to a simple cause: you haven’t scanned anything in the last few minutes. After 5 to 10 minutes of inactivity, most scanners doze off into a power-saving mode. If you see an error window, click the Try Again button, repeatedly. After the seventh click or so, the scanner usually wakes up and scans your image.
The “one-touch” button doesn’t work. Some scanners offer “one-touch” scanning that lets you push a button on the scanner’s case for automatic scans using a preset resolution setting. Windows XP’s scanner wizard doesn’t support these types of buttons, which means that you need to install and use the scanner’s bundled software (Section 6.4).
Not enough memory or space. Scanners can create monster-sized files. If your scanner complains about not having enough memory or hard drive space, you’re probably trying to scan at too high a resolution. Reduce the resolution (Section 6.4) and try again.