
Not content to have pushed aside typewriters, fax machines, and copy machines, computers now replace stereos in some homes. The most tricked-out PCs serve as home theaters, with speakers dangling from every wall. Even low-budget models play CDs, ready to provide a soundtrack as you work through your day.
This chapter describes the sound-creation mechanisms inside your PC: its sound card, microphone, and speakers. You’ll learn how to set up all these devices and tweak their settings, so whether you’re playing games or hooking your PC up to a stereo, everything sounds crystal clear.
Also included is a quick guide to help you wade through the types of music files found on the Internet, and advice on how to choose the right ones for your digital music player—be it an iPod, or one of the zillions of others. Musicians will learn the basics of setting up a small recording studio. Finally, record collectors will find out how to move all their vinyl out of the closet and into their PCs, so they can finally switch from dusty to digital.
The circuitry dishing up sound and music within your PC is technically called a sound adapter, but most people and computer stores simply call it a sound card. That term comes straight from your PC’s history. Early PCs merely blurted out a single beep on startup, meant to reassure nervous owners that everything was working correctly. (More than two beeps, on the other hand, meant it was time to reach for the screwdriver.)
The only way to improve a PC’s sound back then was to spend $300 or more on a drop-in sound card (Section 7.1.1); most gamers gladly paid the premium. Today, all new PCs include stereo sound, but the circuitry lives in any of three different places—on the motherboard (Section 1.4), on a separate sound card, or inside a box that plugs into a USB port.
To see which type of sound adapter lives inside your own PC, take a look at where your speaker cable plugs in to the PC; that cable’s location shows you what type of sound circuitry your PC has.
LAPTOP LIFE: Sound Advice for Laptops
Built for portability over performance, most laptops usually squeak by with a pair of tinny speakers and, mercifully, a headphone jack. Some models toss in a microphone port, great for recording classroom lectures. That’s usually enough for people on the run, letting them plug in their iPod headphones while watching a DVD during a long flight.
Because laptops now outsell desktop PCs, many laptops are working the swing shift, computing on the road and back at the desktop. To give your laptop the same sound as a desktop, Creative Labs (http://www.creative.com) squeezed the circuitry from their most powerful sound card into the creditcard sized Audigy 2 ZS Notebook PC card shown here. Slide the $100 card into your notebook’s PC card slot, and it’s ready to power your room’s stack of speakers while you watch DVDs or play computer games.
The card’s designed to let your notebook take advantage of any sound situation you encounter, either at home or on the road. At a friend’s house, for instance, plug your laptop into her stereo while watching a DVD or playing a game to enjoy its five-speaker surround sound.
The card’s optical ports also come in handy for Digital Audio Tape and MiniDisc enthusiasts. If you’re one of these people, you can dump your bootlegged concert soundtracks directly onto a laptop’s hard drive in the car, burn quick CDs, and hand them out to friends in the parking lot.
The card’s way too powerful for the average notebook owner,
but if sound is important to you, this is your best option for
portable music power.
If the speakers plug into a port living next to your mouse and keyboard ports (shown at the top of Figure 7-1), your PC has integrated audio. That means the sound circuits are built right into the motherboard itself, a cost-saving option for your PC’s manufacturer, but possibly a quality-cutting measure for you.
If the speakers plug into a port living on one of several parallel metal strips (shown at bottom in Figure 7-1), your PC has a sound card. Sound cards often provide higher quality sound than circuits built into the motherboard.
If the speakers plug into a box that connects to a USB port (Section 1.8.1), the sound circuitry lives inside the plug-in box, which is handy for moving the sound capabilities from one PC to another.
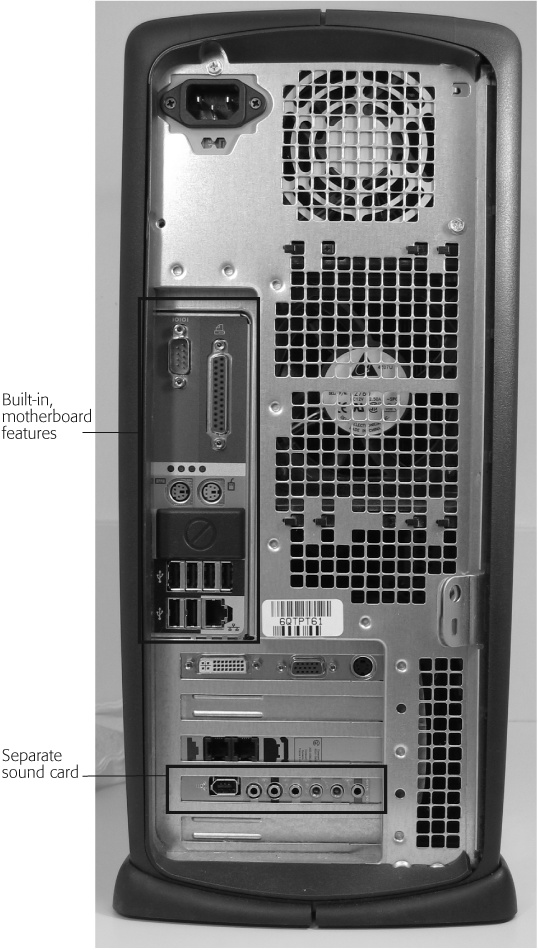
Figure 7-1. All the ports contained in the rectangular area near the USB, mouse, and keyboard ports are built into the motherboard. If your speakers and microphone plug in up here, your sound circuitry is built into the motherboard, too. The ports on the parallel strips near the bottom of your PC are attached to add-on cards. If your speakers and microphone plug in down here, your PC has a sound card.
Don’t have any speakers at all? Then you’re limited to headphones until you either plug your PC into your stereo (Section 7.3) or buy and plug in a cheap set of speakers. If you’ve got a laptop, check out the "Sound Advice for Laptops” box.)
Each of the three types of adapter serves slightly different needs, all of which are described in the following sections.
All notebooks and most modern PCs rely on integrated audio. Listed on spec sheets and sales floors, the term simply means your PC’s sound circuitry lives tucked away inside one of the motherboard’s chips. Reducing the sound card’s circuitry to a single chip lowers the PC’s price, yet still lets your PC play stereo sound and record from a microphone or other gadget.
A few years ago, the term “integrated audio” cried out “budget PC,” leading to derisive scowls at geek gatherings. Integrated sound’s come a long way since then, and some of today’s new motherboards even include 5.1 surround sound for the most realistic rumbling helicopter explosions.
In a few years, integrated audio will handle all of a PC’s sounds, replacing everything but specialized cards aimed at musicians.
Gamers and music fans tend to drool over high-performance sound cards, which drop into a special slot (Section 1.7.1) on your motherboard. A basic stereo card runs less than $20; a more elaborate one with higher-quality sound costs between $150 and $200.
People upgrade to a sound card, shown in Figure 7-2, for several reasons.
Upgrades. If your older PC doesn’t even include integrated audio—or if its current sound card doesn’t power enough speakers for your latest game—a sound card upgrades your sound quickly and inexpensively. Also, the circuits on old or cheap motherboards sometimes fail. If your motherboard’s sound chip dies, dropping in a cheap sound card extends your PC’s life just a little longer.
Power. Passing the sound-creation chores to the sound card lets the computer concentrate on other tasks, like creating more realistic-looking graphics and faster games.
Quality. Being somewhat isolated from your PC’s main circuitry, sound cards provide a cleaner, more buzz-free sound than sound circuits built into the motherboard itself.
Software. The software bundled with most sound cards let you tweak the sound slightly for different conditions. Choose the Karaoke profile, for instance, and the card automatically filters out the singer’s voice and lets you record your own. Closet musicians can add effects to recorded sounds, and gamers can tailor sound profiles to match each game’s unique monster-howling attributes. (Some sound cards come with free games, as well.)
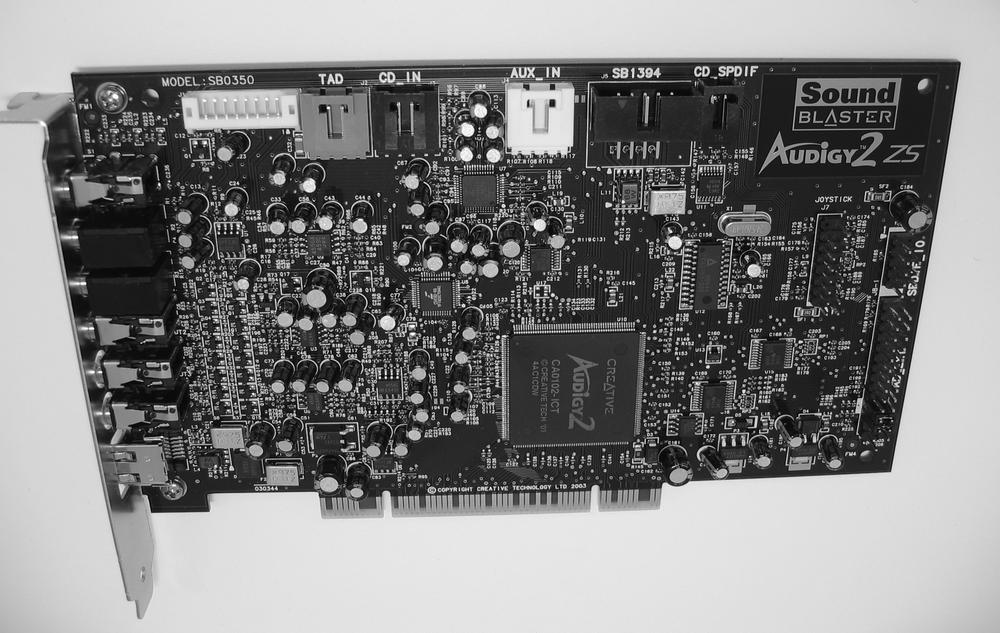
Figure 7-2. Considered a high-end card, Creative Lab’s Audigy 2 ZS slips inside your PC, granting it 7.1 sound. It powers a wall of three speakers in front, two in back, and one on each side. (Toss in the bass-producing subwoofer for the “.1” part.)
Note
If you add a sound card to a PC, you may need to disable your PC’s integrated audio by flipping a switch in its BIOS (see Section 17.2 for details).
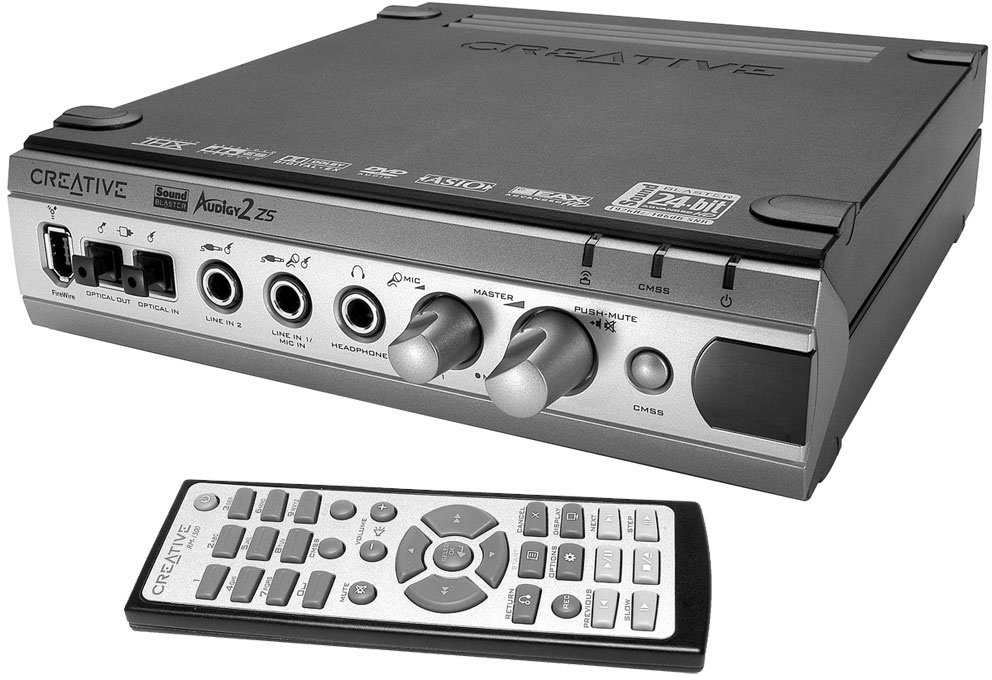
Some sound circuitry doesn’t live inside the PC at all. Instead, it resides in a separate box, as shown in Figure 7-3, that plugs into your computer’s USB port. These boxes cost about the same as a sound card and come in handy for people who want better sound but shudder at the thought of opening up their PC’s case. For instance, if your current sound card won’t play your DVDs in surround sound, plug a box into a USB port, plug the speakers into the box, and listen to the helicopters whirl overhead.
When shopping for a plug-in box, make sure it plugs into a FireWire or USB 2.0 port rather than the older USB 1.1 ports. The USB 2.0 ports move information 10 times faster than the older versions, which is vital when moving lots of sound information between the box and your PC.
No matter how your PC houses its sound circuitry, you always end up with three main audio-related ports:
Microphone. Plug a microphone in here, usually to record your voice.
Speakers. This lets you hear your PC through headphones or a pair of stereo speakers.
Line In. The microphone port records natural sounds (voices, birds chirping, and so on), but this port records sounds emitted by another gadget. For instance, connect a cable here from your analog or digital camcorder to record its soundtrack (Section 5.8.2). This port also lets you record sound from a VCR, TV, record player, or radio.
Figure 7-3. External sound adapters make for easy, no-screwdriver-required installation. It’s also easy to move these adapters between several different computers, including a laptop. As an added bonus, these sound adapters sit directly on your desktop, where they’re easily accessible when you plug in accessories or want to quickly adjust the volume. Although they’re not very portable, plug-in boxes work with laptops as well as with PCs.
The rest of this section describes these ports in more detail, describing how to best use them.
Microphones offer a way for you to not only talk back to your PC, but have it record you as well. Few PCs come with a bundled microphone, but nearly all PCs—including laptops—include a spot where you can plug one in. Many people happily ignore this function; others find microphones indispensable, using them in a wide variety of programs:
Talking with friends in instant messaging programs
Talking to people spread across the globe using Voice Over Internet Protocol (VoIP) gear (described in the online appendix, “Other Cool Things You Can Do Online,” available on the “Missing CD” page at http://www.missingmanuals.com) like Skype (http://www.skype.com)
Adding narration to movies or slideshows in Movie Maker (Section 5.9)
Recording comments with dictation software
Cackling to the opponent you’re blowing up in an online game
Singing along to MP3s with karaoke programs
Recording classroom lectures on a laptop
POWER USERS’ CLINIC: Those Other Sound Connectors
Most sound cards come with a tightly packed row of 1/8-inch jacks (Section 1.8.7) on their outside edges so that you can plug in front speakers, rear speakers, microphones, camcorders, and other doodads. But buried inside your computer, sitting along the sound card’s top edge, awaits another set of connectors for spelunkers to discover. Shown in the figure below, the connectors often bear these labels:
CD In (Compact Disc In). Years ago, a thin, four-wire cable carried sound here from a CD drive’s analog connector (Section 10.15). Newer CD drives ignore this connector, piping sound straight through their main connector cables.
CD SPDIF (Sony-Philips Digital Interface). Yet another PC relic, this connected to a thin, two-wire cable that carried numbers from a CD drive’s digital connector (Section 10.16). Newer CD drives ignore this connector, too.
TAD (Telephone Answering Device). Some fancier modems come with built-in answering machines. A connector runs between here and the PC’s built-in modem, letting the sound card play back and record messages.
SB 1394. The “1394” moniker refers to the tech world’s awful official term for “FireWire” (Section 1.8.3.1), a port used by digital camcorders and some iPods. If your PC offers a FireWire port along the front of its case, a wire from that port probably connects to this port on your sound card.
Aux In. Yet another leftover from days gone by, this let you grab sound from a second CD drive’s analog port; today, it’s rarely, if ever, used.
Rows of pins. When you see two long rows of little pins sticking up from the card, they’re probably meant for a daughterboard—a second circuit board containing all the stuff that wouldn’t fit onto the regular sound card. A cable plugs into the daughterboard; the cable’s other end holds a connector with two rows of holes that mesh with the card’s pins. Some daughterboards fit into a drive bay (Section 1.3), placing the sound card’s ports along the front of the PC’s case—an idea greatly praised by the headphone contingent.

Very few people record anything but their own speaking voice on a PC, so the voice-recording circuitry rarely sounds better than a telephone. Feel free to buy a fairly cheap PC microphone, like the $10 model shown in the top of Figure 7-4.
Many microphones bypass the microphone port altogether and plug into the ever-versatile USB port. People who use their microphones for communication rather than dictation sometimes prefer headset microphones with attached earphones (see Figure 7-4, bottom). Since the other person’s voice comes over the headphones, rather than out through your PC’s speakers, these headsets cut down on feedback.
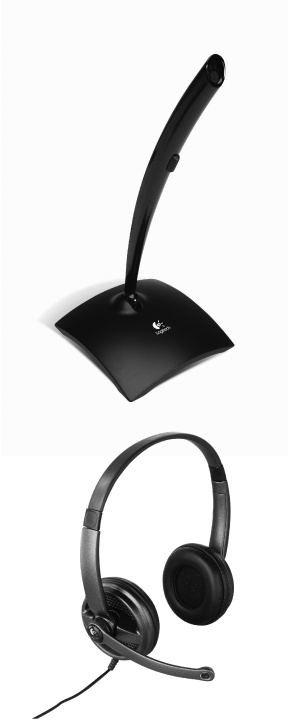
Figure 7-4. Top: PCs don’t record in stereo sound, so save your money and buy an inexpensive mono microphone. To meet different needs, some microphones come mounted on a stand for your desktop; others attach to your monitor (or come built into the monitor). A few even attach to your collar with a clip. Bottom: Combination microphone headsets, handy for talking to others during instant messaging and other conferencing programs, plug into a computer’s USB port or come with two cables, one for the microphone port and the other for the speaker port. They’re popular for folks working in offices and construction sites since they filter out outside noise.
Almost every PC offers the same type of headphone jack as your iPod—they both dish up stereo sound and neither jack’s powerful enough, by itself, to drive its sound out to a pair of speakers. To compensate, speaker manufacturers build power into the speakers that they make for PCs (that’s why they’re often called powered speakers). Some speakers also contain tiny battery-powered amplifiers, creating a battery gobbler with tinny sound. The better ones plug straight into the wall, just like a home stereo.
Some cheap speakers bypass the PC’s headphone jack and plug straight into the PC’s USB port, drawing power straight from the USB port. That leaves them more susceptible to electrical interference, unfortunately, a phrase that, loosely translated, means a constant background whine.
A big step up in quality and price gets you a large subwoofer—a box-like heavy speaker that dishes out desk-shaking bass tones. The subwoofer plugs into a wall outlet to power its built-in amplifier, which routes the sound to satellite speakers—smaller speakers you strategically place around you. Most subwoofers come with both analog and digital ports to connect with whatever signal your PC’s sound card dishes out.
Tip
Unplug your PC’s speakers and plug them into the headphone jack of your iPod or other music player to fill the room with music.
A single pair of speakers works fine for most people’s needs, and all sound cards support them. Game players and movie watchers often invest in more expensive sound adapter and speaker combinations, placing different speakers around the room for "surround sound,” where the music emanates from all edges of the room.
To make Windows XP start using your current speaker setup, choose Start → Control Panel → Sounds and Audio Devices, and choose Advanced in the Speaker’s Settings area. Windows XP lets you select your current speaker setup from a dropdown box, shown in Figure 7-5.
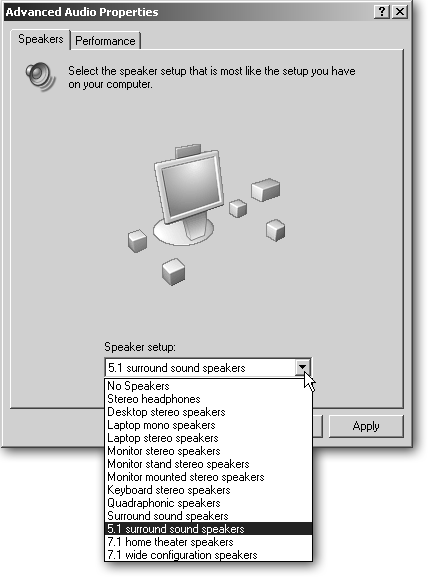
Figure 7-5. Windows XP handles a wide variety of speaker settings, from those built into a laptop to those resembling a home theater. As you switch between settings, Windows XP displays a handy picture showing where to position each speaker. Some sound cards come with their own speaker selection programs that work much like the one shown here in Windows XP. If you select a speaker setup in your sound card’s bundled program, avoid potential problems by making sure that the program automatically updated Windows XP’s settings to match.
Most people choose one of these common speaker configurations:
Pair. Place a pair of speakers on your desktop, one on each side of the monitor. (To keep from being shot at from an unexpected side, be sure to put the left speaker on your left and the right speaker on your right.)
4.1 (surround sound). In addition to the pair of speakers at your monitor’s sides, place the second pair behind you, letting the ghostly voices move around the room.
5.1 sound. If you watch DVDs on your PC, it makes sense to upgrade to 5.1 sound, the same as found in home theaters. This arrangement contains the same speakers as you get with 4.1 sound, but you mount an additional mono speaker above your monitor to represent sound coming directly in front of you—dialog in a movie or game, for instance.
6.1 (also called 5.1 EX) sound. This works like 5.1 sound, but with an extra speaker between the two rear speakers. The spaceship fires directly from your monitor and the blaster ray beams directly over your head, shattering the wall behind you.
7.1 sound. Found in a few games, this dizzying setup places three speakers along the front, a pair in the back, one speaker along each side, and tosses in a few navigation problems as you try to maneuver past all those speaker cables on your way to the PC.
Note
The subwoofer, a chunky speaker that plays only low-frequency, desk-rumbling bass, counts as the “.1” in the 4.1, 5.1, 6.1, and 7.1 combinations. It’s sometimes called the LFE channel, as it plays Low Frequency Effects to simulate explosions. Place the subwoofer in a corner, up against the walls, for maximum rumbling.
It looks pretty cool when you have eight speakers surrounding your PC, but unless a sound technician designed your room, you probably won’t notice much difference between 5.1, 6.1, and 7.1 sound.
Your PC includes a built-in synthesizer, but you needn’t join a 70s revival band to make use of it. Nearly every computer game creates its soundtrack by using the synthesizer. The more expensive the sound card, the more realistic the synthesized sounds are. Also, some annoying Web sites greet you with a burst of sound that leaves you reaching for your speaker’s volume knob; credit your PC’s synthesizer for that, as well.
To give your PC’s built-in synthesizer a listen, fire up Windows XP’s Search program, find a file called onestop.mid on your C drive, and give it a double-click. Slipped into Windows XP as a test file for programmers, the song plays a wide range of instruments through your PC’s synthesizer.
Called Audio In, Aux In, or Line In, this port lets you record stereo sound from a wide variety of electronic gadgets, including TVs, camcorders, and radios. Most ports on your PC stay constantly connected to a particular device—either speakers or a microphone, for instance. Items that you plug into this port, by contrast, change according to what you want to record at any given time.
Today, many people connect their record players to this port to convert their records to CDs, a chore described next.
Many music fans still cling to their old record collections. Some can’t find CDs to replace their cherished Herb Alpert LPs. Others loathe paying twice for the same recordings. Fortunately, pretty much any PC nowadays lets you convert your old records into a variety of digital formats. You can hire a professional for the job, or do it yourself with your own sound card and CD burner. Both have their advantages.
Professional. Professionals charge around $20 per album, tacking on another $10 or so to remove the pops and clicks. Some charge yet more fees for “extra” services like separating the recording into individual tracks, scanning in the album cover for the CD’s case, or shipping the finished CD back to you. Check Magic Sound Restoration (http://www.lp2cd.com) or LightSound (http://www.lightsound.com) for price quotes.
Do it yourself. You can use your PC’s sound card and CD burner to record your LP and burn it to a CD. The big question is whether you have enough time. Converting LPs can take about 90 minutes per record, even longer for especially dirty vinyl. Some turntables require a preamp (a small amplifier), available for about $50, along with sound-editing software (between $50 and $100). Finally, you may need even a larger hard drive: sound recordings consume about 10 MB per minute, or almost a gigabyte for each Herb Alpert album.
If you choose the do-it-yourself route, follow these steps:
Clean your records, and install a new needle in your record player.
You’ll be hearing the version you play for a long time, so make it worth hearing by cleaning up the sound as much as possible. Kab Electro (http://www.kabusa.com) sells many record cleaners, ranging from a $25 brush/liquid combo to a $700 motorized model.
Turntable Needles (http://www.turntableneedles.com) also sells cleaners, as well as a wide supply of needles. If you can’t find a replacement needle for your record player, buy a new cartridge—the box-like holder on the end of your record player’s arm—and a new needle to fit it.
No record player? They’re still for sale at stereo stores, Amazon (http://www.amazon.com), and eBay (http://www.ebay.com).
Connect your record player to your PC.
Most record players send sound through a cable that has a pair of RCA jacks on the end. Your PC, however, accepts sound only through a tiny, 1/8-inch port (Section 7.2.1)—the same as an iPod headphone jack.
Since the two can’t directly plug into each other, connect them with the Holy Grail of PC cable adapters: the RCA-jack-to-1/8-inch-stereo port cable, shown in Figure 7-6. After connecting the record player to the adapter, plug the adapter’s small end into your PC’s Audio In port. (That port’s sometimes lime green.)
Figure 7-6. The Holy Grail of stereo-to-PC adapters, Radio Shack’s little spaceship-shaped connector (Part #274-369) lets you connect VCRs, TVs, stereos, and record players to a PC. Connect your record player’s two RCA plugs to this little adapter’s two RCA ports. Be sure to match the colors; the red jack carries the stereo signal’s right channel. Then plug the adapter’s small end into your PC’s Line In port. (An icon next to the port [Section 1.8.7] usually shows an icon of an arrow pointing inward.)
Run your recording software and record both sides of the vinyl, saving each side in its own file.
Here’s where professional software saves you a lot of time. It automatically adjusts the recording levels, records your album, removes any pops and clicks, and separates the recording into individual tracks called “WAV files.”
Check out LP Ripper (http://www.cfbsoftware.com), MAGIX Audio Cleaning Lab (http://www.magix.net), Diamond Cut (http://www.diamondcut.com), and BlazeAudio (http://www.blazeaudio.com).
If your record player lacks the oomph to make the recording loud enough, you need a preamp to boost its signal. They’re available from Amazon (http://www.amazon.com) and most home stereo stores for around $50. (BlazeAudio sells a preamp software combination.) Connect the preamp between the record player and your PC.
GEM IN THE ROUGH: A Makeshift Preamp
Instead of buying a preamp for your record player, you may be able to borrow the one inside your stereo. Look on the back of your receiver for a pair of RCA jacks labeled Tape Out, shown at right in this photo.
Your tape recorder normally records from your stereo through the Tape Out jacks, so they’re perfect for sending sound to your PC as well. Leave your record player connected to your stereo’s Phono jacks, shown at left in the photo. Then connect a pair of RCA cables from the Tape Out jacks to the adapter shown in Figure 7-6.
Important: don’t ever connect your stereo’s speaker wires to your PC, or you’ll blow up your sound card.

Burn the individual WAV files to a CD.
Windows Media Player handles this task (Section 10.5.2), although CD burning software works much more easily. Once you’ve burned the CD, convert (rip) it to MP3 files, if desired, so you can groove to your old vinyl on your iPod.
Once you burn the WAV files to CD or convert them to MP3 files, feel free to delete them, freeing up your hard drive for other projects.
![The Holy Grail of stereo-to-PC adapters, Radio Shack’s little spaceship-shaped connector (Part #274-369) lets you connect VCRs, TVs, stereos, and record players to a PC. Connect your record player’s two RCA plugs to this little adapter’s two RCA ports. Be sure to match the colors; the red jack carries the stereo signal’s right channel. Then plug the adapter’s small end into your PC’s Line In port. (An icon next to the port [Section 1.8.7] usually shows an icon of an arrow pointing inward.)](http://imgdetail.ebookreading.net/design/12/0596100930/0596100930__pcs-the-missing__0596100930__httpatomoreillycomsourceoreillyimages2045419.png.jpg)
When it comes to storing their pictures, digital photographers have it easy. They snap a picture, toss the resulting JPG files (Section 6.4) onto their hard drive, and open the photo in any program. Sound files, by contrast, come stored in a dizzying array of formats: MP3, WMA, AAC, and on and on and on.
Part of the problem comes from a music file’s bulk. With music files in raw form, a CD can hold only a dozen or so songs. And each of the different music file formats shrink these files down using a variety of different strategies. (You’ll occasionally see the terms lossy, which refers to compressed audio, and lossless, which means the file hasn’t been shrunk at all and contains the same fidelity as the file on the CD.)
Another problem comes from copy protection. When you snap a photo, you’re creating a picture you want to share with your friends, so camera manufacturers make that task easy. Record companies, by contrast, want to stop you from sharing songs. So some formats feature built-in virtual locks that limit the number of times you can copy a file, or even restrict which devices you can play it on.
Normally, dealing with several different audio formats wouldn’t be a big problem. Windows XP, for instance, can open a wide variety of files. But most portable digital music players like the iPod can open only two or three different formats. Here are the ones you encounter most frequently.
Tip
Dubbed the “Swiss army knife of audio,” you can use the free dBpower MC (http://www.dbpoweramp.com) program to convert sound files from one format to another as well as to rip CDs. dBpower MC supports MP3, WMA, AAC, WAV, and many other music formats.
You may not have heard of this format, but you’ve certainly heard the music. Musicians record their songs as immense WAV files, which do a yeoman’s work by preserving the full quality of the original music. The music then moves straight to CD without any compression, letting songs retain their full quality.
When displaying a CD’s contents in My Computer and similar programs, Windows XP does something confusing. Instead of showing the CD’s WAV files and pleasantly offering to convert them into the more versatile MP3 files, Windows simply lists the uncompressed songs as shortcuts called CDA files: Track01.cda, Track02.cda, Track03.cda, and so on.
Unless you’re a musician recording with a home studio, you probably won’t be messing with WAV files. They’re much too big for most portable players, anyway. To pack as much music on a portable player as possible, people turn to the compressed file formats, discussed next.
Thankfully shortened to the acronym MP3, this sound format began life in the early 90s, survived the wrath of the recording industry and lives on as the world’s most popular music format. MP3 squishes a song’s size by nearly 90 percent (compared to the original WAV file), letting you cram hundreds of songs onto your PC, iPod, or other portable music player. Best of all, MP3 files work on nearly every portable music player sold.
Windows Media Player plays MP3 files without a problem. But creating MP3 files in Media Player 9, the version included with Windows XP, costs money. Patent-holder Fraunhofer (http://www.iis.fraunhofer.de/amm/) charges licensing fees of around $10 per computer for its MP3 codec—a small file holding the formula for stuffing music into an MP3 file. That leaves you two options for creating MP3 files:
Buy and install the MP3 codec for $10 (choose Start → All Programs → Media Player → View → Plugins → Download Plugins).
Upgrade to Media Player 10 (http://www.microsoft.com/windows/windowsmedia/mp10). Available only for Windows XP owners, this newer version of Media Player tosses in the codec for free.
Some people simply bypass Windows Media Player altogether: The LAME (Lame Ain’t an MP3 Encoder) MP3 codec works with several competing programs to create MP3-compatible files for free. Download and install the LAME MP3 codec (http://lame.sourceforge.net/), along with any of the recommended free MP3 encoding programs listed on the site.
Instead of supporting MP3, Microsoft offers its competing WMA format for storing files. Windows Media Player plays and creates WMA files. Many newer music players (but not the iPod) also support WMA as well as MP3.
Finding a WMA-compatible player has grown so complicated that Microsoft created PlaysForSure (http://www.playsforsure.com ), a sales and marketing site disguised as a service for matching compatible players with download services and music formats. (A search for iPod on the site brings up only a competing player that handles WMA files; iTunes isn’t even mentioned.)
Windows Media Player adds copy protection to every WMA file you create, stopping you (or anyone) from playing back that file on another computer—even on other computers you own. To disable the copy protection in Media Player, choose Tools → Options and turn off the “Copy protect music” checkbox.
AAC became Apple’s soldier in the music format wars when Apple chose it as the format for the iPod, Apple’s wildly successful digital music player. Although a large group of companies—including Dolby, Fraunhofer (FhG), AT&T, Sony, and Nokia—created AAC, few competing music players play it, making it impractical for all but the legions of iPod faithful (more than 10 million at last count).
The iPod also plays MP3 files; to help sway PC customers with huge libraries of WMA files, iTunes for Windows converts non-copy-protected WMA files to AAC.
Apple’s iTunes software sells only songs in the AAC format, and it adds copy protection to keep the file from moving to more than five PCs.
Converting a music file from one format to another—a chore you encounter when moving music to a digital music player—usually takes a few clicks on a converter program like dBpower MC (http://www.dbpoweramp.com). Converting MIDI files isn’t nearly as easy, as the files don’t contain recorded music, but instructions for how a synthesizer should play back a piece of music. Depending on the synthesizer, a MIDI file can sound as cheesy as a children’s toy or as beautiful as a harp in the park.
If you need to convert a MIDI file to MP3 for a ring tone, for instance, fire up Apple’s free iTunes program (http://www.apple.com). It converts MIDI to MP3 by playing it through your PC’s synthesizer, and then records the results as it plays. Consequently, the resulting MP3 file sounds only as good as the sound card on the computer you use to convert it.
As for converting MP3 files to MIDI, forget it. Some programs offer a conversion feature, but the resulting file sounds pretty awful.
Most PC sound cards concentrate their powers on playing music, usually through as many speakers as will fit into the room. Musicians, by contrast, want sound cards that specialize in recording music. The flimsy microphone circuitry in consumer-level sound cards can’t handle heavy-duty recording, so musicians skip the computer stores and head for the music shops.
There, they find hundreds of cards and software combinations costing anywhere from $100 to nearly $10,000. Products range from the USB plug-in box shown in Figure 7-7 to drop-in sound cards with accompanying bunches of cables, all aimed at turning a PC into a recording studio.
When comparing sound cards at the music store, be sure to try the bundled software before plunking down your money. The programs all do relatively the same thing, but each offers a “feel” that only you can measure. Some offer plug-in knobs for manually controlling the recording volumes, for instance, which is a nice touch compared to turning knobs with a mouse.
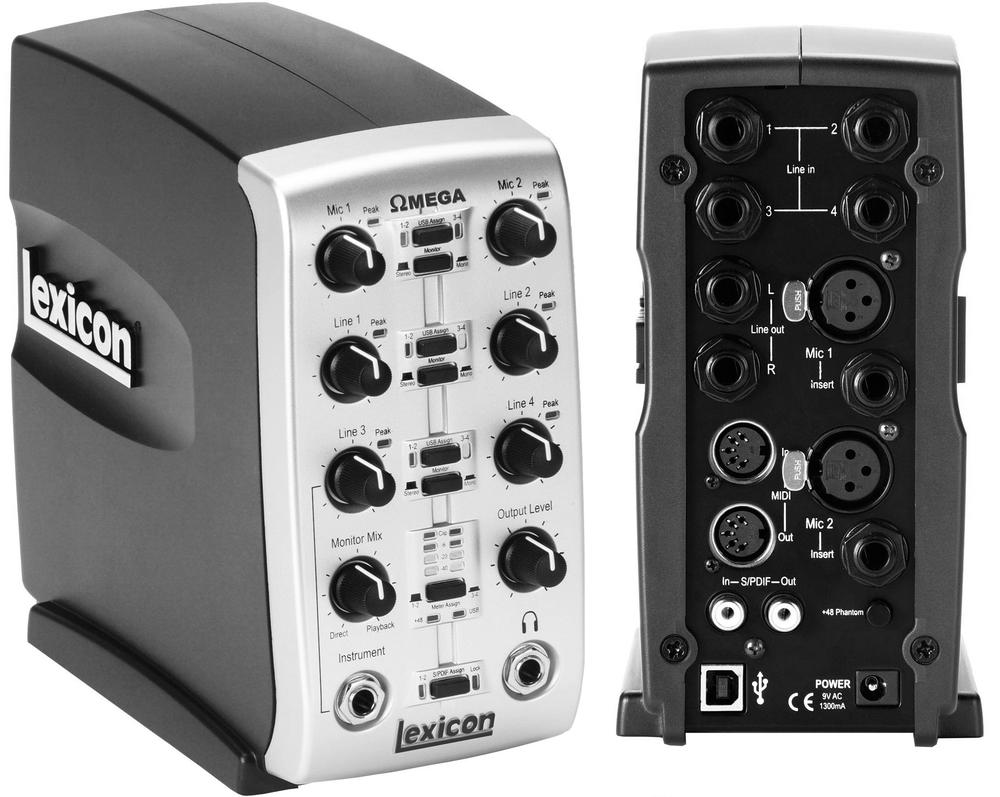
Figure 7-7. One of the hundreds of cards and software packages aimed at musicians, the $300 Lexicon Omega Desktop Recording Studio ranks as one of the most affordable. The box plugs into your PC’s USB 2.0 port, and records up to four tracks simultaneously. The box contains built-in microphone preamps (you need to add your own microphones), connects with MIDI instruments, and includes Steinberg’s Cubase LE for editing and mixing up to 48 tracks. Like most gear aimed at musicians, this box contains 1/4-inch jacks for plugging in standard electric guitars and keyboards.
Most musician-level sound cards contain the following features:
Recording several simultaneous tracks. Instead of recording using just one cheap microphone, musicians want to record jams with four or more instruments simultaneously—each on its own separate track. After the jam, the musician sits down with editing software and mixes the tracks, changing their volume and timing, adding effects, and fixing off notes.
Jack size. Most musical instruments connect with 1/4-inch mono plugs rather than the PCs fragile 1/8-inch stereo plugs. Music stores sell adapters, but one swing of a guitar can leave the broken stub of an adapter’s jack stuck in your sound card. Look for a sound card that offers several sturdy 1/4-inch plugs, usually offered through a little box that connects to the card.
Preamp. Like record players, microphones aren’t loud enough to be recorded directly. You need a preamp to amplify the microphone’s sound before it enters the PC for recording.
Microphone. PC microphones don’t cut it. The popular Shure SM-57 microphones cost less than $100 apiece, and let you record stereo tracks.
Software. The hardest worker in a home studio, audio software lets you mix your tracks to the right volume levels, arrange snippets of music in the right order, edit out bad notes, edit MIDI information (described next), and add effects to recorded sounds.
Tip
Musicians’ recording gear comes with a steep learning curve. To keep from being overwhelmed and discouraged, start by buying something used or fairly simple. Once you’ve mastered it, move on to more advanced gear.
The computerized version of an old player piano roll, a MIDI program faithfully writes down every note a musician plays during a performance, as well as each note’s duration and intensity. Play back the MIDI file on a synthesizer, and you hear the original performance. But MIDI’s much more powerful than a mere recording device.
For instance, piano rolls only sound like, well, antique pianos, but synthesizers mimic any instrument. That lets a MIDI keyboard player frighten the neighbors with tuba or accordion solos. Layer more parts into the mix, toss in a string section, and you’ve created an entire orchestra. (Most thunderous orchestral scores you hear in the movie theater started with a single musician in front of a MIDI keyboard.)
Most people hear only MIDI sounds on their PCs during computer games, but if you’re a musician, MIDI gives you a universal musical language for a wide range of tasks.
Backing tracks. MIDI files can contain complete band performances. Turn off the guitar or keyboard part, plug in your MIDI instrument, and jam along to create your own solo. Many musicians create a band in a box, playing a MIDI drum and bass track while they play guitar or piano—no arguments over the tip bucket.
Editing. MIDI editing software lets you edit performances as easily as editing words in a word processor. Hit an off note? Drag and drop it down a bit on the scale until it sounds just right. If something plays too quickly, just slow down the pacing a bit, while keeping everything in the same key.
Instrument variety. Just as keyboards can create orchestras, you can quickly switch an MIDI instrument to an oboe, clarinet, saxophone, or anything that fits the mood.
Sharing music. Google lists zillions of sites that offer free MIDI files. Jam Online (http://fjam.zapto.org/) adds a twist by letting musicians meet to create their own MIDI files, each adding a new layer in turn until finishing the composition (or giving up in frustration). The eJamming site (http://www.ejamming.com) charges a monthly fee for MIDI musicians to meet and jam together simultaneously over the Internet.
Printing sheet music. MIDI notation programs print out MIDI files as musical scores for passing around at the next jam.
For an ironic twist on history, drop by the Roll Scanning (http://www.trachtman.org/rollscans) Web site to hear old piano rolls scanned in and saved as MIDI files. If you find any old piano rolls in your attic, send them to Mr. Trachtman for scanning and conversion, helping to preserve our nation’s musical history.
The most common sound problem is hearing nothing. One speaker works, for instance, but the other stays mum. When faced with some missing sound, be it from one speaker or all of them, start off by playing music continuously on your PC—stick in a CD or play several repeating MP3 files, for instance. That gives you some background sounds to listen for as you fiddle with the settings, cables, connections, and programs. When you finally hear something coming from the previously dead speakers, you know you’ve found and fixed the problem.
Start troubleshooting by making sure you’ve plugged everything into the correct port. Then check the mixer settings (explained on Section 7.5.2) to make sure you turned on what you’re trying to hear or record. Finally, check the master volume level (Section 7.5.3). If none of those work, a driver (Section 16.5.4) may be the culprit. Here’s how to handle each step of sleuthing.
By far the biggest problem with PC sound comes from pushing the right plug into the wrong port of the sound card. It’s certainly easy to do, as most sound cards present a row of three or more identically shaped jacks, as shown in Figure 7-8. Confounding the problem further is their dark location in the back of your PC. Grab a flashlight, take a close look at the ports, and make sure you plugged your device into the correct jack. Figure 1-21 (Section 1.8.7) and the table below it show the identifying symbols etched next to each jack.
It’s usually hard to tell which cable belongs to which speaker. After tracing a cable to its destination, make note of it. Wrap a piece of tape around the cable near the plug and write down what’s on the other end of the cable: the front, rear, or middle pair of speakers; the microphone; or perhaps a camcorder or VCR.
Pushing a plug into the wrong port won’t do any damage; it just won’t work. If you’re desperate, try the process of elimination: plug the thing into every port until you eventually hear your music.
Tip
When testing your speaker setup, look in your sound card’s software for a Test or Calibration mode. The program shows a picture of your speaker setup onscreen, then sends a tone to each speaker, moving the tone slowly from speaker to speaker and showing you which one should be sending the sound. That helps you find speakers that aren’t playing sounds, as well as helping figure out if you’ve reversed any of the speakers. Windows XP doesn’t offer a built-in speaker test like this, unfortunately, so you need to rummage through your sound card’s bundled software.
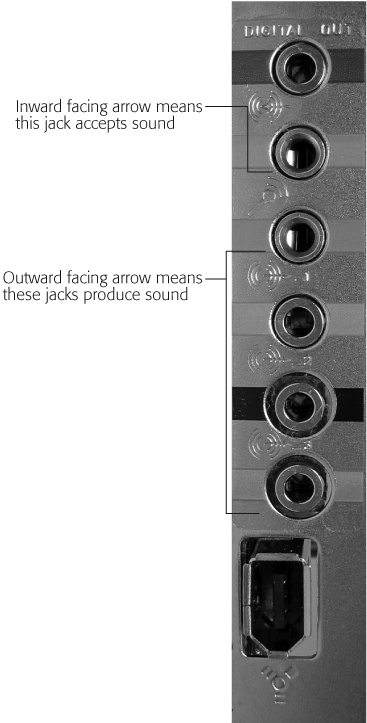
Figure 7-8. When plugging in a jack, look at the little symbol etched next to each jack—specifically, the little arrow on the symbol. If it points inward, the jack accepts sound, which means it’s for a microphone or other sound-producing item. If the arrow points outward, it’s a speaker jack. Some manufacturers put identifying colors next to each port on some newer cards; for example, Microphone = pink, Line In = blue, Speaker = green, and Digital = orange.
Your PC contains nearly a dozen things that can make noise, including its synthesizer, CD player, and microphone. Since your PC can play all of them at the same time, which should play the loudest? Windows XP’s built-in mixer, shown in Figure 7-9, answers that question. The mixer provides a scaled-down version of the multitrack console found in every recording studio.
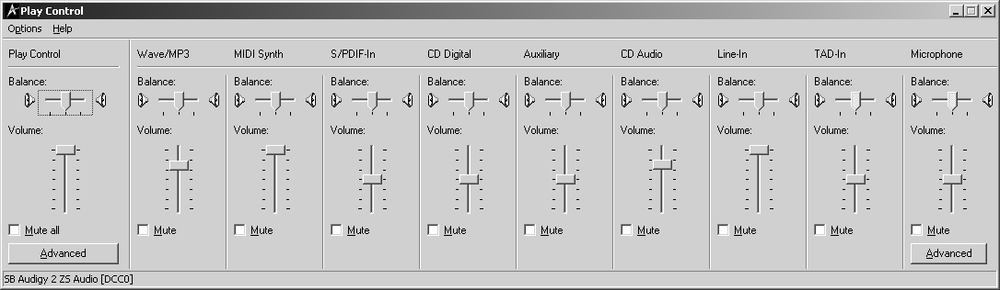
Figure 7-9. The mixer lists everything in your PC that’s capable of making sounds—a list that grows so large on some sound cards that half the mixer hangs outside your monitor’s view. To trim it, remove some of the devices you don’t use—the Telephone Answering Device, for instance, or the Line In and AUX ports. Choose Options → Properties, and then turn off the checkboxes next to devices you don’t use. The mixer removes them from view, shrinking its size accordingly.
To call up the mixer, choose Start → Control Panel → Sounds and Audio Devices and choose Advanced in the Device Volume area. Windows XP’s mixer appears onscreen, showing you the current volume level of everything inside your PC that makes noise.
To control the volume of each item in your PC, slide the mixer’s controls, shown in Figure 7-9. Slide them up to increase the volume and down to reduce the volume.
Check these settings when you’re having trouble hearing or recording something:
If you spot an important item with the Mute checkbox turned on, Windows XP is keeping that sound out of the mix. If it’s important—your CD player, for instance—make sure the Mute box isn’t turned on.
Conversely, if one of the items gives an annoying hum—the Telephone Answering Device, for instance—feel free to turn on its Mute toggle.
When recording on your PC, usually through the microphone, choose Options → Properties from the Mixer and turn on Recording. That makes the recording mixer appear, and it lists everything in your PC that is capable of recording. Since most PCs can record only one item at a time, be sure to turn on the checkbox for what you’re trying to record—usually the microphone.
If you hear sound from only one speaker, check the balance setting: the little sliding bars along the mixer’s top. Slide the balance control so it’s in the center to send the sound equally to the left and right speakers.
Your PC lets you change its volume levels through its mixer, described above. But you can change the mother of all volume controls, its Master volume, in three additional ways.
CD drive. The CD drives on some older PCs offered a built-in headphone jack and volume control—the rim of a little spinning wheel poking from the drive’s front. If you’re listening through the drive’s headphone jack, be sure to give the little volume wheel a spin to make sure the volume’s not turned down too far. Newer PCs don’t use that volume setting, and instead control everything through Windows XP’s mixer.
Master volume. The mixer settings let you adjust the proportional level of your PC’s sounds—handy for keeping your voice louder than your background music during a narrated slideshow, for instance. The master volume controls the loudness of the entire mix as a whole. To turn it off in a hurry, click the little speaker icon next to your taskbar’s clock, and either turn on the Mute checkbox or slide down the volume control.
Speaker volume. Most speakers come with a built-in volume knob. If it’s turned down, you won’t hear anything, no matter how high you’ve cranked up your mixer. Look for the knob on your speaker and give it a turn to mid-volume.
You need to inspect all three of these volume settings because if only one’s turned down, you won’t hear anything.
Once you rule out the main sound problem culprits—the mixer, the mute toggle, and the cable ports—the next step is to check your sound card’s drivers. They probably need to be updated or reinstalled (a process described on Section 16.5.4).
Before upgrading to a new driver, be sure to uninstall any software installed by your old adapter: choose Start → Control Panel → Add or Remove Programs to make Windows XP uninstall the unwanted goods.