
More than 200 million copies of Windows XP live on PCs worldwide. With such widespread distribution, Windows XP is an attractive target for legions of wannabe virus writers, scammers, and shady business opportunists. For example, as soon as a teenager discovers a vulnerability he can exploit on his own copy of Windows, he can immediately inflict damage on millions of Internet-connected PCs across the globe.
This chapter shows how to thwart these evildoers by backing up your software regularly, creating and managing effective passwords, automatically installing newly released software “patches,” and preventing the theft of your PC or laptop. You’ll also learn how to avoid email scams, viruses, and spyware, and what to do if your PC’s already infected.
The most important step you can take to secure your computer is to regularly back up your data. Once you’ve put a reliable backup system in place, you’re prepared for just about anything that can happen. Without one, you stand to lose family photos, tax records, home movies, years of correspondence, music collections, and other valuables that have slowly migrated from bookshelves and closets onto your computer.
There’s one bright spot: you don’t need to back up any of your programs that came on their own CDs. You can always reinstall these programs should your hard drive melt down. If you’ve downloaded software online, be sure to copy those programs onto a CD and keep the CD with the others for safekeeping.
But you must back up all your data by copying it out of your PC and onto something else: a CD, DVD, portable hard drive, USB flash drive, or even a second PC. Backing up to a different folder on your hard drive won’t help; a crashed hard drive takes down everything with it, including duplicates of files you’ve stored there.
The next two sections describe quick ways to find and back up a selection of important files, as well as a sure-fire savior: backing up everything—automatically.
Tip
As you work in any program, frequently press Ctrl+S—the universal “Save this file now” shortcut. Doing so immediately moves your current work from your PC’s memory (its temporary storage repository) to its hard drive (its permanent safe haven). That way, even if you lose power, or your PC crashes, you’ll have an up-to-date version of the file you’re working on.
Sometimes you just need to back up a few precious items: your novel-in-progress, your list of Internet Explorer favorite sites, or the Loch Ness monster photo you just downloaded. The backing up part’s actually pretty easy (see the list below for reminders on what you need to do).
Tip
To back up important files quickly, email them to your own Web-based email account, like Gmail (http://www.gmail.com) or Hotmail (http://www.hotmail.com). For details about setting up a Web-based email account, see Section 12.1.4.
For many people, the big challenge lies in simply finding their data, especially when some program’s stashed it away in the deep recesses of the PC. The rest of this section explains where to find, and how to back up, some common, yet irreplaceable, items. Once you’ve found your data, copy it to a CD (Section 10.5.1), an external hard drive (Section 9.6.3), a shared network drive (Section 14.8.5), or a USB keychain drive.
Digital music and photos. These files present the biggest problems, since they’re often too large to squeeze onto a few CDs, or even onto a DVD. Backing up these files onto a portable hard drive (see Section 9.6.3) is the best answer.
Digital music licenses. Whenever you purchase music online through Media Player, be sure to back up your digital licenses (Media Player → Tools → Manage licenses). If your PC crashes and you don’t have a backup of your licenses, your purchased music disappears from your virtual shelves. To avoid that problem with CDs you rip yourself, make sure Media Player isn’t adding copy-protection to your ripped music (see Section 8.5.6 for details).
Downloaded programs. Some software companies sell their programs straight from their Web sites; you download a program onto your PC and you don’t have to deal with shipping charges or having to pry a CD from its oversized container. Although speedy and convenient, this distribution method also leaves you stuck without a backup CD. Therefore, after downloading any program, copy it to a CD, then write its name and your order number onto the CD with a black Sharpie marker. (To play it really safe, place a copy of your “order confirmation” email onto the CD as well.)
Financial records. Look for a Backup or Export option on the File menus of Quicken, TurboTax, and other financial programs.
Firefox bookmarks. (See Section 13.1.3.) Back up your favorite Web sites, grouped by category, so you can quickly move them from one PC to another. Click Bookmarks → Manage Bookmarks → File → Export, and then save the bookmarks.html file.
Internet Explorer favorites. (See Section 13.1.2.) Just as with Firefox, back up your favorites for quick transfers. Click File → Import and Export. The Import/ Export wizard then leads you through “exporting” your favorites to a file called bookmark.htm.
Microsoft Outlook. Microsoft Outlook stores your email, calendar, and contact information in one large file with a .pst extension. When you’re ready to back up this file, the hardest part is finding it, as the location varies among versions, installation methods, and setup options. The easiest way to dig it up is to let Windows’ Search program (Start → Search) look for all files ending in “.pst”.
To do so, open the Search program and turn on the “All files and folders” checkbox. In the “All or part of the file name” box, type *.pst and then click Search. The Search program then looks for files that meet your criterion, and lists the files it finds in the Search Results window. The file you need is probably the largest file, and it usually lives nestled somewhere in the reaches of your C:Documents and Settings folder. But if you’re unsure, be safe and copy all those .pst files to a CD.
Miscellaneous files and folders. To back up any file or folder to a CD, portable hard drive, or even another PC on a thrown together two-PC network (see Section 14.10), select the items, right-click them, and choose Copy. Then right-click inside the receiving container and choose Paste.
Outlook Express account settings. Although the Files and Settings Transfer wizard (Section 14.8.3) will copy and save Outlook Express email, the wizard leaves your account settings behind: your user name, password, server name, and other technical tidbits required to access your email account. Outlook Express can export those settings directly to a file for backup when you choose Tools → Accounts → Export.
Outlook Express email. To back up your email, Windows XP’s Files and Settings Transfer wizard (Section 14.8.3) will copy your mail into one large file, which you can then copy to a CD. To copy that file back into Outlook Express, either on the same PC or a new PC, run the Files and Settings Transfer wizard once more. This time, tell the wizard to copy that large file from your CD, and place its contents back into Outlook Express’ proper mailboxes.
Program settings and information. Some programs don’t offer a convenient way to export their settings or data. When a program leaves you scrambling for a backup method, run Windows XP’s Files and Settings Transfer wizard (see Section 14.8.3). Although the wizard’s designed to copy your data and settings from one PC to another, you can also use it to back up your data and settings. Here’s how. Once the wizard packages your data into a big file, keep that file safe by storing it on an external hard drive, or burning it to a CD (Section 10.5.1). If you ever need to use the backup, run the wizard again on your PC—but tell the wizard a white lie: Tell the wizard it’s running on a new PC (it’ll ask whether it’s operating on your old or your new PC). Thinking it’s unpacking your files on your new PC, the dutiful wizard places all your backed up files back into their original folders.
Windows Address Book. (See Section 12.6.) This file contains all your contact information from Outlook Express. Consider this file one of your backup “musts,” and a good one to toss onto your iPod or USB flash drive.
Microsoft’s built-in Backup program makes it fairly easy to back up your data automatically, every night. The biggest problem is finding a place to store all your stuff. The Backup program takes the files you’ve chosen to back up and packages them inside one huge file that’s almost always too big to fit on anything but another hard drive.
Manufacturers have rapidly lowered prices on external hard drives (see Section 9.6.3), letting more people plug them into their PC’s USB or FireWire ports for a backup solution. Sure, it’s an extra expense. But when your hard drive crashes, the 100 bucks or so that you’ve forked over may seem like the best money you’ve ever spent.
Tip
For the ultimate in backup safety, buy a program like Norton Ghost (http://www.symantec.com) or Acronis TrueImage Backup (http://www.acronis.com). These programs automatically send a mirror image of your hard drive to an external hard drive. If your hard drive crashes, that mirror image can get you back up and running in the least amount of time.
Follow these steps to back up your data automatically with Windows Backup.
Launch the Backup program from its perch on a long limb of the Start menu (Start → All Programs → Accessories → System Tools → Backup). If you don’t spot Backup there, you’re probably using Windows XP Home; Microsoft not only left the program off the Start menu, they left it off your PC (see Section 15.1.3 for instructions on installing Backup).
Tip
When the Backup wizard appears, make sure the “Always start in wizard mode” option is turned on. The Backup program’s advanced menus are terse and frightening; you don’t want to walk down this path unaccompanied. If the Backup program somehow slips into Advanced mode, choose Tools → Switch to Wizard Mode to put the wizard back in charge.
Making no assumptions, the wizard first asks whether you want to back up your data or restore it. Choose Backup, of course, because you’re preparing for the impending catastrophe. If you’re returning here post-catastrophe, choose Restore (see Section 15.1.3). After choosing, click Next.
Instead of presenting you with a list of several thousand files, the wizard simplifies matters by presenting you with four scenarios, each described below.
My documents and settings. The natural choice when you’re the only person working on the PC. This option grabs everything within your local user profile: your My Documents folder, Desktop files and shortcuts, Start menu, Outlook Express email, Windows Address Book, some program settings, and some program data.
To see exactly what this option backs up—and what it leaves behind—open My Computer (Start → My Computer) and browse to C:Documents and Settings Username, substituting your own user account name for “Username.” (If you can’t recall your user name, take a peek at the top of your Start menu.)
Note
Windows normally makes some of the files and folders in your Username folder invisible in order to protect you from accidentally deleting them. To see any of these ghosts when browsing in My Computer, open any folder and choose Tools → Folder Options → View tab. Turn on “Show hidden files and folders” and turn off “Hide protected operating system files.” The Backup program then backs up all of a folder’s files, whether they’re hidden or not. But turning off the hidden files mode when you’re spelunking through folders gives you a reassuring glimpse of all the items inside a folder that are being backed up.
Everyone’s documents and settings. Designed for families that share one PC, this option grabs the local user profile of everybody with a user account; it also saves a copy of the Shared Documents folder. (Specifically, this option backs up the entire C:Documents and Settings folder including the folders inside it.)
All information on this computer. This backs up everything on your PC. Although it seems the natural choice when preparing for future emergencies, it’s rarely the best choice. For one, you need a backup drive as large as your PC’s hard drive. And since it’s backing up everything, it’s also going to waste time and space grabbing things you don’t really need: Windows XP itself, for instance, as well as all of your programs. Your operating system and programs come on CDs, in most cases, which you can reinstall.
If you’re worried about a disk-obliterating catastrophe, you’re better off buying a hard disk–imaging program for backups (see Section 15.1.2). That will put your PC back on track faster than Windows XP’s sparse (and not especially customizable) Backup program.
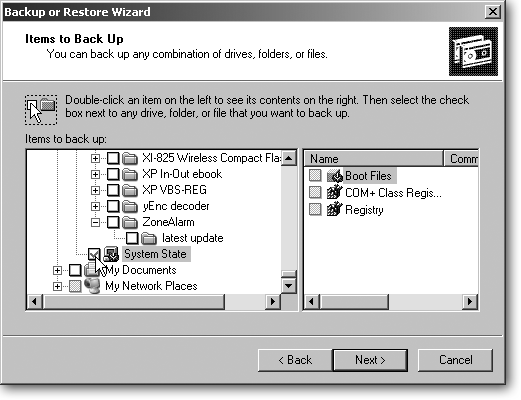
Let me choose what to back up. Designed for the pickers and choosers, this option brings up a Windows Explorer-like box, shown in Figure 15-1, where you turn on checkboxes of the files and folders you want to save. There, you can grab your account’s Documents and Settings folder, for instance, just like the first option. You can also tack on a few other folders with important data.
This option also lets you turn off some checkboxes to remove unnecessary items from the backup. (Internet Explorer’s wastefully large Temporary Internet Folder, found in your Local Settings area, is a prime candidate.)
Choose your option, and then click Next.
The wizard packs your entire backup into one enormous file, and it needs to know where to stash your precious goods. Oddly enough, the wizard starts by suggesting the smallest storage area on your PC: a floppy disk (Figure 15-2), which works fine if you have a roomful of floppies and a week’s worth of take-out food. Instead, click Browse to gently guide the wizard to a better solution. Unfortunately, the choices aren’t great:
External Hard Drive. By far the best option. This little hard drive in a box (see Section 9.6.3) has several things going for it. First, it’s external, living outside of your PC and often coming with its own power supply. That lets it survive when your PC goes up in smoke. Second, it’s easy to grab and run in emergencies. Third, external hard drives are fairly inexpensive: an 80 GB drive costs about $100; smaller drives cost less.
Figure 15-1. Microsoft Backup lets you pick and choose which files to backup or restore. To make your choices, click the plus sign to expand any category. While you’re browsing, be sure to select System State. This backs up many of the same settings as System Restore (Section 16.3), making it easier to put your PC back into working shape.
Best of all, external hard drives allow for completely unattended backups. Your automatic backups can take place automatically each night, so you don’t need to remember that time-consuming backup chore.
Figure 15-2. The wizard asks you to make three decisions: what type of backup to make, where to store the backup, and what to name the backup file. Your PC actually makes your first decision for you. If your PC’s attached to a tape backup drive, your PC chooses that in the top box. If you don’t own a tape backup drive, the program “grays out” that box and lists the name “File.” Although the wizard, amusingly, suggests storing your backup file on a floppy disk, click that box’s dropdown menu to choose an external hard drive (assuming you have one). In the bottom box, type a distinctive name for your backup so you’ll recognize it on sight when searching for it later.
CD or DVDs. Astonishingly, the Backup program can’t save files to CDs or DVDs. If you select one of your CD or DVD drives, the wizard responds with a curt “The backup file name could not be used.”
Your Own PC. The wizard lets you save the backup on your PC’s own hard drive, but don’t fall for it. Inside every hard drive, a little metal head coasts atop platters that spin more than 80 times each second. A crash often pushes that head scratching across your platters. Instead of leaving an annoying click through your Rolling Stones album, that scratch wipes out large chunks of your data. Always keep your backup outside of the potential destruction zone.
Tape Backup Drive. If you’re one of the rare breed with a tape backup drive in the house, choose that. Even better, backtrack a bit: most tape backup drives include their own backup software that’s much more versatile than Windows XP’s Backup program.
Iomega Cartridge. Some people still own those old Zip and Jaz external drives cartridges, which will work in a pinch. If you choose this option, hopefully you own the newer cartridges that hold at least 750 MB; the older 100 MB and 250 MB ones fill up much too quickly. Plus, opting for a cartridge requires you to hang around during the backup, feeding your PC new cartridges.
Network Drive. A choice only if you’ve got a house full of networked PCs (see Chapter 14). This option lets you save your data on a second PC’s hard drive. You can back up your laptop to your PC’s hard drive, for instance. It’s a money saver, but only if you’re on a network and the receiving PC has enough room on its hard drive.
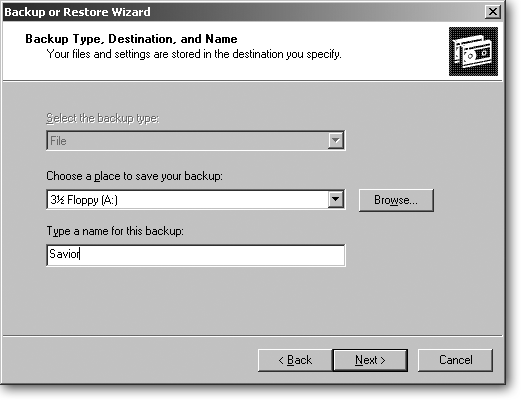
If you’re like most people, the wizard automatically chooses File in the “Select a backup type” box, as explained in Figure 15-2.
The wizard chooses the name “Backup” for your saved file, but you should change that name (in the “Type a name for this backup” box) to something more descriptive. People with two or more PCs should name each backup after the PC that they’re backing up, which makes it easy to find the correct file later on. The standard file naming rules apply here; don’t try to name your backup file anything you wouldn’t name a folder.
After selecting the file’s storage area and name, click Next; then click Finish to start backing up immediately (see the following Tip for advice on when you may want to click Advanced rather than Finish). When the wizard finishes, it displays a final window reporting its accomplishments. If it complains of an error, click Report to find out what went wrong.
Although a few people on each continent possess the discipline to run the Backup program every evening, everybody else should take the wizard one step further by automating the backup. If you’re backing up to a drive that’s always connected to your PC—an external hard drive, for instance, or a network drive—follow these steps to let the wizard automatically back up your files every day at a chosen time. (If you’re one of the poor souls backing up to floppies or cartridges, you can’t automate the Backup program unless you own a particularly well-trained robotic dog.)
At the Backup wizard’s closing window, click Advanced rather than Finish.
Choose Normal, and then click Next.
Normal creates a complete backup of your chosen files. The other options, Copy, Incremental, Differential, and Daily, offer more advanced, space-saving options for large-scale backups.
Turn on any needed options, and then click Next.
The wizard offers three options:
Verify data after backup. Turn this on; it tells Backup to double-check that each copied file safely arrives at its new destination. Since you won’t be hand-feeding your PC floppies or cartridges, let the program take that little extra time.
Use hardware compression, if available. Available for tape drive owners. Turn this setting on only if you see it. When this option’s available, it means that the Backup program recognizes your tape drive’s brand and model, so it knows how to pack more data onto less tape by turning on the drive’s compression option.
Disable volume shadow copy. Always leave this option turned off. When turned off, your PC can copy files and programs even when the files are open or in use. That way, Backup can back up Chapter 13 of your autobiography while you’re still rewording the third paragraph.
Choose “Replace the existing backups,” and then click Next.
This tells Backup to replace yesterday’s backup file with the one it’s creating right now. That saves space, preventing it from piling a second backup into the same ever-growing file.
Schedule the backup time and add your password.
Here’s where everything comes together. Choose Later instead of Now, and type in a Job Name—Automated Backup, for instance. Then click the Set Schedule button and choose a date and time for your automatic backup (Figure 15-3).
At the appointed hour, Backup packs your selected files into one huge file and places it in your chosen location for safekeeping. At least that’s what it’s supposed to do. Be sure to check the date and time of your first backup, making sure it matches what you’ve chosen. Then restore a few files, described in the next section, to get a feel for how the restore feature works—and to make sure it’s actually working.
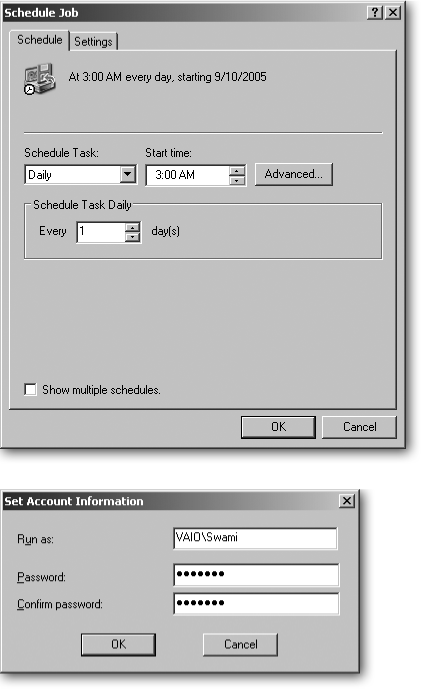
Figure 15-3. Top: The Backup wizard’s advanced settings let you schedule automatic backups whenever you like. To schedule a daily backup every morning at 3 a.m., for instance, click the Schedule Task drop-down menu and choose Daily. From the Start time drop-down menu, choose 3 a.m., and then click OK. Bottom: Enter your User Account password to give the wizard permission to back up your files and add your backup plan to Windows XP’s Scheduled Tasks list. If you need to tweak the settings of your backup schedule later on, head to the Control Panel’s Scheduled Tasks area and open the Backup entry.
Remember to leave your PC turned on and awake—not hibernating—all evening if you choose to back up your PC automatically at night. To turn off hibernation, choose Start → Settings → Control Panel → Power Options and then choose Never for these three settings: “Turn off hard disks,” “System Standby,” and “Turn off hard disks.” Then click the Hibernate tab, and turn off Enable Hibernation. Click OK when you’re done. (Screen savers are fine, and you can even turn off your monitor; the Backup program will still run.)
If you prefer to turn off your PC at night, choose a time when you know your PC will be on. Backup can run in the background while you’re working.
Note
If your scheduled Backup never takes place, rerun the Backup wizard, but be sure to add your user account password when setting up the automated backup. In fact, if you haven’t yet password-protected your user account (see Section 15.3), now’s the time to do it. Scheduled tasks run only on user accounts that have a password.
Hopefully, you’ll never need to read this section. But if you’re here, now’s the time to cash in on the time you’ve spent setting up your backup system. To do that, you need to enlist the help of the Backup wizard’s alter ego: the Restore wizard.
Although the Backup wizard makes it fairly easy to back up your files, the Restore wizard seems strangely intimidating the first time through. The lazy wizard doesn’t bother to display your file’s familiar icons, for instance. Instead, it shows only a list of file names.
Oddly enough, much of that obfuscation works to protect your backed-up files from inadvertent damage during the restoration process. That’s because the Restore wizard works much like the indexer of a book. The Restore wizard peeks inside your backup file, creates an index of its contents, and then shows you the index—which it refers to as a catalog—letting you pick and choose which files to restore.
Since the wizard displays only an index of your files—not the files themselves— you’re completely separated from your files. Even if you delete the index for some reason, there’s no harm done—the wizard doesn’t delete your backed up files. Just tell the Restore wizard to peek into the backup file again and create a new index, which takes a second or two.
You don’t need to wait for a disaster before enlisting the Backup program’s restore feature. The program comes in handy if you want to restore just a few selected files or folders, which is a nice fallback if, say, you deleted a file in the morning and cleaned out your Recycle Bin in the afternoon, but realize you need the file back in the evening.
Restoring a file or two is also the only way to know for sure that your backup program is really working the way it should.
Follow these steps to retrieve any or all files and folders from your backup file:
Open Microsoft Backup and click Next.
Click Start → All Programs → Accessories → System Tools → Backup.
At the Welcome Screen, click Next. Choose “Restore files and settings,” and then click Next.
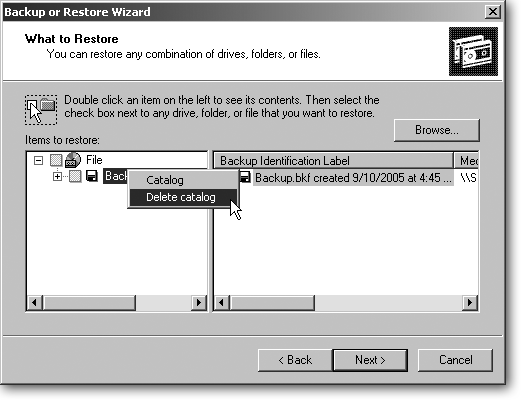
The wizard lists a screen much like the one where you chose the files to back up. The big difference is the word “File” at the top, shown in Figure 15-4. Click the word “File” to see your “catalogs”—indices to the backup files you’ve created. (If you’re running Backup on several PCs, you’ll see a catalog for each backup file.)
Figure 15-4. To display a backup file’s contents, the Restore wizard peeks inside the file and creates a catalog—an index—of its contents. Then the wizard displays the catalog in this window: the backup file’s name appears on the window’s left pane, and the backup file’s contents appear on the right. If the window looks confusing, showing too many backup files on the left or the wrong dates on the right, you’re probably seeing an out-of-date catalog. To start with a fresh slate, delete any or all of the listed catalogs. Right-click the index file’s name on the right and then choose Delete Catalog. That scary-sounding option doesn’t delete your backup file, just an outdated index. Then, create an up-to-date index of your current backup file: click Browse, navigate to your backup file, and choose the Backup file you’d like to restore. The Wizard quickly catalogs that file and displays its contents in the window for you to restore.
The wizard then displays the catalog—the index to that file—on the screen.
Click the plus sign next to the word “File” to see the contents of your backup file.
Select the files or folders to restore and click Next.
Turn on the checkboxes next to any files or folders you want to resuscitate.
Restore the files.
Clicking Finish neatly extracts the files and tucks them back in their original positions, which is what you want to do when replacing lost or damaged files. However, the Advanced button offers three other options that come in handy on certain occasions:
Original location. This option restores your selected files and folders to their original folders—unless the Backup program encounters a file in that folder with an identical name. If it does, the Backup program assumes you don’t need that particular file restored, so it skips it.
Choosing this option lets you restore an entire folder’s contents quickly, knowing that only the missing files will be restored.
Alternate location. This lets you restore the selected files and folders to any folder you want. This option preserves the original folders’ structures, neatly tucking the right subfolders into the appropriate parent folders. But it places that whole “branch” of folders in a different location. For instance, you can tell the wizard to restore your My Pictures folder inside a Test folder. When the wizard’s through, your My Pictures folder appears inside your Test folder, with all its original files and folders intact. That lets you peek at the contents of the restored files and folders, making sure they’re really the ones you want to salvage. (This comes in especially handy when restoring digital photos.)
Single folder. This dumps all the selected files and folders into a single folder of your choice. Unlike the “Alternate location” option, this option ignores the file’s original folder structure. You may find this option handy for restoring a handful of files to a USB drive, for instance, but impractical when restoring lots of files.
A password of 75aRvLx3 is pretty darn unguessable. Unfortunately, it’s also impossible to memorize except by a few child prodigies. And therein lies the problem with passwords: picking them creates a constant tradeoff between convenience and security.
To make things worse, everything seems to wants a password these days: ATM machines, Web sites, email accounts, cell phones—even Windows XP asks for a logon password, if you password-protect your user account (Start → Control Panel → User Accounts).
When faced with a deluge of password requests, too many people resort to the quick and dirty approach: using the same password for everything, which creates a master key for a thief. Other people choose simple, easy-to-remember passwords like “1234” or “asdf” that fail most basic “good password” guidelines. Several worms (see Section 15.6.2) released on the Internet in the past two years come with password crackers that try the most common passwords.
Tip
A good password is eight characters or longer and mixes numbers with uppercase and lowercase letters. A bad password is your own name, the words admin; 1234; password; open sesame; the name of a spouse, relative, or pet; or your home or work address.
Although passwords will always be an inconvenient necessity, several creation tricks make them slightly less bothersome:
Mnemonic phrases. Anybody who’s taken piano lessons remembers “Every Good Boy Does Fine,” which helps them remember the E, G, B, D, and F positions on the music scale. Similarly, passwords based on mnemonics hold special significance to their creators. For instance, the phrase “I ate fish last Thursday evening” could be reduced to I8flTe, creating that rare combination of both a strong and memorable password.
Word combinations. Combine two random four-to-six letter words with a number or symbol between them, like apple#deluge.
Browser automation. Both Internet Explorer and Firefox will memorize passwords for Web sites, automatically filling in both your user name and password whenever you visit. That’s fine for your recipe swap site or woodworking group. But your browsers repeat that helpful act for anybody sitting at your PC, including the person who walked off with your laptop yesterday. Limit your browser’s password stash to low-risk sites.
To change Internet Explorer’s password assistance settings, open the program and choose Tools → Internet Options. On the Content tab, click Auto-Complete, and then either turn on or off “User names and passwords on forms. " Doing so tells Internet Explorer to stop memorizing your passwords.
To change Firefox’s password settings, open the program and choose Tools → Options → Privacy → Saved Passwords, and then turn off Remember Passwords. Or, to have security and Firefox’s password helper, click Set Master Password on that same page. After you set a Master Password, you must enter that password each time you open Firefox on your PC. Without that password, Firefox will still run, but it won’t automatically fill in your passwords at the Web sites you visit.
Both programs place a password-clearing button on these password settings pages, which is handy after you enter your password at a public terminal. Just click the button at the end of your session, and you instantly force the browser to forget any password you’ve just entered.
When you find yourself juggling more passwords than you can remember, you may want to enlist the help of a password management program. These programs let you enter one strong password, after which they display your entire password collection. Whenever you visit a site requesting a password, open your password management program by typing its single password, copying the password you need, pasting it into the Web site, and then closing the program.
Some of the more popular password managers include Password Safe (http://passwordsafe.sourceforge.net), which even creates those hard-to-think-up passwords like “i5GBh9F6.” Other people prefer hardware devices like a fingerprint reader, shown in Figure 15-5, for quick access to sites.
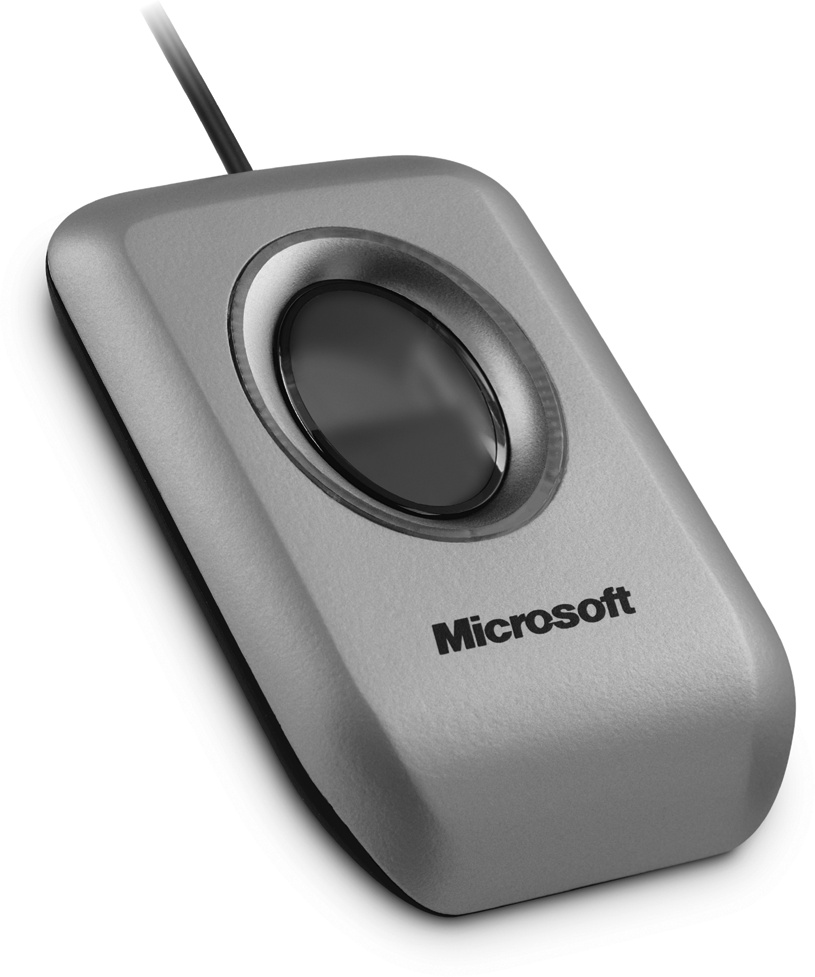
Figure 15-5. Microsoft’s fingerprint readers (http://www.microsoft.com/hardware) come in a standalone model (shown here), as well as models built into keyboards and mice. All three variations let you log onto Windows XP at the touch of a finger, but they really shine at logging onto password-protected Web sites, automatically entering your user name and password when you touch the pad.
For security on your own PC, these passwords will stop most people from accessing your data:
Entire PC. To stop people from even getting into Windows, much less your files, password protect your PC’s BIOS (Section 17.2.3). That tells your PC to request a password when first turned on, before it loads any operating system or program. It’s only a first line of defense, as some PCs make a BIOS password easier to bypass than others. Try to break in (see Section 17.1) and see whether your PC’s BIOS opens the door or keeps it slammed shut.
Windows user account. Password protecting your user account (Start → Control Panel → User Accounts) keeps out others, but be sure to create and hide a Password Recovery Disk before you find yourself locked out of your own account. If you’re already locked out of your own account, sans Password Recovery Disk, you’re not completely out of luck.
Microsoft releases critical patches (software fixes) on the second Tuesday of each month to address the latest in an endless flow of Windows XP security threats, among other problems. Occasionally, Microsoft releases “ultra critical” patches too important to wait for the monthly delivery schedule.
But rather than trying to keep up with Microsoft’s security problems, set your PC to grab and install patches automatically, as described in this section.
To fix problems with Windows XP as quickly as possible, Microsoft turned its update site (http://www.windowsupdate.com) into a constantly running spigot. Once you’ve activated a feature called Automatic Update, Windows Update downloads new patches as soon as they’re released, and then installs them on your PC, even if you’re working online at the time.
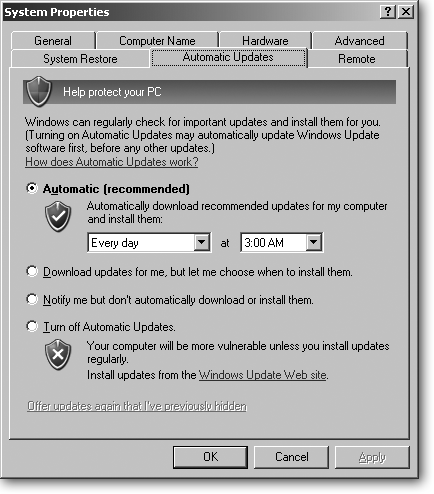
To make sure your PC takes advantage of Automatic Update, click the Start button, right-click My Computer, and from the shortcut menu, choose Properties. To see or change your settings, click the Automatic Updates tab, shown in Figure 15-6. Then choose from the following options:
Automatic. The best option for most people. This tells your PC to fetch any newly released updates in the background as soon as you connect to the Internet. It also lets you choose a particular time of day to install newly acquired patches. For best results, choose the default setting: “Every day at 3 a.m.” If your PC is turned off at the appointed hour, Windows XP asks to install the downloaded update the next time you turn on your PC.
Download updates for me, but let me choose when to install them. A good choice for laptoppers. This automatically downloads available updates in the background whenever you connect to the Internet. Once the update arrives on your PC, your taskbar sprouts a “notification balloon,” asking permission to install it. Should you need to turn off your laptop and dash for the taxi, change the permission balloon’s “Now” option to “Tomorrow.” Otherwise, install the update.
Figure 15-6. Set Windows Update to Automatic so your PC downloads new patches as they’re released. The downloads take place in the background, so they don’t interfere with your other Internet browsing and email activities. Should you disconnect before downloading the entire update, Windows resumes downloading where it left off the next time you connect to the Internet. You can install downloaded updates any time, even when you’re not online.
Notify me but don’t automatically download or install updates. Chosen only by those who enjoy nagging screens, this option makes Windows Update ask permission before downloading an update, and then ask yet again before installing it.
Turn off Automatic Updates. Microsoft tossed this in mostly for large corporations with dozens or even thousands of PCs. The delay gives the company’s techies enough time to test patches for potential conflicts with in-house software before installing the patch on every PC, thereby freeing workers from the chore.
Tip
Even if you’ve set Windows Update to Automatic, drop by the Windows Update site (http://www.windowsupdate.com) occasionally and click the Custom button. The Automatic Updates install only “Critical” updates—fixes that keep vandals from messing with your PC and its contents. The Custom button lets you view nonessential updates: enhancements to Media Player, for instance, as well as bug fixes—not security fixes—for programs like Outlook Express. Be sure to use Internet Explorer when you visit; Windows Update doesn’t work with any other Web browser.
Since Windows XP’s release in 2001, Microsoft has released a flood of patches to plug security problems. To simplify the patch-grabbing process, Microsoft released two mammoth patch bundles: Service Pack 1 and Service Pack 2. (Some people resort to the term “Service Pack 0” to describe Windows XP without any Service Pack installed.)
Service Pack 1, a large 133 MB file released on September 9, 2002, contained all of Windows Update’s patches from Windows XP’s first year of release, as well as support for the speedy new USB 2.0 ports (see Section 1.8.1) and faster S-ATA (Section 9.6.1) connections for new technology hard drives.
Don’t worry if you missed Service Pack 1, though. Service Pack 2, a whopping 266 MB file released on August 6, 2004, contains everything in Service Pack 1, plus enough patches to bring it up to date through July 2004. Service Pack 2 adds much-needed security enhancements by turning on Windows XP’s built-in firewall, improving wireless Internet support, adding a pop-up blocker to Internet Explorer (see Section 13.3), and adding Bluetooth support (see Section 14.10.5).
Note
Service Pack 2 installs only on legitimately purchased copies of Windows XP, which includes any PC purchased from a manufacturer like Dell or Gateway. If you had a friend build you a new PC with Windows XP for “really cheap,” you might be in for an unpleasant surprise when you try to install Service Pack 2 on your PC.
If you haven’t yet installed Service Pack 2, shown in Figure 15-7, you can download it from Microsoft’s Security Essentials site (http://www.microsoft.com/protect). The Service Pack interferes with some older versions of software like Norton Anti-Virus. If Service Pack 2 causes problems with one of your programs, visit that program manufacturer’s Web site; most have released free downloadable patches to fix the problem. You’ll find more information about Service Pack 2 on Microsoft’s Service Pack 2 information site (http://www.microsoft.com/windowsxp/sp2).

Figure 15-7. To see the Service Pack version installed on your PC, click Start and then right-click My Computer; from the shortcut menu, choose Properties. When the window opens to the General tab, the Service Pack version appears as the bottom line of the System section. Setting Windows Update to automatic tells Windows to grab waiting Critical Updates, including Service Pack 2.
In statistics trumpeted by vendors selling computer security products, the FBI reports a laptop is stolen every 53 seconds, and that 97 percent are never recovered. Even worse, the FBI announced in 2002 that 310 of its own laptops—about two percent of its inventory—were missing.
To keep laptops and other computer equipment firmly attached to their owners, several companies sell security devices:
Absolute Software (http://www.absolute.com); CyberAngel (http://www.sentryinc.com). Both companies sell computer recovery systems for tracking a stolen PC’s whereabouts. The first time the thief connects to the Internet, the software silently and securely drops by the company’s computers, which log the missing PC’s IP address—a traceable number showing the PC’s geographic location and Internet Service Provider. Working with the police, the company traces the IP address to the Internet account owner’s billing address, and then sends in the dogs. Both companies report nearly 90 percent recovery rates.
CaveoAntitheft (http://www.caveo.com). This motion-sensing PC Card shrieks when somebody moves a laptop without first disarming the alarm.
CompuCage (http://www.compucage.com). Built to keep equipment from ever leaving a desk, CompuCage’s products include a variety of chunky metal holders, thick cables, and bolt-on devices for PCs, laptops, and monitors.
Kensington’s Security Slot (http://www.kensington.com). The Kensington Security Slot comes installed on a wide range of computer hardware, including laptops (see Figure 15-8), and works with a variety of locking devices to keep computers and other devices from walking off.
If a stranger came up to you on the street and asked for your banking password, you’d probably think he was loony. Yet, thousands of people feel compelled to hand over their banking passwords when that same request comes through email.
In a practice known as phishing, scammers send emails that appear to come from your bank, PayPal, eBay, or similar finance-related sites (see Figure 15-9). Unfortunately, the emails are carefully crafted spoofs that try to trick you into visiting the scammer’s site (cleverly constructed to look like a legitimate site) and entering your coveted account name and password.
Legitimate companies never send you email asking you to verify your password. If legitimate companies need to contact you, they’ll send a letter. Or, they simply wait until you visit their site and log in. The “urgent” requests in your mailbox come from thieves waiting for you to click their links and enter your account information, password, credit card numbers, and anything else they can trick you into revealing.
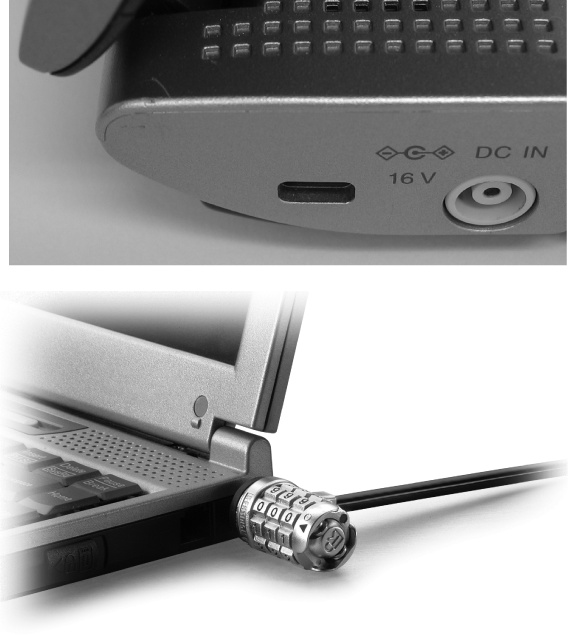
Figure 15-8. Top: Many laptops, portable hard drives, monitors, projectors, and other expensive gadgets include a Security Slot—a small rectangular hole in the case that’s left more than a few owners wondering what plugs into it. Bottom: The answer comes from Kensington (http://www.kensington.com), which, along with many other companies, sells cables and locks that latch onto the slot, letting you fasten your laptop or other equipment to the nearest desk leg, chair, or other large, solid object. Manufacturers often place a reinforcing strip of metal behind the security slot; ripping the lock out of the slot takes a good chunk of the laptop’s case along with it.
Note
The easiest way to avoid phishers is to never give any personal, financial, or account information to any Web site or email address unless you started the communication. When in doubt, open your browser, and type in the institution’s Web site address by hand, not by clicking any emailed link. Check the link displayed in your email program’s lower corner against the link at the company’s legitimate Web site. If they’re different, you’re being scammed.
Just about everybody’s heard the terms virus and spyware by now, but they’re only a few examples of a growing category of software called malware: programs designed for malicious purposes. Most slip into your PC behind your back, leaving problems in their wakes. This section describes the various types of malware, how to identify them, and most importantly, how to get rid of them.
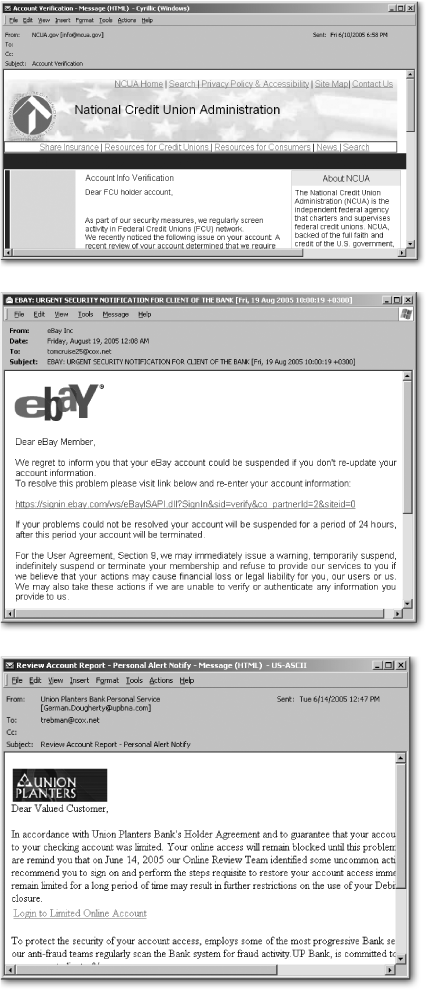
Figure 15-9. These “phishing” emails are some of more than 35 million fraudulent email messages sent to people during the first six months of 2005, according to IBM. Don’t respond to any requests like this that arrive through email; they’re all scams. Instead, type the company’s email address into your browser—don’t click the emailed link—and then forward the email to the company’s security department.
Malware goes unloved by everybody but its creators. Unfortunately, removing malware is much more difficult than becoming infected by it. Here are some of the most common types of malware found today, so you’ll know just what your antivirus program is talking about.
Adware. Just as some free magazines support themselves with ads, some programs do the same: an advertising banner appears inside the program as it runs. Examples include Eudora email (see Section 12.1.2), AOL Instant Messenger, and some popular file-sharing programs. The worst type of adware hijacks your Web browser and places an ad-filled bar along one side of the browser window. Some ads continue to appear even long after you’ve disconnected from the Internet.
Back doors. Whether spread as a virus or worm, this software lets its creator enter and use your PC from remote locations. These back doors are often used to create Zombie PCs (see later in this list).
Cookies. Not to be confused with viruses, adware, or spyware, cookies (see Section 13.1.1.5) are small identifying files that Web sites place on your PC. They’re not inherently evil, and some work to your benefit.
Dialers. These programs tell a dial-up modem to call expensive “pay-per-dial” numbers, resulting in hefty charges on your next phone bill. If you hear your PC dialing at odd hours of the day when you’re not at the keyboard, you may be a victim.
Hijackers. These attach themselves to Internet Explorer, changing its settings so you’re sent to certain pages automatically. Many hijack your Home page and search pages, redirecting your PC to Web sites loaded with advertising or pornography.
Key logger. This software waits until you visit a secure site—a bank, online merchant, or similar site—and then begins recording your keystrokes, catching your credit card number as you enter it into the online form. Most work with back doors to send the information back to the thief.
Spyware. This software monitors your computing activities, learning about your life. Some spyware simply watches the Web sites you visit to learn your interests. Then, as you visit your usual round of sites, the ads you’re presented with are tailored to your interests. The worst type of spyware works like a key logger, waiting for you to type in a credit card number so it can catch the information and then send it to the spyware’s creator.
Trojan Horse. Not a virus as much as a delivery mechanism, this software contains something different than you expected: a virus or back door built into a seemingly innocent game, for instance.
Viruses. This software attaches itself to another file—email, for instance, or a program. When you open the file or run the program, you launch the software instead, and end up infecting your system. The virus then embeds itself into other files or email, waiting to be sent to the next victim.
Worms. Worms behave much like viruses, but they’re able to spread themselves without human assistance. Some come with built-in email programs that email copies of themselves to people in your address book; others travel the Internet, or internal networks, looking for unprotected PCs to infect and, from there, to begin replicating themselves.
Zombie PCs. These Internet-connected PCs have been broken into by online thieves and harnessed for their own projects. Some virus writers create flocks with hundreds or thousands of broadband zombie PCs, and then sell or rent them to others for sending spam. Zombie PCs behave naturally, so most owners—often businesses or universities with dozens of PCs—don’t notice anything unusual. Security firms estimate that more than 50 percent of spam now comes from zombies, as spammers try new tactics to thwart anti-spam laws.
Any or all of these symptoms may appear when your PC’s infected with a virus, spyware, or other malware variant:
Extra ads. You may notice advertising banners that don’t go away as you move from one Web site to another, or pop-up/pop-under ads that seem to thwart Internet Explorer’s pop-up blocker (Internet Explorer → Tools → Pop-up Blocker → Turn On Pop-up Blocker). If you don’t see the pop-up blocker, you need to install Windows XP’s Service Pack 2 (see Section 15.4). Some ads may appear even when you’re not online.
Sluggishness. Since your PC’s burdened with extra tasks taking place surreptitiously, it may run more slowly than usual, taking longer for Windows to load, or to move from one Web site to another.
Error messages. Most malware isn’t written with performance in mind, leading to cryptic error messages about programs or things you’ve never heard of before, much less installed. You may see phrases like “Illegal Operation Error.”
Internet Explorer problems. You may not be allowed to visit sites you’ve previously visited, or Internet Explorer may visit sites you haven’t requested. When your browser first opens, it may show a Web site other than your Home page and refuse to let you change it back to your original selection.
Toolbar issues. Some malware installs a new toolbar in your browser that’s difficult to pry off.
Crashes. Your Internet browser or even your PC may crash unexpectedly at times, and for no apparent reason.
When your PC’s acting strangely, fire up a free spyware scanning program (see Section 15.6.3.2) instead of calling tech support or reinstalling software. If you’ve never run an anti-spyware program before, you’ll be amazed at all the critters it finds bedding down in your PC.
Like a bad cold, malware is easy to catch, but difficult to get rid of. A variety of programs detect, remove, and protect against infections.
Although some antivirus programs are slowly adding spyware removal to their inventories, most only protect you from viruses. Unless your virus program specifically says that it detects and removes spyware, you need two separate programs: one to remove viruses, and another to recognize and remove spyware.
The key word here is recognize. When these programs scour your PC, they search for code that matches code in their databases. When they find a match, they either delete it or send it into “quarantine,” leaving it powerless.
But since the most recently released viruses and spyware don’t yet appear in the latest databases, the programs can’t detect them. To keep up, companies constantly update their databases, sometimes hourly. That’s why running any antivirus or anti-spyware program requires you to download the latest database. Antivirus programs usually require a yearly subscription for access to their latest databases.
Some programs keep themselves automatically updated, visiting the Internet and downloading what they need in the background. Others require you to connect to the Internet and download the latest “definitions” each time you run the program. But whether they call it a database or a definition, it’s mandatory; without this new information, the program’s no defense against the latest batch of villains.
Windows XP doesn’t include any antivirus program, but Microsoft offers a page that links to discount trial offers from a variety of software manufacturers including the four biggies: Symantec (http://www.symantec.com), McAfee (http://www.mcafee.com), Trend Micro (http://www.trendmicro.com), and Computer Associates (http://www.ca.com).
The following page is an excellent first stop if you’re running an unprotected PC. To download the trial versions, visit this Web page:
| http://www.microsoft.com/athome/security/viruses/wsc/en-us/default.mspx |
Several companies offer free antivirus software, letting you try a product without any strings attached. They’re limited to personal use, which means you’re not supposed to run them if you’re working in an office. Their updates and definitions don’t download as quickly as do the pay versions; and they offer no technical support. Some are given away in the hope you’ll upgrade to the pay versions with their additional features. These are the three biggest antivirus freebies:
AVG Antivirus (http://free.grisoft.com)
Free avast! 4 Home Edition (http://www.avast.com/eng/free_software.html)
ClamWin (http://www.clamwin.com)
Note
Windows XP’s Security Center nags you when you install an antivirus program that it doesn’t recognize. If XP’s Security Center doesn’t recognize your’s, stop the nagging screens by visiting the Security Center (Start → Control Panel → Security Center) and then choose “Change the way Security Center alerts me.” There, you can turn off the Virus Protection option, effectively stifling the alerts.
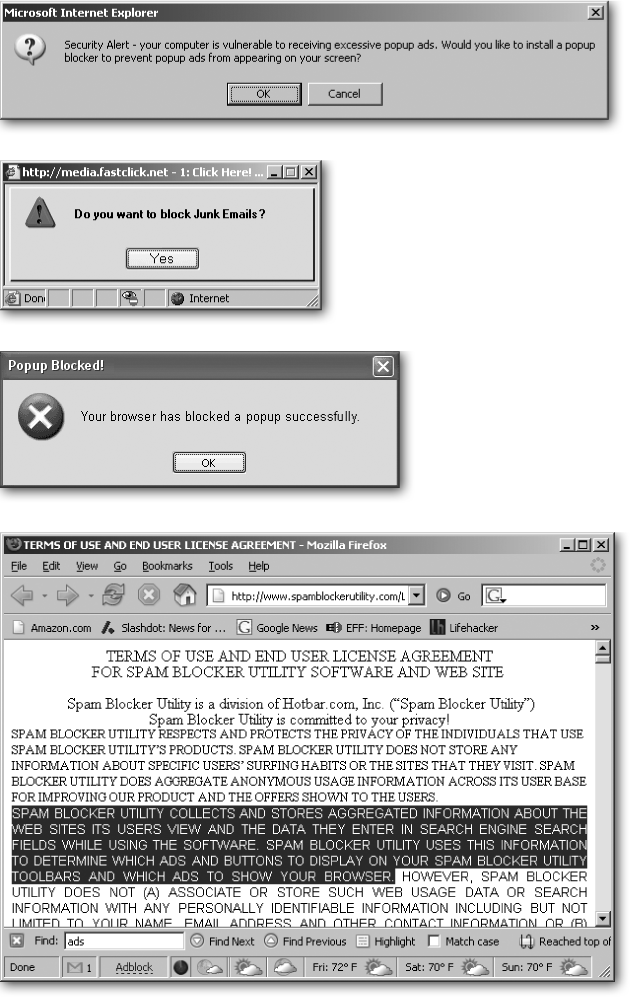
The first step in removing spyware and adware is to not get tricked into installing it. Lots of spyware tries to install itself automatically when you click a pop-up ad, like the ones shown in the top of Figure 15-10. As the software begins to install, it spills the beans midway through the fine print of the multipage End User Legal Agreement, shown in Figure 15-10, bottom. Most people miss this not-so-fine print as they race to click the I Accept button.
To avoid picking up unwanted software, follow these tips:
Install Service Pack 2 (see Section 15.4) and turn on Internet Explorer’s pop-up blocker (Section 13.3).
Better yet, switch to Firefox, which doesn’t support the type of programming exploited by many unwanted programs.
Figure 15-10. Top and Middle: Pop-up ads lure you by mimicking Windows XP’s own messages or claiming to do something useful. Bottom: When you install this “junk email blocking” software, more details emerge deep in the licensing agreement: the utility displays targeted ads and popups from both the company itself and third-parties. And get this part: “Spam Blocker Utility, from time to time, may work with email direct marketers, affiliates, and/or sponsors to offer users the opportunity to subscribe to various subscriptions to newsletters and information, whether by e-mail or otherwise.”
Don’t click any pop-ups except the X in their upper right-hand corners. (Clicking the pop-up’s button marked Close sends you to the company’s Web site.) If you’re barraged with pop-ups, don’t try to close them individually. Instead, close them all in one swoop: right-click the group of Internet Explorer programs on your taskbar and then, from the shortcut menu, choose Close Group.
Read licensing agreements thoroughly before installing anything offered to you on the Internet.
If it’s too late, and your PC’s plagued with unwanted toolbars, ads, and other nuisances, several free programs can scan your PC and strip away any spyware or adware they find.
Ad-Aware SE (http://www.lavasoftusa.com/support/download/)
Spybot-S&D (http://www.safer-networking.org)
When those programs can’t catch a particularly clingy piece of spyware—or they won’t even run—follow these steps to put Windows into troubleshooting mode, giving the spyware killers a better chance to wring the spyware out of your PC:
Download and install both pieces of anti-spyware software mentioned above.
Some spyware restricts Internet Explorer so it can’t visit anti-spyware sites. If your copy of Internet Explorer’s in similar bad shape, download and install Firefox (see Section 13.1.2). It’s a much more difficult target for spyware programs.
Load each program, one at a time, updating its definitions and then closing it without performing any kind of scanning operation.
Disconnect from the Internet and restart Windows XP in Safe Mode.
Disconnect your PC from the Internet by unplugging your PC’s phone or network cable, or unplugging its wireless adapter.
Safe Mode, a basic troubleshooting tool, starts Windows in a no-frills mode, bypassing all but the most basic drivers and not running your PC’s normal “start up” software—which often consists of spyware or adware. To enter Safe Mode, restart your PC (Start → Turn Off Computer → Restart), and then press F8 once or twice a second before Windows XP loads. When Windows XP’s Boot Mode menu appears, select Safe Mode.
Run Ad-Aware SE and remove any spyware it finds.
Run Spybot-S&D and remove any spyware it finds.
Restart your PC normally and reconnect to the Internet.
Visit Windows Update with Internet Explorer and install any “critical” patches.
Be sure to download and install any patches marked “Critical.” If you’ve turned on Automatic Updates (see Section 15.3), you shouldn’t find many, if any.
Tip
Microsoft entered the anti-spyware market, and it’s currently giving away a copy of the program during its testing phase. Feel free to download it (http://www.microsoft.com/athome/security/spyware/software/default.mspx ) and let it extricate any spyware the other two programs may have missed.
PCs are no longer safe when directly connected to the Internet. A new, unpatched version of Windows XP typically becomes infected within 15 minutes of connecting to the Internet. Microsoft finally realized the extent of the problem, and its collection of patches in Service Pack 2 automatically flipped Windows XP’s built-in firewall to “On.” (Before that, Microsoft expected you to find the firewall and turn it on yourself.)
Firewalls work their magic by constantly monitoring the flow of information between your PC and the Internet. When a program—your Web browser, for instance—needs information, it sends a request to the Internet, asking for information to be sent back to your PC. The firewall takes careful note of every request, as well as every piece of incoming information.
When the firewall finds a match between a request and an answer, it lets the answer enter your PC. But if information arrives without a matching request, the firewall assumes it’s either evil, lost, or simply background noise; either way, the firewall prevents it from entering.
Firewalls come in two types, hardware and software, both described next.
Letting your broadband-fed PC connect directly to the Internet is like not bothering to install a door. It’s convenient when carrying in groceries, but otherwise it’s a pretty unsafe arrangement.
That’s where a hardware firewall comes in. A broadband router (see Section 14.1.3) works as a base-level hardware firewall by sitting between your PC and the Internet. Potential intruders can’t “see” your PC, which means that none of their Windows exploits work. And since they also won’t know your brand of router, their arsenal of router exploits is further limited. The triple crown protection benefit is the simple software that controls the router’s traffic directing: it’s small, and much easier to keep secure than Windows.
A router is a very safe investment for anybody with an always-on broadband Internet connection. The latest routers come with more advanced firewall software built in for added protection. When shopping for a router, look for one that advertises a built-in firewall with both SPI (Stateful Packet Inspection) and NAT (Network Address Translation).
Whereas a hardware firewall sits between the PC and the Internet, a software firewall lives inside the PC itself, inserting itself between the Internet and your programs. Software firewalls come in two types: one-way, and two-way.
One way firewalls simply turn away any unrequested information coming from the Internet. That’s enough to stop many worms from slipping inside your PC. Windows XP’s built-in firewall (see below) is a one-way firewall. Like most one-way firewalls, it’s small and easy to live with.
Two-way firewalls, like one-way firewalls, also keep things from entering your computer without permission. But a two-way firewall keeps things from leaving your computer without permission as well. That lets you catch spyware, key loggers, back doors, and other programs that slip into your PC, and then try to notify their creator of their whereabouts.
That second layer of outgoing protection places a big burden of inconvenience on you, however. The firewall asks you questions like, “Should AcroRD32.exe be allowed to connect to the Internet?” Unless you already know that AcroRD32.exe is Adobe’s Acrobat Reader checking for a newer version, you’re left feeling like a 5-year old in a calculus class.
Fortunately, plenty of other people feel the same way, and a search for any questionable program’s name on Google usually turns up the answer immediately. Once you flag a program as Trusted, the firewall no longer bugs you about it. As a result, only your first few days with a two-way firewall are a nightmare; after that, the firewall rarely bugs you until you either install a new program or the firewall notices something evil trying to phone home.
Zone Labs (http://www.zonelabs.com) offers both a free and paid version of its two-way firewall, ZoneAlarm.
Service Pack 2 not only turns on Windows XP’s built-in firewall, it also makes it difficult to turn off. For instance, the Network Connection Wizard, a requirement for setting up a new network, promptly firewalls every connection on your PC. If you manually flip Windows Firewall’s On switch, Windows places a firewall on all your network-capable connections. It even protects your FireWire port from your digital camcorder.
To decide for yourself which connections the firewall protects, click Start → Control Panel → Windows Firewall. Windows Firewall’s Properties page, shown in Figure 15-11, separates its controls into three tabs: General, Exceptions, and Advanced.
As soon as you turn on a firewall, adding that layer of insulation between your PC and the Internet’s evils, the clamoring begins. Many Internet-connected programs like messengers and online games insist that you start poking holes in the firewall’s protective layer so they can talk to the outside world.
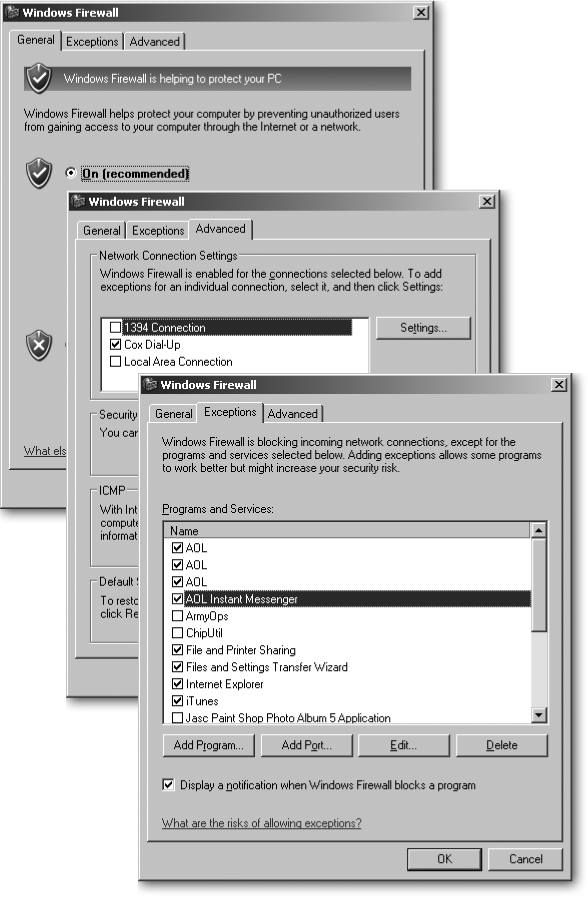
Figure 15-11. Top: The General tab lets you turn on Windows Firewall. Since you want only one software firewall working at a time, Windows Firewall is smart enough to turn itself off when it spots another firewall. If you install an unrecognized firewall, come here to turn off Windows Firewall so the two firewalls don’t interfere with each other. Middle: Windows Firewall lists all your network connections here, letting you turn off the firewall for connections that don’t need protection. Turn the firewall on for your dial-up or broadband Internet connections, for instance, but turn it off for your local network and FireWire port. Bottom: The Advanced tab lets you grant safe passage to programs like AOL Instant Messenger that need to receive spontaneous communications from the Internet.
To add a program to Windows Firewall’s exceptions list, follow these steps:
Open the firewall’s Exceptions tab.
Click Start → Control Panel → Windows Firewall and then click the Exceptions tab, shown in Figure 15-11.
Click the Add Program button, add the program, and then click OK.
The firewall lists a wide variety of programs it recognizes. If you spot your program, click its name from the list and then click OK to add it. If it’s not listed, though, follow the next step.
Click Browse and navigate to the program’s folder; click the program’s name, and then click OK.
The firewall adds that program to the “okay” list, allowing any program on the Internet to communicate with it.
Some programs want you to add ports—little communications portholes—so they can talk to the Internet uninterrupted. To add a port to Windows Firewall’s Exceptions list, you need to know two things from the program: the port number and the port’s protocol (either TCP or UDP).
For instance, the World of Warcraft online multiplayer game wants you to open two ports: TCP port 3724 and TCP port 6112. Armed with that information, follow these steps to open those ports in Windows Firewall:
Open the Firewall’s Exceptions tab.
Click Start → Control Panel → Windows Firewall and then click the Exceptions tab, shown in Figure 15-11.
Click the Add Port button and then add the port name and type, shown in Figure 15-12 .

Figure 15-12. If you’re having trouble with an Internet-connection-hungry program, ask the troubled program’s Customer Support site the port “number” and “type” to open in Windows Firewall. Then click Add Port on the Exception’s tab to fill out this form. In the Name box, type a name so you’ll remember why you’re opening that particular port. In the Port number box, type the port number. Then choose the port’s type, either TCP or UDP. Click OK to finish the job.