Chapter Goal: Learn how shapes and type can warp and distort with the Envelope Distort tool.
The Envelope Distort tool in Illustrator is similar to the Puppet Warp and the Transform ➤ Warp found in Photoshop, though those commands are not required for this book. The Envelope Distort tool allows you to create a shaped mesh around a shape or text item that you can then warp and manipulate to create unusual distortions. We will explore the options of the Envelope Distort in this chapter.
Note
You can find the projects for this chapter in the Chapter 9 folder.
Envelope Distorts on Objects and Type
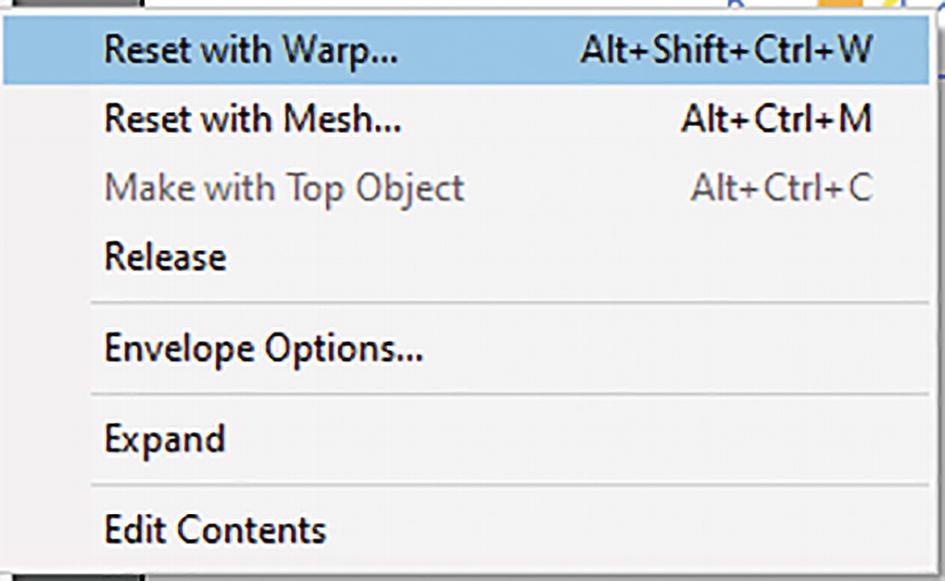
If you need to warp an object, text, or even a pattern, you can do so with three commands that are found in the Object ➤ Envelope Distort menu. Refer to Figure 9-1.
Figure 9-1
Object ➤Envelope Distort ➤ Sub-menu Commands
They are as follows:
Make with Warp
Make with Mesh
Make with Top Object
Envelope Options
However, before you use these commands, and to warp all your designs successfully, you should first look at Object ➤ Envelope Distort ➤ Envelope Options, as these settings affect the three commands. Refer to Figure 9-2.
Figure 9-2
Envelope Options dialog box
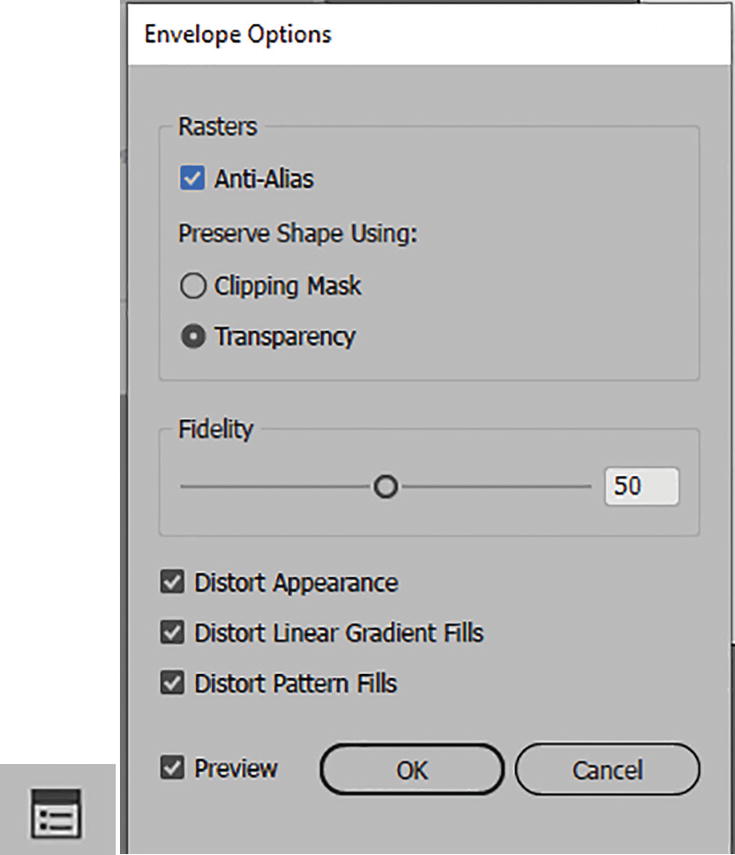
In the Envelope Options dialog box are settings for the following:
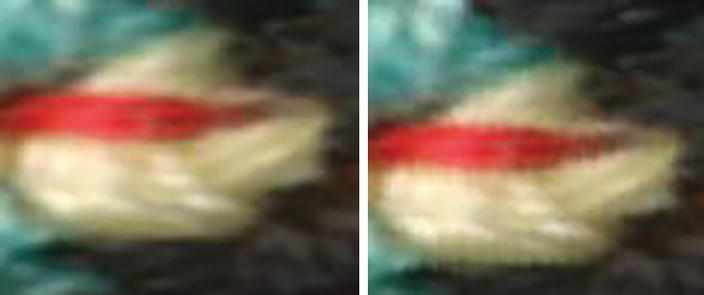
Rasters: The Anti-Alias setting, by default, is enabled and appears to affect raster images, like an embedded image, so that when it is warped by the envelope, there is a smooth transition. Alternatively, you can uncheck it to speed up the warp, but the raster image warp may not be as smooth. This option does not appear to affect vector graphics, which we have been using in previous chapters. However, keep this setting enabled. Refer to Figure 9-2 and Figure 9-3.
Figure 9-3
Close-up of a photo of thread with and without Anti-Alias setting enabled
Preserve Shape Using: This setting has Clipping Mask and Transparency options. This affects how the raster image will be preserved in its shape when you are using non-rectangular envelopes to distort the image. By default, it is set to Clipping Mask. The Transparency setting will create an alpha channel instead. In this case, because I am using vector graphics in my projects, I left it at the default of Clipping Mask. Refer to Figure 9-2.
Fidelity: The range is 0–100, and the default is 50. This determines how closely the object will fit the mesh of the envelope. If it is a complex group of shapes within the envelope, a higher setting of 99 may improve the conformity of the objects to the envelope, but may increase distortion time. Leave it at the default of 50 for now, as most of the envelope distortions that we will do in this chapter will be simple. Refer to Figure 9-4.
Figure 9-4
Envelope Options dialog box, Fidelity setting
Distort Appearance: By default, this is checked, and you can distort the general appearance of your graphic styles and effects. If unchecked, then the options to affect gradients and pattern fills are disabled. However, strokes can still be distorted; for our purposes, you should have this option enabled. Refer to Figure 9-5.
Figure 9-5
Envelope Options dialog box, Distort Appearance setting disabled and enabled
Distort Linear Gradient Fills: If the object has gradient fills, it is possible to warp the linear gradient fill. However, radial and freeform gradients cannot be warped using this method. Check to enable this setting. Refer to Figure 9-6.
Figure 9-6
Envelope Options dialog box, Distort Linear Gradient Fills and Distort Pattern Fills enabled
Distort Pattern Fills: If you want to distort the pattern fills in your fill and stroke, then you need to enable this checkbox as well. We will look at this in more detail later. Refer to Figure 9-6.
Once you have updated your settings in the dialog box, click OK to commit the settings and note that the preview is enabled by default. Refer to Figure 9-7.
Figure 9-7
Envelope Options Dialog Box with preview enabled and the OK and Cancel buttons
Make with Warp
When you have a group of type or an object that you need to warp and distort in a preset way, using Object ➤ Envelope Distort ➤ Make with Warp is a good solution.
To test the command, go to File ➤ Open Make_With_Warp_Start.ai. Save as a copy if you want to practice or view some of my examples. Refer to Figure 9-8.
Figure 9-8
Colorful shapes and type with a pattern within
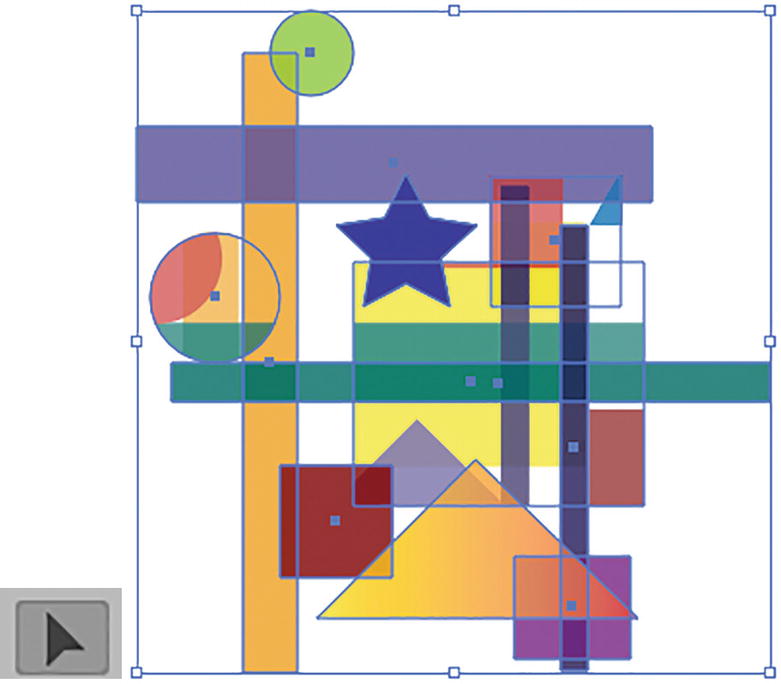
In this case, select the pattern of the grouped object with the Selection tool first. It has some solid colors but also patterns and linear gradients. Refer to Figure 9-9.
Figure 9-9
Use the Selection tool to select the grouped shapes
Now go to Object ➤ Envelope Distort ➤Make with Warp. Refer to Figure 9-10.
Figure 9-10
Warp Options dialog box
This brings up the Warp Options dialog box, which is similar to what you’ve seen in Photoshop, if you’ve worked with Edit ➤ Transform ➤ Warp on your own projects. Though not required for this book, take a moment to compare this area in Photoshop; you can refer to this link:
A rectangular envelope has now wrapped the object, and you can manipulate the shape by setting the Style to either Arc, Arc Lower, Arc Upper, Arch, Bulge, Shell Lower, Shell Upper, Flag, Wave, Fish, Rise, FishEye, Inflate, Squeeze, or Twist. You can see that these and the following settings change when the preview is enabled. Refer to Figure 9-11.
Figure 9-11
Warp Options dialog box with Style options, and a warp set to Arc for the enveloped object
Test out each of these styles and then adjust the following settings:
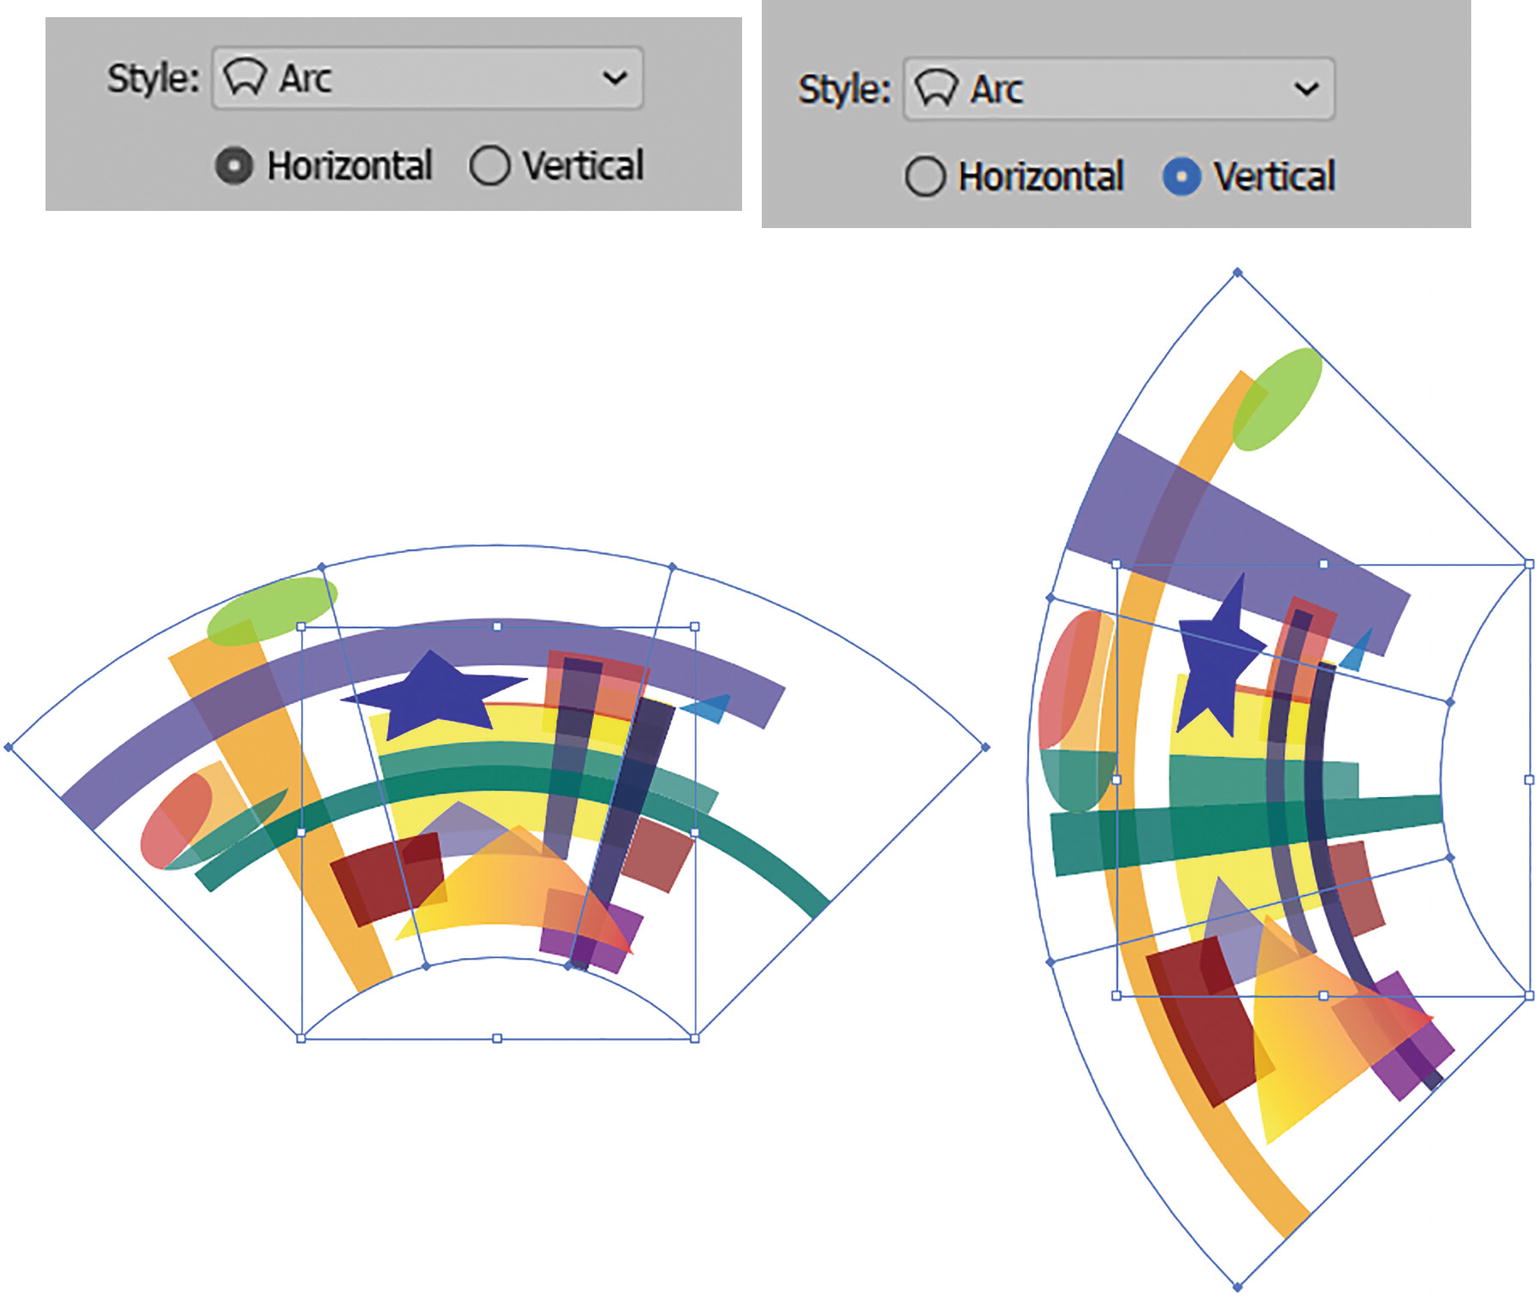
Horizontal and Vertical: This affects the direction of the style. Refer to Figure 9-12.
Figure 9-12
Warp Options dialog box with examples of Arc with Horizontal and Vertical settings
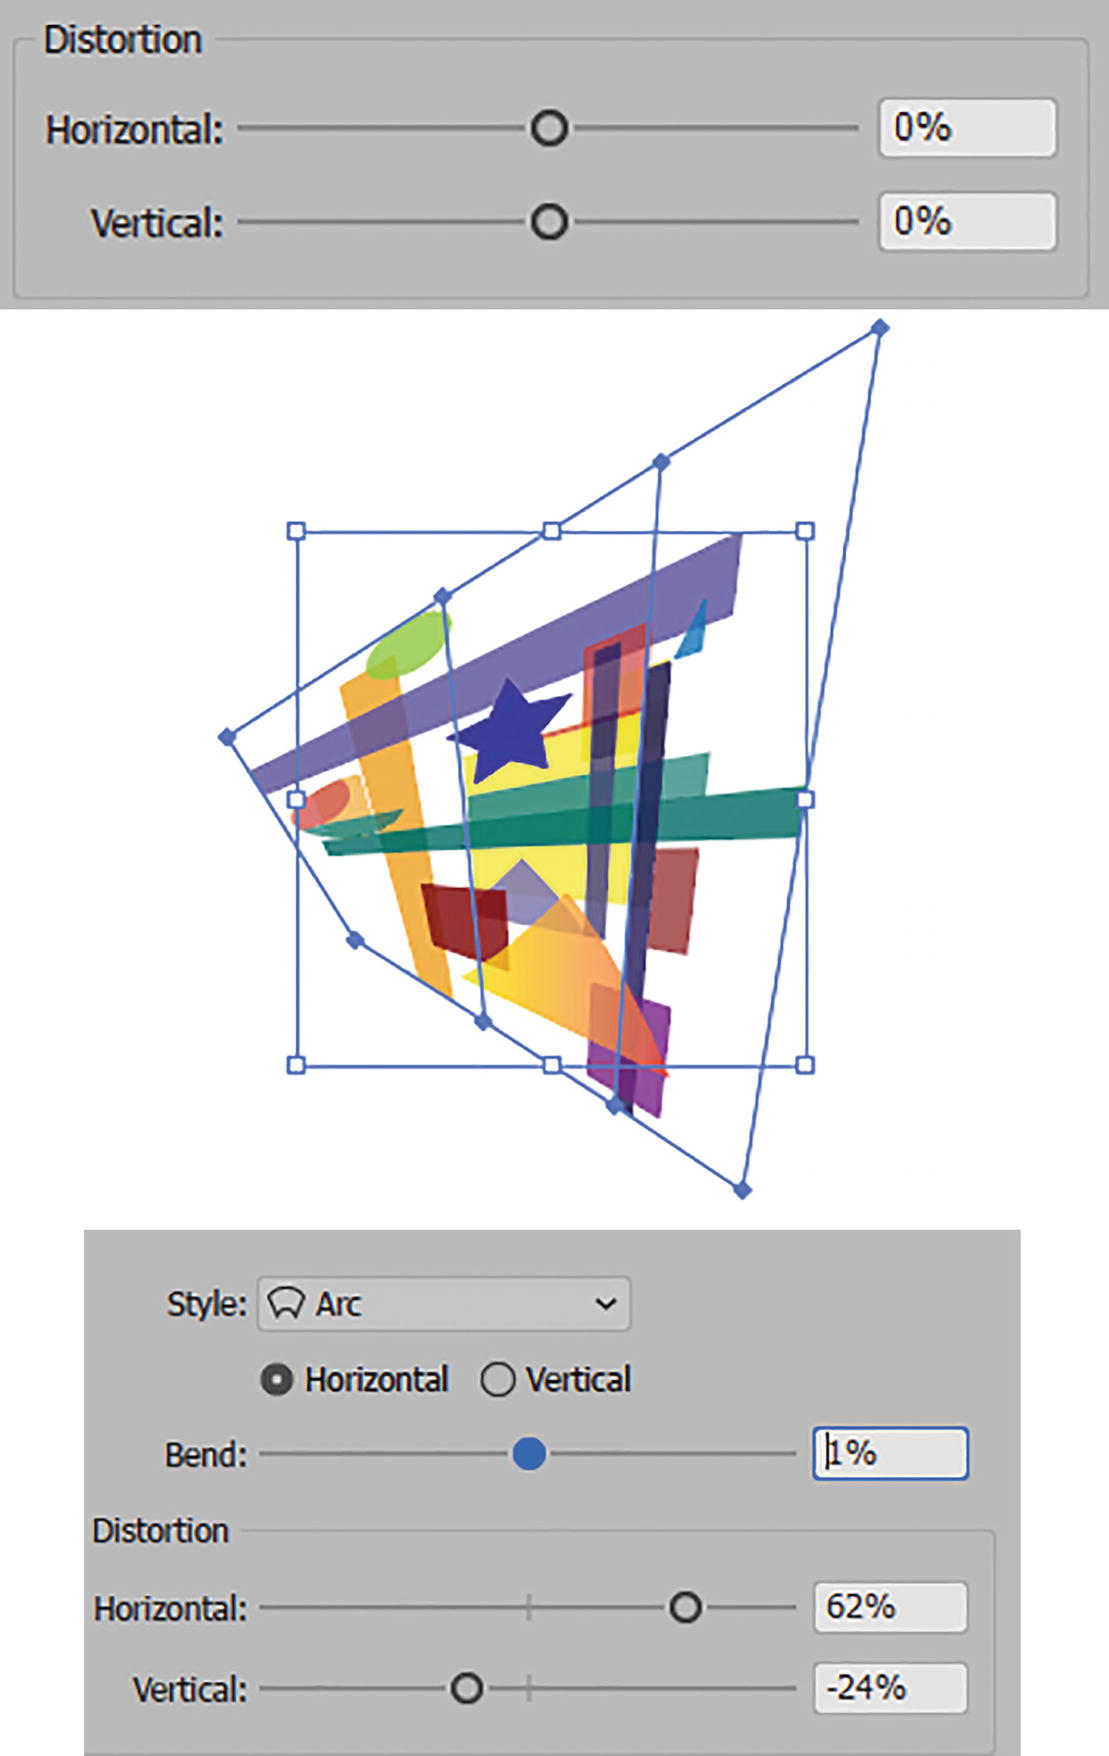
Bend: By default, this is set to 50%. However, it can range from -100% to 100%. Depending on if the Bend is set to Horizontal or Vertical, the shape can warp quite a bit. Refer to Figure 9-13.
Figure 9-13
Warp Options dialog box with example of setting the bend from 50% to 100%
Distortion: This can be either Horizontal (-100% to 100%) or Vertical (-100% to 100%). This can affect how the sides of the object warp on the horizontal or vertical planes. Refer to Figure 9-14.
Figure 9-14
Warp Options dialog box with example of setting the bend and Vertical and Horizontal distortion sliders
Note
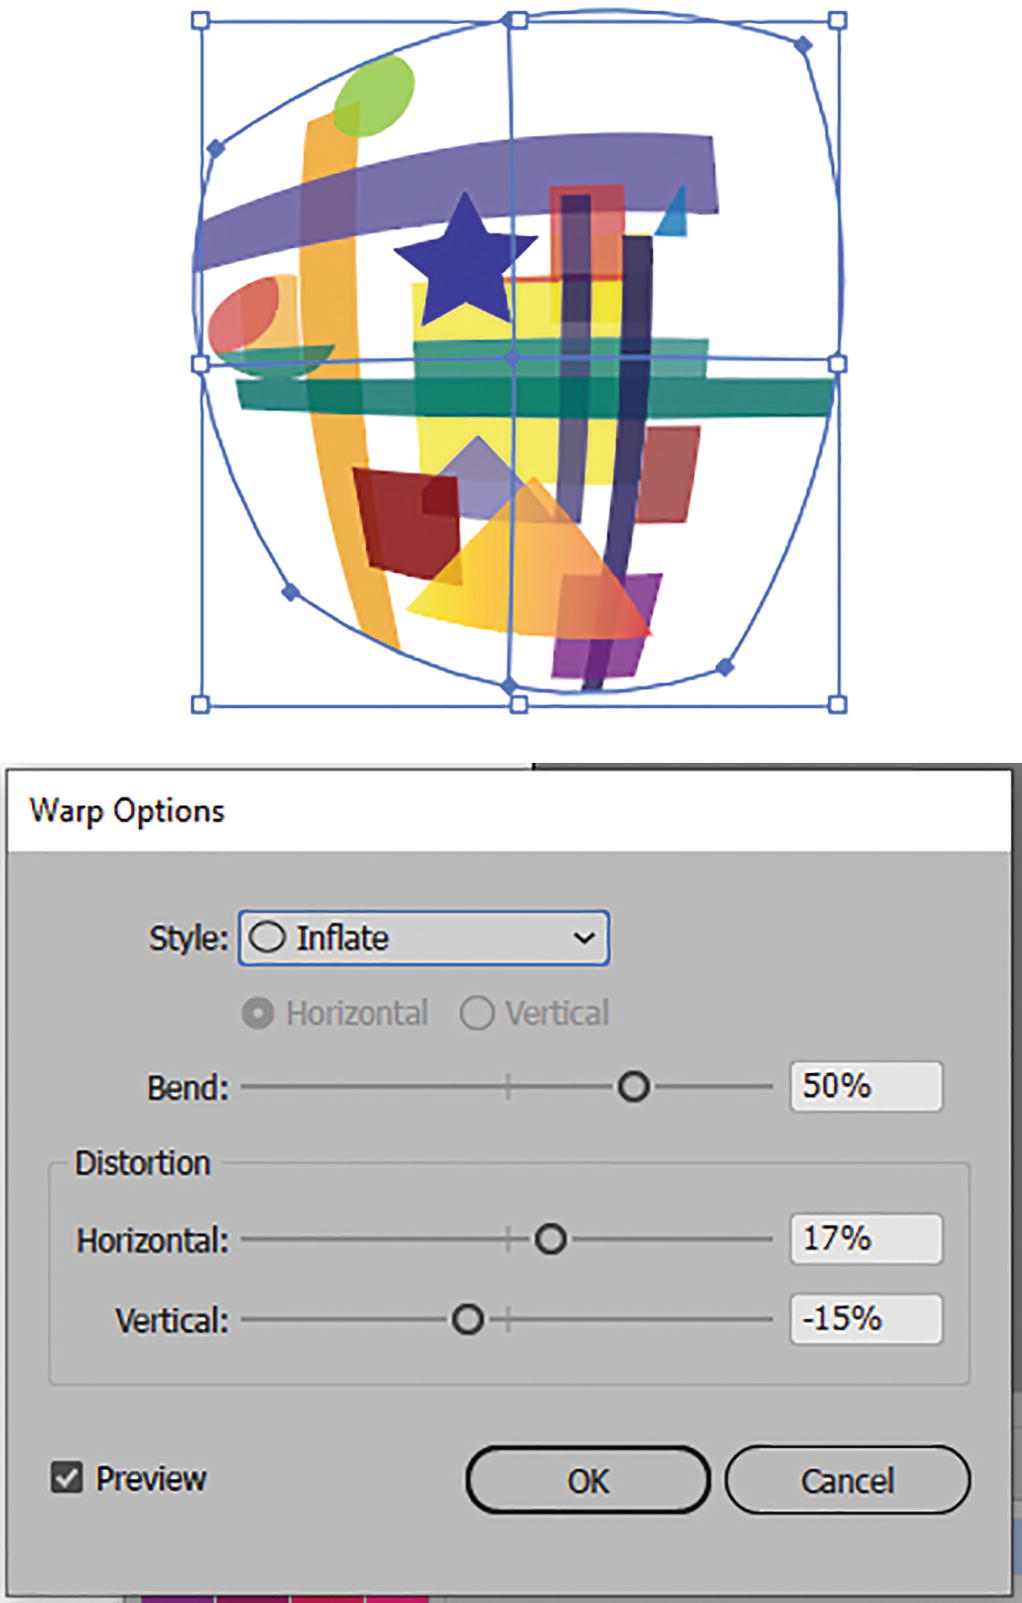
As you test the style options, you’ll note that FishEye and Inflate do not have Horizontal and Vertical style options, though you can set the Bend and Horizontal and Vertical distortion sliders. Refer to Figure 9-15.
Figure 9-15
Warp Options dialog box with Inflate setting with Horizontal and Vertical options grayed out
In this case, for this pattern, I liked the Flag style, horizontal, with a bend of 32% and distortion of -15% horizontal and -1% vertical. I clicked OK to commit the change, and some of the shapes were expanded in the process. Refer to Figure 9-16.
Figure 9-16
Warp Options dialog box with example of Flag setting and settings altered in the dialog box
Now that the selected object is within an envelope warp, you can refer to the Control panel.
Control Panel Options
Besides the similar Control panel options that you find for most objects to control the opacity of the mask, alignment, and transformation, the Control panel lists some options that specifically relate to the Envelope Warp. Refer to Figure 9-17.
Figure 9-17
Control panel options for Envelope Warp tool
Edit Envelope: Currently, this setting is enabled so that you can continue to edit the envelope from the Control panel rather than having to enter the Warp Options dialog box again. You can adjust the Style from the list, select Horizontal and Vertical radio buttons, and set a new bend and horizontal (H) and vertical (V) distortions using the text box or sliders. Refer to Figure 9-18.
Figure 9-18
Control panel Edit Envelope options for the current style warp
You can also adjust your Envelope Options dialog box from here by clicking on the List icon. In this case, the options have changed to Preserve Shape Using Transparency. However, in other situations it may be set to Clipping Mask. On most vector shapes, this will make little difference. Refer to Figure 9-19.
Figure 9-19
Control panel Envelope Options button to access the Envelope Options dialog box
The other button in the Control panel is Edit Content. This is the same as selecting Object ➤ Envelope Distort ➤ Edit Contents. This allows you to see the other Control panel options for objects specifically, as we saw starting in Chapter 2, to adjust parts of the object. Refer to Figure 9-20.
Figure 9-20
Control panel Options for Edit Content
For now, switch back to and click on the Edit Envelope option. Refer to Figure 9-21.
Figure 9-21
Control panel Edit Envelope button
Some other related Make with Warp settings are included in the Envelope Distort menu. Refer to Figure 9-22.
Figure 9-22
Additional Envelope Distort options in the Envelope Distort menu
Reset with Warp: Allows you to reset the warp by entering the Warp Options dialog box and making changes. Refer to Figure 9-23.
Figure 9-23
Warp Options dialog box where you can reset the warp
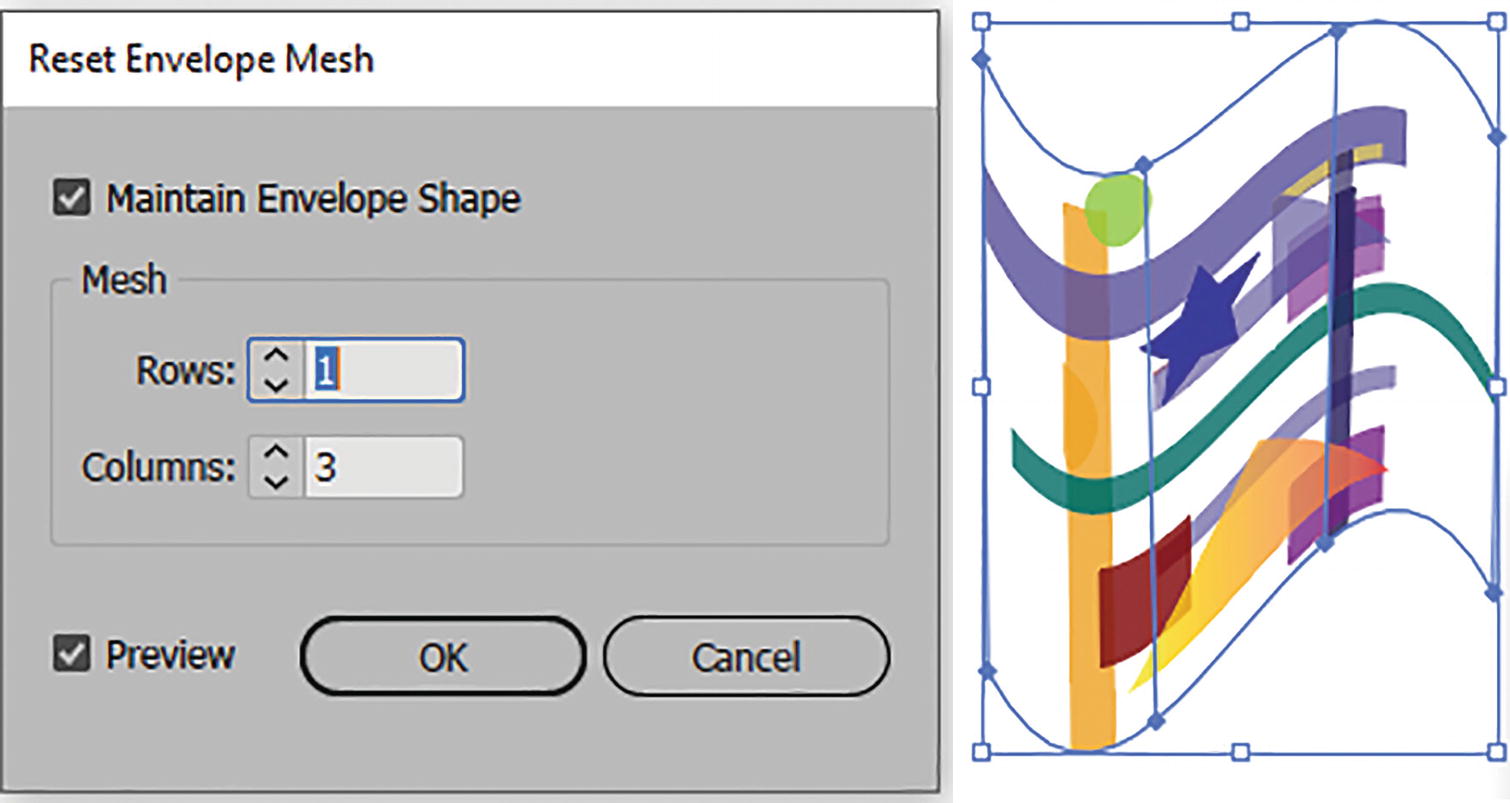
Reset with Mesh: Once a mesh is created, you can choose to maintain the envelope shape but also adjust the rows and columns of the mesh. In this case, it is set to Rows: 1 and Columns: 3. You can adjust this; however, doing so will make it into a custom mesh, and you may not have access to the Warp Options settings. In this case, click the Cancel button, or, if you committed the setting by clicking OK, then go to Edit ➤ Undo (Ctrl/CMD+Z) right away, or use the History panel to revert to a prior state. Refer to Figure 9-24.
Figure 9-24
Reset Envelope Mesh dialog box next to an example of a mesh
We will look at this custom option in the next section of this chapter.
However, as long as you do not add extra rows and columns to the mesh, if you want to edit your Make with Warp envelope further you can click on points and handles with the Direct Selection tool or Anchor Point tool, as you did with the mesh in Chapter 8. Then, when you click on the shape with the Selection tool again, you can access the Select Warp Styles option in the Control panel.
Release: This releases the object from the envelope and makes the mesh a separate shape, which you can later select separately and then backspace/delete if you do not require it. Refer to Figure 9-25.
Figure 9-25
Release the mesh from the grouped object and delete the mesh
In this case, use Edit ➤ Undo right away if you did not intend to release the object.
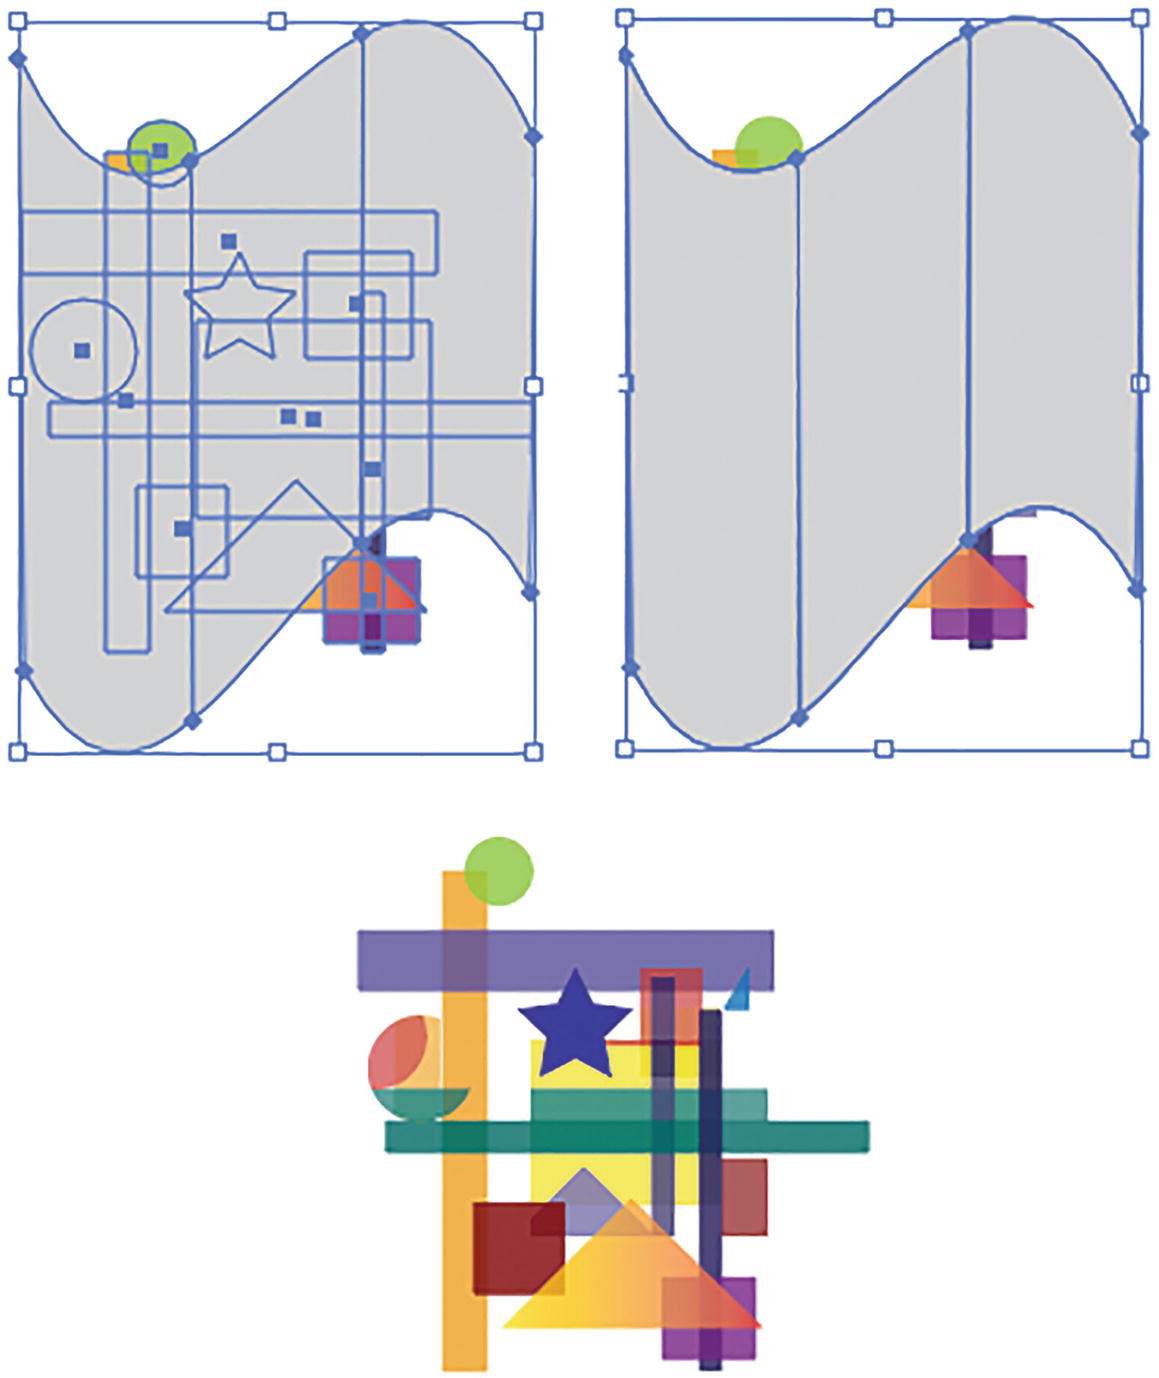
Expand: This releases the object in the shape of the envelope so that all the objects are permanently distorted. It is now a grouped shape. Refer to Figure 9-26.
Figure 9-26
Expand the mesh so that the shapes form to the envelope’s shape
In this case, use Edit ➤ Undo right away if you did not intend to expand the shape.
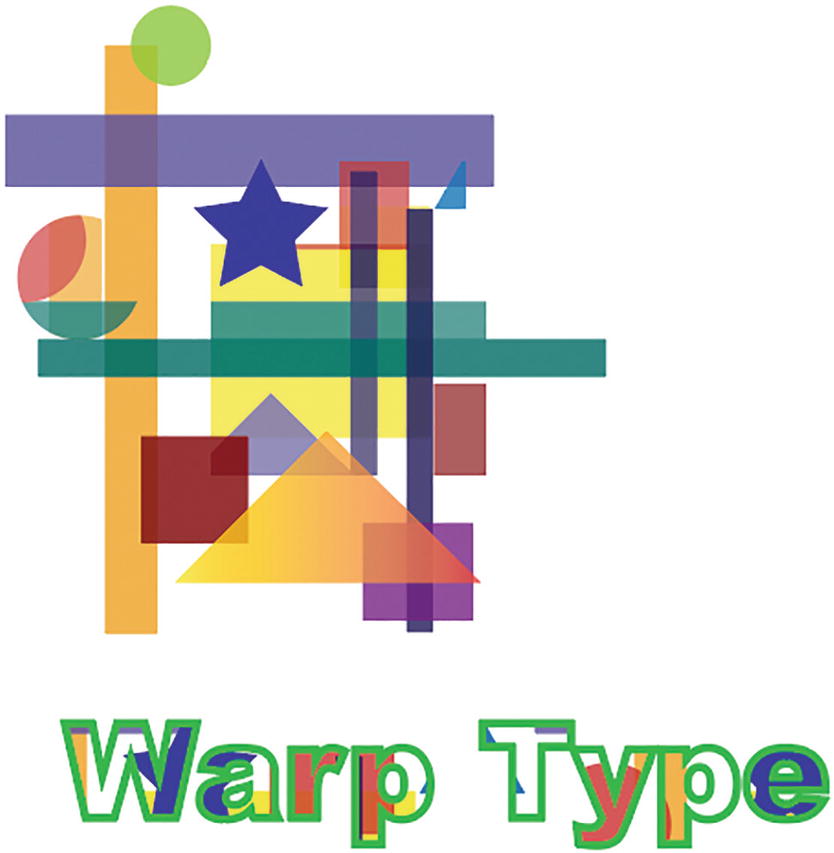
Warp Type
You can use the Make with Warp command to warp type as well. We will look at text in more detail in Chapter 10 and apply it to a project there. However, if you want to test the warp options now, select the text in this project with the Selection tool and choose Object ➤ Envelope Distort ➤ Make with Warp and try some different settings. Refer to Figure 9-27.
Figure 9-27
Type warped after using the Warp Options dialog box
Later, in Chapter 11, we will look at a very similar command where we can do this exact same thing, using the Effect menu instead, to create live effects rather than rely on the envelope.
Note
The type in this case can have a fill and a stroke with a pattern or areas of solid color. However, the fill and stroke of type cannot have a gradient directly applied from the Swatches panel. Text would have to go through Type ➤ Create Outlines first in order to apply a gradient to the lettering that is now a path. Refer to Figure 9-28. However, there is another way to apply a gradient to live type, which is with the Graphic Styles panel that we will see in Chapter 11.
Figure 9-28
For type to have a gradient it must be changed to an outline first
Make with Mesh
Make with Mesh allows you to create a custom warp area with additional rows and columns.
You can see some of these examples in the file Make_With_Mesh_Start.ai. Save a copy of the file if you need to follow along.
In this example, select a grouped object with the Selection tool and choose Object ➤ Envelope Distort ➤ Make with Mesh. This brings up the Envelope Mesh dialog box. Refer to Figure 9-29.
Figure 9-29
Use the Selection tool to select the grouped shape and use the Envelope Mesh dialog box to add a mesh
Here, you can set the mesh rows and columns and preview the result. If you like the result, then click OK to commit the change. Refer to Figure 9-30.
Figure 9-30
Grouped object inside of an envelope mesh
Control Panel Options
In the Control panel, the envelope mesh options for Edit Envelope are currently enabled, and the Edit Contents button is deselected. As you saw earlier in the chapter, that button brings up options specifically for editing the object and not the mesh. Refer to Figure 9-31.
Figure 9-31
Control panel settings for a Make with Mesh envelope
While the Edit Envelope button is selected, you can continue to add additional rows and columns.
Another way to add custom rows is to use the Toolbars panel’s Mesh tool. We saw this same tool earlier, in Chapter 8, when we were creating gradient meshes. However, it can be used to edit envelope meshes as well, but not add color to them. Refer to Figure 9-32.
Figure 9-32
Toolbars panel Mesh tool
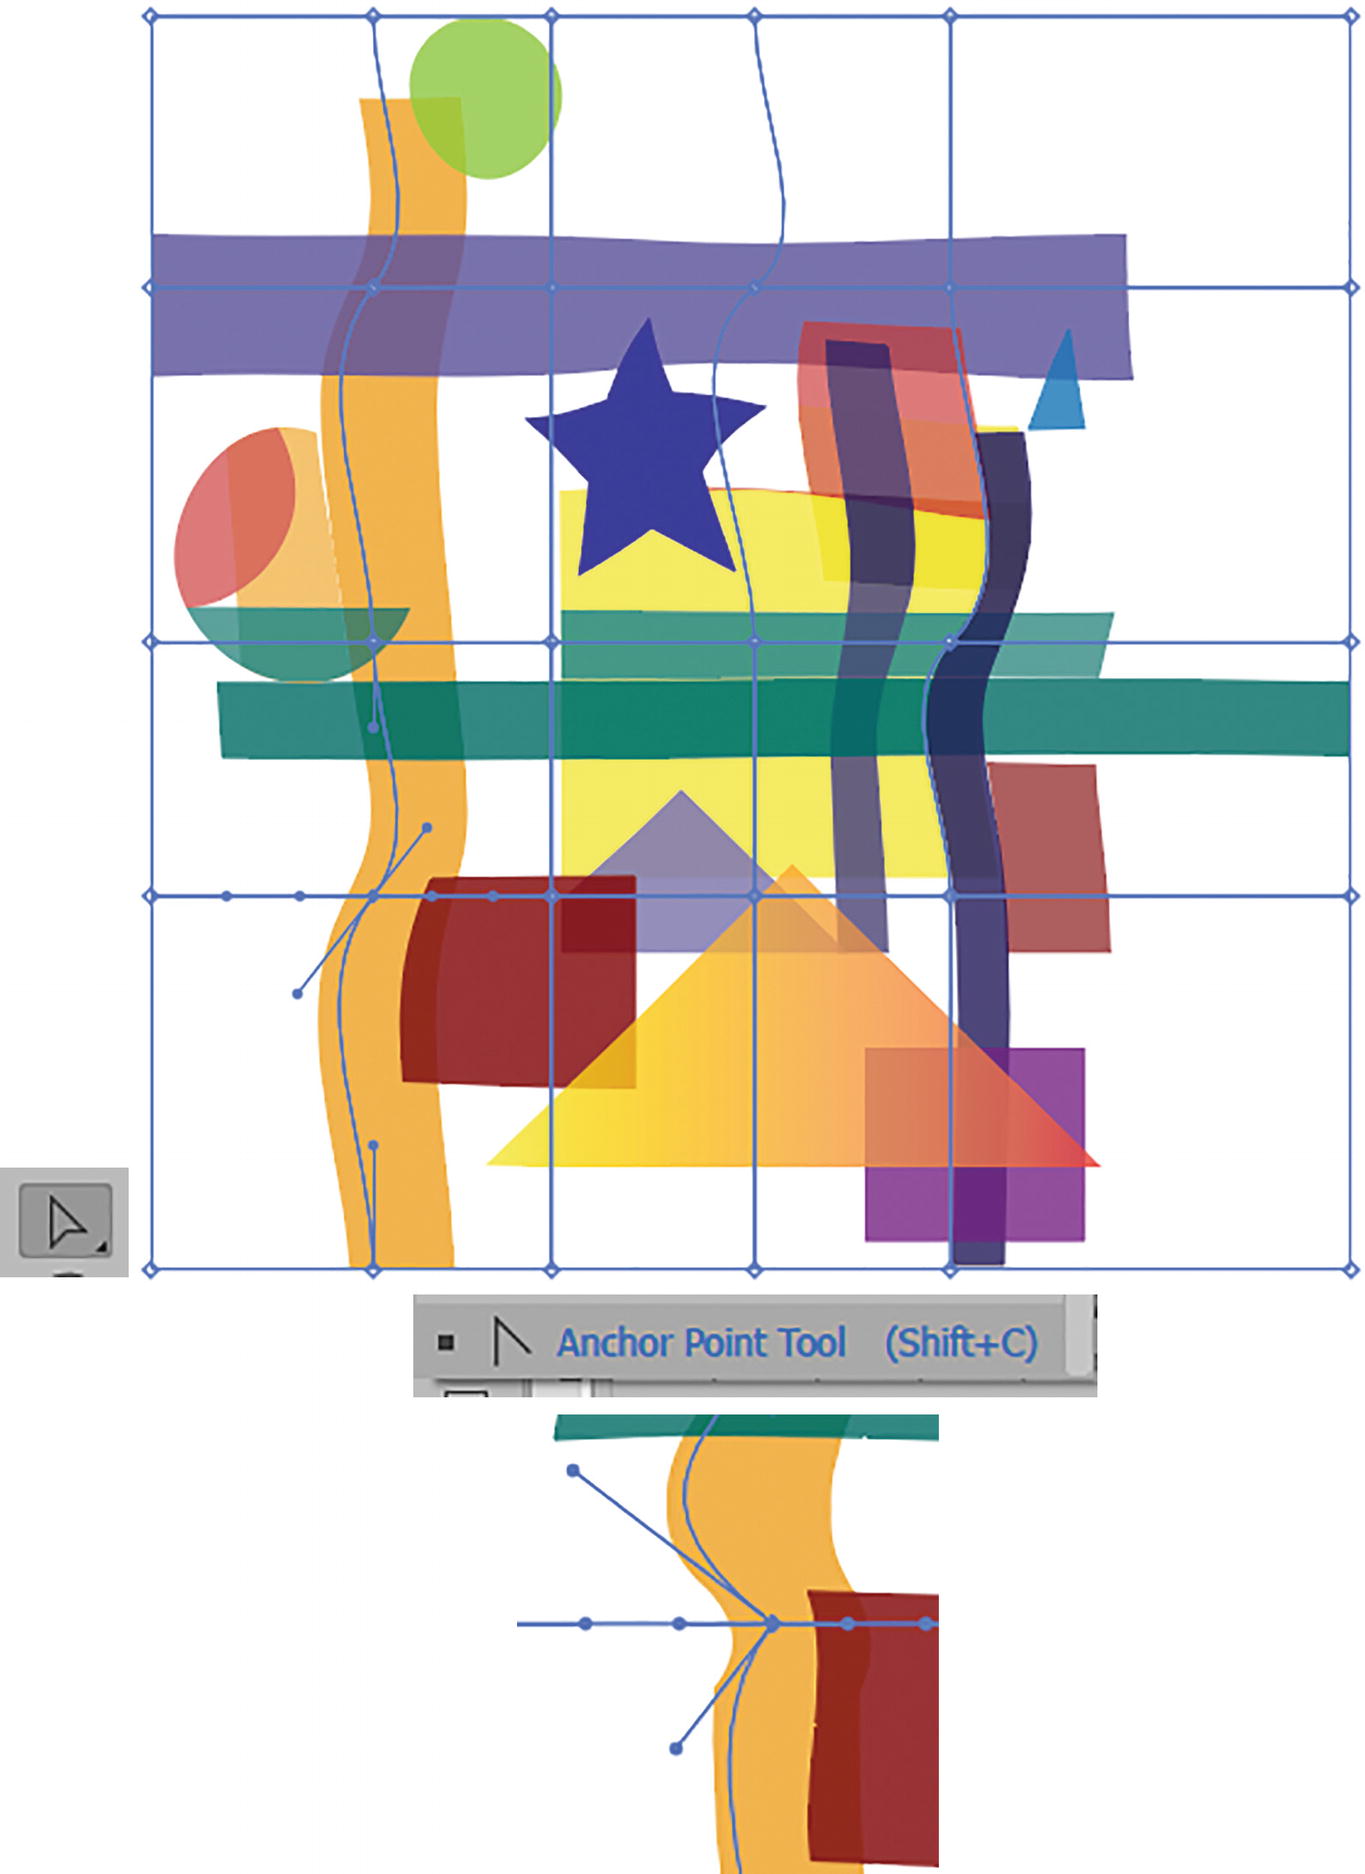
Click on the envelope with this tool when you want to add more rows and columns at random spacings. Refer to Figure 9-33.
Figure 9-33
Use the Mesh tool to add more mesh lines and points to the envelope
To edit these mesh points and alter the warp, you can continue to use the Mesh tool to drag or move the handles, as you did when you created the gradient mesh. Refer to Chapter 8 for some tips. Or, instead, use the Direct Selection tool to drag and move the handles and the Anchor Point tool to adjust the anchor point handles further. Refer to Figure 9-34.
Figure 9-34
Select points on the mesh with the Direct Selection tool and adjust the handles further with the Anchor Point tool
Other options that are available in the Control panel when the envelope is selected with the Selection tool include the Reset Envelope Shape button, to reset the warp on the grid, as well as access to envelope options. Refer to Figure 9-35.
Figure 9-35
Control panel Reset the Envelope Shape button and Envelope Options button
Note
To undo a reset make sure to use Edit ➤ Undo right away or use the History panel.
Other options are available in the Object ➤ Envelope Distort menu, as you saw with Make with Warp. These include Reset with Warp, which we looked at earlier in the chapter. Refer to Figure 9-23 and Figure 9-36.
Figure 9-36
Envelope Distort additional menu options
The other option is Reset with Mesh: This will allow you to adjust the rows and columns, as you did with the Envelope Mesh dialog box, and maintain the envelope warp. Refer to Figure 9-37.
Figure 9-37
Reset Envelope Mesh dialog box
You can also, from the menu, release the object from the envelope or expand the object to mold to the envelope shape. Refer to Figure 9-38.
Figure 9-38
Expand the mesh from the envelope to make all the grouped shapes warped
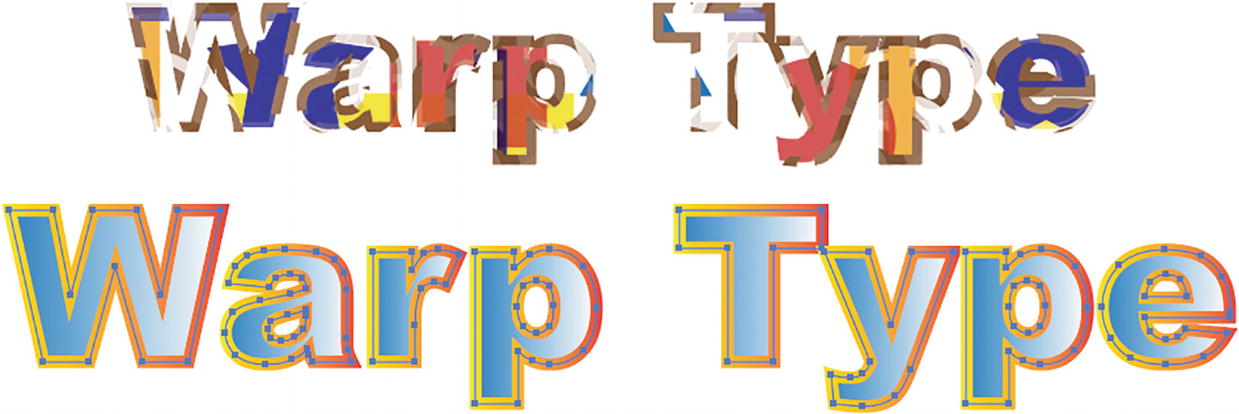
Warp Type
Alternatively, this option can be used to warp text as well. Use your Mesh tool, Direct Selection tool, and Anchor Point tool to edit the custom mesh. Refer to Figure 9-39.
Figure 9-39
Use the Mesh tool, Direct Selection tool, and Anchor Point tool to warp an envelope with type
Make with Top Object
This last mesh option is the one I like the most, as you can use custom shapes to create some unusual warps.
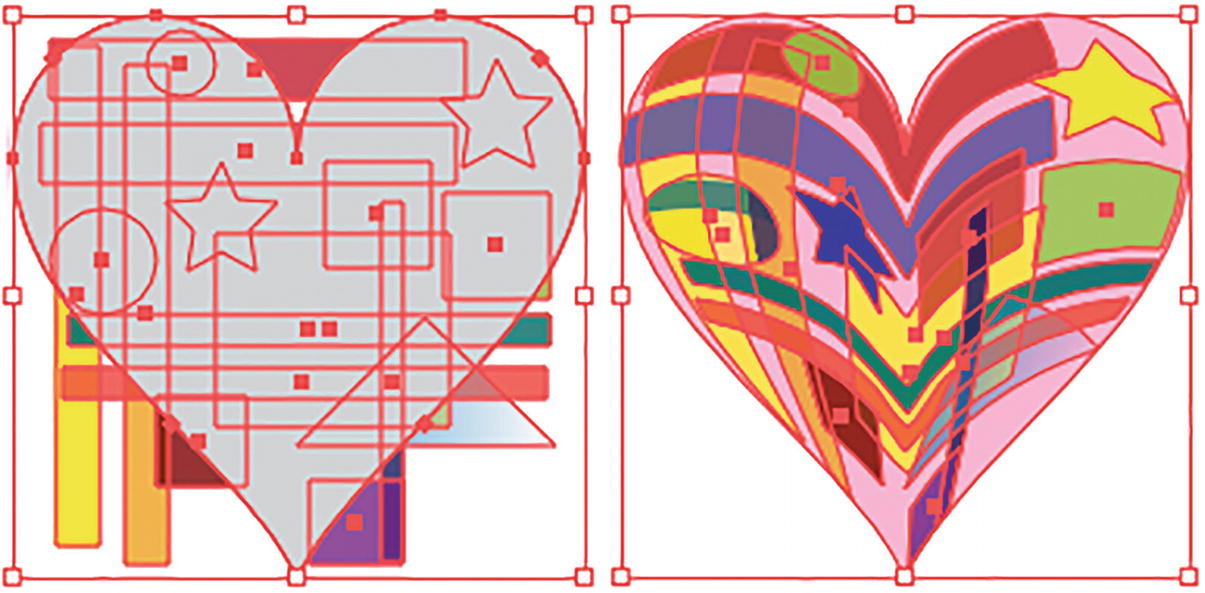
In this case, go to File ➤ Open and open Make_With_Top_Object_Start.ai. Save a copy if you would like to practice or view my results. Refer to Figure 9-40.
Figure 9-40
Grouped pattern with a heart below
In this example, to warp this pattern above the heart, select, with the Selection tool, the heart below the grouped pattern. Refer to Figure 9-41.
Figure 9-41
Use the Selection tool to select the heart below the grouped shape
This time, go to Edit ➤ Copy (Ctrl/CMD+C) and then Edit ➤ Paste in Front (Ctrl/CMD+F).
This pastes one copy in front of the other. Then, with the copy selected, choose Object ➤ Arrange ➤ Bring to Front. This places the heart copy above the grouped shapes. Refer to Figure 9-42.
Figure 9-42
A copy of the heart is pasted in front and then brought to front above the grouped shape
While the heart is selected with the Selection tool, press Shift and click on the group pattern below (not the lower heart) and choose Object ➤ Envelope Distort ➤ Make with Top Object. This causes the heart to become a mesh and mold the underlying shapes in the object, creating a unique warp. Refer to Figure 9-43.
Figure 9-43
The top heart shape is what creates the envelope mesh and warp
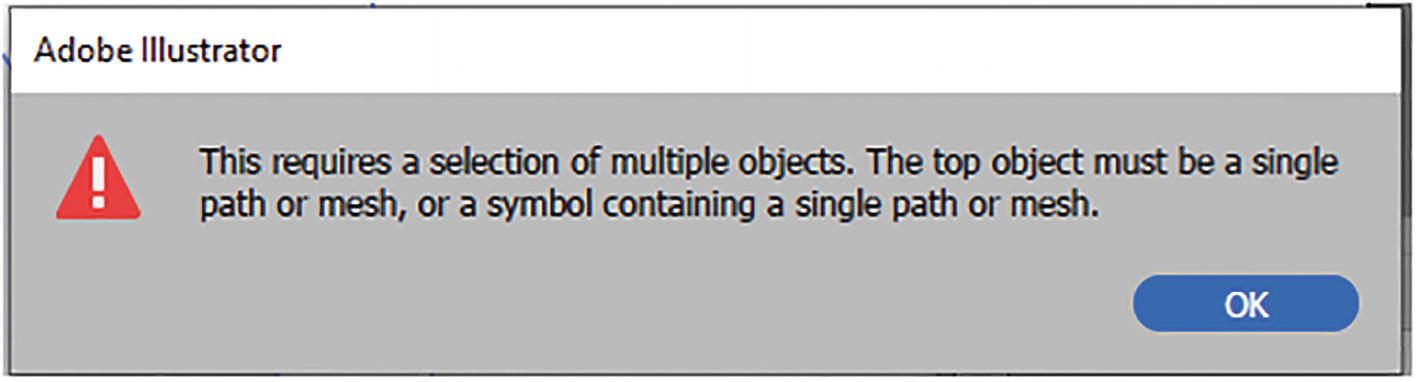
Note
When working with this command, for example, a top object (heart) and a lower object (shapes) must be both selected. If only one item is selected you will get the following warning message that a selection of multiple objects is required. The top object must be a single path or mesh or a symbol containing a single path or mesh. Click OK and then make sure you have two objects selected before you try the Make with Top Object command again. Refer to Figure 9-44.
Figure 9-44
Warning message that would appear if you only selected one path for Mesh with Top Object
Control Panel Options
The Control panel, for Make with Top Object does not offer as many options as the other Envelope commands discussed earlier in the Chapter, while in Edit Envelope, but you can still switch to Edit Contents and Envelope Options, if required. Refer to Figure 9-45.
Figure 9-45
Control panel Envelope Top settings and Envelope Options dialog box
The Options menu lets you use the other options mentioned earlier, Reset with Warp and Reset with Mesh, to revert to earlier mesh options. Refer to Figure 9-46.
Figure 9-46
Envelope Distort additional menu options
As with the other envelopes, you can use the menu to release the mesh from the envelope or to expand your envelope to warp all the shapes. Refer to Figure 9-47.
Figure 9-47
Envelope Release and Envelope Expand examples with heart path
Make sure to use Edit ➤ Undo if release or expansion was not your intent.
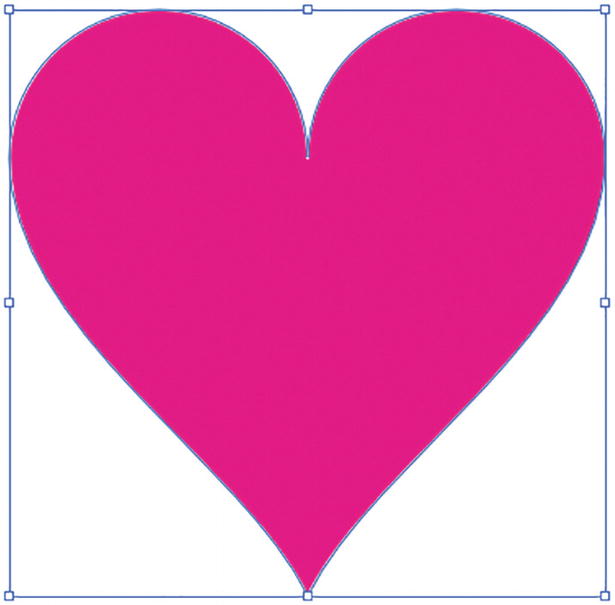
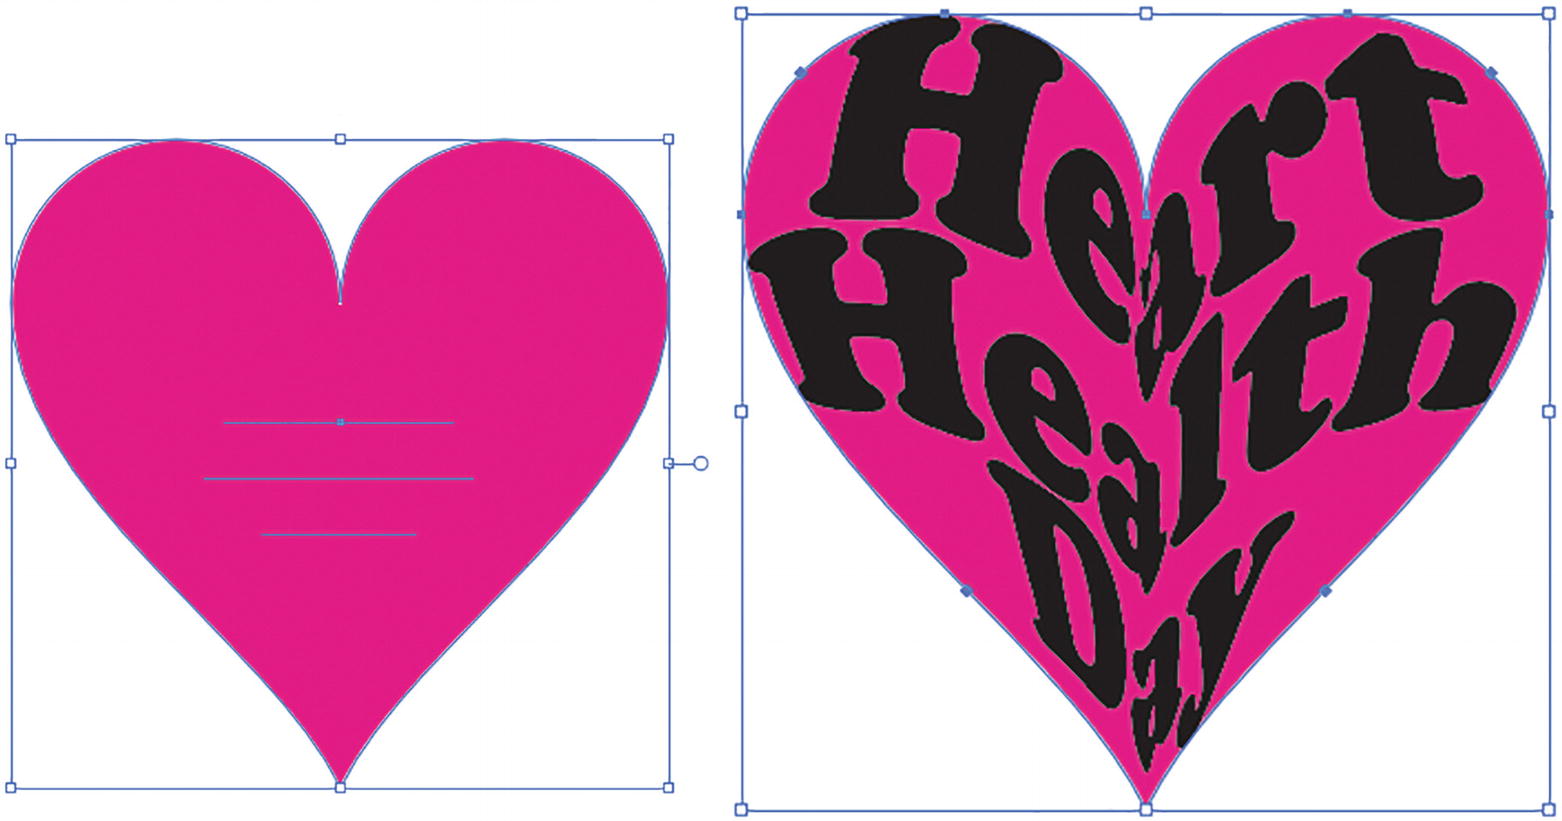
Project: Type in the Heart
In this second example in the same file, we can use the same custom envelope to warp text within a heart. Maybe you want it to be part of a flyer or a logo. Refer to Figure 9-48.
Figure 9-48
Heart path below a Type layer
Note
The font I am using in this example is Cooper Black, but you can use a similar font if you want to—just make sure that it is bold.
Like we did for the other heart, make sure to select it with the Selection tool and copy and paste it in front. Then, while the copy heart is selected, choose Object ➤ Arrange ➤ Bring to Front. Refer to Figure 9-49.
Figure 9-49
Copy of heart above the type layer
Now, to select the hidden type, while the heart is selected go into View ➤ Outline (Ctrl/CMD+Y). With the Selection tool, press Shift and click on the type. You do not want to have the lower heart selected by mistake. Refer to Figure 9-50.
Figure 9-50
Heart and type in Outline view
Return to View ➤ Preview and then choose Object ➤ Envelope Distort ➤ Make with Top Object. Refer to Figure 9-51.
Figure 9-51
Heart and type selected, and then as an envelope with Make with Top Object
The type in this case is a bit too distorted and needs some additional adjustments, especially for the center. In the Envelope Options I found adjusting the Fidelity setting made little difference.
In this case, you should be in Edit Envelope mode in the Control panel. Refer to Figure 9-52.
Figure 9-52
Control panel with Edit Envelope setting
Use the Direct Selection tool, as well as the Anchor Point tool, to move and edit the mesh so that it conforms better to the heart. In this case, the envelope will no longer be heart shaped, but the text will flow better over the underlying heart. Refer to Figure 9-53.
Figure 9-53
Use the Direct Selection tool and Anchor Point tool to edit the envelope mesh so that the text sits more evenly on the heart
The type is still editable, should you need to make changes to the color or font.
You can see an example of this heart in my file Make_With_Top_Object_Start.ai.
As mentioned, we will look more at type in Chapter 10.
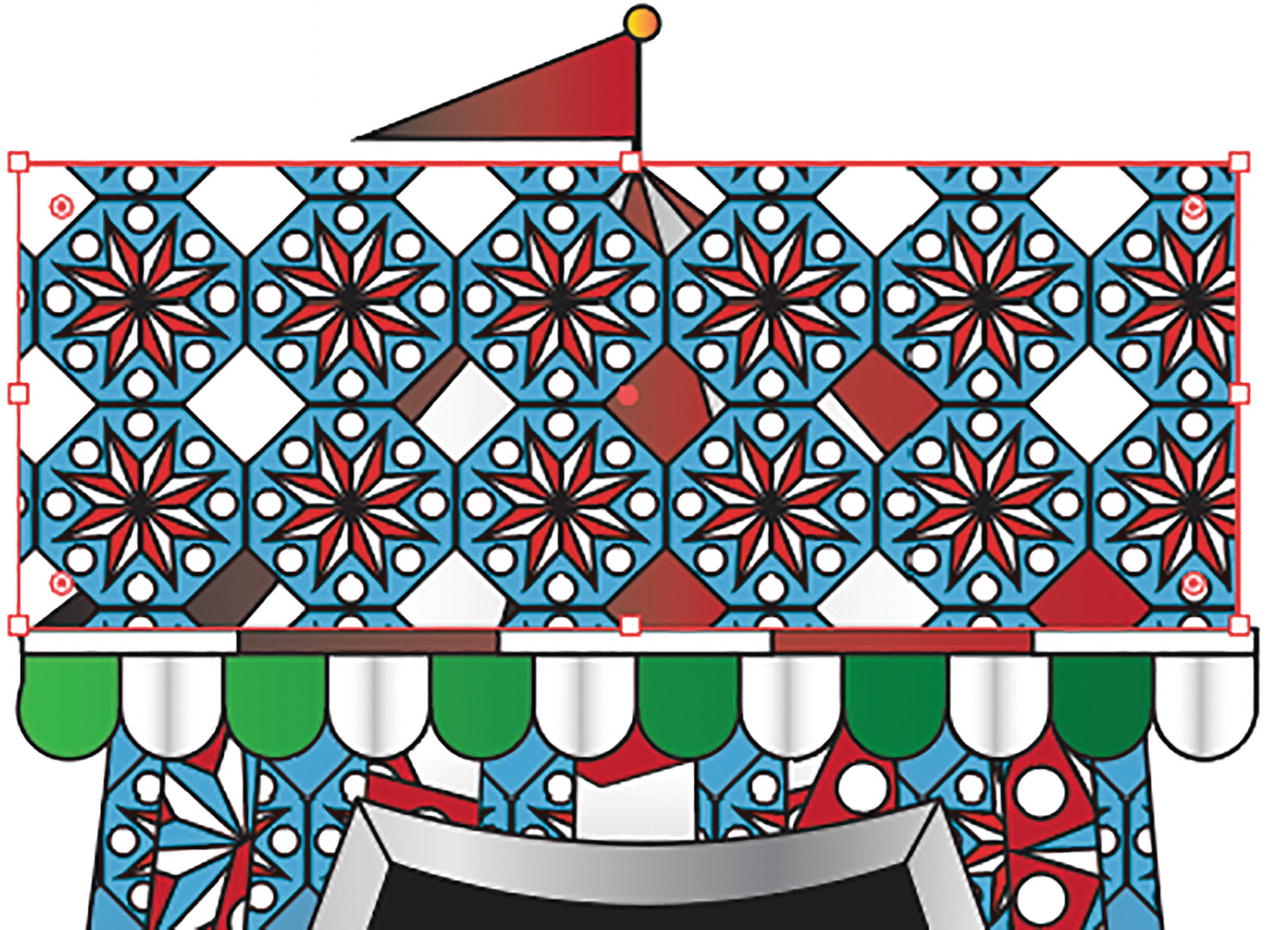
Project: Circus Tent and Molded Masks
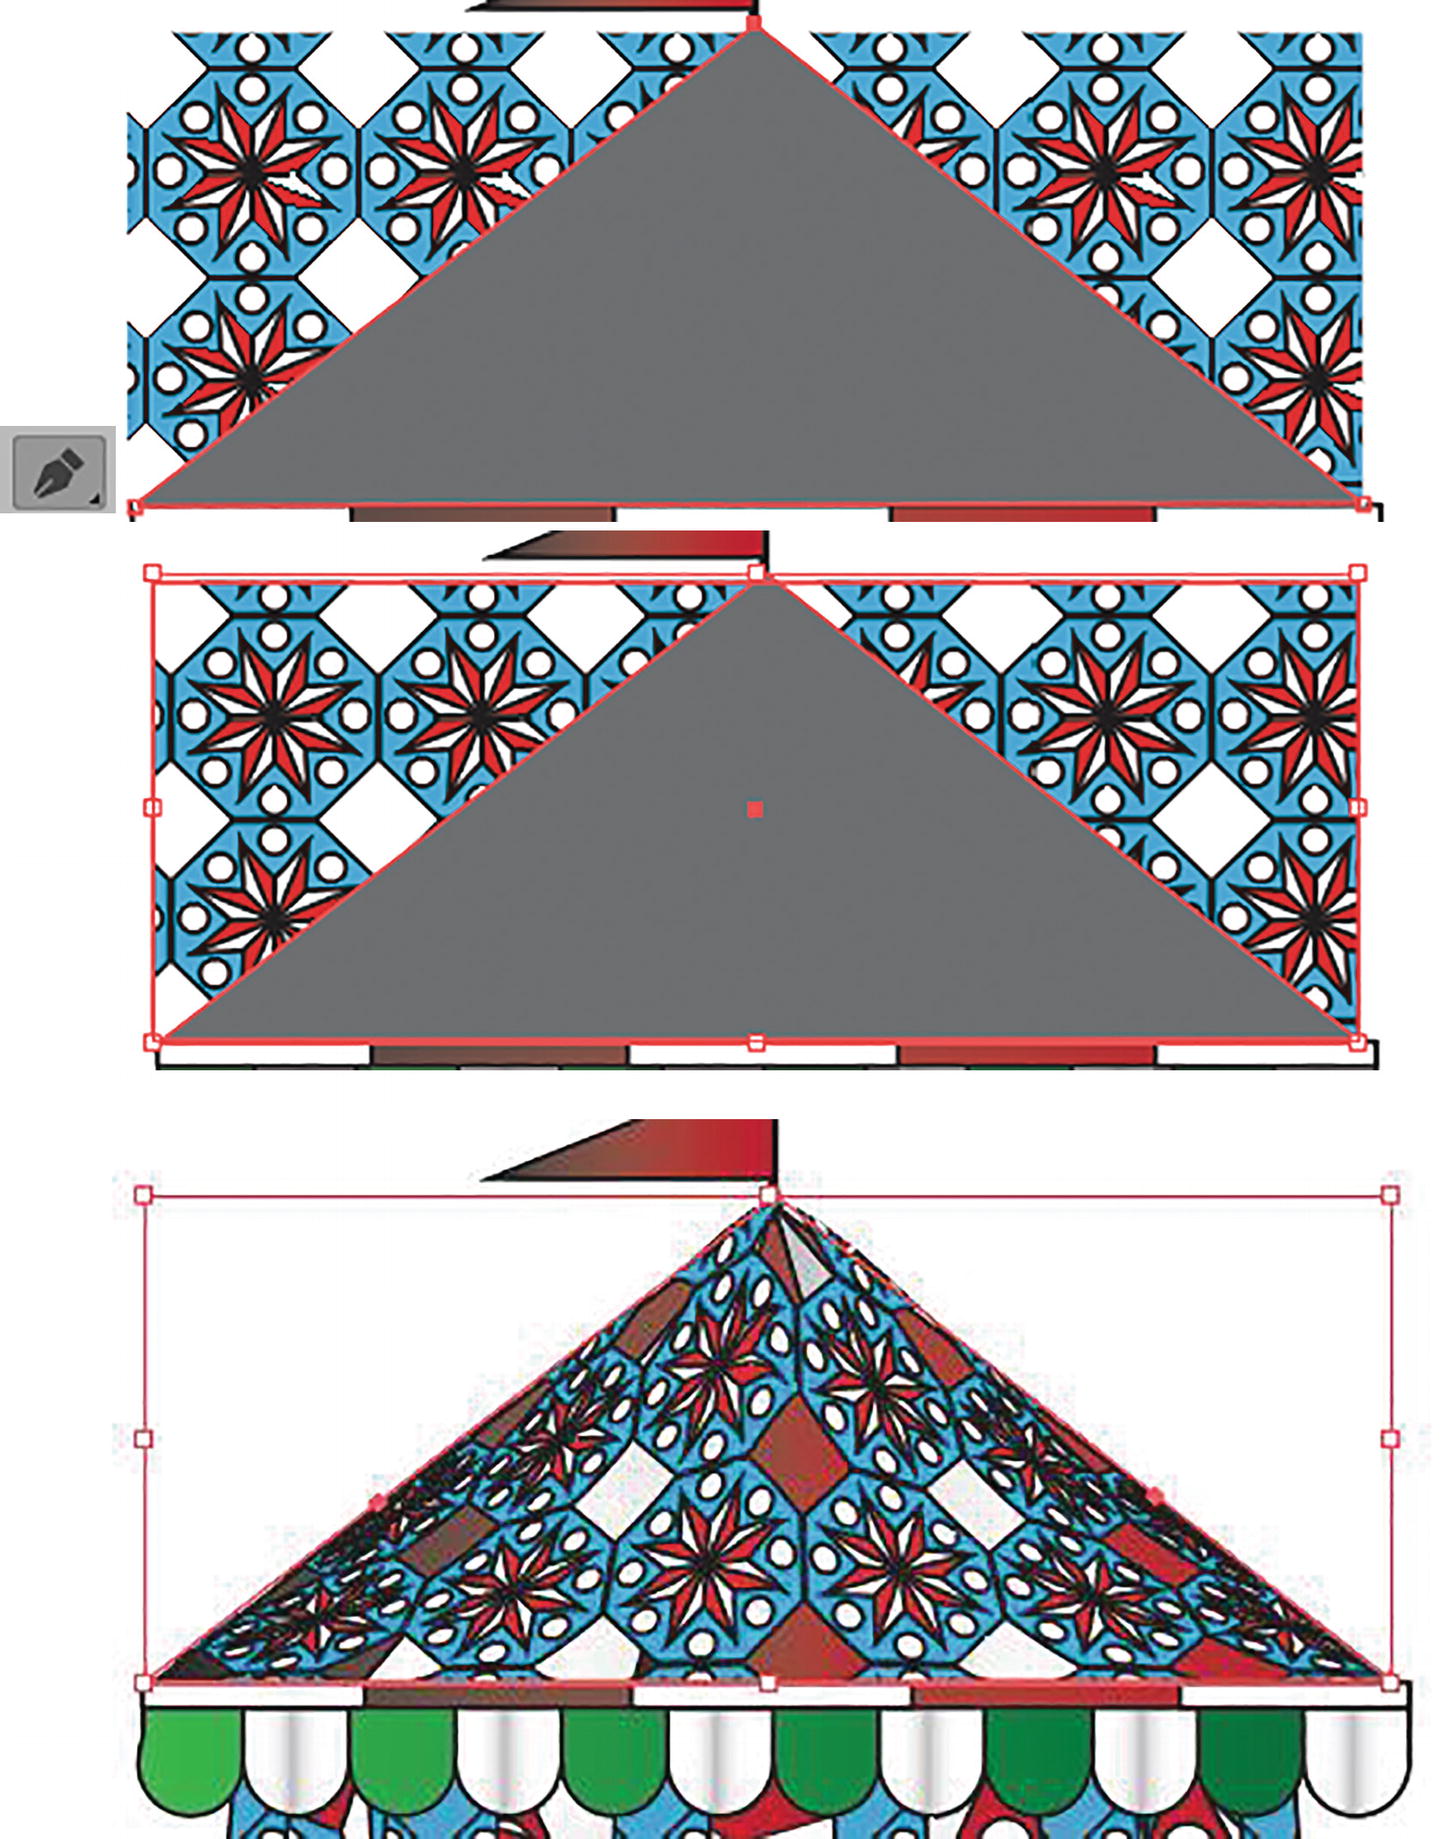
In Chapter 7, when we were creating patterns and then colorizing the circus tent, I mentioned that if you wanted to add a warped pattern to the top of the tent, you would need to possibly use an envelope distort, as it would be less destructive than going to Object ➤ Expand and using the Free Transform tool. Now I will show you what using an envelope would look like. In the file Envelope_Circus_Tent.ai, if you look at the Envelope Mesh layer, you will see that it is an envelope warp that was created with Make with Top Object, as you did with the heart earlier. Refer to Figure 9-54.
Figure 9-54
A tent with an envelope mesh pattern on a separate layer above the locked Tent layer
Originally, the pattern on top of the tent was a rectangular shape with a fill pattern on top of the tent, covering the area. Refer to Figure 9-55.
Figure 9-55
Pattern within a rectangular shape over top of the tent
I then, with the Pen tool, clicked and created a triangle over the top of the pattern, which was the envelope. Then I pressed Shift and clicked, selecting the rectangle and the triangle. I chose Object ➤ Envelope Distort ➤ Make with Top Object. Refer to Figure 9-56.
Figure 9-56
Use the Pen tool to create a triangle that covers the top of the tent, select the shape with the pattern as well, and then choose Make with Top Object to create the pattern distort
I then used the Direct Selection tool to make minor adjustments to the points and moved them so that the pattern sat better on the tent. And then, using the Transparency panel, I set the blending mode to Soft Light so that some of the original tent pattern lines showed through. Refer to Figure 9-57.
Figure 9-57
Use the Direct Selection tool to modify the envelope over the path; change the blending mode in the Transparency panel or change the opacity to make the pattern appear faded on the cloth
So, you can see that envelope distorts can be used to add interest and texture to a design.
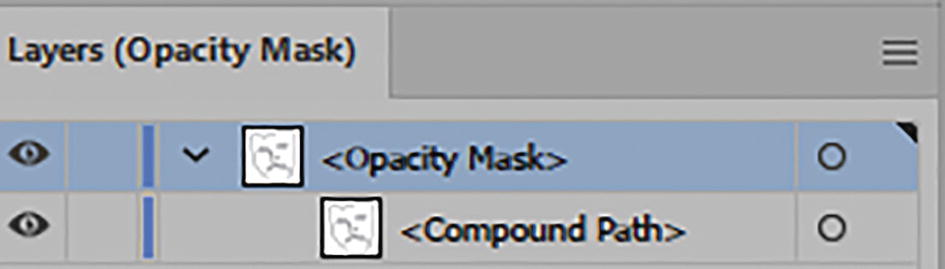
Molded Mask
Envelope warps can be further enhanced with Opacity masks. If you would like to see an example of that, you can check out the file Envelope_Masks.ai. Refer to Figure 9-58.
Figure 9-58
Masks with envelope warps, and Transparency panel with Opacity mask applied
The Opacity mask is necessary in this case, so that you can see through to the color on the other side of the mask. You can also use your Layers panel to examine the Opacity mask while it is selected, to see its multiple paths. Refer to Figure 9-59.
Figure 9-59
Layers panel in Opacity Mask mode
At this point, you can save any documents you have been working on.
Various envelope distorts can be used to modify shapes as well as paths. They can transform an object or a path into an unusual design, and we can modify and edit the pattern while it is part of the envelope. You can also incorporate them with Opacity masks using the Transparency panel. In the next chapter, we will focus on how to distort text, as well as on how to add type to a path using tools in Illustrator.