
Maybe when you picture graphic artists or photographers using computers to create or edit their artwork, you imagine them using their mouse or a pen and tablet. If you imagine an accountant or a secretary using her computer, you probably picture them pounding away on the keyboard, not only entering data and text, but also issuing software commands.
While these images are probably accurate to some degree, the first one needs an adjustment. In truth, a Photoshop user can and should make much more use of the keyboard — borrowing a page from that accountant or secretary who can whip through menus and dialog box with efficient flair.
If you're using Photoshop, the keyboard, used to invoke the seemingly unlimited list of commands and features, is at least as important as the mouse or tablet to the creative process. Why? Because it's so much faster than taking your mouse and pointing to a menu or button. For example, if you just copied a picture or a portion thereof to the clipboard, you can make a new Photoshop image out if it with three keyboard shortcuts: one to open a new image window, one to paste the copied content, and one to save the file. Need to resize an image? Why stop, go to a menu, and choose a command when you can press a set of keys and see the appropriate dialog box open, which you also can spin through by typing values and then pressing Enter or Return to accept the new size settings?
In Photoshop CS3, the aforementioned reliance on the keyboard is taken a step further — with enhanced capabilities for customizing keyboard shortcuts, any discomfort with using and remembering the shortcuts is eliminated. For the things you'd rather do from the menus, there are new ways to customize their functioning and appearance as well, so if you're still not sold on the keyboard as your primary way of "talking" to Photoshop, you still can customize things to make Photoshop work your way.
Photoshop's keyboard convenience comes in two varieties:
Shortcuts: Some keystrokes (single keys) and keystroke combinations (two or more keys, pressed simultaneously) produce immediate effects. For example, pressing Ctrl+Backspace (

Modifiers: Some keys change the behavior of a tool or command. Pressing Shift while dragging with the Lasso tool adds the lassoed area to the previous selection. Because they modify other keystrokes and combinations, the Shift, Alt, and Ctrl keys (also Shift, Control, Option, and
One of the goals of this Appendix is to help you become familiar with all that you can do with the keyboard in Photoshop. You may think of the keyboard only as some dry tool for typing text and numbers, but as you read on, you'll see that it's much, much more — it's what helps unleash the power of Photoshop's tools so that you can truly unleash your own imagination.
Hidden Shortcuts and Modifiers
Shortcuts permit you to initiate various Photoshop commands and features without having to stop what you're doing and click a Toolbox button or pull down a menu to make a selection. Some shortcuts are fairly obvious, and you'll find them easy to remember, either because the alpha characters used make sense or because the key combinations are ubiquitous, like Ctrl+S (
Many of Photoshop's keyboard shortcuts are displayed in the form of tool tips, which are pop-ups that appear when you hover over a tool with your mouse. Some are listed in menus to let you know the keyboard equivalent of a given command. But many of Photoshop's shortcuts are hidden, and it's only in a book like this, or by digging through Photoshop's Help files, that you'll find out about them. What's weird is that the hidden shortcuts turn out to be some of the most important ones in the bunch.
Under Windows, you can perform many operations using hot keys, which are the underlined letters you see in menus and dialog boxes. To access one of these functions, press Alt to display the hot keys and then press the underlined letter. This can be very useful when choosing commands that lack a Ctrl-key shortcut. For example, normally, you would choose Image
You can even access commands that have no underlines. To access the Unsharp Mask, you normally choose Filter
For more mouse-less excitement, you also can zip through the menus with the arrow keys. After you press Alt plus the underlined letter to display a menu, use the up and down arrows to highlight commands in the menu. Use the left and right arrows to display neighboring menus. To choose a highlighted command, press Enter. To hide the menus and return focus to the image window, press Esc twice. Yeah, that's right — suddenly that keyboard is looking pretty useful.
Tip
Mac users can enjoy the same level of keyboard navigation power by turning on Full Keyboard Access through System Preferences.
One of the best and least documented tricks in Photoshop is right-clicking. For Mac users with a one-button mouse, control-clicking will net you the same shortcuts. Of course, if your Mac has a three-button mouse, you can right-click as well. It's not really a hidden concept if you use lots of other software, because right-clicking is fairly common in Windows and most Windows applications. For Mac users, Control-clicking isn't exactly a foreign concept, either.
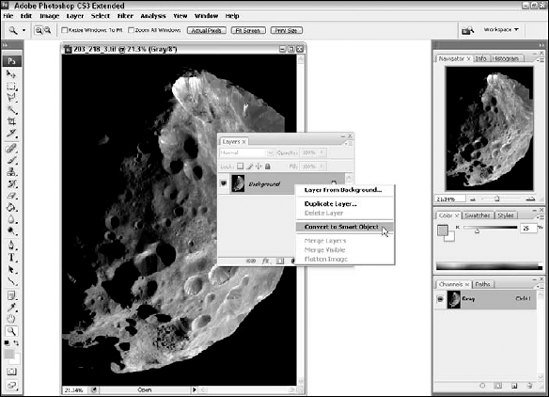
When you right-click or Control-click the mouse button in the image window, Photoshop displays a shortcut menu of commands tailored to your current activity and/or the item you right-clicked/Control-clicked. For example, if you right-click or Control-click a layer in the Layers menu, you get the pop-up menu shown in Figure A.1. There are other ways to get at some of these commands, but this way is very quick and easy, especially if you're already using your mouse to paint or draw in the image window. You're already in the neighborhood, so why not right-click while you're there?
Shortcut menus are considered context sensitive, because they're triggered in and their commands relate to where you literally are in the program. Although some tools and onscreen elements have no shortcut menus associated with them, most do, and you'll find that simply seeing what the menu has to offer is educational unto itself.
Usability has always been one of Photoshop's great strengths, and the ability to activate Toolbox tools with a single keystroke is a perfect example of this. You can keep your dominant hand on the mouse and use the other hand to press the key (or use your mouse hand, if you prefer) — all without stopping to perform some digital gymnastics to reach two or three keys at the same time. The shortcuts also work even when the Toolbox is hidden. After you get used to the shortcuts, you may find that the only time you look at the Toolbox is to check which tool is selected.
Figure A.2 shows the Toolbox and all the keys that give you quick access to the tools. The way it works is simple, press the appropriate key, as shown in the figure; no Ctrl key, Option key, or other modifier key is required. Many of the shortcuts make sense. For example, M selects the Marquee tool, and L is for the Lasso tool. Some only make sense in a strange way — I for Eyedropper. But then there are the ones you have to wonder about, such as O for DOdge or R for BluR. Well, they sort of make sense — at least those letters are in the tool names, but they're not entirely memorable.
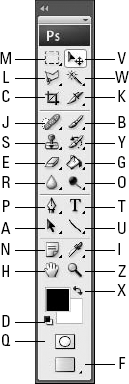
Figure A.2. Press these keys to select tools and activate controls. The bold letters indicate keys that they toggle between alternate tools or settings.
Note that when two or more buttons share a single slot on the Toolbox, the keyboard shortcut switches between those tools. For example, press G to access either the Gradient tool or the Fill Bucket. If you're on the Fill Bucket, pressing Shift+G switches to Gradient, and vice versa. If there are three or more tools sharing a slot, you can cycle through them all by continuing to press Shift plus the shortcut key.
You can eliminate the need for Shift by choosing Edit
Tip
One Toolbox shortcut doesn't require the Shift + combination. Represented on the Toolbox at the very bottom, the various workspace views can be accessed with the letter F. Cycle through all the view modes — Standard, Maximized, Full Screen with Menu Bar, and Full Screen — by continuing to press the F key.
Photoshop also lets you access palette options from the keyboard, and a list of the palettes, their purpose, and shortcuts for access appears below. Note that each of the shortcuts works even when the palette is hidden:
Palette function keys: Press F5 to show or hide the Brushes palette. Press F6, F7, F8, or Alt+F9 (Option+F9 on the Mac) to toggle the display of the Color, Layers, Info, or Actions palette, respectively. If for some weird reason the Options bar is hidden, press Enter or Return to bring it back. Note that if you're using a Mac, you may want to avoid the F8 key unless you've changed the default (Spaces) for that key. You can change this setting through your System Preferences.
Hide or show all palettes: Press Tab to hide or show all palettes, including the Toolbox, Options bar, and the status bar. To hide or show the standard palettes only — that is, everything except the Toolbox, Options bar, and the status bar — press Shift+Tab.
Brush size: Press left bracket ([) to decrease or right bracket (]) to increase the brush size when a paint or edit tool is active.
Brush hardness: Press Shift with a bracket key to change the hardness of a brush. Shift+] gives the brush a sharper edge; Shift+[ makes it softer. Again, a paint or edit tool must be active.
Brush preset: Press comma (,) or period (.) to cycle between preset brushes. If this doesn't work for you, try pressing Shift+comma, which selects the first preset, the single-pixel brush. Then press period to move forward. Shift+period jumps to the last preset brush.
Gradient style: Select the Gradient tool and press a bracket key, [ or ], to switch among the five gradient styles.
Gradient preset: Press comma or period to step backward or forward, respectively, through the predefined gradients. Press Shift+comma or Shift+period to switch to the first or last gradient in the list.
Shape layer styles: Select any of the shape tools and press comma (,) or period (.) to step backward or forward through the predefined layer styles. Press Shift+comma or Shift+period to jump to the first or last style in the list.
Shape attribute: With the Rounded Rectangle tool active, press a bracket key, [ or ], to decrease or increase, respectively, the corner radius. Select the Polygon tool and press a bracket key, [ or ], to decrease or increase the number of sides in the next polygon or star you draw. For the Line tool, press a bracket key, [ or ], to decrease or increase the line weight.
Custom shape preset: Select the Custom Shape tool, and press a bracket key, [ or ], to step backward or forward through the predefined shapes. Press Shift+[ or Shift+] to switch to the first or last shape in the list.
Brush opacity: When a paint or edit tool is active, press a number key to change the Opacity, Strength, or Exposure value in the Options bar. Press 1 to change the value to 10 percent, press 2 for 20 percent, and so on, up to 0 for 100 percent. Or use an exact value by typing two numbers in a row. For example, type 87 for 87 percent or 05 for 5 percent.
Airbrush: If a tool offers an airbrush icon in the Options bar, press Shift+Alt+P (Shift+Option+P on the Mac) to toggle it on or off.
Airbrush flow: If a tool offers the Airbrush, it includes both an Opacity value and a Flow value. When the Airbrush is turned off, press Shift with a number key to change the Flow value. When the Airbrush is on, press a number key to change the Flow value; press Shift with a number key to change the Opacity value.
Layer opacity: When any tool other than a paint or edit tool is selected — that is, any tool in the first, third, or fourth group in the Toolbox — pressing a number key changes the Opacity value for the active layer. Again, press one number to modify the Opacity setting in 10 percent increments; press two numbers to specify an exact Opacity setting.
Fill opacity: Press Shift with a number key to change the Fill value for the active layer, which modifies the opacity of the pixels in a layer without affecting the layer effects.
Brush mode: When a paint or edit tool is active, you can cycle through brush modes by pressing Shift+plus (+) or Shift+minus (−). Shift+plus takes you down the brush mode pop-up menu, and Shift+minus takes you back up.
Blend mode: When some other tool is selected, Shift+plus and Shift+minus affect the blend mode applied to the active layer. You also can access a particular blend mode by pressing Shift and Alt (or Option) with a letter key. For example, Shift+Alt+M selects the Multiply mode; Shift+Alt+S selects Screen; Shift+Alt+N takes you back to Normal.
Lock setting: Press the forward slash (/) to toggle on and off the lock icon that controls transparency in the Layers palette. If one or more of the lock icons is already active, press / to turn off all four. Press / again to return the options to their former configuration. Layer locking can be extremely useful for protecting the contents of layers, as explained in Chapter 12.
Switch layer: Press Alt+] to ascend through the layers. Press Alt+[ to descend. Press Shift+Alt+] to activate the top layer in the composition. Press Shift+Alt+[ to go all the way down to the bottom of the stack, usually the Background layer.
Arrange layer: Press Ctrl+] (
Photoshop CS gave us what many Photoshop users have been requesting for a very long time — the ability to edit keyboard shortcuts. Of course, CS2 and now CS3 continue to offer this ability — because being able to customize them is key to their being useful, and because a keystroke or combination that's hard to remember or difficult to reach with one hand's fingers is one you won't use.
So now, you don't have to live with the totally illogical and hard to remember strokes, such as J to activate the Healing Brush (J? why J?) or the inscrutable Ctrl+Shift+E (
Despite its power to really change the way you interface with Photoshop, the Keyboard Shortcuts and Menus dialog box is quite easy to use. First, from the Set pop-up menu, select the collection of shortcuts to which you'd like to make edits. You can modify the default set or create new ones for different users or types of image-editing work. Use the three icons to the right of the Set drop-down menu to save the set, create a new set, or discard the entire set, respectively. From there, select a category from the Shortcuts For pop-up menu, and then simply explore the various subsections in the list below. If you dig around enough, you can find almost every single command, function, and filter in the program. Aside from this appendix and references to the shortcuts throughout this book, this might be the best place to find all the shortcuts you never knew existed.
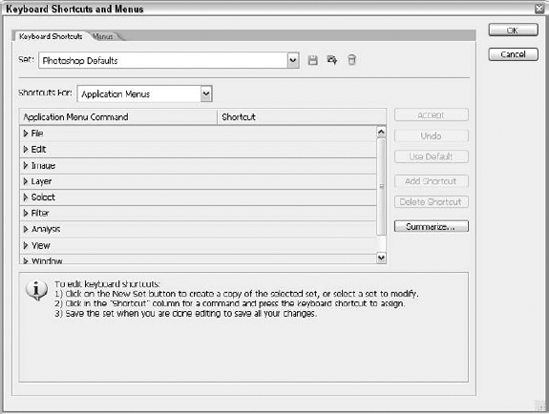
Figure A.3. The Keyboard Shortcuts and Menus dialog box lets you change your keyboard shortcuts and menus so that they look and work the way you need them to.
To assign a new shortcut to a command, simply click in the blank area labeled Shortcut to the right of the command name and press the desired shortcut key or combination of keys. As soon as you click the spot in the dialog box, the currently assigned key or combination highlights, so the next thing you type replaces it. If there is no key or combination currently assigned, just type whatever you want to be the shortcut. Then click Accept to make the change/addition permanent.
If you happen to type a keyboard shortcut that is already assigned to another function in the program, Photoshop displays information at the bottom of the dialog box, as shown in Figure A.3, and gives you the option to accept or undo your changes. You also can use the buttons along the right side of the dialog box to save and discard changes, as well as add and delete shortcuts. Lastly, you can click Summarize to generate and display an HTML Web page that lists the currently active keyboard shortcuts, which is a handy list to tack up close to your computer.
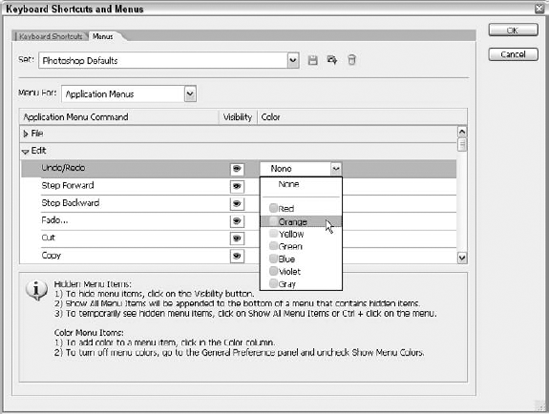
Photoshop's menus also can be made friendlier, using the Menus tab in the Keyboard Shortcuts and Menus dialog box. You can turn on commands that currently have no menu representations so that they do appear in menus, and you can change the color of menu commands so that they stand out for you.
Tip
If you want to assign colors to menus and menu commands, be sure that Show Menu Colors is selected in the General Preferences dialog box; choose Edit
To change a menu command's visibility and/or color, choose the Set (Photoshop Defaults or a custom set you or another user who shares your computer may have created), and then choose either Application Menus or Palette Menus from the Menus For list. Application Menus refers to the main menus across the top of the workspace — File, Edit, Image, and so on. The Palette Menus are the menus that are available by clicking the tiny triangle button in the upper-right corner of various palettes.
After you select a Set and a Menu group, choose a particular menu to change. In Figure A.4, the File menu (from the Applications Menus) is chosen, and its commands are displayed by clicking the triangle to the left of the word File. For each menu command, there's an entry in the Visibility and Color columns. Click to insert or remove the eye icon, displaying or hiding that particular command, respectively. If you click the Color option (None, by default), a list of colors appears, also shown in Figure A.4.
Go through and change all the commands you want, hiding some and showing others, changing colors for those you want to have stand out, or grouping related commands by a common color. After you make all your changes, click OK and the changes take effect.
Tip
When you hide commands, the Show All Menu Items command is added to that menu. If you ever want to see the hidden commands again, you can Ctrl-click the menu in question, and all hidden commands become visible. Or just click the Show All Menu Items command to redisplay those commands you've hidden.
If you want to keep the Photoshop Defaults set of menus just as they are "out of the box," you can create your own custom menu set and customize it instead. Just make your changes — hiding and coloring commands as desired — and then click the second of three buttons to the right of the Set list. This opens a Save dialog box. Name the new set and click Save to make it a reality. The file extension for menu set files is .MNU, and by default, they're stored in the Menu Customization folder, a subfolder of the Presets folder found in your Adobe folder. Don't monkey with the default location for your new .MNU file; if you do, it won't appear automatically in the Set list for future use or modification.
A shortcuts table has always been a part of the Photoshop Bible. What kind of Bible would it be if such a handy and powerful list weren't included? The table, however, has grown and improved over the years, and Deke did a great job of turning it into the fabulous table that it is today.
Any tool is more useful if you know how to use it properly. The table that follows these paragraphs doesn't really need much introduction, but there are a few things to keep in mind. If these reminders seem insulting to your intelligence, we apologize, but ask that you simply skip ahead to the table and don't mutter under your breath. We're just trying to help.
First, don't press Shift just because a key combination involves a character that normally requires the Shift key. For example, the shortcut for the Zoom In command is Ctrl+plus (
Second, if you're a Windows user, note that many of Photoshop's keyboard shortcuts involve both the Ctrl and Alt keys. Ctrl+Alt+O, for example, invokes the Open As command, and Ctrl+Alt+Z undoes an operation from the History palette. Unfortunately, Windows likes to reserve Ctrl+Alt combinations to launch applications, and if you, as a Windows user, set up a keyboard shortcut to invoke a particular application, Windows will commandeer that command and you won't be able to successfully use it within Photoshop. So be careful when creating Windows shortcuts and avoid the following when assigning file-launching shortcuts, which are very much used in Photoshop: B, D, E, F, J, K, L, M, N, O, P, S, T, U, W, X, Z, plus, minus, semicolon, and 0 through 9. This doesn't leave you many other options, but which is more important, Photoshop or Windows? That's right.
Tip
Don't know how to create a Windows shortcut to start an application? Here you go: Create a shortcut icon for the application by dragging the Programs menu command and icon from the Programs menu (press and hold Ctrl while dragging so that you make a copy of the command) onto the Desktop. Then right-click the new shortcut icon, choose Properties, click the Shortcut tab, and type the character and modifier key/s of your choice into the Shortcut Key option box.
It's time to wade right into the table and immerse yourself in Photoshop's keyboard shortcuts. Some will be familiar and others won't be. Some will invoke a command or feature you have never used, and others may be the keyboard access to something you do 50 times a day, and now you can't believe how much time you've been wasting clicking buttons and menus. Throughout the table, operations are listed in the left column. Windows shortcuts are in the center column, and Mac shortcuts are in the right column. There is no implied priority in this order — Windows first, or Mac in the "right" column — it's just how it all worked out.
Table A.1. Photoshop's Shortcuts and Modifiers
Windows Shortcut | Macintosh Shortcut | |
|---|---|---|
Actual Pixels | Ctrl+Alt+0 (zero) | |
Auto Color | Ctrl+Shift+B | |
Auto Contrast | Ctrl+Shift+Alt+L | |
Auto Levels | Ctrl+Shift+L | |
Bring Layer Forward | Ctrl+right bracket (]) | |
Bring Layer to Front | Ctrl+Shift+right bracket (]) | |
Browse | Ctrl+Shift+O | |
Canvas Size | right-click title bar | |
Clear | Backspace or Delete | Delete |
Close | Ctrl+W or Ctrl+F4 | |
Close All | Ctrl+Shift+W or Ctrl+Shift+F4 | |
Color Balance | Ctrl+B | |
Color Balance, with last settings | Ctrl+Alt+B | |
Color Settings | Ctrl+Shift+K | |
Copy | Ctrl+C | |
Copy Merged | Ctrl+Shift+C | |
Curves | Ctrl+M | |
Curves, with last settings | Ctrl+Alt+M | |
Cut | Ctrl+X | |
Desaturate | Ctrl+Shift+U | |
Deselect | Ctrl+D | |
Duplicate | click left icon at bottom of History palette or right-click title bar | click left icon at bottom of History palette |
Exit/Quit | Ctrl+Q or Alt+F4 | |
Extract | Ctrl+Alt+X | |
Fade last operation | Ctrl+Shift+F | |
Feather selection | Ctrl+Alt+D | |
File Info | right-click title bar | |
Fill | Shift+Backspace | Shift+Delete |
Ctrl+Alt+Backspace | ||
Filter, repeat last | Ctrl+F | |
Filter, repeat with new settings | Ctrl+Alt+F | |
Fit on Screen | Ctrl+0 (zero) | |
Free Transform | Ctrl+T | |
Free Transform, from clone | Ctrl+Alt+T | |
Gamut Warning | Ctrl+Shift+Y | |
Group with Previous layer | Ctrl+G | |
Help Contents | F1 | |
Hue/Saturation | Ctrl+U | |
Hue/Saturation, with last settings | Ctrl+Alt+U | |
Image Size | right-click title bar | |
Inverse Selection | Ctrl+Shift+I | |
Invert | Ctrl+I | |
Layer Via Copy | Ctrl+J | |
Layer Via Cut | Ctrl+Shift+J | |
Levels | Ctrl+L | |
Levels, with last settings | Ctrl+Alt+L | |
Liquify | Ctrl+Shift+X | |
Lock Guides | Ctrl+Alt+semicolon (;) | |
Merge Down/Linked/Layer Set | Ctrl+E | |
Merge Visible | Ctrl+Shift+E | |
Merge Visible, into current layer | Ctrl+Shift+Alt+E | |
New, document | Ctrl+N | |
New, with default settings | Ctrl+Alt+N | |
New Layer | Ctrl+Shift+N | |
New Layer, skip options | Ctrl+Shift+Alt+N | |
Open, existing document | Ctrl+O | |
Open As | Ctrl+Alt+O | |
Page Setup | Ctrl+Shift+P | |
Paste | Ctrl+V or F4 | |
Ctrl+Shift+V | ||
Pattern Maker | Ctrl+Shift+Alt+X | |
Preferences | Ctrl+K | |
Preferences, last panel | Ctrl+Alt+K | |
Ctrl+P | ||
Print One Copy | Ctrl+Shift+Alt+P | |
Print with Preview | Ctrl+Alt+P | |
Proof Colors | Ctrl+Y | |
Redo | Ctrl+Z | |
Reselect | Ctrl+Shift+D | |
Revert | F12 | F12 (reset System Preferences to use this, or you'll open the Dashboard) |
Rulers, show or hide | Ctrl+R | |
Save | Ctrl+S | |
Save As | Ctrl+Shift+S | |
Save as a copy | Ctrl+Alt+S | |
Save For Web | Ctrl+Shift+Alt+S | |
Select All | Ctrl+A | |
Send Layer Backward | Ctrl+left bracket ([) | |
Send Layer to Back | Ctrl+Shift+left bracket ([) | |
Show/Hide Extras (for example, selection edges, slices, annotation) | Ctrl+H | |
Show/Hide Grid | Ctrl+Alt+quote (") | |
Show/Hide Guides | Ctrl+semicolon (;) | |
Show/Hide Selected Path | Ctrl+Shift+H | |
Snap (for example, guides, grid, document bounds) | Ctrl+Shift+semicolon (;) | |
Step Backward in History | Ctrl+Alt+Z | |
Step Forward in History | Ctrl+Shift+Z | |
Transform Again | Ctrl+Shift+T | |
Ctrl+Shift+Alt+T | ||
Undo | Ctrl+Z | |
Ungroup Layers | Ctrl+Shift+G | |
Zoom In | Ctrl+plus (+) | |
Zoom Out | Ctrl+minus (−) | |
Scroll image with Hand tool | spacebar+drag or drag in Navigator palette | spacebar+drag or drag in Navigator palette |
Scroll up or down one screen | Page Up or Page Down | Page Up or Page Down |
Scroll up or down slightly | Shift+Page Up or Shift+Page Down | Shift+Page Up or Shift+Page Down |
Scroll left or right one screen | Ctrl+Page Up or Ctrl+Page Down | |
Scroll left or right slightly | Ctrl+Shift+Page Up or Ctrl+Shift+Page Down | |
Switch to upper-left corner | Home | Home |
Switch to lower-right corner | End | End |
Magnify to custom zoom ratio | Ctrl+spacebar+drag or Ctrl+drag in Navigator palette | |
Zoom in and change window size to fit (assuming default settings) | Ctrl+Alt+plus (+) | |
Zoom in without changing window size | Ctrl+spacebar+click or Ctrl+plus (+) | |
Zoom out and change window size to fit (assuming default settings) | Ctrl+Alt+minus (−) | |
Zoom out without changing window size | Alt+spacebar+click or Ctrl+minus (−) | Option+spacebar+click or |
Zoom to 100% | Ctrl+Alt+0 (zero) or double+click zoom tool icon | |
Fit image on screen | Ctrl+0 (zero) or double-click hand tool icon | |
Apply zoom value but keep magnification box active | Shift+Enter | Shift+Return |
F | F | |
Change screen mode for all open windows | Shift+click screen icon in toolbox | Shift+click screen icon in toolbox |
Toggle display of menu bar in full screen modes | Shift+F | Shift+F |
Bring forward next open image window | Ctrl+Tab | Ctrl+Tab |
Display crosshair cursor | Caps Lock | Caps Lock |
Erase to History | Alt+drag with Eraser | Option+drag with Eraser |
Select Brush tool or Pencil tool | B or Shift+B | B or Shift+B |
Select Airbrush (while Brush tool is active) | Shift+Alt+P | Shift+Option+P |
Cycle between Stamp tools | S or Shift+S | S or Shift+S |
Select Healing Brush or Patch tool | J or Shift+J | J or Shift+J |
Specify area to clone | Alt+click with Clone stamp or Bealing Brush | Option+click with Clone Stamp or Healing Brush |
Cycle between Focus tools | R or Shift+R | R or Shift+R |
Sharpen with Blur tool or blur with Sharpen tool | Alt+drag | Option+drag |
Dip into foreground color when smearing | Alt+drag with Smudge tool | Option+drag with Smudge tool |
Cycle between the Dodge, Burn, and Sponge tools | O or Shift+O | O or Shift+O |
Darken with Dodge tool or lighten with Burn tool | Alt+drag | Option+drag |
Paint or edit in a straight line | click, and then Shift+click | click, and then Shift+click |
Change Opacity, Strength, or Exposure in 10% increments | number (1 through 0) | number (1 through 0) |
Change Opacity, Strength, or Exposure in 1% increments | two numbers in a row | two numbers in a row |
Change Flow in 10% increments | Shift+number (1 through 0) | Shift+number (1 through 0) |
Change Flow in 1% increments | Shift+two numbers in a row | Shift+two numbers in a row |
Shift+right-click with paint or edit tool or Shift+Alt+letter | Shift+Control-click with paint or edit tool or Shift+Option+letter | |
Cycle through brush modes | Shift+plus (+) or Shift+minus (−) | Shift+plus (+) or Shift+minus (−) |
Reset to Normal brush mode | Shift+Alt+N | Shift+Option+N |
Change brush diameter in increments proportional to brush size | bracket key, [ or ] | bracket key, [ or ] |
Change brush hardness in 25 percent increments | Shift+bracket, [ or ] | Shift+bracket, [ or ] |
Cycle between brush presets | comma (,) or period (.) | comma (,) or period (.) |
Select first or last brush preset | Shift+comma (,) or Shift+period (.) | Shift+comma (,) or Shift+period (.) |
Display Brushes palette | F5 or right-click with paint or edit tool | F5 or Control-click with paint or edit tool |
Delete preset brush from Brushes palette | Alt+click preset | Option+click preset |
Edit preset name in Brushes palette | double-click preset | double-click preset |
Applying Colors and Styles | ||
|---|---|---|
Switch foreground and background colors | X | X |
Reset foreground and background colors to black and white | D | D |
Lift foreground color from image | Alt+click with Paint tool or click with Eyedropper | Option+click with Paint tool or click with Eyedropper |
Lift background color from image | Alt+click with Eyedropper | Option+click with Eyedropper |
Lift color from different application | click with Eyedropper in image window, and then drag outside window into other application | click with Eyedropper in image window, and then drag outside window into other application |
Place fixed color sampler in image | click with Color Sampler tool or Shift+click with Eyedropper | click with Color Sampler tool or Shift+click with Eyedropper |
Delete fixed color sampler | Alt+click with Color Sampler tool or Shift+Alt+click with Eyedropper | Option+click with Color Sampler tool or Shift+Option+click with Eyedropper |
Display or hide Color palette | F6 | F6 |
Lift foreground color from color bar at bottom of Color palette | click color bar | click color bar |
Lift background color from color bar | Alt+click color bar | Option+click color bar |
Cycle through color bars | Shift+click color bar | Shift+click color bar |
Specify new color bar | Right-click color bar | Control-click color bar |
Lift foreground color from Swatches palette | click swatch | click swatch |
Lift background color from Swatches palette | Ctrl+click swatch | |
Delete swatch or style from palette | Alt+click swatch or style | Option+click swatch or style |
Add new swatch or style to palette | click in empty area of palette | click in empty area of palette |
Add new swatch or style without naming | Alt+click in empty area of palette | Option+click in empty area of palette |
Apply style to active layer | click icon in Styles palette | click icon in Styles palette |
Add effects in style to those applied to active layer | Shift+click icon in Styles palette | Shift+click icon in Styles palette |
Fill selection or layer with foreground color | Alt+Backspace | Option+Delete |
Fill layer with foreground color, preserve transparency | Shift+Alt+Backspace | Shift+Option+Delete |
Fill selection on background layer with background color | Backspace or Delete | Delete |
Fill selection on any layer with background color | Ctrl+Backspace | |
Fill layer with background color, preserve transparency | Ctrl+Shift+Backspace | |
Fill selection with source state in History palette | Ctrl+Alt+Backspace | |
Display Fill dialog box | Shift+Backspace | Shift+Delete |
Select Gradient Tool or Paint Bucket | G or Shift+G | G or Shift+G |
Change gradient style | bracket key, [ or ] | bracket key, [ or ] |
Cycle between gradient presets | comma (,) or period (.) | comma (,) or period (.) |
Select first or last gradient preset | Shift+comma (,) or Shift+period (.) | Shift+comma (,) or Shift+period (.) |
Select all text on text layer | double-click T in Layers palette | double-click T in Layers palette |
Select all text when already working inside text layer | Ctrl+A | |
Select single word | double-click word with type tool | double-click word with Type tool |
Select word to left or right | Ctrl+Shift+left or right arrow | |
Increase type size 2 pixels (or points) | Ctrl+Shift+greater than (>) | |
Decrease type size 2 pixels | Ctrl+Shift+less than (<) | |
Increase type size 10 pixels | Ctrl+Shift+Alt+greater than (>) | |
Decrease type size 10 pixels | Ctrl+Shift+Alt+less than (<) | |
Kern together 2/100 em | Alt+left arrow | Option+left arrow |
Kern apart 2/100 em | Alt+right arrow | Option+right arrow |
Kern together 1/10 em | Ctrl+Alt+left arrow | |
Kern apart 1/10 em | Ctrl+Alt+right arrow | |
Toggle underlining | Ctrl+Shift+U | |
Toggle strikethrough | Ctrl+Shift+slash (/) | |
Toggle all uppercase text | Ctrl+Shift+K | |
Toggle small caps text | Ctrl+Shift+H | |
Toggle superscript text | Ctrl+Shift+plus (+) | |
Toggle subscript text | Ctrl+Shift+Alt+plus (+) | |
Restore 100% horizontal scale | Ctrl+Shift+X | |
Restore 100% vertical scale | Ctrl+Shift+Alt+X | |
Tighten leading 2 pixels | Alt+up arrow | Option+up arrow |
Expand leading 2 pixels | Alt+down arrow | Option+down arrow |
Tighten leading 10 pixels | Ctrl+Alt+up arrow | |
Expand leading 10 pixels | Ctrl+Alt+down arrow | |
Switch to Auto leading | Ctrl+Shift+Alt+A | |
Raise baseline shift 2 pixels | Shift+Alt+up arrow | Shift+Option+up arrow |
Lower baseline shift 2 pixels | Shift+Alt+down arrow | Shift+Option+down arrow |
Raise baseline shift 10 pixels | Ctrl+Shift+Alt+up arrow | |
Lower baseline shift 10 pixels | Ctrl+Shift+Alt+down arrow | |
Ctrl+Shift+L | ||
Center-align text | Ctrl+Shift+C | |
Right-align text | Ctrl+Shift+R | |
Justify all text | Ctrl+Shift+F | |
Justify all text except last line | Ctrl+Shift+J | |
Insert nonbreaking hyphen | Ctrl+Alt+hyphen (-) | none |
Insert nonbreaking space | Ctrl+Alt+X | Option+spacebar |
Show or hide highlight while editing text | Ctrl+H | |
Move live text | Ctrl+drag | |
Accept changes to text | Enter on keypad or Ctrl+Enter | Enter or |
Cancel changes to text (cannot undo) | Esc | Escape |
Highlight font option when Type Tool active but no type highlighted | Enter | Return |
Change formatting for multiple linked text layers | Shift+choose setting from Options bar or type value and press Shift+Enter | Shift+choose setting from Options bar or type value and press Shift+Return |
Display Character palette | Ctrl+T when text highlighted | |
Display Paragraph palette | Ctrl+M when text highlighted | |
Select everything | Ctrl+A | |
Deselect everything | Ctrl+D | |
Restore last selection outline | Ctrl+Shift+D | |
Hide or show marching ants | Ctrl+H | |
Feather selection | Ctrl+Alt+D | |
Reverse selection | Ctrl+Shift+I | |
Toggle between Rectangular and Elliptical Marquee tools | M or Shift+M | M or Shift+M |
Draw out from center with Marquee tool | Alt | Option |
Constrain marquee to square or circle | Shift | Shift |
Move marquee as you draw it | spacebar | spacebar |
Cycle between Lasso tools | L or Shift+L | L or Shift+L |
Add corner to straight-sided selection outline | Alt+click with Lasso tool or click with Polygonal Lasso tool | Option+click with Lasso tool or click with Polygonal Lasso tool |
Add point to magnetic selection | click with Magnetic Lasso tool | click with Magnetic Lasso tool |
Delete last point added with Magnetic Lasso tool | Backspace | Delete |
Increase or reduce magnetic lasso width | bracket, [ or ] | bracket, [ or ] |
Close polygon or magnetic selection | double-click with respective Lasso tool or press Enter | double-click with respective Lasso tool or press Return |
Close magnetic selection with straight segment | Alt+double-click or Alt+Enter | Option+double-click or Option+Return |
Cancel polygon or magnetic selection | Esc | None |
Add to selection | Shift+drag (marquee, lasso) or Shift+click (magic wand) | Shift+drag (marquee, lasso) or Shift+click (magic wand) |
Subtract from selection | Alt+drag (Marquee, Lasso) or Alt+click (Magic Wand) | Option+drag (Marquee, Lasso) or Option+click (Magic Wand) |
Retain intersected portion of selection | Shift+Alt+drag (Marquee, Lasso) or Shift+Alt+click (Magic Wand) | Shift+Option+drag (Marquee, Lasso) or Shift+Option+click (Magic Wand) |
Select Move tool | V or press and hold Ctrl | V or press and hold |
Move selection | drag with Move tool or Ctrl+drag with other tool | drag with Move tool or |
Constrain movement vertically or horizontally | press Shift while dragging selection | press Shift while dragging selection |
Move selection in 1-pixel increments | Ctrl+arrow key | |
Move selection in 10-pixel increments | Ctrl+Shift+arrow key | |
Clone selection | Alt+drag selection with Move tool or Ctrl+Alt+drag with other tool | Option+drag selection with Move tool or |
Clone selection in 1-pixel increments | Ctrl+Alt+arrow key | |
Clone selection and move the clone in 10-pixel increments | Ctrl+Shift+Alt+arrow key | |
Clone selection to different image | Ctrl+drag selection from one window and drop it into another | |
Move selection outline independently of its contents | drag with Selection tool | drag with Selection tool |
Move selection outline in 1-pixel increments | arrow key when Selection tool is active | arrow key when Selection tool is active |
Move selection outline in 10-pixel increments | Shift+arrow key when Selection tool is active | Shift+arrow key when Selection tool is active |
Copy empty selection outline to different image | drag selection from one window into another with Selection tool | drag selection from one window into another with Selection tool |
Change opacity or blend mode of floating selection, when used immediately after applying a filter | Ctrl+Shift+F | |
Paste image into selection | Ctrl+Shift+V | |
Paste image behind selection | Ctrl+Shift+Alt+V | |
Display or hide Layers palette | F7 | F7 |
View single layer by itself | Alt+click eyeball icon in Layers palette | Option+click Eyeball icon in Layers palette |
Create new layer above current layer | click Page icon at bottom of Layers palette or Ctrl+Shift+Alt+N | click Page icon at bottom of Layers palette or |
Create new layer below current layer | Ctrl+click Page icon at bottom of Layers palette | |
Create new layer above current layer and assign name | Alt+click Page icon at bottom of Layers palette or Ctrl+Shift+N | Option+click Page icon at bottom of Layers palette or |
Create new layer below current layer and assign name | Ctrl+Alt+click Page icon at bottom of Layers palette | |
Clone selection or entire layer to new layer | Ctrl+J | |
Clone selection or entire layer to new layer and assign name | Ctrl+Alt+J | |
Transfer selection to new layer | Ctrl+Shift+J | |
Transfer selection to new layer and assign name | Ctrl+Shift+Alt+J | |
Convert floating selection to new layer | Ctrl+Shift+J | |
Create adjustment layer | choose from Dual-tone icon menu at bottom of Layers palette | choose from Dual-tone icon menu at bottom of Layers palette |
Create and name adjustment layer | Alt+choose from Dual-tone icon menu at bottom of Layers palette | Option+choose from Dual-tone icon menu at bottom of Layers palette |
Add layer set | click Folder icon in Layers palette | click Folder icon in Layers palette |
Add and name layer set | Alt+click Folder icon in Layers palette | Option+click Folder icon in Layers palette |
Ascend one layer | Alt+right bracket (]) | Option+right bracket (]) |
Descend one layer | Alt+left bracket ([) | Option+left bracket ([) |
Ascend to top layer | Shift+Alt+right bracket (]) | Shift+Option+right bracket (]) |
Descend to background layer | Shift+Alt+left bracket ([) | Shift+Option+left bracket ([) |
Go directly to layer containing specific image element when using Move tool | Ctrl+click or Alt+right+click layer in image window | |
Go directly to layer containing specific image element when using any tool except Move tool | Ctrl+Alt+right-click layer in image window | |
Select from layers that overlap when using Move tool | Right-click layer in image window | Control-click layer in image window |
Select from layers that overlap when using any tool except Move tool | Ctrl+right-click layer in image window | |
Lock transparency of layer | slash (/) | slash (/) |
Toggle between current lock configuration and no locks in Layers palette | slash (/) | slash (/) |
Convert layer's transparency mask to selection outline | Ctrl+click layer name in Layers palette | |
Add transparency mask to selection | Ctrl+Shift+click layer name | |
Subtract transparency mask from selection | Ctrl+Alt+click layer name | |
Retain intersection of transparency mask and selection | Ctrl+Shift+Alt+click layer name | |
Move layer | drag with Move tool or Ctrl+drag with other tool | drag with Move tool or |
Move layer in 1-pixel increments | Ctrl+arrow key | |
Move layer in 10-pixel increments | Ctrl+Shift+arrow key | |
Clone and move layer | Alt+drag with Move tool or Ctrl+Alt+drag with other tool | Option+drag with Move tool or |
Clone and move layer in 1-pixel increments | Ctrl+Alt+arrow key | |
Clone and move layer in 10-pixel increments | Ctrl+Shift+Alt+arrow key | |
Clone layer to another open image | Ctrl+drag layer from one window and drop it into another | |
Clone layer to new image | Alt+drag layer onto page icon at bottom of Layers palette, choose New from Document menu | Option+drag layer onto page icon at bottom of Layers palette, choose New from Document menu |
Bring layer forward one level | Ctrl+right bracket (]) | |
Bring layer to front of file | Ctrl+Shift+right bracket (]) | |
Send layer backward one level | Ctrl+left bracket ([) | |
Send layer to back, just above background layer | Ctrl+Shift+left bracket ([) | |
Link layer containing specific image element with active layer | Ctrl+Shift+Alt+right-click layer in image window | |
Unlink layer that contains specific image element from active layer | Ctrl+Shift+Alt+right-click layer in image window | |
Unlink all layers from active layer | Alt+click brush icon in front of layer name in Layers palette or Ctrl+Shift+Alt+right-click active layer in image window | Option+click brush icon in front of layer name in Layers palette or |
Change opacity of active layer in 10% increments | number (1 through 0) when Selection tool is active | number (1 through 0) when Selection tool is active |
Change opacity of active layer in 1% increments | two numbers in a row when Selection tool is active | two numbers in a row when Selection tool is active |
Change opacity of pixels in active layer in 10% increments, independently of effects | Shift+number (1 through 0) when Selection tool is active | Shift+number (1 through 0) when Selection tool is active |
Change opacity of pixels in active layer in 1% increments, independently of effects | Shift+two numbers in a row when Selection tool is active | Shift+two numbers in a row when Selection tool is active |
Edit layer name | double-click layer name in Layers palette | double-click layer name in Layers palette |
Edit blending options for layer | double-click thumbnail in Layers palette or Alt+double-click layer name | double-click thumbnail in Layers palette or Option+double-click layer name |
Edit settings for fill or adjustment layer | double-click thumbnail in Layers palette | double-click thumbnail in Layers palette |
Change blend mode when Selection tool is active | Shift+Alt+letter | Shift+Option+letter |
Cycle between blend modes when Selection tool is active | Shift+plus (+) or Shift+minus (−) | Shift+plus (+) or Shift+minus (−) |
Reset to Normal blend mode when Selection tool is active | Shift+Alt+N | Shift+Option+N |
Adjust "fuzziness" in Layer Style dialog box | Alt+drag This Layer or Underlying Layer slider triangle | Option+drag This Layer or Underlying Layer slider triangle |
Merge layer with next layer down | Ctrl+E | |
Merge linked layers | Ctrl+E | |
Merge grouped layers | Ctrl+E | |
Merge all layers in active set | Ctrl+E | |
Merge all visible layers | Ctrl+Shift+E | |
Copy merged version of selection to Clipboard | Ctrl+Shift+C | |
Clone contents of layer into next layer down | Ctrl+Alt+E | |
Clone contents of linked layers to active layer | Ctrl+Alt+E | |
Clone contents of all visible layers to active layer | Ctrl+Shift+Alt+E | |
Delete active layer | click Trash icon in Layers palette | click Trash icon in Layers palette |
Delete active layer without warning | Alt+click Trash icon in Layers palette | Option+click Trash icon in Layers palette |
Ctrl+click Trash icon in Layers palette | ||
Delete multiple linked layers and sets without warning | Ctrl+Alt+click Trash icon in Layers palette | |
Edit specific layer effect | double-click effect name in Layers palette | double-click effect name in Layers palette |
Switch between effects in Layer Styles dialog box | Ctrl+1 through Ctrl+0 | |
Save flattened copy of layered image | Ctrl+Alt+S | |
Normal | Shift+Alt+N or Shift+Alt+L | Shift+Option+N |
Dissolve | Shift+Alt+I | Shift+Option+I |
Behind | Shift+Alt+Q | Shift+Option+Q |
Clear | Shift+Alt+R | Shift+Option+R |
Darken | Shift+Alt+K | Shift+Option+K |
Multiply | Shift+Alt+M | Shift+Option+M |
Color Burn | Shift+Alt+B | Shift+Option+B |
Linear Burn | Shift+Alt+A | Shift+Option+A |
Lighten | Shift+Alt+G | Shift+Option+G |
Screen | Shift+Alt+S | Shift+Option+S |
Color Dodge | Shift+Alt+D | Shift+Option+D |
Linear Dodge | Shift+Alt+W | Shift+Option+W |
Overlay | Shift+Alt+O | Shift+Option+O |
Soft Light | Shift+Alt+F | Shift+Option+F |
Hard Light | Shift+Alt+H | Shift+Option+H |
Vivid Light | Shift+Alt+V | Shift+Option+V |
Linear Light | Shift+Alt+J | Shift+Option+J |
Pin Light | Shift+Alt+Z | Shift+Option+Z |
Hard Mix | Shift+Alt+L | Shift+Option+L |
Difference | Shift+Alt+E | Shift+Option+E |
Exclusion | Shift+Alt+X | Shift+Option+X |
Hue | Shift+Alt+U | Shift+Option+U |
Shift+Alt+T | Shift+Option+T | |
Color | Shift+Alt+C | Shift+Option+C |
Luminosity | Shift+Alt+Y | Shift+Option+Y |
Saturate (Sponge tool) | Shift+Alt+S | Shift+Option+S |
Desaturate (Sponge tool) | Shift+Alt+D | Shift+Option+D |
Shadows (Dodge and Burn tools) | Shift+Alt+S | Shift+Option+S |
Midtones (Dodge and Burn tools) | Shift+Alt+M | Shift+Option+M |
Highlights (Dodge and Burn tools) | Shift+Alt+H | Shift+Option+H |
Replace (Healing Brush) | Shift+Alt+Z | Shift+Option+Z |
Pass Through (layer set) | Shift+Alt+P | Shift+Option+P |
Cycle to next mode | Shift+plus (+) | Shift+plus (+) |
Cycle to previous mode | Shift+minus (−) | Shift+minus (−) |
Switch between independent color and mask channels | Ctrl+1 through Ctrl+9 | |
View composite RGB, Lab, or CMYK image | Ctrl+tilde (~) | |
Activate or deactivate color channel | Shift+click channel name in Channels palette | Shift+click channel name in Channels palette |
Create channel mask filled with black | click Page icon at bottom of Channels palette | click Page icon at bottom of Channels palette |
Create and name channel mask filled with black | Alt+click Page icon at bottom of Channels palette | Option+click Page icon at bottom of Channels palette |
Create channel mask from selection outline | click Mask icon at bottom of Channels palette | click Mask icon at bottom of Channels palette |
Create and name channel mask from selection outline | Alt+click Mask icon at bottom of Channels palette | Option+click Mask icon at bottom of Channels palette |
View active channel mask as rubylith overlay | tilde (~) | tilde (~) |
Convert channel mask to selection outline | Ctrl+click channel name in Channels palette or Ctrl+Alt+number (1 through 0) | |
Add channel mask to selection | Ctrl+Shift+click channel name | |
Subtract channel mask from selection | Ctrl+Alt+click channel name | |
Retain intersection of channel mask and selection | Ctrl+Shift+Alt+click channel name | |
Enter or exit quick mask mode | Q | Q |
Toggle quick mask color over masked or selected area | Alt+click Quick Mask icon in Toolbox | Option+click Quick Mask icon in Toolbox |
Change quick mask color overlay | double-click Quick Mask icon | double-click Quick Mask icon |
View quick mask independently of image | tilde (~) | tilde (~) |
Add spot color channel | Ctrl+click Page icon at bottom of Channels palette | |
Create layer mask filled with white when nothing selected | click Mask icon at bottom of Layers palette | click Mask icon at bottom of Layers palette |
Create layer mask filled with black when nothing selected | Alt+click Mask icon | Option+click Mask icon |
Create layer mask from selection outline | click Mask icon | click Mask icon |
Create layer mask that hides selection | Alt+click Mask icon | Option+click Mask icon |
Switch focus from layer mask to image | Ctrl+tilde (~) | |
Switch focus from image to layer mask | Ctrl+backslash () | |
View layer mask as rubylith overlay | backslash () or Shift+Alt+click layer mask thumbnail in Layers palette | backslash () or Shift+Option+click layer mask thumbnail in Layers palette |
View layer mask independently of image | backslash (), and then tilde (~) or Alt+click layer mask thumbnail in Layers palette | backslash (), and then tilde (~) or Option+click layer mask thumbnail in Layers palette |
Add vector mask to layer | Ctrl+click Mask icon in Layers palette | |
Convert current path to vector mask | Ctrl+click Mask icon in Layers palette with path active | |
Toggle display of vector mask | click vector mask thumbnail or press Enter when shape or arrow tool is active | click vector mask thumbnail or press Return when shape or arrow tool is active |
Disable layer mask or vector mask | Shift+click mask thumbnail in Layers palette | Shift+click mask thumbnail in Layers palette |
Toggle link between layer and mask | click between layer and mask thumbnails in Layers palette | click between layer and mask thumbnails in Layers palette |
Copy layer mask or vector mask from one layer to active layer | drag mask thumbnail onto Mask icon at bottom of Layers palette | drag mask thumbnail onto Mask icon at bottom of Layers palette |
Convert layer mask to selection outline | Ctrl+click layer mask thumbnail or Ctrl+Alt+backslash () | |
Convert vector mask to selection outline | Ctrl+click vector mask thumbnail | |
Add layer mask or vector mask to selection | Ctrl+Shift+click mask thumbnail | |
Subtract layer mask or vector mask from selection | Ctrl+Alt+click mask thumbnail | |
Retain intersection of layer mask or vector mask and selection | Ctrl+Shift+Alt+click mask thumbnail | |
Cycle between standard, Freeform, and Magnetic Pen tools | P or Shift+P | P or Shift+P |
Add corner to end of active path | click with Pen tool or Alt+click with Freeform Pen tool | click with pen tool or Option+click with Freeform Pen tool |
Add smooth arc to end of active path | drag with Pen tool | drag with Pen tool |
Add cusp to end of active path | Alt+click, and then drag with Pen tool | Option+click, and then drag with Pen tool |
Add point to end of active magnetic selection | click with Magnetic Pen tool | click with Magnetic Pen tool |
Delete last point added with standard or Magnetic Pen tool | Backspace | Delete |
Draw freehand path segment | drag with Freeform Pen tool or Alt+drag with Magnetic Pen tool | drag with Freeform Pen tool or Option+drag with Magnetic Pen tool |
Increase or reduce Magnetic Pen tool path width | bracket, [ or ] | bracket, [ or ] |
Close magnetic selection | double-click with Magnetic Pen tool or click first point in path | double-click with Magnetic Pen tool or click first point in path |
Close magnetic selection with straight segment | Alt+double-click or Alt+Enter | Option+double-click or Option+Return |
Cancel magnetic or freeform selection | Esc | Esc |
Select Arrow tool | A or press Ctrl when Pen tool is active | A or press |
Move selected points | drag point with Arrow tool or Ctrl+drag with Pen tool | drag point with Arrow tool or |
Select multiple points in path | Shift+click with Arrow or Ctrl+Shift+click with Pen tool | Shift+click with Arrow or |
Select entire path | Alt+click path with white arrow or Alt+click path in Paths palette | Option+click path with arrow or Option+click path in Paths palette |
Clone path | Alt+drag path with Arrow or Ctrl+Alt+drag with Pen tools | Option+drag path with Arrow tool or |
Access Convert direction tool when Pen tool is active | Alt while hovering cursor over anchor point | Option while hovering cursor over anchor point |
Access Convert Direction tool when Arrow tool is active | Ctrl+Alt while hovering cursor over anchor point | |
Convert corner or cusp to smooth arc | Alt+drag point with Pen tool | Option+drag point with Pen tool |
Convert arc to corner | Alt+click point with Pen tool | Option+click point with Pen tool |
Convert arc to cusp | Alt+drag handle with Pen tool | Option+drag handle with Pen tool |
Insert point in selected path | click segment with Pen tool | click segment with Pen tool |
Remove point from path | click point with Pen tool | click point with Pen tool |
Convert path to selection outline | Ctrl+click path name in Paths palette or Ctrl+Enter when Pen or Arrow tool is active | |
Add path to selection | Ctrl+Shift+click path name in Paths palette | |
Subtract path from selection | Ctrl+Alt+click path name in Paths palette | |
Retain intersection of path and selection | Ctrl+Shift+Alt+click path name in Paths palette | |
Apply brushstroke around perimeter of path | Enter on keypad when Paint or edit tool is active | Enter when Paint or Edit tool is active |
Revert around perimeter of path | Enter on keypad when History Brush is active | Enter when History Brush is active |
double-click Work Path item in Paths palette | double-click Work Path item in Paths palette | |
Hide path (it remains active) | Ctrl+Shift+H | |
Deactivate path | click in empty portion of Paths palette or Enter when Pen or Arrow tool is active | click in empty portion of Paths palette or Return when Pen or Arrow tool is active |
Cycle between shape tools | U or Shift+U | U or Shift+U |
Move shape as you draw it | spacebar | spacebar |
Add next shape you draw to active shape layer | plus (+) | plus (+) |
Subtract next shape you draw from active shape layer | minus (−) | minus (−) |
Adjust roundness of next rounded rectangle you draw | bracket key, [ or ] | bracket key, [ or ] |
Change number of sides on next regular polygon or star you draw | bracket key, [ or ] | bracket key, [ or ] |
Change weight of next straight line you draw | bracket key, [ or ] | bracket key, [ or ] |
Cycle between custom shapes | bracket key, [ or ] | bracket key, [ or ] |
Cycle between layer styles | comma (,) or period (.) | comma (,) or period (.) |
Change color of active shape layer to foreground or background color | Alt+Backspace or Ctrl+Backspace | Option+Delete or |
Hide shape outlines (shape layer remains active) | Ctrl+Shift+H | |
Deactivate shape outlines | Enter when Pen or Arrow tool is active | Return when Pen or Arrow tool is active |
Delete shape layer when shape outlines are active | Backspace or Delete | Delete |
Select Crop tool | C | C |
Move crop boundary as you draw it | spacebar | spacebar |
Move crop boundary | drag inside boundary | drag inside boundary |
Scale crop boundary | drag boundary handle | drag boundary handle |
Scale crop boundary proportionally | Shift+drag corner handle | Shift+drag corner handle |
Scale crop boundary with respect to origin | Alt+drag boundary handle | Option+drag boundary handle |
Scale crop boundary proportionally with respect to origin point | Shift+Alt+drag corner | Shift+Option+drag corner |
Rotate crop boundary (always with respect to origin) | drag outside boundary | drag outside boundary |
Rotate crop boundary in 15° increments | Shift+drag outside boundary | Shift+drag outside boundary |
Distort crop boundary | draw crop boundary, select Perspective check box in Options bar, drag boundary handle | draw crop boundary, select Perspective check box in Options bar, drag boundary handle |
Constrain distortion effect in Perspective mode | Shift+drag corner handle | Shift+drag corner handle |
Scale crop boundary in Perspective mode | Alt+drag handle | Option+drag handle |
Accept crop | Enter | Return |
Cancel crop | Esc | Escape |
Freely transform selection, layer, or path | Ctrl+T | |
Duplicate selection, layer, or path and freely transform | Ctrl+Alt+T | |
Move image in Free Transform mode | drag inside boundary | drag inside boundary |
Move transformation origin | drag cross-hair target | drag cross-hair target |
Scale image | drag boundary handle | drag boundary handle |
Scale image proportionally | Shift+drag corner handle | Shift+drag corner handle |
Scale image with respect to origin | Alt+drag boundary handle | Option+drag boundary handle |
Rotate image (always with respect to origin) | drag outside boundary | drag outside boundary |
Rotate image in 15° increments | Shift+drag outside boundary | Shift+drag outside boundary |
Skew image | Ctrl+drag side handle | |
Skew image along constrained axis | Ctrl+Shift+drag side handle | |
Skew image with respect to origin | Ctrl+Alt+drag side handle | |
Ctrl+Shift+Alt+drag side handle | ||
Distort image | Ctrl+drag corner handle | |
Symmetrically distort opposite corners | Ctrl+Alt+drag corner handle | |
Constrain distortion to achieve perspective effect | Ctrl+Shift+drag corner handle | |
Constrain distortion to achieve symmetrical perspective effect | Ctrl+Shift+Alt+drag corner handle | |
Apply specific transformation in Free Transform mode | right+click in image window | Control+click in image window |
Apply numerical transformation in Free Transform mode | enter values in Options bar | enter values in Options bar |
Accept transformation | Enter | Return |
Cancel transformation | Esc | Escape |
Replay last transformation | Ctrl+Shift+T | |
Duplicate selection, layer, or path and replay last transformation | Ctrl+Shift+Alt+T | |
Display or hide rulers | Ctrl+R | |
Display or hide Info palette | F8 | F8 (be sure to edit your System Preferences or this will invoke Spaces) |
Change unit of measure | right-click ruler or drag from X,Y pop-up in Info palette | Control-click ruler or drag from X,Y pop-up in Info palette |
Reset ruler origin | double-click ruler origin box | double-click ruler origin box |
Select Measure tool | I, I, I (or I, Shift+I, Shift+I) | I, I, I (or I, Shift+I, Shift+I) |
Measure distance and angle | drag with Measure tool | drag with Measure tool |
Move measure line | drag measure line | drag measure line |
Change length and angle of measure line | drag endpoint of measure line | drag endpoint of measure line |
Measure angle between two lines (protractor option) | Alt+drag endpoint | Option+drag endpoint |
Match rotation of entire image to measure line | Choose Image | choose Image |
Choose Edit | choose Edit | |
Create guide | drag from ruler | drag from ruler |
Move guide | drag guide with Move tool or Ctrl+drag with other tool | drag guide with Move tool or |
Change horizontal guide to vertical or vice versa | press Alt while dragging guide | press Option while dragging guide |
Snap guide to ruler tick marks | press Shift while dragging guide | press Shift while dragging guide |
Display or hide guides | Ctrl+semicolon (;) | |
Lock or unlock guides | Ctrl+Alt+semicolon (;) | |
Display or hide grid | Ctrl+quote (") | |
Toggle guide and grid snapping | Ctrl+Shift+semicolon (;) | |
Edit guide color and grid increments | Ctrl+double+click guide | |
Repeat filter with last-used settings | Ctrl+F | |
Repeat filter with different settings | Ctrl+Alt+F | |
Fade effect of last filter | Ctrl+Shift+F | |
Scroll preview box in corrective filter dialog boxes | drag in preview box or click in image window | drag in preview box or click in image window |
Zoom preview box in corrective filter dialog boxes | Ctrl+click and Alt+click | |
Zoom full image preview | Ctrl+plus (+) and Ctrl+minus (−) | |
Increase selected option box value by 1 (or 0.1) | up arrow | up arrow |
Decrease value by 1 (or 0.1) | down arrow | down arrow |
Increase value by 10 (or 1) | Shift+up arrow | Shift+up arrow |
Decrease value by 10 (or 1) | Shift+down arrow | Shift+down arrow |
Adjust Angle value (where offered) in 15° increments | Shift+drag in Angle wheel | Shift+drag in Angle wheel |
Reset options in corrective filter dialog boxes | Alt+click Cancel button | Option+click Cancel button or Option+Escape |
Create high-contrast clouds effect | Alt+choose Filter | Option+choose Filter |
Specify numerical center in Lens Flare dialog box | Alt+click in preview | Option+click in preview |
Clone light in Lighting Effects dialog box | Alt+drag light | Option+drag light |
Delete Lighting Effects light | press Delete | press Delete |
Adjust size of footprint without affecting angle of light | Shift+drag handle | Shift+drag handle |
Adjust angle of light without affecting size of footprint | Ctrl+drag handle | |
Select Forward Warp or Push Left tool in Liquify dialog box | W or O | W or O |
Select Twirl Clockwise or Turbulence tool | C or T | C or T |
Select Pucker or Bloat tool | S or B | S or B |
Select Reconstruct or Mirror tool | R or M | R or M |
Select Freeze Mask or Thaw Mask tool | F or D | F or D |
Change Liquify brush diameter in 1-pixel increments | Bracket key, [ or ] | bracket key, [ or ] |
Change Liquify brush diameter in 10-pixel increments | Shift+bracket, [ or ] | Shift+bracket, [ or ] |
Undo last brushstroke in Liquify dialog box | Ctrl+Z | |
Undo brushstroke prior to last one | Ctrl+Alt+Z | |
Redo undone brushstroke | Ctrl+Shift+Z | |
Select the select image, rotate image, or set vanishing point tool in Photomerge dialog box | A, R, or V | A, R, or V |
Select Zoom or Hand tool | Z or H | Z or H |
Temporarily access Hand tool | Spacebar | Spacebar |
Step backward | Ctrl+Z | |
Step forward | Ctrl+Shift+Z | |
Show individual image border | Alt+move pointer over image | Option+move pointer over image |
Choose Levels command | Ctrl+L | |
Switch between channels in Levels or Curves dialog box | Ctrl+1 through Ctrl+3, or Ctrl+tilde (~) for composite | |
Preview black and white points in Levels dialog box | Alt+drag black or white Input Levels triangle | Option+drag black or white Input Levels triangle |
Specify alternate colors for black point, white point, and midtone | double-click black, white, or gray Eyedropper tool | double-click black, white, or gray Eyedropper tool |
Invert image in Levels dialog box | swap black and white Output Levels triangles | swap black and white Output Levels triangles |
Repeat last Levels correction | Ctrl+Alt+L | |
Choose Curves command | Ctrl+M | |
Add point in Curves dialog box | click graph line | click graph line |
Add specific color as new point on composite curve in point mode | Ctrl+click in image window | |
Add color as new point on independent channel curves | Ctrl+Shift+click in image window | |
Nudge Input value for selected point | left or right arrow key | left or right arrow key |
Nudge Output value for selected point | up- or down-arrow key | up- or down-arrow key |
Select next curve point | Ctrl+Tab | Control+Tab |
Select previous curve point | Ctrl+Shift+Tab | Control+Shift+Tab |
Delete curve point | Ctrl+click point | |
Select multiple curve points | Shift+click point | Shift+click point |
Deselect all points | Ctrl+D | |
Repeat last Curves correction | Ctrl+Alt+M | |
Choose Hue/Saturation command | Ctrl+U | |
Add colors to Hue/Saturation range when Edit set to anything but Master | Shift+click or drag in image window | Shift+click or drag in image window |
Subtract colors from Hue/Saturation range when Edit set to anything but Master | Alt+click or drag in image window | Option+click or drag in image window |
Edit all colors in Hue/Saturation dialog box | Ctrl+tilde (~) | |
Edit predefined color range | Ctrl+1 through Ctrl+6 | |
Repeat last Hue/Saturation correction | Ctrl+Alt+U | |
Desaturation colors | Ctrl+Shift+U | |
Undo or redo last operation | Ctrl+Z | |
Undo operation prior to last one | Ctrl+Alt+Z | |
Redo undone operation | Ctrl+Shift+Z | |
Undo to specific point | click item in History palette | click item in History palette |
Duplicate previously performed operation | Alt+click item in History palette | Option+click item in History palette |
Select state to revert to with History Brush | click in front of item in History palette | click in front of item in History palette |
Create snapshot from active state | click camera icon at bottom of History palette | click camera icon at bottom of History palette |
Create duplicate image from active state | click leftmost icon at bottom of History palette | click leftmost icon at bottom of History palette |
Revert selection to active History state | Ctrl+Alt+Backspace | |
Revert entire image to saved state | F12 | F12 (Be sure to edit your System Preferences or this will open the Dashboard) |
Display or hide all palettes, Toolbox, and status bar | Tab | Tab |
Display or hide palettes except Toolbox, Options bar, and status bar | Shift+Tab | Shift+Tab |
Hide Toolbox, Options bar, and status bar | Tab, and then Shift+Tab | Tab, and then Shift+Tab |
Display Options bar | Enter | Return |
Move panel out of palette | drag panel tab | drag panel tab |
Dock palette | drag panel tab into docking well | drag panel tab into docking well |
Snap palette to edge of screen | Shift+click palette title bar | Shift+click palette title bar |
Fully collapse palette | Alt+click collapse box or double-click panel tab | Option+click collapse box or double-click panel tab |
Delete item without warning from any palette that includes trash can | Alt+click Trash icon | Option+click Trash icon |
Preview how image sits on printed page | click Doc box in status bar | click Doc box at bottom of image window |
View size and resolution of image | Alt+click Doc box in status bar | Option+click Doc box at bottom of image window |
View image tile information | Ctrl+click Doc box in status bar | |
Change preference settings | Ctrl+K | |
Display last-used Preferences dialog box panel | Ctrl+Alt+K | |
Bring up dialog box with last-used settings | Alt+choose command from Image | Option+choose command from Image |
Duplicate image and bypass dialog box | Alt+choose Image | Option+choose Image |
Cancel operation | Esc | |
Activate No or Don't Save button when closing image | N | D |
Activate Don't Flatten button when changing color modes | D | D |
Activate Flatten button when changing color modes | F | F |