In This Chapter
Getting your images
Using the Elements Downloader and AutoPlay
Scanning photos
Getting photos from cell phones, files, and folders
Opening photos in an Editor
Creating new blank images
Converting the Clipboard
Saving your files
Processing multiple images
Adding new pages
Closing and quitting in Elements
After you install Photoshop Elements, the first thing you want to do is open some photos. It stands to reason that, before you can jump into all the editing opportunities you have with the program, you need to have something to work with.
You may have digital camera photos still on a memory card, or you may have copied files to your computer. You might have a photo print you want to scan, or you may want to get a photo off your cell phone. Regardless of where you have photos stored, you want to get them into Elements and start working on them.

In this chapter, we talk about getting your files into the Organizer (Windows) or Adobe Bridge (Mac) and opening them in an Editor. After you have your files in one workspace or another, you have a number of different options for sorting, finding, and arranging photos in the Organizer (Bridge). First, however, we look at acquiring images from a variety of sources and check out how to open them in an Editor. (Look over Book II, Chapter 2 if you just can't wait to find out more on working with the Organizer or Book II, Chapter 3 for Adobe Bridge.)
When you work with Elements, you most frequently use one of two workspaces, as we describe in Book I, Chapter 1 — the Organizer (or Adobe Bridge) or the Editor. The Organizer (Windows) or Adobe Bridge (Mac) is frequently used as your first stop in editing photos. Unless you have an image you want to edit in Edit Full mode and, therefore, open it immediately in the Editor, your typical first step is to look over a collection of photos you've taken with a digital camera or imported using a scanner. Therefore, when we talk about getting images from your camera, we're pointing you to the Organizer or Bridge workspace.
To load images from your camera in the Organizer window or Adobe Bridge, you open the Organizer (Bridge) and use a cable connected to your camera and your computer. Most digital cameras come with USB cables that can be connected to both camera and computer.
Almost all cameras use memory cards to store photos. After shooting some images, you have a choice of either grabbing those images directly from the camera and shunting them to your computer via a USB or FireWire cable, or you can remove the memory card itself from the camera and place it in a card reader hooked up to your computer using one of the same cables.
Both methods — a direct hookup or a connection to a card reader — afford you an opportunity to load your photos in the Elements Organizer or Adobe Bridge. To add photos to the Organizer or Adobe Bridge, do the following:
Either hook up your camera to your computer via a USB/FireWire cable, hook up a card reader via a cable, or insert a card if you have a built-in reader on your computer and insert the memory card in the reader.
Use the cable supported by your camera/card reader.
Cancel the AutoPlay Wizard (Windows). If iPhoto or Image Capture opens on the Mac, close the application.
When you hook up your camera or card reader, the AutoPlay Wizard opens. Click Cancel in the wizard to proceed.
Open the Organizer (Windows) or Adobe Bridge (Mac).
Launch Photoshop Elements and click Organize in the Welcome screen (Windows). On the Mac, launch Adobe Bridge.
Get photos from the camera/card reader.
In the Organizer, choose File

Choose the media source.
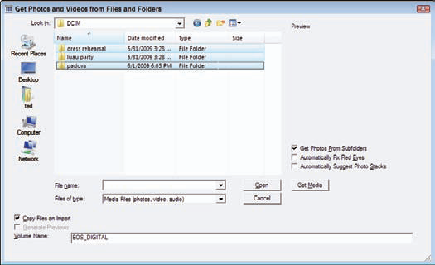
The first wizard you see when you choose the menu command is the Adobe Photoshop Elements 8.0 - Photo Downloader (Windows). This wizard opens when you choose to get photos from within the Organizer. At the top of the wizard, you find a drop-down list that displays your hard drive and a source, such as a camera or card reader, attached to your computer. Choose a source, as shown in Figure 1-1. On the Mac, choose a source drive from the Source pop-up menu, as shown in Figure 1-2.
Get the photos.
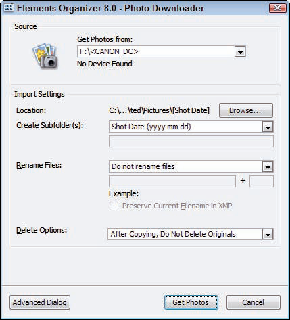
After you choose a camera or card reader, the Downloader appears with the Get Photos button active, as shown in Figure 1-3. Click Get Photos and leave the other settings at the defaults.
Wait for the Downloader to complete downloading all images before continuing.
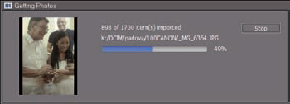
A progress bar displays the download progress, as shown in Figure 1-4. If you have many photos on your memory card, it may take a little time to complete the download. Be patient and wait for the download to finish.
A dialog box opens when the download is complete. The download doesn't copy images to the Organizer. To import the copied images into the Organizer, click OK.
View the results.
After the photos have been imported in the Organizer or Adobe Bridge, you see thumbnail images for all the photos acquired from the memory card.

After the photos are added to the Organizer (Adobe Bridge), you can edit the images in Full Edit or Quick Fix mode. See "Opening an Image in Edit Full Mode," later in this chapter.
The Adobe Photoshop Elements 8.0 – Photo Downloader Wizard (as shown in Figure 1-5) has a number of settings you can use when getting photos from a media source. Among the options you have are
Location: Click the Browse button to navigate your hard drive and select a target folder for saving the downloaded files. The directory path is shown in the wizard. In the advanced options shown later in Figure 1-5, you can create subfolders to further organize your photos.
Rename Files: You can choose to preserve the filenames created by your camera or add an extension or custom name for the files. Open the drop-down list and make a choice for the naming convention you want to use.
Delete options: You can copy images to your hard drive and retain the files on the media card, or you can delete the files after copying them. Choose an option from the drop-down list appearing below the Import into Album check box.
Advanced Options: If it's in the Advanced Options section of the Advanced dialog box, it must be doubly advanced, right? Items listed here include
Automatically Fix Red Eyes: Red-eye removal is applied to all images where Elements detects a red-eye problem.
Automatically Suggest Photo Stacks: Images with similar content can be stacked so that only a single-image thumbnail appears in the Organizer. You can unstack the photos at any time by clicking a stacked group. Checking this box automatically suggests photo stacks that you can confirm or deny.
Make 'Group Custom Name' a Tag: Photos can be tagged for sorting and organizing purposes. Checking this box adds a tag to the photos based on the group of photos imported.
Import into Album: You can import a number of images into an existing Photo Album by checking this box.
Apply Metadata: Metadata is information added to photos. Your camera can add metadata such as F-stop, date the shot was taken, ISO rating, and much more. You also have some custom options for adding metadata such as
Template to Use: Choose Basic Metadata for the template from the drop-down list and the other items in this group become active.
Creator: This is an open text field you can use to add something like a photographer's name.
Copyright: Another open text field where you can add the name of the copyright holder, such as a photo studio or a client.
Check All: The button at the bottom of the dialog box is used to check all the images. When checked, all images are copied from the media card to your hard drive.
UnCheck All: Check this box and you can individually check the box adjacent to the lower-right corner of each photo thumbnail. Only the checked items are copied to your hard drive when you click the Get Photos button.
Automatic Download: If you check this box, the Adobe Photoshop Elements 8.0 – Photo Downloader Wizard automatically downloads images when a media card is inserted in a card reader or when your camera is connected to your computer. You can establish download options from the Organizer preferences (see Book I, Chapter 4 for more on customizing preferences).

Earlier in this chapter, we cancelled the AutoPlay Wizard when we added photos in the Organizer. At times, you may want to use the AutoPlay Wizard to copy files to your computer.
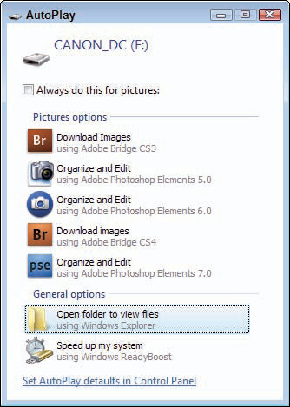
To use the AutoPlay Wizard, connect your camera or card reader to your computer or insert a CD-ROM. The AutoPlay Wizard opens by default. In the AutoPlay Wizard shown in Figure 1-6, you have the following options:
Pictures Options: In the list below Pictures Options, you find applications that can open images on the stored media device. If you want to open files in Elements, click the Organize and Edit link adjacent to the Elements icon.
General Options: If you want to browse the media storage device, click the Open Folder to View Files link. The folder where your images are stored opens on the desktop. You can copy folders and images to your hard drive by dragging them from the media device to a folder on your hard drive.
Scanners connect through the same ports as cameras and card readers. Most of today's scanners use either USB or FireWire. Almost all low-end scanners sold now are USB devices.
Even the lowest-end scanners provide 16-bit scans that help you get a little more data in the shadows and highlights. Like a digital camera, a scanner's price is normally in proportion to its quality.
Just as you'd clean a lens on a digital camera and set various menu selections before clicking the shutter button, you should prepare a few things ahead of time before scanning:
Connect the scanner properly. Make sure that you have all connections made to your computer according to the user manual that came with your scanner. If you just purchased a scanner, check for any lock bolts or tape and remove them according to the instructions.
Clean the scanner platen. Use a lint-free cloth and some glass cleaner (applied to the cloth) to remove all dust and particles on the glass. The more dust particles you remove, the easier it is to edit your image in Elements.
Clean the source material. Be certain that the print or film you want to scan is free of dust and spots.
If you have old negatives that are dirty or that have water spots or debris that you can't remove with a cloth and film cleaner, soak the film in photo flo (a liquid you can purchase at a photo retailer). Be certain that your hands are clean and then run the filmstrip between two fingers to remove the excess liquid. Turn on your shower full force with hot water only and hang film nearby to dry it. Remove the film when it's dry, and you should see a surprisingly clean filmstrip compared to your soiled original.
Get to know your scanner software. When you scan in Elements, the software supplied with your scanner takes charge, and you use the options in this software before the image scan finally drops into an Elements Image window.
Prepare the artwork. If you plan on scanning pages in a book or pamphlet, remove the pages or try to make photocopies so that the piece you scan lies flat on the scanner platen. Make sure that you observe copyright laws if you're scanning printed works. For faxes and photocopies, try to improve originals by recopying them on a photocopier by using darker settings.
Find the scanner's sweet spot. Every scanner has an area where you can acquire the best scans. This area is often called the sweet spot. To find the scanner's sweet spot, scan a blank piece of paper. The sweet spot is the brightest area on the resultant scan. Other areas should be darker. The sweet spot is most often in the upper-left quadrant, the lower-right quadrant, or the middle of the page. Note the area and plan to place your source material within this area when scanning pictures.
All scanning software provides you with options for determining resolution and color mode before you start a new scan. You should decide what output you intend to use and scan originals at target resolutions designed to accommodate a given output. For example
Scan the artwork or photo at the size and resolution for the final output. If you have a 3-x-5 photo that needs to be 1.5 × 2.5 inches on a Web page, scan the original with a 50-percent reduction in size at 72 ppi (pixels per inch). (See Book III, Chapter 1 for information about resizing images.)
Size images with the scanner software. If you have a 4-x-6 photo that needs to be output for prepress and commercial printing at 8 × 12 inches, scan the photo at 4 × 6 inches at 600 ppi (enough to size to 200 percent for a 300 dpi [dots per inch] image).
Scan properly for line art. Line art is 1-bit black and white only — something like a black-and-white illustration. When you print line art on laser printers or prepare files for commercial printing, the line art resolution should match the device resolution. For example, printing to a 600 dpi laser printer requires 600 ppi for a 1-bit line-art image. When you're printing to an image setter at a print shop, or it's going directly to plate or press, the resolution should be 1200 dpi.
Scan grayscale images in color. In some cases, it doesn't matter, but with some images and scanners, you can get better results by scanning in RGB (red, green, blue) color and converting to grayscale by using the Hue/Saturation dialog box or the Convert to Black and White dialog box, as we explain in Book III, Chapter 2.
Scan in high bit depths. If your scanner is capable of scanning in 16 or 32 bit, by all means, scan at the higher bit depths to capture the most data. See Book III, Chapter 2 for more information about working with higher-bit images.
Generally, when you install your scanner software, a standalone application and a plug-in are installed to control the scanning process. Plug-ins are designed to work inside other software programs such as Photoshop Elements. When you're using the plug-in, you can stay right in Elements to do all your scanning. Here's how it works:
After installing a new scanner and the accompanying software, launch Elements and then open the Organizer by clicking Organize in the Welcome screen (Windows) or click Import from Scanner on the Welcome screen (Mac).
From the Organizer, open the Preferences dialog box by pressing Ctrl+K (Windows). On the Mac, choose your scanner from the Import drop-down menu that appears in the Select Import Source dialog box.
Click Scanner in the left column and adjust the Scanner preferences, as we describe in Book I, Chapter 4 (Windows).
When the Preferences dialog box sees your scanner, you know that the connection is properly set up and you're ready to scan. On the Mac, when you choose your scanner from the Import drop-down list, you're ready to scan when Elements recognizes the scanner. Assuming all your connections are properly set up, here's how to complete your scan:
To open the scanner software from within Elements, choose File
Note
You must be in the Organizer window (Windows) to access this menu command.
Elements may churn a bit, but eventually your scanner software appears atop the Organizer window (Windows) or Elements window (Mac), as shown in Figure 1-7. The window is the scanner software provided by your scanner manufacturer. (Your window looks different from the one in Figure 1-7 unless you use the same scanner we use.) Regardless of which software you use, you should have similar options for creating a preview; selecting resolution, color mode, and image size; scaling; and other options.
Adjust the options according to your output requirements and the recommendations made by your scanner manufacturer.
When everything is ready to go, click the Scan button.

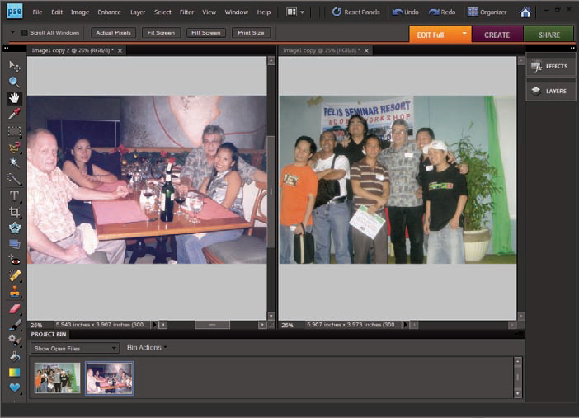
If you have several photos to scan, you can lay them out on the scanner platen and perform a single scan to acquire all images in one pass. Arrange the photos to scan on the glass and set up all the options in the scanner window for your intended output. When you scan multiple images, they form a single scan, as you can see in Figure 1-8.

After you scan multiple images, Elements makes it easy for you to separate each image into its own Image window, where you can save the images as separate files. Choose Image
With newer cell phones, you have several ways you can get photos from your phone to your computer. Elements doesn't have a menu command to import cell phone images directly. You first need to copy photos to your computer or connect your phone via a USB cable to your computer and from there, you can import them into the Organizer or open them in an Editor.
Here's what you find with cell phones and connection options:
Cable connection: If your phone comes with a USB port, you can connect your phone to your computer and copy images from the phone's memory card or hard drive to your computer. Your computer should see the cell phone as an external device. In some cases, you may need to load software that was provided by your cell phone developer.
Bluetooth: If your computer and your phone are equipped with Bluetooth, you can use your computer's Bluetooth interface to browse for a device to connect to your phone. On your phone, you accept the connection invitation and after you're connected, you can perform a wireless transfer of your files.
E-mail: Phones equipped with Internet connection options and e-mail provide you with the ability to e-mail photos to your desktop e-mail client. After these are e-mailed to your client, you can save the files to a target folder.
After you copy photos to your hard drive, you can get the photos in the Organizer, as we explain in Book II, Chapter 2, or open them directly in an Editor.
We've covered several different options you might use to copy files to your hard drive. Whether you've opened a folder from a media device or copied cell phone images to your computer, after they are on your computer's hard drive, you want to work with them in Elements.
To load files copied to your hard drive into the Organizer on Windows, do the following:
Copy files to a folder.
You can organize photos into separate folders on your hard drive, nest folders, or copy a bunch of photos to a single folder. When you use multiple folders, you repeat the steps here to import each folder's images into the Organizer. If you nest folders, you can get files from a parent folder and all subfolders.
Choose File
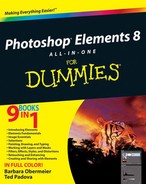
You can import a single file or a collection of images with this command. When you choose the menu command, the Get Photos and Videos from Files and Folders dialog box opens, as shown earlier in Figure 1-1.
Select images to import.
If you want to import all photos within a given folder, click any file in the list and then press Ctrl+A to select all. Alternatively, you can click and Ctrl-click to select files individually in a noncontiguous order or click and Shift-click to select photos in a contiguous order.
Specify your Fix Red Eyes and Photo Stacks options.
If you want to automatically correct red-eye problems or create photo stacks, check the check boxes respectively for these options.
Get the photos.
Click the Get Photos button and wait for Elements to complete the import process. Your photos appear in a new Organizer window and you're ready to apply edits in either the Organizer or an Editor.
You might have a single photo you want to edit without adding it to the Organizer or viewing it in Adobe Bridge. Perhaps you just want to apply some edits to an image you have on a media source or on your hard drive and then send it off via e-mail or share the photo using one of several supported sharing services.
If this is the case, you can bypass the Organizer and start in Edit Full mode. To open an image in Edit Full mode, do the following:
Launch Photoshop Elements.
Choose File
(Optional) If you want to search for photos saved within a given format, open the All Formats drop-down list (Format pop-up menu on the Mac) and choose the format for a file you want to open.
Selecting a format narrows down a collection of photos so that only files saved within the selected format are displayed. For example, if you have Camera Raw, JPEG, and TIFF images in a folder and you want to open only a JPEG file, you can select JPEG (*.JPG, *.JPEG, *.JPE) from the All Formats drop-down list (or JPEG from the Format pop-up menu [Mac]). Doing so displays only files saved in the format you choose from the drop-down list or pop-up menu.
If you're not sure what format the file you want to open is, leave the default choice from the menu at All Formats.
From the list of photo files displayed, click the photo you want to open.
Click the Open button in the Open dialog box.
The file opens in Edit Full mode.
You may have a photo that was saved as a JPEG, TIFF, or some other format without a file extension or an incorrect file extension for the file type. You may not see the file listed in the Open dialog box, but you know it's there, and you know what format the file is. If this is the case, you can try to use the Open As command.
Choose File
Tip
One advantage to using the Open As command is opening images in Camera Raw. You can open any photo (JPEG, TIFF, and so on) in the Camera Raw converter even if your camera didn't originally capture the photo in Camera Raw. We cover all you want to know about Camera Raw and why this would be an advantage when editing photos in Book III, Chapter 3.
A quick way to open recently edited files is to choose File
If the file you want to open appears in the submenu, click the filename in the list and the file opens in Edit Full mode. On the Mac, a recent file list appears on the Welcome screen when you first launch Elements.
Tip
The Recently Edited Files list also appears in the Organizer. If you want to open a recently edited image while in the Organizer workspace, choose File
You may have a piece of artwork you want to add to a photo. The artwork can be of any file type you find for the supported formats that you can open in Elements. Quite often you may find a vector art drawing or a PDF file that contains the artwork you want to import; however, any of the supported formats can be used for placing content on a photo.
To place content in Elements, use the Place command as follows:
Open a photo in Edit Full mode.
You must start with a file open in Edit Full mode in order to use the Place command.
Choose File
The Place dialog box opens. This dialog box has the same options you find in the Open dialog box.
Select a file to place.
Your file can be an image format, EPS or other type of vector format, or PDF or any other file type you see listed in the Files of Type drop-down list (Windows) or Format pop-up menu (Mac). Click the file you want to place.
Click Place.
When you place an image, you see handles around the image that can be used for sizing the image, as shown in Figure 1-10.
Size and position the image.
If you import a vector art image or PDF file containing vector art, you can drag the corner handles out to size up the image without losing image quality. Press the Shift key when sizing the image to constrain proportions and press the Enter (Return) key to accept your resizing edits. After you press the Enter (Return) key, the image data are rasterized and lose image quality if you decide to upsize the image. Click the image and move it to the desired position. (For more information on vector versus raster art and upsizing images, see Book III, Chapter 1.)

You may want to start with a fresh, new canvas where you can copy and paste content from other pictures, place objects, add shapes, and/or add text to create your own scene. To begin the process, you create a new image.
In either Edit Full mode or the Organizer, choose File
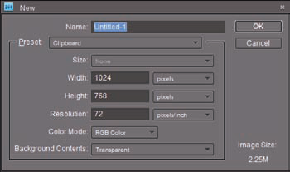
Figure 1.11. Choose File
The options you have here are covered thoroughly in Book III, Chapter 2. Look over that chapter for details on the options you have for creating new, blank files.
Whatever you copy to the Clipboard in Elements can be converted to an image. If you copy data from somewhere else, such as text in Office applications, objects in Office applications, illustration programs, and other types of applications, the data on the Clipboard can be converted to a new Elements image.
After copying data from another application, choose File
Note
If you want to convert something like a vector object to an Elements file with a resolution higher than 72 ppi, create a new document in Elements at the desired resolution and then choose File
Photoshop Elements files can be saved in a variety of different formats. Some format types require you to convert a color mode before the format can be used. Therefore, a relationship exists between file formats and saving files. Additionally, bit depths in images also relate to the kinds of file formats you can use in saving files.
Before you go too far in Elements, you should really familiarize yourself with the file formats you use and the conversions you need to make in order to save in one format or another (as we explain in Book III, Chapters 1 and 2). If you do nothing to an image in terms of converting modes or changing bit depth, you can save a file after editing in the same format in which the file was opened. In many circumstances, you open an image and prepare it for some form of output, which requires more thought about the kind of file format you use in saving the file.
In most any program, the Save (or Save As) dialog box is a familiar place where you make some choices about the file to be saved. With Save As, you can save a duplicate copy of your image or a modified copy and retain the original file.
To use the Save (or Save As) dialog box, choose File
The standard navigational tools you find in any Save dialog box appear in the Elements Save/Save As dialog box. Here are some standard options you find in the Elements Save/Save As dialog box:
A few options make the Photoshop Elements Save/Save As dialog box different from other Save dialog boxes you might be accustomed to using. The Save Options area in the Save As dialog box provides these choices:
Include in the Organizer (Windows): If you want the file added to the Organizer, select this check box.
Save in Version Set with Original (Windows): You can edit images and save a version of your image, but only in Edit Quick mode. When you save the file from Edit Quick mode, this check box is active. Select the box, and a version of the original is saved and appears in the Organizer.
Color: Check the box for the ICC (International Color Consortium) Profile. Depending on which profile you're using, the option appears for sRGB or Adobe RGB (1998). When the check box is selected, the profile is embedded in the image. See Book III, Chapter 2 for more information on profiles.
Thumbnail (Windows): If you save a file with a thumbnail, you can see a miniature representation of your image when viewing it in folders or on the desktop. If you select Ask When Saving in the Saving Files preferences, the check box can be enabled or disabled. If you're choosing an option for Never Save or Always Save in the Preferences dialog box, this box is enabled or disabled for you and is grayed out. You need to return to the Preferences dialog box if you want to change the option.
Use Lower Case Extension (Windows): File extensions give you a clue to which file format was used when a file was saved. Elements automatically adds the extension to the filename for you. Your choices are to use uppercase or lowercase letters for the extension name. Select the check box for Use Lower Case Extension for lowercase or deselect the check box if you want to use uppercase characters in the filename.
Elements provides you with some automated features for processing batches of photos. You can export multiple files from one format to another file format, and you can export files changing file formats if you like. In addition, you have a limited number of other editing tasks you can automate.
The method you use and the features you want depend on whether you choose Export in the Organizer or Process Files in Edit Full mode.
When you open JPEG images and save back to a JPEG format, you're adding file compression to the saved images. JPEG is a lossy file format, which means that you lose image data when you save in this format. If you edit a JPEG image many times and save back to JPEG format each time, you continually lose more image data.
In some cases, you may want to convert multiple JPEG files to a file format that doesn't toss away data. You can use formats such as Photoshop PSD or TIFF, and no data are thrown away when you save the file.
For a single instance when you want to convert a JPEG image to a PSD or TIFF image, you can open the file in Elements and choose File
If you have multiple files and you want to convert the file type more efficiently, you can process a folder of files using a single command. To use a batch process type of action to convert multiple files from one format to another, do the following:
Open the Organizer (Windows).
You should have a collection of photos in the Organizer saved as JPEG or some other format that you want to convert to a newer format.
Select files in the Organizer you want to convert.
Click a file and press Shift and click the last file in a group or click and press Ctrl (

Choose File
The Export New Files dialog box opens, as shown in Figure 1-12.
Choose an Export file format.
If converting JPEG files, you might want to choose PSD for the file format. This format does not compress files.
Choose a Size and Quality.
Choose Original if you want to maintain the same image dimensions and resolution. If you want a different size for the saved images, make a choice from the Photo Size drop-down list.
Click the Browse button.
You can target a folder on your hard drive if you don't want to use the default folder shown in the Export New Files dialog box.
Choose filenames.
You can save the files to a new folder with the same names without overwriting the original files or save to the same folder adding a common base name. If you click Common Base Name, you can type a base name in the text box. Type something like Hawaii, for example, and the files are saved as
Hawaii001, Hawaii002, and so on.Click Add/Remove to add additional files or remove some from the list.
If you want to add more files, click the Add plus (+) icon. You can scroll the list of thumbnails, and if you find photos you want to remove, click the respective photo and click the Remove minus (−) icon.
Click the Export button.
A progress bar is displayed in a dialog box, as shown in Figure 1-13. Wait for the progress to complete before moving on.
Click OK.
After the export progress finishes, the Exporting Files Complete dialog box opens. Click OK, and the file export task is completed.


The Export as New Files command in the Organizer (Windows) or Process Multiple Files dialog (Mac) provides you a batch process for converting file formats with a rather limited set of options. For much more power and the ability to make several enhancements to the new files saved, you can use the Process Multiple Files command in Edit Full mode.
You need to switch from the Organizer to Edit Full mode to take advantage of the additional features provided in the Process Multiple Files dialog box. In Edit Full mode, choose Edit

As you can see in Figure 1-14, you have far more options available to you in the Process Multiple Files dialog box than you have in the Export New Files dialog box shown earlier in Figure 1-12.
Among some of the additional choices are
Image attributes: In the left pane of the dialog box, you have all the attribute options you would have if you were exporting files. Make choices for file-naming conventions, locations for saved files, image size and resolution, and file formats.
Quick Fix: From the options shown in the Quick Fix panel on the right, you can check the boxes for the image enhancements you want to make. For a complete description of these items, see Book VIII, Chapter 1.
Labels: You can apply watermarks, custom labels, and choose a variety of font attributes for text added to the new saved files.
Select a folder of files and make your choices in the Process Multiple Files dialog box and click OK. Your files are converted and saved to the target folder you identify in the dialog box.
You can add pages to images for use when creating projects, such as slide shows. Any pages you add to a document can be blank, new pages of the exact same size and resolution as the current image or a duplicate of the current image added as an additional page.
To add new pages to a file, do the following:
Open a photo in Edit Full mode.
Open a context menu on the image thumbnail in the Project Bin or open the Edit menu and choose Add Blank Page, as shown in Figure 1-15.
Alternatively, you can choose Edit
The Add Blank Page menu command adds a blank page to the current open document. If you want to copy the content in the file and duplicate it on a new page, choose Add Page Using Current Layout from either menu command.
Click OK.
An application alert dialog box opens, informing you that the file must be saved as a Photo Creation Project (PSE) file type. Click OK, and your new page is added.
Save the file.
Choose File

Obviously, when adding new pages to an image and saving as a Photo Creation Project, you want to add content to the new page and perhaps add additional pages. We show you more on creating projects in Book IX, Chapter 1. For now, be aware that you can add additional pages to photos and that the files must be saved as PSE files in order to preserve the additional pages.
It's important to understand a few things when closing files and quitting Elements. When you are in Edit Full mode and have an image open in the Image window, you can close the image without quitting the Edit Full mode workspace. Click the X button in the top-right corner of the Image window or the red button in the top-left corner (Mac) and the open file is closed.
If you click the X (red button) in the top-right (top-left on a Mac) corner of the Edit Full mode workspace, you quit Edit Full mode. Alternatively, you can press Ctrl+K (
If you happen to have the Organizer and an Editor open and you quit one workspace, the other workspace remains open. For example, if the Organizer and Edit Full mode are both open and you quit the Organizer, Edit Full mode remains open and vice versa.
If you make an edit on a photo in Edit Full mode and decide to quit Edit Full mode, Elements prompts you to save the file before quitting.
If you also have the Welcome screen open as well as the Organizer and an Editor, quitting both the Organizer and the Editor doesn't get you out of Elements. The Welcome screen can remain open even though you've quit the workspaces.
To completely shut down Elements, take a look at the status bar (Windows) or the Dock (Mac). If you see one workspace open, click the respective item in the status bar (Dock) and then choose File