Looking at the Tools panel
Understanding the tool groups
Using automation tools
You edit photos by using menu commands and tools. Elements knows that, so it provides you with a toolshed chock-full of different tools to perform all sorts of different editing tasks.
These tasks include selecting image content area, refining and sharpening photos, drawing and painting applications, adding text, and more.
In addition to using tools for manually changing the characteristics of a photo, you can use a number of different tools to magically automate tasks. In this chapter, you take a look at the Tools panel and all the different tools at your disposal for modifying photos in many different ways.
The Tools panel opens by default when you enter Edit Full mode. As you may recall from Chapter 1 of this minibook, you can open Edit Full mode directly from the Welcome screen by clicking the Edit button or by choosing Editor

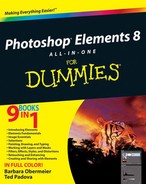
The tools you see in Figure 2-1 are listed by name and their keyboard shortcuts. If you press the key adjacent to the tools shown in Figure 2-1, you select the respective tool. See Chapter 1 in this minibook for more on keyboard shortcuts.
The tools in the Tools panel include the following, listed (basically) from top to bottom. To get you into the habit of using keyboard shortcuts, we've listed the shortcut associated with each tool.
Note
Where you see a tiny right arrow on a tool, you find additional tools that open in a flyout menu. Pressing the same keyboard shortcut scrolls through the tools in the flyout menu.
V. Move tool: Use this tool to move either content within a selection or the entire image.
Z. Zoom tool: Click with this tool found in the Tools panel and you zoom in on an image. Press the Alt (Option on the Mac) key when the tool is selected and click to zoom out.
H. Hand tool: The Hand tool is used to move an image around the Image window without changing the image position on the canvas. If you zoom in on a photo and see scroll bars on the right and left side of the Image window, you can drag the image around the window to display the hidden areas.
I. Eyedropper tool: The Eyedropper is used to sample color in an image. Click anywhere in a photo and the foreground color swatch changes to the sample taken with the Eyedropper tool. Press the Alt (Option) key and click the Eyedropper tool to sample color for the background color.
M. Rectangular Marquee tool: The Rectangular Marquee tool is one of many different tools you use to select image data.
L. Lasso tool: Another selection tool, the Lasso tool is used to select image data in a freeform manner.
W. Magic Wand tool: Like the Eyedropper, the Magic Wand tool is used to sample color in an image, but it then allows you to travel out from the sampled area to automatically select similar pixels in a contiguous or noncontiguous area. The contiguity is determined from choices made in the Options bar.
A. Quick Selection tool: The Quick Selection tool is similar to the Magic Wand tool. It enables you to click and drag to select image data.
T. Horizontal Type tool: This tool is used to add text to a photo.
C. Crop tool: This tool is used for cropping images.
Q. Cookie Cutter tool: This tool is used to create a mask so the area outside the shape is removed from the photo.
P. Straighten tool: Use this tool to straighten images — particularly useful for scanned images.
Y. Red Eye Removal tool: Use this tool to remove red eye from photos.
J. Healing Brush tool: This tool is used to repair images by removing dust and scratches.
S. Clone Stamp tool: This tool is used to clone an image area.
E. Eraser tool: Use this tool for erasing part of your image.
B. Brush tool: A number of brush tips are available for use with this tool that permits you to paint over a photo.
F. Smart Brush tool: This tool is magical by design. You can use the tool to brighten or add contrast to areas you specify by "brushing over" the image.
K. Paint Bucket tool: The tool is used for filling an area with a foreground color.
G. Gradient tool: Use this tool to create gradients.
U. Custom Shape tool: This tool is used to add different shapes to a photo.
R. Blur tool: This tool is helpful to soften edges, particularly when you paste new image content in a photo and want to blur the edges of the pasted data slightly.
O. Sponge tool: The Sponge tool is used for adding or removing color saturation on a photo.
X. Switch Foreground and Background Colors: This tool switches the foreground and background colors.
D. Default Foreground and Background Colors: Use this tool to return the foreground color to default black and the background color to default white.
The tools in the Tools panel can be grouped into several categories. Knowing a little about the categories can help you decide where to look first when you want to make some edits to a photo.
The selection tools are used to create selections of pixels in a photo. Unlike the objects you'd find in programs like Microsoft PowerPoint, imported graphics in Microsoft Word, or artwork you create in illustration programs like Adobe Illustrator or CorelDraw, photos are comprised of tiny little pixels. In other programs where objects are available, you can just click the mouse button with the cursor placed on an object to select it. In Photoshop Elements, you need to surround pixels with a selection tool to select a part of a photo.
Clicking an object is easy, but selecting pixels requires some careful steps. It also requires using the best tool to make a given selection. You can easily run into problems when there's little contrast and color difference between the areas you want to select and those areas you want to remain unselected in a photo.
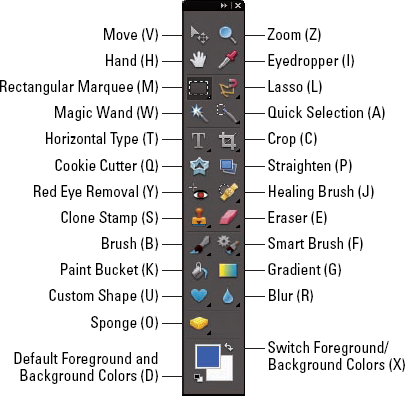
The geometric selection tools include the Rectangular Marquee tool and the Elliptical Marquee tool. By default, the Rectangular Marquee tool appears "on top" in the Tools panel, whereas the Elliptical Marquee tool is kept out of view. So how do you get to the hidden tool? Easy. Notice the tiny arrow in the lower-right corner on several tools in the Tools panel? When you click and hold down the mouse button or right-click, a flyout menu opens, as shown in Figure 2-2. In Figure 2-2, we clicked and held the Rectangular Marquee tool to open the flyout menu where both the Rectangular Marquee tool and the Elliptical Marquee tool appear.
Tip
We talk about the keyboard shortcuts earlier in this chapter and mention that you can access the Rectangular Marquee tool from a shortcut by pressing the M key on your keyboard. If you press M and then press M again, you select the Elliptical Marquee tool. Continually pressing the M key on the keyboard toggles between the Rectangular and Elliptical Marquee tools.
Using geometric selection tools is straightforward. Click either the Rectangular Marquee tool or the Elliptical Marquee tool and drag on a photo to create a rectangle or elliptical shape.
You can also use certain keyboard modifiers to manage selections when using a selection tool. Such modifiers include the following:
Shift key: If you select a geometric selection tool and then press the Shift key while dragging the mouse, your shapes are constrained to a square/circle. Also, if you make a selection on a photo and then press the Shift key and drag a new selection, you get to add that selection to the one you've already made. If you have made a selection on a photo and don't use the Shift key when you create a new selection, by default the first area you chose becomes deselected.
Alt (Option on the Mac) key: When you press the Alt (Option) key and drag a geometric selection tool, you draw the selection from the center outward. If you already have a selection and then press the Alt (Option) key and drag through the first selection, you remove that segment from the current selection.
Shift+Alt (Shift+Option on the Mac): If you already have a selection drawn, pressing the Shift key and the Alt (Option) key while dragging through that selection creates a new selection at the intersection with the original selection.
Spacebar: If you press the spacebar while you depress the mouse button, you can move a selection to another area in a photo without changing the size of the selection.
Whereas the geometric selection tools restrict you to rectangles and elliptical shapes, the Lasso tools are used to create irregular selections — similar to freehand drawing with a pencil. The following three types of Lasso tools are shown in Figure 2-3:
Lasso tool: Click this tool and draw on a photo in a freeform fashion to select pixels around irregular shapes.
Magnetic Lasso tool: Click and drag around a shape, and Elements magically hugs the shape as you draw. If you have something like a foreground figure you want to isolate from the background, you can drag this tool around the shape. Elements automatically refines the selection to grab the shape you're selecting.
Polygonal Lasso tool: This tool behaves like a Polygon tool that requires you to click and release the mouse button and then move the cursor to click to in another area on the photo. As you keep clicking, the selection shape takes the form of a polygon.

To determine the amount of variance of the pixel values picked up by the Magic Wand tool, tweak the Tolerance value in the Options bar, as shown in Figure 2-4. You can change the value so the Magic Wand tool selects a wider range of pixels (a higher number) or narrower range of pixels (a lower value).
Note
By default, the Tolerance is set to 32, which means that the pixel you click produces a selection of 16 pixel values lower than the sample and 16 pixel values higher than the sample.
After you create a selection with the Magic Wand tool and you want to add another selection to the first selection, press the Shift key and click the Magic Wand tool in another area on the photo. If you grab too many pixels, you can press the Alt (Option) key and click the area you don't want selected. If you need to refine the selection, you can adjust the Tolerance value in the Options bar before clicking the mouse button each time you add to or subtract from a selection.
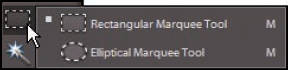
In Figure 2-5, we used the Quick Selection tool and clicked a few times in the sky area of the photo to create the selection.
Figure 2.5. Click the Quick Selection tool in a few areas with similar pixel values to create a selection.
After you have a selection — regardless of the tool you use to create the selection — other edits you perform in Elements apply only to the active selection. If no selection appears on your photo, edits are made to the entire layer.
Using Figure 2-5 as an example, we left the contrast alone on all areas but the sky to demonstrate editing a selection. We used the Quick Selection tool to select just the sky area and adjusted the contrast to make the sky appear a little brighter and with more contrast, as shown in Figure 2-6.
Drawing and painting tools provide you with a huge number of options for adding illustrations, paintings, effects, and modifying brightness and contrast in photos. Don't think of these tools strictly as tools you use to draw and paint with. They can also be used for color correction, adjusting contrast, and other kinds of brightness enhancements.
Several types of tools are tucked away in the Brush tools flyout menu. To view all the tools nested there, click and hold down the mouse button on the Brush tool to open the flyout menu, as shown in Figure 2-7.

Tools you have available from the flyout menu include the following:
Brush tool: The Brush tool supports a number of different brush tips you can choose from the Options bar. You use the Brush tool as you would use a brush to apply paint to a canvas. You can paint within type selections, add color to selected areas, paint in selection channels, and more. For more information on selections, see Book IV, Chapter 1. For more on type selections, see Book V, Chapter 3. For more on selection channels and selection masks, see Book VI, Chapter 4.
Impressionist Brush tool: This tool is designed to paint over your photo to make it look like a masterpiece by Renoir or Matisse. You can set various options that change the style of the brush strokes. Styles are chosen from a drop-down list in the Options bar.
Color Replacement tool: As the name suggests, you use this tool to paint over areas where you want to replace color.
Pencil tool: Like an analog pencil, the Pencil tool enables you to draw pencil-type marks on a photo. Also from the Options bar, you have a large number of tips to choose from for the pencil drawing shapes.
These two tools, as shown in Figure 2-8, are located in the Smart Brush flyout menu:

Smart Brush tool: The Smart Brush tool is used to paint large areas of common pixel values. When you drag across a sky or a section of greenery, for example, you can select the area and apply different hue changes from choices in a drop-down list from the Options bar.
Detail Smart Brush tool: The Detail Smart Brush tool offers similar options to the Smart Brush tool, but you can continue to paint in the selected area, applying more hue changes to a given region.
Three different Eraser tools appear in the flyout menu, as shown in Figure 2-9:

Eraser tool: The Eraser tool actually paints a color on a photo. The current background color is used when you paint with this tool on the Background layer. If your photo appears on a layer, the Eraser tool behaves like a normal eraser, removing pixels as you drag across a photo.
Background Eraser tool: When you open a photo in Edit Full mode, the photo appears on a background. Certain objects and type are added in layers that appear above the background. Two things happen when you make your first edit with this tool: The background is converted to a layer and, as you drag the cursor, the image data is removed from the layer.
Magic Eraser tool: The Magic Eraser tool is like a combination of the Quick Selection tool and the Eraser tool. When you click and draw on a background, the area where you click is selected just as with the Quick Selection tool. Also, the background is converted to a layer, and the selected area is removed from the photo.
The cloning and healing tools are used for effects and when you need to clean up images. Cloning involves duplicating an image area to construct image content that wasn't in your original photo, whereas healing (in an Elements context) means removing dust, scratches, and imperfections in photos.
Cloning tools are designed to duplicate image area. You can use them for artistic effects, reconstructing photos, repairing photos, and enhancing photos. The two tools (as shown in Figure 2-10) are
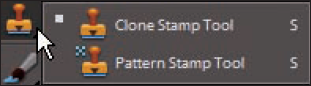
Clone Stamp tool: You use this tool by first sampling an area on a photo you want to clone. Sampling is performed by placing the cursor over the area to clone, pressing the Alt (Option) key, and then clicking the mouse button. You then move the cursor to an area where the clone image will appear and start painting with the cursor.
Pattern Stamp tool: The Pattern Stamp tool is used to apply a pattern you select from a list of available patterns from the Options bar. Select a pattern and paint with the cursor to apply the pattern to an area on a photo.
Healing brushes are designed for photo-repair tasks, such as removing dust and scratches. The two Healing Brush tools (as shown in Figure 2-11) are
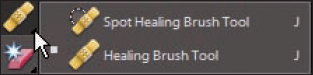
Spot Healing Brush tool: The Spot Healing Brush tool automatically samples neighboring pixels to correct image imperfections in one step. Unlike when you use the Healing Brush tool, you don't need to sample an area and then apply the brush strokes.
Healing Brush tool: You use the Healing Brush tool by first pressing the Alt (Option) key and sampling an area you want to use as a source for the repair. Then move the cursor to a scratch or other imperfection and paint over the area.
Four different tools are used to add type to a photo. The tools (as shown in Figure 2-12) include
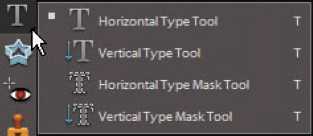
Horizontal Type tool: Click the cursor and type text horizontally. You can choose from various type attributes in the Options bar.
Vertical Type tool: Use this tool to add type vertically on a photo.
Horizontal Type Mask tool: The Type Mask tools create selection outlines of type as you add text with the tools. The Horizontal Type Mask tool creates an outline selection of text horizontally.
Vertical Type Mask tool: Use this tool to create a selection mask vertically.
Focus and toning tools are used to edit image brightness, contrast, and color. Several tools for making these adjustments are contained within the Tools panel.
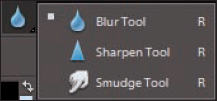
The toning tools are used to refine edges on pasted content by softening edges, sharpening up a photo in areas, and blending areas that might have been cloned or pasted into your photos. The tools, as shown in Figure 2-13, include
Focus tools are used for making edits similar to those traditionally used in photo darkrooms. The tools, as shown in Figure 2-14, include
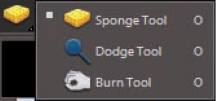
Sponge tool: Use this tool to scrub over an area that you want to either saturate with more color or reduce saturation. The choices for saturation/desaturation are found in the Options bar.
Dodge tool: The process of dodging in a traditional darkroom holds back light during a print exposure resulting in a lighter image. Use this tool to scrub over areas in a photo that you want to lighten up.
Burn tool: Burning has the opposite effect as dodging. Use this tool to darken some image area.
Shapes can be used to add artistic elements to photos or mask out some areas in a photo.
The Shape tools, as shown in Figure 2-15, are used to add different shape objects to a photo. The tools include
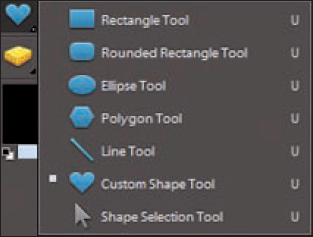
Rounded Rectangle tool: Used for rectangles with rounded corners.
Custom Shape tool: Used for drawing custom shapes from a choice of different shapes identical to those available for the Cookie Cutter tool. Again, you make shape choices from a drop-down list in the Options bar.
Shape Selection tool: After a shape has been drawn, it appears as an object on a photo and can be moved by clicking and dragging with this tool.
Individual tools are used for zooming in and out of photos, moving a photo around the Image window, and sampling color.
You find the same magnifying glass icon for the Zoom tool appearing in different dialog boxes. Whenever you see this tool icon, realize that to zoom out, you always need to press the Alt (Option) key and then click the photo.
Tip
When using any of the painting tools, pressing Alt (Option) gets you the Eyedropper tool. You can click to sample color; release the Alt (Option) key and you return to the selected painting tool.
Elements offers you some one-click steps to improve your images. Although these automated tasks aren't tools per se, we list them here as tools to simplify the message. In actuality, you use menu commands to automate some refinements for your photos.
To observe the automation tools available to you, click the Enhance menu and look over the first set of commands, as shown in Figure 2-16. The menu commands beginning with Auto in the command name indicate that the command has something to do with some sort of automated function.

The automated features you find in the Enhance menu include
Auto Smart Fix: Auto Smart Fix is used to add more contrast, adjust brightness, and improve color with one menu choice.
Auto Levels: The Levels adjustment is used to adjust image brightness. Elements takes a guess at the proper brightness and automatically boosts the white and black points in your photos to render a more pure white and rich black.
Auto Contrast: Use this command when contrast is flat and without any snap.
Auto Color Correction: Auto Color Correction is used to improve color in images by removing colorcasts.
Auto Sharpen: Use the Auto Sharpen command to sharpen up dull images.
Auto Red Eye Fix: You use this tool to remove red eye in photos. If you have a group shot taken with flash, you can use this command to remove red eye in all the subjects.