In This Chapter
Using the Cookie Cutter tool
Working with the Magic Extractor
Selective erasing with the Eraser tools
Working with layer masks
Creating clipping groups
In Book IV, we present you with lots of information about making selections with the many tools that Elements provides for that very purpose, such as the Marquee and Lasso tools, the Magic Wand, the Quick Selection tool, and the Selection Brush. But we left the discussion of a few tools until this chapter. The tools in Book IV involve making selections by dragging around, clicking, or painting over. And though the result is similar — selecting what you want or don't want in an image — the tools in this chapter are a little different in their methodology. They involve cutting out, extracting from, and erasing around.
To add to your selection repertoire, we give you details on layer masking, a feature that is the most versatile way to get what you want out of an image. Layer masking is essentially just another way of making a selection. Instead of defining your selection with a selection outline or by erasing away what you don't want, you can use masks to define your selection with up to 256 levels of gray. This gives you varying levels of selection. You can choose to fully show your layer, partially show it, or hide (or mask) certain areas. The nice thing about layer masks is that you can creatively blend one layer into another in a multitude of different ways.
We round out this chapter by showing you how to create a clipping group, yet another way to blend your layers by masking your layers to the opaque areas of a base layer. Don't worry: It may sound complicated, but it's a piece of cake.

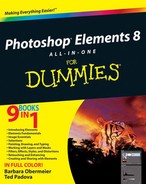
The Cookie Cutter tool is a cute name for a pretty powerful tool. Think of it as a Custom Shape tool for images. But, whereas the Custom Shape tool creates a mask and just hides everything outside the shape, the Cookie Cutter cuts away everything outside the shape, much like a traditional cookie cutter does with dough. The preset libraries provide you with a variety of shapes, from animals and flowers to symbols and faces.
Here's how to use the Cookie Cutter:

The tool icon looks like a star. You can also press the Q key.
Specify the following options on the Options bar.
Shape: Click the down-pointing arrow and choose a shape from the preset library in the drop-down panel. To load other libraries, click the panel pop-up menu and choose one from the submenu.
Shape Options: Draw your shape using certain parameters:
Unconstrained: Draw freely using the default, Unconstrained.
Defined Proportions: Keep the height and width proportional.
Defined Size: Crop the image to the original, fixed size of the shape you choose. You can't make it bigger or smaller.
Fixed Size: Enter a width and height.
From Center: Draw the shape from the center outward.
Feather: Create a soft-edged selection.
Crop: Crop the image into the shape. The shape fills the Image window.
Click and drag your mouse on the image to create your desired shape. Size the shape by dragging one handle of the bounding box. Position the shape by placing the mouse cursor inside the box and dragging.
You can also perform other types of transformations, such as rotating and skewing. For more on transformations, see Book IV, Chapter 2.
Take a gander at the Layers panel. Notice the temporary creation of a Layer Mask icon. See the section "Working with Layer Masks," later in this chapter, for details on layer masks.
Click the Commit button on the Options bar and press Enter or double-click inside the bounding box to complete the cut.
Figure 4-1 shows our image cut into a flower. If you change your mind and don't want the cut, click the Cancel button on the Options bar or press Esc.
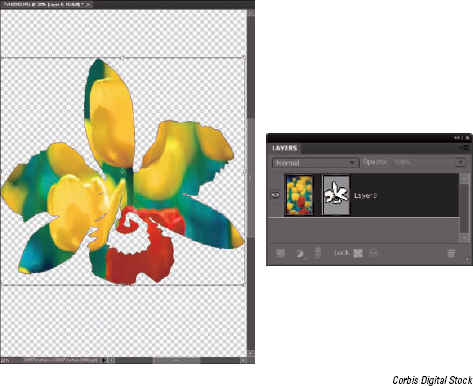
When you see a name like Magic Extractor, you may wonder whether you have to do anything except utter a mystical incantation to have your desired element cleanly plucked from its background. Unfortunately, it isn't quite that easy, but it's pretty close. You use the Magic Extractor command to make selections based on your identification of the foreground and background portions of your image. Specify your foreground and background by clicking these areas with the Brush tool and "marking" them. Click the magic OK button, and your object or objects are neatly and painlessly extracted.
Tip
Make a rough selection first before selecting the Magic Extractor command. This technique, which isn't mandatory, restricts what's extracted and can result in a more accurate selection.
Follow these steps to magically extract your element:
In the Editor, in Edit Full mode, choose Image

The Magic Extractor dialog box appears.
Choose the Foreground Brush tool from the dialog box and then click or drag to mark foreground areas — the areas you want to select.
The default color of the Foreground Brush is red, as shown in Figure 4-2.
The more accurate the data you provide to the command's algorithm, the more accurate your extraction. Be sure to use the Zoom and Hand tools to help magnify and move around your image as needed.
You can also change the size of your brush tip (from 1 to 100 pixels) in the Tool Options area on the right side of the dialog box. If necessary, change the color of your foreground and background colors by clicking the swatch and choosing a new color from the Color Picker.
Select the Background Brush tool from the dialog box and then click or drag to mark the background area — the portions you don't want to select.
The default color of the Background Brush is blue.
Click Preview to view your extraction.
You can change the preview by going to the Preview section of the Magic Extractor dialog box and choosing either Selection Area or Original Photo from the Display pop-up menu.
If you want to see your selection against a different background, choose one from the Background pop-up list. (A black matte for a black background is nice.)
If the extraction needs more accuracy, you can refine the selection with the help of the Magic Extractor tools set, located along the left side of the dialog box:
The following editing tricks use options found on the right side of the dialog box:
If things start to go awry, you can start over by clicking Reset at the bottom of the dialog box.
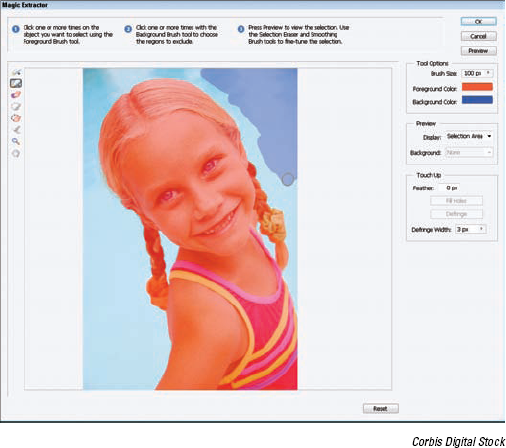
When you're pleased with the results, click OK to finish the extraction process and close the Magic Extractor dialog box.
Your newly extracted image appears as a new file, as shown in Figure 4-3.

The eraser tools let you erase portions of an image. The three eraser tools are the regular Eraser, the Magic Eraser, and the Background Eraser, which all share a flyout menu in the Tools panel.
The eraser tools look like real erasers, so you can't miss them. But just in case you do, press E and then Shift+E to toggle through the three tools.
Warning
When you erase pixels, those pixels are gone. For good. Before using the eraser tools, you should make a backup of your image. You can save the image as either a separate file or another layer. That way, if things run amok, you have some cheap insurance.
The Eraser tool allows you to erase areas on your image. If the image contains just a background, you erase to the background color. If the image is on a layer, you erase to transparency. Both instances are shown in Figure 4-4.
To use this tool, simply select the image and then click and drag through your desired area on it, and you're done. Because it isn't the most accurate tool on the planet, remember to zoom way in and use smaller brush tips to do some accurate erasing.
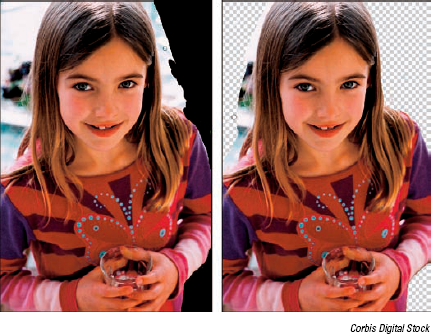
Figure 4.4. The Eraser tool erases to either the background color (left) or, if you're on a layer, transparency (right).
These options on the Options bar control the Eraser tool:
Brush Presets: Click the drop-down panel to access the Brush presets. Choose the brush you want. Again, additional brush libraries are available from the Brushes pop-up menu.
Size: Click the down-pointing arrow to access the Size slider. Choose from a brush size between 1 and 2500 pixels.
Mode: Select from Brush, Pencil, and Block. When you select Brush or Pencil, you have access to the Brush Preset Picker panel on the far-left side of the Options bar. When you select Block, you're stuck with one size (a 16-x-16-pixel square tip). But because the block size remains constant, if you zoom way in, you can perform some detailed erasing.
Opacity: Specify a percentage of transparency for the erased areas. The lower the Opacity setting, the less it erases. This option isn't available for Block mode.
The Magic Eraser tool works like a combination Eraser and Magic Wand tool. It selects and erases similarly colored pixels simultaneously. Here's how it works:
When you click a layer: The Magic Eraser tool erases pixels of a similar color based on a specified range and leaves the area transparent, as shown in Figure 4-5.
When you click the background: The Magic Eraser tool automatically converts the background to a layer and then does the same pixel-erasing thing.
When you click a layer with locked transparency: The Magic Eraser tool erases the pixels and replaces the area with the background color.

Here are the options for using the Magic Eraser tool:
Tolerance: Defines the range of colors that Elements erases, just as it does with the Magic Wand tool. The value determines how similar a neighboring color has to be to the color that you click. A higher value picks up more colors, whereas a lower value picks up fewer colors.
Anti-alias: Creates a slightly soft edge around the transparent area.
Contiguous: Selects only similar colors that are adjacent to each other. Deselect this option to select and then delete similarly colored pixels wherever they appear in your image.
Sample All Layers: Samples colors using data from all visible layers, but erases pixels on the active layer only.
Opacity: Works like it does for the regular Eraser tool, described in the previous section.
The Background Eraser tool is probably the most sophisticated of the eraser-tool lot. It erases the background from an image, and should leave the foreground untouched. But if you're not careful in using the Background Eraser tool, it can erase the foreground and anything else in its path.
Like the Magic Eraser tool, the Background Eraser tool erases to transparency on a layer. If you drag on the background, Elements converts the background into a layer.
To use the Background Eraser tool successfully, carefully keep the crosshair, or hot spot, that appears in the center of the cursor, on the background pixels while you drag. The hot spot samples the color of the pixels and deletes pixels of that color wherever they fall under the brush circumference. But, if you get close to a foreground pixel with the hot spot, that pixel is gobbled up as well. This tool works better with images that have good contrast in color between the background and foreground objects, as shown in Figure 4-6. Also, if your image has very detailed or wispy edges (such as hair or fur), you're better off using the Magic Extractor command, which we describe earlier in this chapter.
Here's the rundown on the options, found on the Options bar, for the Background Eraser:
Brush Preset Picker: This option provides various settings to customize the size and appearance of your eraser brush tip. The Size and Tolerance settings at the bottom are for pressure-sensitive drawing tablets. You can base the size and tolerance on the pen pressure or position of the thumbwheel.
Limits: The Contiguous setting erases similar colors that are adjacent to one another under the brush circumference. The Discontiguous setting erases similar colors whenever they're under the brush circumference, regardless of whether they're adjacent.
Tolerance: Works just like the Magic Eraser Tolerance setting, described in the previous section.

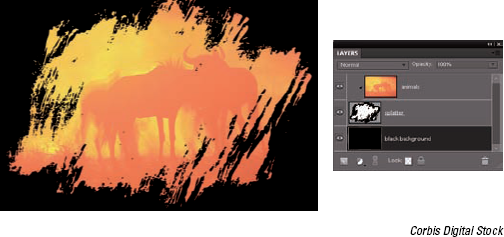
Unfortunately, one of the areas where Photoshop has a leg up on Elements is in the area of layer masks. To create a layer mask in Photoshop, you merely have to click a button in the Layers panel. To get layer masks in Elements requires a clever work-around. And, fortunately, though it's clever, it's also very easy to do. But before we get ahead of ourselves and tell you how to get a layer mask, you may want to know what one is and why in the world you would ever need one.
A layer mask is like a second sheet of acetate that hovers over a layer. You can use layer masks with image layers and adjustment layers. In the case of an image layer, the layer mask allows you to selectively show, hide, or partially show portions of your image. With adjustment layers, the layer mask lets you selectively apply the adjustment to the layers below it. You do this by painting on a layer mask with black, white, and various shades of gray. Any black areas on the mask hide the image or the adjustment; any white areas show the image or adjustment; and anything in between (gray) partially shows the image or adjustment, as shown in Figure 4-7.
Layer masks are excellent for blending layers of images and creating soft transitions between elements. You can gradually brush in transparency and opacity on a selective-pixel basis. You can even apply gradients and filters to your layer masks to create interesting special effects.

Figure 4.7. A layer mask uses varying shades of gray to selectively apply the adjustment to the underlying layers.
By default, the mask is completely white. This allows the image or adjustment to be fully applied to the layers. If you paint on a layer mask with black, the areas under those black areas don't show the image or adjustment. If you paint with a shade of gray, those areas partially show the image or adjustment. The darker the shade of gray, the less it shows the image or adjustment. Note that if you have an active selection border in your image before you add an adjustment layer, the adjustment is applied only to that area within the selection border. The resulting layer mask also reflects that selection: The selected areas are white, and the unselected areas are black.
Now comes the clever part. We mention in the first paragraph in this section that Elements doesn't have a layer mask option in the Layers panel. The only way to get a layer mask in Elements is to create an adjustment layer. When you create an adjustment layer, you also create a layer mask on that layer at the same time. If you don't need any adjustments and just want the layer mask, after you create the adjustment layer just don't make any adjustment settings. Then use the layer mask to blend two layers.
Just to make things crystal clear, follow these steps to create a layer mask:
In the Editor, in Edit Full mode, open or create your layered image.
In the Layers panel, select the bottommost layer of the two layers you want to blend.
You want to sandwich the adjustment layers between the two layers you want to blend.
Choose Layer
You can choose any of the adjustments because you don't specify any settings. Remember that creating an adjustment layer is the only way to get the layer mask.
Click OK in the New Layer dialog box.
The Levels dialog box appears. Don't specify any settings in the dialog box. Just click OK.
Select the topmost layer that you want to blend in the Layers panel and then choose Layer
This command creates a clipping mask. For a detailed explanation of clipping masks, see the next section in this chapter.
With the painting tool of your choice (we recommend the Brush tool), paint on your layer mask.
Apply a foreground color of black where you want to hide the portions of the topmost layer. Leave the mask white where you want the topmost layer to show. Adjust the Opacity setting in the Options bar to paint with a less-opaque black, which is essentially like painting with gray. The higher the Opacity, the darker the gray and the more it partially hides the topmost layer. If you want subtle blending between layers, use a large, feathered brush tip and vary your opacity settings accordingly.
If things start to run amok, just choose Edit
Tip
Note that you can also use the Gradient tool on the layer mask. Using foreground and background colors of white and black, you can create a nice transition from showing and hiding the layer, as shown in Figure 4-8. The darker areas of the gradient gradually hide the image, whereas the lighter areas gradually show the image. For more on gradients, see Book V, Chapter 2.
In a clipping mask, the bottommost layer (also known as the base layer) acts as a mask for the layers above it. The layer or layers above clip to the opaque areas of the base layer and don't show over the transparent areas of the base layer.
Creating a clipping mask works well if you want to fill a shape or some type with different images on multiple layers.
Using the steps that follow, we created a new document with a white background. We then used the Custom Shape tool to create a bird shape on a second layer. We added two layer styles — a drop shadow and a simple inner bevel — to the shape for added dimension, but this step isn't mandatory. We then opened an image of some clouds and then dragged and dropped that image onto our composite.
Follow these steps to create your own clipping mask:
In the Editor, in Edit Full mode, open or create an image that has several layers.
To see best how this technique works, try creating a shape layer for your base layer. For more on shape layers, see Book V, Chapter 1.
Arrange your layers so that your base layer is the bottommost layer.
Hold down Alt (Option on the Mac) and, in the Layers panel, position your mouse cursor over the line dividing the base layer and the layer above it.
Your cursor changes to two overlapping circles with a small arrow icon. You can also choose Layer
Click your mouse button.
Repeat Steps 3 and 4 for any remaining layers you want clipped to the base layer. Notice how our sky image clips to the base layer (the bird shape) in the Layers panel (appears indented).
Nothing outside the boundaries of the bird shape is visible on the layer in the clipping mask, as shown in Figure 4-9. The down-pointing arrow icon beside the layer on the Layers panel indicates that the layer is clipped. The clipped layers take on the opacity and Blend mode of the base layer.
Tip
A couple other tips to keep in mind when working with clipping masks include these:
To remove a layer from the clipping mask, you can simply Alt-click (Option-click on the Mac) the line between the two layers in the Layers panel. Or, you can select the layer and choose Layer
You can also apply clipping masks to adjustment and fill layers. If you clip between a regular layer and an adjustment layer, or between a regular layer and a fill layer, the adjustment or fill layer affects only the pixels of the adjacent underlying layer, rather than all the underlying layers.