Understanding creations
Creating photo books and a calendar
Producing photo collages and greeting cards
Making photo stamps and CD/DVD labels
Constructing VCDs with menus
Making flipbooks
Adobe Photoshop Elements offers you a number of creations that can be shared onscreen or in print. From both the Create and Share panels in the Panel Bin in the Organizer and from within both editing modes, you have a number of menu choices for producing creations designed for sharing.
In Book IX, Chapter 3, we look at creating files for screen and Web viewing. In this chapter, we talk about creations designed for print and sharing.

In Book IX, Chapter 4, we talk about online albums, attaching files to e-mail, using photo mail, and using online sharing services. All these creations offer different output options, such as e-mailing, burning files to a disc, and creating HTML documents — as well as printing and PDF creation — and you create them all using the Share panel.
You work with the remaining creations — photo books, photo collages, photo calendars, greeting cards, print labels, and photo stamps — by choosing options from the Create panel, as shown in Figure 1-1. All these creations are designed for output to your printer or for sending files to an online printing service or to friends and family.
Note
When you make a creation that will ultimately be sent to an online service or shared with other users, keep in mind that you first must select the photos you want in your creation. For example, creating a photo book by clicking the Photo Book button in the Create panel first requires you to let Elements know what photos are to be used in your photo book. If you happen to click a button and nothing happens, more than likely you haven't selected any photos.

Many creation options follow a similar set of steps to produce a file that will be shared with other users or sent to an online printing service. In the Project Bin, you find all you need to make a new project. It gives you choices for layouts and producing a creation. Some of the choices from both the Create and Share panels are
Layout options: Select some photos in the Organizer and click an item, such as Photo Book, to make the Create panel change to the Project view. This view displays some information about making a new creation.
Auto-Fill with Project Bin Photos: This check box is selected by default, and the files you see in the Project Bin are added to your project.
Include Captions: Select this check box if you want the photo captions to appear on each page below their respective photos.
Number of Pages: Elements automatically creates the number of pages to accommodate the number of photos you selected in the Organizer. Note that some creations require a minimum number of photos to produce a project. Photo Book, for example, requires a minimum of 18 pages.
After assembling your creation, click the Create button. Elements then incorporates the selected photos into the layout and theme you specified in the panel. Be patient and wait for Elements to complete the task.
After a creation has been made, the document appears like any other image you open in Elements. You can crop, modify, print, and more. Using an Elements file, choose File
Elements provides some fancy ways to create pages for a photo album. The Photo Book Creation panel offers many different options for choosing page templates, adding artwork and type, printing your album pages, or sending the files to an online service for professional printing.
Follow these steps to create a photo book:
Select files in the Organizer and click the Create tab (Windows) or open several photos in Edit Full mode (Windows/Mac) and click Create.
The procedure for all creations is the same. You first select files in the Organizer (Windows) or an editing mode (Windows or Mac) and then click the Create tab in the Panel Bin. Ideally, it's best to create an album, as we explain in Book II, Chapter 2, and click the album to display the album photos in the Organizer window. But remember, after you display an album in the Organizer, you still need to select all the photos.
Tip
To select all photos shown in an Organizer window, press Ctrl+A.
Click Photo Book in the Create panel.
Regardless of whether you're working in the Organizer or an editing mode, the Photo Book option is available in the same Create panel. When you click Photo Book, the order system for Shutterfly opens. Shutterfly is an online order supplier where you can order prints of photos and have them shipped back to you and any other individuals you may wish to share your photos with.
Regardless of whether you're working in the Organizer or an editing mode, the Photo Book option is available in the same Create panel. The Create panel changes to the first of several panes that walk you through the steps to create a photo book. If you start in the Organizer, clicking Photo Book in the Create panel opens your selected photos in Edit Full mode.
Choose a photo book option from the Order Shutterfly Wizard.
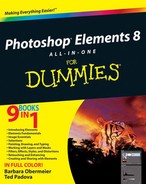
The Shutterfly Wizard displays server options for ordering a photo book, as shown in Figure 1-2. Click one of the Create Now buttons for the type of book you want to order.
The next screen offers you several options for a cover style.
Make a selection and click Next.
Your default Web browser opens the Shutterfly URL, where you're guided through steps to order your book, as shown in Figure 1-3. Proceed through the steps for ordering and identifying recipients.

Are you ready to design a personal calendar using your favorite photos? Elements helps you design an attractive calendar of the kids, the girls' soccer team, the bullhead moose fraternity, or any other type of activity or event you want to work with. Elements makes it easy to create professional-looking calendars.
Here's how you create a calendar that can be professionally printed and ordered via an online service:
Select photos in the Organizer.
For calendars, you might want to select 13 photos — 1 photo for the calendar cover and 12 for each month. You can also choose 12 photos and use one of the calendar months for the cover photo.
Open the Create panel and click Photo Calendar.
The Kodak EasyShare Gallery Services opens. If you don't have an account, sign up on the opening page in the Kodak EasyShare Wizard. If you have an account, supply your logon and password.
Click through the wizard to upload photos and click the final Next button to log on to the services Web page.
At this point, you leave Elements and work within a Web browser.
When you first log on to the Kodak Gallery Web page, you're prompted to auto-fill or manually fill the calendar.
Click Autofill and then click Next.
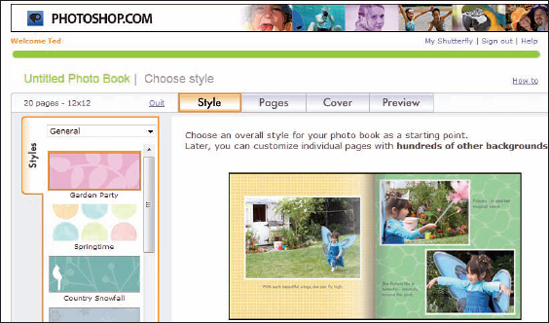
On the next page, as shown in Figure 1-4, choose the background design and theme. Then click Next.
On the next page, click one of the layout options for the number of photos you want to appear on each month. Then click Next.
If you chose 12 or 13 photos, use the 1-Up option, as shown in Figure 1-5.
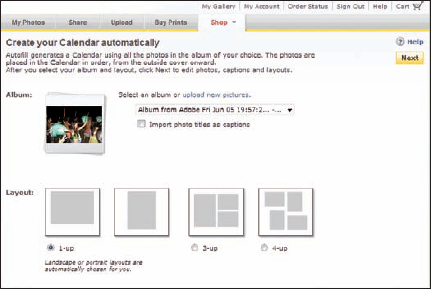
On the preview page, as shown in Figure 1-6, add a title and author/date name.
This page provides text boxes where you can add a title for the calendar and supply your name as the author.
To preview the calendar, click the (preview) link shown in Figure 1-6.
Alternatively, click the First Month drop-down list and view the layout for each month.
When the calendar appears as you like, click the Order button.
You proceed to the order page where you can select the number of copies and recipients for your calendar.

To put together a photo collage, you first need to select a few photos in the Organizer and then click Photo Collage in the Create panel.
On the Macintosh, click several photos in Adobe Bridge and open a context menu. Choose Open With
The panel changes, as shown in Figure 1-7.

Figure 1.7. Select photos in the Organizer (or Adobe Bridge on a Mac) and click Photo Collage in the Create panel to open the Photo Collage panel.
The rest of the photo collage process is pretty straightforward. Just choose a page size from the Page Size drop-down list and a theme from the scrollable options. If you like, you can choose a background from the Content panel and click the Apply button to apply a background style to the photos.
After creating your photo book, you can submit it for an online order or print the book on your printer. When you choose File
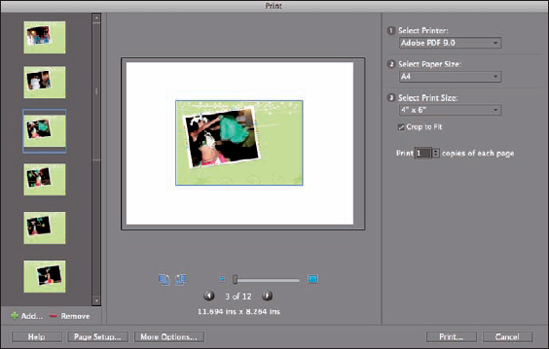
For more information on printing photos and photo projects, see Book IX, Chapter 2.
Note
After you assemble a creation, you can save the project and return to make additional edits, such as changing a theme or background. Choose File
To create a slide show using the Create panel, first select the images you want in the Organizer, click the Create tab in the Panel Bin, and then click PDF Slide Show. On the Macintosh, click photos in Adobe Bridge and open the photos in Elements, click the Create tab, and click PDF Slide Show. When you click PDF Slide Show, on the Mac you return to the Bridge window, where you choose all options for the final output.
The first thing you see is the Slide Show Preferences dialog box, as shown in Figure 1-9. You make choices in this dialog box for setting up your slide show — stuff like setting transition type, transition duration, and background color.

When you click OK in the Slide Show Preferences dialog box, the Slide Show Editor opens, as shown in Figure 1-10, where you define the attributes such as editing transitions, artwork from the Extras panel, and specifying zooms and time codes.
Rather than submit the slide show for online viewing, you can choose other output options. Click the Output button (refer to Figure 1-10), and the Slide Show Output dialog box opens, as shown in Figure 1-11.
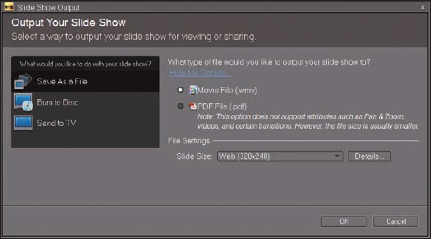
In the dialog box, you have several options from which to choose. These include
Save as a File: Click Save as a File, and in the right pane, you can choose from
Movie File: Choose Movie File to export the file as a video in WMV format.
PDF File: Choose PDF File to export the file as an Adobe PDF document.
Burn to Disc: Choose Burn to Disc to write a self-running VCD (Video CD).
Send to TV: Choose Send to TV to burn a DVD using one of the following formats:
Standard Definition (NTSC): Standard TV format using NTSC that is supported by USA and Japanese video players.
Standard Definition (PAL): Standard TV format using PAL that's supported by video players outside the USA and Japan.
Widescreen Definition (NTSC): Widescreen TV format using NTSC that's supported by USA and Japanese video players.
Widescreen Definition (PAL): Widescreen TV format using PAL that's supported by video players outside the USA and Japan.
Enhanced Definition: For use with TV sets supporting enhanced definition.
Widescreen Enhanced Definition: For use with TV sets supporting widescreen enhanced definition.
Widescreen High Definition: For use with TV sets supporting widescreen high definition.
Click OK in the dialog box after making the output choice, and your slide show is output using the settings you applied in the Slide Show Output dialog box.
To order prints online using the Create panel, you must have a Kodak EasyShare account. When you select photos in the Organizer and click Order Prints in the Create panel, the Kodak Order Prints logon window opens, similar to the screen shown in Figure 1-12.
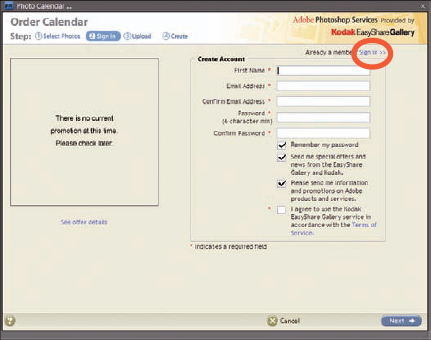
After you log on to Kodak Order Calendar (click the Sign In button if you have an account or fill in the text boxes to create a new account), the files you selected earlier are uploaded and you see an order page similar to the one in Figure 1-12. Choose from the different print-size options and specify the quantity for each print. As you navigate through the order process, you can identify other recipients for your order and have copies of the calendars mailed back to you and sent to others.
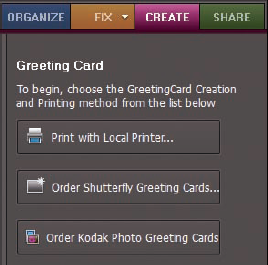
You can create greeting cards in a snap in Photoshop Elements by using the Greeting Card panel. Here's how to do it:
1. Open the Organizer (Windows) and select a photo or open a photo in Edit Full mode (Windows/Macintosh).
Click Create in the Panel Bin.
Click Greeting Card to open the Greeting Card panel.
The options available for creating greeting cards are shown in the panel (Windows), as you can see in Figure 1-13. On the Mac, the panel changes to display the settings shown in Figure 1-14.
In the Greeting Card panel, scroll the Choose a Theme window and click a theme you want to use.
In the Content panel, choose a Content option.
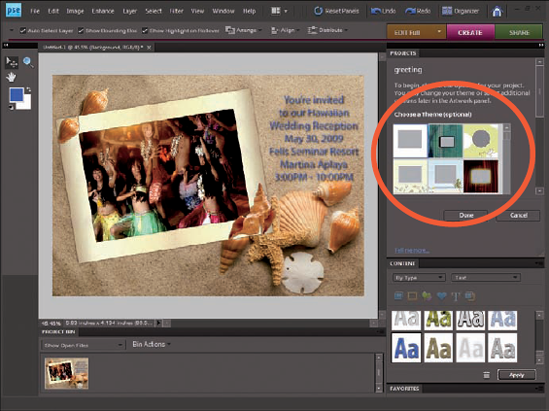
Figure 1.14. Add some text to your greeting card by choosing a Type option in the Content panel and then clicking the photo (Mac).
The Content panel offers a number of choices from drop-down lists. In our example, we added text by choosing Text from the drop-down list, as shown in Figure 1-14.
To add text, click a style in the scrollable list and click the Apply button. Default text appears on your layout. Highlight the default text and type the text you want to add to your greeting card.
Choose File

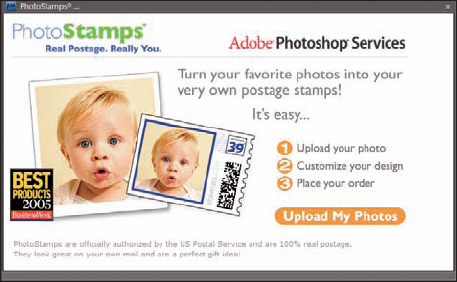
Another online creation feature in Elements is the option to create your own personal postage stamps. Yes, they're real stamps that you can use for mailing though the post office.
Here's the simple, easy way to use Elements to place an order for your very own personal postage stamps:
Select an image in the Organizer.
Your file needs to be less than 5MB. (See Book III, Chapter 1 for more on resizing images.)
Click Create in the Panel Bin and then choose PhotoStamps from the More Options drop-down list.
The PhotoStamps dialog box opens.
Click the Upload My Photos button in the dialog box (see Figure 1-15).
Your photo is uploaded to the
PhotoStamps.comWeb site.The
PhotoStamps.comWeb site provides an easy-to-use interface for ordering stamps. After you fill out the order and provide billing information, your stamps are mailed to you.
Another creation option in Elements is a simple, easy way to create CD and DVD labels. From the Create panel, choose a menu item for CD Jacket, DVD Jacket, or CD/DVD Label from the More Options drop-down list. From templates provided in the panel, Elements offers you an easy method for printing your own, personalized labels and jackets for CDs and DVDs.
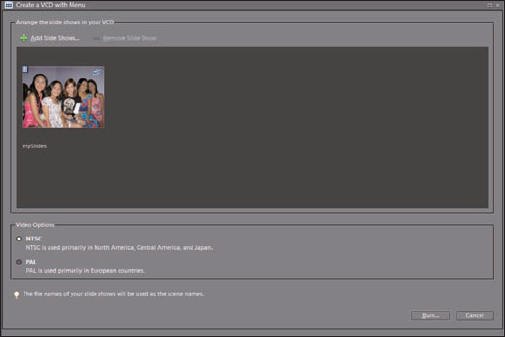
Select a slide show project and open the Create panel. From the More Options drop-down list, choose VCD with Menu. The Create a VCD with Menu dialog box opens, as shown in Figure 1-16. Select a project, make a choice for NTSC or PAL format, and click Burn. The file created is a Video CD with a menu you can control with your DVD player's remote control device.
At the bottom of the More Options drop-down list in the Create panel, you can find a command for Flipbook. If you want to create a quick little video that shows off your photos by flashing stills on your screen or your TV set, you can quickly create a flipbook. Here's how you do it:
Open the Organizer and select the files you want to use.
Note that you must select at least two files in order to create the flipbook.
Click the Create tab in the Panel Bin and choose Flipbook from the More Options drop-down list.
The Elements Organizer Flipbook dialog box opens, as shown in Figure 1-17.
Set the playback speed by typing a value in the Speed text box or moving the slider to the desired speed.
Note that flipping through photos looks best at low speeds, such as one or two frames per second (fps). Also, you can select the size for your video file from options on the Movie Size drop-down list. As file sizes are reduced, the download speeds when sharing files on the Internet increase. To get familiar with the file size that works best for you, experiment a little by saving files at different sizes.
Click Output.
Type a filename and click Save.

Figure 1.17. The Elements Organizer Flipbook dialog box permits you to select a speed and movie file size.
Your file is written as a .wmv file. You can use Microsoft Movie Maker to write the file to a CD or DVD.
Warning
The WMV format is not recognized by many DVD players. You may need to convert the file format to a format recognized by your DVD player. Do an Internet search and explore some Web sites that offer freeware or shareware conversion utilities to find out more about video file formats acceptable to DVD players.