Understanding Web optimization
Understanding Web Safe colors
Optimizing type for screen viewing
Optimizing images for Web hosting
When we talk about optimizing images for Web viewing, we're also talking about viewing files on computer monitors, TVs, iPods, and other screen devices. After all, viewing Web pages at this time in technology history requires viewing Web pages on a screen of some kind. This chapter presents concepts related to preparing and viewing files on the Web, as well as sharing files for viewing onscreen devices.
There are a few variances between Web-viewing photos and screen-viewing photos. It is important to use a color palette that can display the same colors on Web-page images whatever the viewer's computer operating system.
In this chapter, we talk about preparing images for Web hosting and screen viewing, working with color palettes optimized for Web-hosted images, preparing type for Web and screen viewing, and creating Web galleries to upload your files to a Web service.
If you've read through chapters in any of the previous minibooks, you're aware of some of the differences between files you prepare for print and those that are used for Web pages.
To optimize images for Web viewing, you want to reduce the file size for every image uploaded to a URL. If you download files from your camera or card reader (as we explain in Book II, Chapter 1) or prepare files for print (as we explain in Book IX, Chapter 2), you must often reduce the file sizes for Web-hosted images in order to ensure faster downloads.
Anyone viewing a Web page is likely to get impatient if file sizes are large and the download times are extraordinary. Getting files to the smallest file size without compromising image quality is the goal of every Web designer.
Your first effort at optimizing files for Web hosting involves obtaining the best resolutions for Web-hosted files.
On the Macintosh, Web-hosted files are optimum at 72 ppi (pixels per inch); on Windows, resolutions of 72 and 96 ppi are optimum for Web hosting.
Before moving on to other optimizing tasks, it's best to downsample images to either 72 or 96 ppi. As a standard, you can set the resolution to 72 ppi, confident that all Web browsers will display the images at the same size.
To downsample an image, do the following:
Open an image in Edit Full mode.
Choose Image

The Image Size dialog box opens, as shown in Figure 3-1.
Set the dimensions.
Type the new dimensions in either the Width or Height text box for the document size. By default, the proportions are constrained so when you type a value in either text box, the other size is supplied automatically by Elements.
Check the Resample Image check box and choose a resampling method from the drop-down list.
By default, the resampling method used is Bicubic, which provides the best results for continuous-tone images such as photos. You have other options in the drop-down list that work better with illustrated art, line art, and other types of images. For more information on the downsampling methods, see Book III, Chapter 1.
Enter the desired resolution in the Resolution field.
Click OK.
The file is downsampled according to the settings made in the Image Size dialog box.

As a general rule, avoid upsampling images — sizing up an image with the Resample Image check box enabled in the Image Size dialog box. We cover some of the pitfalls for upsampling images in Book III, Chapter 1. We also point you to a third-party plug-in that can be useful if you absolutely have to upsize images.
Rasterizing files is the process of converting vector artwork to raster artwork. Artwork created in programs like Adobe Illustrator and CorelDraw are typically vector art files. Vector objects in Elements can be type as well as some shapes that are created on vector layers.
When you flatten layers in Elements you rasterize the vector layers. When you open vector art, such as Adobe Illustrator files, CorelDraw files, or PDF files, you rasterize the artwork. To read more about raster versus vector art, see Book III, Chapter 1. To read more about type on layers, see Book V, Chapter 3.
Rasterizing vector artwork on layers in Elements converts the artwork to pixels at the resolution of the open file where the vector artwork is added. When you open a file containing vector art, you can choose to rasterize the artwork at a user-defined resolution.
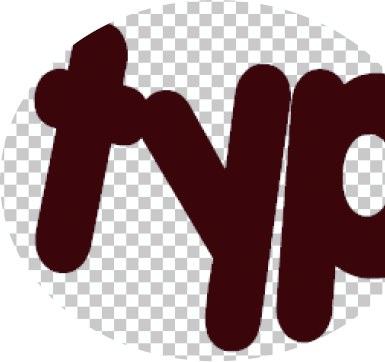
When you open artwork containing vector art, you see a dialog box where you control the options for rasterizing the file. In Figure 3-2, we opened a PDF document. The Import PDF dialog provides some controls for determining the size and resolution.
Unlike raster art, upsizing a vector art file doesn't degrade the image. Because the artwork is not yet pixels, you can rasterize a vector file to any size you like. When preparing these images, you want both the physical dimensions and the resolution to be the best for your Web pages.
In Book III, Chapter 2, we cover all the color modes supported by Elements. When you create images for Web pages, all the color modes available in Elements are acceptable for Web graphics. Your choices for color modes include
Bitmap: The bitmap color mode is generally used for line art. Images, such as black-and-white logos, might be scanned as line art and, therefore, be rendered as bitmap images. After you have a bitmap image in Elements, you can save the files as GIF or PNG, but you don't have an option for using the Save for Web command. It's generally best to convert bitmap images to grayscale first and then save the files for the Web.
Grayscale: Grayscale images can be saved for Web hosting.
Indexed Color: Indexed color images provide some options for reducing the number of colors in a file to get smaller file sizes. Continuous-tone images, such as photographs, generally won't look as good onscreen unless they're saved as RGB color images. However, artwork, such as color logos, can be reduced in file size by limiting the number of colors to fewer than 256 without degrading image quality.
RGB color: RGB is best used with continuous-tone images.
Elements has a number of different file formats for saving files. However, only a few of the long list of supported file formats work with Web graphics. We cover all the formats in Book III, Chapter 2. For a little review, here are the formats you can use when preparing files for Web hosting.
GIF is one of the popular file formats you find on many Web sites. GIF files are saved as indexed color where the total number of colors in an image can be reduced to fewer than 256 in order to get smaller file sizes. You can also use the GIF format when saving images that display animated effects.
When you choose File
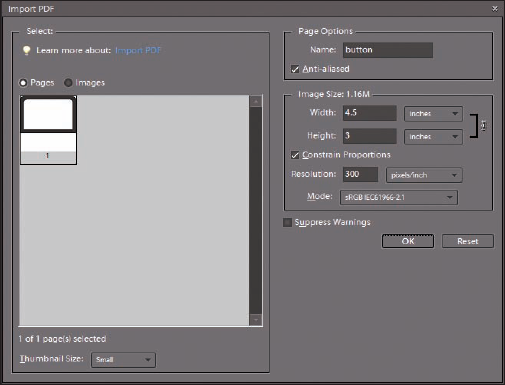
Palette: Open the Palette drop-down list and you can choose from a number of different color-palette options. Among your choices is the Web palette. Making this choice reduces the total colors from the default 256 to 217. The 217 colors are known as Web Safe colors, meaning that these colors look the same on both the Macintosh and Windows operating systems.
Colors: You can reduce colors lower than the default 256 by typing a number in the Colors text box. The more colors you eliminate, the lower the file size. However, if you reduce colors in continuous-tone images, you notice severe contrast between tones. This contrast is likely to produce degraded images. Furthermore, reducing colors in artwork too far may produce other unwanted results. You need to experiment a little when reducing colors by checking the Preview check box and viewing the image before actually saving. What you see on your screen is what you get. If the preview looks good, go ahead and click OK.
Forced: This option is available with bitmap images. You can save as Black and White, and when the Transparency check box is enabled, the whites appear as transparent.
Matte: When you have transparency in an image, you can use a matte color for the transparent areas. Your choices include a list of preset colors as well as a Custom option for you to set the color to a custom color within the palette you choose.
Dither: When indexed files are saved and the colors contain up to a maximum of 256 colors, you need a way to simulate color transitions. This is handled through a dithering process whereby the color transitions simulate a view that appears to have more than 256 colors. Your dither choices include Diffusion, Pattern, and Noise. For continuous tone images, the Diffusion dither produces the least-obvious color transitions.
Preserve Exact Colors: Check this box to preserve colors that have exact matches to the color palette you choose.
JPEG is also one of the most popular file formats you find on Web pages. JPEG images can be saved as progressive JPEGs to permit the image file to be downloaded progressively (in stages, in other words), This format supports some great file compression. When you save as JPEG, the JPEG Options dialog box opens, as shown in Figure 3-4. Your options in this dialog box include
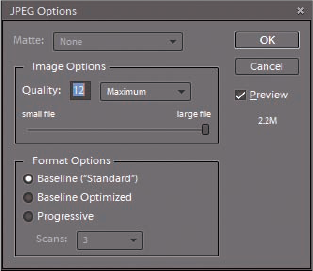
Matte: This option is the same as when saving as GIF.
Quality: Type a value between 1 and 12 for the amount of compression you want to apply to the saved file. JPEG is a lossy file format, meaning that data are thrown away during compression. The lower the number, the more data are thrown away. If you reduce the value too low, you see obvious image degradation. Keep the Preview check box checked, and you can dynamically see the results your tweaking has on the image before clicking OK.
The drop-down list adjacent to the Quality value offers you five settings. When making a menu choice, the Quality value changes respective to the menu choice. Additionally, you can move the slider to change the value in the Quality text box.
Tip
When previewing different compression options, be sure to zoom in on your photos. If the photo is fit in the Image window, you may not see the results of the compression selections you make when the Preview check box is checked. If you start with the image fit within the Image window, you can keep the JPEG Options dialog box open and press Ctrl++ (

Format Options: You have three choices. The first two use line-by-line passing and an optimized encoding system to display images. The Progressive option displays images using several passes. You specify the number of passes in the Scans drop-down list, where you can choose from 3 and 5.
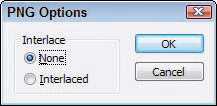
PNG supports two different formats — PNG-8 and PNG-24. You can save files as PNG-8 using the Save As dialog box. However, using the Save As command doesn't provide you all the options that can be set for PNG files. (In fact, all you get from the Save As dialog box are the rather paltry options shown in Figure 3-5.) If you want to use the PNG-24 format or take advantage of more option choices for PNG-8, you must use the Save for Web dialog box. See "Optimizing Images with Save for Web" later in this chapter.
When working with indexed color files, you have a maximum of 256 colors available in the Indexed Color palette. Compare that value with the 16.7 million colors that you have available with RGB color.
When you convert an RGB image to indexed color, the colors outside the Indexed Color spectrum are dithered to simulate colors that more closely resemble an image in RGB mode.
Out of the 256 colors that you find in the Indexed Color palette, 39 colors do not look the same in different operating systems. The color display is determined by the operating system (OS) for the Macintosh and Windows computers, and it turns out that these operating systems produce 39 different color values that can't be viewed identically across platforms. Therefore, you have 217 out of 256 colors that are viewed identically by both operating systems.
The 217 colors are referred to as being within a Web Safe color palette, and Elements makes it easy for you to work with the palette when converting color images, creating type, and creating graphic elements, such as buttons and icons.
To specify a color within the Web Safe color palette, do the following:
Open Edit Full mode.
Click the Foreground color swatch in the Tools panel.
The Color Picker (Foreground Color) dialog box opens.
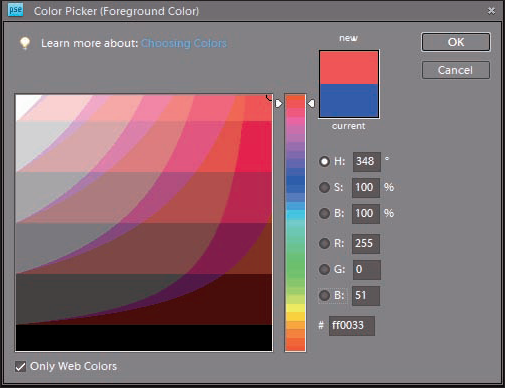
Click Only Web Colors.
Only the colors within a Web Safe color palette are displayed in the dialog box.
Click in the large color swatch to make a color selection.
You can scroll the hues by moving the slider to the right of the large color swatch. When you enter the hue range of a color you want, click in the swatch, as shown in Figure 3-6.
Note
The color choice you make in the Foreground Color dialog box reports the hexadecimal value of the color. In Figure 3-6, the value is ff0033. You can use this value in HTML code when creating Web pages to specify background color and color for other Web page elements.
Click OK.
The Web Safe color you selected is loaded in the Foreground color swatch in the Tools panel. When you fill selections and use the painting and marking tools, the color you apply is a Web Safe color. For more information on filling selections and painting, see Book IV, Chapter 1.
If you create various elements and objects that you want to include in a Web page design, you want to open a palette and work with Web Safe colors. To do so, follow these steps:
Open Edit Full mode.
Open the Color Swatches palette.
Choose Window
Load a Web Safe palette.
Open the drop-down list in the Color Swatches palette and choose from Web Hues, Web Safe Colors, or Web Spectrum, as shown in Figure 3-7. The colors you work with from any of these color swatch libraries are within the Web Safe color spectrum.

Adding type to images or creating type on a blank, new file (for example, one that creates a banner on a Web page) is something that you do frequently in Elements if you're a Web page designer.
You need to take few precautions when creating type for the Web. These include
Setting the file size and resolution before creating the type.
Don't rely on resampling images when you have type as either a standalone element or an addition to photos and layouts.
Using Web Safe colors.
Set the foreground color from the Web Safe color palette, or choose a color from the Color Swatches library of Web Safe colors.
Being certain to use anti-aliased type.
When you create type, be certain the Anti-alias icon is enabled in the Options bar, as shown in Figure 3-8.

When you anti-alias type, Elements creates some pixels of different color values at the edges of your type to simulate a smoother type appearance. If you don't anti-alias the type, the edges appear jagged. In Figure 3-9, you see type created on the left without anti-aliasing. On the right, you see the same type created with anti-aliasing.

We cover a lot more related to working with type in Book V, Chapter 3. Look over that chapter to understand much more about specifying type.
The save options you have available in the Save As dialog box enable you to save files in formats that are compatible with Web-hosted images. However, the options you have in the Save As dialog box are much more limited than the ones available to you in the Save for Web dialog box.
In the Save for Web dialog box, you can optimize images and create previews to simulate download times. Even if you don't tweak the sampling and/or resolution of your files, you can rely on the Save for Web dialog box to offer you many other optimization features.
Choose File

The option choices you have in the Save for Web dialog box are covered in Book III, Chapter 2. Look over that chapter to explore all the possible options.