In This Chapter
Working with catalogs
Locating and viewing images
Sorting files
Searching files
Managing files
Creating albums
Showing and hiding files
Backing up files
In Book II, Chapter 1, we talk about getting images from cameras, card readers, scanners, and other media sources. For good measure, we also talk about opening a file directly in an Editor, copying files to your hard drive, and loading up images in Elements.
To continue the story, be aware that any files loaded in Elements on Windows end up in the Organizer. Furthermore, when you add files to the Organizer, you have many options for managing files, sorting them, searching for files, tagging files with keywords, examining file properties, and using a host of different project-creation opportunities.

This chapter covers many of the features you find only when working in the Organizer on a Windows machine. It also offers tips on how best to manage photo collections in an Organizer catalog, and takes a closer look at some tasks you can perform that are unique to the Organizer. (The alternative for Mac users is working with Adobe Bridge. If you're a Mac user, look over Book II, Chapter 3, where we cover Adobe Bridge in depth.)
The default Organizer view — the view you're most likely to use in all your Elements work sessions — looks a lot like a slide sorter. The Organizer provides an efficient way to access the photos you want to open in one of the Editors. Just double-click a photo in the Organizer, and you see the image zoom in size to fill an Organizer window. You can carefully examine the photo to be certain that it's the one you want, and then just select an Editor to use — whether from the Editor drop-down list on the Menu bar, from the context menu you open on the image in the Organizer window, or by clicking the Fix button in the Panel Bin.
In addition to the default view in the Organizer, you can also examine your pictures one by one in a slide show or side by side to compare them.
The first step to working in the Organizer involves loading up images in a new catalog. By default, when you launch Elements and open the Organizer, you arrive at an empty default catalog.
Note
Before you can do anything in the Organizer, you have to import images into a catalog. As we explain in Book II, Chapter 1, you can copy images to your computer via a drag-and-drop method, using the AutoPlay Wizard, or by using the Photoshop Elements Downloader Wizard.
Presuming you copied photos to your hard drive (as we explain in Book II, Chapter 1), here's how you add them to the default empty catalog:
Open the Organizer.
Launch Elements and click Organize in the Welcome screen.
In the Organizer, choose File

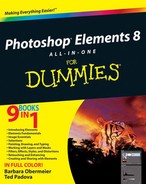
The Get Photos and Videos from Files and Folders dialog box opens, as shown in Figure 2-1.
From the View menu (circled in Figure 2-1), choose Large icons (or Medium icons).
In Large icon (or Medium icon) view, thumbnail images of most of your files appear in a scrollable list large enough to see some detail. (Note: You might not see Camera Raw files and some files saved in different formats.) This view makes it easy to locate the files you want to add to the Organizer. For example, if you want to load only Camera Raw images, you can easily see them represented as icons, rather than as image previews.
Select files to add to the Organizer window.
Click a thumbnail and use either the Shift key or the Ctrl key to select additional photos. When you hold down Shift and click, all photos between the first thumbnail and the thumbnail you Shift-click are selected. When you Ctrl-click, you can select additional noncontiguous photos.
Click Get Photos to add the selected photos to the Organizer window.
Photos are imported into your default catalog.
View all photos.
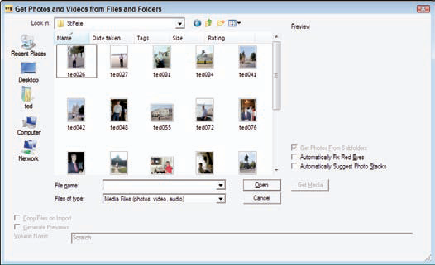
After you import your photos, a dialog box opens (as shown in Figure 2-2), displaying information related to viewing your photos in the Organizer. Click OK and then click the Show All button in the Shortcuts bar to view the photos in the catalog.
To add additional photos to a catalog, use the same File
You follow the same steps to import photos as you did when you created your new catalog. When you arrive at the same dialog box shown in Figure 2-1, the new imported images are displayed in a new Organizer view. After clicking OK, you click Show All to see the new imported images and the original files you imported into your default catalog.
If you have lots of pictures — perhaps numbering in the hundreds or even thousands — you can still add each and every one of these photos to a single catalog. However, doing so slows down the performance in the Organizer and makes searching for photos a bit more difficult. A better option for you when dealing with large numbers of photos is to create separate catalogs.
You might have a number of photos that were taken at some event or special occasion and want to create a separate new catalog to manage just those files. Here's how you go about creating a second catalog:
In the Organizer, choose File
The Catalog Manager opens, as shown in Figure 2-3.
In the Catalogs section of the Catalog Manager, choose an accessibility level.
By default, your catalog is accessible to all users. If you have several logons for different users, all users can access the catalog.
If you want to make the catalog accessible only to you and not to others logging on to your computer, click the Catalogs Accessible by the Current User radio button.
Choose a location.
By default, the catalog is saved to a default location. If you want to save the catalog to the folder of your choice, click the Custom Location radio button and click the Browse button to select a folder on your hard drive in which you want to store the catalog.
Click New in the top-right corner of the Catalog Manager.
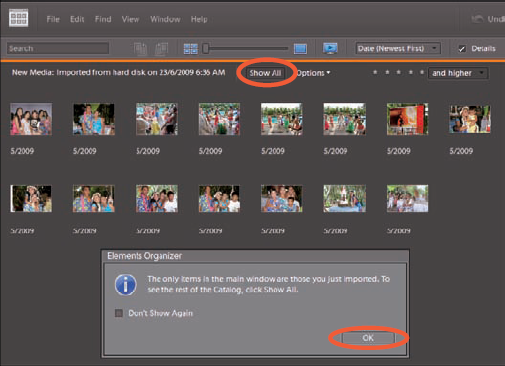
The Enter a Name for the New Catalog dialog box opens, as shown in Figure 2-4.
Type a name for your new catalog.
If you want to import free music files for later use when creating slide shows, check the check box shown in Figure 2-4.
Click OK.
You return to the Catalog Manager, and the new catalog is listed below your default catalog.
Click OK in the Catalog Manager.
The new catalog opens in the Organizer with an empty screen. From here, you can add photos by importing images, using any of the methods described in Book II, Chapter 1.

If you're a Photoshop Elements user of a previous version of Elements, you may want to convert an older catalog created in an earlier version of Elements to one that can be recognized by Elements 8.
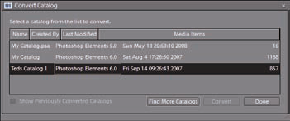
To convert a legacy catalog, open the Catalog Manager by selecting File
Click Done, and the catalogs are converted and displayed in the Catalog Manager.
As you create new catalogs, you'll want to switch back and forth between catalogs to view photos in the Organizer. If you make a catalog active, of course, you see only the photos you've previously added to that particular catalog.
To switch catalogs, choose File

When the catalog you want to open is selected, click the Open button. The photos added to the catalog appear in the Organizer, and you're ready to edit the pictures.
The Organizer window shows you all files that have been added to a particular catalog. You can change the types of views you see in the Organizer to facilitate finding photos and managing them.
When you open the Organizer, the default view is a Thumbnail display. Your photos, videos, projects, audio files, and so on are shown as mini-images or icons that can be adjusted to different sizes. In the Shortcuts bar, you can move a slider left to create smaller thumbnail views or right to create larger thumbnail views in the Organizer window.
The icon on the left side of the slider (as shown in Figure 2-7) takes you to a default view of small thumbnail images in the Organizer window. The icon on the far right shows you a single image in the Organizer window. Move the slider left to see thumbnails at smaller sizes; move it to the right to view thumbnails at larger sizes.
If you double-click a photo, the image thumbnail zooms into view as a single photo in the Organizer. To return to a view where you see smaller thumbnails, click the icon to the left of the slider.

The Thumbnail display is one of many options for viewing photos and other files in the Organizer. A quick glance at the Display drop-down list shows some alternative views available to you, as shown in Figure 2-8.

Below the default option for Thumbnail View, you find Import Batch. (To get there, open the Display menu and then select Import Batch, or press Ctrl+Alt+2.) The display in the Organizer keeps the view set to thumbnails, but the order of your files changes to a date order (according to the date you imported the files with the Get Photos and Videos command, as discussed in Book II, Chapter 1). This view can be helpful if you want to organize images according to the batch you imported on a given day.
What's nifty about the Folder Location display is that you can peruse your hard drive for all files and folders while you remain in the Organizer window. Just select Folder Location from the Display menu or press Ctrl+Alt+3 to make an Explorer sidebar show you your hard drive(s), network locations, and offline media.
Choosing Folder Location changes the view to something approaching what you see in Figure 2-9. When you want to poke around in a folder, right-click and select Reveal in Explorer from the context menu that appears. A Windows Explorer window opens on top of the Organizer window and shows you all the files contained in that folder.
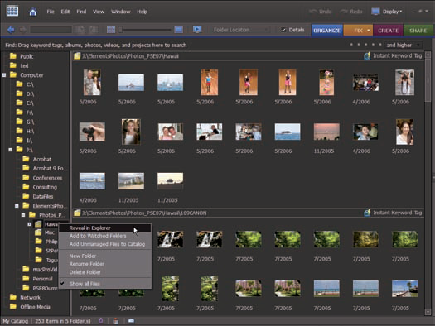
Figure 2.9. Choose Folder Location from the Display menu and then right-click to open a context menu.
When you find an image you want to edit, right-click and choose Open With
Note
When you want more of the screen window dedicated to seeing the files in the Organizer, hide the Panel Bin by clicking the separator bar. One click on the tiny right-pointing arrow on the separator bar hides the panel. Click the arrow on a collapsed panel to reopen that panel. In Figure 2-9, you see the Organizer window with the Panel Bin hidden, so that more thumbnail images appear in the Organizer window.
Choose Date View (Ctrl+Alt+D) from the Display menu to change your Organizer window to a calendar showing you the dates on which your images were shot. The date information is derived from metadata imported with your images that are recorded by your camera. (For more information on metadata, see "Searching metadata" later in this chapter.)
If you shoot many pictures on a given date, the images are stacked on the calendar for that date. In the Project Bin in Edit Full mode, you find arrows that are used to scroll the stacked images left or right. Notice that a number appears in the lower-left corner of the image thumbnail in view. In Figure 2-10, for example, the numbers appear as 5 of 6 — meaning that on April 13, 2008 (the date at the top of the thumbnail), six photos were taken, and the current view is the fifth photo in the stacked order.

To return to the default Organizer thumbnail display, click the binoculars icon or press Ctrl+Alt+O (the letter O, not zero).
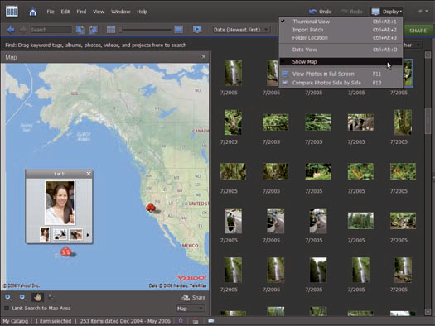
How would you like to see a visual display of where your photos were taken geographically? Photoshop Elements 8 provides you the answer with Yahoo! Maps and an option for placing your photos on a world map.
To open Yahoo! Maps in Elements, open the Display menu in the Shortcuts bar and choose Show Map. The Map panel on the left side of the Organizer window opens, as shown in Figure 2-11.
To map the location of photos shown in the Organizer to Yahoo! Maps, you can choose from a couple different options:
Select photos in the Organizer and drag them to a map location on the map in the Map panel.
Select photos in the Organizer and right-click the selected photos. From the menu options, choose Place on Map. In the dialog box that opens, type a city name and click the Find button. If more than one city is reported in the dialog box, click the city name you want to use for the mapped photos.
To move around the map, place the cursor inside the Yahoo! Map panel and drag the map with the Hand tool within the panel window. If you go too far left, don't worry; the Asian, Indian, and Eastern European countries are found by dragging right across the Atlantic and eastward. Dragging left stops somewhere around the International Date Line; if you live in Singapore, you have to keep dragging to the right to find your country.
Zooming in the Map panel is handled by the tools you see at the bottom of the map. Use the Zoom In tool to find cities and road maps in a detailed view. Use the Zoom Out tool after you find the location you want to use.
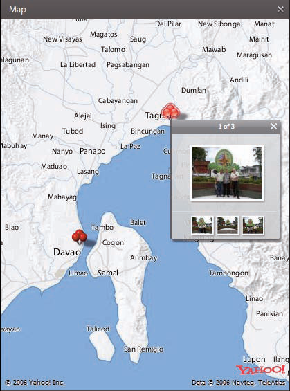
After you add photos to the map, you can view the images by clicking the red pin placed on the map whenever you add photos to a location. Click the red pin to open a pop-up window that shows a thumbnail view of the current photo, along with smaller photos, in a slide organizer below the primary image thumbnail (as shown in Figure 2-12). Click the left and right arrows in the pop-up window to scroll the slides. Clicking the current image thumbnail in the pop-up window opens the image in a Slide Show view (there's more about Slide Show views in the next section).
In the Map panel, you can choose from several display options in the drop-down list on the bottom-right side of the panel. Choose from the default Map (the standard cartographic type), a Hybrid map (the topographic type), or Satellite map. Choose Satellite to locate Uncle Jeremy's house, where the last family reunion took place (and where you shot all those wonderful pictures).
To close the Map panel, return to the Display menu and choose Show Map again. The panel collapses, and you're back to the standard Organizer view.
Note
When you view panels in Elements, drag the vertical separator bar on a panel to widen the panel or reduce the panel size. Look for the arrowhead on the vertical bar separating the Organizer window from a panel, and click and drag left or right to change panel sizes.
Are you ready for some exciting viewing in Photoshop Elements? Using an alternative view of your Organizer files, you can see your pictures in a self-running slide show (in Full Screen view), complete with transition effects and background music. Full Screen view takes you to a slide show view. For the purposes of clarity, think of Full Screen view and viewing a slide show as the same thing. Full-screen viewing temporarily hides the Elements tools and menus, and gives you the most viewing area on your monitor to see your pictures.
Tip
Viewing files in Slide Show mode can be helpful for quickly previewing the files you want to edit for all kinds of output, as well as for previewing photos you might use in an exported slide show (which we explain in Book IX, Chapter 1).
To set up your slide show and/or enter Full Screen view, follow these steps:
Open the Organizer.
Select images that you want to see in a slide show or use all the images in the Organizer for your slide show.
If no images are selected when you enter Full Screen view, all photos in the Organizer window are shown in Full Screen view.
Choose Display
In previous versions of Elements, a dialog box opened where you could choose preferences for full-screen viewing. Now, in Elements 8, you jump right into the full-screen view with some panels and tools displayed, as shown in Figure 2-13.
Click the arrow keys at the bottom of the screen to move forward and back through the slides. Click a slide, and the main window displays the slide.
You can also click the Toggle Film Strip icon (the first icon on the left at the bottom of the screen) to show a filmstrip on the right side of the screen displaying your slides, as shown in Figure 2-13.
Press the Esc key on your keyboard to return to the Organizer window.

While in Full Screen view, you can play the slide show and move back and forth between slides. These options and more are available to you on the toolbar that opens when you first enter full-screen viewing. After the toolbar disappears, you can bring it back by simply moving the mouse.
The toolbar, as shown in Figure 2-14, contains tools for the following:
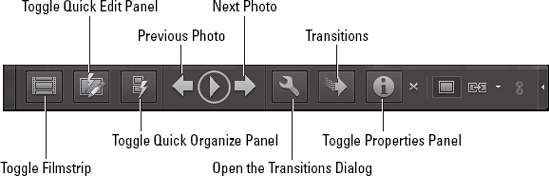
Toggle Filmstrip: Click this tool to show/hide the filmstrip on the right side of the window.
Toggle Quick Edit panel: Click this tool to show/hide the Quick Edit panel.
Toggle Quick Organize Panel: Click this tool to show/hide the Quick Organize Panel.
Previous Photo: Click the left arrow to open the previous photo.
Play/Pause: Click to play or pause a slide show.
Next Photo: Click the right arrow to advance to the next photo.
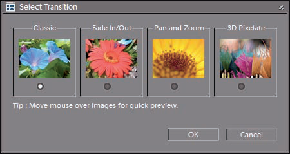
Open the Transitions Dialog: Click to open the Select Transitions dialog box (as shown in Figure 2-15).
Transitions: Click the Transitions tool and the Select Transition dialog box opens, as shown in Figure 2-15. When you enter Full Screen view, this tool is selected. Four different transition effects are displayed in the dialog box. You can preview a transition effect by placing the cursor over one of the images. When you find an effect you like, click the image and click OK to change the transition.
Toggle Properties panel: Click this tool to open the Properties dialog box, where property attributes are assigned.
Show all controls (right arrow): Click the tiny right-pointing arrow at the far right side of the toolbar, and the toolbar expands to reveal some additional tools. Here you find a large display icon used for showing the Full Screen default view. The double monitors icon to the right is used to show two slides adjacent to each other in the slide show.
Note
The main thing to keep in mind is that the Full Screen view is a temporary viewing option you have in Elements. It's not permanent. You use the view for a quick display method on your computer when you want to show off some photos to family and friends. You do have more permanent options for saving files as slide shows that can be shared with other users, as we explain in Book IX, Chapter 2.
When you open photos in Full Screen view, the Preferences dialog box is not immediately shown, as was the case in earlier versions of Elements. You need to click the Open Settings Dialog button in the toolbar (the icon shape that appears as a wrench). When you click the icon, the Full Screen View Options dialog box opens, as shown in Figure 2-16.
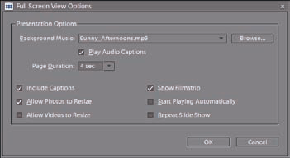
The various adjustments you have available in the Full Screen View Options dialog box are detailed in Table 2-1.
Table 2.1. Using the Full Screen View Options Dialog Box
Option | What You Can Do with It |
|---|---|
Background Music | Select a preinstalled sound file from the drop-down list or click the Browse button to locate sound files stored on your computer. The sound file formats you can use are |
Add audio captions to images. Select this check box to play these captions. | |
Page Duration | Specify the duration of each slide before the program advances to the next slide. The text box accepts durations ranging from 1 to 3600 seconds. |
Include Captions | View text captions that you've added to images. |
Allow Photos to Resize | View images at full-screen size. Make sure the resolution is sufficient before resizing the images to fit the screen. Image resolution is optimal at 72 ppi (pixels per inch) at 100-percent size, as we point out in Book III, Chapter 1. |
Allow Videos to Resize | View video frames at full-screen size in the slide show. Be certain that the video supports a resolution sufficient to clearly see the video frames. When in doubt, test a movie clip in Full Screen view to see whether the quality is satisfactory. |
Show Filmstrip | View a filmstrip along the right side of the full-screen window. Click a thumbnail in the filmstrip to jump to the selected slide. |
Start Playing Automatically | Put the slide show into Play mode automatically. If you don't check this box, you must click a tool in Full Screen view to start the play manually. |
Repeat Slide Show | Create a continuous loop. You could use this option for a self-running kiosk. |
Considering all the Photoshop Elements modes and workspaces you have become familiar with, you need a consistent starting place to handle all your editing tasks. Think of the Organizer as New York's Grand Central Station. From this central location, you can take the Long Island Railroad to any destination you desire. In Elements terms, rather than head out to Port Washington, you travel to a specific editing mode. Rather than go to the Hamptons, you journey through all the creation areas. In short, the Organizer is the central depot on the Photoshop Elements map.
In addition to serving as a tool to navigate to other workspaces, the Organizer is a management tool you can use to organize, sort, search, and describe photos with identity information. In terms of sorting and organizing files, Elements provides many different options; we cover them all in the following sections.
One quick way to sort images in the Organizer is to use the menu in the Shortcuts bar in the Organizer window for date sorting. Two options are available to you, as shown in Figure 2-17.
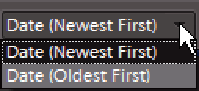
The sorting options available to you from the menu are
Date (Newest First): Select this option to view images according to the date you took the photos, beginning with the most recent date.
Date (Oldest First): This option displays photos in chronological order, starting with the oldest file.
Note
You can also view files according to the Import Batch date and Folder Locations, as we mention in the section "Viewing Images in the Organizer," earlier in this chapter.

The Organizer's Find menu is devoted entirely to searching for photos. From the Find menu, you can locate photos in albums, catalogs, and the Organizer window according to a variety of different search criteria.
To use the commands on the Find menu, you need to have photos loaded in the Organizer window or create albums or catalogs, which we explain in this chapter. The categories described in the following sections can be searched in the Organizer.
When you have a number of different files in an Organizer window including photos shot on different dates, you can narrow your search to find photos — and all other types of files supported by Elements — through a date search.
Note
Be careful: The date is taken from the camera metadata, and if a date isn't available from the camera data, the date is taken from the file's creation date. The creation date is not likely to be the date you shot the photo.
To search files by date, follow these steps:
If you haven't yet added photos to your default catalog, open files in the Organizer by first choosing File
To open files stored on your hard drive, choose the From Files and Folders submenu command.
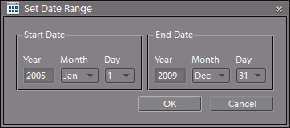
To select a date range, choose Find
The Set Date Range dialog box (as shown in Figure 2-19) opens.
Specify the dates.
Type a year in the Start Date Year text box. Select the month and day from the Month and Day drop-down lists. Repeat the same selections for the End Date.
Click OK.
The thumbnails shown in the Organizer window include only files created within the specified date range.
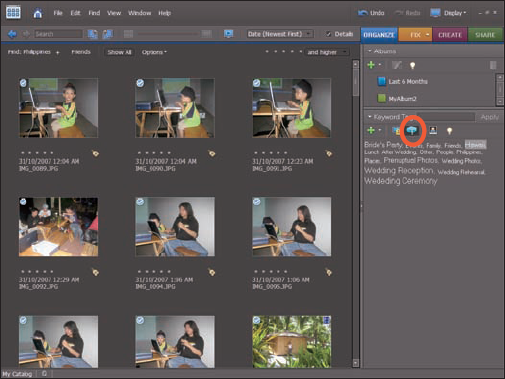
You can tag files with a number of different criteria, as we explain later in this chapter (in the section "Organizing and Managing in the Organizer"). When tags are added to images, you can sort files according to tag labels. We cover sorting by tag labels later in this chapter, too. For now, take a look at the Find menu and notice the Untagged Items command. If you want to add tags to certain items, and so want to show only the untagged files, choose Find
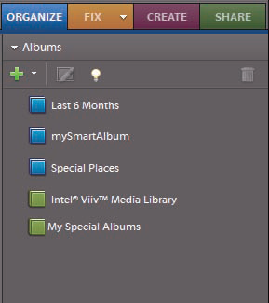
You can create albums (as we describe later in this chapter in the section "Creating Albums") and then select an album in the Albums panel (contained in the Organize panel), as shown in Figure 2-20. Selecting an album is like having a first level of sorting. You can then search by date or other sort options (discussed in the preceding and following sections) to narrow your choices.
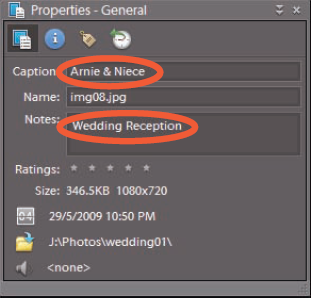
When captions or notes are added to files, you can search for the caption name, contents of a note, or both. Before you can search for captions and notes, though, you have to add them to your images.
A way to identify your files beyond the tagging capabilities, which we discuss in the section "Organizing and Managing in the Organizer," later in this chapter, is to add captions and notes. When you add a caption or note, you can search captions or notes by choosing the Find
Text captions are easy to create. Although you can select a thumbnail image in the Organizer window and choose Edit
To open the Properties panel, select a thumbnail image in the Organizer, right-click it, and choose Show Properties from the context menu that appears.
Alternatively, you can choose Window
Type a caption by adding text to the Caption text box.
Type text in the Notes area on the panel to add a note.
That's all there is to it. You can also record audio notes about an image.
After you create captions and notes, you can search for the words contained in the descriptions.
To search for caption names and notes in your open catalog, follow these steps:
Open the Organizer.
You should have images in a catalog and have files identified with captions and notes.
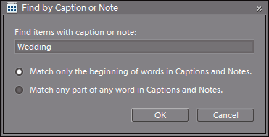
Choose Find
The Find by Caption or Note dialog box opens, as shown in Figure 2-22.
Options in the dialog box are as follows:
Find Items with Caption or Note: In the text box, type the words you want to locate.
Match Only the Beginning of Words in Captions and Notes: Click this radio button when you know that your caption or note begins with words that you type into the text box.
Match Any Part of Any Word in Captions or Notes: Click this radio button if you're not sure whether the text typed in the box is used at the beginning of a caption or note, or whether it's contained in the caption's name or the note's text.
Click OK.
Your results appear in the Organizer window.
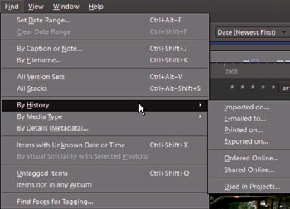
Elements keeps track of what you do with your photos, such as printing, e-mailing, sharing, and performing various other tasks. If you want to base a search for files on the file history, choose Find
Your options in the By History submenu include
Imported On: Choose this option and you can select a date when files were imported into the current catalog. When you make this choice in the submenu, a dialog box opens where you can select the import date and click OK. (All options in the submenu display a dialog box similar to Figure 2-24 when the respective menu command is selected.)
E-Mailed To: Click this menu item, and the list in Figure 2-24 changes to reflect all the photos you e-mailed from within Elements.
Printed On: This option displays all files printed in a date order for the print date and time.
Exported On: This choice displays files that were exported from the current catalog.
Ordered Online: This item displays files that were submitted for an online service.
Shared Online: This choice displays files that were shared online.
Used in Projects: This option displays files that were used in projects. See Book IX, Chapter 1 for all the different types of projects you can create in Elements.

Metadata includes not only the information about your images that's supplied by digital cameras, but also the custom data you can add to a file. Metadata contains descriptions of the image, including such data as your camera name, the camera settings you used to take a picture, copyright information, and much more.
Searching metadata is easy. Just choose Find
In earlier versions of Elements, you had a menu command that permitted you to search through a catalog and find faces. Any photo where a person's face could easily be detected was displayed in the Organizer as a sorted group.
Note
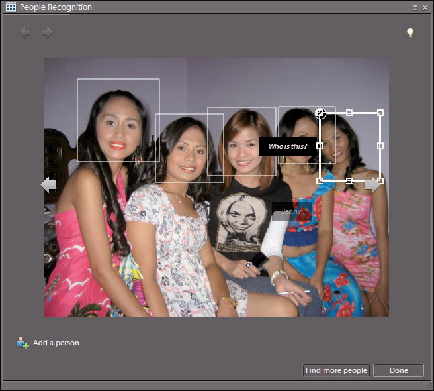
Elements 8 has a new menu command for finding people. Choose Find
When the Organizer window displays a photo with people, the faces are highlighted with a white border. If Elements misses a person, you can click the Add a Person button, as we did for the photo shown in Figure 2-26. The border shown with handles is a new frame added by clicking the Add a Person button.
As you move the mouse cursor over individual borders, a pop-up text box opens with the text Who is this?, as shown in Figure 2-26. Click the text and then type the name of the individual in the text box. Each time you open the photo and move the mouse cursor over the individual faces, the pop-up text box displays the names of the individuals you recorded when you typed the names.
Elements provides you with a great opportunity for organizing files in the form of keyword tags. After you acquire your images in the Organizer and sort them, you can add some permanent keyword tags according to the dates you took the pictures, the subject matter, or some other categorical arrangement.
In the Organizer window, two panels help you sort your pictures and keep them well organized. You use the Keyword Tags panel (which we talk about in the section "Working with keyword tags," later in this chapter) to identify individual images by using a limitless number of options for categorizing your pictures. On the Keyword Tags panel, you can create keyword tags and collection groups to neatly organize files.
Tip
Keyword tags are handy when you want to use the many different project options, which we explain in Book IX, Chapter 1. You create a keyword tag from files stored in various folders on your hard drive and preview the images to be used in a creation. You can, for example, select images to use when you're creating slide shows and photo albums. When you finish your creations, go back and delete the keyword tag.
In the following sections, you can find out how to create and manage keyword tags.
To create a new keyword tag and add photos to the tag, follow these steps:
Open photos in the Organizer.
Open the Organizer window by clicking the Organizer button in an editing mode or by selecting Organize on the Welcome screen. Choose File
To create a new keyword tag, click the plus sign (+) icon in the Keyword Tags panel to open a drop-down list and then choose New Keyword Tag.
The Create Keyword Tag dialog box opens, as shown in Figure 2-27.
Type a name for the tag in the Name text box and add a note to describe the keyword tag.
You might use the location where you took the photos, the subject matter, or other descriptive information for the note.
If you want to assign the keyword tag to a map location on Yahoo! Maps, click the Place on Map button.
When you click Place on Map, a dialog box opens in which you type a city name for placing the image on Yahoo! Maps. Type a city name and select the correct city from options provided in a second dialog box.
Click OK in the Create Keyword Tag dialog box.
You return to the Organizer window.
In the Organizer window, select the photos you want to give keyword tags.
Click a photo and Shift-click another photo to select photos in a group. Click a photo and Ctrl-click different photos scattered around the Organizer window to select photos in a nonconsecutive order.
To add a new keyword tag to a photo (or selection of photos), click one of the selected photos in the Organizer window and drag the photo thumbnail to the New Tag icon in the Keyword Tags panel.
Alternatively, you can drag a tag from the Keyword Tags panel to the selected photos.
When you release the mouse button, the new keyword tags are added to the selected photos.
Repeat Steps 3 through 7 to create keyword tags for all the images you want to organize.
To view one or more keyword tags, click the empty square adjacent to a keyword-tag icon to show the photos marked with that particular keyword-tag icon.
When you click the empty square, an icon in the shape of a pair of binoculars appears inside the square, as shown in Figure 2-28. All photos matching the keyword tags are shown in the Organizer window.

Tip
To return to viewing all photos in the Organizer, click the binoculars in the Keyword Tags panel. The square returns to empty and turns off viewing the tagged files.
You can manage keyword tags pretty easily by using the Keyword Tags panel. To access the major menu commands, either click the plus sign (+) icon in the Keyword Tags panel to call up the New drop-down list or right-click a keyword tag on the Keyword Tags panel and make your choice from the context menu that appears.
The New drop-down list offers you the following commands:
New Keyword Tag: Create a new keyword tag, as we describe in the steps in the preceding section.
New Sub-Category: A subcategory is like a nested bookmark. Create a sub-category by selecting New Sub-Category from the New menu; a dialog box opens, prompting you to type a name for the new subcategory. As an example of how you might use keyword tags and subcategories, you might have a keyword tag named Uncle Joe's Wedding. Then, you might create subcategories for Bride's Dressing Room, Ceremony, Family Photos, Reception, and so on.
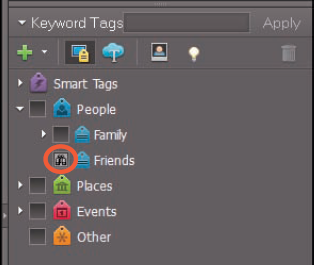
New Category: Choose New Category from the New menu in the Keyword Tags panel to open a dialog box that prompts you to type a name for the new category. By default, you find predefined category names for People, Places, Events, and Other. If you want to add your own custom category, use this menu command.
From File: If you export a keyword tag, the file is written as XML (eXtensible Markup Language). When you choose From File, you can import an XML file containing keyword tags as were added using the Keyword Tags to a File command.
Save Keyword Tags to a File: You can save keyword tags to a file that can be retrieved with the From File command. This option is handy when you open a different catalog file and want to import the same collection names created in one catalog file to another catalog file. (See the section "Cataloging Files" earlier in this chapter.)
Collapse All Keyword Tags: Keyword tags appear like bookmark lists that can be collapsed and expanded. An expanded list shows you all the subcategory keyword tags. Choose Collapse All Keyword Tags to collapse the list.
Expand All Keyword Tags: This command expands a collapsed list.
Note
When you create a new keyword tag, you see a large icon in the Keyword Tags panel. The default tags appear with small icons. You can access the items that appear below default tags by clicking the right-pointing arrow to expand the list.
Right-click a Keyword Tag name to make the following menu commands appear:
Change <keyword tag name> Keyword Tag to a Sub-Category: Choose this menu command to change a specific keyword tag into a subcategory of keyword tags.
Edit <keyword tag name> Keyword Tag: This menu command opens the Edit Keyword Tag dialog box. You can rename a keyword tag, change the note, or change the map location in this dialog box. Alternatively, you can click the Pencil tool on the Keyword Tags panel to open the same dialog box.
Delete <keyword tag name> Keyword Tag: Select a keyword tag and then select this menu option to delete it. An alternative way to delete a keyword tag is to select the tag and then click the Trash icon in the panel.
Note
Deleting a keyword tag doesn't delete files.
Place on Map: Choose Place on Map to add images to a Yahoo! Map location.
Remove from Map: Choose this command to remove tags from Yahoo! Maps.
Show on Map: This command opens the Yahoo! Maps panel and shows the red pin at the map location with which the image(s) are associated.
New Search Using <keyword tag name> Keyword Tag: This command searches through a catalog and displays all the photos assigned a particular keyword tag in the Organizer window.
Add Photos with <keyword tag name> Keyword Tag to Search Results: If you select one photo in the Organizer, the number is one. Selecting more than one photo changes the number to the total number of selected images. When you open a context menu, the selected images are added to the keyword tag at the place where the context menu opened.
Exclude Photos with <keyword tag name> Keyword Tag from Search Results: Select photos in the Organizer window and choose this command to exclude the selected photos from the search.
Attach <keyword tag name> Keyword Tag to <n> Selected Items: Select a file in the Organizer window and choose this command to attach the keyword tag to the file.
Warning
Keyword tags are saved automatically with the catalog you're working in. By default, Elements creates a catalog and auto-saves your work to it. If you happen to create another catalog (as we explain earlier in the chapter), your keyword tags disappear. Be aware of which catalog is open when you create keyword tags so you can later return to them.
Note
Elements 8 introduces another way to view and search for photos in a catalog: the Tags Cloud feature. Click the View Tags Cloud icon in the Keyword Tags panel, as shown in Figure 2-29. When you click the icon, an alphabetical list of your tags appears in the panel.
Click a tag name in the list to select a tag and view all photos tagged with the respective name.
When you choose Window
You can narrow a search to examine photos within a given time frame by dragging the Timeline slider left or right (see Figure 2-30). You can also move two other sliders on the Timeline. By dragging the left-facing arrowheads to the right and the right-facing arrowheads to the left, you can narrow the number of thumbnail images that appear in the Organizer window.
Note
When you move the two outside sliders toward each other, you hide image thumbnails appearing in the Organizer that are outside the dates on the Timeline relative to the slider positions. When you move the center slider, Elements displays the first photo on a given date with the date flashing below the respective image thumbnail.
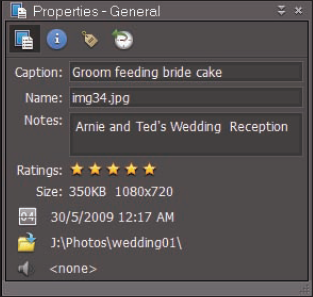
We introduced the Properties panel earlier in Figure 2-21 when we talked about adding captions and notes. In addition to adding this information to images, the Properties panel offers you some information about your files. The information includes
Rating files: You can assign ratings to files, as we describe later in this chapter in the section "Rating images."
Date: The panel reports the date the picture was shot (or scanned).
Directory path: The panel displays the directory path for the file location on your hard drive.
Sound: If the file contains a sound, the sound information is displayed.
With keyword tags, you can organize files into categories and subcategories. Doing so keeps your files neatly organized within a catalog. Elements offers additional organizing control in the Albums panel. You might want to organize an album for sharing photos with others on Photoshop.com, assemble an album that rates each photo from one to five stars, create a slide show, or just use the Albums panel to further segregate images within different categories.
Note
Be aware that you have an Album panel in the Panel Bin, and you have some options in the Create panel for designing projects similar to (but not the same as) photo albums. To avoid confusion, Elements refers to the projects not as photo albums but as Photo Books and Photo Collages. The term Album in Photoshop Elements nomenclature refers to a collection of images that are not yet integrated into projects. You can use the Album panel to organize and help manage your photo files.
Note
Think of a catalog as a parent item and keyword tags as its children.
Within keyword tags, you can use the sort options we've talked about in this chapter to sort files according to date. If you still have a number of files in an Organizer window that are hard to manage, you can create tags that form subcategories within the keyword tags. Additionally, you can create an album out of a number of photos within a given keyword tag. For example, you might have a huge number of photos taken on a European vacation. Your catalog contains all the images taken on that trip. You can then create keyword tags for files according to the country visited. You then might rate the photos according to the best pictures you took on your trip. The highest-rated images could then be assembled in an album and then later viewed as a slide show or integrated as part of a project such as a Photo Book.
You can rate photos in the Organizer by tagging images with one to five stars. You might have some exceptional photos that you want to give a five-star rating. Poor photos with lighting and focus problems might be rated with one star.
To rate a file with a star rating, open a context menu by right-clicking a photo and select Properties from that menu. The Properties – General panel, shown in Figure 2-31, opens. Click a star to rate the photo. Alternatively, you can click a photo, choose Edit
To return to a view in which all your photos are shown in the Organizer, including all photos you haven't rated, click Show All in the Shortcuts bar.
You might want to rate images with star ratings and then add all your images to an album. Within the album, you can still choose to view your pictures according to star ratings.
In the section "Working with keyword tags," earlier in this chapter, we discuss how creating keyword tags and assigning tags to photos help you organize a collection of photos — and how subcategories help you divide a collection into more specific groups. With albums and star ratings, you can identify groups within a collection that you might want to print, share, or use in onscreen slide shows.
To create an album, follow these steps:
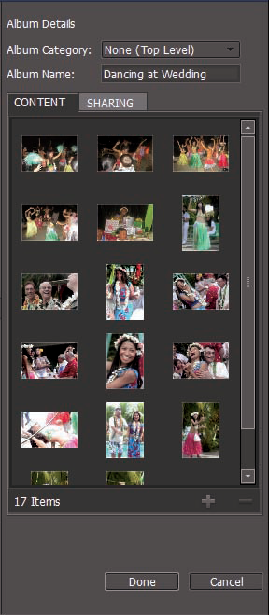
Click the Organize panel, click the plus sign (+) icon in the Albums panel, and choose New Album from the drop-down list shown in Figure 2-32.
The Albums panel expands to show the Album Details.
Name the new album.
Type a name for the album in the Album Name text box.
View the Backup/Synchronization Help.
Click the light bulb to display the help information related to checking the Backup/Synchronize check box. Checking this check box protects your files by using backup services provided by
Photoshop.com.Click the help note to dismiss it from view.
A help note is shown in Figure 2-33.
Drag photos from the Organizer to the Items window in the Album Details panel, shown in Figure 2-34.
Alternatively, you can select photos in the Organizer and click the plus-sign (+) icon in the Album Details panel to add them to the album.
Click Done at the bottom of the panel — unfortunately not visible in Figure 2-34.
Your new album now appears listed in the Albums panel.


That's it! Your new album is created, and any photos you drag to the album in the future are added to it. You can isolate all the photos within a given album by clicking the album name in the Albums panel.
Note
Creating multiple albums uses only a fraction of the memory required to duplicate photos for multiple purposes (such as printing, Web hosting, sharing, and so on).
You can perform a search based on a number of different criteria. You can, for example, rate images with stars and choose to view all files with three or more stars, or maybe you changed camera models and want to show only the photos taken with your newest camera. You can search a catalog by metadata, location, or some other criterion. Furthermore, you can combine searches, first searching for (say) a location and then searching the files within a given date range.
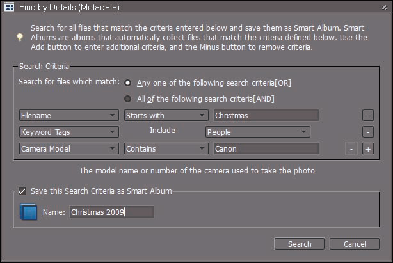
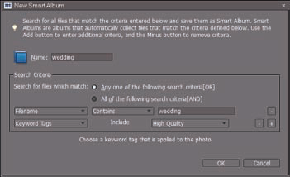
Another option for searching files is performing a search and saving not only the search results but also a complex set of search criteria in the form of a Smart Album. You create a Smart Album by opening the New menu in the Albums panel and choosing New Smart Album.
The New Smart Album dialog box opens, as shown in Figure 2-35. Type a name for your new Smart Album and make selections for the search criteria below the Name text box. Click OK, and the Smart Album is listed above the albums in the Albums panel.
The Albums panel contains all the albums and Smart Albums you create in an organized list. By default, the albums are listed in alphabetical order. If you add many albums to the panel, the list can be long, making it difficult to find the album you want to use for a given editing session.
An Album Group is no more than a divider shown in the Albums panel. You don't add photos to the group. You nest albums within a group in a hierarchical order. To see how to create an Album Group, follow these steps:
Create several albums.
To begin, you should have two or more albums added to the Albums panel. For example, suppose that you have many photos of a vacation trip to Hawaii. You want to divide the photos by images taken at a luau, a diving trip, a day on Waikiki Beach, or photos of other similar events that you want to group together. For each category — such as Luau, Diving, or Waikiki — you create a separate album.
Create an Album Group by clicking the New menu (the + sign) in the Albums panel and choosing New Album Group.
The Create Album Category dialog box (as shown in Figure 2-36) opens.
Type a name for the group in the Album Category Name text box.
You also have an option to choose a parent group from a drop-down list so you can nest albums in a hierarchical order.
Click OK.
Your new Album Group is added to the Albums panel.
Click and drag an album onto the Album Group name in the Albums panel.
The albums you drag to the Album Group are nested within the group, as shown in Figure 2-37.
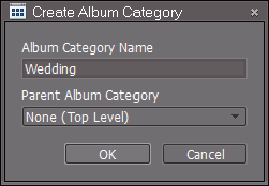
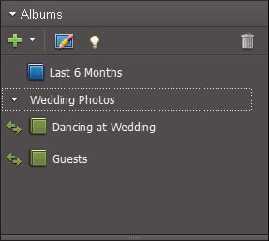
Figure 2-37 shows an expanded Album Group, as denoted by the list (below Wedding Photos) and the disclosure triangle. To collapse a group, click the down-pointing arrow. The group names remain visible and provide you with more viewing space in the Albums panel, making it easier to scroll long lists.
Like keyword tags, albums can be saved to an XML file, and the files can be loaded in the Albums panel. Open the New menu, where you find commands for Save Albums to File and From File. You can export an album to a file and then copy the file to another computer, making it easy to organize photos on several computers.
Elements offers a few ways to hide files so you can keep your images organized and easy to find.
With a simple menu command, you can mark selected files in the Organizer as hidden. You might have several files of the same subject and want to keep only one file visible in the Organizer window. However, you may not want to delete the other photos. You can hide files in the Organizer window — and show the hidden files later on by using menu commands.
Select files you want to hide, and from either the Edit menu or a context menu, choose Visibility
Think of stacks like a stack of cards that are face-up. You see only the front card, and all the other cards are hidden behind that card. Stacks work the same way. You hide different images behind a foreground image. At any time, you can sort the images or display all images in the stack in the Organizer window.
To create a stack, follow these steps:
In the Organizer, select several photos.
You can select any number of photos. However, you can't stack audio or movie files.
Choose Edit
Elements stacks your photos. The first image you select remains in view in the Organizer window. In the upper-right area, an icon that looks like a stack of cards appears on the image thumbnail when you've stacked some images. When you double-click the photo to open the stack in the Organizer, you find the same icon in the top-right corner, as shown in Figure 2-38.

After you stack a group of images, you can use the Stack submenu commands to manage the photos. Click a stack to select it and then choose Edit
Automatically Suggest Photo Stacks: Select this command to make Elements search the photos in the Organizer window for visually similar appearances. Photos that look similar are opened in a separate window, where you can select the photos you want to stack. Make a selection of two or more photos, and select Stack Selected Photos.
Stack Selected Photos: This command remains grayed out unless you have several photos selected to create a stack.
Unstack Photos: Click a stack in the Organizer and choose this command to return all images to the Organizer window and eliminate the stack.
Expand Photos in Stack: This command expands the stack to show all thumbnail images in the Organizer window.
Collapse Photos in Stack: This command collapses a stack to show only the top photo in the Organizer window.
Flatten Stack: After you stack some photos, this command becomes available. When you flatten a stack, the top-level photo is retained and all other photos in the stack are deleted from the catalog.
Warning
Be careful with this command. All photos except for the top photo really are deleted from the catalog — although not from your hard disk.
Remove Photo from Stack: Choosing this command removes the selected photo from the stack. It does not delete the photo from your catalog but merely moves it outside the stack.
Set as Top Photo: Before accessing this command, you first choose Expand Photos in Stack. If you don't like the topmost photo, select another and choose this menu command to move the selected photo to the top of the stack.
Tip
If you want to view all stacks in an Organizer window in expanded form, choose View
Versions are similar to stacks, but you create versions from only one file. You can edit an image and save both the edited version and the original as a version set. You can make additional edits in either of these editing modes and save them to a version set. To create a version set, follow these steps:
Select an image by clicking it in the Organizer window.
For example, right in the Organizer, you can correct some brightness problems in your image. Choose Edit
View the items in the version set by clicking the image in the Organizer and choosing Edit
Elements automatically creates a version set for you when you apply the Auto Smart Fix to the file. A new Organizer window opens and shows two thumbnail images — one representing the original image and the other representing the edited version.
To open the original in Edit Full mode, select the original image and then select Full Edit from the Display drop-down list on the Organizer Menu bar.
Edit the image in Edit Full mode.
You can choose from many different menu commands to edit the image. For example, change the color mode to Indexed Color by choosing Image
Save a version by choosing File
In the Save Options area of the Save As dialog box, select the Include in the Organizer and Save in Version Set with Original check boxes.
Click Save.
The edit made in Edit Full mode is saved as another version in your version set.
Tip
When you have a version set, you can open the Edit
After you create a version set, you find additional submenu commands you can use to manage the version set. Choose Edit

Items listed in the Version Set submenu include
Expand Items in Version Set: Click a version set and choose this menu command to expand the items in the version set.
Collapse Items in Version Set: When items are expanded, you can return them to a collapsed view by selecting this command.
Flatten Version Set: Be careful here. If you choose this command, you lose all items in the version set except the top image.
Convert Version Set to Individual Items: This command removes items from the version set and adds each version as a separate image to the Organizer window.
Revert to Original: This command deletes the version set and returns you to the original, unedited version of the file.
Remove Item(s) from Version Set: This option removes any selected item (or items) from a version set.
Set as Top Item: When viewing an expanded version set, click one of the images and choose this item to move it to the top.
Computer users often learn the hard way about the importance of backing up a hard drive — and the precious data that took a lot of time to create and edit. We can save you some aggravation right now before you spend any more time editing your photos in Elements.
We authors are so paranoid when we're writing a book that we back up our chapters on multiple drives, CDs, and DVDs when we finish them. The standard rule is that if you spend sufficient time working on a project and it gets to the point at which redoing your work would be a major aggravation, it's time to back up your files.
When organizing your files, adding keyword tags and albums, and creating stacks and version sets, you want to back up the catalog file in case your catalog becomes corrupted.
Here's how you can use Elements to create a backup of your data:
Choose File
This wizard has three panes that Elements walks you through; it's a pretty painless way to back up your files.
Select the source you want to back up.
The first pane in the Burn/Backup Wizard offers two options:
Full Backup: Click this radio button to perform your first backup or when you're writing files to a new media source.
Incremental Backup: Use this option if you've already performed at least one backup and you want to update the backed-up files.
Click Next and select a target location for your backed-up files.
Active drives, including CD/DVD drives attached to your computer, appear in the Select Destination Drive list, as shown in Figure 2-40. Select a drive, and Elements automatically assesses the write speed and identifies a previous backup file if one was created. The wizard also displays the total size of the files you have chosen to copy. This information is helpful so you know whether you need more than one CD or DVD to complete the backup.
If you intend to copy files to your hard drive or to another hard drive attached to your computer, click the Browse button and identify the path.
If you use a media source, such as a CD or DVD, Elements prompts you to insert a disc and readies the media for writing.
Click Done, and the backup commences.
Note
Be certain to not interrupt the backup. It might take some time, so just let Elements work away until you're notified that the backup is complete.
