Backgrounds versus layers
Taking a look at the types of layers
Working with the Layers panel and menu
Creating layers
Compositing with multiple layers
Transforming layers
Simplifying layers
Using Elements without the assistance of layers would be like trying to wash your car with a toothbrush and a pail of water instead of with a hose and a power-scrubber brush. Yes, it can be done. But it takes a lot longer and is downright tedious. The benefit to using layers is that you have tremendous flexibility. You can make endless edits as long as those layers exist. You can rearrange their order, and if you decide you don't want them anymore, you simply delete them. Layers make working in Elements a lot more forgiving, allowing you to make changes quickly and productively.
But hey, it's not just the technical and practical aspects that make layers so awesome. Layers also allow you to express your creative side: You can composite several images into one with just a drag of the mouse, for example. This chapter gives you the basics on working with layers. Chapter 2 of this minibook fills in the rest of the details. After you give layers a try, you'll find that they make your image-editing life so much easier. Now, if only they would go out and wash the car.
In terms of a real-world analogy, think of layers as sheets of acetate or transparency film, similar to those clear plastic sheets used with overhead projectors. You have drawings, photos, or type on the individual sheets. What you place on one sheet doesn't affect the other sheets. You can show just one sheet, or you can stack several on top of one another to create a combination image, or composite (or collage). You can reshuffle the order of the sheets, add sheets, or delete sheets. Any space on the sheet that doesn't have an image, a drawing, or some type on it is transparent.
That's how layers work in Elements. You can place elements on separate layers yet show them together to create a composite. You can also add, delete, or rearrange layers. And, unlike using real sheets of acetate, you can adjust an element's opacity, or how opaque or transparent it is on the layer. You can also change the way the colors between layers interact by using Blend modes. Both opacity and Blend modes are covered in Chapter 3 of this minibook.
When you create a new image with a white or colored background, scan an image into Elements, or open a file from a CD or your digital camera, you basically have a file with just a background. You have no layers yet.
At this basic level, an image contains only the single background, and you can't do much to it besides paint on it and make basic adjustments. You can't rearrange the background in the stack of layers (after you have some) — it's always on the bottom of the Layers panel. You also can't change the opacity or Blend mode of a background. What you can do is convert a background to a layer, making it possible to shuffle, change the opacity, and change the Blend modes of your newly formed layer.
Note
Keep in mind that to work with layers, you must be in the Editor in Edit Full mode.
To convert a background into a layer, follow these steps:
In the Editor, in Edit Full mode, choose Window

The Layers panel is explained in the upcoming section "Getting to Know the Layers Panel."
Double-click Background in the Layers panel.
You can also choose Layer
The New Layer dialog box appears.
Name the layer or leave it at the default name of Layer 0.
Note that you can also adjust the Blend mode and opacity of the layer in the New Layer dialog box. You should do so by using the Layers panel commands. We cover these techniques in Chapter 3 of this minibook.
Click OK.
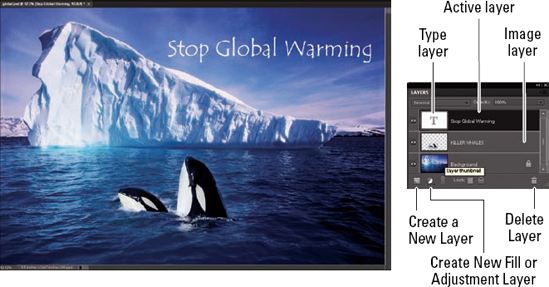
Elements converts your background into a layer, also known as an image layer. Note that the layer name is no longer italicized nor is it locked, as shown in Figure 1-2.
Tip
When you create a new image with transparent content for the background, the image doesn't contain a background but instead is created with a single layer. If you so desire, you can convert a layer into a background by selecting it and then choosing Layer

Although turning the background into a layer (discussed in the preceding section) is a popular activity, Elements refers to plural layers for a reason. You'll probably create image layers most of the time, but other types exist. Elements offers five types of layers. Some you may never use, and some you may use only occasionally, but you should be familiar with them all.
The image layer is the one that most closely matches the acetate analogy (discussed in the section "Getting Familiar with Layers," earlier in this chapter). You put various elements on separate layers to create a composite image. You can create blank layers and add images to them, or you can create layers from images themselves. You can create as many layers as your computer's memory allows.
Because each layer in an image is a separate entity, you can edit, paint, transform, mask (described in Chapter 4 of this minibook), or apply a filter to a layer without affecting the other layers or the background. And, after an element is on a layer, you no longer have to make a selection to select it. (See Book IV for details on selections.) Just drag the element with the Move tool. The element freely floats in a sea of transparency.
Note
Because showing clear areas, or transparency, is impossible on a computer monitor, Elements uses a gray-and-white checkerboard by default to represent the transparent areas of a layer.
An adjustment layer is a special kind of layer used mostly for color and contrast correction. What's helpful about adjustment layers is that you can apply those corrections without permanently affecting any pixels on your layers. Adjustment layers are totally nondestructive. They apply the correction to all layers below them, without affecting any layers above them.
Because the adjustment resides on a layer, you can edit, delete, duplicate, merge, or rearrange the adjustment layer at any time. You have more flexibility in your image-editing chores and more freedom for experimentation. In addition, none of this experimentation harms your image because it takes place above the image on an adjustment layer.
Note
Another unique feature of adjustment layers is that when you create one, you also create a layer mask on that layer. A layer mask is like a second sheet of acetate that hovers over the underlying layers. You use the layer mask to selectively apply the adjustment to the layers below it by applying shades of gray — from white to black — on the mask. For example, because the mask is, by default, completely white, you can fully apply the adjustment to the layers. If you paint on a layer mask with black, as shown in Figure 1-3, the areas under those black areas don't show the adjustment. If you paint with a shade of gray, those areas partially show the adjustment. The darker the shade of gray, the less these areas show the adjustment. Note that if your image has an active selection border in it before you add an adjustment layer, the adjustment is applied to only the area within the selection border. The resulting layer mask also reflects that selection: The selected areas are white, and the unselected areas are black.

You can also use the layer mask to creatively blend two layers. Be sure to see Chapter 4 of this minibook to find out how. It's definitely worth your while.
Elements has eight kinds of adjustment layers, and you can use as many as your heart desires. The adjustments offered are the same ones you find on the Enhance
In the Editor, in Edit Full mode, open an image of your choice.
Because you're applying an adjustment layer, you may want to use an image that's in need of some color adjustment. Note that with adjustment layers, you don't need to convert your background into a layer.
Click the Create Adjustment Layer icon in the Layers panel.
The Adjustment Layer drop-down list appears.
Note that you can also choose Layer
From the drop-down list, choose an adjustment.
The dialog box pertaining to your adjustment appears in the new Adjustments panel.
Make the necessary adjustments in the Adjustments panel.
The adjustment layer appears in the Layers panel, shown in Figure 1-4. The Adjustment Layer icon (sporting a few gears) and a thumbnail (representing a layer mask) appear on the adjustment layer.
Note
In our example, the layer mask of the Levels adjustment layer — the central layer of the three-layer sandwich — is all white, so the adjustment shows up full strength over the image. Note that you can paint on the layer mask to selectively allow only portions of your image to receive the adjustment, as shown in our Hue/Saturation adjustment layer. Use the Brush or Pencil tool to paint. Or, you can also make a selection and fill it with any shade of gray, from white to black. Finally, you can use the Gradient tool on the mask to create a gradual application of the adjustment.
You can also adjust the opacity and Blend modes of an adjustment layer, just as with image layers. Reducing the opacity of an adjustment layer reduces the effect of the adjustment on the underlying layers.
Tip
If you want to view your image without the adjustment, click the Eye icon in the left column of the Layers panel to hide the adjustment layer. If you want to delete the adjustment layer, simply drag it to the Trash icon in the Layers panel or choose Delete
After you create an adjustment layer, you can easily edit it. Simply double-click the Adjustment Layer icon in the Layers panel. You can also choose Layer

Note
Click an icon. From left to right, here's what the icons do:
Have the adjustment layer clip to the layer below it (affects only the layer directly beneath it, not all underlying layers in the stack)
Toggle the adjustment layer on and off
View the previous state (how the image appeared before your most-recent step)
Reset the adjustment layer settings to their defaults
If you don't use an adjustment layer when you make color corrections, the correction you apply affects only the active layer (the layer highlighted in the Layers panel). The correction doesn't affect all layers below it, as it would if you used an adjustment layer. But you can also isolate the adjustment layer to a single layer or a portion of a single layer.
Here are some tips for using and isolating adjustment layers:
Correct part (but not all) of a layer. To enable the adjustment layer to correct only a portion of a layer, make a selection before you create the adjustment layer. The adjustment affects only the pixels within the selection outline. The adjustment affects the pixels within the selection outline on each layer that resides below the adjustment layer.
Tip
Another way to correct part of a layer is to paint on the adjustment layer mask. Painting with black hides the adjustment, and painting with various levels of gray partially hides the adjustment. For more on masks, see Chapter 4 of this minibook.
Clip to the layer. If you want the adjustment layer to affect only the immediate underlying layer and not those below that immediate layer, you can create a clipping group. To do so, press the Alt key (Option on the Mac) and click the line between the adjustment layer and your immediate, underlying image layer. For details on clipping groups, see Chapter 4 of this minibook.
A fill layer lets you add a layer of solid color, a gradient, or a pattern. Like adjustment layers, fill layers also have layer masks, as indicated by the Mask icon thumbnail in the Layers panel.
Just as with image layers and adjustment layers, you can create as many fill layers as you want. You can also edit, rearrange, duplicate, delete, and merge fill layers. And, you can blend fill layers with other layers by using the opacity and Blend mode options in the Layers panel.
Note
You can confine the effects of a fill layer, as you can with an adjustment layer, to a portion of the image. Make a selection before you create the fill layer (see Book IV for more on selections) or paint on the mask later (described in the earlier section "Isolating your adjustments"). Editing a fill layer is similar to editing an adjustment layer. To edit a fill layer, double-click the Fill Layer thumbnail in the Layers panel.
Here's how to create a fill layer:
In the Editor, in Edit Full mode, open an image of your choice.
In this case, open an image that would look good with a frame or border or even some type. Note that if you don't have an active selection, the fill layer encompasses your entire layer.
Click the Create Adjustment Layer icon on the Layers panel. From the drop-down list, choose a fill of a solid color, gradient, or pattern.
Note that you can also choose Layer
The dialog box specific to your type of fill appears.
Specify your options, depending on the fill type you chose in Step 2:
Solid Color: Select a color from the Color Picker. (For more on color, see Book III, Chapter 4.)
Gradient: Click the down-pointing arrow to choose a preset gradient from the drop-down panel or click the Gradient preview to display the Gradient Editor and create your own gradient. For details on gradients, see Book V, Chapter 2.
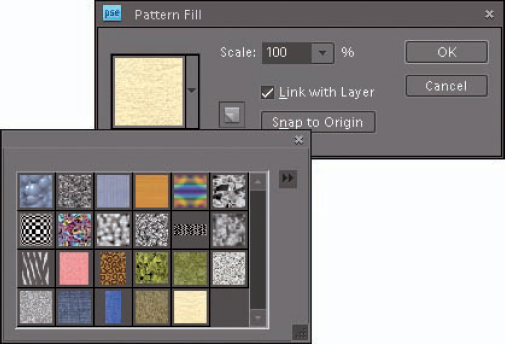
Pattern: Select a pattern from the drop-down panel, as shown in Figure 1-5. Choose a value from the Scale drop-down list, if you want. Click Snap to Origin to make the origin of the pattern the same as the origin of the document. Select the Link with Layer option to specify that the pattern moves with the fill layer if you move the layer.
Click OK.
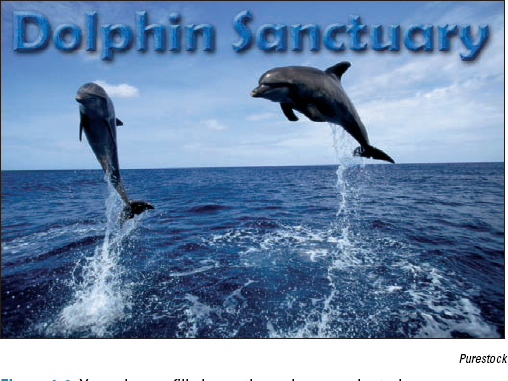
The fill layer appears in the Layers panel. Similar to what happens in adjustment layers, a layer mask is created on the fill layer. In our example, in Figure 1-6, the words Dolphin Sanctuary appear in white on the layer mask, thereby allowing our pattern to show through. The remaining areas are black, hiding our pattern. We also added some layer styles (bevel and drop shadow) to jazz up our type. For more on layer styles, see Book VII, Chapter 3.
If you want to delete the fill layer, first select the layer in the Layers panel; then either drag it to the Trash icon in the Layers panel, choose Delete
Tip
You can simplify a fill layer to convert it to a regular image layer. Choose Layer
Believe or not, Elements isn't just about photos and painting. It also has a set of shape-drawing tools — six, to be exact. You can fill those shapes with solid color, gradients, or patterns. When you create a shape, you're creating a vector-based object: This term means that the shapes are defined by mathematical equations, which create points and paths, rather than by pixels. The advantage of using vector-based objects is that you can freely size these objects without causing degradation. In addition, they're always printed with smooth edges, not with the jaggies you're familiar with seeing in pixel-based elements.
To create a shape layer, grab a shape tool from the Tools panel and drag it on your canvas. When you create a shape, it resides on its own, unique shape layer, as shown in Figure 1-7. Although you can move and transform shapes and adjust the Blend modes and opacity, your ability to edit shape layers is limited. To apply filters and other special effects, you must first simplify the shape layers — that is, convert the vector paths to pixels. For more on shapes, see Book V, Chapter 1.
To create type, such as the type shown in Figure 1-8, click your canvas with the Type tool and type some text. After you commit your text by pressing Enter on the numeric keypad or clicking the Commit button (the check mark icon) on the Options bar, you've created a type layer. In the Layers panel, you see a layer with a T icon, indicating that it's a type layer. Initially, the name of the type layer corresponds to the text you typed (you can change the layer name, if you want). Like shapes, the text in Elements is vector-based type and, if left in that format, always prints smoothly and without the jaggies. For more information on vector images, see Book III, Chapter 1.
Another great thing about type in Elements is that it's live: You can edit the text at any time. Besides being able to change the font and size, you can change the orientation, apply anti-aliasing (softening of the edges), and even warp it into various distortions. You can transform, move, rearrange, copy, and change the layer options (opacity, fill, and mode) of a type layer just as you can for image layers. If, however, you want to apply filters, you must first simplify (convert into pixels) the text. For everything you need to know about type, see Book V, Chapter 3.


Just like every other important aspect of Elements, layers are controlled in their very own panel. You might have seen bits and pieces of the Layers panel throughout this chapter, but now it's time for a full-blown discussion of its capabilities. To display the Layers panel, shown in Figure 1-9, choose Window
The order of the layers in the Layers panel represents the order in the image. We refer to this concept as the stacking order. The top layer in the panel is the top layer in your image, and so on.
For some tasks, you can work on only one layer at a time. For other tasks, you can work on multiple layers simultaneously.
Here's the lowdown on how to work with the Layers panel:
Select a layer. Click a layer name or thumbnail. Elements then highlights the active layer in the panel.
Select multiple contiguous layers. Click your first layer and then Shift-click your last layer.
Select multiple noncontiguous layers. Ctrl-click (

Note
Only layers that are visible are printed. This can be useful if you want to have several versions of an image (each on a separate layer) for a project within the same file.
Select the actual element (the nontransparent pixels) on the layer. Ctrl-click (
Create a new, blank layer. Click the Create New Layer icon (a dog-eared page) at the top of the panel.
Create an adjustment or fill layer. Click the Create New Fill or Adjustment Layer icon (the black-and-white circle) at the top of the panel. See the earlier sections "Using adjustment layers" and "Taking advantage of fill layers" for more on these types of layers.
Duplicate an existing layer. Drag the layer to the Create a New Layer icon at the top of the panel.
Rename a layer. When you create a new layer, Elements provides default layer names (Layer 1, Layer 2, and so on). To rename a layer, double-click the layer name (the name, not the thumbnail) in the Layers panel, enter the name directly in the Layers panel, and press Enter (Return on the Mac). Although it may seem tedious to give your layers meaningful names, it can increase your productivity, especially when the number of layers in your file starts to increase.
Adjust the interaction between colors on layers and adjust the transparency of layers. You can use the Blend modes and the Opacity drop-down menus at the top of the panel to mix the colors between layers and adjust the transparency of the layers. (Take a look at Figure 1-10, where we set the opacity at 30% and chose Lighten from the Blend mode drop-down menu.) For details, see Chapter 3 of this minibook.
Delete a layer. Drag it to the Trash icon at the bottom of the Layers panel. You can also choose Layer
You use the remaining icons at the top of the Layers panel to link layers and lock layers. Both actions warrant sections of their own. In addition, you can view, hide, rearrange, merge, and flatten layers. See Chapter 2 of this minibook for more details on all these features.
As with many features in Elements, you usually have more than one way to do something, especially when it comes to working with layers. Besides the commands on the Layers panel itself, you have two layer menus — the Layer menu and the Select menu — both of which you can find on the main Menu bar at the top of the Application window or at the top of the screen on a Mac.
Much of what you can do with the Layers panel icons, you can also do by using the Layer menu on the Menu bar and the Layers panel pop-up menu. (Click the down-pointing arrow in the upper-right corner to call up that one.) Commands such as New, Duplicate, Delete, and Rename are omnipresent throughout. But you also find commands that are exclusive to the panel, the main Layer menu, and the Layers pop-up menu. So, if you can't find what you're looking for in one area, just go to another. Some commands require an expanded explanation and are described in other sections of this and other minibooks. Here's a quick description of most of the commands:
Delete Linked Layers and Delete Hidden Layers: These commands delete only those layers that have been linked or hidden from display on the Layers panel.
Layer Style: These commands manage the styles or special effects you apply to your layers. Find more on layer styles and effects in Book VII, Chapter 3.
Arrange: You use this command to shuffle the layer-stacking order. See Chapter 2 of this minibook for more on this topic.
Group with Previous and Ungroup: The Group command creates a clipping group, in which a group of layers is constrained to the boundaries of a base layer. Find more details in Chapter 4 of this minibook.
Type: The commands on the Type submenu control the display of type layers. For more on type, see Book V, Chapter 3.
Rename Layer: You use this option to give a layer a new name. You can also simply double-click the name on the Layers panel.
Simplify: This command converts a type layer, shape layer, or fill layer into a regular image layer. In other words, it converts vector-based type and images to pixel-based type and images. See Chapter 2 of this minibook for details.
Merge and Flatten: The various Merge and Flatten commands combine multiple layers into a single layer or, in the case of flattening, combine all layers into a single background. See Chapter 2 of this minibook for more info.
Palette Options: Choose Palette Options from the Layers panel menu and select a thumbnail size. You can also choose whether to display just the boundary of the layer contents or the whole document in the thumbnail.
Although the Select menu's main duties are to assist you in making and refining your selections, it offers a few handy layer commands. Here's a quick introduction to each command:
Select All Layers: Want to quickly get everything in your file? Choose Select
Select Layers of Similar Type: This command is helpful if you have different types of layers in your document — such as regular layers, type layers, shape layers, and adjustment layers — and you want to select just one type. Select a layer and then choose Select
Deselect All Layers: Choose Select
Good old-fashioned image layers are the backbone of the world of layers. You can create multiple image layers within a single document. Even more fun is creating a composite from several different images. The creative possibilities are endless. The following sections take a look at the various ways to create these layers.
You can create a layer in a new file or an existing one. To go the new-file route, choose File
If you have an open image and you want to create a new, blank layer, here's how to do so:
In the Editor, in Edit Full mode, click the Create New Layer icon at the top of the Layers panel. A layer with the default name Layer 1 appears in the Layers panel.
In the Editor, in Edit Full mode, select New Layer from the Layers panel pop-up menu (located under More in the top-right area of the panel).
Choose Layer
If you create a layer by using either of the preceding menu commands, you open a dialog box in which you name your layer and can specify other options for blending and opacity. Provide a name for your layer and click OK. You should specify the other options directly in the Layers panel later.
After your new transparent layer is ready to go, you can put content on the new layer in one of several ways:
Use one of the painting tools, such as the Brush or Pencil, and paint directly on the layer.
Make a selection on another layer or on the background within the same document or from another image entirely. Then choose Edit
Make a selection on another layer (or on the background) within the same document or from another image and then choose Edit
Transfer an entire image to your new layer by choosing Select
Another way to create a layer is to use the Layer via Copy command on the Layer menu. Make a selection on a layer or background and choose Layer
If you want to duplicate an existing layer, first select it in the Layers panel. Then drag the layer to the Create New Layer icon at the top of the Layers panel. You can also duplicate a layer by selecting Duplicate Layer from the Layers panel pop-up menu or by choosing Layer
Often, when working with layers, you're not using just a single image. Face it: You can only do so much to that family portrait taken down at the local photo studio. But pluck your family out of that stale studio and put them in front of the ruins at Pompeii or the summit at K2 and you have endless hours of fun. When you get the hang of working with several images, you find that it opens up a whole new realm of creative possibilities. And, you're not limited to snapshots. You can incorporate type, shapes, and scans of just about anything you can place on a scanning bed. Apply some effects, maybe a filter or two, and you have an image worthy of some major wall real estate.
In the "Making Layers" section, earlier in this chapter, we explain how to use the Copy, Cut, and Paste commands within the same image or between two different images when you want to fill a new, blank layer with content. You can also use the Copy and Paste commands without having a blank layer ready. When you copy and paste a selection without a blank layer, Elements automatically creates a new layer from the pasted selection. You can go on your merry way and perform all your layer creations by using only those commands. However, we rarely use them when working with multiple images. We prefer the drag-and-drop method, which we describe in the following section.
Follow these steps to drag and drop layers from one file to another:
In the Editor, in Edit Full mode, open two or more images.
In one of your images, select a layer in the Layers panel.
Grab the Move tool (the four-headed arrow) from the Tools panel.
Position the Move tool within an image and click it, and then drag and drop the layer onto your destination file.
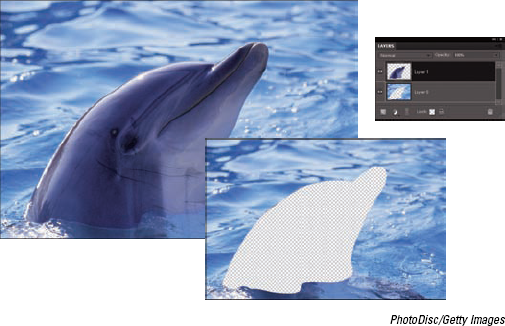
The dropped layer pops in as a new layer above the active layer in the image, as shown in Figure 1-12. You don't need to have a selection border to copy the entire layer. But, if you want to copy just a portion of the layer, make your selection before you drag and drop with the Move tool. If you want the selected element to be centered on the destination file, press the Shift key while you drag and drop.
Tip
If you have multiple elements on one layer and want to select only one of the elements to drag and drop, simply grab the Lasso tool and draw around the object. You don't have to be superprecise, but don't include any portion of the other elements on the layer. Then hold down the Ctrl key (
Be sure to check out the nearby sidebar, "Bypassing the Clipboard," for more on dragging and dropping.
The Paste into Selection command lets you put a copied or cut image on a separate layer while inserting that image into a selection border on another layer. That's where the Edit
Tip
Bypassing the Clipboard
Yes, you can always cut and paste or copy and paste a layer from one image to another, but we prefer to drag and drop, rather than copy and paste, between two images. By dragging and dropping, you bypass the temporary storage area for copied and stored data — the Clipboard. (Whenever you copy or cut a selection, Elements stores the selection on the Clipboard until you're ready to paste it to its new home.) So, what's wrong with that? Well, nothing, unless you're working with high-resolution images. Storing images on the Clipboard, even temporarily, can slow down your system. Keeping your Clipboard clear of data ensures that Elements is running lean and mean so that you can drag and drop more images, selections, and layers more quickly and more efficiently. If you want to perform a little spring cleaning on your Clipboard, you can always choose Edit
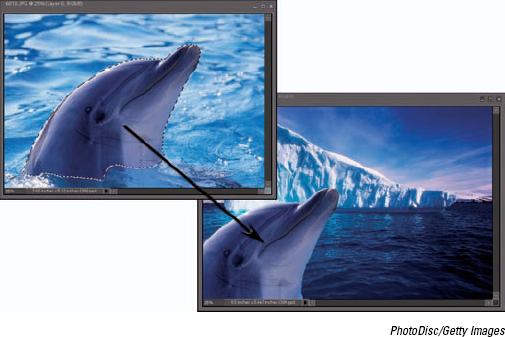
For example, if you want to make it appear as though a snake is poking its head out of the opening of a cave or a paintbrush is poking out of a can, Paste into Selection is your command (see Figure 1-13). Be sure to check out the Putting It Together project in this chapter to get more practice in using this practical technique.
Follow these steps to insert a copied or cut selected image into a selection outline:
In the Editor, in Edit Full mode, make the selection on the layer that you want the image to fill.
It's the destination layer.
Select the image that will fill that selection.
This source image can be within the same file or from another file.
Choose Edit
Return to the destination image layer and choose Edit
The pasted selection is visible only inside the selection outline (refer to Figure 1-13). If necessary, reposition your pasted selection with the Move tool. If you need to scale the pasted selection, choose Image
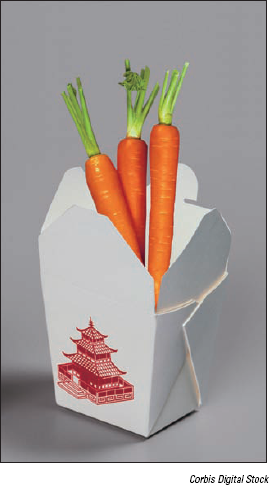
Figure 1.13. Use the Paste Into command to make one layer appear as though it's emerging from another.
Creating Layers and Using the Paste into Selection Command to Make a Collage
You probably remember from elementary school cutting out a bunch of pictures from magazines and pasting them on a piece of construction paper. Well, with Elements, the idea of a collage isn't much different, but the activity is a little more refined.
Maybe you want to unleash your artistic side. Or, maybe you need to combine several images into one as part of a job. Whatever your reason, you can use the steps here to get started on your first collage. And by the way, if collage is too prissy a word for you, you can substitute it with composite — which has the definition "derived from many components" We usually do.
Note
Creating a collage takes many steps. Throughout this minibook, you can find several ongoing Putting It Together projects, all of which build on each other and lead you to a finished collage. Be sure to save your collage file so that you can work on it while you make your way through this minibook, if you like.
If you're short on photos, you can go to www.gettyimages.com. Be sure to register so that you have access to a huge gallery of free comping images. Comping images are small, low-resolution images used for internal corporate or personal noncommercial use only. You can also purchase high-resolution images for a song (from $1 to $20) at www.istockphoto.com or www.stockxpert.com. If that's too pricey for you, check out stock.xchng at www.sxc.hu, where you can find user-uploaded files and download them for free. Just be sure to ask for the photographer's permission if you want to use the images for anything other than practice.
To create the first layer of your collage, follow these steps:
Decide on two images you want to use in your collage and open them in the Editor, in Edit Full mode, by choosing File
You can pick an image to use as your main canvas and then open a supporting image that you can select and then drag onto that main image. However, if you want, you can also start with just a blank document, which is what we've done. We then filled our blank image with light green. See Book V, Chapter 2 for details on filling with color.

Choose Window
Always be sure that the Layers panel is visible whenever you're creating a composite from multiple images. You need to see what's happening while you drag and drop, and you need to be aware, at all times, of which layer you're working on.
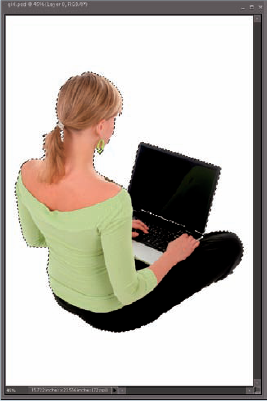
Select an element in the supporting image.
Feel free to use whichever selection method suits your fancy, but remember that the finished collage will look only as good as its individual selections. For more on making selections, see Book IV.
We used the Quick Selection tool to select the girl. We then used the Lasso tool and cleaned up our selection border.
Choose Select
Contract the selections lightly (we chose a value of 1 pixel) before you apply a feather (we chose a 0.5 pixel value) to avoid picking up some of the background during the feathering process. Note that the values you choose depend on the resolution of your images; the lower the resolution, the smaller the value needed.
With the Move tool, drag and drop the selection onto the background image.
The Layers panel shows that you've produced a layer. Notice that your main image remains as the background below the layer, as shown in the figure.

Choose File
Keep the file in a handy spot on your hard drive so that you can find it when you're ready to do more with your collage.
In the preceding steps, we show you how to create a layer by dragging and dropping an image onto a background image. The process we demonstrate in the following steps is a little different. It entails pasting one selection into another.
To paste one selection into another on your collage, follow these steps:
In the Editor, in Edit Full mode, choose File
Choose Window
Note
Always keep the Layers panel visible whenever you're creating a composite from multiple images.

Select the part of the supporting image that you want to use.
Feel free to use whichever selection method you want, but try to get as accurate a selection as you can.
We wanted to use the whole image, so we chose Select
Contract and feather the selection (as described in Step 4 in the preceding set of steps).
Unless you're going for a special effect, be consistent with the treatment of the edges of each of your elements in your composite.

We bypassed this step because we're using the entire image.
Choose Edit
In your saved collage file, use the Lasso tool (or any other selection tool) to create a selection in which to paste your new supporting image.
We selected the blank screen of the girl's laptop with the Polygonal Lasso tool.
Choose Edit
Use the Move tool to position the pasted image within the boundaries of the selection outline.
If your image needs to be scaled or rotated, choose Image
Choose File
Save.