
Back in 1984, Apple Computer brought windowing interfaces to the masses with the introduction of the Macintosh computer. Also tucked into that interface was the Undo command. Both innovations revolutionized the way people use personal computers. Together with the Cut, Copy, and Paste commands, these features became a standard in all programs that followed.
Being able to Undo your most recent edit in a program like Elements gives you the freedom to experiment, as well as the chance to correct mistakes immediately. Adobe broadened that initial Undo feature in Photoshop Elements so you can retrace an entire series of editing steps with multiple undos, see a visual list of edits in the Undo History panel, and work with different editing states.
In this chapter, we explore the many options you have for branching out, experimenting a little, and retracing your editing steps (or overcoming a series of editing mistakes) without having to save multiple versions of your photos.
As you might expect, the Undo command is found in the Edit menu. To undo an editing step, you simply choose Edit
When you open the Edit menu, you find the Undo command at the top of the menu. In addition, you find the name of the edit you last applied to the image. In Figure 5-1, you can see that we just applied a fill within a selection. When we opened the Edit menu, the menu command appears as Undo Fill.
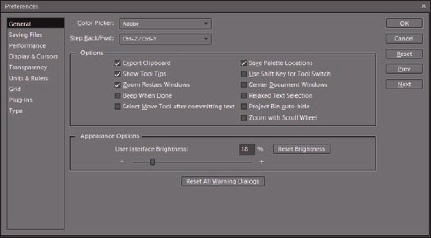
If you make several edits in Elements, you can take advantage of the Undo command several times. The number of undos you have available is determined in the Edit Full Preferences dialog box. To adjust the number of undos you want available, choose Edit
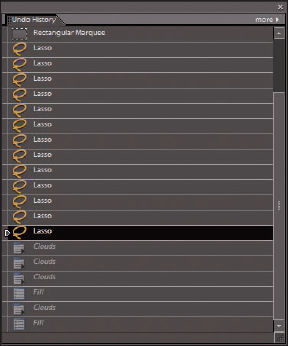
Figure 5.1. The Undo command appears listed in the Edit menu with the name of the last edit applied to the document.
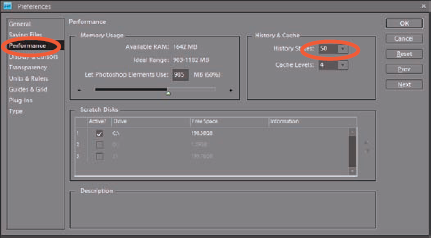
In the Preferences dialog box, you click the Performance item in the list on the left to open the Performance preferences panel. Below the History & Cache item on the right, you find History States, as shown in Figure 5-3. The setting you make here — by adjusting the slider or by typing a number in the History States text box — determines the number of undos you have available when you choose Edit
Note
The adjustment for History States also relates to the Undo History panel we talk about later in this chapter in the section, "Working with the Almighty Undo History Panel."
At times, rather than undo a bunch of edits, you just want to toss all the edits away and return to the last saved version of your file. The Revert command in the Edit menu returns you to the last saved version of your photo.
If you make several edits and you like what you see, you can choose File
Note
In many Adobe programs, you find a Revert command listed under the File menu. In Photoshop Elements, however, the Revert command is listed under the Edit menu. Keep this in mind when you perform edits in Edit Full mode.
Using menu commands and keyboard shortcuts enables you to travel back and forward in time to undo and redo edits. When executing these actions, you don't have a visual clue to tell you which edit will be undone or redone. Instead, you have to choose a menu command or keyboard shortcut and then view the result in the Image window.
The Undo History panel, on the other hand, displays a visual of your editing history where you can travel back and forward in time to change your edits with a complete list of the edits made on a photo shown in the panel.
To open the Undo History panel, choose Window

The Undo History panel gives you a capability that menu commands don't: You can target an Undo (or Redo) to go back (or forward) to a specific edit. For example, if you create a selection, apply an enhancement edit (such as changing image brightness), and then apply a filter, you can return to the selection with one mouse click. Instead of choosing Undo to undo the filter and Undo again to undo the image brightness, you simply click the selection edit in the Undo History panel.
The number of history states is determined in the Performance preferences shown earlier in Figure 5-3. By default, you have 50 history states that appear in the Undo History panel. When you come to the 51st edit, the first edit in the sequence is deleted from the panel and you can't return to that state. As you make more new edits, you continually delete edits from the top of the panel.
If you want to add more states to the Undo History panel, open the Performance preferences and change the value in the History States text box.
Warning
As you increase history states in the Performance preferences, the amount of memory required by Elements is increased. You may find the program getting sluggish if you double the History States or add more than twice the default value.
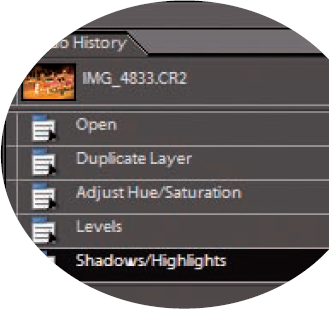
To return to an earlier edit in the Undo History panel, find the item you want to return to in the list and click it. You can also apply a number of edits to create a selection and, after the selection is created, apply another series of edits to the selected area. If you want to return to the selection edit, click the item in the Undo History panel, as shown in Figure 5-5.

Figure 5.5. Click the item in the list that you want to return to so you can undo a series of edits.
As long as the items remain in the list, you can click backward or forward to undo and redo edits.
You may have applied a series of edits to a document and then want to return to an earlier edit. Suppose you decide that all the edits made after the one you want to return to are no longer needed. (This might happen if you're experimenting with different edits and viewing the results.) If you know that the edits following a particular edit are no longer needed, you can delete them from the list.
To delete the last edit in the Undo History panel, click it in the list and then right-click to open a context menu. From the menu choices, select Delete. The selected edit is deleted from the list.
If you have a series of items you want to delete from the list, click the first item within a given list of edits to open a context menu. Then, when you choose Delete, all items in the list that follow the selected item are deleted.
Warning
Keep in mind that all edits following an edit you target for deletion are deleted when you open a context menu and choose Delete. If you want to delete a series of edits that are followed by edits you want to retain, it's a bit more complex: You have to delete the unwanted edits individually. Elements doesn't give you the capability to select a group of edits and then delete the whole group at once.
If you apply a number of edits and choose File