In This Chapter
Making pencil sketches and brush strokes
Using Brush presets
Creating basic and custom shapes
Understanding vectors
Setting Geometry options
Feel free to keep on your street clothes for this chapter on drawing and painting. The tools you work with in Elements are self-cleaning and don't require that you wear a smock. Painting is one of the basic skills you need to have down pat in Elements. After you get familiar with the technique of painting strokes and working with brushes, you're well on your way to mastering more-advanced skills, such as retouching, which come easier to you if you already have some strong painting skills under your belt.
In tandem with painting, of course, comes drawing. The Elements shape tools add an important dimension to your drawing capabilities. This chapter introduces you to a plethora of tools and techniques. We start with painting and then move on to drawing. Master both, and they can serve you well.

The Pencil and Brush tools are like chocolate and mint. Not only do they work well together, but they also share many important attributes. Just as important, however, are their differences. You can access these tools in the Tools panel. Press the B key to make the Brush tool appear by default. By pressing Shift+B, you can toggle between the Brush tool, the Impressionist Brush, and the Color Replacement tools. Strangely enough, to access the Pencil, which shares the same flyout menu, press the N key.
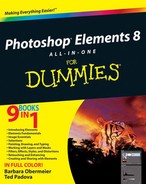
The Pencil and Brush tools are very much alike, except that the Pencil tool has hard edges whereas the Brush tool can have soft, feathered edges. In fact, the edges of a pencil stroke can't even be anti-aliased. Keep in mind that if you draw anything other than vertical or horizontal lines, the lines have some jaggies when they're viewed up close. But hey, don't dismiss the Pencil. Those hard strokes can work great for Web graphics because they lend themselves to producing crisp-edged images for display in a browser window. What's more, the Pencil tool can erase itself, and it's great for digital sketches, as shown in Figure 1-1.
You can do all the following with the Pencil tool:
Drag the mouse to draw freehand lines.
Click at one point, release the mouse button, and then Shift-click at a second point to draw a straight line between the points. As long as you hold down the Shift key, you can keep clicking to draw straight lines between each of the points.
Press the Alt key (the Option key on the Mac) and click any area of color in the drawing to switch the foreground color to that hue.
To try out the Pencil tool, follow these steps:
Select the Pencil tool from the Tools panel.
The Pencil tool shares a flyout menu with the Brush tool. You can press the N key to make it appear if it's hidden underneath the Brush tool.
In the Options bar, choose your pencil options. Options include
Brush preset: By default, the Pencil tool's brush tip is the 1-pixel brush. Click the arrow and select your desired brush from the Brush Preset Picker drop-down panel that appears.
Brush size: A preset brush's pixel diameters are shown as text below a thumbnail image of the brush shape. If you want to change the size of that brush tip, drag the Size slider or enter a value.
To load another preset library, click the Brushes pop-up menu at the top of the panel. You also find options to save, rename, or delete individual brushes and also save, load, and reset brush libraries.
If you want to draw using anything other than Normal mode, select a mode from the Mode options menu in the Options bar.
Blend modes alter the interaction of the color you're applying with the color on your canvas. See more on blend modes in Book VI, Chapter 3.
In the Options bar, specify an Opacity percentage for your pencil strokes.
If you want your background to show partially through your strokes, select an opacity of less than 100 percent by using the slider or by typing an opacity percentage directly into the text box. The lower the percentage, the more the background images show through.
Select Auto Erase to enable that option.
This option erases portions of your pencil strokes. For example, say that the foreground color is black and the background color is white, and you apply some black strokes. With Auto Erase enabled, you apply white if you drag back over the black strokes. If you drag over the white background, you apply black.
Click and drag with the mouse to create your pencil lines.
The Brush tool is a popular tool used throughout Elements in various incarnations, so getting to know this tool and how it operates is a good idea.
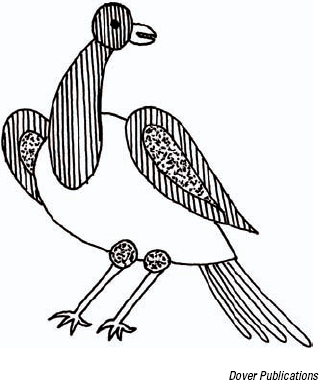
The most important difference between the Brush and the Pencil tools is that, by default, the Brush tool produces soft-edged lines, as shown in Figure 1-2. How soft those strokes are depends on which brush you use. By default, even the hardest brush has a slightly soft edge because it's anti-aliased. Anti-aliasing creates a single row of partially filled pixels along the edges to produce the illusion of a smooth edge. You can also get even softer brushes, which employ feathering.
Although jagged edges are most apparent in diagonal lines, Elements applies anti-aliasing to brush-stroke edges, even in horizontal and vertical lines.
The Brush tool shares most of the basic options found in the Pencil tool, except that the Auto Erase feature isn't available.
Here are a few tips on working with the Brush tool and its unique options:
Select the Brush tool from the Tools panel, or press the B key (or Shift+B) until you get the Brush.
In the Options bar, click the arrow and select your desired brush tip from the Brush Preset Picker drop-down panel that appears.
Select a mode and opacity from the options on the Options bar.
Drag to paint, click and Shift-click to paint straight lines, and hold down the Shift key while dragging to constrain the Brush tool to horizontal or vertical lines.
Press the Alt key (the Option key on the Mac) and click any area of color to switch the foreground color to that color.
The Brush tool has several other options to select from:
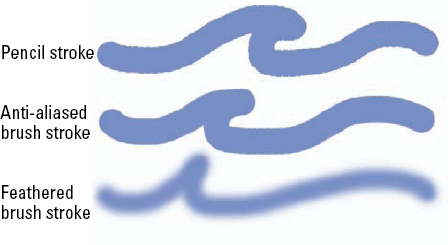
Airbrush: Click the Airbrush button on the Options bar to apply the Airbrush mode. This mode produces the spray effect you get with a traditional airbrush. The longer you hold down the mouse button, the more paint pumps out of the tool, and the wider the airbrush effect spreads, as shown in Figure 1-3.
Tablet Options: If you're using a pressure-sensitive digital drawing tablet, check the settings you want the tablet to control, including size, scatter, opacity, roundness, and hue jitter (switching of color between foreground and background colors). The harder you press with the stylus, the greater the effect of these options.
More Options: In the Options bar, click the Brush icon to access additional options, referred to as brush dynamics. Brush dynamics enable you to change the brush strokes as you apply them. Here is a quick lowdown on each option (see Figure 1-4):
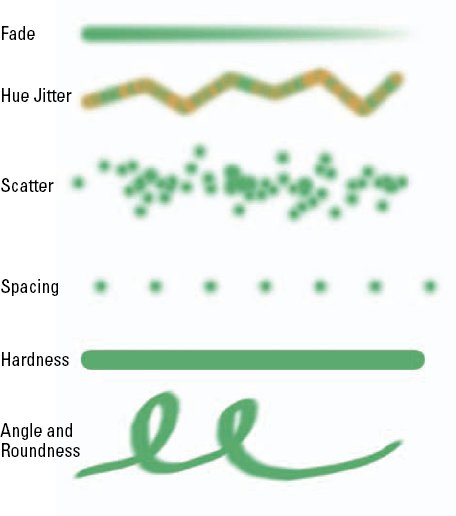
Fade: The lower the value, the quicker the stroke fades. Zero, however, creates no fade.
Hue Jitter: This option varies the stroke between the foreground and background colors. The higher the value, the more frequent the variation.
Scatter: The higher the value, the higher the number of brush marks and the farther apart they are.
Keep These Settings for All Brushes: You can lock in these brush dynamics by selecting this check box, ensuring that every brush you select adopts these settings.
Spacing: The higher the number, the more space between marks.
Hardness: The higher the value, the harder the brush.
Angle: If you create an oval brush by adjusting the roundness, this option controls the angle of that oval brush stroke. It's much easier to drag the points and the arrow on the diagram than to "guesstimate" values in the text boxes.
Roundness: A setting of 100 percent is totally circular. The lower the percentage, the more elliptical your brush becomes.
Just as they do for the Pencil tool, more features for the Brush tool appear in the pop-up menu on the Brush Preset Picker drop-down panel (click the arrow at the top of the panel). Here's a quick explanation of each:
Save Brush: Allows you to save a custom brush as a preset. See the following section for details.
Rename Brush: Don't like the name of your brush? Give it a new one with this option.
Delete Brush: Eliminate an unwanted brush with this option.
Reset Brushes: Reverts your current brush library to the default.
Save Brushes: Saves custom brushes in a separate library.
Load Brushes: Loads a preset or custom brush library. They have names like Special Effect Brushes and Faux Finish Brushes. Select one to append the brushes to your current set or to replace the current set with the library you select. (A dialog box appears that offers a choice of either action.)
The display options: A set of commands that enables you to change the way your brush tips are displayed in the drop-down panel. The default view is Stroke Thumbnail, which displays the appearance of the stroke. Other commands include Text Only (text names of brush tips), Small and Large Thumbnail (thumbnail images with diameter in pixels), and Small and Large List (thumbnail images with text names).
Tip
You can also manage brush tip libraries by using the Preset Manager (choose Edit
The Impressionist Brush is designed to paint over your photos in a way that makes them look like fine art paintings. You can set various options that change the style of the brush strokes.
Here's how to use this artistic brush:
Select the Impressionist Brush from the Tools panel.
It looks like a brush with a curlicue next to it. You can also press the B key, or Shift+B, to cycle through the brushes.
Set the brush options.
The Brushes, Size, Mode, and Opacity options are identical to those for the Brush tool, described in the previous section "Painting with the Brush tool" You can also find some unique options on the More Options panel, indicated by the Impressionist Brush icon:
Style: This drop-down list contains various brush stroke styles, such as Dab and Tight Curl.
Area: Controls the size of your brush stroke. The larger the value, the larger the area covered.
Tolerance: Controls how similar color pixels have to be before they're changed by the brush stroke.
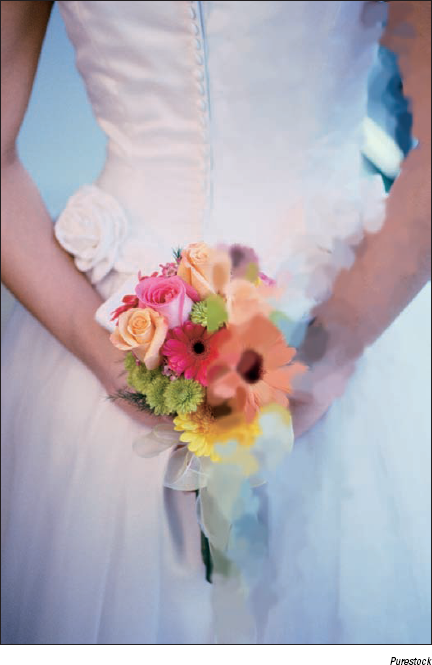
Drag on your image and paint with your brush strokes, as shown in Figure 1-5.
The best way to get familiar with the Impressionist Brush is to open your favorite image and experiment with the tool.
After playing with all the various options, if you really like the personalized brush you've created, save it as a preset so that you can access it again and again. Click the arrow at the top of the Brush Preset Picker drop-down panel and choose Save Brush from the pop-up menu. Name the brush and click OK. Your new custom brush shows up at the bottom of the Brush Preset Picker drop-down panel.
There's one other way to create a brush. Elements enables you to create a brush from all or part of your image. The image can be a photograph or something you've painted or drawn.
Here's how to create a brush from your image:
Select part of your image with any of the selection tools.
If you want to use the entire image or entire layer, deselect everything.
Choose Edit

You see one command or the other, depending on what you do in Step 1.
Name the brush and click OK in the dialog box.
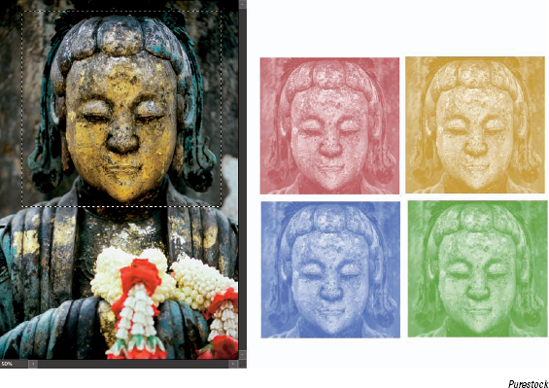
The new brush shows up at the bottom of your Brush Preset Picker drop-down panel. Note that your brush is only a grayscale version of your image. When you use the brush, it automatically applies the color you've selected as your foreground color, as shown in Figure 1-6.
Colorizing Black-and-White Images
Just as there are artistic reasons for shooting a photo in black and white, there are also valid arguments for converting a grayscale image into a color one. Perhaps the picture is an old one, taken before color film was widely used, and you want to colorize it. Or you may come across a monochrome image that would look more interesting in color. Elements can let you add back the missing colors to your original black-and-white pictures or can give you free rein to create your own customized color image.
In our example, we chose a black-and-white photo of an adorable little girl. Rather than trying to duplicate a color photograph, we want to apply a technique that mimics the subtle, hand-colored look of the Marshall's Photo Coloring System of pigments, photo oils, spot colors, retouch pencils, and other products popular in the '50s and '60s. You may have also seen this look used in greeting cards featuring children.
In the Editor, in Edit Full mode, open a grayscale image in Elements.
Choose Image
Choose Layer
This creates a new transparent layer to paint on, as shown in the figure. Although you can paint directly on an image, using a blank layer is safer — and gives you more flexibility in editing when you make a mistake. (For more information on working with layers, see Book VI, Chapter 1.)

In the New Layer dialog box that appears, name the layer and then click OK.
You can paint all your colors on a single layer, but you may find that using a separate layer for each part of the face lets you fade that color in and out as required to blend smoothly with your other hues.
Select the Color mode from the Blend Mode drop-down list in the Layers panel.
Elements uses this mode to combine the painting layer with the image layer, enabling you to apply color while retaining the details of the underlying image.
Select a color you want to apply from the Swatches panel or use the Color panel to mix your own.
Select the Brush tool from the Tools panel.
Click the down arrow next to the Brush Preset Picker on the Options bar and select a brush from the drop-down panel.
Start with a soft-edged brush.
Tip
The Airbrush option on the Options bar creates a very subtle and soft effect. Just be sure you pick the kind of brush that works best for the area of the picture you're colorizing. (Use a small, fuzzy brush for smaller areas and use a bigger, sharper brush for more defined lines and wider areas.)
Paint all the parts of the image where you want to apply color.
If you make a mistake, you can use the Eraser tool (or the Undo History panel, see Book III, Chapter 5) to erase the bad strokes without affecting the underlying grayscale image because you're painting on a separate layer.
Tip
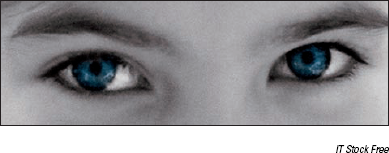
In our example, we chose a nice, light blue to change the color of the girl's eyes, as shown in the figure. A small, fuzzy brush is perfect for a small area such as the eyes.
Change brushes as necessary by clicking the Brush Preset Picker on the Options bar and selecting a larger or smaller brush.
When you finish with that area of the image, create a new layer for each of the image's main components and repeat Steps 4–9 with an additional color.
We painted the eyes, lips, cheeks, hair, and hair highlights separately because creating natural, subtle effects with people's skin, hair, and eyes takes a special touch:
Eyes: When painting the eyes, paint only the irises and leave the pupils their original black color. Don't paint over the catchlights in the eyes, either. (Catchlights are reflections of light sources, such as windows or the flash.)
Lips: Color the inner surface of the lips a darker, rosier pink than the outer surface. Lips look best when portrayed in at least two shades. Don't forget to color the gums with an even lighter pink.
Hair: Hair looks best when the highlights and darker portions are slightly different colors.
Cheeks: To put a little blush in the cheeks, choose the Airbrush option on the Options bar and work with a relatively large brush size. Apply a good dash of color to each cheek and a lighter bit of color to the forehead and chin, as shown in the figure.

We left the clothes and background uncolored to emphasize that the focal point is the girl's face.
For the overall skin tone, choose a different technique, using the Hue/Saturation command.
This technique works especially well with those who have naturally dark complexions. You can choose to paint the skin with a brush or use this technique:
Duplicate the grayscale Background layer and then choose Enhance
Choose the Colorize option and move the Hue slider to the left to produce a sepia tone. We set our Hue to 36 and Saturation to 25 percent and then click OK to colorize this layer.
Use the Eraser tool to remove everything in the colorized layer that isn't skin. In our example, we removed the hair, background, eyes, lips, teeth, and clothing. This result is a nice sepia tone to the face, as shown in the figure.

Tip
Be sure to pick a color that's as close to life as possible. If the subject has darker skin, you may need to move away from rosier blush tones.
When you finish coloring your layers, experiment with different opacity levels for each colorized layer to see whether more-transparent hues might look better.
Although we're big fans of photos and pixels, sometimes you have the need for a vector shape or two. Maybe you need to create a button for a Web page or a simple logo for a poster. In these instances, drawing a vector shape with one of the shape tools does the job.
Before we discuss the ins and outs of creating shapes, here's a little overview that explains the difference between pixels and vectors (both types are shown in Figure 1-7):
Pixel images describe a shape in terms of a grid of pixels. When you increase the size of a pixel-based image, it loses quality and begins to look blocky, mushy, and otherwise nasty. For more details on resizing pixel-based images and the ramifications of doing so, see Book III, Chapter 1.
Vectors describe a shape mathematically. The shapes comprise paths made up of lines, curves, and anchor points. Because vector shapes are math based, you can resize them without any loss of quality whatsoever.

When you create a shape in Elements, you're creating a vector-based element. Shapes reside on a special kind of layer called, not surprisingly, a shape layer.
Elements offers an assortment of shape tools for you to choose from. Follow these steps to draw a shape in your document:
Select a shape tool from the Tools panel.
You can also press the U key, or Shift+U to cycle through the tools. You can select from the following shape tools (as shown in Figure 1-8):

Figure 1.8. The shape tools and Options bar give you all you need to make shapes, from the simple to the ornate.
Rectangle/Ellipse: The Rectangle and Ellipse shapes have no special parameters on the Options bar; however, they both behave much like their counterparts among the selection tools. Hold down the Shift key while dragging a shape to produce a perfect square or circle; hold down Shift+Alt (Shift+Option on the Mac) to additionally draw the shape outward from the center.
Rounded Rectangle: This shape has the same options as the Rectangle, with the addition of a radius value used to round off the corners of the rectangle.
Polygon: This tool creates a polygon with a specified number of sides, from 3 to 100.
Line: Creates a line with a width from 1 to 1000 pixels. You can also add an arrowhead at either or both ends.
Custom Shape: You can find numerous preset custom shapes to choose from. As with any shape, hold down the Shift key to constrain proportions or the Alt key (Option key on the Mac) to draw from the center out.
Shape Selection: Use this tool to select and move your shapes.
In the Options bar, click the down-pointing arrow just to the right of the shape tools to specify Geometry options.
Each shape has its own options. For a detailed explanation, see the section "Specifying Geometry options," later in this chapter.
If you chose the Custom Shape tool in Step 1, click the down-pointing arrow to access the drop-down Custom Shapes panel and choose your desired shape. You can access more preset shape libraries via the pop-up menu at the top of the panel.
Select your desired color from the Color drop-down panel on the Options bar.
Click the More Colors button (down-pointing arrow) to access the Color Picker for additional color choices.
Select a style from the Style drop-down panel.
To spice up the shape with bevels and interesting edges, choose a style from the panel. For more on styles, see Book VII, Chapter 3.
Drag in the document to draw the shape you've defined.
The shape appears in the Image window on its very own shape layer. Check out the Layers panel to see this phenomenon. Figure 1-9 shows our shape, an Elvis do.

After you create a shape layer, you can draw additional shapes on that layer. You can add, subtract, exclude overlapping, and intersect shapes in exactly the same way you do with selections, as described in Book IV, Chapter 2. Follow these steps:
After you create the first shape, as we explain in the preceding section, select a state button on the Options bar:
Add to Shape Area: Combines and joins two or more shapes
Subtract from Shape Area: Subtracts one shape from another shape
Intersect Shape Areas: Creates a shape only from the areas that overlap
Exclude Overlapping Shape Areas: Creates a shape from only the areas that don't overlap
Choose a shape tool and draw the next shape.
We finished our drawing, as shown in Figure 1-10, by adding a face to our Elvis impersonator.
Tip
You can also hold down the Shift key to temporarily switch to Add to Shape Area while drawing a new shape. Hold down the Alt key (Option key on the Mac) to temporarily switch to Subtract from Shape Area. This works just like adding or subtracting selections.

Geometry options for your shapes help define how the shapes look. Click the down-pointing arrow at the end of the row of Shape tools on the Options bar to access the Geometry options described in the following sections.
Here are the Geometry options for the Rectangle and Rounded Rectangle shapes:
Unconstrained: Enables you to freely draw a rectangle of any shape or size.
Square: Constrains the shape to a perfect square. (You can also hold down the Shift key to do the same thing on the fly.)
Fixed Size: Lets you draw rectangles only in fixed sizes. Specify the exact size by entering a width and height.
Proportional: Enables you to define an aspect ratio, or proportion, for the rectangle. Type 3 into the W box and 4 into the H box to constrain yourself to drawing any sized rectangle with fixed proportions in a 3:4 ratio.
From Center: Enables you to draw the shape from the center outward.
Snap to Pixels: Aligns the edges of a rectangle or rounded rectangle to the pixels on your screen.
Radius: For rounded rectangles, uses an inscribed circle of the given radius to round off the corners of a rectangle.
The Ellipse shape has many of the same options available for rectangles. Of course, instead of being able to create a perfect square, you can restrain the shape to be a perfect circle. Also, the Snap to Pixels option (available for rectangles) doesn't exist for ellipses.
These are the Geometry options for the polygon:
Radius: Controls the distance from the center of a polygon to its outer points.
Smooth Corners: Rounds off the corners.
Star: Creates a nonconvex polygon, also known as a star.
Indent Sides By: Determines the amount the sides indent inward.
Smooth Indents: Rounds off the inner of indented sides.
Sides: Lets you indicate the number of sides for a polygon or the number of points for a star.
The Line shape's Geometry settings include whether to put arrowheads at the start or end of the line, neither, or both. You can also specify the width, length, and concavity settings, which affect the arrowhead shapes.
You can edit shapes that you create by using a variety of tools and techniques. Here's a list of the things you can do to modify your shapes:
Select: Choose the Shape Selection tool to move one or more shapes in their layers. This tool shares a flyout menu with the shape tools.
Move: Choose the Move tool (press the V key) to move the entire contents of the shape layer.
Delete: Select a shape and press Delete to remove it.
Transform shapes: Choose the Shape Selection tool and select your shape. Choose Image
Change the color: Double-click the thumbnail of the shape layer on the Layers panel. This action takes you to the Color Picker, where you can choose a new color.
Clone a shape: Hold down the Alt key (Option key on the Mac) and move the shape with the Move tool.
Tip
To convert your vector-based shape into a pixel-based shape, click the Simplify button on the Options bar or choose Layer