
Replacing a Sky
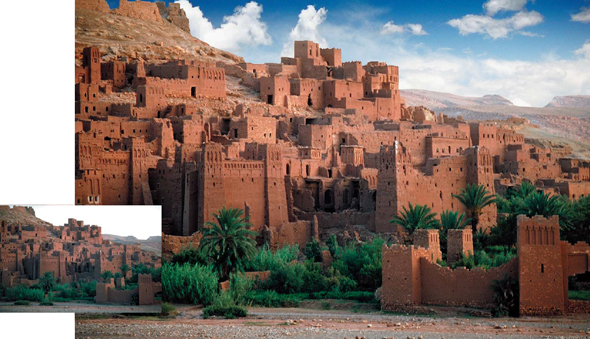
The Road to Morocco - change the sky to change the weather
For people who seem to find themselves in the right place at the wrong time! Have you ever traveled long and far to get to a scenic vista only to find that the lighting is useless and the sky is a little short of inspiring? Do you make camp and wait for the weather to change or reluctantly and humiliatingly buy the postcard? Before you hit the delete button or assign these ‘almost rans’ to a never-to-be-opened-again folder to collect digital dust, consider the post-production alternatives. Adobe lets you revisit these uninspired digital vistas to inject the mood that you were looking for when you first whipped the camera from its case.
I think every photographer can relate to the intrepid explorers of the Australian Outback who, after scaling the highest peak in the area with great expectations, decided to call it Mount Disappointment! One can only conclude that they were expecting to see something that was simply not there. This something extra could be made real so that all of your landscapes live up to your high expectations - with just a little digital help.
|
Check out the supporting DVD to access an extensive stock library of royalty-free skies |

This tutorial requires a little something you prepared earlier - a sky. It is worth making a little photographic collection of interesting skies for projects such as this one. A whole library of interesting skies can be found in the stock library on the supporting DVD.
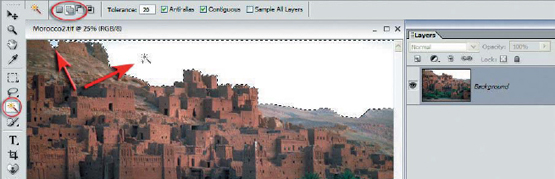
1. Open the resource image and use the Magic Wand tool to select the sky. Select the ‘Add to Selection’ icon in the Options bar to add additional areas of sky. Increasing the tolerance in the options bar from the default setting will increase the amount of sky that is selected the first time.
PERFORMANCE TIP
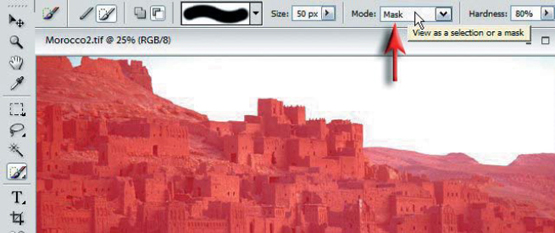
Note > Clicking off the ‘Contiguous’ option in the Options bar will allow the Magic Wand Tool to select areas of sky that may be surrounded by tree branches that would otherwise not have been selected without extensive clicking in ‘Add to Selection’ mode. This may however cause highlights present in the image to be included in the selection. If this happens select the Lasso Tool with the ‘Subtract from Selection’ option and then encircle the areas you wish to remove from the overall selection. The Selection Brush Tool can also be used to ‘fine-tune’ your selection. Select the ‘Mask’ option in the Options bar for a more accurate view of the selection area. Press the Alt or Option key to ‘paint out’ parts of the selection you do not require.
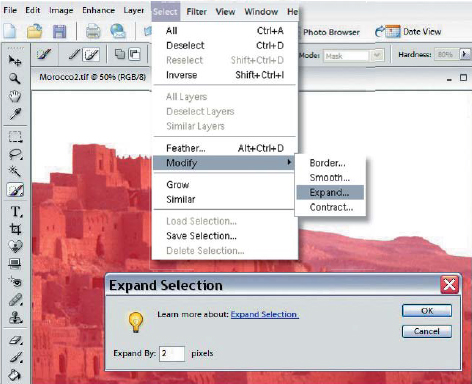
2. Zoom in on the edge that separates the sky from the rest of the landscape. You may find that the selection falls a little short. If this is the case go to Select >Modify >Expand and then expand the selection by 1 or 2 pixels. Click OK and then zoom in on the edge of the selection to see if this improves the positioning of the selection.
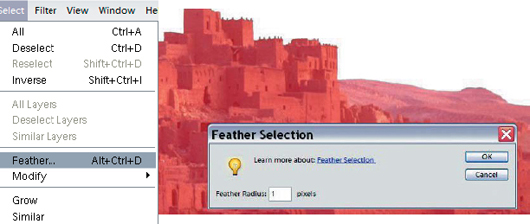
3. To prevent the new sky looking as though it has been cut out of a magazine and stuck onto your image it is important to create a ‘feathered’ edge for the selection (something that will create a soft and seamless transition). Go to Select >Feather and enter a 1 or 2 pixel ‘Feather Radius’. When the mask is accurate switch back to the ‘Selection’ option in the Options bar.
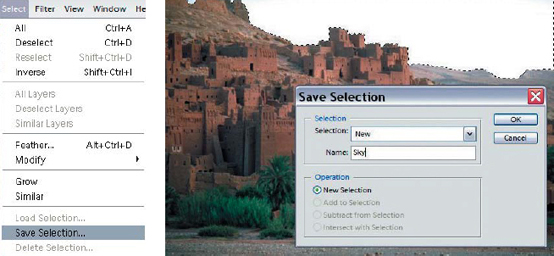
4. It is advisable to save any important selections that you have made to prevent your selection being accidentally lost. Go to Select >Save Selection and name your selection with an original name such as ‘Sky’. After saving a selection you will be able to impress your friends by loading a selection with the words ‘here is something I prepared earlier’. Save the changes to the edited file so the selection can be loaded even after the image has been closed and then reopened.
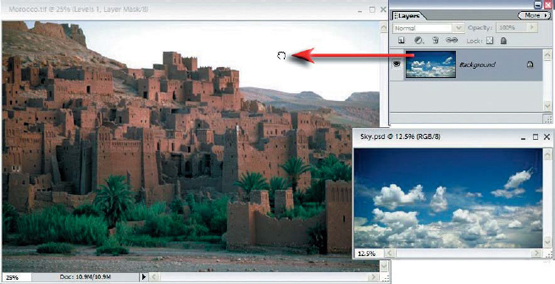
5. Open the image with the sky you wish to import. Click and drag the sky thumbnail in the Layers palette into the Morocco image window. The sky should have similar pixel dimensions to that of the host image. If the images do not precisely match you can however use the Transform >Free Transform command to resize your sky to fit.
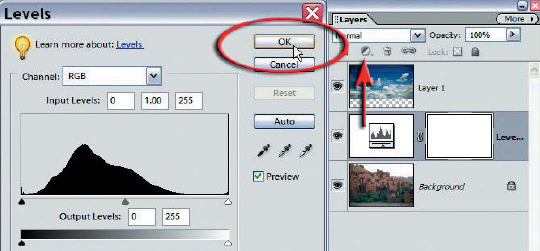
6. Click on the background layer in the Layers palette to make it the active layer and then add a levels adjustment layer. Select OK without making any adjustment (we only need the layer mask and not the adjustment itself).
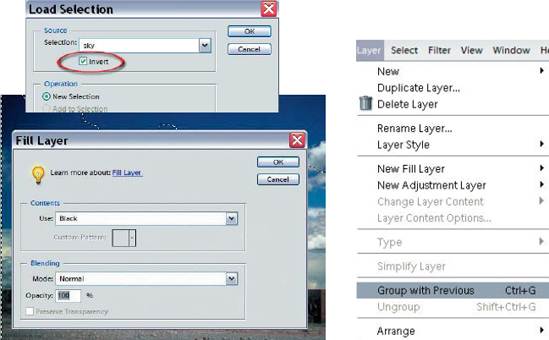
7. To restrict or limit the visibility of the new sky to the correct area we need to load the selection that we saved earlier. Go to the Select menu and choose ‘Load Selection’. Choose your named selection, check the Invert option and click OK. With your active selection and the layer mask of the levels adjustment layer’ selected choose the ‘Fill Selection’ option form the Edit menu and choose ‘Black’ from the Contents menu. The final step in the process is to select the sky layer and from the layer menu choose ‘Group with Previous’.
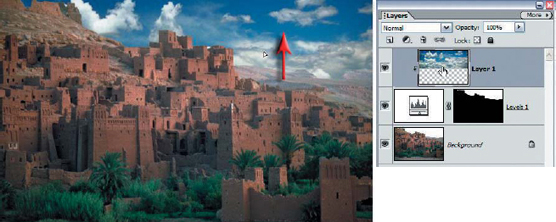
8. Select the Move Tool and choose the best position for the new sky by dragging it in the main Image window. It is not going to look perfect just yet as most skies get progressively lighter as they near the horizon. If the sky you are importing does not have this quality it can easily be fixed in a two-step process.
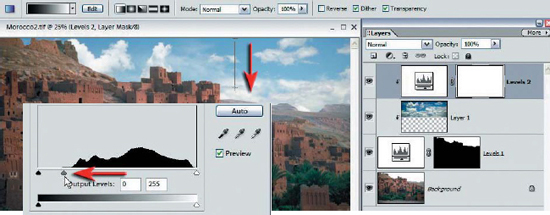
9. Hold down the Alt key and create another levels adjustment layer. The Layers dialog box that opens gives you the option to ‘Group’ this adjustment layer with the previous layer. This will restrict the adjustments we are about to make to only the sky component of the image. Click OK and when the Levels dialog box opens make the entire sky much lighter by dragging the Gamma slider most of the way to the left. Select OK to close the Levels dialog box.
To fade or lighten the sky progressively towards the top of the hills start by selecting the default ‘Foreground’ and ‘Background’ colors in the Tools palette. You may need to switch the colors to ensure black is the foreground color. Select the ‘Gradient Tool’ with the ‘Foreground to Background and ‘Linear Gradient’ options from the Options bar. Drag a gradient from the top of the frame to just above the top of the hills. If the effect is anything other than ‘cool’, hit the Edit >Undo, check the settings and try again.
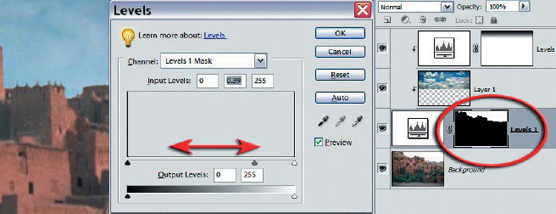
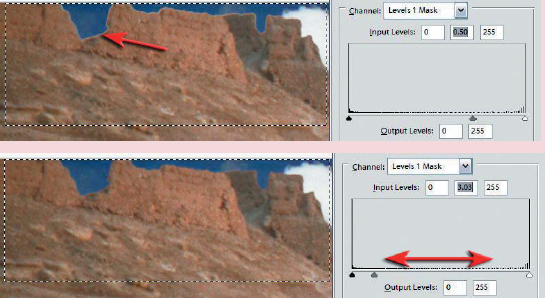
10. Zoom in to 100% Actual pixels or 200% and use the spacebar to drag the image along the seam between the host image and its new sky. If you detect any white halos or loss of fine detail along this edge we can adjust the position of the edge to create a perfect match. Select the layer mask at the base of the clipping group and from the Enhance > Adjust Lighting menu select ‘Levels’. Moving the Gamma slider either to the left or to the right should perfect the visual appearance.
Note > More adjustment can be provided by using either the Maximum or Minimum filters from the Filter > Other menu.
PERFORMANCE TIP
If an initial adjustment to the layer mask fixes the majority of the edge accuracy, but leaves an inaccurate section, you should proceed to make a feathered selection of the offending area (use the Lasso Tool or a Marquee Tool with a 3 to 5 pixel feather radius), then reapply a levels adjustment. The resulting modification will be restricted to the selected area only.
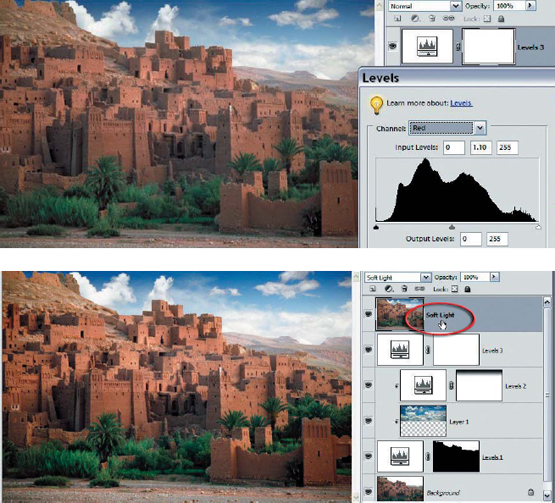
11. When replacing a sky you can aim to match the light quality found in the host image with that likely to be provided by the new, but more interesting, sky. There are examples of skies on the supporting DVD that would provide soft, filtered, sunny, warm or cool lighting to any scene. If however the new sky looks altogether more sunny than the one you have replaced, you may need to warm up the scene you are working on and increase the contrast to suit.
In this image the entire image is made warmer and brighter using a levels adjustment layer. Adjust the individual channels to increase the red component and reduce the blue component. A neat trick to add some warmth and contrast is to stamp the visible elements to a new layer (Ctrl+Alt+Shift and then type E) and set the blend mode to ‘Soft Light’.
Now that you have spread a little sunshine around you may like to consider the words of an old pop song ‘Everywhere you go, always take the weather with you’. With Adobe rendering the world with an altogether sunnier outlook alternative realities are always a possibility. May your landscapes always bask in beautiful/interesting weather!
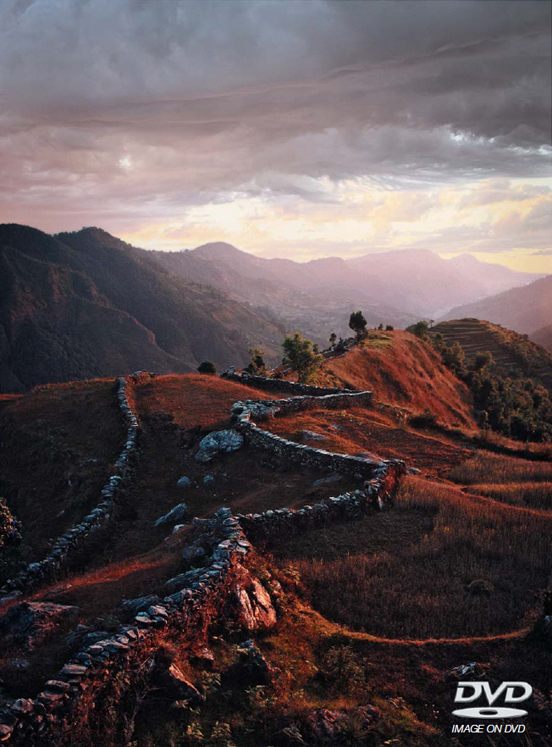
Create this image using techniques from Project 2 - investigate the stock library of skies for alternatives