
Appendix B. Installing, compiling, and upgrading
There are several ways to install PostgreSQL/PostGIS. When we were starting out, the only way was to compile the code yourself. Life has become much simpler, and the general user doesn’t need to experience the joys and frustrations of compiling their own source code. Compiling from source is still an adventurous journey and builds character, but most take the easy road.
Installing PostgreSQL and PostGIS
It goes without saying that you need a functioning PostgreSQL server to use PostGIS. The installation options we discuss describe the base PostgreSQL installation as well as the additional PostGIS installation.
Desktop Linux, Windows, Mac OS X using one-click installers
If you’re on a Windows system or a desktop Linux or Mac OS X system, the easiest way to get started is to use one of the one-click installers provided by EnterpriseDB at http://www.enterprisedb.com/products/pgdownload.do.
EnterpriseDB one-click installers will work for any desktop Linux system (32 bit and 64 bit), Windows system (2000, XP, 2003, 2008), and Mac OS X. The installer comes with the following prepackaged goods:
- PostgreSQL Server
- pgAdmin III (GUI database administration tool)
- Application Stack Builder—Allows you to install PostgreSQL add-ons such as PostGIS, JDBC, and ODBC, plus application development environments such as Apache and Ruby on Rails, the PostgreSQL Tuning Wizard (to help you quickly configure memory and other settings for your desired profile), and the MySQL Migration Wizard (requires Java to be installed). If you don’t want to use the built-in Stack Builder because you need to install on a system not connected to the internet, you can download the PostgreSQL binaries directly from the PostgreSQL website at http://www.postgresql.org/download/ and the precompiled Stack Builder PostGIS pieces (Windows precompiled but only source for Linux) from http://pgfoundry.org/projects/stackbuilder/.
For those trying to install using the Linux one-click installer, make sure to make the .bin file executable by running chmod 777 on the .bin file.
For further help getting started, check out appendix A, “Additional resources.”
Windows Vista Gotchas
When trying to install on Windows Vista you may get an error something of the form shown in figure B.1.
Figure B.1. Common error on Windows Vista

And then it proceeds to uninstall PostgreSQL. This is because of the security measures added to Vista. If you’re installing on Windows Vista, follow the instructions outlined in the PostGIS Wiki at http://trac.osgeo.org/postgis/wiki/UsersWikiWinVista.
It may be sufficient to just turn off User Account Control (UAC) located in Control Panel > User Accounts. In most cases the newer PostgreSQL installers seem capable of creating a postgres account on their own.
Installing on Linux server (Red Hat EL, CentOS) using YUM
The PostgreSQL Yum repository has the latest and greatest for the main and beta versions of PostgreSQL, if you’re running a variant of Red Hat Enterprise Linux, Red Hat Fedora, or CentOS. In addition to core PostgreSQL, the Yum repository has additional packages, such as PostGIS and other add-ons, available at http://yum.pgrpms.org/.
The Yum repository is most suitable for command-line server installs, but it can also be used for desktop installs via the Yum installer.
Details on how to install can be found at the following link we’ve written: Postgres OnLine Journal, An Almost Idiot’s Guide to PostgreSQL YUM—http://www.postgresonline.com/journal/index.php?/archives/45-An-Almost-Idiots-Guide-to-PostgreSQL-YUM.html
For other topics we’ve written about on YUM check out http://www.postgresonline.com/journal/categories/53-yum.
OpenSUSE and SUSE aren’t available yet through this repository, but these are a planned addition in the future. For OpenSUSE you can use the EnterpriseDB one-click installers or via distros of OpenSUSE/SUSE.
Mac OS X–specific installers
If you’re a Mac user, you might want to check out KyngChaos: http://www.kyngchaos.com/software:postgres.
KyngChaos has packages for the latest stable releases of PostGIS/PostgreSQL and pgRouting. Packages are usually for the latest two versions of Mac OS X (currently Leopard and Snow Leopard) as well as a number of other interesting GIS open source packages. KyngChaos generally stays up to date with the latest and greatest PostGIS stable offerings and has them available right after the PostGIS source is officially released.
Other available binaries and distros
Most of the other distros such as Ubuntu and Debian make PostgreSQL and PostGIS available via their package manager. Ubuntu and Debian both use apt-get. These don’t always have the latest version binaries, though things are improving nowadays, so they’re more up to date. As of this writing, we’d suggest using the aforementioned PostgreSQL binaries if you can, because those are specifically maintained by PostgreSQL high-end users and so are most always up to date.
Compiling and installing from PostGIS source
If you want the most bleeding-edge version of PostGIS, compiling it yourself is still the only way to go. This is covered in the PostGIS manual and wiki, which are kept fairly current.
- chapter 2 of the official PostGIS manual covers standard compilation on Linux systems; see http://www.postgis.org/documentation/manual-svn/postgis_installation.html#PGInstall. Although you can compile your own PostgreSQL, if you’re on Linux you don’t need to even if you want to compile PostGIS yourself. But you’ll need the PostgreSQL development headers (usually packaged in something called postgresqldevel) in addition to installing postgresql and postgresql-server, which you can install using your Linux packager, such as YUM, YatZ, apt-get, or whatever your distribution uses for software install. The YUM, YatZ, and apt-gets of the world are similar in concept to Windows Update and provide already precompiled binaries of PostgreSQL and PostGIS for your particular Linux distribution from well-defined repositories.
- There is a whole user-contributed section on the PostGIS wiki with details on compiling PostGIS on various operating systems; see http://trac.osgeo.org/postgis/wiki/UsersWikiMain.
- For Windows, as of this writing (headers aren’t available for Windows because Windows PostgreSQL versions are compiled with Visual C++), you must compile your own PostgreSQL under MingW if you want to compile PostGIS. The PostGIS user wiki covers this: http://trac.osgeo.org/postgis/wiki/UsersWikiWinCompile.
PostgreSQL 9.0 introduced support for 64-bit on Windows. A few people have been able to compile PostGIS under Visual Studio (targeting 64-bit) and Visual C++ Express editions of 2005/2008, 32-bit only (note that Express doesn’t support 64-bit compilation), by creating their own project and solution files. The PostGIS development team is currently working on direct support for Windows Visual C++, Visual Studio, and also Msys64 to make support of the newer PostgreSQL versions on Windows 64-bit easier.
If you don’t want to experience the joys and pains of compiling code and don’t mind waiting for a package maintainer to compile and prepare a package for general consumption, then stick with the compiled versions.
Creating a PostGIS database
The Windows one-click installer already creates a template_postgis database for you, but many of the binary packages won’t.
A template database is a database that serves as a model for new databases. If you create a template specifically for PostGIS work, you can use it as a quick way to create PostGIS-enabled databases. You can also add other stuff you commonly use; for example, if you’re a Python programmer you may want to enable plpython in this template). For those with a SQL Server background, the idea of a template database is similar in concept to SQL Server’s model database, except that PostgreSQL allows you to create multiple template databases to be used for various use cases. PostgreSQL comes packaged with two template databases: template0 and template1. Template0 is a super-plain-vanilla database with the absolute minimum required for a functioning PostgreSQL database. Template1 is the more commonly used one, with the common function libraries and languages already installed.
Before you can even create a spatial database, or any database for that matter, you need to be able to log in to your PostgreSQL server via pgAdmin III or psql. If you have problems doing that, then please refer to appendix D.
Creating template_postgis under PostGIS 1.3.x
Listing B.1 is a simple script to create a template_postgis database for PostGIS 1.3.x installations using psql. Please note that the paths may be different from installation to installation, so you may need to change the paths.
For Red Hat Enterprise Linux installations, the path locations are the ones listed. For Windows, the path is usually C:/Program Files/PostgreSQL/8.x/share or C:/ Program Files (x86)/PostgreSQL/8.something/share (for 64-bit Windows running 32-bit PostgreSQL).
To launch psql, enter the following from the command line on the PostgreSQL server or in PgAdmin3:
psql -d postgres -U postgres
If psql isn’t accessible without the full path name, you may need to include the full path to your postgresql/bin folder or add the postgresql bin folder to your system PATH variable.
Once you’re in psql, enter the code in the following listing.
Listing B.1. Creating a template_postgis for 1.3

This code creates a ![]() new template PostGIS 1.3 database with all the PostGIS functions and metatables and
new template PostGIS 1.3 database with all the PostGIS functions and metatables and ![]() grants all permissions to all for the geometry_columns and spatial_ref_sys. This means that when a database is created based
on this template, new geometry columns can be registered by the user and new spatial_ref_sys records can be added as needed.
grants all permissions to all for the geometry_columns and spatial_ref_sys. This means that when a database is created based
on this template, new geometry columns can be registered by the user and new spatial_ref_sys records can be added as needed.
![]() The q is a psql-only command not available in pgAdmin that exits psql.
The q is a psql-only command not available in pgAdmin that exits psql.
Creating template_postgis under PostGIS 1.4,1.5+
Listing B.2 is a simple script to create a template_postgis database for a PostGIS 1.4+ installs using psql. In the 1.4 and above versions, the paths and names of files changed a little.
For Red Hat Enterprise Linux installs, the path locations are the ones listed. For Windows, the path is usually C:/Program Files/PostgreSQL/8.x/share/contrib/postgis-1.4 (postgis-1.5) or C:/Program Files (x86)/PostgreSQL/8.x/share/contrib/post-gis-1.5 (for 64-bit Windows running 32-bit PostgreSQL).
To launch psql, enter the following from the command line on the PostgreSQL server:
psql -d postgres -U postgres
If psql isn’t accessible without the full path, you may need to include the full path to your postgresql/bin folder.
Once you’re in psql, enter the code in the following listing.
Listing B.2. Creating template_postgis for 1.5
CREATE DATABASE template_postgis WITH TEMPLATE = template1 ENCODING = 'UTF8';
c template_postgis;
CREATE LANGUAGE plpgsql; --this may not be needed if running 8.4
i /usr/share/pgsql/contrib/postgis-1.5/postgis.sql;
i /usr/share/pgsql/contrib/postgis-1.5/spatial_ref_sys.sql;
i /usr/share/pgsql/contrib/postgis-1.5/postgis_comments.sql;
UPDATE pg_database SET datistemplate = TRUE WHERE datname = 'template_postgis';
GRANT ALL ON geometry_columns TO PUBLIC;
GRANT ALL ON spatial_ref_sys TO PUBLIC;
q
You use this listing at the PSQL command line or pgAdmin III to create a new template PostGIS 1.5 database and give permissions to the geometry_columns and spatial_ref_sys so that when a database is created with it, new geometry columns can be registered by the user and new spatial_ref_sys records can be added as needed. The q is a psql-only command not available in pgAdmin that exits out of the psql command line.
In PostGIS 1.4 the library generated changed to include the version number, for example, postgis-1.4.so or postgis-1.4.dll or postgis-1.5.so. This allowed for the possibility of running multiple versions of PostGIS on the same server. In PostGIS 1.5 the install process was changed so that PostGIS scripts are also installed in their own versioned folders so they don’t overwrite each other during install. All Windows installs via Stack Builder have this naming change from PostGIS 1.4 on, but Linux and Mac OS X installations didn’t change to this standard until PostGIS 1.5.
Creating a new spatially enabled database
Once you’ve created a template_postgis database, you can use it to create new PostGIS-enabled databases. You can create a new spatially enabled database with pgAdmin III or the psql command-line/shell tool.
Using Pgadmin III
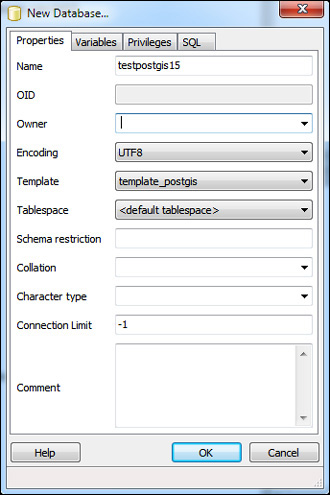
If you’re using pgAdmin III, right-click the database tree icon and create a new database. Then choose the template_postgis database as your template, as shown in figure B.2.
Figure B.2. New Database dialog box in pgAdmin III with the template_postgis database selected

Using PSQL or Shell View
If you don’t have pgAdmin III or prefer to live in the shell, you have two options (accessed in Linux by regular shell commands, in Windows by launching Start > Programs > PostgreSQL > SQL Shell). pgAdmin III versions 1.10 and above also include on the plug-ins menu an option to launch psql connected to your selected database.
Connect via psql to any database and run the following command:
CREATE DATABASE mygisdb WITH TEMPLATE = template_postgis;
q
Or use the createdb command, which is in the PostgreSQL/..bin folder or in Linux / usr/bin:
createdb
Spatially enabling an existing PostgreSQL database
To spatially enable a PostgreSQL database that doesn’t have PostGIS installed, follow these steps:
1. Install PostGIS binaries, which you can get from the one-click installer, from Stack Builder (should be on your PostgreSQL menu), or via Yum or your distro. Or you can compile and install the binaries following the directions on the PostGIS wiki.
2. Then run the same scripts we demonstrated to install template_postgis.
3. To verify your install, run the following query after connecting to the newly created database from either psql or pgAdmin III:
Upgrading an existing install
Before you upgrade your PostGIS install, you should first verify which version of PostGIS you’re running:
SELECT postgis_full_version();
After verifying your current install, compile or upgrade the PostGIS binaries as described earlier, and then follow the steps in the following sections to upgrade your database.
As of PostGIS 1.4, it’s possible to have PostGIS 1.3, PostGIS 1.4, and PostGIS 1.5 all installed on the same PostgreSQL server but using different PostgreSQL databases, which would be useful for testing functionality. If you have multiple versions, you’ll want to name your templates something like template_postgis13, template_postgis14, and template_postgis15.
They all have to share the same GEOS and Proj libraries, however, so keep that in mind.
Upgrading database from 1.3.x to 1.3.x+
If you’re running a PostGIS version of 1.3 or above and are upgrading to a point release, say 1.3.3 to 1.3.6, you can run /path/to/pgsql/share/contrib/postgis/ lwpostgis_upgrade.sql to upgrade your database.
Upgrading database from 1.3.x to 1.4.x or 1.3.x to 1.5.x
If you’re running a PostGIS version of 1.3 or above, you can use the soft upgrade script located in the postgis (version) folder:
postgis_upgrade_13_to_14.sql
For example, for 1.5 it would be postgis_upgrade_13_15.sql and so on.
Then once you’ve finished, to verify you’re running 1.4, enter
SELECT postgis_full_version();
Hard upgrades
Hard upgrades are required when upgrading from a PostGIS major release to another major release (for example, 0.9 to 1.3). Although they aren’t required from semi-major to semi-major, if your database is small enough, you should probably do a hard upgrade. There are degrees of this.
All hard upgrades require a backup of your database (dump), followed by a restore. The manual covers a somewhat cleaner way of doing a hard upgrade that’s a bit more time consuming than what we’ll demonstrate and also requires that you have Perl installed, which may not be an option on a Windows Server.
Official hard upgrade instructions are provided on the following sites:
- 1.5— http://www.postgis.org/documentation/manual-1.5/ch02.html#upgrading
- Latest— http://www.postgis.org/documentation/manual-svn/postgis_installation.html#hard_upgrade
Hard Upgrade From 0.X, 1.X TO 1.3.X or 1.4 or 1.5
If you’re running an older version between 1.1 and 1.2.2 (or lower) or are upgrading to a major release (such as 1.2 to 1.3), you should do a hard upgrade even though running the upgrade script may lead you to believe that you can do a soft upgrade. The reason is that certain things such as changes to CASTS, types, and operators can’t be accomplished with a soft upgrade. Also, you can’t drop items in use without destroying the dependents. When disk storage changes happen, you also really need to reload the data for the old format to be stored in the new.
For versions after 1.1, you can alternatively use our cutting-corners way. It will leave some junk from prior versions, however.
You’ll want to dump your database with the following command (replace local-host with your server’s name if you aren’t local to it). You do this step from the command line, or if you’re local to the server and are using a server with pgAdmin III installed, you can use the right-click backup (compressed) feature of pgAdmin III, as shown in figure B.3.
Figure B.3. If you’re using pgAdmin III for backup, your screen should look like this.

/path/to/pgsql/bin/pg_dump -i -h localhost -p 5432 -U youruser -F c -b -v -f "/path/to/backup/yourdbhere.backup" yourdbhere
Launch psql (or you can use pgAdmin III):
/path/to/pgsql/bin/psql -i -h localhost -p 5432 -U postgres
Then perform the following steps from the psql prompt.
Install a new PostGIS and create a new template_postgis based on the new PostGIS install. If you’re on the same server as your old database, drop the old database (but make note of the database encoding because you’ll want to create your new database with the same encoding).
The example shown in the following listing uses UTF8; you should replace it with whatever your old database was encoded with.
Listing B.3. Hard upgrade

Alternatively, you can use pgAdmin III, as shown in figure B.4.
Figure B.4. Creating a new database with pgAdmin III using template_postgis
Once you have a fresh PostGIS database, you can restore your old data on top of it. The pg_restore won’t put in the old functions (it will skip over functions and aggregates already present), so the new functions you install will take precedence. As for data, it won’t re-create tables already present but will insert data into those tables if the structure is the same.
Because spatial_ref_sys has a primary key and data, it will fail trying to add records, so any custom records you added will need to be added again. Alternatively, you can delete the spatial_ref_sys table before doing the restore so your old spatial_ref_sys will get restored, but then you’ll lose the corrections made in the newer spatial_ref_sys.
You can restore using the command-line pg_restore.exe packaged with PostgreSQL:
/path/to/bin/pg_restore --host=localhost --port=5432 --username=postgres --
dbname=yourdbgoeshere --verbose "/path/to/yourbackupfile"
Or you can use pgAdmin III, if network bandwidth between the PostgreSQL server and your workstation is good (or your database is small), as shown in figure B.5.
Figure B.5. Doing a restore with pgAdmin III
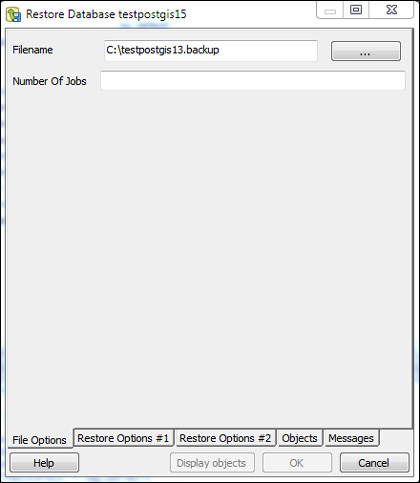
Versions of pgAdmin III from 1.12 on provide additional options, such as the number of jobs, shown in figure B.5, which allows you to specify the number of parallel jobs to use for restore. This feature works only with PostgreSQL 8.4+. It can reduce the restore process by half or more. In addition, the other Restore tabs provide options such as selective restore of tables and how to fail on errors.