We will discuss how to install and configure Tripwire on our Ubuntu system in the following steps:
- The first step will be to install the Tripwire package using apt-get, as shown here:

- During the installation process, it will show an information window. Click OK to continue.
- In the next window, select Internet Site for type of mail configuration and click Ok:

- In the next window, it will ask for system mail name. Enter the domain name of the system on which you are configuring Tripwire:

- Press Ok on the next screen to continue.
- Now, we will be asked if we want to create a passphrase for Tripwire. Select Yes and continue.
- Now, we will be asked if we want to rebuild the configuration file. Select Yes and continue:

- Next, select Yes to rebuild the policy file of Tripwire:

- Next, provide the passphrase you wish to configure for Tripwire:

It will also ask you to re-confirm the passphrase in the next screen.
- Next, provide a passphrase for the local key and also re-confirm it in the next screen:

- The next screen confirms that the installation process has completed successfully. Click Ok to complete the installation:

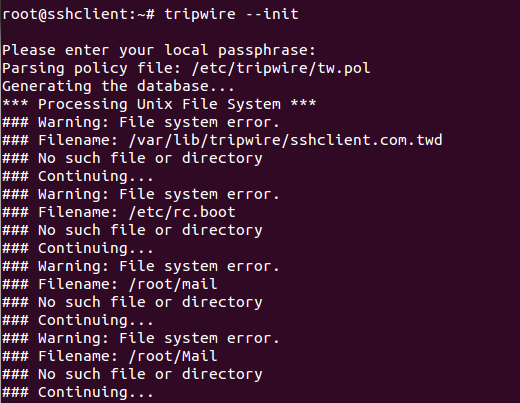
- Once the installation has been completed successfully, our next step would be to initialize the Tripwire database. To do so, we run the command shown here:

In the output shown here, we can see that an error called No such file or directory is displayed for many filenames. This happens because Tripwire scans for every file mentioned in its configuration file, whether it exists on the system or not.
- If we wish to remove the error shown previously, we have to edit the /etc/tripwire/tw.pol file and comment the lines for the file/directory that is not present in our system. We can even leave it as it is if we wish to, as it does not hamper Tripwire.
- In case we get any error related to "Segmentation fault", we may have to edit /etc/tripwire/twpol.txt file to disable the devices/files for which the error appears, as shown below -

- We shall now test how Tripwire is working. To do so, we will create a new file by running this command:
touch tripwire_testing
You can choose any name for the file.
- Now, run the Tripwire interactive command to test it's working. To do so, the command is as follows:
tripwire --check --interactive

We will get the output shown previously. Tripwire checks all the files/directories and if there are any modifications, it will be shown in the result:

In our case, it displays the line shown previously, which tells us that a file, tripwire_testing, has been added in the /root directory. If we wish to keep the changes shown, just save the resulting file that was automatically opened in your editor. While saving the result, you will be prompted for the local passphrase. Enter the passphrase that you configured during the installation of Tripwire.
- Finally, we add an entry in crontab to run Tripwire automatically to check for the changes in the file/directory. Open the /etc/crontab file in the editor of your choice and add this line:

Here, 00 6 tells us that Tripwire will check daily at 6 o'clock.
